1
THE
LAN I R 0 V E R (tm)
MAN AGE MEN T
G U IDE
THE
LAN I R 0 V E R (tm)
MAN AGE MEN T
G U IDE
THIS DOCUMENT is to be used in conjunction with the ADEVCO
LAN/Rover(tm) Local Area Network System, and is subject to
change without notice.
Copyright (c)
part of th is
transcribed,
any language,
permission by
1984 by Adevco, Inc. All rights reserved.
No
publ ica t ion may be reproduced, transm it ted,
stored in a retrievable system or translated in
in any form, or by any means without the prior
Adevco, Inc.
Adevco, Inc.
3790 El Camino Real, Suite 329
Palo Alto, California 94306
ADEVCO LAN/ROVER
TABLE
MANAGEMENT GUIDE, PREFACE
o
F
CONTENTS
============~==========================================
MANUAL "B"
MANAGEMENT GUIDE
=======================================================
NETWORK ORGANIZATION •••••••••••••••••••••••••••••••• B.l
NETWORK MANAGEMENT •••••••••••••••••••••••••••••••••• B.2
NETWORK ACCESS ••••••••••••••••••••••.••••••••••••••• B.3
MANAGEMENT GUIDE INDEX •••••••••••••••••••••••••••••• B.4
ADEVCO LAN/ROVER
MANAGEMENT GUIDE. PREFACE
- PN 385 -
THE ADEVCO LAN/Rover
Local Area Network System
MANAGEMENT GUIDE PREFACE
WELCOME
We hope tha t you find the ADEVCO LAN /Rover (tm) *
system will meet your office needs.
We have made every effort
to develop an integrated networking system that will operate
efficiently under delilanding conditions.
It has been designed
to provide the management benefits of an automated office for a
reasonable price.
With the LAN/Rover(trn), users can do remotely over
the network almost anything that they can do locally on a
stand-alone computer.
Every other computer attached to the
network becomes part of one user's computer, as theirs becomes
part of every other user's.'
Users can share the files stored on the disk drive of
another station. They can send and receive electronic mail,
and "flash" messages onto the screen of other users.
They can
also "log on" to the drive of another machine and run a program
when that is necessary.
They may also use any printer connected to any computer on the network. In many ways, the power
of each computer is increased to the cumulative power of all
computers attached to the network.
The LAN/Rover system is made up of these parts:
LAN/Rover
LAN/Rover
LAN/Rover
LAN/Scape
LAN/Rover
network interface circuit board.
connecting cables and hardware.
User Manual, Warranty & Sales Agreement.
operating system software.
network support software.
The LAN /Rover sys tern ut iIi ze s the LAN /Scape (tm)
network operating software developed by Centram Systems, Inc.
The software comlilands are clear, lean and powerful.
Also included on a separate diskette'are software
utilities from the public domain which have been selected and
modified to extend the usefullness of the network.
The hardware included in the LAN/Rover is manufactured and tested to exacting standards by ADEVCO, Inc.
It has
just been developed to be the simplest, least cost and highest
performance local area network system now available for select
CP /M computers.
B. 1» i
ADEVCO LAN/ROVER
MANAGEMENT GUIDE, PREFACE
If you are an experienced CP/M user, it should take
less than an hour to learn the operation of the network. However, it is important for all users, advanced and novice alike,
to have a good understanding of the CP/M operating system and
the a p p lie at ion s so f twa r e b e fore a t t e mp tin g to use the
LAN/Rover.
The extraordinary power of the LAN/Rover and
LAN/Scape software requires careful management. In offices
with sensitive or extremely valuable data, security and office
procedures should be planned before using the LAN/Rover system.
Consider using professional help to assist in the ideal design
and layout of your networking system, or if extreme security is
demanded.
====================
THE LAN/ROVER GUIDES
===================='
The ADEVCO LAN/Rover Manuals
are made up of the
following:
USER GUIDE, MANUAL "A" - Contains all the most frequently used
functions of The LAN/Rover network.
It is recommended that
each user have a copy of this section.
M.ANAGEMENT GUIDE, MANUAL "B" - Details the planning, set-up,
testing, software configuration and management of the network.
This section should only be made available to those responsible
for network management.
TECHNICAL GUIDE,
MANUAL "c" - Contains step by step
instructions for installing and wiring the ADEVCO network
interface circuit board into a micro-computer, instructions to
wire an office for the LAN/Rover, a guide on office mana~ement
of a network, and a problem solving section.
B. 1, i i
ADEVCO LAN/ROVER
MANAGEMENT GUIDE. PREFACE
============
CONVENTIONS
===========
This manual, except where otherwise marked, uses the
following conventions to describe "dialogues" between the
computer and user:
Dialogues are always indented.
A computer response is shown without notation
it will appear on your computer screen.
as
If several options may be entered in response to a
computer prompt, the description of what you are
to enter is enclosed by "greater" and "less than"
symbols.
(Return) means type the carriage RETURN key on the
keyboard.
(CTRL) (KEY) mean s to press the indicated key
while
holding down the control key labelled
"CTRL" •
EXAMPLE:
(Return)
PRINTER (Station Number>
Note that after entering the command "PRINTER" you
are to enter a number to correspond with a station number on
the net, such as:
PRINTER 5
(Return)
B. 1 J
ii i
ADEVCO LAN/ROVER
MANAGEMENT GUIDE, PREFACE
=====================
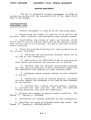
Installation Process:
=====================
The LAN/Rover
these steps:
installation process
should follow
1.
Install the ADEVCO Netwo~k Interface circuit
board into each computer.
2.
Set-up initial software configuration.
3.
Run
4.
Wire on-site location for network.
5.
Configure software for office needs.
pr~lim
inary tests.
Steps one through four are detailed in the Technical Guide
(Guide C), along with some notes about specific applications
software, relevant to step five.
The LAN/Rover Local Area Network office management system is
produced and manufactured by ADEVCO, Inc. and is based on
technology licensed from Centram Systems, Inc. All rights
reserved.
Specifications subject to change without notice.
LAN/Rover(tm) & LAN/Scape(tm) are trademarks of ADEVCO, Inc.
The LAN/Scape network software and hardware technology
(c)Copyright, 1984. Centram Systems, Inc.
CP/M is a registered trademark of Digital Research, Inc.
WordStar is
registered trademark of Micropro, Inc.
dBase II is a trademark of Ashton-Tate, Corp.
PerfectCalc & Perfect Writer are trademarks of Perfect
Software, Inc.
a
B.l, iv
ADEVCO LAN/ROVER
MANAGEMENT GUIDE, ORGANIZATION
NETWORK ORGANIZATION
A local area network is a very powerful office
management tool.
As such it is important to set time aside to
manage the network for the most efficient, secure and reliable
use.
Networ~s
which are small or used for dedicated tasks
may not need a manager.
In this case the most knowledgable
user must have a good grasp of the entire documentation.
For most installations it is important to appoint one
office member as the "network manager." This person should be
familiar with MANUALS, "A", USER GUIDE and "B" MANAGEMENT
GUI DE.
In add it ion, the manager should review MANUAL "C",
TECHNICAL GUIDE, especially regarding software use & problem
solving.
In this documentation, a computer with networking
capability is referred to as a "workstation" or a "station";
the machine which a' person uses to gain access to other files,
printers and operators through the network.
====================
PLANNING THE NETWORK
====================
Just as each business office has its own style" no
single LAN/Rover network system configuration will meet every
need, so customization will usually be necessary.
In the
complex office with vital security requirements, careful
planning will be needed to set up the system.
If your office has few security requirements, there
are short cuts which can shorten your set up time. See
the following Section B.3, of this manual.
==========================
QUICK SET-UP FOR OFFICES
- NO SECURITY REQUIREMENTS
==========================
If you are using your LAN/Rover(tm) in an office in
which all employees will have equal access to the network, you
need not enable the security provisions of the network as
described below.
B. 1, 1
ADEVCO LAN/ROVER
MANAGEMENT GUIDE, ORGANIZATION
All you really need to do is "s ign on" in the manner
described below in Section C.4, SOFTWARE.
You can keep the
same password that comes with the distribution copy of the
software (TEST) or set the password as a blank carriage return
<RETURN).
You will only need to assign each station a station
number, described below under the MANAGER.COM network
management program, Section B.3.
===================
SECURITY PROVISIONS
===================
Before you can establish a secure network in your
office, consider how the network will be used by answering:
How many workstations will there be?
Where will the workstations be located?
How many users will each station have?
Who will be using each station?
What programs will each user need?
Where will these programs be stored?
Where will data files be stored?
Who needs access to data files?
Who will update data files?
Once you have answered these questions, you can
begin the task of setting up the network.
Since the LAN/Rover
uses a true "bus topology", it is easy to change the physical
layout of the net even after you have installed it. However,
the results of unplanned data management can be far reaching,
and many problems can be avoided by taking the time to set
things up correctly in the beginning.
--------------
ACTIVITY TABLE
=============
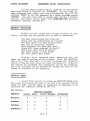
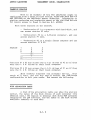
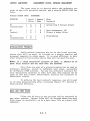
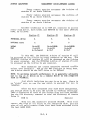
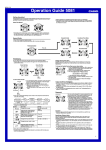
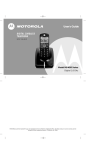
A good first step is to create an ACTIVITY TABLE with
the major activities you plan to do with your network listed
along the left, and the names-or categories of employees to be
operating the computers listed on the top.
FOR EXAMPLE:
FUNCTION
George
NETWORK OPERATORS
Susan
Credit-Manager
Accountant
Wordproc.
y
y
y
y
Accounts
n
y
n
y
Database
y
y
y
n
Schedules
y
y
y
n
:
:
:
B. 1 , 2
ADEVCO IAN/ROVER
MANAGEMENT GUIDE. ORGANIZATION
In this example, there are four employees and four
categories of activities.
Only one employee has unrestricted
access to all activities: Susan, who is also the network
t!lanager.
The credit manager needs access to the master
database, while the accountant, an outside consultant, does
not.
Nor does she need access to the schedules of employees.
Develop a table like the one above for your office.
Make it as complete as possible, but don't worry if there are
areas to be changed in the future.
The LAN/Rover system can be
eas ily lTlodified.
Discussed here are the tools you will use in planning
your network to provide the kind of management and security
that you need:
Station numbers,
USER numbers and passwords,
Privileges,
File attributes and
Disk drive access.
===============
STATION NUMBERS
===============
Each station connected must have a unique station
number, or "address" in order to send and receive data.
Any
address may be used from 00 to FF. Two different systems of
numbering are described in section B.3, MANAGEMENT.
============
USER NUMBERS
============
CP /M allows you to create up to sixteen "user areas"
or directories on a single disk.
Applications programs may be
organized on a disk by placing them in designated user areas.
When signing into The LAN, the network operator is
first asked for their user number. The USER NUMBER denotes the
USER AREA in which the operator will enter the network.
Users performing many tasks will need to change user
areas.
Other users may be restricted to a single user area,
blocking access to the files belonging to others.
If the software to be used is not in the ideal
location for your networking needs, it is easy to place files
in the desired USER AREA by using the CP/M command PIP (See
your computer dealer or manual, or the CP/M manual), or to use
the ADEVCO supplied program, MAKE.COM.
B. 1, 3
ADEVCO LAN/ROVER
MANAGEMENT GUIDE, ORGANIZATION
Some files will be used by everyone on the network.
These include the "system" files in user area 0, which are used
to tell the computer how to operate in the networking
environment.
They may also include programs that are of
general interest such as file management utilities.
================
PRIVILEGE LEVELS
==================
Privilege levels can determine users' access to files
in the system.
Certain privilege levels allow users to change
their USER number and have the full range over the network.
See Section B.3, MANAGEMENT and A.2, ~etwork USE.
===============
FILE ATTRIBUTES
=====================
Access to files may be limited in three additional
ways by the setting of "file attributes."
1. a file may be designated EXCLUSIVE for Local access.
2. files can be designated LOCKABLE.
This prevents two
users from accessing the file at the same time.
3. files may also be designated READ ONLY.
This prevents
users from overwriting an important piece of common data.
B.3,
These file attribute options are detailed in Section
ORGANIZATION in the discussion of "PRIVILEGE LEVELS."
=================
DISK DRIVE ACCESS
=================
One of the most basic levels of security is whether a
user may access a remote disk drive to read or write data.
This is accomplished through the MANAGER.COM, Section B.3.
Then the network manager may provide access to
various disk drives through the MAP instructions detailed in
Sect ion B.3, ACCESS.
B.', 4,
ADEVCO LAN/ROVER
MANAGEMENT GUIDE, ORGANIZATION
=================
PLANNING EXAMPLE
=================
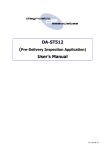
Here is an example of how The LAN/Rover might be
configured with a three station system. FILES FOR THIS SET-UP
ARE INCLUDED on the LAN/Rover master diskettes. Information on
station numbering and assigning names to the the disk drives
for remote access is found in Section B.3, ACCESS.
With three stations on the network;
Workstation 1/1 is a computer with hard-disk, and
can access station #2 only.
Workstation #2 is a 2-floppy computer,
access station #1 only.
and can
Workstation #3 is a single floppy computer and can
access stations #1 & #2.
STATION
1 2 3
A
B
A
B
A
B
---------)G<-----------------)H<---------
D<--------I----------------~--
E<--------
S tat ion s # 1 f.c 113 may a c c e sst he A: & B: d r i ve s 0 f # 2 a s if the y
were the G: & H: drives on their local computer.
Stations #2 & #3 may access the A: & B: drives of #1 as if they
were the D: & E: drives on their local computer.
This example suggests one possible set-up.
Your
needs will vary, and you may easily modify the LAN/Scape
configuration to suit your needs. Now assume the following:
=====================
DISK ALLOCATION TABLE
=====================
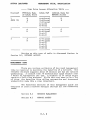
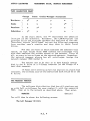
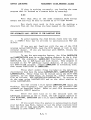
A disk drive allocation table can show the station
number, the names of the disk drives of each computer (the
physical name,) the logical to physical disk drive MAP commands
required by the LAN software, and the names of the disk drives
available remotely to each user.
B. 1, 5
ADEVCO LAN/ROVER
MANAGEMENT GUIDE. ORGANIZATION
----- Disk Drive Access Allocation Table
Station11
=========
1
(MOD 10)
PHYSICAL Name
of LOCAL Drive
-------------A
B
C
~---
LOCAL MAP
LOGICAL Name for
REMOTE Access
==========
==================
A:=A:Local
B:=B:Local
C:=C:Local
G:=A:02
H:=B:02
D
E
A:=A:Local
B:=B:Local
D:=A:01
E:=B:01
G
H
---------
----- ... _-------
---------
-------------- ---------- ----------------
2
3
A
B
A
B
---------- ----------------
A:=A:Local
B:=B:Local
D:=A:01
E:=B:01
G:=A:02
H:=B:02
--------- -------------- ---------- ---------------Setting up this type of table is discussed further in
Section B.3, NETWORK ACCESS.
================
MANAGEMENT TIME
===============
There are various estimates of how much management
time is required to maximize the benefits of a network.
One
reliable estimate suggests about 20 minutes per day per network
workstation. A network with 10 workstations could require over
3 hours of management per day.
A network of 24 users might
require a full-time manager! While this may seem to be a lot
of time, the benefits from office automation and increased
productivity make this a wise investment.
The following sections of this management guide are
designed to lead a network manager through all the necessary
tasks.
Section B.2
NETWORK MANAGEMENT
Section B.3
REMOTE ACCESS
B. 1, 6
ADEVCO LAN/ROVER
MANAGEMENT GUIDE, NETWORK MANAGEMENT
NETWORK MANAGEMENT
The key to successful network management is often to
assign one person with the responsibility of the tasks which
need to be managed.
================
MANAGEMENT TASKS
================.
Network
mana~ement
is made up of the following tasks:
1. Determining the number of stations to be used on the
network, their location, and assigning each station number.
2.
Determining the number of users per station, which
users need to use th~ special functions of the network, which
disk drives need to be accessed, and which stations require
remote printing.
3.
Preparing working diskettes for each workstation on
the network, including:
A.
Selecting the applications programs which are to
be used at each workstation.
B. Determining the USER AREA in which each program
must reside and assuring the programs are so located.
c. Assuring that the selected applications programs
for each user are available at each workstation along with
the appropriate LAN programs for that computer model.
D. Assigning unique station numbers to each computer
on the net.
E. Determining levels of network security, including
the user numbers and passwords to be used by each operator
of the network.
F. Assuring that a unique labelled working diskette
is prepared for each station, and that the prepared
working diskettes stay with the workstation.
4. Testing the network to assure proper operation.
Manual "C", Section 4, SOFTWARE.
5.
See
Maintaining the working diskettes of each workstation.
6.
Resolving the cause of problems which may arise.
Manual "C", Section 6, PROBLEM SOLVING.
B.2, 1
See
ADEVCO LAN/ROVER
A.
MANAGEMENT GUIDE, NETWORK MANAGEMENT
Identifying symptoms of network problems.
B.
Identifying whether a problem arises from
operator error and network misuse (including inefficient
program use) or from hardware faults.
c.
Diagnosing potential causes of problems.
D. Taking action to correct the problem.
======================
ORGANIZING THE NETWORK
======================
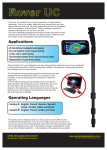
A good start can be made by drawing a simple lay-out
of your network by room and station number.
Each station
number must be unique, and it is easy to assign each room a
letter and each station a number in that room.
for example
let's say we have three rooms.
Room A might be accounting,
room B Sales, and room E engineering, with three workstations
to be networked. So a simple floorplan might look like this:
Room A
It A 1
Room B
It B 1
Room E
It E 1
. And a disk access table might look like this:
STATION
Local
Drives
Remote
Disk
Drive
Access
A1
A
B
B1
A
B
E1
A
B
--------->G<----------------->H<--------D<--------I---------E<-------- ----------
Where Stations flA1 & fiE 1 may access the A: & B: drives of :ftB1
as if they were the G: & H: drives on their local computer.
And S tat ion s It B 1 & It E 1 may a c c e s s t h e A: & B: d r i ve s 0 f It A 1 as
if they were the D: & E: drives on their local computer.
B.2, 2
ADEVCO LAN/ROVER
MANAGEMENT GUIDE" NETWORK MANAGEMENT
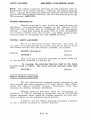
The next step is to decide where the software you
plan to use will actually reside, and a simple QUEUE CARD can
help.
Sample QUEUE CARD
STATION
A1
(accounting)
I
(MANAGER)
Local
Drive
I
I
A
B
Remote
Name
I
Disk
Contents
& Spread sheets
D
E
Accounting
Data management, WP
Client & order files
B1
(sales)
A
G
B
H
E1
(engineering)
B
A
Programming
-------------------------
=====================
APPLICATIONS PROGRAMS
=====================
Applications programs may be on the Local station,
where they will be used, or located on a single station and
accessed remotely by other users. It is most efficient to have
them located on the station where they will be used the most.
NOTE: If a "disk intensive" program is used, it should be on
your local station and not used over the network.
More than one coPy of a single program may be used on
different machines, stored in different user areas, accessible
by different USER numbers. Revievl the software licenses for
your application programs to make sure that they legally can be
used in the multi-user environment without the purchase of
additional copies.
To achieve the best network response, you will need
to do some experimenting after reviewing Manual ."C", Section 4,
Applications Software.
===================
DATA AND TEXT FILES
===================
Files may be kept on any station and be accessed by
any other station. Larger files will be located where the most
disk space is avai lable, as in a da ta base file on a hard disk
comp~ter.
B.2, 3
ADEVCO LAN/ROVER
MANAGEMENT GUIDE, NETWORK MANAGEMENT
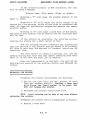
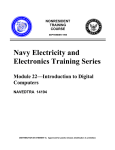
=====================
TASK ALLOCATION CHART
=====================
George
Susan
Wordproc.
y*
y
y
n
Books
n
y
n
y*
Database
n·
y*
y
n
Schedules
y*
y
y
n
Credit-Manager Accountant
:
:
In the chart above, the "*" represents the physical
location of the software.
Remember, the LAN/Rover(tm) can
transfer files and programs between any stations of the net.
Therefore, anyone "pr i vi leged" can get the fi les and programs
from another user's station and copy them to their local
drives.
Now that you know on which machines the software will
reside, we must decide which USER numbers and privileges will
~ive each employee the correct access to the network.
First of
all, we want to set up Susan as the network manager. Remember,
the network manager always has all privileges. Assign the
network manager USER number O.
The easiest way to do this is to have Susan's system
disk in the B: drive of
2-floppy computer (or the floppy of a
hard disk computer.
a
If Susan were setting up her own station on a hard disk
computer, the working copy of the LAN system disk would be on the
A: drive.
===================
THE MANAGER PROGRAM
===================
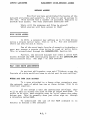
The software distribution disk has all stations set
up with full privileges for user number 0, with the password
TEST.
Sign on to the network as described above.
Then enter:
MANAGER
(Return)
You will then be shown the following screen:
The LAN Manager Utility
B.2, 4
ADEVCO lAN/ROVER
MANAGEMENT GUIDE, NETWORK MANAGEMENT
This program assigns Station Addresses, Passwords and
Privileges for each User in each station.
This information is
stored in secure encrypted form in the LAN/Scape system program
SIGN.COM.
You may modify the system program either locally or over
the LAN /Rover by us ing MAP command to gi ve access to the remote
disk drive, and by using this option to change drives.
The
program SIGN.COM for the station that you are changing must be
present on the drive which you specify.
While a manager may modify a remote station's set up,
this could create confusion to network users and is best done
Locally at the manager's station.
The MANAGER management utility should be kept
separate from the rest of the office software, in a secure
place, accessable only to the designated manager.
The MANAGER-COM menu:
D
Change Drive, Current Drive is A:
A
Assign Station Address
P
Examine or modify Passwords / Privileges
E
Exit this program
Which?
In our example, Susan's system disk is in the C: drive
of a hard disk computer. Now change the Current drive to C: by
entering:
D
The screen responds:
Change System on Drive:
and you respond:
c
You will now be shown the menu screen once again, and the
Current Dri ve will be shown to be C:.
Note that the above commands DO NOT require a <Return>.
B.2, 5
ADEVCO LAN/ROVER
MANAGEMENT GUIDE, NETWORK MANAGEMENT
========================
CHANGING STATION NUMBERS
========================
How many· workstations will there be?
Where will the workstations be?
Each station connected must have a unique station
number, or "address" in order to send and receive data.
The
LAN/Scape allows any address to be used from 00 to FF, and at
least two different systems of station numbering are possible.
For small networks, a linear 1-99 numbering system
w 0 r k s well. Th e fir s t s tat ion can b e If 1, an 0 the r 2, the n ext
3 and so on.
Similarly the first could be numbered 10, the
second 20, the next 30 and so on.
The system in the earlier examples designated
building areas (or task areas) by letters from A to F. Using
the M (Modify) option, assign the appropriate user number then
using no password. The system will then ask the manager if she
wants to de-assign the password.
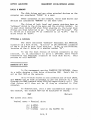
When you are ready to initialize the disks of the
other machines on the net, load your co-worker's working
diskettes on your floppy drive, or log onto thir A:drive if
they have a model 10. Follow the procedures for the MANAGER
program as described above. Enter the appropriate passwords
and privileges for each worker. In our example the final screen
will look like this:
User # Password
User
Change
Attrib
Change
Read
Remote
Write
Remote
Manager
===========================================================
o
1
2
3
4
Detroit
Berkeley
Bombay
Harrisburg
y
y
y
Y
5
6
7
8
9
10
11
12
13
14
15
M S -
Q -
Modify Password & Privileges
Save changes
Quit, abandon changes
B.2, 6
Y
y
Y
Y
Y (Susan)
(George)
(CredMan)
(Account)
ADEVCO LAN/ROVER
MANAGEMENT GUIDE, NETWORK MANAGEMENT
Note that not every station must have the same
paraMeters. Operators on different stations may have different
passwords to sign on the same USER number but they may have
different privileges.
You can create temporary passwords to allow a user to
enter data to a database to which he or she would ordinarily
not have access. At the end of the work day, you can kill the
temporary password by simply running MANAGER for that user's
station again.
You may want to do it over the net rather than
locally on your floppy drive.
As a final security measure, you will erase all
copies of the MANAGER program except that on your own drive.
You will be able to do this over the network after you have
learned to MAP your drives in the next section.
===============
FILE ATTRIBUTES
===============
If a user has been granted the privilege of setting
file attributes, as described above, they use the SETA.COM
program as detailed in the user guide. This program allows
files to have the following network attributes.
First, a file may have an EXCLUSIVE attribute.
Only the station on which such a file resides may have access
to that file.
No remote stations may gain access to that file.
This technique of protection gives the greatest immunity to
outside tampering, and is the default of the MAILBOX file to
assure mail privacy.
Second, files can have the LOCKABLE attribute.
This will prevent two users from accessing the file at the same
time.
When a user opens a "LOCKABLE" file, other users are
automatically "locked out" of that file.
When the user is
through with" that file and it is properly closed, it becomes
available to anyone on the network.
This file protection is
used as an office management procedure to protect data
integrity rather than as a security measure.
Third, files may have a READ ONLY attribute. This
can prevent users from overwriting an important piece of common
data.
These file attribute options and their use are
detailed in the user manual "A".
B.2, 7
ADEVCO LAN/ROVER
MANAGEMENT GUIDE, NETWORK ACCESS
NETWORK ACCESS
Now that you have established the basics of the
network structure and security, it's time to set up access to
the net. This system has a number of powerful features to
provide this access. The most important questions are:
Where will the programs and files be stored?
Which station will have access to them?
=================
DISK DRIVE ACCESS
=================
In CP/M, a computer may address up to 16 disk drives
using a single letter name, from A: to P:. For any computer
there can only be one A: drive.
One of the mos t bas ic leve Is of secur i ty is whether a
user may access a remote disk drive to read or write data.
This is accomplished through the MANAGER.COM, Section B.2.
Further, the network manager may limit a users disk
access through the MAP instructions placed in the LANSTART.SUB
initialization file. See page 7 of this section.
===========================
MAP: DISK DRIVE ASSIGNMENTS
===========================
Anan c i en t phi los 0 ph e ron c e sa i d "w i tho uta map th e
Captain of a ship would not know to which port he was sailing."
WHERE ARE YOUR DISK DRIVES?
To a user attached to a dozen other computers over
the network, each of which has two or three drives, this is an
important question.
If you assign a user the appropriate privilege, they
will be able to access the disk drives of other stations. In
order to do this, each machine must be "told" where the other
drives are. This is normally done just after sign on, through
a procedure called MAP.
To unders tand the us e of the MAP command it
helpful to discuss a few concepts:
B.3, 1
is
ADEVCO LAN/ROVER
MANAGEMENT GUIDE, NETWORK ACCESS
.LOCAL & REMOTE
The disk drives and any other attached devices on the
computer are cons idered "LOCAL" to a user.
Other computers on the network, their disk drives and
devices are cons idered "REMOTE" to the same user.
The drives of both local and remote stations have an
"address" which is the drive name and the station number. As
is seen when typing MAP when first signing on, the Local disk
drives are then referred to as: "A:local" and "B:local". The
A: drive on a station 114 is referred to as "A: 04".
The B:
drive would be "B:04".
PHYSICAL & LOGICAL
The above mentioned "address" describes the PHYSICAL
location of a disk drive. "A:local" is the PHYSICAL location
of the A: drive on your local station. "A:04" is the PHYSICAL
location of the A: drive of a station number "04".
To use the disk drives of remote computers on the
network, it is necessary to give a LOGICAL name which
represents the PHYSICAL location of each disk drive.
This
process we call MAPPING.
================
SETTING UP A MAP
================
In the management section PLANNING THE NETWORK, there
is a table showing a disk drive allocation MAP.
Here's how to
set up that MAP on the network.
Up to 1 6 disk drives in any combination of both LOCAL
and REMOTE may be made accessable to anyone station at a time
through the MAP command us ing LOGICAL names from A: to P:. The
disk drives will then act as if they're attached to that
computer.
To demonstrate, once a user sucessfully signs on to
the network, the network MAP may be displayed by typing:
MAP
(Return)
The screen will show:
Logical name: = Physical drive
A:= A:LOCAL
B:= B:LOCAL
C:= C:LOCAL
(and on the KAYPRO 10)
B.3, 2
ADEVCO LAN/ROVER
MANAGEMENT GUIDE,NETWORK ACCESS
***
WARNING
***
THE MAP PROCESS REQUIRES ACCURACY. TAKE CARE TO MAP ONLY TO
"TRULY" ACCESSIBLE DISK DRIVES! Any user attempting to access
a remote file from a MAP with a non-existing remote physical
drive can "bomb" the remote user back to the CP/M prompt.
EXAMPLE: If your MAP 'is:
MAP D:=D:03
There is no D: physical drive on most computers.
So
in this case the logical drive D: is set to the non-existing
physical disk D: of station #03.
If you tried to access a file on your D: drive and
s tat ion # 0 3 was on the net W 0 r k, the use r on s tat ion 1103 w i 11 be
"bombed" back to the AO) prompt of the LAN CP/M.
This is the same response as Its tand-alone" CP /N, and
the problem is caused by a CP/M ROM call, and is not amenable
to software change.
CAUTION: DO NOT USE SPECIAL CHARACTERS IN AN ADDRESS
("@", n=", " ", ,,(n, n.").
Using special characters
addresses can-result in erratic MAPping.
in
-------------MAP STRATEGIES
==============
To MAP drives to be accessed,
logic of how drives should be named.
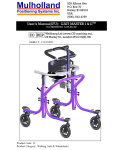
first decide on the
One method is to MAP each station to access the same
remote disk drive using the same LOGICAL name (A:=P:), as
follows:
PHYSICAL drive
(Local use)
LOGICAL name
(Remote use)
LOCAL
MAP
Station t'l
A
Station 1'2
A
D
A:=A:Local
G:=A:2
J:=A:3
G
A:=A:Local
D:=A: 1
J:=A:3
Station tl3
A
J
A:=A:Local
G:=A:2
D:=A: 1
In this MAP, each computer has its own A:drive and B:
drive accessed Locally as A: or B:.
Further every other
computer on the network accesses the same PHYSICAL drive by the
same LOGICAL name.
B.3, 3
ADEVCO IAN/ROVER
MANAGEMENT GUIDE, NETWORK ACCESS
Every remote station accesses the A:drive of
station 111 as their D:drive.
Every remote station accesses the A:drive of
station 112 as their G:dri vee
Every remote station accesses the A:drive of
station 111 as their J :dri vee
Another technique is to MAP all stations to access
every disk drive, both LOCAL and REMOTE by the same LOGICAL
name, as follows:
Station 111
Station 112
Station 113
PHYSICAL drive
A
A
A
LOGICAL name
A
D
G
D:=A:LOCAL
G:=A:03
A:=A: 1
G:=A:LOCAL
D:=A:02
A:=A: 1
LOCAL
MAP
D:=A:02
G:=A:03
A:=A:Local
In this MAP, the PHYSICAL A:drive of station #1 will
be accessed as the A:drive by every computer on the net. The
PHYSICAL A:drive of station #2 will be accessed as the D:drive
by every computer. And the PHYSICAL A:drive of station #3 will
be accessed as the G:drive by any computer.
This technique can create excessive network traffic
unless used carefully.
And as the MAP function is being done,
the A:drive should be the LAST drive to be MAPped.
NOTE: To optimize network performance it is generally advisable
not to log an A: drive on to a remote drive to run programs
such as WordStar.
Just which technique you use is up to you. there is
no "right" way, so use the one which is easiest for you to
remember.
After you have completed your disk drive assignments,
you should check to be sure the system is working correctly.
Take a directory of each of the drives that you have MAPPED.
Use the DIR directory command to read the dlrectory of remote
Drive D:
DIR D:
(Return)
Then try the directory program DD.COM.
This will
report the size of all files on the requested disk, and the
size of all valid remote disks that have been accessed since
the last WARM BOOT.
B.3, 4
ADEVCO LAN/ROVER
MANAGEMENT GUIDE. NETWORK ACCESS
If that is working correctly, try loading the same
program that is located on a remote drive by entering:
(Return)
D:DD
Note
except
now~you
that this is the same standard CP/M format
will be able to access up to 16 disk drives.
Now check your work to this point by getting a
directory from all the drives you have mapped on the network.
===============================================
THE AUTOMATIC MAP: SETTING UP THE LANSTART FILE
===============================================
To avoid mapping the disk drives every time you sign
on, a SUBMIT file may be written to automatically MAP all
drives.
If you are not familiar with the use of the CP/M
program called SUBMIT.COM, read the CP/M manual or turn to your
computer dealer.
If you are familiar with SUBMIT, follow the
instructions below.
To use the auto-mapping feature, the files LANEX.COM
and LANSTART.SUB must be on the working diskette in the A: disk
drive 0 f the computer. LANEX.COM funct ions sim ilarly to
SUBMIT.COM, but is RAM-based and much faster. This program is
included on the "B" LAN /Scape master diskette. If you must use
the SUBMIT.COM program, rename LANEX.COM to something else,
then rename SUBMIT.COM to LANEX.COM.
Three short submit files included on the LAN/Scape
distribution disk have the names LANSTART.N01. LANSTART.N02 and
LANSTART.N03. These files may be viewed using the CP/M TYPE
command.
To use these files, on station #1, simply rename the
file as follows:
REN LANSTART.SUB=LANSTART.N01. On station #2
do the same using LANSTART.N02 and on the third station by
us ing LANSTART.N03.
You may create a file named LANSTART.SUB using the
WordStar "non-document", and include only the specific MAP
commands as described below. Refer to your CP/M documentation
for specific SUBMIT details.
After the user logs on to the network with the
LAN/Scape programs on the A: drive, the LAN program expects to
find SIGN.COM, LANEX.COM and a file named LANSTART.SUB on the
same drive.
If you would like the system to automatically check
your mailbox (see MAIL, below) or let the other stations know
that you are on line (see FLASH, below), you may include these
command~ in your SUBMIT file.
B.3, 5
ADEVCO LAN/ROVER
MANAGEMENT GUIOE.NETWORK ACCESS
If you always wish to run a specific program every
time that you sign on the network, you may include the name of
that program as the last entry in the LANSTART.SUB file.
Here is an example of a LANSTART.SUB file with all
these options.
MAP G:=A:02
MAP H:=B:02
MAP J:=A:10
MAP K:=B: 10
MAP L: ~C': 10
FLASH ALL Hi There Station 1 is on-line II
MAIL /R *
MAP
WS
==========
UN-MAPPING
==========
If it is desirable to limit the access of a station
after signing on, LANSTART.SUB file can use the MAP command of
a works ta t ion to un-MAP the unneeded disk dr i ves by th i s
command:
(Return)
MAP E:=
This command will unMAP the E:drive.
=========
REMAPPING
=========
As mentioned earlier,
accessing up to 16 disk drives
more drives may be accessed, or
drives may be made accessable
system.
with CP/M a user is limited to
named A: through P:. However
different combinations of disk
by re-MAPping your LAN/Rover
Before changing a disk drive MAP, you should check to
be sure the system is working correctly. Take a directory of
each of the drives that are assigned. If there is a 0: drive,
use the DIR command to read the directory as follows:
OIR D:
(Return)
If you decide that it is unlikely that you will need
information from drive F: now mapped to drive A: at station 4.
Simply remap drive F: by entering:
MAP F:=A: 18
(Return)
B.3, 6
ADEVCO lAN/ROVER
MANAGEMENT GUIDE,NETWORK ACCESS
You now have the drive you want.
You still are
restricted to 16 machines at a time, but you can reMAP to any
other 1 6 d isk drives at will. Any alphanum er ic address other
than a valid station number (OO-FF) will result in the mapping
of a drive locally.
================
AUTOMATIC RE-MAP
================
You can also make files of specific disk drive
assignments and "automatically" MAP and re-MAP disk drives for
your needs.
All disk drive MAP configurations must use the file
extension .SUB.
For. instance an engineering department could
have a MAP in the file ENGINE.SUB
and the accounting
department could have another called ACCOUNT.SUB.
Both files could be on the A:drive of the LAN working
diskette, and the system may be dynamically reMAPped at any
time by entering:
lANEX ENGINE
(Return)
LANEX ACCOUNT
(Return)
or:
=================
REMOTE DRIVE A:
=================
THE A: and B: drives of one computer may be MAPPED to
another.
This is not generally advisable because it increases
network traffic.
In some cases a specific program, such as a complex
accounting program requires that it be located on an A: or B:
drive of a hard disk drive. If that were on a remote model 10
KAYPRO numbered station #10, you may MAP the drives like this:
MAP A:=A: 10
MAP B:=B: 1 0
(Return)
(Return)
This results in the mapping of your A: and B: drives
to station 10. As soon as you're done it is good practice to
re-MAP your A: and B: drives back to LOCAL.
The MAP of an A: or B: drive to a remote station may
be done automatically using the LANEX program together with the
LANSTART file.
If SUBHIT is used, special care is required in the
order of execution.
For instance, to MAP the A: drive to a
remote station, the MAP A:=A:<station #> would have to be the
final command in the .SUB file.
B.3, 7
ADEVCO LAN/ROVER
MANAGEMENT GUIDE,NETWORK ACCESS
=================
MAPPING TO LOCAL
================
Having LOCAL drives MAPPED remotely, (A:=A:2, .B:=B:2)
can significantly increase the data traffic over the network,
and can slow down response time. When you are finished using
this, re-MAP you drives to LOCAL as follows:
MAP A:=A:LOCAL
MAP B:=B:LOCAL
(Return)
(Return)
================================
REMOTE PRINTING ON THE LAN/Rover
================================
The ideal network should print out to any printer
attached to any workstation on the network.
It should also
print from inside an applications program as if the information
were being printed locally.
The LAN/Scape software will accurately print out
during remote disk accesses, and works with software spoolers.
However software spoolers usually require considerable disk
storage.
They can cause intensive disk use and thereby
possibly severly reduce network performance.
It is recommended that a hardware buffer or
intelligent spooler be installed on the printers which are to
be used with the network. By accepting data as quickly as the
computer can send it to the buffer, the workstation is "freedup" from the printing task quicker, therby reducing possible
contention and delays on the network.
There are at least three ways to print out files
while connected to the LAN/Rover:
1.
2.
3.
PRINTING LOCAL FILES
PRINTING REMOTE FILES
USING A REMOTE PRINTER
PRINTING SUPERVISION
A printer needs attention; the right type of paper
loaded, a full ribbon and correct print wheel installed.
It
also needs attention to the forms or tractor feeder for
alignment. For these reasons it is recommended that one person
be responsible for the printed products of an office.
This person will control and monitor the printer
attached to THEIR Station, say #1.
B.3, 8
ADEVCO LAN/ROVER
MANAGEMENT GUIDE. NETWORK ACCESS
PRINTING LOCAL FILES
The LAN/Rover system can print out any files locally
as a stand-alone computer might.
Files which have been
transferred from a remote station to the printer supervisor's
disk drive can be printed out at any time.
For example, network users can save their files
directly on a disk drive of Station If1, or using the PIP
command transfer their files to a disk drive on Station #1.
These files wou14 be printed at the discretion of the operator
of Station #1.
PRINTING REMOTE FILES
A printer may also print out files from any remote
disk drive over the network.
EXAMPLE:
Station #1 (with a printer) will print a
file from the B: drive of Station #3.
Station #1 will MAP
drive B:03 to D: by using the LAN command, MAP D:=B:3.
To
p r i n t a f i 1 e , the 0 per a tor 0 n S tat ion If 1 jus t p r in t s
D:FILENAME.EXT from their applications program.
USING A REMOTE PRINTER
The network will allow an operator to print a file
directly from an applications program to any parallel printer
attached to any other station on the network. The following
requirements must be met to use this option:
1.
The correct LAN software must be on both the
printing station (initiating the printing) and the printer
station (with the printer attached).
2.
The initiating station must set the print output
to go to the printer station.
3.
Once a "print job"
finished by releasing the printer.
is
started,
it must be
========================
REMOTE PRINTING SOFTWARE
========================
The station initiating the printing and the station
with the printer attached both must have the LAN remote printer
programs installed.
These programs are:
LAN. COM
PRINTER. COM
B.3, 9
(main LAN/Rover program)
ADEVCO LAN/ROVER
MANAGEMENT GUIDE, NETWORK ACCESS
NOTE:
The remote printing versions of LAN programs take an
additional lk of usable memory, reducing the usable program
area. If your applications programs require maximum TPA and
you do NOT need remote printing, use the non-remote printing
LAN programs, LANLP.COM.
PRINTER CONFIGURATION
Whether printing is done locally or remotely over the
LAN/Rover, the .applications program on the station which
initiates the printing must be configured for the destination
printer. A user must always be aware that to print sucessfully
to a remote printer over the network, the LOCAL applications
software must be configured for that REMOTE printer.
PRINTER: REMOTE ASSIGNMENT
Prior to starting remote printing, the user to
initiate the printing must tell their station to print out on
the remote station with the printer attached, as follows:
PRINTER <Station
#>
(Return)
Example:
PRINTER 3
(Return)
This will set a station's programs to print files out
at the printer attached to station #3.
To reassign the printing function back to the local
station from a remote, the local station operator need only
type:
PRINTER L
(Return)
==========================
REMOTE PRINTING OPERATIONS
==========================
Not all applications programs handle printing by the
same method and some programs will work better than others
using the remote printing option.
Experiment with your
progra~s to develop reliable procedures.
Remote printing has been made as transparent as
possible: A "CTRL P" command is recognized just as in CP/M and
screen responses which would be printed normally in CP/M will
print normally on the assigned remote printer.
A station set for remote printing initiates a request
to use a printer attached to another station.
B.3, 10
ADEVCO LAN/ROVER
MANAGEMENT GUIDE, NETWORK ACCESS
If the selected printer is NOT available,
will be given a message:
Printer busy;
(T)ry again,
the user
(D)ump or (A)bort.
Entering a "T" will cause the sending station to try
again to print.
Entering a "D" will cause the print output to be
dumped for five seconds, which allows time to terminate the
print job from the applications program and empties the remote
printing buffer.'
Entering an "A" will cause a Warm Boot of the system.
The applications program will be aborted and any transient data
will be lost.
If the printer is available, the printing station
reserves the printer for a short period of time.
Now the sendin~ station transfers the information
over the network to the printer station where it is printed.
All data is sent over the network in "packets" which are 128
charac ters long.
The last packet is usually a partial one, and the
sending station will hold this last packet (awaiting more data)
until it is told that the print job is complete.
When the transmission is complete, the user OR the
applications program of the sending station must RELEASE the
printer.
=====================
RELEASING THE PRINTER
=====================
Releasing the printer accomplishes two functions:
1. Prints out the final partial packet of data
from the sending station.
Sending a form feed
will force the final packet to be sent, but
will not release the printer.
2. Releases the printer reservation time.
NOTE:
Local printing may be done at any time without
releasing the printer.
Releasing the printer may be accomplished as follows:
A. Execute a Warm Boot.
B.3, 11
MANAGEMENT GUIDE
ADEVCO LAN/ROVER
I N DE X
A
ACTIVITY TABLE, B'.1-2
APPLICATIONS PROGRAMS, B.2.3
AUTOMATIC MAP, B.3.S
AUTOMATIC REHAP, .B. 3. 7
D
DATA AND TEXT FILES, B.2.3
DISK ALLOCATION TABLE, R.l.S
DISK DRIVE ACCESS, B.l.4, B.3.l
F
FILE ATTRIBUTES, B.l.4, B.2.7
M
MANAGEMENT TASKS, B.2.l
MANAGEMENT TIME, R.l.6
MANAGER PROGRAN, B.2.4
MAP STRATEGIES, B.3.3
HAP: DISK DRIVE ASSIGNHENTS, B.3.l
MAPPING TO LOCAL, B.3.8
o
ORGANIZING THE NET, B.2.2
P
PASSWORDS, CHANGING, B.2.6
PASSWORDS, TEHPORARY, B.2.7
PLANNING EXAMPLE, B.l.S
PLANNING THE NETI~ORK, B.l.l
PRINTER CONFIGURATION, B.3.10
PRINTER: REMOTE ASSIGNMENT, B.3.l0
PRINTER R: RELEASING THE PRINTER, B.3.ll
PRINTER S: SPECIAL RELEASE CHARACTERS, SEE USER GUIDE
PRINTER T: RESERVATION TIHE, B.3.ll AND SEE USER GUIDE
PRIVILEGE LEVELS, B.l.4
Q
QUICK SET-UP, B.l.l
R
RELEASING THE PRINTER, B.3.ll
REMAPPING, B.3.6
REMOTE DRIVE A:, B.3.7
REMOTE PRINTING, B.3.8
REMOTE PRINTING OPERATIONS, B.3.10
REMOTE PRI NTI NG SOFTIJARE, B. 3. 9
ADEVCO LAN/ROVER
S
SECURITY PROVISIONS, B.l.2
SETTING UP A MAP, B.3.2
STATION NUMBERS, B.l.3
STATION NUMBERS, CHANGING, B.2.6
T
TASK ALLOCATION CHART, B.2.4
U
UNlVTAPPING, B.3.6
USER NUMBERS, B.1.3
MANAGEMENT GUIDE