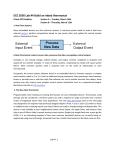
1
LPC4088 Experiment Base Board - User’s Guide Copyright 2014 © Embedded Artists AB LPC4088 Experiment Base Board User’s Guide Get Up-and-Running Quickly and Start Developing Your Application On Day 1! EA2-USG-0702 v1.0 Rev A LPC4088 Experiment Base Board - User’s Guide Page 2 Embedded Artists AB Davidshallsgatan 16 211 45 Malmö Sweden [email protected] http://www.EmbeddedArtists.com Copyright 2014 © Embedded Artists AB. All rights reserved. No part of this publication may be reproduced, transmitted, transcribed, stored in a retrieval system, or translated into any language or computer language, in any form or by any means, electronic, mechanical, magnetic, optical, chemical, manual or otherwise, without the prior written permission of Embedded Artists AB. Disclaimer Embedded Artists AB makes no representation or warranties with respect to the contents hereof and specifically disclaim any implied warranties or merchantability or fitness for any particular purpose. Information in this publication is subject to change without notice and does not represent a commitment on the part of Embedded Artists AB. Feedback We appreciate any feedback you may have for improvements on this document. Please send your comments to [email protected]. Trademarks All brand and product names mentioned herein are trademarks, services marks, registered trademarks, or registered service marks of their respective owners and should be treated as such. Copyright 2014 © Embedded Artists AB LPC4088 Experiment Base Board - User’s Guide Page 3 Table of Contents 1 Document Revision History 6 2 Introduction 7 2.1 Features 7 2.2 ESD Precaution 8 2.3 General Handling Care 8 2.4 Code Read Protection 8 2.5 CE Assessment 8 2.6 Other Products from Embedded Artists 9 2.6.1 Design and Production Services 9 2.6.2 OEM / LPCXpresso / QuickStart Boards and Kits 9 3 Getting Started 3.1 LPC4088 Experiment Bundle 10 3.2 Mounting the LPC4088 QuickStart Board 10 3.3 Powering 12 3.4 Demo/Test Application 12 3.5 Program Development 13 3.5.1 mbed Framework 13 3.5.2 LPCOpen Framework 14 3.5.3 Setup Own Framework 14 3.6 Program Download 14 3.7 How to Debug 16 3.8 Default Jumper Positions 16 3.9 Things to Note 17 3.9.1 Current Consumption and Limits of USB Ports 17 3.9.2 USB Mass-storage Does Not Work On Mac - LPC4088 Locks Up 17 3.9.3 USB Virtual Serial Channel Behavior 18 3.9.4 Cannot Download Binary To LPC4088 Via HDK Or Cortex Debug Connector 18 3.10 Updating the HDK 18 3.10.1 Update Procedure 4 LPC4088 Experiment Board Design 18 20 4.1 Modifications to LPC4088 Experiment Base Board 20 4.2 SP2: Pin Usage 21 4.3 SP3: LPC4088 QuickStart Board Connectors 21 4.3.1 Copyright 2014 © Embedded Artists AB 10 Powering of LPC4088 QuickStart Board ArduinoTM 21 4.4 SP3: Shield Connector 21 4.5 SP3: Serial Expansion Connector 22 4.6 SP4: uSD Memory Card Interface 23 4.7 SP4: UART Interfaces 23 4.8 SP4: CAN Interface 24 LPC4088 Experiment Base Board - User’s Guide 4.9 Page 4 SP5: SPI Shift Register and LEDs / Character LCD 4.10 SP5: RGB-LED 24 4.11 SP5: 5-key Joystick Switch 24 4.12 SP5: 1.8" LCD Interface Connector 24 4.13 SP5: Reset Push-button 24 4.14 SP6: I2C Interface Selector 25 4.15 SP6: I2C Sensors (LM75 and MMA7455) 25 4.16 SP6: Analog Input 25 4.17 SP7: Audio Codec 25 4.18 SP8: Power Supply 27 4.19 SP8: VBAT and Alarm 27 4.20 SP9: LCD Interface 28 5 Display Expansion 29 5.1 TFT LCD Interface 29 5.2 Serial Expansion Connector 29 5.3 1.8" TFT Color LCD 30 5.4 Arduino Shield Connectors 30 5.5 Character LCD 31 6 LPC4088 QuickStart Board 33 6.1 LPC4088 QuickStart Board Features 33 6.2 Pin Usage, Key Components and Jumpers 34 6.3 mbed-enabled 35 6.4 HDK - Hardware Development Kit 36 7 mbed Getting Started Tour 38 7.1 Connect the LPC4088 QuickStart Board to a PC 38 7.2 Register Account on mbed.org 39 7.3 Download Applications 40 7.3.1 7.4 7.4.1 Troubleshooting Experiment #1: Create Application and Compile Open the mbed compiler 41 41 41 7.4.2 Select LPC4088 platform 41 7.4.3 Create a new program 42 7.4.4 View the default program source code 42 7.4.5 Compile and Download the program 43 7.4.6 Change program and Recompile 43 7.5 Experiment #2: Timer 44 7.6 Experiment #3: Pushbutton 45 7.7 Experiment #4: UART and HDK 46 8 Troubleshooting Copyright 2014 © Embedded Artists AB 24 48 8.1 Powering 48 8.2 Program Download to LPC4088 48 LPC4088 Experiment Base Board - User’s Guide 8.3 Page 5 Using Test Application to Verify Correct Operation 9 Further Information Copyright 2014 © Embedded Artists AB 49 52 LPC4088 Experiment Base Board - User’s Guide Page 6 1 Document Revision History Revision Date Description PA1 2014-09-29 First version. PA2 2014-10-02 Corrected default jumpers. Copyright 2014 © Embedded Artists AB LPC4088 Experiment Base Board - User’s Guide Page 7 2 Introduction Thank you for buying Embedded Artists’ LPC4088 Experiment Base Board. The board has been designed to operate together with the LPC4088 QuickStart board, which is based on NXP’s ARM Cortex-M4 LPC4088 microcontroller. This document is a User’s Guide that describes the LPC4088 Experiment Base Board hardware design. It also describes how the board function together with the LPC4088 QuickStart Board, which together form the LPC4088 Experiment Bundle. 2.1 Features Embedded Artists’ LPC4088 Experiment Base Board lets you get up-and-running quickly with the mbed-platform and Cortex-M4 programming in general. The features of the board are: Interfaces and Connectors Dual 22-pos headers and 61-pos FPC/FFC connector for the LPC4088 QuickStart Board Dual 22-pos pin-list for accessing the LPC4088 QuickStart Board pins ArduinoTM compatible expansion connectors (for Arduino shields) Serial Expansion Connector, 14-pos connector with UART/I2C/SPI/GPIO pins micro-SD (uSD) interface & connector (both MCI and SPI interface versions) Connector to 1.8" TFT LCD 128x160 pixels (LCD not included) Connector for character LCD (with standard 16-pin interface, display not included) Audio Interface LCD Interface 40-pos FPC connector for 4.3" and 5" LCD interfaces (LCD expansion kits sold separately) Touch screen interface controller based on AR1021 LCD backlight voltage generator Other UART interfaces for UART0/UART3 via FTDI cables (not included) Shift register on SPI bus controlling 8 LEDs Above shift register also creating a character LCD interface RGB-LED 5-key Joystick MMA7455 3-axis accelerometer (I2C connected) LM75 temperature sensor (I2C connected) Trimming potentiometer on analog input Power Copyright 2014 © Embedded Artists AB WM8731 Audio codec, with microphone input, Line in, Line out and Headphone out Power supply, either via USB or external +5V DC (2.1mm jack) LPC4088 Experiment Base Board - User’s Guide 12mm coin cell powering supported (CR1216 battery not included) for RTC and LED on ALARM signal Dimensions 2.2 Page 8 Compact size: 134 x 114 mm ESD Precaution Please note that the LPC4088 Experiment Base Board and LPC4088 QuickStart Board come without any case/box and all components are exposed for finger touches – and therefore extra attention must be paid to ESD (electrostatic discharge) precaution. Make it a habit always to first touch the metal surface of one of the USB or Ethernet connectors for a few seconds with both hands before touching any other parts of the boards. That way, you will have the same potential as the board and therefore minimize the risk for ESD. In general touch as little as possible on the boards in order to minimize the risk of ESD damage. Note that Embedded Artists does not replace boards that have been damaged by ESD. 2.3 General Handling Care Handle the LPC4088 Experiment Base Board and LPC4088 QuickStart Board with care. The boards are not mounted in a protective case/box and are not designed for rough physical handling. Connectors can wear out after excessive use. The LPC4088 Experiment Base Board is designed for prototyping use, and not for integration into an end-product. The LPC4088 QuickStart Board is however designed for integration into end-products. For boards with the LCD expansion kit mounted, do not exercise excessive pressure on the LCD glass area. That will damage the display. Also, do not apply pressure on the flex cables connecting the LCD/touch screen. These are relatively sensitive and can be damaged if too much pressure is applied to them. Note that Embedded Artists does not replace boards where the LCD has been improperly handled. 2.4 Code Read Protection The LPC4088 has a Code Read Protection function (specifically CRP3, see datasheet for details) that, if enabled, will make the LPC4088 impossible to reprogram (unless the user program has implemented such functionality). Note that Embedded Artists does not replace LPC4088 QuickStart Boards where the LPC4088 has CRP3 enabled. It’s the user’s responsibility to not invoke this mode by accident. 2.5 CE Assessment The LPC4088 Experiment Bundle (consisting of the LPC4088 Experiment Base Board and LPC4088 QuickStart Board) is CE marked. See separate CE Declaration of Conformity document. The LPC4088 Experiment Bundle is a class A product. In a domestic environment this product may cause radio interference in which case the user may be required to take adequate measures. EMC emission test has been performed on the LPC4088 Experiment Bundle. Standard interfaces like Ethernet, USB, serial have been in use. General expansion connectors where internal signals are made available (for example processor pins) have been left unconnected. Connecting other devices to the product via the general expansion connectors may alter EMC emission. It is the user’s Copyright 2014 © Embedded Artists AB LPC4088 Experiment Base Board - User’s Guide Page 9 responsibility to make sure EMC emission limits are not exceeded when connecting other devices to the general expansion connectors of the LPC4088 Experiment Bundle. Due to the nature of the LPC4088 Experiment Bundle – an evaluation board not for integration into an end-product – fast transient immunity tests and conducted radio-frequency immunity tests have not been executed. Externally connected cables are assumed to be less than 3 meters. The general expansion connectors where internal signals are made available do not have any other ESD protection than from the chip themselves. Observe ESD precaution. 2.6 Other Products from Embedded Artists Embedded Artists have a broad range of LPC based boards that are very low cost and developed for prototyping / development as well as for OEM applications (i.e., for integration). Modifications for OEM applications can be done easily, even for modest production volumes. Contact Embedded Artists for further information about design and production services. 2.6.1 Design and Production Services Embedded Artists provide design services for custom designs, either completely new or modification to existing boards. Specific peripherals and I/O can be added easily to different designs, for example, communication interfaces, specific analog or digital I/O, and power supplies. Embedded Artists has a broad, and long, experience in designing industrial electronics in general and with NXP’s LPC microcontroller families in specific. Our competence also includes wireless and wired communication for embedded systems. 2.6.2 OEM / LPCXpresso / QuickStart Boards and Kits Visit Embedded Artists’ home page, www.EmbeddedArtists.com, for information about other products or contact your local distributor. Copyright 2014 © Embedded Artists AB LPC4088 Experiment Base Board - User’s Guide Page 10 3 Getting Started This chapter contains information about how to get acquainted with the LPC4088 Experiment Bundle. Please read this section first before you start using the board - it will be well spent time! 3.1 LPC4088 Experiment Bundle The LPC4088 Experiment Base Board cannot function on its own. It is designed to be connected to the LPC4088 QuickStart Board and together they form the LPC4088 Experiment Bundle, see picture below. + LPC4088 QuickStart Board = LPC4088 Experiment Base Board LPC4088 Experiment Bundle Figure 1 – LPC4088 Experiment Bundle Definition For more information about hardware design of the LPC4088 Experiment Base Board see chapter 4 . For more information about display expansion see chapter 5 . For more information about the LPC4088 QuickStart Board see chapter 6 . For more information about the program development see section 3.5 . For more information about how to get started with mbed see chapter 7 . 3.2 Mounting the LPC4088 QuickStart Board Mounting the LPC4088 QuickStart Board on the LPC4088 Experiment Base Board is very straightforward with the dual 22 pos edge connectors. It is the FPC/FFC (Flexible Flat Cable) connector that is a little more challenging, so follow these steps: 1. Start with connecting the 61-pos FFC on the LPC4088 Experiment Base Board. The open metal connectors shall be facing down. Open the FFC connector carefully. See the picture below for details about how far in the connector the FFC can be expected to be inserted. Carefully close the connect with two fingers pressing at each end of the connector. 2. Mount the LPC4088 QuickStart Board on the LPC4088 Experiment Base Board (via the dual edge row connectors). 3. Open the FFC connector carefully on the LPC4088 QuickStart Board can insert the free end of the FFC. See the picture below for details about how far in the connector the FFC can be expected to be inserted. Carefully close the connect with two fingers pressing at each end of the connector. Copyright 2014 © Embedded Artists AB LPC4088 Experiment Base Board - User’s Guide Page 11 Figure 2 – FFC on LPC4088 Experiment Base Board Figure 3 – FFC on LPC4088 QuickStart Board Do not forget to follow standard ESD precaution routines when mounting/removing the boards. To get same electrical potential between the boards (before connecting them), hold the LPC4088 QuickStart Board in one hand. Make sure this hand has at least one finger on the metal surfaces of the Ethernet and/or USB connectors. With the same hand, then touch the metal surface of the uSD connector on the LPC4088 Experiment Base Board for a while. Now both boards have the same potential and can be connected together without any electrostatic discharges. Copyright 2014 © Embedded Artists AB LPC4088 Experiment Base Board - User’s Guide 3.3 Page 12 Powering Powering is very flexible. Either the LPC4088 QuickStart Board powers the LPC4088 Experiment Base Board, or vice versa. The picture below illustrates the two principal powering options. The simplest powering option is to power the LPC4088 Experiment Bundle via the HDK micro-B USB connector on the LPC4088 QuickStart Board. This cable is typically always connected when doing program development. Note that not all PC/laptops can provide enough current. An externally powered USB hub can be used in this case or use the other option (see next point below). Alternatively an external +5V DC / 1A power supply (5W) is connected to J18. A 2.1mm standard power plug is used to connect to the board. Center pin is positive. Your PC/Laptop Optional Powering alt#2 Power Supply USB cable USB Hub Optional Powering alt#1 Figure 4 – Powering of LPC4088 Experiment Bundle There is a third, less common, powering option and that is via one of the UART interface connectors. The FTDI TTL-232R-3V3 cable provides a +5V supply. Note that only one FTDI cable should be connected at a time since both UART interface connectors share the same supply net. 3.4 Demo/Test Application A simple demo/test application has been created. It can also be used as a troubleshooting application. The application is not pre-loaded so follow the guidelines for how to download a program in section 3.5 . The source code and pre-compiled binary file (*.bin) is available from the support site. Section 8.3 describe the behavior of the application. Copyright 2014 © Embedded Artists AB LPC4088 Experiment Base Board - User’s Guide Page 13 Make sure the jumpers are correctly set when running the demo/troubleshooting application. See section 3.8 for details. 3.5 Program Development When starting program development two initial selections must be done - which program framework to start working in and which tool chain to use. Sometimes the choices are linked together. Three different framework solutions for the LPC4088 Experiment Bundle are presented in the following sub sections. The different tool chains are presented in each sub-section, since the choices are somewhat different between the frameworks 3.5.1 mbed Framework The mbed framework[12] might seem like to only natural choice since the LPC4088 QuickStart board is marketed as an mbed-enabled board. This is true and the mbed framework will be described in this sub-section, but there are other alternatives as well. The mbed framework has its strengths and weaknesses, just like any other solution. The mbed site (http://mbed.org) points to four cornerstones in the framework: The mbed Software Development Kit (SDK), which is an open source C/C++ microcontroller software platform designed for a suitable level of hardware abstraction to simplify microcontroller programming. The mbed Compiler is a powerful online IDE that is tightly integrated with the mbed SDK and Developer's Website (mbed.org). The mbed Hardware Development Kit (HDK), which is an interface design that provides simple USB drag-n-drop programming and CMSIS-DAP debug interface for the LPC4088 microcontroller. The LPC4088 QuickStart Board has an on-board HDK. The mbed.org community, with extensive documentation in the form of handbooks, cookbooks, project pages, User Forums for getting help and advice from other mbed users, etc. The mbed Compiler gives you instant access to lightweight C/C++ microcontroller development. It is an online web application IDE (Integrated Development Environment) that you can log in from anywhere and work on Windows, Mac, iOS, Android or Linux. For a quick guide how to write code, compile and download to the LPC4088 QuickStart Board, see chapter 7 . The mbed Compiler has some limitations, mainly when it comes to debugging. There are alternatives to the online compiler when more professional program development and debugging is needed. The mbed framework and the application code can be exported from the online compiler and imported into an offline tool chain. For more details, see here: http://mbed.org/handbook/Exporting-to-offlinetoolchains Currently there are guides for exporting to: uVision LPCXpresso IDE CodeSourcery GCC ARM Embedded IAR Embedded Workbench Under these tool chains it is possible to perform advanced debugging with breakpoints, inspecting variable values, dumping memory regions and even trace the program execution flow (provided the debug probe supports the feature). Copyright 2014 © Embedded Artists AB LPC4088 Experiment Base Board - User’s Guide 3.5.2 Page 14 LPCOpen Framework LPCOpen[10] has been created by NXP. It is a platform consisting of a large number of libraries and examples that allows you to get started quickly. The platform uses common APIs that work equally across all NXP microcontroller families. It supports the common development tool chains; uVision from Keil/ARM, Embedded Workbench from IAR, and LPCXpresso IDE from NXP. There is a core driver library containing three important sections: Chip Driver Layer - Peripheral drivers for the microcontroller Board Layer - Board specific functions and low level setup code Examples - Chip family specific examples for peripherals, interfaces, libraries, etc. LPCOpen also contains some important larger program packages/libraries, like FreeRTOS, LWIP (TCP/IP stack), USB driver and graphical library - all together with bigger project examples. Embedded Artists has created an LPCOpen port for the LPC4088 QuickStart Board. 3.5.3 Setup Own Framework There is always the option to roll your own solution and start from scratch to build the needed framework. Most tool chains (LPCXpresso IDE from NXP, uVision from Keil/ARM, Embedded Workbench from IAR, etc.) can create empty program skeletons. Besides an empty main()-function, only the most important startup code for initializing clocks and the very basic functions in the microcontroller is given. This approach is definitively a possibility and might be a preferred option if for example there is legacy code to be ported to the new platform. The approach will require more reading, and understanding, of the LPC4088 User's Manual from NXP. 3.6 Program Download This section describes some basic methods for downloading application code to the LPC4088. Note that this section does not describe how to create the application code (write the program and compile it). It is assumed that a binary file exist that represent the application program. Most program development environments create files that also contains debug information (*.elf file or *.axf file). This way, the integrated debuggers have the information needed when debugging. When these files are stripped from the debug information and just the pure binary file is left, it is often also called hex-file, which is a file format that Intel created a long time ago. It can also be a pure binary file (which is typically called a bin-file). Note that the on-line mbed compiler create pure binary files without debug information (since this environment does not support debugging in the traditional meaning. There are four basic methods for program download (the top two methods are the recommended that will give a quick start since it is support by on-board functionality): - Copyright 2014 © Embedded Artists AB On-board HDK: USB drag-n-drop The on-board HDK (see section 6.4 for more information) creates a USB drag-n-drop programming function. A USB Mass Storage Device (MSD) is created and the binary image that the on-line mbed compiler creates can just be dragged and dropped on this drive on the PC-side. The image will then automatically be flashed to the LPC4088 on the board. Note that any binary file can be dragged and dropped - and programmed. It is not only the online mbed compiler that can generate binary files. Normally, however, the generated files also contains debug information. This must be stripped to generate a binary file that can be used. LPC4088 Experiment Base Board - User’s Guide Page 15 See the documentation for the used program development environment for details. - On-board HDK: CMSIS-DAP Interface (SWD/JTAG) The on-board HDK (see section 6.4 for more information) also creates a CMSIS-DAP debug interface, which basically creates an SW debug interface to the LPC4088. The CMSIS-DAP interface is supported by major program development tool vendors. This interface is not the fastest available (due to limitation of the LPC11U35, the MCU that implements the HDK), but it works very well for hobbyists and semi-professional users. For higher download speed, needed for professional use, an external debug probe is recommended. See next alternative for more details. - SWD/JTAG via External Debugger The LPC4088 QuickStart Board also offers direct access to the Serial Wire (SW) and trace debug interface of the LPC4088 MCU. Any external debug probe that supports the LPC4088 and the 20-pin SW interface, called the Cortex Debug+ETM Connector, can be connected to this interface. The LPC-Link 2 debug probe directly supports the 20-pin connector, see picture below. The cheap 20 EUR package of EA-XPR-200 (LPC-Link 2) and EX-ACC-014 (20-pos flat cable) is needed to connect to the 20-pin SW interface (J7 in the LPC4088 QuickStart Board) and creates a powerful, professional quality debug interface. Figure 5 – LPC-Link2 Connected To LPC4088 QuickStart Board The 10-pin SW interface, called the Cortex Debug Connector, is common on many debug probes. This interface can easily be supported via a special cable that connect only the first 10 position on the 20-pos connector on the LPC4088 QuickStart Board. The picture below shows how the cable looks like (included in the ULINK-PRO package). Copyright 2014 © Embedded Artists AB LPC4088 Experiment Base Board - User’s Guide Page 16 Figure 6 – 10-pos to 20-pos Debug Cable There are many other SWD/JTAG interfaces on the market, for example ULINK and ULINKPro from Keil, JLINK from Segger, I-Jet from IAR. There is also OpenOCD, which is an open source project. Consult the respective manual for the SWD/JTAG interface used to get instructions how to download a hex/binary file via SWD/JTAG. Using this method, the application can be downloaded to (internal) SRAM, to (internal) flash memory or (external) qspi flash. Note that the debugger needs special download functionality in order to download to external qspi flash memory. Check the supported functions in the program development environment/IDE that is used. ISP over UART ISP is short for In-System Programming. The LPC4088 contains a bootloader in ROM that is activated by pulling pin P2_10 low during reset. This is easily accomplished by pressing the user pushbutton during reset/power-up. UART0 pins P0.2 (U0_TXD) and P0.3 (U0_RXD) are then used to download the program . An application is needed on the PC for downloading the application code, for example Flash Magic (http://www.flashmagictool.com/). This method is only included to make the list of options complete, but it is not recommended since the other options are simpler and faster alternatives. See Figure 21 for details how to connect an FTDI USB-to-UART cable to P0.2/P0.3. - 3.7 How to Debug The debug options are given by the development environment selected. If mbed is selected as framework and the on-line compiler is used, the debug options are very few - basically only printf()style and flashing LED debugging. This is not acceptable for professional users. If the mbed project is exported to an external development environment, for example the LPCXpresso IDE, then the full debug options are available (like breakpoints, watch-points, etc). The on-board HDK implements a CMSIS-DAP debug interface that is supported by most development tool vendors. It is not as fast as an external debug probe would be but still acceptable for many applications. 3.8 Default Jumper Positions Figure 7 illustrates the default jumper positions as mounted when the board is delivered from Embedded Artists. Copyright 2014 © Embedded Artists AB LPC4088 Experiment Base Board - User’s Guide Page 17 uSD interface selector JP1-JP6 Pos 1-2 (lower - default): MCI interface Pos 2-3 (upper): SPI interface I2S-siganls J14 I2C-pin selector JP8/JP9 Pos 1-2 (right) is default Pos 2-3 (left) Character LCD-backlight JP7 Figure 7 – LPC4088 Experiment Base Board, Default Jumpers 3.9 Things to Note This section lists things to note when using the LPC4088 Experiment Bundle. 3.9.1 Current Consumption and Limits of USB Ports The current consumption for the LPC4088 Experiment Bundle is in the region of 150-200 mA. The current consumption for the LPC4088 Experiment Bundle and the 5.0 inch LCD Board is in the region of 365-410 mA. This is very close to what some USB Host port can supply. If the boards are powered from a USB Host port (for example a PC or laptop) and there are problems, like spontaneous resets or other strange things, it is likely that an external power supply is needed. 3.9.2 USB Mass-storage Does Not Work On Mac - LPC4088 Locks Up This note affects the LPC4088 QuickStart Board. The HDK is not compatible with how a Mac writes the binary file to the USB mass-storage device (that the HDK creates). If a Mac is used to download a binary file, the LPC4088 will be flashed with a partial binary that is in no way correct. When the LPC4088 starts executing this program it can lock up. Further, the HDK gives an error message (error file on the USB mass-storage device). If this happens, place the LPC4088 in ISP mode. This is accomplished by pressing the user pushbutton when powering up the board (or resetting it). Alternatively ground pin 23 (carrying signal P2.10). After that it is possible for the HDK to communicate again with the LPC4088 and download the binary correctly (if a Windows/Linux PC is used). Note that the user push-button must be pressed whenever the LPC4088 is power cycled or reset to keep the board in ISP mode. It is not until a new, correct Copyright 2014 © Embedded Artists AB LPC4088 Experiment Base Board - User’s Guide Page 18 binary has been downloaded that the "enter ISP mode" operation can be ignored after a power cycle or reset. 3.9.3 USB Virtual Serial Channel Behavior This note affects the LPC4088 QuickStart Board. A known behavior of the HDK USB device is that it restarts after downloading any file to the mass storage device. If a virtual serial channel is active it will of course stop during the restart. A power cycle of the HDK is needed in order to restart the virtual serial channel after this. The simplest way to accomplish this is to open (and then short) JP3 on the LPC4088 QuickStart Board. This jumper can be found just beside the FPC/FFC connector. 3.9.4 Cannot Download Binary To LPC4088 Via HDK Or Cortex Debug Connector This note affects the LPC4088 QuickStart Board. If it is impossible to download a new binary to the LPC4088 via the HDK/external debugger, it is likely that the LPC4088 is in a mode where it is impossible for the HDK/debugger to take control over it. Press the user push-button while powering the board. That will place the LPC4088 is ISP/bootloader mode. After that it should be possible for the HDK/debugger to download a new binary. Note that from rev B of the LPC4088 QuickStart Board and with latest HDK firmware, the HDK can put the LPC4088 in ISP/bootloader mode automatically, so this will be an issue that no longer exist in newer versions of the hardware. 3.10 Updating the HDK It is a good idea to always have the latest version of the HDK firmware on the LPC4088 QuickStart Board. The first step is to identify which HDK firmware version that is running. Connect the LPC4088 QuickStart Board to a computer to get the MBED drive and then open the mbed.htm file in an editor e.g. notepad (don't double click the file as it will launch a web browser and that will not help). The first firmware version (from 2013-10-02) has a mbed.htm file that looks like below (the value of the code= will be different): <!-- mbed Microcontroller Website and Authentication Shortcut --> <html> <head> <meta http-equiv="refresh" content="0; url=http://mbed.org/platforms/EA-LPC4088/?code=..."/> <title>mbed Website Shortcut</title> </head> <body></body> Subsequent version of the firmware looks like below ( a version number, build date and release date in this case it is the release from 2014-01-07): <!-- Version: 0200 Build: Jan 7 2014 10:48:51 --> <!-- Released by Embedded Artists on 2014-01-07 --> The latest firmware version is available from the product support on Embedded Artists website or from the mbed.org site (more specifically the documentation pages for the LPC4088 QuickStart Board). 3.10.1 Update Procedure The location of the RESET pushbutton and the USB interface to use for firmware update is shown in the picture below. Copyright 2014 © Embedded Artists AB LPC4088 Experiment Base Board - User’s Guide Page 19 Figure 8 – LPC4088 QuickStart Board, LEDs and Push-buttons Windows (or Linux) 1. Start by downloading the firmware that you want (links above) 2. Connect the LPC4088 QuickStart Board to a Windows machine (Linux does not always work this is a limitation of the LPC11U35 MCU) 3. Press and hold down the RESET button on the LPC4088 QuickStart Board 4. Insert the USB cable 5. Release the RESET button 6. You should now have a CRP_DISABLD drive (if not unplug and redo steps 2, 3 and 4) 7. Delete the firmware.bin file from the CRP_DISABLD drive 8. Copy the binary that you downloaded in step 1 to the CRP_DISABLD drive 9. Disconnect and then connect the USB cable to get the normal MBED drive Mac It is not possible to update the HDK firmware on the LPC4088 QuickStart Board from a Mac computer. Copyright 2014 © Embedded Artists AB LPC4088 Experiment Base Board - User’s Guide Page 20 4 LPC4088 Experiment Board Design This chapter contains information about the peripherals and general design of the LPC4088 Experiment Base Board and how to set the different jumpers on the board. The schematic can be downloaded in pdf format from the support page, and is recommended to have printed out while reading this chapter. Section naming begins with SPx, which is short for Schematic Page x. The picture below gives an overview of the LPC4088 Experiment Base Board design. uSD connector Power Supply Input J18 Battery holder J19 Audio Interface J13, J15, J16, J17 LPC4088 QuickStart connector J2 Serial Expansion Connector J1 UART Expansion Connectors Reset Push-button SW2 LPC4088 QuickStart FPC/FFC connector J21 RGB-LED LED1 1.8" TFT LCD Connector Character LCD Connector LEDs LED2-LED9 Trimming Pot. R47 Joystick SW1 Figure 9 – LPC4088 Experiment Base Board Overview 4.1 Modifications to LPC4088 Experiment Base Board The LPC4088 Experiment Base Board has been designed to be flexible. Most options can be controlled via jumpers but there are a few options that need soldering. Note that modifications to the board are done at own risk and void all warranties. Copyright 2014 © Embedded Artists AB LPC4088 Experiment Base Board - User’s Guide 4.2 Page 21 SP2: Pin Usage The second page of the schematic lists how the LPC4088 QuickStart Board expansion pins are used. This also include the signals available over the 61-pos FPC display expansion connector. The information is included to ease programming and general understanding of the board. Note: Always consult the pin usage list so that there is no pin usage contention when starting a new project! For example, the RGB-LED and the uSD interface in MCI mode cannot be used simultaneous. The shift register and uSD interface in SPI cannot be used simultaneous. 4.3 SP3: LPC4088 QuickStart Board Connectors The LPC4088 QuickStart Board has two 22-pos edge connectors that are pin lists facing down. J2 is a header (female) connector that allows the LPC4088 QuickStart Board to be mounted on the board. Note that the LPC4088 QuickStart Board also has a 61-pos FPC connector. This is J21, found on schematic page 9. All 44 edge signals are accessible via pin headers (J3/J4) just beside the LPC4088 QuickStart Board. 4.3.1 Powering of LPC4088 QuickStart Board Powering is very flexible. Either the LPC4088 QuickStart Board powers the LPC4088 Experiment Base Board, or vice versa. The +5V net (pin 43 on J2) is shared between the boards to accomplish this. Both boards can also be powered separately. The LPC4088 QuickStart Board has its own 3.3V voltage regulator and powers its internal circuits. The 3.3V supply from the LPC4088 QuickStart Board is not used to power the LPC4088 Experiment Base Board. Similarly the LPC4088 Experiment Base Board has its own 3.3V supply. Note that signal VIN (pin 2, J2) on the LPC4088 QuickStart Board is not connected to EXT_VIN (since the board is sharing power via the +5V net). 4.4 SP3: ArduinoTM Shield Connector J1 is an Arduino UNO R3 compatible shield connector (or actually four separate headers). It is not 100% compatible, but close to. Note that several of the pins connected are also used on other interfaces on the board. Consult page 2 of the schematic for an overview. Before connecting an Arduino shield make sure there are no signal contentions between the shield and the LPC4088 Experiment Base Board. Arduino Signal LPC4088 pin LPC4088 QuickStart Board pin number Note SCL P1.31 p20 Same signal as A5 SDA P1.30 p19 Same signal as A4 D13: GPIO/SPI-SCK P0.7 p13 D12: GPIO/SPI-MISO P0.8 p12 D11: GPIO/PWM/SPI-MOSI P0.9 p11 D10: GPIO/PWM/SPI-SSEL P0.6 p14 D9: GPIO/PWM P5.4 p37 D8: GPIO P5.3 p31 Copyright 2014 © Embedded Artists AB Minimize capacitive loading on this net when using it as output, since it is an opendrain output (with 1500 ohm LPC4088 Experiment Base Board - User’s Guide Page 22 pull-up). D7: GPIO P0.4 p34 D6: GPIO/PWM P5.1 p38 D5: GPIO/PWM P5.0 p39 D4: GPIO P0.5 p33 D3: GPIO/PWM P5.2 p32 D2: GPIO P0.21 p8 D1: GPIO/UART-TXD P0.0 p9 D0: GPIO/UART-RXD P0.1 p10 A5: GPIO/AIN/I2C-SCL P1.31 p20 A4: GPIO/AIN/I2C-SDA P1.30 p19 A3: GPIO/AIN P0.26 p18 A2: GPIO/AIN P0.25 p17 A1: GPIO/AIN P0.24 p16 A0: GPIO/AIN P0.23 p15 4.5 Minimize capacitive loading on this net when using it as output, since it is an opendrain output (with 1500 ohm pull-up). SP3: Serial Expansion Connector The Serial Expansion Connector is a standardized serial interface connector that is included on many boards from Embedded Artists, including this board. The purpose is to provide a simple expansion connector for smaller expansion modules. Such modules are typically sensors of different kinds and communication modules, but can also be smaller displays. The connector contains 14 pins that support SPI, UART and I2C communication. Four additional pins exist for specific functionality, like module reset, interrupt pins, analog signals and pwm signals. Power (3.3V) is also provided. Maximum current consumption of the external module is 250mA. All signals are protected with 470 ohm series resistors to minimize current in case of shorts to ground, +3.3V, or similar. Usage of the different signals is specific for each module connected. All signals can be configured as either main function or alternatively as a general purpose input/output signal (GPIO). The picture below show where the connector can be found and the table lists which pins are connected. The application program has the responsibility to program the individual pins to correct state/function. Note that several of the pins connected are also used on other interfaces on the board. Consult page 2 of the schematic for an overview. Before connecting to the Serial Expansion Connector make sure there are no signal contentions between the used signals and the LPC4088 Experiment Base Board. Serial Expansion Connector Signal LPC4088 pin LPC4088 QuickStart Board pin number Pin 3: SPI-SCK P0.7 p13 Pin 4: SPI-MOSI P0.9 p11 Copyright 2014 © Embedded Artists AB LPC4088 Experiment Base Board - User’s Guide Page 23 Pin 5: SPI-MISO P0.8 p12 Pin 6: SPI-SSEL P0.6 p14 Pin 7: UART-RX/GPIO P0.1 p10 Pin 8: UART-TX/GPIO P0.0 p9 Pin 9: I2C-SCL P1.31 p20 Pin 10: I2C-SDA P1.30 p19 Pin 11: GPIO P5.4 p37 Pin 12: GPIO P5.1 p38 Pin 13: AIN0/GPIO P0.25 p17 Pin 14: AIN3/AOUT/GPIO P0.26 p18 4.6 SP4: uSD Memory Card Interface The board has a uSD memory card interface, J7. Supply voltage to the external memory card is always enabled (+3.3V). The Card Detect (CD) switch in the card connector is not connected. It is possible to select either an SPI or a MCI interface to the uSD memory card, via jumpers JP1-JP6. See picture below for locating where JP1-JP6 are located on the board. uSD Interface selector From left to right: JP2, JP1, JP6, JP5, JP3, JP4 Pos 1-2 (lower position): MCI interface Pos 2-3 (upper position): SPI interface Figure 10 – LPC4088 Experiment Base Board, uSD Interface Jumpers 4.7 SP4: UART Interfaces There are two UART interfaces via J6 and J8. These are 6-pos pin lists that are supposed to be connected to FTDI cables, to be exact the TTL-232R-3V3 cable. These cables will create a virtual COM port when connected to a PC (provided the FTDI driver has been installed). There is no keying on the 6-pos connectors so make sure they are turned the correct way when connected. Pin 1 is connected to a black cable and pin 6 to a green cable. Both pin 1 and 6 are marked on the pcb. P6 are connected to signals P4.28/P4.29. These signals can carry UART3. Note that these signals are only available when the FPC cable is connected between the LPC4088 QuickStart Board and the LPC4088 Experiment Base Board. P8 are connected to signals P0.0/P0.1 (P9 and P10 edge signals). These signals can carry UART0 or UART3, depending on set pin multiplexing on the LPC4088. Copyright 2014 © Embedded Artists AB LPC4088 Experiment Base Board - User’s Guide Page 24 Note that it is also possible to power the LPC4088 Experiment Bundle via the FTDI TTL-232R-3V3 cable. Note that only one FTDI cable should be connected at a time since the UART_USB_PWR net is shared between the connectors. 4.8 SP4: CAN Interface There is a CAN interface in the schematic but for production cost reasons the components are not mounted. It is possible to mount the components if the interface is needed. U1 can be either TJA1042T or TJF1051/T3. SJ1 must be set accordingly. J9 is typically a male, right-angled 9-pos DSUB connector. 4.9 SP5: SPI Shift Register and LEDs / Character LCD The shift register, U3, is connected to the SPI bus (available on p5/p7 with p30 as SSEL). Eight LEDs are connected to the shift register outputs. The shift register has been included on the design to give output signal expansion without using a lot of GPIO-pins and also to give Besides controlling eight LEDs it is possible to control a Character LCD, in 4-databit mode, via the shift register. The fairly standard 16-pos single row interface is supported via connector J11. Contrast can be controlled via the trimming potentiometer, R33, connected to pin 3 of J11. Note that not all character LCD's contrast can be controlled via this pin and it is not always R33 is the correct way of controlling the contrast. R84 can be removed to connect other voltages to pin 3 of J11, if needed. Check the datasheet of the character LCD selected to be sure it is compatible with the hardware interface. Backlight can be constantly on by shorting JP7. It can alternatively be controlled (for example for dimming or SW control) via a P2.1. 4.10 SP5: RGB-LED The RGB-LED, LED1, is controlled by three GPIO signals. Note that the RGB-LED and uSD interface in MCI mode cannot be used simultaneous since the three pins are used on both circuits. 4.11 SP5: 5-key Joystick Switch The 5-key joystick switch, SW1, is connected to five GPIO signals. The signals are debouched via 100nF capacitors. The series resistors are included to minimize risk for short circuits in case the GPIO pins are configured as outputs. 4.12 SP5: 1.8" LCD Interface Connector The board has an interface connector, J12, for the 1.8" TFT LCD DM-TFT18-101 from www.DisplayModule.com. The display is a quality, low-cost color LCD with 128x160 pixel resolution. The display has an SPI interface with two additional GPIOs (for reset and command/data control). 4.13 SP5: Reset Push-button The reset push-button, SW2, is connected to the global reset signal. Copyright 2014 © Embedded Artists AB LPC4088 Experiment Base Board - User’s Guide Page 25 4.14 SP6: I2C Interface Selector It is possible to select between two sets of pins, via jumpers JP8/JP9, for I2C channel#0 to connect to the I2C bus on the board. JP8/JP9 in position 1-2: I2C channel#0 available on P0.27/P0.28 is used for the I2C bus on the board. Note that these signals are only available when the FPC cable is connected between the LPC4088 QuickStart Board and the LPC4088 Experiment Base Board. JP8/JP9 in position 2-3: I2C channel#0 available on P1.30/P1.31 is used for the I2C bus on the board. 4.15 SP6: I2C Sensors (LM75 and MMA7455) There are some I2C peripherals on the board. that can be accessed from a common I2C bus. The I2C addresses for the individual components are given in the schematic. The I2C components are: LM75 Temperature sensor. 3-axis Accelerometer (MMA7455). Note that the two interrupt outputs are not connected but available on JP5. Audio Codec (WM8731), see description for schematic page 7. Touch screen controller (AR1021), see description for schematic page 9. 4.16 SP6: Analog Input The board contains a trimming potentiometer (R47) for manually generating an adjustable voltage (between GND and +3.3V). 4.17 SP7: Audio Codec The board contains an audio codec based on WM8731 from Wolfson. The codec is controlled via I2C and audio data is transferred over the I2S bus. The audio codec provides a mono microphone input, a stereo line input, a stereo line output and a stereo headphone output. The audio codec must be setup to be the I2S master, generating the WS and sample/bit clock signals to the LPC4088. The codec can generate the sample/bit clock from a local 12.288MHz crystal oscillator (default) or a clock signal via P2.27 from the LPC4088 (typically a 12.000MHz clock). By removing the six jumpers in J14 the audio codec is isolated from driving the I2S signals. See picture below for locating relevant components. The table below lists signal connections. Copyright 2014 © Embedded Artists AB LPC4088 Experiment Base Board - User’s Guide Page 26 Audio Connectors Left-to-right: J15, J13, J16, J17 Line in, Mic in, Line out, Headphone out I2S-signals J14 Figure 11 – LPC4088 Experiment Base Board, Audio Codec Code signals LPC4088 QSB pin LPC4088 pin Note I2C-SDA p19 or via FPC P0.27 or P1.30 Depending on JP8 I2C-SCL p20 or via FPC P0.28 or P1.31 Depending on JP9 I2S_RX_WS p33 P0.5 Codec ADCLRC signal. Output from codec. I2S_RX_SCK p34 P0.4 Codec BCLK signal, also connected to I2S_TX_SCK. Output from codec. I2S_RX_SDA p14 P0.6 Codec ADCDAT signal. Output from codec. I2S_TX_WS p12 P0.8 Codec DACLRC signal. Output from codec. I2S_TX_SCK p13 P0.7 Codec BCLK signal, also connected to I2S_RX_SCK. Output from codec. I2S_TX_SDA p11 P0.9 Codec DACDAT signal. Input to codec. MCLK P2.27 via FPC P2.27 alt. own 12MHz crystal Depending on SJ10 Copyright 2014 © Embedded Artists AB LPC4088 Experiment Base Board - User’s Guide Page 27 4.18 SP8: Power Supply The power supply on the board is straight forward and simple, yet flexible. U8 is a 700mA +3.3V linear regulator, generating the 3.3V from the +5V net. The +5V net is in direct connection with the EXT_VIN net. LED11 signals presence of regulated +3.3V. Three voltage measurement pads exist (TP3=+3.3V, TP4=+5V, TP5=GND) for verifying correct voltage levels on the board. Either the LPC4088 QuickStart Board powers the LPC4088 Experiment Base Board, or vice versa. The +5V net (pin 43 on J2) is shared between the boards to accomplish this. Both boards can also be powered separately. The LPC4088 QuickStart Board has its own 3.3V voltage regulator and powers its internal circuits. The 3.3V supply from the LPC4088 QuickStart Board is not used to power the LPC4088 Experiment Base Board. Similarly the LPC4088 Experiment Base Board has its own 3.3V supply (i.e., U8). The LPC4088 Experiment Board has three powering sources: 1. +5V DC via 2.1mm power jack (J18). Center pin positive. There is over-voltage and polarity protection on this input. 2. Powering via J6 or J8, see schematic page 4. The USB-to-UART cables from FTDI (TTL232R-3V3) that can be connected to J6/J8 can power the board. Note 1: that only one cable at a time shall be connected. Note 2: not all PC:s and laptops can provide needed current over their USB Host connectors. An external USB Hub with external power supply can be used in that case. Note 3: that cables are not included. 3. The shared +5V net (powering from the LPC4088 QuickStart Board). 4.19 SP8: VBAT and Alarm The board can power the VBAT input supply (to the LPC4088 QuickStart Board) from two different sources: The +3.3V power supply. This is done locally on the LPC4088 QuickStart Board. A 3V 12mm Lithium CR1216/CR1220 size coin battery. Note that battery is not included. VBAT input must be above 2.8V for the RTC (on the LPC4088 QuickStart Board) to operate properly. It is possible to add super capacitors on the two different pads (C43/C54) on the PCB to experiment with these also. Note that there is no powering of the super capacitors via the +3.3V net. This can be accomplished via a diode from +3.3V net to the super capacitors. A 1K series resistor is also recommended. See schematic. Note that the diode and resistor are not part of the schematic. The ALARM signal control LED12. Note that LED12 will consume a lot of current from the battery and/or super-capacitor. Restrict on/high time to preserve energy. The VBAT current can be measured via the voltage drop over R66, a 10Kohm resistor. Each uA current will result in 10mV voltage over R66. Copyright 2014 © Embedded Artists AB LPC4088 Experiment Base Board - User’s Guide Page 28 Battery Holder J19 ALARM-LED LED12 Figure 12 – VBAT and ALARM circuit 4.20 SP9: LCD Interface The board has an LCD interface, via J20, that connects the display expansion connector of the LPC4088 QuickStart Board. LCD expansion kits are sold separately with different display sizes and resolutions. A color depth of 16-bits is supported in the 5:6:5 RGB-format. Even of the connected display supports 18- or 24-bit color depth, only 16-bits will contribute to the color depth. There is a resistive touch panel controller, AR1021, that can handle the low-level sampling and filtering of the touch panel samples, hence off-loading the LPC4088 from this task. The display's touch panel is by default connected to the AR1021 controller (SJ5-SJ8 in 1-2 position) but can also be connected to ADC/GPIO pins of the LPC4088. The latter is a possible solution to move the touch panel controller functionality to the LPC4088. U10 is a DC/DC switched voltage converter that generates a constant current for the display backlight. The resistance over R80/R81 sets the constant current level. 15 ohm (R80=R81=30 ohm) sets the level to 20 mA. 7.5 ohm (R80=R81=15 ohm) sets the level to 40 mA. The current level can also be controlled via a PWM signal on P2.1. This allows software to implement backlight dimming. Copyright 2014 © Embedded Artists AB LPC4088 Experiment Base Board - User’s Guide Page 29 5 Display Expansion The board has several different ways to add display functionality. This chapter present the most obvious ways to connect a display to the board. Larger displays (large number of pixels) require the LPC4088 on-chip LCD controller to generate the pixel stream and must be interfaced to the display expansion connector. The frame buffer resides in the SDRAM of the LPC4088 QuickStart Board. Smaller displays (less number of pixels) typically has some kind of serial interface, like SPI or I2C. It can also be 8- or 16-bit parallel memory bus-like interfaces. The frame buffer for these displays typically resides in the on-display controller chip. 5.1 TFT LCD Interface The LPC4088 Experiment Bundle has built-in support for TFT color LCDs. The displays are sold as separate kits that can easily be mounted on the bottom side of the board. The build-in support routed the RGB-pixel data signals that are available on the display expansion connector on the LPC4088 QuickStart Board to the 40-pos LCD connector, which is directly connects to an LCD. Currently 4.3 inch (480x272 pixels) and 5" inch (800x480 pixels) display expansion kits are available. There is also a resistive touch panel controller and backlight voltage generate built-in. For performance reasons (on the LPC4088), 16-bit color depth is implemented. A 565-system is most commonly used. This means 5 bits for red, 6 for green and 5 for blue - 16 bits in total. The LPC4088 also supports 24-bit systems but that would double to load on the external memory bus since each pixel is stored as 32-bits (instead of 16-bits). 5.2 Serial Expansion Connector Embedded Artists has a number of smaller displays that can interface via the serial interface connector, more specifically: 2.7 inch ePaper display module with 264x176 pixels resolution. This display has an SPI interface with some addition GPIOs. It also utilize the I2C bus for communicating with a temperature sensor. 1.5 inch RGB OLED with 128x128 pixels resolution. This display has an SPI interface with some addition GPIOs. 1.35 inch Memory LCD with 96x96 pixels resolution. This display has an SPI interface with some addition GPIOs. It is simple to connect a custom display with a serial interface to the Serial Expansion Connector. Below are some pictures showing these displays connected to the LPC4088 Experiment Bundle. 2.7" ePaper 1.5" RGB OLED Figure 13 – LPC4088 Experiment Bundle, Displays and Serial Expansion Connector Copyright 2014 © Embedded Artists AB 1.35" Memory LCD LPC4088 Experiment Base Board - User’s Guide Page 30 Some of the pins in the Serial Expansion Connector are also used for other purposes on the board. Remember to check so that there is no pin usage contention. 5.3 1.8" TFT Color LCD The board has an interface connector, J12, that specifically supports the 1.8" TFT LCD DM-TFT18-101 from www.DisplayModule.com. The display is a quality, low-cost color LCD with 128x160 pixel resolution. The display has an SPI interface with two additional GPIOs (for reset and command/data control). The picture below illustrates how the display is connected. Figure 14 – LPC4088 Experiment Bundle and 1.8" LCD Expansion Note that J12 is not mounted by default on the board. Any standard 40-pos dual row, 100 mil pitch header (female) connector, for example PPPC202LFBN-RC from Sullins Connector Solutions. 5.4 Arduino Shield Connectors There are many different display shields on the market that are designed for the standard Arduino shield connector. Many of them emulates an 8-bit parallel bus that allows relatively fast update of even larger displays (larger in the meaning many pixels), for example QVGA resolution displays. There are also example of SPI-like interfaces to displays via Arduino shields. www.DisplayModule.com also has a small adapter board that allows many of their displays to be connected via the Arduino shield connectors. Below is a picture of 2.8" TFT LCD DM-TFT28-105 from www.DisplayModule.com. This particular display connects directly to the Arduino shield connector. Copyright 2014 © Embedded Artists AB LPC4088 Experiment Base Board - User’s Guide Page 31 Figure 15 – LPC4088 Experiment Bundle and Arduino Shield Displays A display can also be an array of RGB-LEDs, like the NeoPixel shield from Adafruit (product id# 1430, http://www.adafruit.com/products/1430). 40 RGB-LEDs are controlled via one single control line. See picture below for an example of this display. Figure 16 – LPC4088 Experiment Bundle and NeoPixel Sheild Note that some of the pins on the Arduino shield connectors are also used for other purposes on the board. Remember to check so that there is no pin usage contention. 5.5 Character LCD The board has an interface connector, J11, that specifically supports the standard 16-pos, single row character LCD. There are many suppliers of low-cost character LCDs. These displays have a parallel memory bus-like interface that supports both 4- and 8-bit databus width. The board supports the 4-bit databus width mode and emulates the parallel bus via a shift register (connected to an SPI bus). Only three pins are needed to control the LCD (via the SPI interface). The picture below illustrates how the display is connected. Copyright 2014 © Embedded Artists AB LPC4088 Experiment Base Board - User’s Guide Page 32 Figure 17 – LPC4088 Experiment Base Board, Character LCD Note that not all character LCDs have the 16-pos single row interface. Also the contrast controlling voltage (VLCD) can require different external control between different displays. The 10Kohm trimming potentiometer between ground and VCC (+3.3V) is a common structure. Always check if the selected display is compatible with the interface before connecting the display to J11. Copyright 2014 © Embedded Artists AB LPC4088 Experiment Base Board - User’s Guide Page 33 6 LPC4088 QuickStart Board The LPC4088 Experiment Base Board cannot function on its own. It is designed to be connected to the LPC4088 QuickStart Board and together they form the LPC4088 Experiment Bundle. This chapter present the LPC4088 QuickStart Board features in more detail. The mbed-enabled LPC4088 QuickStart Board from Embedded Artists is an easy to use ARM CortexTM-M4 rapid prototyping board in a standard through hole DIP package (44-pin), targeted at high-performance, as well as, low-power applications. Communication interfaces, large on-board memories and LCD controller enables graphical user interface (GUI) and communication gateway designs. On-board connectors and industrial design makes the module perfect for product integration. 6.1 LPC4088 QuickStart Board Features The small form factor LPC4088 QuickStart Board offers many unique features that ease your learning curve and program development. The board has been designed for integration. NXP's ARM Cortex-M4 LPC4088 microcontroller in BGA package, with on-chip 512 KByte program FLASH and 96 KByte SRAM. Running at up to 120 MHz core frequency. External data memory: 32 MB SDRAM (32-bit databus width) 8 MBit QSPI flash on SPIFI interface 12.0000 MHz crystal for maximum execution speed and standard serial bit rates, including CAN and USB requirements 32.768kHz RTC crystal Interfaces and Connectors Copyright 2014 © Embedded Artists AB Two 22-pos edge pins for expansion 100/10Mbps Ethernet (RJ45) USB-A (USB Host interface) USB-micro B (USB Device interface) USB-micro B (mbed HDK debug interface) 20 position SDW/Trace connector (ARM Cortex standard debug connector) 61 pos 0.3 mm pitch FPC connector for display expansion 20 pos XBee compatible connector for RF module add-on Powering 4.5 - 5.5V input on pin 2, or via micro-B USB HDK connector, or via trace connector (+5V) Other Onboard reset generation 1 Kbit E2PROM with EUI-48™ number (for Ethernet MAC address) Proper ESD protection on communication interfaces CMSIS-DAP Interface On-board (debug interface functions) Supported by the mbed SDK and online tools LPC4088 Experiment Base Board - User’s Guide Supported by professional tools and middleware Industrial temperature specified (-40 to +85 degrees Celsius) Production and shipping compensated for carbon dioxide emission Compact format: 101 x 28 mm (104 x 28 mm with connectors) 6.2 Page 34 Eight layer PCB design for best EMC performance, with controlled impedance and length matched routing for critical signals Pin Usage, Key Components and Jumpers The picture below illustrates the pin usage of the LPC4088 QuickStart Board. Figure 18 – LPC4088 QuickStart Board, Pin Usage The picture below illustrates the where the key components, including the three jumpers, are located on the LPC4088 QuickStart Board. Copyright 2014 © Embedded Artists AB LPC4088 Experiment Base Board - User’s Guide Page 35 Figure 19 – LPC4088 QuickStart Board, Pin Usage With the two USB jumpers it is possible to select if USB channel #2 (of the LPC4088) shall be connected to the on-board micro-B USB connector (under the RJ45 Ethernet connector) or to pin 35/36 on the edge connectors. The jumpers are located close to the RJ45 Ethernet connector: Left position: Connected to on-board micro-B USB connector Right position: Connected to pin 35/36 on the edge connector The HDK enable jumper is located close to pin 23 and close to the FPC/FFC connector for display expansion. The jumper controls the HDK functionality: 6.3 Jumper closed: The HDK functionality is enabled and active. Note that the HDK functionality will draw current all the time so low-power applications will not reach to the lowest possible current consumption values. Jumper open: The HDK functionality is disabled. The HDK functionality will not consume any current so this mode can be used when testing and measuring on low-power applications. Use this mode when connecting an external debug interface to the Cortex trace connector on the board. Also use this mode when the LPC4088 QuickStart Board is embedded into a product (and field-upgrade of the product is not needed). mbed-enabled The LPC4088 QuickStart Board is mbed-enabled - meaning that the board take full advantage of the mbed platform. The LPC4088 QuickStart Board is also the most advanced mbed enabled board to date - it is the most integrated, has most memory and has graphical possibilities. Copyright 2014 © Embedded Artists AB LPC4088 Experiment Base Board - User’s Guide 6.4 Page 36 The mbed Software Development Kit (SDK), which is an open source C/C++ microcontroller software platform designed for a suitable level of hardware abstraction to simplify microcontroller programming. The mbed Compiler is a powerful online IDE that is tightly integrated with the mbed SDK and Developer's Website (mbed.org). The mbed Hardware Development Kit (HDK), which is an interface design that provides simple USB drag-n-drop programming and CMSIS-DAP debug interface for the LPC4088 microcontroller. The mbed.org community, with extensive documentation in the form of handbooks, cookbooks, project pages, User Forums for getting help and advice from other mbed users, etc. HDK - Hardware Development Kit The mbed Hardware Development Kit (HDK) is included (which is part of what makes the module an mbed-enabled module). The HDK offers the following features over a common USB connection (the HDK USB port): 1. USB drag-n-drop programming of the target processor. A USB Mass Storage Device (MSD) is created and the binary image that the compiler creates can just be dragged and dropped on this drive on the PC-side. The image will then automatically be flashed to the LPC4088 on the board. 2. Virtual serial port, which creates a virtual COM port on the PC-side. There is a serial (UART) channel on the LPC4088 QuickStart Board that can be tunneled over to the PC-side for debug, logging, statistics or other reasons. 3. CMSIS-DAP debug interface, which basically creates an SW debug interface to the LPC4088. The CMSIS-DAP interface is supported by major tool vendors. The HDK functionality is implemented in a separate microcontroller (LPC11U35). It communicates with the PC over a USB interface and with the LPC4088 via the (Cortex) debug interface. The picture below illustrates the connections and also the physical place of the HDK microcontroller. USB interface debug interface HDK Separate MCU Figure 20 – LPC4088 QuickStart Board and HDK Copyright 2014 © Embedded Artists AB LPC4088, memories and interfaces LPC4088 Experiment Base Board - User’s Guide Page 37 The virtual serial port channel (pins P0.2/P0.3 on the LPC4088) is also available on pin P41/P42. If, for some reason, the HDK interface cannot be used during debugging it is possible to connect an FTDIcable to this UART interface, see picture below. It is recommended to disable the HDK functionality by removing the jumper in JP3 before connecting anything to P41 (else there will be multiple drivers on the signal). Figure 21 – LPC4088 QuickStart Board, FTDI Cable to mbed HDK UART Copyright 2014 © Embedded Artists AB LPC4088 Experiment Base Board - User’s Guide Page 38 7 mbed Getting Started Tour This chapter contains a short (and highly recommended) getting started tour to quickly familiarize you with the LPC4088 QuickStart Board when using the mbed development environment. 7.1 Connect the LPC4088 QuickStart Board to a PC Connect the HDK USB interface to a PC. A micro-B to A USB cable is needed for this. The HDK USB interface is found on the bottom side of the board under the reset pushbutton (same end of the board where the FFC/FPC display connector is located), see picture below. Figure 22 – LPC4088 QuickStart Board, LEDs and Push-buttons Three LEDs (blue, green, red) will flash and after a few seconds of activity, the PC will recognize the LPC4088 QuickStart Board HDK interface as a standard USB drive (see picture below). Please note that the files on this drive are read-only and cannot be modified or removed. Copyright 2014 © Embedded Artists AB LPC4088 Experiment Base Board - User’s Guide Page 39 Figure 23 – USB Mass Storage Device of LPC4088 HDK With the current version of the HDK firmware, the mbed.htm file will only lead to a non-existing page on the mbed.org site (giving an error message). On future HDK firmware versions, double-clicking on the mbed.htm file in the new USB drive will take you to the on-line documentation for the board. Note that the file mbed.htm contains version HDK firmware information. 7.2 Register Account on mbed.org You need an mbed account to continue. If you do not have one, signup here and create your account. Otherwise, if you already have an account, log in with your normal username and password. An account gives you access to the on-line compiler. As a first step the LPC4088 QuickStart Board platform should be added to your account. Click on "Platforms" on the toolbar and then select the "EA LPC4088" platform. The page will likely look different since more platforms are continuously added. Figure 24 – List of platform on mbed.org Copyright 2014 © Embedded Artists AB LPC4088 Experiment Base Board - User’s Guide Page 40 On the page presenting the LPC4088 QuickStart Board, click in "Add to mbed Compiler" button as shown below. The platform is now connected to your account. Figure 25 – Add LPC4088 QuickStart Board Platform It is possible to add more platforms to you account but for now it is best to have just the LPC4088 QuickStart Board platform connected. 7.3 Download Applications The next step is to learn how to download a pre-compiled program. 1. The on-line compiler creates a *.bin-file as a result of a successful compilation. Save this binary file (https://mbed.org/media/uploads/embeddedartists/firsttestprogram_lpc4088.bin) to the "MBED" USB drive that is created when connecting your LPC4088 QuickStart Board to your PC. The red HDK LED will flash as the file is copied to the board. To be more specific the content of the binary file is programmed into the LPC4088 flash memory. When the binary file has been copied the USB drive will shortly disappear from the PC and then come back on. This is because the HDK restarts the USB disk after any operation. 2. Press the Reset pushbutton 3. The program will start to execute. It is a running pattern on the four user LEDs. Note that the name of the binary file has no meaning. The file is recognized by the *.bin file ending. The source code for this pre-compiled program will be investigated in the next step where you learn how to create and compile a program. The three HDK LEDs have the following meaning: Red HDK LED: Flashes when there is activity on the HDK USB drive (when writing a binary file). Green HDK LED: Flashes when the CMSIS DAP debug interface is used. Blue HDK LED: Flashes when there is serial communication over the virtual USB serial COM channel. Note that the current HDK firmware version does not support download from Linux or Mac computers. It will only work from Windows operating system. Copyright 2014 © Embedded Artists AB LPC4088 Experiment Base Board - User’s Guide 7.3.1 Page 41 Troubleshooting Make sure you save the file to the USB disk that was created when connecting the HDK USB interface to your PC. The name of the drive is be MBED. The drive letter will however be different between different PCs. If the red HDK LED did not flash when saving the binary file you probably saved it elsewhere! Some browsers default to saving files to your "Desktop" - that should be changed. Some Linux PCs don't write data until you "Eject" the drive - but in general Linux PCs will not transfer the binary file properly, so only use Windows PCs Don't try and "Open" or "Run" the program files. Always "Save" them to the "MBED" USB disk. Some applications (e.g. VLC Media Player) recognize the .bin extension; ignore them! Make sure you actually start the program! Remember to press the Reset pushbutton to start it after you download a new program If the binary file has been copied (i.e., downloaded) but nothing happens after pressing the Reset pushbutton, make sure the correct binary file was copied. When you unplug the USB cable from the HDK USB interface (i.e., disconnect the board from your PC), you may get a "Device Removal" error message; just ignore it. To avoid the message, you can also use "Safely Remove Hardware" (Windows). 7.4 Experiment #1: Create Application and Compile The mbed Compiler (http://mbed.org/handbook/mbed-Compiler) is an online application used to create your own programs for the LPC4088 QuickStart Board. It translates program source code that you write in to a program binary that the LPC4088 microcontroller can execute. A longer introduction to the online compiler can be found here: http://mbed.org/handbook/mbed-Compiler-Getting-Started The following six simple steps demonstrate how to create an application, compile it and generate the binary file. The download process was covered in the previous step. 7.4.1 Open the mbed compiler Open the online compiler using the link in the site menu (top-right of the page). This will open the Compiler in a new browser tab or window. Figure 26 – Compiler Launch Button on mbed.org 7.4.2 Select LPC4088 platform Make sure the "EA LPC4088" platform is selected. It should be by default since the "EA LPC4088" platform was the last one added to your account. Figure 27 – EA LPC4088 Platform Selected in On-line Compiler Copyright 2014 © Embedded Artists AB LPC4088 Experiment Base Board - User’s Guide Page 42 If no platform has been selected the position (upper right corner in the compiler window) will display "No device selected". If this is the case or if some other platform is selected, just press on the position. A new window will pop up where it is possible to change selected platform. 7.4.3 Create a new program To create a new program in your personal Program Workspace, click in "New" and select "New Program..." Figure 28 – New Program in On-line Compiler Next, enter the name of the new program (e.g. "firstTestProgram"), and click "OK" Figure 29 – Set New Program Name in On-line Compiler Your new program folder will be created under "My Programs". 7.4.4 View the default program source code Click on the "main.cpp" file in your new program to open it in the file editor window. This is the main source code file in your program, and by default it contains a simple LED flashing program already. The code should look like below: #include "mbed.h" DigitalOut myled(LED1); int main() { while(1) { myled = 1; wait(0.2); myled = 0; wait(0.2); } } Copyright 2014 © Embedded Artists AB LPC4088 Experiment Base Board - User’s Guide 7.4.5 Page 43 Compile and Download the program To compile the program, click the Compile button in the toolbar. This will compile all the program source code files within the program folder to create a binary program. After a successful compile, you will get a "Success!" message in the compiler output and the download dialog will pop up. Save it to the location of the "MBED" USB disk, and then press the Reset pushbutton on the board to start it! The red HDK LED will flash while downloading the binary file. If there are errors, they will show up in the "Compiler Output" window, and will need to be fixed! Note that the two blue LEDs (LED3 and LED4) will light weakly. This is because the controlling pins are inputs per default and the pull-up resistors in the LPC4088 pin will turn the LEDs on weakly. 7.4.6 Change program and Recompile After this simple first program, lets test something more complex and control all four LEDs in a running pattern. Update the code in main.cpp as below. Compile, download and verify the effect. #include "mbed.h" DigitalOut DigitalOut DigitalOut DigitalOut myled1(LED1); myled2(LED2); myled3(LED3); myled4(LED4); int main() //Turn myled1 myled2 myled3 myled4 { all LEDs off = 1; //LED1 = 1; //LED2 = 0; //LED3 = 0; //LED4 is is is is active active active active //Enter forever loop while(1) { myled3 = 0; //Turn myled1 = 0; //Turn wait(0.2); //Wait myled1 = 1; //Turn myled2 = 0; //Turn wait(0.2); //Wait myled2 = 1; //Turn myled4 = 1; //Turn wait(0.2); //Wait myled4 = 0; //Turn myled3 = 1; //Turn wait(0.2); //Wait } low, turn it off low, turn it off high, turn it off high, turn it off LED3 off LED1 on 200 ms LED1 off LED2 on 200 ms LED2 off LED4 on 200 ms LED4 off LED3 on 200 ms } Note that LED1 and LED2 are active low meaning that they will turn on when the respective LPC4088 pin is low. LED3 and LED4 have the opposite polarity They are active high and the LEDs will turn on when the LPC4088 pin is high. Experiment with more LED flash patterns! Try to recreate the flash pattern in the pre-compiled test binary in step 3. Copyright 2014 © Embedded Artists AB LPC4088 Experiment Base Board - User’s Guide Page 44 More information about the wait()-function can be found here: http://mbed.org/handbook/Wait There are also wait_ms() and wait_us() functions. 7.5 Experiment #2: Timer The programs in the previous step were controlled by delays. There are more sophisticated ways to control the LED flashing, for example by using the mbed ticker functionality. More information can be found here: http://mbed.org/handbook/Ticker The ticker functionality is a prime example of the powerful mbed framework. Advanced functionality can quickly be incorporated into your application by just instantiating an object. Test the code below and experiment with different flash patterns. #include "mbed.h" Ticker tickObject; DigitalOut myled1(LED1); DigitalOut myled2(LED2); DigitalOut myled3(LED3); DigitalOut myled4(LED4); void flashHandler(void) { static int ledState = 0; //Turn myled1 myled2 myled3 myled4 all LEDs off = 1; = 1; = 0; = 0; switch (ledState) { case 0: myled1 = 0; break; case 1: myled2 = 0; break; case 2: myled3 = 1; break; case 3: myled4 = 1; break; default: ledState = 0; } ledState++; if (ledState >= 4) ledState = 0; //Turn //Turn //Turn //Turn LED1 LED2 LED3 LED4 on on on on } int main() //Turn myled1 myled2 myled3 myled4 { all LEDs off = 1; //LED1 = 1; //LED2 = 0; //LED3 = 0; //LED4 is is is is active active active active low, turn it off low, turn it off high, turn it off high, turn it off //Repeatedly call flashHandler(), once each 200ms tickObject.attach(&flashHandler, 0.2); //Enter forever loop while(1) { //do something useful while LED flashing is handled in background ; } } Copyright 2014 © Embedded Artists AB LPC4088 Experiment Base Board - User’s Guide Page 45 There is also a timeout functionality (http://mbed.org/handbook/Timeout) that can be used, for example if varying time intervals are needed between calling flashHandler(). The timeout must then restart after every call to flashHandler(). 7.6 Experiment #3: Pushbutton There is a user pushbutton on the board. See top picture on this page for locating the pushbutton. It is on the opposite end of the board from the reset pushbutton. The user pushbutton can short pin 23 (LPC4088 pin P2.10) to ground allowing the pin to be sampled low when the button is pressed. Note that the pull-up resistor on pin 23 must be enabled. Else the pin will not sample high when the pushbutton is not read. See example code below for how that is accomplished. If the user pushbutton is pressed while power cycling the board the LPC4088 microcontroller will enter ISP mode. The program that is possibly already loaded into flash will not start executing. However, it is still possible to download programs via HDK USB drag-n-drop. Below is a naive implementation where the user pushbutton is supposed to advance the flash pattern one step every time the button is pressed... but in reality a four state random generator is created. Test and verify for yourself. #include "mbed.h" DigitalIn myButton(p23); //p23 is pin P2.10 on the LPC4088 and has the user pushbutton connected to it DigitalOut myled1(LED1); DigitalOut myled2(LED2); DigitalOut myled3(LED3); DigitalOut myled4(LED4); int main() //Turn myled1 myled2 myled3 myled4 { all LEDs off = 1; //LED1 = 1; //LED2 = 0; //LED3 = 0; //LED4 is is is is active active active active myButton.mode(PullUp); //Enter forever loop while(1) { myled3 = 0; //Turn myled1 = 0; //Turn while (myButton); myled1 = 1; //Turn myled2 = 0; //Turn while (myButton); myled2 = 1; //Turn myled4 = 1; //Turn while (myButton); myled4 = 0; //Turn myled3 = 1; //Turn while (myButton); } low, turn it off low, turn it off high, turn it off high, turn it off //enable pullup resistor on input LED3 off LED1 on //Wait until LED1 off LED2 on //Wait until LED2 off LED4 on //Wait until LED4 off LED3 on //Wait until button pressed button pressed button pressed button pressed } The code must be updated so that every time the program wait for a button press it must not only wait for the press but also for the release. Hint: while (!myButton); will wait for the button to be released. Copyright 2014 © Embedded Artists AB LPC4088 Experiment Base Board - User’s Guide Page 46 7.7 Experiment #4: UART and HDK The HDK has functionality to communicate with the PC through a "USB Virtual Serial Port" over the same USB cable that is used for programming. To begin with, a USB driver is needed for this. Follow the installation details here: http://mbed.org/handbook/SerialPC That page also contains information about how to make use of the serial channel. The example program below demonstrates usage. #include "mbed.h" Serial pc(USBTX, USBRX); Ticker tickObject; DigitalOut myled3(LED3); DigitalOut myled4(LED4); DigitalIn myButton(p23); //serial channel over HDK USB interface //p23 is pin P2.10 on the LPC4088 and has //the user pushbutton connected to it void flashHandler(void) { static int ledState = 0; //Turn both LEDs off myled3 = 0; myled4 = 0; switch (ledState) { case 0: myled3 = 1; break; //Turn LED3 on case 1: myled4 = 1; break; //Turn LED4 on default: ledState = 0; } ledState++; if (ledState >= 2) ledState = 0; } int main() //Turn myled3 myled4 { all LEDs off = 0; //LED3 is active high, turn it off = 0; //LED4 is active high, turn it off myButton.mode(PullUp); //enable pullup resistor on input //Repeatedly call flashHandler(), once each 200ms tickObject.attach(&flashHandler, 0.2); //Enter forever loop pc.printf("Ok, so now we are entering the forever loop...\n"); while(1) { //check if user button pressed if (myButton == 0) { pc.printf("Button pressed!\n"); while (!myButton); //wait until button released wait_ms(10); //add short delay to handle contact bounce } } } See the Serial communication with a PC handbook page (http://mbed.org/handbook/SerialPC) for more details about how to for example receive characters from the PC. Copyright 2014 © Embedded Artists AB LPC4088 Experiment Base Board - User’s Guide Page 47 Note that the blue HDK LED flash every time characters are transferred over the USB virtual serial port. Copyright 2014 © Embedded Artists AB LPC4088 Experiment Base Board - User’s Guide Page 48 8 Troubleshooting This chapter contains information about how to troubleshoot a board that does not seem to operate properly. It is strongly advised to read through the list of tests and actions that can be done before contacting Embedded Artists. The different tests can help determine if there is a problem with the board, or not. For return policy, please read Embedded Artists’ General Terms and Conditions document (can be found at http://www.embeddedartists.com/shop/). 8.1 Powering The first step is to make sure that powering works properly. Powering is described in section 3.3 . 1. Disconnect any external hardware connected to the LPC4088 Experiment Bundle. This also apply to any display kit mounted (just disconnect the 40 pos FPC/FFC display connector). 2. Power the bundle via the micro-B USB connector (the mbed HDK connector) on the LPC4088 QuickStart Board. 3. Measure the +5V and +3.3V voltages with the help of the voltage measuring pads on the LPC4088 Experiment Base Board; TP3=+3.3V supply, TP4=5V supply, TP5=ground. Acceptable range for the +5V voltage is 4.4V to 5.5V. This is measured between TP4/TP5. Acceptable range for the +3.3V voltage is +3.15V to +3.45V. This is measured between TP3/TP5. Also measure the voltage between pin 1 and 44 on the LPC4088 QuickStart Board. Note that pin 44 cannot be measured on the J4 pin list (because R2 is not mounted). It must be measured on the soldered pin on the LPC4088 QuickStart Board. If the reset-LED is dimming instead of being clearly on or off, it is also a sign that the supply voltages are not stable and outside of valid ranges. 4. Verify that there are no voltage dips on the supply. A typical indication of this is that the resetLED flash from time to time. An oscilloscope can detect voltage dips; measure the supply voltage in AC mode. Set horizontal resolution to 50mV per square. Set the trigger to normal mode and adjust the trigger to 50mV below the normal level. That way, the oscilloscope will trigger every time a voltage dips occurs. By watching the dips it is possible to judge if there is a problem, or not. 5. Verify that the reset-LED (on the LPC4088 QuickStart Board) flash when pressing the reset push-button. The LED should also light shortly after releasing the push button. The extra “LED on time” is very short but still noticeable (typically a 1/5 of a second, i.e., 200mS). 6. In most cases it is possible to power the board via the micro-B USB (HDK) connector, but note that not all PC:s and/or laptops can power the board via their USB interfaces. In such cases, a USB hub with independent powering can work. Alternatively connect a stable DC supply (+5V, positive center) to J18 on the LPC4088 Experiment Base Board. Minimum current capability shall be 1A for this test. The noise level should be minimal, less than 50mV. Redo tests 3) to 5) above again. 8.2 Program Download to LPC4088 The second step is to make sure that it is possible to download an application (via the HDK) to the LPC4088. This step is not an explicit test of the LPC4088 Experiment Base Board but a prerequisite for the next step where the base board is tested. Follow these steps: 1. Connect a USB cable between the micro-B HDK USB connector and a PC running WindowsTM. Copyright 2014 © Embedded Artists AB LPC4088 Experiment Base Board - User’s Guide Page 49 2. In Windows, a drive (for example F:\) with the label “MBED” will appear. 3. Copy the pre-compiled binary file that is the test application. It can be downloaded from Embedded Artists' support page for the board. 4. When completed the HDK on the board will automatically restart and the MBED drive will appear again but without the file that was copied (the file has however been downloaded to the LPC4088). 5. Press reset to start the application. 8.3 Using Test Application to Verify Correct Operation The third step is to utilize the just downloaded pre-compiled test application to verify correct operation of the board. Make sure all jumpers are in default positions, see section 3.8 and that the FFC is connected between the two boards. First, a FAT/FAT32 formatted uSD memory card must be prepared. Add a file, message.txt, in the root directory containing the following text: eatest2014 Important that the first 10 characters are "eatest2014", the rest does not matter!!! Insert the prepared uSD card in the uSD connector on the LPC4088 Experiment Base Board. After this, start a terminal program in Windows with 115200baud, 8bit data, no parity, 1 stop bit and no flow control. Connect to the COM board that is created by the HDK. Finally before starting the test, connect the LCD is a display expansion kit is installed. Press the reset-button and make sure the test application greeting message can be seen in the terminal program. 1. Verify that the greeting message (from the test application) can be seen in the terminal program. 2. Next there will be rapid flash of the RED, GREEN and BLUE LEDs in the RGB-LED to indicate test start. No interaction needed 3. Test of MCI interface to SD card. No interaction needed 4. Test of accelerometer. No interaction needed 5. Test of LM75 temperature sensor. No interaction needed 6. Test of trimming potentiometer (the right one). The test application will print the read value for 5 seconds. Turn the trimming potentiometer to its outer limits and as soon as that is detected the test will continue. 7. Test of joystick. Within 10 seconds all 5 directions (up/down/left/right/center click) of the joystick shall be exercised. The test ends when all joystick directions have been detected. 8. Test RGB-LED. The following texts will be output on the terminal program: The LED will turn RED, press the button. The LED will turn GREEN, press the button. The LED will turn BLUE, press the button. Press the User-button on the LPC4088 QuickStart Board if the indicated colors on the LED is on, else not. Copyright 2014 © Embedded Artists AB LPC4088 Experiment Base Board - User’s Guide Page 50 9. Test of audio codec. a. Connect a microphone to the microphone input. Connect headphones to the headphone output. Connect a audio source to the line input (for example the headphone output from an MP3 player or smart phone). b. Verify that the sound to the microphone is heard with a delay (about a third of a second). Tap for example on the microphone and observe the delayed tap sound in the headphones. Adjust volume with the right trimming potentiometer, if needed c. Activate the audio source connected to the line input. Observe the same sound in the headphones. If needed, adjust volume with the right trimming potentiometer. d. Move the headphones to the line output. Verify that the same audio can he heard but likely with lower volume. e. Press the joystick down and observe the short jingle being played in the headphones. f. Press the joystick up to end the audio test. 10. Test of display contrast. This test only applies of a display expansion kit has been mounted. The LCD will be initialized and it should show three colored bars like this: For 8 seconds the contrast can be controlled using the right trimming potentiometer. The countdown of the eight seconds can be seen in the terminal program. Verify that the contrast can be controlled and make sure that the display is easy to read before the time ends. If no display exist, just wait 8 seconds until next test part starts. 11. Test of resistive touch panel. This test only applies of a display expansion kit has been mounted. There will be a small white target drawn on the display, click on it and it will go back to confirm the click. A new white one will be drawn in the next corner. When all four corners have been clicked it will look like this: The test program lets you draw on the display for ca 5 seconds. Test that the calibration result is ok. Copyright 2014 © Embedded Artists AB LPC4088 Experiment Base Board - User’s Guide Page 51 12. Test of shift register and LEDs. There will be a running light on the 8 LEDs. The test has now completed and it can end with two different results: PASSED. All the following conditions must be met: Green-RGB LED on The display will be GREEN The terminal program will show the following text: Test PASSED FAILED. Depending on what failed one or more of these will be shown: Red-RGB LED on The display will be RED The terminal program will show the following text including how many of the tests that failed: Test FAILED (2 failed parts) Copyright 2014 © Embedded Artists AB LPC4088 Experiment Base Board - User’s Guide Page 52 9 Further Information The LPC4088 microcontroller is a complex circuit and there exist a number of other documents with a lot more information. The following documents are recommended as a complement to this document. [1] NXP LPC4088 Datasheet http://www.nxp.com/documents/data_sheet/LPC408X_7X.pdf [2] NXP LPC4088 User’s Manual http://www.nxp.com/documents/user_manual/UM10562.pdf [3] NXP LPC4088 Errata http://www.nxp.com/documents/errata_sheet/ES_LPC407X_8X.pdf [4] ARM Processor Documentation Documentation from ARM can be found at: http://infocenter.arm.com/. [5] Information on different ARM Architectures http://www.arm.com/products/processors/technologies/ instruction-set-architectures.php [6] ARMv7-M Architecture Reference Manual. Document identity: DDI 0403D http://infocenter.arm.com/help/index.jsp?topic=/com.arm.doc.ddi0403c/index.html [7] Cortex-M4 Technical Reference Manual. Revision: r0p1 http://infocenter.arm.com/help/index.jsp?topic=/com.arm.doc.ddi0439c/index.html [8] LPCware, NXP's community for developers http://www.lpcware.com/ [9] LPCXpresso IDE: NXP's low-cost development platform for LPC families, which is an Eclipsebased IDE. http://www.lpcware.com/lpcxpresso [10] LPCOpen - a Software Development Platform for NXP's LPC Microcontrollers http://www.lpcware.com/lpcopen [11] LPC2000 Yahoo Group. A discussion forum dedicated entirely to the NXP LPC2xxx series of microcontrollers. http://tech.groups.yahoo.com/group/lpc2000/ [12] mbed.org, the official site for mbed development and gives access to all documentation and the on-line compiler. http://mbed.org Note that there can be newer versions of the documents than the ones linked to here. Always check for the latest information/version. Copyright 2014 © Embedded Artists AB