1
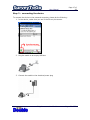
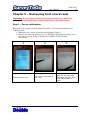
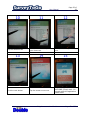
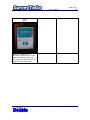
User Manual
Page 1 of 26
SurveyToGo
Enterprise
PDA User Guide
All rights reserved to Dooblo
Page 1 of 26
User Manual
Page 2 of 26
Table of contents
Chapter 1 Working with the system .......................................................3
Logging in .............................................................................................................4
Surveys List screen..........................................................................................5
Survey details screen......................................................................................6
Backing up the data.........................................................................................6
Conducting the survey ...................................................................................7
Chapter 2 Connecting the device to the computer for the first
time ..............................................................................................................................8
Step 1 - Preparations......................................................................................8
Step 2 ActiveSync installation ...............................................................9
Chapter 3 Synchronizing results & surveys......................................16
Step 1 - Preparations....................................................................................16
Step 2 connecting the device ............................................................... 17
Chapter 4 Recovering from a hard-reset............................................ 20
Step 1 Device intialization ..................................................................... 20
Chapter 5 Updating the application ......................................................24
Step 1 General..............................................................................................24
Step 2 Automatically updating the application ...........................24
All rights reserved to Dooblo
Page 2 of 26
User Manual
Page 3 of 26
Chapter 1 Installing SurveyToGo on the
mobile device
Installation
SurveyToGo can be installed on your Windows Mobile device in 2 ways:
1. Through the SurveyToGo Designer application
2. Directly by using a CAB file.
The preferred way to install SurveyToGo is by using the Designer.
Installing SurveyToGo from the Designer:
In order to install SurveyToGo from the designer, please follow these steps:
1. Open up the Designer
2. Login using your user name and password.
3. Click the Tools > Install To Mobile Device option
4. Follow the onscreen instructions.
Note: SurveyToGo requires the .NET Compact Framework and SQL Mobile on your
device. When installing from the designer, all necessary components are installed
along with SurveyToGo.
Installing SurveyToGo directly by using a CAB file:
SurveyToGo requires the following components in order to run correctly:
1. .NET Compact Framework v2.
2. SQL Mobile Edition.
To download and install these components, please refer to:
www.microsoft.com/mobile
Please make sure that these component are installed prior to following these steps
(note: when using the Designer to install SurveyToGo, there is NO NEED to install
any of these components as the Designer installs them for you):
1. Transfer the .CAB file to your device by using the File Explorer.
2. Use the File Explorer on your device to locate the .CAB file, then tap the file
once to start the installation.
All rights reserved to Dooblo
Page 3 of 26
User Manual
Chapter 2
Page 4 of 26
Working with the system
Logging in
The first screen of the application is the login screen.
In this screen you should enter your login details as you have received them from
the system administrator and tap the Login button to login.
All rights reserved to Dooblo
Page 4 of 26
User Manual
Page 5 of 26
Surveys List screen
After successfully logging into the system, you will be transferred to the survey list
screen, where you can view a list of all the available surveys and their current results
on the device.
Select the desired survey and tap it >>>
The survey will be loaded
In order to select the desired survey, simply tap once on the survey.
Important: Loading the survey for the first time can take a while depending on the
length and size of the survey. This is a normal condition. Simply wait for the wait
cursor to stop spinning.
All rights reserved to Dooblo
Page 5 of 26
User Manual
Page 6 of 26
Survey details screen
After loading the survey you will reach the following survey details screen. From this
screen you can start conducting surveys.
In order to start conducting a new survey, simply tap the big green Start button, and
the screen will turn to the conducting screen.
Backing up the data
In order to backup the collected data to the attached external backup card, tap the
big blue Backup button.
All rights reserved to Dooblo
Page 6 of 26
User Manual
Page 7 of 26
Conducting the survey
Conducting the survey consists of reading the question, entering the proper answer,
and navigating the survey as needed. 2 sample screens from a sample survey are
shown below. Notice the navigation bar which is used to navigate through the survey
as needed.
To cancel the survey and go back to the previous screen, you can tap the red cancel
button as shown in the above figure.
You can also stop conducting the survey to later continue working on it by pressing
the blue disk button.
Once you have answered all the questions in the survey, the survey is marked as
completed and you are redirected back to the previous screen, the Survey Details
screen. Notice the list of results is now updated with the new survey result:
All rights reserved to Dooblo
Page 7 of 26
User Manual
Page 8 of 26
Chapter 3 Connecting the device to the
computer for the first time
Important: Do not connect the cradle to the computer
until instructed to do so!
Step 1 - Preparations
Before installing, please make sure of the following:
1. Your personal computer is switched on.
2. Your internet connection is turned on and is working. To check, open up
internet explorer and go to www.news.com if the site loads up, your internet
connection is turned on & working.
All rights reserved to Dooblo
Page 8 of 26
User Manual
Step 2
Page 9 of 26
ActiveSync installation
ActiveSync allows for connecting your device to your personal computer. To install
ActiveSync, please do the following:
1. Insert the SurveyToGo installation CD to your CD/DVD drive.
2. Run the Setup.exe file from your CD by doubling clicking the Setup.exe file
located on the CD. The following screens will show up:
and right after that:
Then this one .
All rights reserved to Dooblo
Page 9 of 26
User Manual
Page 10 of
26
3. After a few seconds the following screen will appear. Press the Next button:
Then press Next in the following screen as well:
All rights reserved to Dooblo
Page 10 of 26
Page 11 of
26
User Manual
4. The computer will start showing a percentage bar. Please allow the computer
to go all the way up to 100%.
5. Once 100% has been reached, you should see the following screen.
Do not press any key!:
6. Connect the cradle of the device to an empty USB socket.
All rights reserved to Dooblo
Page 11 of 26
User Manual
Page 12 of
26
7. Connect the cradle to the electrical plug point:
8. Put the device onto the cradle:
All rights reserved to Dooblo
Page 12 of 26
User Manual
Page 13 of
26
9. After a few seconds to following screen will appear. Press the Next button
10. Press Next once more:
All rights reserved to Dooblo
Page 13 of 26
User Manual
Page 14 of
26
11. In the following screen, clear all the checkboxes (by pressing each selected
checkbox once), then click Next
12. Press the Finish button on the following screen:
All rights reserved to Dooblo
Page 14 of 26
User Manual
Page 15 of
26
13. In a few seconds, the following screen will appear. Please do not continue
until the green circle stops spinning.
spinning green circle
>>>>
turns into a steady green circle
14. The first time installation procedure is now complete. To synchronize your
results and surveys, please turn to Chapter 3 Synchronizing results &
surveys.
All rights reserved to Dooblo
Page 15 of 26
User Manual
Chapter 4
Page 16 of
26
Synchronizing results & surveys
Important: If this is the first time you are connecting the device to your
personal computer, please do not continue and turn to Chapter 2
Connecting the device to the computer for the first time.
Step 1 - Preparations
Before synchronizing the device, please make sure:
1. The personal computer is turned on.
2. There is a small circle, located on the bottom right corner of your desktop.
The circle can be either green or gray.
Or
3. Your internet connection is turned on and is working. To check, open up
internet explorer and go to www.news.com if the site loads up, your internet
connection is turned on & working.
4.
All rights reserved to Dooblo
Page 16 of 26
Page 17 of
26
User Manual
Step 2
connecting the device
To connect the device to the personal computer, please do the following:
1. In the device, make sure you are in the Survey List screen.
2. Plug the cradle to an empty USB slot
3. Connect the cradle to the electrical power plug
All rights reserved to Dooblo
Page 17 of 26
User Manual
Page 18 of
26
4. Put the device onto the cradle
5. Make sure the ActiveSync icon (located on the bottom right corner of your
desktop) is green:
6. Important: If you are seeing the following screen, Please
turn to Chapter 2 Connecting the device to the computer
for the first time. Once completed, continue with the
instructions.
All rights reserved to Dooblo
Page 18 of 26
User Manual
Page 19 of
26
7. After a few seconds, the device will start synchronizing. A small green
spinning circle will appear on the bottom of the device:
8. After a few minutes, the synchronization will be completed. The small green
icon will stop spinning, and you will notice that all the survey have 0 results.
9. Once synchronization is complete, you can turn off the device and allow it to
fully charge.
All rights reserved to Dooblo
Page 19 of 26
Page 20 of
26
User Manual
Chapter 5
Recovering from a hard-reset
Important: Do not perform the following actions unless your device has
performed a hard-reset due to battery depletion or any other reason.
Step 1
Device intialization
Before you can continue working with SurveyToGo, you will need to perform the
following steps:
1. Make sure your screen is like the one depicted in figure 1
2. Perform the following steps one by one WITHOUT skipping any of them, you
can refer to the on-screen instructions in addition to the following
instructions:
1
Tap the screen once
2
Tap once in the center of
the cross
3
Keep tapping on the
center of the cross until
the screen changes. This
might take 5 taps or
more.
All rights reserved to Dooblo
Page 20 of 26
Page 21 of
26
User Manual
4
Click the Next button
7
Tap and hold on the line
marked 11 until a menu
pops up.
5
Tap & hold on the white
box until a menu appears.
6
Tap the Cut option
8
Select Paste from the
menu
9
Tap the Next button
All rights reserved to Dooblo
Page 21 of 26
Page 22 of
26
User Manual
10
Tap the selection box
13
Click the next button
11
Scroll the screen until you find
your time-zone
12
Select your country timezone
14
Tap the screen once more
15
In this screen, do not do
ANYTHING. Simply wait ~20
seconds while the application
installs itself.
All rights reserved to Dooblo
Page 22 of 26
User Manual
Page 23 of
26
16
Once the installation in
finished, perform a soft-reset.
After the device is done with
the soft reset, SurveyToGo will
load with the latest data.
All rights reserved to Dooblo
Page 23 of 26
User Manual
Chapter 5
Step 1
Page 24 of
26
Updating the application
General
SurveyToGo includes an auto-update process. This process checks to see if there are
any updates to the application each time you synchronize the device.
Step 2
Automatically updating the application
Once you synchronize the device, the auto-update process will check for an update.
If it finds one, the following message will be displayed:
To update the application, please follow the following instructions:
All rights reserved to Dooblo
Page 24 of 26
Page 25 of
26
User Manual
1
2
Press the YES button, and wait for
approximately 30 seconds.
Once this message comes up, press the
OK button and wait for application to
close.
All rights reserved to Dooblo
Page 25 of 26
Page 26 of
26
User Manual
3
4
Do not do anything on this screen
Once the application loads up again,
simply login to complete the update
process.
All rights reserved to Dooblo
Page 26 of 26