1
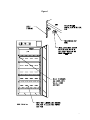
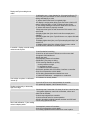
4
Section
CONTROL PANEL OVERVIEW (See Figure 2)
4.1
Power Switch: The main power I/O (On/Off) switch on the panel controls all the
power to the incubator. It must be in the I/On position before any systems are
operational.
4.2
Main Temperature Controller: Marked C°, this controller contains the digital
temperature display, UP and DOWN arrow pads, HIGH and LOW alarm indicators
and an alarm MUTE indicator.
A. Digital Temperature Display indicates the actual temperature within the
chamber to .1°C.
B. UP and DOWN Arrow Pads are used for inputting the set point, calibrating
the display and muting or unmuting the audible alarm.
C.
HIGH and LOW Alarm Indicators will light whenever there is an alarm
condition associated with the temperature within the incubator.
D. Alarm MUTE Indicator will light whenever the audible alarm has been muted.
4.3
Heating: This pilot lamp is on whenever the temperature controller is energizing
the heating element. The element will go on and off as heat is needed to maintain
the set point temperature.
4.4
High Limit Thermostat: Marked SET HIGH LIMIT, the High Limit Thermostat is
completely independent of the Main Temperature Controller and functions as an
override control. If at any time the Main Temperature Control fails in the ON
position, the chamber temperature is then limited to the High Limit Thermostat set
point which is manually set approximately 1°C above the Main Controllers set
point. Note that the HEATING indicator will continue to function under the control
of the High Limit Thermostat. It is not recommended that the unit be allowed to
operate for an extended period of time using the High Limit to control temperature
as temperature uniformity will suffer.
4.5
Safety Activated: This pilot lamp is on whenever the High Limit Thermostat has
taken control of the incubator and shut down the elements. Under normal
operating conditions this pilot lamp should never be on.
8