1
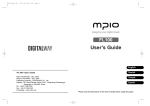
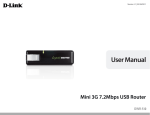
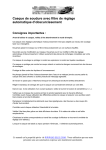
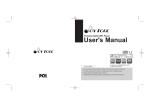
www.smax.com.tw AV1 2MP IP66 Small Vandal Dome Camera User Manual Ver 1.2 CONTENTS Chapter I. 1.1. Read Before Use 1 1.2. Physical Description 2 1.3. Safety Instructions 4 1.4. Package Contents 5 1.5. Electromagnetic Compatibility 6 3.4. Using Mobile APP 16 3.5. Using VMS 17 Chapter 4. 4.1. Main Page 22 4.2. Client Settings 23 Chapter 5. Chapter 2. 2.1. Hardware Installation 7 2.2. SMAX Finder Installation 8 2.3. Ready to Use 9 Chapter 3. 5.1. System Setup 24 5.2. Network Setup 28 5.3. Video & Audio Setup 38 5.4. SD Card Setup 51 5.5. Event Setup 55 3.1. Network Deployment 10 5.6. Maintenance 61 3.2. Using Web Browsers 14 5.7. Device info 64 3.3. Using RTSP Players 15 www.smax.com.tw CONTENTS Chapter 6. 6.1. URL Commands 66 6.2. Technical Specifications 81 6.3. Onvif Supports List 83 6.4. Liability 94 6.5. Copyright 95 www.smax.com.tw Chapter I. 1.1. Read Before Use This network camera is a professional equipment for surveillance purpose. Please comply with each national laws to prevent from any relevant privacy violations before use. In order to operate this network camera, it require a basic knowledge of network structure. For further use of project application, it requests an advance level of knowledge in lens optics selection, network structure design, storage planning and software capability. This product service may be different since the diversity of distributors. We suggest to purchase SMAX product from SMAX direct distributors or system integrators to get the most complete after service. Please first check the package contents are complete with nothing missing. Then, carefully read through all attentions and instructions before use. www.smax.com.tw P 01 Chapter I. 1.2. Physical Description 1.2.1. Mechanical and hardware interface AV1 is an internal built fixed lens network camera. It can be placed on the wall or ceiling. With its IP66/IK8 design, it is suitable to locate in a both indoor and outdoor environment where it needs to have vandal proof function. MicroSD/SDHC Card Slot AV1 accepts both POE or DC 12V as power supply. Please noted that the DC 12V adapter is an extra accessory which does not include in this package. Light Sensor IR LED AV1 supports two ways audio function which can connect with an external speaker and microphone. DIDO Terminal Block AV1 has micro SD/SDHC card slot built in for recording storage function. DC 12V Ethernet 10/100 RJ45 port www.smax.com.tw Audio Out RCA port Audio In RCA port P 02 Chapter I. 1.2. Physical Description 1.2.2. Digital Input (DI) & Digital Output (D0) Item 1 2 3 Digital Input Pin Notes Trigger is “Off”, DO connect to GND Trigger is “On”, DO is floating Specifications Max load: 30mA,30VDC Description DO GND DI CAMERA H DO RL Power Trigger GND GND Digital Output Pin Notes DI is floating, trigger is “high” DI is high, trigger is “low” CAMERA H DI Specifications Max current input: 30mA Suggested Component Value: SW RL Power(VDC) 3.3V 5V 12V RL(Ω) 100Ω 200Ω 510Ω Power Trigger GND L GND www.smax.com.tw P 03 Chapter I. 1.3. Safety Instructions Please carefully read through below safety instruction to prevent any damage of camera and person or any reason that will cause the invalid of the warranty. Network camera is a highly delicate electronic equipment. Please do not stumble or falling from high. It will cause damage to the camera. Please do not store the camera in a environment that the temperature or humidity are exceed camera’s specification. Please also prevent from the direct expose of the sun light. Network camera is not a toy. Please prevent from the use of the child for any accident possibility. Please be careful when operate this network camera to prevent from any possibility that cause the device or components to invade your body. Please do not disassemble the camera to prevent from any abnormal function or operation. When place the camera in a high humidity or wet environment, please select the IP66/67 level products. Or else, please pus the camera in a outer housing box to prevent from damage. Please do not put any wire or cable within the camera device to prevent from damage. Cause of heat is a normal situation when operate network camera, please prevent direct contact when the camera is in use for a while. Please do not attach DC/AC power directly to the camera’s DI/DO port. Please check the correct direction when insert the SDHC card into camera device. Please contact your sales channel or find a regional SMAX distributor for any warranty issues. www.smax.com.tw P 04 Chapter I. 1.4. Package Contents Description Qty Network Camera 1 Tools package (Screw Kit…etc.) 1 CD: A. Software: SMAX Finder x 1 SMAX VMS64 x 1 Network Camera 1 B. Doc: SMAX All Products Datasheet, User Manual, Quick Installation Guide CD www.smax.com.tw P 05 Chapter I. 1.5. EMC(Electromagnetic Compatibility) FCC Statement This device compiles with FCC Rules Part 15. Operation is subject to the following two conditions. (1.) This device may not cause harmful interference, and (2.)This device must accept any interference received, including interference that may cause undesired operation. This equipment has been tested and found to comply with the limits for a Class A digital device, pursuant to Part 15 of the FCC Rules. These limits are designed to provide reasonable protection against harmful interference when the equipment is operated in a commercial environment. This equipment generates, uses, and can radiate radio frequency energy and, if not installed and used in accordance with the installation manual, may cause harmful interference to radio communications. Operation of this equipment in a residential area is likely to cause harmful interference, in which case the user will be required to correct the interference at his own expense. CE Mark Warning This is a Class A product. In a domestic environment, this product may cause radio interference, in which case the user may be required to take adequate measures. www.smax.com.tw P 06 Chapter 2. 2.1. Installation Setup 3. Please adjust the tilt angle and focus Setup 6. as your desire. Please follow below instructions to setup Please re-mount the cover and tight it up. your network camera. Setup 1. Please remove the front cover by using screw driver from the tools package. And insert micro SD card if necessary. Setup 4. Please connect this network camera Please make sure the network to a *PoE switch, PoE injector, or DC camera cover must keep closed and 12V the network cable output is at adapter. Make sure all connection is stable . Setup 2. Setup 7. correct location. *. The network camera Please fix the camera on the wall or supports both PoE power ceiling with supplied screws. Make or DC 12V adapter sure they are tightly attached. Setup 5. Please connect the network cable to network camera. DC 12V www.smax.com.tw P 07 Chapter 2. 2.2. SMAX Finder Installation Basic structure of a network camera setting is as shown on the right picture: (In a normal application, it only needs to be within a local LAN structure to meet the SMB surveillance requirement.) SMAX Finder Installation: Please read the CD from the package content. Then copy SMAX Finder.exe file to your personal PC. Run the program until the SMAX Finder windows display as shown on the right picture. SMAX Finder procedure: Network Camera IP address: 192.168.1.99 Subnet Mask: 255.255.255.0 Gateway: 192.168.1.1 4+2 ports PoE Switch PC IP address: 192.168.1.10 Subnet Mask: 255.255.255.0 Gateway: 192.168.1.1 VR1 or NVR / VMS IP address: 192.168.1.88 Subnet Mask: 255.255.255.0 Gateway: 192.168.1.1 Press Discover button so the program will search all SMAX camera’s IP within the local LAN. Choose a specific camera, then press Link button. The program will run the default browser to set up camera connection to its web UI access page. Notification: SMAX camera default IP setting is DHCP mode. Default IP address is 192.168.1.99. Default username and password is both admin. www.smax.com.tw P 08 Chapter 2. 2.3. Prepare to Access Access procedure: When link from SMAX Finder to the camera’s web UI access page, please enter default username and password (ID: admin / PW: admin) for further access. When first connect to a SMAX camera, it needs to install some plugin to your computer. Please follow instruction and press allowed to proceed installation process. After installation of ActiveX plugin, you should be able to see the video stream from camera as shown on the below picture. www.smax.com.tw P 09 Chapter 3. 3.1. Network Environment Setting Internet 網際網路 SMAX camera supports both intranet and internet structure. Hereby to supply different ways of network setting when SMAX camera is under internet environment structure. A. B. C. Network Camera xDSL Modem True IP address setting Transfer from UPnP router PPPoE connection setting Structure as shown on the right Please run the SMAX Finder and search the local LAN camera. Please enter you static true IP address which provided by your ISP service vender. Then press enter. Notification: Please contact your ISP vender for further static true IP address setting or service. 4+2 ports PoE Switch Router VR1 PC Notification: When you have the true IP address, you may set your network camera in static IP mode. Then you may use the internet browser by entering this static true IP address to access your network camera. If your true IP address was set to your router, you may use the port forwarding function and turn on the UPnP function within your network camera to connect. This is the solution that solves the problem when a SMB surveillance project has lack of true IP address to manage. However, please noted that the performance of the camera will be strongly depends on the performance of the router. It may cause abnormal connecting due to this issue. <Please refer to 3.1. B. setting > Internet and Intranet setting structure illustration www.smax.com.tw P 10 Chapter 3. 3.1. Network Environment Setting A. True IP address setting Please run the SMAX Finder and search for the camera within local LAN. Select the camera for internet setting and click Change IP button. Select static mode and enter your true IP address, Subnet mask, Default gateway, and the username and password of the camera. Then press OK to finish setting. It will prompt below pop out to show the success message. Notification: Please contact your ISP vender for further static true IP address setting or service. www.smax.com.tw P 11 Chapter 3. 3.1. Network Environment Setting A. Transfer from UPnP router Please access to the camera’s web UI page and select Configuration button. Select Network button. Please assign a static IP address of your local network. And enter your gateway address and DNS numbers of your router. Please select Enable UPnP Discovery and Enable UPnP Port Mapping. Then press Apply button to finish setting. Notification: Network camera’s UPnP function may have some compatible issue with router’s UPnP function. For your router’s further setting, please kindly refer to your router’s instruction about Port Forwarding and UPnP setting. www.smax.com.tw P 12 Chapter 3. 3.1. Network Environment Setting A. PPPoE connection setting Please access to the camera’s web UI page and select Configuration button. Select Network button. Please select PPPoE and enter your username and password. Then press Apply button to finish setting. Notification: When select PPPoE connection setting, please make sure your network camera is equip with a true static IP address. If so, you can access to the camera by entering the IP address via internet. If not, please refer to our DDNS setting. www.smax.com.tw P 13 Chapter 3. SMAX Network Camera connection: SMAX network camera supports multiple connections for accessing. Includes multiple browsers connection, video player connection that supports RTSP, SmaxViewer APP connection, or SMAX VMS or CMS software to access. Each connection fulfill different surveillance application for different purpose. 3.2. Accessing via Web UI You can select browser for the purpose of monitoring, system setting, SD card recording and searching, local computer recording, audio function…etc. Notification: 1) We suggest to use IE 9/10/11 and above version to access SMAX network camera. 2) Other than IE browser, SMAX network camera also support both Google Chrome and Mozilla Firefox browsers for accessing. 3) If using Google Chrome and Mozilla Firefox to access, those browsers will need Quick Time to play the live video. If your computer has not install Quick Time software, please download and install it. Then refresh the browser. www.smax.com.tw P 14 Chapter 3. 3.3. Accessing via RTSP Player SMAX network camera supports accessing via RTSP player. Below using VLC player as a reference instruction: Please run the VLC player and select Media(M) button. Then select Open network stream(N). It will pop out the setting window. Please enter RTSP address and press Play button. It should link to the camera for the live video as shown in below picture. Notification: SMAX network camera provide three RTSP stream: Main stream address: rtsp://Camera’s IP/stream1 Second stream address: rtsp://Camera’s IP/stream2 Mobile stream address: rtsp://Camera’s IP/mobile www.smax.com.tw P 15 Chapter 3. 3.4. Accessing via Mobile APP SMAX network camera supports accessing via mobile APP with both iOS and Android system. Below using iPad mini as a reference instruction: Please download SmaxViewer from the APP store to your iPhone or iPad device. Please run the SmaxViewer APP and press + button. It will goes to the adding camera page. Please enter your camera’s IP address, Username and password setting. Then press Apply button to store the setting. Please select the added camera from the Device List to access camera. Notification: SmaxViewer support horizontal display. www.smax.com.tw P 16 Chapter 3. 3.5. Accessing via SMAX VMS Setup 3. Setup 4. Please select Setup.exe from the SMAX VMS folder of CD content. Follow installation procedure and setting. Then you can run the SMAX VMS software to use. 3.5.1. SMAX VMS Installation procedure: Setup 1. Setup 5. Setup 2. www.smax.com.tw P 17 Chapter 3. 3.5. Accessing via SMAX VMS Start to use your SMAX VMS software by clicking the shortcut from your desktop after installation is complete. 3.5.1. SMAX VMS adding camera procedure: Run the SMAX VMS software and enter the Username and Password. Notification: Default username is admin. Password leave as blank. Select System icon to your system setting page. www.smax.com.tw P 18 Chapter 3. 3.5. Accessing via SMAX VMS Please select Add Camera button to you adding page. There are two ways of adding new camera. One is search the camera within local LAN. Press Search button so the VNS will automatically search all SMAX camera within local LAN. Second way is to add camera over internet structure by entering IP address, HTTP port, Username, Password and Name. Then press Search Server button. Notification: When press Search Server button, it will pop out below confirmation window. Press Yes to continue process. www.smax.com.tw P 19 Chapter 3. 3.5. Accessing via SMAX VMS After search sever process, you may see the further detail setting if VMS is able link to your network camera. Please select all possible function that you wish to enable, such as Audio, Recording, PTZ and Operate camera. Notification: Different camera device has different function. If one function does not work, please first check whether your camera has the function. Operate camera function can wait till all cameras have been add to VMS. Then Operate all cameras at the same time. Select Add button to finish setting. You may see your added camera in the Camera List. www.smax.com.tw P 20 Chapter 3. 3.5. Accessing via SMAX VMS Press Confirm button at last and it will pop out the confirmation windows. Press Yes to store and finish your setting. After above procedures, you should be able to watch all live video from the live view page of VMS. Notification: For further SMAX VMS software setting or operation, please kindly refer to its manual. www.smax.com.tw P 21 Chapter 4. 4.1. Home page You can access SMAX network camera via web browser to monitor live view, manage setting, SD card recording…etc. There is a complete introduction procedure of all function in the following chapter four and five. 1 Homepage function list: 1) Live view screen 2) Select stream format 3) Digital output on/off switch 4) Select language 5) Client settings 6) System configuration 7) Live view operation control list Main function List 7 2 Notification: Function list of icons as shown on the picture to the right. Original size display 3 5 4 www.smax.com.tw Live view operation list 6 Stream play/stop Snapshot Recording Digital zoom Two way audio operation P 22 Chapter 4. 4.2. Client Settings 4.2.1. Protocol option This setting is to define your protocol option. Default set as RTSP/RTP over TCP. This protocol make sure that all image data must be transferred. But if you choose the image quality comes first, then you can change to RTSP/RTP over UDP. If your network environment only allows to connect with web page, then you can change to HTTP protocol. 4.2.2. Storage Option This setting is to define your storage option. When doing a recording action, you can set where the recording file saves to. Press Browse button to set your folder path name. You can also name the Prefix of recording file and select to Add date and time suffix to file name. At last, press Apply to complete setting. www.smax.com.tw P 23 Chapter 5. 5.1. Configuration Settings In the menu of configuration, it includes all operating function for settings, maintenance, log and device information…etc. Configuration menu as shown below: 1) System 2) Security 3) 4) 5) 6) 7) Network IP Filter Video Audio Motion Detection 8) 9) 10) 11) 12) Privacy Mask Event Recording SDHC Log 13) Device Info 14) Maintenance www.smax.com.tw P 24 Chapter 5. 5.1. Configuration Settings 5.1.1. System This system page display your network camera’s Host Name, LED Indicator ON/OFF Switch and set the Date and Time. Date and Time Setting procedure : Select your network camera’s Time Zone and enable Daylight Saving if needs to. There are four ways to synchronize camera’s time: Keep the current date and time, Synchronize with computer time, Synchronize with NTP Server and Set Manually. For a small surveillance system, we suggest to Synchronize with computer time. Press Apply button to complete setting. For a medium or above surveillance system, we suggest to Synchronize with NTP Server. Please enter your NTP Server Address and select Update Interval. Then press Apply to complete setting. www.smax.com.tw P 25 Chapter 5. 5.1. Configuration Settings 5.1.2. Security Select Security button under the Configuration menu. It will goes to setting page. This function is to manage the user of this camera by setting Administrator and Account List. Administrator Setting Procedure : Please enter a new Password and Retype Password. Notification: Administrator password can be a composition of English letters and Arabic numerals. But the length must kept between 4~8 characters. No special character allow. And please keep notice between capital and lowercase English letters. Press Modify to complete setting. www.smax.com.tw P 26 Chapter 5. 5.1.2. Security Account List Setting Procedure : Please enter Username, Password, Retype Password. Notification: Username can be a composition of English letters and Arabic numerals. But the length must kept between 1~32 characters. No special character allow. And please keep notice between capital and lowercase English letters. User password can be a composition of English letters and Arabic numerals. But the length must kept between 4~8 characters. No special character allow. And please keep notice between capital and lowercase English letters. Select Authority then press New to add an account. Notification: Authority has two types, User or Guest. The privilege of a guest is limited to watch the live view from the home page only. Without any setting authority. An User allows to operate all function within the home page and modify the client setting. If access to configuration menu, only LOG and Device Info allowed. www.smax.com.tw P 27 Chapter 5. 5.2. Network Settings Default network setting of camera is set as LAN type, DHCP IPv4/IPv6 and Enable UPnP Discovery. Which means when this network camera set in a local LAN network environment, it will get a dynamic IP from DHCP server each time when camera turns on. 5.2.1. General Network Setting 5.2.1.1. General Network Setting Argument When your surveillance system has lower than 4pcs of network camera, we suggest to set DHCP IPv4/IPv6. You can search the camera’s IP with Smax Finder software. Please refer to chapter 3.1 for further description. If the total pcs of network camera is greater than 4pcs. We suggest to use Static IPv4/IPv6. Camera’s port setting as shown below: a) HTTP Port: 80 b) RTSP Port:554 c) RTP Data Port:5556 Notification: If the default setting cannot connects to network camera properly, please kindly consult with you network managing staff first. www.smax.com.tw P 28 Chapter 5. 5.2.1.1. Intranet Static IPv4/IPv6 Setting Static IPv4 Setting Procedure : Select Static IPv4/IPv6 under Network Type column. Please enter IP Address (IPv4), Subnet Mask, Gateway, Primary DNS and Secondary DNS information. Press Apply to complete setting. Notification: For static IP setting, please refer to the picture as shown on bottom right. If the LAN IP segment is 192.168.1.xxx. Please enter your router’s IP address for the Gateway. We suggest the camera to use from 192.168.1.99 ~ 192.168.1.200 www.smax.com.tw P 29 Chapter 5. 5.2.1.2. Internet Static IPv4/IPv6 Setting Static IPv4 Setting Procedure : Select Static IPv4/IPv6 under Network Type column. Please enter IP Address (IPv4), Subnet Mask, Gateway, Primary DNS and Secondary DNS information. Press Apply to complete setting. Notification: Please contact your ISP service vender for further interne static IP setting. www.smax.com.tw P 30 Chapter 5. 5.2.1.3. PPPoE Setting PPPoE Setting Procedure : Select PPPoE under Network Type column. Please enter Username and Password. Press Apply to complete setting. Notification: PPPoE is a type that supports xDSL network connection. Please contact your ISP service vender for the username and password. For PPPoE connection, network camera will get an IP Address for connection. Some ISP vender may provide a static IP address. So the user only needs to enter that IP on the IE browser, then you will able connects to the network camera. If you ISP vender does not supply PPPoE static IP, please kindly refer to the DDNS setting in Advanced Network Setting. www.smax.com.tw P 31 Chapter 5. 5.2.2. Advanced Network Setting Advanced network setting includes Multicast, Bonjour, Qos, DDNS, HTTPS function setting. 5.2.2.1. HTTPS Setting HTTPS Setting Procedure: Select Advanced page under Network page. Select Enable HTTPS. Default HTTPS Port set as 443. Press Apply to complete setting. www.smax.com.tw P 32 Chapter 5. 5.2.2.2. DDNS Setting DDNS setting must first get a DDNS address from a DDNS service website. That DDNS service website should provide you the Host Name, and let you do the setting on Username and Password. Notification: SMAX network camera provides three DDNS service website: DynDNS.org、TZO.com and No-ip. You can choose either one of the website to start you DDNS Host Name registration. DDNS Setting Procedure: Select Advanced page under Network page. Select Enable DDNS. Then enter Host Name, Username and Password. Press Apply to complete setting. www.smax.com.tw P 33 Chapter 5. 5.2.2.3. Multicast Setting Multicast Description: A normal connection between computer to network camera is a single point delivery. Which means sending a stream packet from camera to one computer only. For a multicast function is to send the stream data to one point, but you can set multiple computer as this point recipient. SMAX network camera is distinguished by the multicast group address. Its IP address range is from 232.0.0.0 to 232.255.255.255 in a class D. A class D is a group address which the network camera will send the stream packet to. Then the recipient will inform the router to join this group. Multicast Setting Procedure: Select Advanced page under Network page. Select Enable Multicast. Then enter Multicast Group Address and all Multicast parameters. Suggest to keep the default setting. Press Apply to complete setting. www.smax.com.tw P 34 Chapter 5. 5.2.2.4. QoS Setting Via QoS setting, it can ensure the video image and audio stream comes first in bandwidth. So the transfer stability will not effected by other network transmit packets. QoS Setting Procedure: Select Advanced page under Network page. Select Enable QoS. And select whether enable Video, Audio or Both, then enter its DSCP value. Press Apply to complete setting. Notification: DSCP (Differentiated Services Code Point). In Dec. 1998, IETF published a QoS classification standard of Diff-Sery (Differentiated Service). DSCP using six bits and its range from 0~63. www.smax.com.tw P 35 Chapter 5. 5.2.2.5. Bonjour Setting Bonjour is called as a Zero-configuration networking, which it can automatically find the device within local LAN network. Bonjour is a standardize protocol that allows for each device to find each other without a IP address or DNS server. Bonjour Setting Procedure: Select Advanced page under Network page. Select Enable Bonjour. Press Apply to complete setting. www.smax.com.tw P 36 Chapter 5. 5.2.3. IP Filter Smax network camera has an IP Filter function. It can manage to set a white list for Accepted IP list or black list for Deny IP list. We suggest to use one rule only to keep hte connecting performance. Normally, we use white list rule in a surveillance project. IP Filter Setting Procedure: Select IP Filter button under the Configuration menu. Select Enable IP Filter. Enter the IP List under Accepted IP list column, then press New button to add into white list. Press Apply to complete setting. Notification: Setting black list for Deny IP list is same as above procedure. www.smax.com.tw P 37 Chapter 5. 5.3. Video & Audio Setting This chapter includes all video setting, image adjusting, and two ways audio setting. Please kindly follow below chapter instruction to set the video setting accordingly.。 5.3.1. Video Setting 5.3.1.1. Main Stream Setting Main Stream Setting Procedure: Select Video button under the Configuration menu. Then goes to Video Setting page. Select your desire format under the Main Stream column. Default set as H.264 format. It can be changed to MPEG-4 format. Define your Resolution, Frame Rate(fps). Default set as 1920x1080 (1080P) @ 30fps. Define your Rate control type. You can choose between Video quality or Bitrate comes first. Default set as constant Bitrate of 5000kbps. Then press Apply to complete setting. www.smax.com.tw P 38 Chapter 5. 5.3.1.1. Main Stream Setting Rate Control Setting Description: For a network camera only environment, we suggest to set the Video quality as Normal. If your surveillance environment is equip with NVR or NAS server for recording purpose, we suggest to set a constant Bitrate numbers. Below is a suggestion chart for the video quality setting depends on your environment. Notification: When changing resolution setting, it will erase your privacy mask setting. Resolution Fps Bitrate suggestion 1920 x 1080 30 4000~6000 kbps 1920 x 1080 15 2000~3000 kbps 1920 x 1080 10 1000~2000 kbps 1280 x 960 30 2000~3500 kbps 1280 x 960 15 1000~2500 kbps 1280 x 720 15 800~2300 kbps 720 x 480 15 768~1500 kbps 640 x 480 15 512~1200 kbps 320 x 480 15 256~900 kbps www.smax.com.tw P 39 Chapter 5. 5.3.1.1. Main Stream Setting Main Stream and Storage Calculation: The best to set a constant Bitrate numbers is for easier calculation of recording storage space. Calculation of storage space as below for each network camera records for one hour. ----------------------------------------------------------------------Bitrate(kbps) / 8 x 60(sec.) x 60(min.) / 1000 / 1000 = The storage space for each hour(GB) ----------------------------------------------------------------------Example Question: If a camera set as 1920x1080 (1080P)@ 10fps, 1000kbps as Bitrate setting, how many space does a storage need to hold at least a monthly(30days) recording files? Answer: ----------------------------------------------------------------------1000(kbps) / 8 x 60 x 60 / 1000 / 1000 x 24(hrs) x 30(days) = 324(GB) / 1000 = 0.324(TB) ----------------------------------------------------------------------- www.smax.com.tw P 40 Chapter 5. 5.3.1.2. Secondary Stream(MJPEG) Setting Secondary Stream(MJPEG) Setting Procedure: Select Video button under the Configuration menu. Then goes to Video Setting page and select Enable under MJPEG column. Define your Video Resolution. There are three resolutions to choose from 720x480(Full D1), 640x480(VGA) and 320x240(QVGA). Define your Frame Rate(fps) and Video Quality. There are five segment of video quality from lowest to highest that you can choose from. Then press Apply to complete setting. We suggest to adjust this setting along side with the actual image. Notification: MJPEG compression rate is lower than H.264 and MPEG-4. But is best format for computer CPU performance when handling the image. Mostly applies to auto recognition application. The snapshot function only supports MJPEG format. Resolution Fps Bitrate suggestion 720 x 480 5 Normal (1000~2000 kbps) 640 x 480 5 Normal (800~1800 kbps) 320 x 480 5 Normal (200~600 kbps) www.smax.com.tw P 41 Chapter 5. 5.3.1.3. Mobile View Setting Mobile View Setting Procedure: Select Video button under the Configuration menu. Then goes to Video Setting page and select Enable under Mobile View column. Select with or without audio depends on your setting. Press Apply button to complete setting. Notification: Mobile stream is set as H.264 format for better compression rate. So it can improves the transmit performance under the mobile network. Default resolution is set as 320x240, 30fps. But the actual transfer speed is depends on your regional environment. The actual test result under Taiwan’s 3G network is only up to 15~20fps. Resolution fps Bitrate suggestion 320 x 240 Max. 30 Normal (500~1000 kbps) www.smax.com.tw P 42 Chapter 5. 5.3.2. Focus Setting AV1 network camera is equip with f=3.6mm fixed Lens. In order to adjust the focus point, user needs to remove the top cover first. Focus Setting Procedure: Please remove the top cover. Set your browser to the main page and double click on the screen to the full screen mode. It is easier to set focus point. Adjust the focus to get your desire clean view of your target by gently rotate the lens. Then put your top cover back on without touching the lens. www.smax.com.tw P 43 Chapter 5. 5.3.3. Image Setting After complete your video setting, you may now start to adjust image setting. Please kindly follow below instructions about image setting and exposure setting to get your ideally image quality. 5.3.3.1. Exposure Setting SMAX network camera supply two Exposure Mode. Default set as Auto mode. User can change to Manual mode for further exposure setting of day and night mode. www.smax.com.tw P 44 Chapter 5. 5.3.3.1. Exposure Setting Exposure Setting Procedure: Select Video button under the Configuration menu. Then goes to Image setting page and change the Exposure Mode from Auto to Manual. As an example picture on the right, the image is too dark during the night mode. So we can manually adjust the maximum Exposure Time to 1/15 Seconds. Press Apply button to complete setting and get a better image quality as shown in below picture. www.smax.com.tw P 45 Chapter 5. 5.3.3.2. Image Setting Image Setting Procedure: Select Video button under the Configuration menu. Then goes to Image setting page. Please enter appropriate Brightness, Contrast, Saturation and Sharpness numbers. Or use + and – button to do the adjusting. When above four numbers has changed, you can check the difference on the image. If reach to your ideally result. Then press Apply button to complete image settings. Notification: The range of Brightness, Contrast, Saturation and Sharpness numbers are from 0~255. Press Default button if you wish to go back to the original factory setting. Then press Apply button to complete image settings. These four numbers result might be different depends on different model. www.smax.com.tw P 46 Chapter 5. 5.3.2. Motion Detection Motion Detection function allows you to set up to three windows on the screen. So these selected areas can detect motion base on the Percentage and Sensitivity numbers that you input. Motion Detection Setting Procedure: Select Motion Detection Configuration menu. button under the Select Enable Privacy Mask, then select Enable under Windows 1 column and define a Title to this windows. Move and resize the Windows 1 windows and drag to the place on the screen that you wish to detect. Adjust Percentage and Sensitivity numbers to get a best motion detecting trigger. Press Apply button to complete Windows 1 setting. If wish to set up Windows 2 and Windows 3, please repeat above procedure. www.smax.com.tw P 47 Chapter 5. 5.3.3. Privacy Mask Privacy Mask function allows you to set up to three privacy mask that covers on your live view screen. It can be selected as different color with different mask. Once the mask has been set, the live view screen will no longer display those selected area. Privacy Mask Setting Procedure: Select Privacy Mask button under the Configuration menu. Select Enable Privacy Mask, then select Enable under Mask 1 column. Move and resize the Mask 1 windows and drag to the place on the screen that you wish to cover. Select mask 1 Filled Color. Press Apply button to complete Mask 1 setting. If wish to set up Mask 2 and Mask 3, please repeat above procedure. www.smax.com.tw P 48 Chapter 5. 5.3.5. Audio Settings SMAX AV1 network camera is equip with two ways audio function. It can connect to a microphone or a speaker. You may enable microphone function with a NVR or SMAX VMS for sound recording function. Or you may enable speaker function for brow casting function. Two ways audio setting procedure: Select Audio button under the Configuration menu. Select Enable Microphone. Then select Audio Type and Microphone Gain settings. Select Enable Speaker. Then select Audio Type. Press Apply button to complete setting. Notification: SMAX network camera’s audio might be differ from a different model. For certain model has already built in microphone. www.smax.com.tw P 49 Chapter 5. 5.4. SD Card Settings Smax GU1 has built in micro SD card slot for continuous, schedule, event and alarm recording function. It also supply for searching recorded file. SDHC card maximum memory size is up to 32GB. 5.4.1. SDHC Setting new SD card procedure: Select SDHC button under the Configuration menu. Select the Status page. If cannot see any SD card status, please make sure the SD card is properly insert. Then press Refresh button to make sure you can see the storage capacity status of the SD card. When first use a newly insert SD card, please first press the Format button to run the format procedure by SMAX network camera. It will pop out a confirmation windows. Press Yes to continues process. It will also show a successful message after the format process is complete. Also press Yes to finish setting. www.smax.com.tw P 50 Chapter 5. 5.4.2. Recording Recording to SD card procedure: Select Recording button under the Configuration menu. Select Enable External storage Recording function and set the maximum size of each recording file. We suggest to set 50MB as the maximum. Arrange your recoding schedule of day and time under the Recording Schedule column. Select save to Memory card under the Storage Option column. Then press Apply button to finish setting. Notification: Under the Enable External storage Recording column. You can also choose to save your recoding file to a Samba Server. For the limitation of each recording file size is from 1~50MB. Each recording file length will depends on the setting of your recording stream. www.smax.com.tw P 51 Chapter 5. 5.4.3. SD Card Recoding Search SD card recoding search procedure: Select Recording button under the SDHC page. Press All file button to see all recoding files from the SD memory card. Or you can search a specific period of recoding file by define your desire Start Time and End Time. Then press Search button to sort the recording files within this period. For all searched recording files, you can choose to download to your computer or to delete file from memory card. www.smax.com.tw P 52 Chapter 5. 5.4.3. SD Card Event Recoding Search When the event recording was triggered and saves to SD memory card. You can search all event files within Event page. SD card event recoding search procedure: Select Event button under the SDHC page. Press All file button to see all event recoding files from the SD memory card. Or you can search a specific period of event recoding file by define your desire Start Time and End Time. Then press Search button to sort the event recording files within this period. For all searched event recording files, you can choose to download to your computer or to delete file from memory card. www.smax.com.tw P 53 Chapter 5. 5.5. Event Settings Event setting function is to define a event trigger so the network camera can proceed an action base on this setting. You can set multiple event setting base on different needs of different applications. SMAX network camera has two was of event trigger settings: 1) Motion Detection 2) Digital Input signal Proceed actions includes: 1) 2) 3) 4) 5) Send to FTP Send to Email Apply to Samba Apply to SD Card Trigger Digital Output www.smax.com.tw P 54 Chapter 5. 5.5.1. Event Server Below is a description of Event Server. Before you set a new event, you can define a details of remote media server: FTP , SMTP and Samba. After setting, all event can proceed to your define FTP, SMTP or Samba Server by sending snapshots, e-mail or recording files. 5.5.1.1. FTP Server FTP Server setting procedure: Select Even button under the Configuration menu. Then select Event server page. Select Enable FTP server. Then enter your FTP server’s IP address, Port, Username, Password and File path Name. You may select Enable Passive Mode depends on your FTP server type. Notification: Default FTP Port is set as 21. Press Test FTP button to check if the FTP connection is successfully established. Press Apply button to complete setting. www.smax.com.tw P 55 Chapter 5. 5.5.1.2. SMTP Server The main function of a SMTP server it to send an email message when event was triggered. SMTP Server setting procedure: Select Event button under the Configuration menu. Then select Event server page. Select Enable SMTP server. Then enter your SMTP server’s IP address, Port, Sender e-mail address, Receiver #1 and #2 e-mail address and Subject. Also need to select whether there is an authentication where the Username and Password need to be set. You may select Require SSL Encryption and Start TLS depends on your desire. Notification: Default SMTP Port is set as 25. Suggest to name your e-mail subject as your device name for easy reference. Press Test SMTP button to check if the SMTP connection is successfully established. Press Apply button to complete setting. www.smax.com.tw P 56 Chapter 5. 5.5.1.3. Samba Server Samba Server setting procedure: Select Event button under the Configuration menu. Then select Event server page. Select Enable Samba server. Then enter your Samba server’s IP address, Storage Path, Username and Password. Press Test SMB button to check if the Samba connection is successfully established. Press Apply button to complete setting. www.smax.com.tw P 57 Chapter 5. 5.5.2. Media setting Media setting is to define what kind of media files should be save when a event was triggered. You can sent a snapshot or an event recoding file to your event server. Media setting procedure: Select Event button under the Configuration menu. Then select Media page. Select Snapshot or Video as your desire. You can set the pre and post event time when select video. The length of Pre Even and Post Event are both 0~5 seconds. Notification: The maximum event recording file size is 3MB. Please do not set the pre and post event time as 0 seconds to prevent error. We suggest to set the pre event as 2 seconds and post event as 3 seconds. Press Apply button to complete setting. www.smax.com.tw P 58 Chapter 5. 5.5.3. Adding New Event Setting Below is an example procedure for adding a new event. It is trigger by motion detection. Schedule time set as always alert. And the action set to trigger SD care recording and digital output alarm. Example of adding new event procedure: Select Event button under the Configuration menu. Select New button to the Setting page. Select Enable Setting and define your event title. Select Motion Detection as a trigger. Select Enable Schedule Time and select all days from Sunday to Saturday. Then set the time as Always. Select Enable SD Card and Enable Digital Output as your action. Also set your digital output time as 10 seconds. Press Apply button to complete setting. www.smax.com.tw P 59 Chapter 5. 5.6. Maintenance Settings This maintenance page includes Reboot, Factory Reset, Backup, Restore, and Upgrade function. 5.6.1. Reboot Reboot procedure: When press Reboot button, it can remotely reboot the camera. 5.6.2. Factory reset There are two ways of factory reset procedure. One is completely reset back to factory default setting. The other one is reset back to default setting except IP address and time setting. Reset procedure: When press Reset button, it can remotely reset the camera. www.smax.com.tw P 60 Chapter 5. 5.6.3. Backup SMAX camera can back up your device setting to either save to your local computer or your SD card. Backup procedure: When press Backup button, SMAX camera will back up setting to your computer. When press Backup to SD card device button, SMAX camera will back up setting to your SD card. 5.6.4. Restore SMAX camera can also restore your back up setting from above procedure. Restore procedure: When restore your setting from the computer, press Browse button and select the backup file that you saved. Then press Restore button. When restore your setting from the SD card, press Restore from SD card device. www.smax.com.tw P 61 Chapter 5. 5.6.5. Upgrade SMAX camera contain its original firmware version when first leave the factory. If for any reason, such as debug or new features, SMAX will put the latest firmware version on SMAX website for download and upgrade purpose. Firmware upgrade procedure: Please save your latest firmware version in the computer that connects to the network camera. Select the exact firmware once you click on Browse button. Then click Upgrade button to performs upgrade procedure. After upgrade procedure is complete, we suggest to perform a factory rest procedure for the system to check its completion. Notification: If above procedure cause abnormal to the camera, please press the reset button for 30 seconds after power on the camera. Once the camera back to default setting, repeat above upgrade procedure and make sure u have the latest correct firmware. www.smax.com.tw P 62 Chapter 5. 5.7. Camera Information SMAX network camera provide two ways of checking information. One is for the device information, it includes the fundamental of network setting and basic function of the camera. The other one is system log, it records all the operation or event history. 5.7.1. Device information Device info display procedure: To access device info, click Configuration from the menu then click Device Info button. You can check the this camera information as shown in the picture from the right. www.smax.com.tw P 63 Chapter 5. 5.7.2. System Log System log display procedure: To access system log, click Configuration from the menu then click Log button. You can check the usage log of this camera as shown in the picture from the right. www.smax.com.tw P 64 Chapter 5. www.smax.com.tw P 65 Chapter 6. 6.1. URL SMAX HTTP API Version: 1.0.10 Style Convention In URL syntax and in descriptions of CGI parameters, text in italics within angle brackets denotes content that should be replaced with either a value or a string. When replacing the text string, the angle brackets must also be replaced. URL syntax is written with the word “Syntax:” shown in bold face, followed by a box with the referred syntax, as shown below. General CGI URL syntax and parameters CGI URLs are written in lower-case. CGI parameters are written in lower-case and as one word. When the CGI request includes internal camera or video server parameters, the internal parameters must be written exactly as named in the camera or video server. For the POST method, the parameters must be included in the body of the HTTP request. HTTP status Codes The built-in Web server uses the standard HTTP status codes. www.smax.com.tw P 66 Chapter 6. OK F/W Version:XXXXXX PT Support:Yes IO Trigger Support:Yes ......\r\n FAIL HTTP/1.1 200 OK\r\n Content-Type: text/plain\r\n Content-Length: <content length>\r\n \r\n Request failed: <error message>\r\n 6.1. URL 6.1.1. System 6.1.1.1. Get Device information Syntax: --------------------------------------------------------------------------http://camera_ip:port/cgi/admin/serverreport.cgi --------------------------------------------------------------------------Example: http://192.168.1.99/cgi/admin/serverreport.cgi Return: OK HTTP/1.1 200 OK\r\n Content-Type: text/plain\r\n Content-Length: <content length>\r\n \r\ns Server Name:XXXXX IP Address:XXXXXX MAC Address: XXXXXX Model Number:XXXXXX Product Number:XXXXX H/W Version:XXXXXX www.smax.com.tw 6.1.1.2. Add, modify and delete users Syntax: --------------------------------------------------------------------------http:// camera_ip:port /cgi/admin /pwdgrp.cgi?<parameter>=<value> [&<parameter>=<value>...] --------------------------------------------------------------------------with the following parameters and values for reference: <parameter>=<value> Value Description action=<string> add, update, remove , get add = create a new user account. update = change the information of specified parameters if the account exists. P 67 Chapter 6. 6.1.1.2. Add, modify and delete users <parameter>=<value> Value Description action=<string> add, update, remove , get remove = remove an existing account if it exists. get = get a list of the users which belong to the specified group. user=<string> <string> The user account name. pwd=<string> <string> The unencrypted password of the account. grp=<string> admin, users, guest An existing primary group name of the account. <parameter name>=<string> <string> An existing primary group name of the account. Return: OK FAIL HTTP/1.1 200 OK\r\n Content-Type: text/plain\r\n Content-Length: <content length>\r\n \r\n Request failed: <error message>\r\n Example (b) : List groups and users. http:// camera_ip:port /cgi/admin /pwdgrp.cgi?action=get Return: OK HTTP/1.1 200 OK\r\n Content-Type: text/plain\r\n Content-Length: <content length>\r\n \r\n admin=”root,stanley,…”\r\n users=”jack,brian,…”\r\n guest=”angus,becky,…”\r\n FAIL HTTP/1.1 200 OK\r\n Content-Type: text/plain\r\n Content-Length: <content length>\r\n \r\n Request failed: <error message>\r\n Example (a) : Create a new administrator account. http:// camera_ip:port /cgi/admin /pwdgrp.cgi?action=add&user =paul&pwd=foo&grp=admin www.smax.com.tw HTTP/1.1 200 OK\r\n Content-Type: text/plain\r\n Content-Length: <content length>\r\n \r\n OK\r\n P 68 Chapter 6. 6.1.1.3. System date and time Get or set the system date and time Syntax: --------------------------------------------------------------------------http:// camera_ip:port /cgi/admin /date.cgi?action=<value> [&<parameter>=<value>...] --------------------------------------------------------------------------with the following parameters and values for reference: <parameter>=<value> Value Description action=<string> get, set get = get the current date and time. set = set the current date and time. year=<string> <string> Current year. month=<string> <string> Current month. day=<string> <string> Current day. hour=<string> <string> Current hour. minute=<string> <string> Current minute. second=<string> <string> Current second. www.smax.com.tw <parameter>=<value> Value Description timezone=<string> 0-56 Specify the time zone for the new date and/or time. The device will translate the time into local time using whichever the time zone has been specified through the web configuration. If omitted the new date and/or time is assumed to be for local time. Note: The daylight saving time (DST) must be turned off, In this edition, the time mode doest not support to synchronize with an NTP server and with the computer time. Currently only GMT is considered valid input. The rest of the time zones are subject to future edition. P 69 Chapter 6. Return: 6.1.1.3. System date and time FAIL Examples(a) : Get system date and time http:// camera_ip:port r/cgi/admin/date.cgi?action=get Return: OK FAIL HTTP/1.1 200 OK\r\n Content-Type: text/plain\r\n Content-Length: <content length>\r\n \r\n 2007/1/20 15:20:25\r\n HTTP/1.1 200 OK\r\n Content-Type: text/plain\r\n Content-Length: <content length>\r\n \r\n Request failed: <error message>\r\n Examples(b) : Set system date and time http:// camera_ip:port /cgi/admin /date.cgi?action=set&year=2005&month=4&day=3 Return: OK HTTP/1.1 200 OK\r\n Content-Type: text/plain\r\n Content-Length: <content length>\r\n \r\n ok\r\n www.smax.com.tw HTTP/1.1 200 OK\r\n Content-Type: text/plain\r\n Content-Length: <content length>\r\n \r\n Request failed: <error message>\r\n 6.1.2. Maintenance 6.1.2.1. Factory Default Syntax: --------------------------------------------------------------------------http:// camera_ip:port /cgi/admin /factorydefault.cgi?mode=value --------------------------------------------------------------------------Example: http:// camera_ip:port /cgi/admin /factorydefault.cgi?mode=1 with the following parameter and value for reference <parameter>=<value> Value Description mode=<string> 1, 2 1 : Reset all parameters to the original factory settings. 2 : Reset all parameters except the IP, time zone and daylight saving to the original factory settings. P 70 Chapter 6. 6.1.2.2. Factory Default Return: OK HTTP/1.1 200 OK\r\n Content-Type: text/plain\r\n Content-Length: <content length>\r\n \r\n OK\r\n FAIL HTTP/1.1 200 OK\r\n Content-Type: text/plain\r\n Content-Length: <content length>\r\n \r\n Request failed: <error message>\r\n 6.1.2.2. Firmware upgrade Method: POST Syntax: --------------------------------------------------------------------------http:// camera_ip:port /cgi/admin /firmwareupgrade.cgi --------------------------------------------------------------------------- www.smax.com.tw Example: --------------------------------------------------------------------------POST /cgi/admin/firmwareupgrade.cgi HTTP/1.1\r\n Content-Type: multipart/form-data; boundary=AsCg5y\r\n Content-Length: <content length>\r\n \r\n --AsCg5y\r\n Content-Disposition: form-data; name="firmware.bin"; filename="firmware.bin"\r\n Content-Type: application/octet-stream\r\n \r\n <firmware file content> --AsCg5y\r\n --------------------------------------------------------------------------Return: OK HTTP/1.1 200 OK\r\n Content-Type: text/plain\r\n Content-Length: <content length>\r\n \r\n OK\r\n FAIL HTTP/1.1 200 OK\r\n Content-Type: text/plain\r\n Content-Length: <content length>\r\n \r\n Request failed: <error message>\r\n P 71 Chapter 6. 6.1.3. Video 6.1.2.3. Factory Default Syntax: --------------------------------------------------------------------------http:// camera_ip:port /cgi/admin/restart.cgi --------------------------------------------------------------------------Example: http:// camera_ip:port /cgi/admin/restart.cgi Return: 6.1.3.1. MJPEG Syntax: --------------------------------------------------------------------------http:// camera_ip:port /cgi/mjpg/mjpeg.cgi --------------------------------------------------------------------------Example: http:// camera_ip:port /cgi/mjpg/mjpeg.cgi Return: OK HTTP/1.1 200 OK\r\n Content-Type: text/plain\r\n Content-Length: <content length>\r\n \r\n OK\r\n OK FAIL HTTP/1.1 200 OK\r\n Content-Type: text/plain\r\n Content-Length: <content length>\r\n \r\n Request failed: <error message>\r\n www.smax.com.tw HTTP/1.1 200 OK\r\n Content-Type: multipart/ mixed;boundary=myboundary\r\n \r\n --myboundary\r\n Content-Length: <content length>\r\n \r\n <Payload Header> <Payload Data> --myboundary\r\n Content-Length: <content length>\r\n \r\n <Payload Header> <Payload Data> …. P 72 Chapter 6. 6.1.3.1. MJPEG Return: FAIL HTTP/1.1 200 OK\r\n Content-Type: text/plain\r\n Content-Length: <content length>\r\n \r\n Request failed: <error message>\r\n Payload Header Format: Offset Parameter Size(Byte) 0x00 Counter 4 payload counter. 0x04 Size 4 payload size. 0x08 Type 4 'J' for JPG, 'A' for audio, 0 for I frame, 1-30 for P frame. 0x0c Second 4 Time stamp 0x10 Microsecond 4 Time stamp 0x14 Format 4 for audio Bit0-3 type 2: PCM 3: uLaw 4: AMR Bit4-5 sample size 0: 8bits 1: 16bits www.smax.com.tw Description Offset Parameter 0x14 Format Size(Byte) 4 Description Bit6-8 sample rate 0: 8K 1: 11K 2: 24K 3: 44K 4: 48K Bit9-10 channel 1: 1 channel 2: 2 channels Bit11-31 packet length in minisecs. For Video: Bit0-3 type 0:JPEG 1:MPEG4 5:H.264 Bit4-7 scale 0: VGA 1: QVGA 2: QQVGA 3: Full D1 (NTSC) 4: Full D1 (PAL) 5: 720P 7: SXGA 8: 4CIF (NTSC) 9: CIF (NTSC) 10: QCIF (NTSC) 11: 4CIF (PAL) 12: CIF (PAL) 13: QCIF (PAL) P 73 Chapter 6. 6.1.3.1. MJPEG Payload Header Format: Offset Parameter 0x14 Format 0x18 Size(Byte) Status www.smax.com.tw 4 4 Description For Video: Bit0-3 type 15: (reference to Bit26-29) Bit8-13 frame rate (1-30) Bit14-21 IP ratio (1-30) Bit22-25 quality level (0 - 4) Bit26-29 scale (used while Bit4-7 is 15) 0: 960P 1: 1080P 2: UXGA 3: QXGA Bit30-31 reserved Bits 0 – 7: window1 motion level (0 – 255) Bits 8 – 15: window2 motion level (0 – 255) Bits 16 – 23: window3 motion level (0 – 255) Bit 24: trigger input 1 status (1:high/0:low) Bit 25: trigger input 2 status (1:high/0:low) Bit 26: trigger output 1 status (1:high/0:low) Bits 27 – 31: reserved 6.1.3.2. MPEG4/H.264 Syntax: --------------------------------------------------------------------------http:// camera_ip:port /cgi/mpeg/stream1.cgi --------------------------------------------------------------------------Example: http:// camera_ip:port /cgi/ mpeg/stream1.cgi Return: The same as MJPEG except payload data is MPEG4/H264. OK HTTP/1.1 200 OK\r\n Content-Type: multipart/ mixed;boundary=myboundary\r\n \r\n --myboundary\r\n Content-Length: <content length>\r\n \r\n <Payload Header> <Payload Data> --myboundary\r\n Content-Length: <content length>\r\n \r\n <Payload Header> <Payload Data> …. P 74 Chapter 6. FAIL 6.1.3.2. MPEG4/H.264 Return: FAIL HTTP/1.1 200 OK\r\n Content-Type: text/plain\r\n Content-Length: <content length>\r\n \r\n Request failed: <error message>\r\n 6.1.4. Snapshot Syntax: --------------------------------------------------------------------------http:// camera_ip:port /cgi/jpg/image.cgi --------------------------------------------------------------------------Example: http:// camera_ip:port /cgi/jpg/image.cgi Return: OK HTTP/1.1 200 OK\r\n Content-Type: text/plain\r\n Content-Length: <content length>\r\n \r\n <image data>\r\n www.smax.com.tw HTTP/1.1 200 OK\r\n Content-Type: text/plain\r\n Content-Length: <content length>\r\n \r\n Request failed: <error message>\r\n 6.1.5. Audio 6.1.5.1. Audio Query Syntax: --------------------------------------------------------------------------http://<servername>/cgi/query/query.cgi?<parameter> --------------------------------------------------------------------------<parameter>=<value> Value Description listen 0-2 Query the listening status (Server to PC) 0: free to connect 1: microphone not available 2: device is disable P 75 Chapter 6. 6.1.5.2. Audio (Camera to PC) Syntax: --------------------------------------------------------------------------http://<servername>/cgi/audio/audio.cgi? type=uLaw --------------------------------------------------------------------------Return: succeed FAIL HTTP/1.1 200 OK\r\n Content-Type: multipart/ mixed;boundary=myboundary\r\n \r\n --myboundary\r\n Content-Length: <content length>\r\n \r\n <Payload Header> <Payload Data> --myboundary\r\n Content-Length: <content length>\r\n \r\n <Payload Header> <Payload Data> …. 6.1.5.3. Audio (Talk:PC to IP video device) Returns a multipart audio stream. Open a IPPROTO_UDP socket and assign this socket to port 5432. Audio support u-Law Data only. Payload Format: Header (12Bytes) u-Law Data (1024 Bytes) Header Content: Byte0 Byte1 Byte2 Byte3 Byte4 Byte5 0x80 0x80 0x10 0x8c 0x00 0x30 Byte6 Byte7 Byte8 Byte9 Byte10 Byte11 0x56 0x9c 0xab 0x45 0xa2 0x07 HTTP/1.1 503 Service Not Available\r\n Content-Length: 0\r\n \r\n www.smax.com.tw P 76 Chapter 6. Return: 6.1.6. Focus & Zoom for Motor Lens (for GV1、GU1 only) Focus & Zoom for Motor Lens : Send focus & zoom control command to IP Camera which with Motor-Lens. Syntax: --------------------------------------------------------------------------http://camera_ip:port/cgi/fz/focuszoomctl.cgi?<param eter><=value> --------------------------------------------------------------------------with the following parameters and values for reference: Parameter Value Description focusminus . Focus motor lens backward 1 step focusplus Focus motor lens forward 1 step movezoom 0~6 Move zoom motor lens to index: 0-6 smartfocusscan Do auto focus quickly fzisbusy Check the motor lens is busy or not getmotorcuspos Get current position both of focus & zoom motor lens www.smax.com.tw OK HTTP/1.1 200 OK\r\n Content-Type: text/plain\r\n Content-Length: <content length>\r\n \r\n <Result> \r\n FAIL HTTP/1.1 200 OK\r\n Content-Type: text/plain\r\n Content-Length: <content length>\r\n \r\n Example: (Server sends setup to network camera.) [Focus Step Forward] http://192.168.101.102:80/cgi/fz /focuszoomctl.cgi?focusplus Example: (Server sends setup to network camera.) [Focus Step backward] http://192.168.101.102:80/cgi/f /focuszoomctl.cgi?focusminus Example: (Server sends setup to network camera.) [movezoom] http://192.168.101.102:80/cgi/fz /focuszoomctl.cgi?movezoom=6 P 77 Chapter 6. 6.1.6. Focus & Zoom for Motor Lens (for GV1、GU1 only) Example: (Server sends setup to network camera.) [Smart Focus] http://192.168.101.102:80/cgi/fz /focuszoomctl.cgi?smartfocusscan Example: (Server sends setup to network camera.) [Check Is Busy] http://192.168.101.102:80/cgi/fz /focuszoomctl.cgi?fzisbusy Example: (Server sends setup to network camera.) [Current Position] http://192.168.101.102:80/cgi/fz /focuszoomctl.cgi?getmotorcurpos Return: [Current Zoom Index Of Position] | [Current Focus Index Of Position] Ex: 6|55 www.smax.com.tw 6.1.7. SD Card Management Get SD Card Status and search result list. Syntax: --------------------------------------------------------------------------http://camera_ip:port/sdcard.cgi?action=<action_para meter>&<parmameter>=<value>& --------------------------------------------------------------------------with the following parameters and values for reference: action_Parameter Value Description status Get SD Card Status space Get SD Card Space format Format SD Card list SD Card File List. download Download File. delete Delete File Parameter Value Description key name List order by key value order ascend List order by order value dir record, event List working folder ch 1 List channel page 1, 2, 3, … List Page Index P 78 Chapter 6. 6.1.7. SD Card Management Parameter Value Description sTime yyyy-mm-dd-hh-mm-ss List Start Time eTime yyyy-mm-dd-hh-mm-ss List End Time fname filename Download/Delete File name FAIL [Status] 1 : SD Card is available 0 : SD Card is not available Ex: 1 Example: (Get SD Card Status.) [Get SD Card Space] http://192.168.101.102:80/sdcard.cgi?action=space& Return: Return: OK Example: (Get SD Card Status.) [Get SD Card Status] http://192.168.101.102:80/sdcard.cgi?action=status& Return: HTTP/1.1 200 OK\r\n Content-Type: text/plain\r\n Content-Length: <content length>\r\n \r\n <Result> \r\n HTTP/1.1 200 OK\r\n Content-Type: text/plain\r\n Content-Length: <content length>\r\n \r\n www.smax.com.tw [Total Space(KB)] | [Used Space(KB)] | [Free Space(KB)] Ex: 30729552|30179056|550496 Example: (Format SD Card.) [Format SD Card] http://192.168.101.102:80/sdcard.cgi?action=format& Return: [Result] 1 : SD Card Format success 0 : SD Card Format fail Ex: 1 P 79 Chapter 6. 6.1.7. SD Card Management Example: (Get File List.) [SD Card File List] http://192.168.101.102:80/sdcard.cgi?action=list&key= name&order=ascend&dir=record& ch=1&page=1&sTime=2010-02-22-00-0000&eTime=2020-03-21-00-00-00 Return: [Path],[Total File],[Total Page],[List Page],<File name|File Time|File Size(KB)>,… Ex: /tmp/mmc_dir/Backup/,2,1,1,SICPT501U-01082014200248.avi |Thu Jan 9 12:02:48 2014 |10808,SICPT501U-01082014-201533.avi|Thu Jan 9 12:15:33 2014 |10815 www.smax.com.tw Example: (Download File.) [Download File] http://192.168.101.102:80/sdcard.cgi?action=downloa d&dir=record&fname=5MP_IP_BOX -03212012-142806.avi& Return: None Example: (Delete File.) [Delete File] http://192.168.101.102:80/sdcard.cgi?action=delete&d ir=record&fname=5MP_IP_BOX-03 212012-142806.avi& Return: [Result] 1 : File Delete success 0 : File Delete fail Ex: 1 P 80 Chapter 6. Video Codec 6.2. Technical Specifications System CPU TI Multimedia SoC Flash / RAM 32MB / 128MB H.264 30fps @ 1920 x 1080 (Max. 1080P) MPEG-4 20fps @ 1920 x 1080 (Max. 1080P) MJPEG 30fps @ 720 x 480 (Max. D1) Codec Quality H.264: 5 Levels (Max. 1080P) Bit Rate (Max. 6Mbps @ 1080P) MPEG-4: 5Levels (Max. 1080P) Image Sensor Max. Resolution 1920(H) x 1080(V) Format 1/2.5" Effective Pixels 2056(H) x 1536(V) Lens Focal Length f=3.6mm Iris (F No.) F1.8 Angle of View H: 69.55°; V:37.44°; D:75.38° Day & Night Interface Local Storage SD Slot x 1 Supported SD/SDHC, Max. 32GB Digital In / Digital Out Digital Input x 1 / Digital Output x 1 Audio in/out Two-way, Supports G.711μ-Law RCA-In x 1 / RCA-Out x 1 (3.5mm) Network Fast Ethernet (10/100Mbps, RJ-45 port) Reset Button Push Button Mechanical IRCF(ICR) Yes (Built-in Removable IR-cut filter) Protocols IR Distance (Max.) 20M, 850nm IPv4, Ipv6, TCP/IP, UDP, HTTP, HTTPs, RTP, RTSP, RTCP Min. Illuminators ICMP, DHCP, NTP, DNS, DDNS, SMTP, FTP, PPPoE, QoS Color Mode 0.05 Lux ToS, DSCP, UPnP, Samba, Bonjour B/W Mode 0 Lux (IR On) Power Supply Mechanical Spec PoE / DC Power PoE (IEEE802.3af) / DC12V PoE, Max. 6.6W / DC12V, Max. 4.3W Dimensions, Weight Ø 110 mm x 80 mm (L), Net 500g Power Consumption Pan-n-Tilt Pan: 350° ; Tilt:30~90° Environment Weatherproof IP66 Operating Temp. -10°C~55°C (-4°F~131°F) Vandal proof IK8 Humidity 20%~90% RH Storage Temp. -20°C~60°C (-4°F~140°F) www.smax.com.tw P 81 Chapter 6. Special Features 6.2. Technical Specifications Event and Alarm Operation Alarm Trigger Event Action 3 Scalable Windows Privacy Mask 3 Scalable Windows Continue Recording Remote Client Recording SD Card Recording Video Motion Detection, Digital Input (Always / Schedule setting) FTP, Email, SD Card Rec., NAS Rec., Digital Output One Snapshot / Rec. Video File Alarm Rec. Buffer Motion Detection Remote Samba (/NAS) Recording Exposure Management AWB, AES, AGC Image Settings Brightness, Contrast, Sharpness, Saturation Adjustable Shutter Time Auto / Menu Mode 5 sec Pre-alarm / 5 sec post-alarm Up to 3MB 1/15~1/25000sec (Image Sensor) 1/15~1/10000sec (Menu Mode) Accessory Recording Software 64-CH VMS Software (VMS-64) Installation Guide Quick Installation Guide, Manual CD Kit Screw Kit Certificate & Warranty CE class A , FCC class A; Warranty 36 Months Full View / BLC (Metering Area) Mirror Vertical, Horizontal Onvif Yes ( Support Onvif Profile S) Digital Zoom Up to 10 x Digital Zoom Network Management IP Filter, QoS (DSCP) Time Management Manual Time Setting Time Server & NTP Support Real Time Clock User Access Control Multi-Level User Access Up to 5 Clients www.smax.com.tw Multiple Streaming Max. 3 Streams Configuration File Backup to PC / Backup to SD card Web Browser Internet Explorer 9.x above Operating System Suggest Windows 7/8/8.1 above Language Supports multiple languages P 82 Chapter 6. 6.3. Onvif Supports List 6.3.1. NVR SMAX Camera NVR Brand SMAX NVR Models VR1 NVR Version V1.1 www.smax.com.tw Model FW ver. NVR Onvif Live View Playback Motion Detection DIDO SD Card Recording PTZ AC1 V1.03.20x -- -- -- -- -- -- -- AD1 V1.03.20x -- OK OK OK OK OK OK AV1 V1.03.20x -- OK OK OK OK OK OK AU1 V1.03.20x -- OK OK OK OK OK OK AP1 V1.03.20x -- OK OK OK OK OK OK GD1 V1.03.20x -- OK OK OK OK OK OK GV1 V1.03.20x -- OK OK OK OK OK OK GU1 V1.03.20x -- OK OK OK OK OK OK GB1 V1.03.20x -- OK OK OK OK OK OK GP1 V1.03.20x -- OK OK OK OK OK OK GP2 V1.03.20x -- OK OK OK OK OK OK SU1 V1.03.20x -- OK OK OK OK OK OK P 83 Chapter 6. 6.3. Onvif Supports List 6.3.1. NVR SMAX Camera NVR Brand QNAP /VioStor NVR Models VS-xxxxx Products NVR Version QVR V5.0.0 /V4.3.x www.smax.com.tw Model FW ver. NVR Onvif Live View Playback Motion Detection DIDO SD Card recording PTZ AC1 V1.03.20x -- -- -- -- -- -- -- AD1 V1.03.20x Yes OK OK -- -- -- -- AV1 V1.03.20x Yes OK OK -- -- -- -- AU1 V1.03.20x Yes OK OK -- -- -- -- AP1 V1.03.20x Yes OK OK -- -- -- -- GD1 V1.03.20x Yes OK OK -- -- -- -- GV1 V1.03.20x Yes OK OK -- -- -- -- GU1 V1.03.20x Yes OK OK -- -- -- -- GB1 V1.03.20x Yes OK OK -- -- -- -- GP1 V1.03.20x Yes OK OK -- -- -- -- GP2 V1.03.20x Yes OK OK -- -- -- -- SU1 V1.03.20x Yes OK OK -- -- -- -- P 84 Chapter 6. 6.3. Onvif Supports List 6.3.1. NVR SMAX Camera NVR Brand Synology NVR Models RSxxxx DSxxxx Products NVR Version DSM V5.0xx www.smax.com.tw Model FW ver. NVR Onvif Live View Playback Motion Detection DIDO SD Card Recording PTZ AC1 V1.03.20x -- -- -- -- -- -- -- AD1 V1.03.20x Yes OK OK -- -- -- -- AV1 V1.03.20x Yes OK OK -- -- -- -- AU1 V1.03.20x Yes OK OK -- -- -- -- AP1 V1.03.20x Yes OK OK -- -- -- -- GD1 V1.03.20x Yes OK OK -- -- -- -- GV1 V1.03.20x Yes OK OK -- -- -- -- GU1 V1.03.20x Yes OK OK -- -- -- -- GB1 V1.03.20x Yes OK OK -- -- -- -- GP1 V1.03.20x Yes OK OK -- -- -- -- GP2 V1.03.20x Yes OK OK -- -- -- -- SU1 V1.03.20x Yes OK OK -- -- -- -- P 85 Chapter 6. 6.3. Onvif Supports List 6.3.1. NVR SMAX Camera NVR Brand HIKVISION NVR Models NVR Version DS7600 DS7700 DS8600 DS9600 Products www.smax.com.tw Model FW ver. NVR Onvif Live View Playback Motion Detection DIDO SD Card Recording PTZ AC1 V1.03.20x -- -- -- -- -- -- -- AD1 V1.03.20x Yes OK OK -- -- -- -- AV1 V1.03.20x Yes OK OK -- -- -- -- AU1 V1.03.20x Yes OK OK -- -- -- -- AP1 V1.03.20x Yes OK OK -- -- -- -- GD1 V1.03.20x Yes OK OK -- -- -- -- GV1 V1.03.20x Yes OK OK -- -- -- -- GU1 V1.03.20x Yes OK OK -- -- -- -- GB1 V1.03.20x Yes OK OK -- -- -- -- GP1 V1.03.20x Yes OK OK -- -- -- -- GP2 V1.03.20x Yes OK OK -- -- -- -- SU1 V1.03.20x Yes OK OK -- -- -- -- P 86 Chapter 6. 6.3. Onvif Supports List 6.3.2. VMS SMAX Camera VMS Brand SMAX VMS Models SMAX VMS VMS Version V1.1x www.smax.com.tw Model FW ver. NVR Onvif Live View Playback Motion Detection DIDO SD Card Recording PTZ AC1 V1.03.20x -- -- -- -- -- -- -- AD1 V1.03.20x -- OK OK OK OK OK OK AV1 V1.03.20x -- OK OK OK OK OK OK AU1 V1.03.20x -- OK OK OK OK OK OK AP1 V1.03.20x -- OK OK OK OK OK OK GD1 V1.03.20x -- OK OK OK OK OK OK GV1 V1.03.20x -- OK OK OK OK OK OK GU1 V1.03.20x -- OK OK OK OK OK OK GB1 V1.03.20x -- OK OK OK OK OK OK GP1 V1.03.20x -- OK OK OK OK OK OK GP2 V1.03.20x -- OK OK OK OK OK OK SU1 V1.03.20x -- OK OK OK OK OK OK P 87 Chapter 6. 6.3. Onvif Supports List 6.3.2. VMS SMAX Camera VMS Brand axxonsoft VMS Models VMS Version NEXT Intellect Enterprise Products www.smax.com.tw Model FW ver. NVR Onvif Live View Playback Motion Detection DIDO SD Card Recording PTZ AC1 V1.03.20x -- -- -- -- -- -- -- AD1 V1.03.20x Yes OK OK -- -- -- -- AV1 V1.03.20x Yes OK OK -- -- -- -- AU1 V1.03.20x Yes OK OK -- -- -- -- AP1 V1.03.20x Yes OK OK -- -- -- -- GD1 V1.03.20x Yes OK OK -- -- -- -- GV1 V1.03.20x Yes OK OK -- -- -- -- GU1 V1.03.20x Yes OK OK -- -- -- -- GB1 V1.03.20x Yes OK OK -- -- -- -- GP1 V1.03.20x Yes OK OK -- -- -- -- GP2 V1.03.20x Yes OK OK -- -- -- -- SU1 V1.03.20x Yes OK OK -- -- -- -- P 88 Chapter 6. 6.3. Onvif Supports List 6.3.2. VMS SMAX Camera VMS Brand axxonsoft VMS Models VMS Version NEXT Intellect Enterprise Products www.smax.com.tw Model FW ver. NVR Onvif Live View Playback Motion Detection DIDO SD Card Recording PTZ AC1 V1.03.20x -- -- -- -- -- -- -- AD1 V1.03.20x Yes OK OK -- -- -- -- AV1 V1.03.20x Yes OK OK -- -- -- -- AU1 V1.03.20x Yes OK OK -- -- -- -- AP1 V1.03.20x Yes OK OK -- -- -- -- GD1 V1.03.20x Yes OK OK -- -- -- -- GV1 V1.03.20x Yes OK OK -- -- -- -- GU1 V1.03.20x Yes OK OK -- -- -- -- GB1 V1.03.20x Yes OK OK -- -- -- -- GP1 V1.03.20x Yes OK OK -- -- -- -- GP2 V1.03.20x Yes OK OK -- -- -- -- SU1 V1.03.20x Yes OK OK -- -- -- -- P 89 Chapter 6. 6.3. Onvif Supports List 6.3.2. VMS SMAX Camera VMS Brand Aimetis VMS Models Symphony Products VMS Version V6.11 V6.12 www.smax.com.tw Model FW ver. NVR Onvif Live View Playback Motion Detection DIDO SD Card Recording PTZ AC1 V1.03.20x -- -- -- -- -- -- -- AD1 V1.03.20x Yes OK OK -- -- -- -- AV1 V1.03.20x Yes OK OK -- -- -- -- AU1 V1.03.20x Yes OK OK -- -- -- -- AP1 V1.03.20x Yes OK OK -- -- -- -- GD1 V1.03.20x Yes OK OK -- -- -- -- GV1 V1.03.20x Yes OK OK -- -- -- -- GU1 V1.03.20x Yes OK OK -- -- -- -- GB1 V1.03.20x Yes OK OK -- -- -- -- GP1 V1.03.20x Yes OK OK -- -- -- -- GP2 V1.03.20x Yes OK OK -- -- -- -- SU1 V1.03.20x Yes OK OK -- -- -- -- P 90 Chapter 6. 6.3. Onvif Supports List 6.3.2. VMS SMAX Camera VMS Brand NUUO VMS Models VMS Version Crystal Products www.smax.com.tw Model FW ver. NVR Onvif Live View Playback Motion Detection DIDO SD Card Recording PTZ AC1 V1.03.20x -- -- -- -- -- -- -- AD1 V1.03.20x Yes OK OK -- -- -- -- AV1 V1.03.20x Yes OK OK -- -- -- -- AU1 V1.03.20x Yes OK OK -- -- -- -- AP1 V1.03.20x Yes OK OK -- -- -- -- GD1 V1.03.20x Yes OK OK -- -- -- -- GV1 V1.03.20x Yes OK OK -- -- -- -- GU1 V1.03.20x Yes OK OK -- -- -- -- GB1 V1.03.20x Yes OK OK -- -- -- -- GP1 V1.03.20x Yes OK OK -- -- -- -- GP2 V1.03.20x Yes OK OK -- -- -- -- SU1 V1.03.20x Yes OK OK -- -- -- -- P 91 Chapter 6. 6.3. Onvif Supports List 6.3.2. VMS SMAX Camera VMS Brand VIVOTEK VMS Models VAST Products VMS Version v1.8.x www.smax.com.tw Model FW ver. NVR Onvif Live View Playback Motion Detection DIDO SD Card Recording PTZ AC1 V1.03.20x -- -- -- -- -- -- -- AD1 V1.03.20x Yes OK OK -- -- -- -- AV1 V1.03.20x Yes OK OK -- -- -- -- AU1 V1.03.20x Yes OK OK -- -- -- -- AP1 V1.03.20x Yes OK OK -- -- -- -- GD1 V1.03.20x Yes OK OK -- -- -- -- GV1 V1.03.20x Yes OK OK -- -- -- -- GU1 V1.03.20x Yes OK OK -- -- -- -- GB1 V1.03.20x Yes OK OK -- -- -- -- GP1 V1.03.20x Yes OK OK -- -- -- -- GP2 V1.03.20x Yes OK OK -- -- -- -- SU1 V1.03.20x Yes OK OK -- -- -- -- P 92 Chapter 6. 6.3. Onvif Supports List 6.3.3. CMS SMAX Camera CMS Brand SMAX CMS Models SAMX CMS512 CSM Version V1.1x www.smax.com.tw Model FW ver. NVR Onvif Live View Playback Motion Detection DIDO SD Card Recording PTZ AC1 V1.03.20x -- -- -- -- -- -- -- AD1 V1.03.20x -- OK OK OK OK OK OK AV1 V1.03.20x -- OK OK OK OK OK OK AU1 V1.03.20x -- OK OK OK OK OK OK AP1 V1.03.20x -- OK OK OK OK OK OK GD1 V1.03.20x -- OK OK OK OK OK OK GV1 V1.03.20x -- OK OK OK OK OK OK GU1 V1.03.20x -- OK OK OK OK OK OK GB1 V1.03.20x -- OK OK OK OK OK OK GP1 V1.03.20x -- OK OK OK OK OK OK GP2 V1.03.20x -- OK OK OK OK OK OK SU1 V1.03.20x -- OK OK OK OK OK OK P 93 Chapter 6. 6.4. Liability SMAX Technology Co., Ltd. does not responsible for any printing errors or any related issues. And hereby to claim that all specification or description within this manual are subject to change without notice. WEEE Directive & Product Disposal At the end of its serviceable life, this product should not be treated as household or general waste. It should be handed over to the applicable collection point for the recycling of electrical and electronic equipment, or returned to the supplier for disposal. All statement of guarantee by SMAX Technology Co., Ltd. are listed within this manual. But it does not apply to any other particular purpose with those implied statement. www.smax.com.tw P 94 Chapter 6. 6.5. Copyright Copyright SMAX Technology Co., Ltd. all rights reserved. No part of this publication may be reproduced, transmitted, transcribed, stored in a retrieval system, or translated into any language or computer language, in any form or by any means, electronic, mechanical, magnetic, optical, chemical, manual or otherwise, without the prior written permission from SMAX Technology Co., Ltd. SMAX Technology Co., Ltd. makes no representations or warranties, either expressed or implied, with respect to the contents hereof and specifically disclaims any warranties, merchantability, or fitness for any particular purpose. Any software described in this manual is sold or licensed as is. Should the programs prove defective following their purchase, the buyer (and not this company, its distributor, or its dealer) assumes the entire cost of all necessary servicing, repair, and any incidental or consequential damages resulting from any defect in the software. SMAX Technology Co., Ltd. reserves the right to revise this publication and to make changes from time to time in the contents hereof without the obligation to notify any person of such revision or changes. The product you have purchased and the setup screen may appear slightly different from those shown in this QIG. For more information about this product, please refer to the user manual on the CD-ROM. The software and specifications are subject to change without notice. Please visit our website www.smax.com.tw for updates. All brand and product names mentioned in this manual are trademarks and/or registered trademarks of their respective holders. Notice According to GNU General Public License Version 2 This product includes software that is subject to the GNU General Public License version 2. The program is free software and distributed without any warranty of the author. We offer, valid for at least three years, to give you, for a charge no more than the costs of physically performing source distribution, a complete machine-readable copy of the corresponding source code. Das Produkt beinhaltet Software, die den Bedingungen der GNU/GPL-Version 2 unterliegt. Das Programm ist eine sog. „Free Software“, der Autor stellt das Programm ohne irgendeine Gewährleistungen zur Verfügung. Wir bieten Ihnen für einen Zeitraum von drei Jahren an, eine vollständige maschinenlesbare Kopie des Quelltextes der Programme zur Verfügung zu stellen – zu nicht höheren Kosten als denen, die durch den physikalischen Kopiervorgang anfallen. GNU GENERAL PUBLIC LICENSE Version 2, June 1991 Copyright (C) 1989, 1991 Free Software Foundation, Inc. 51 Franklin Street, Fifth Floor, Boston, MA 02110-1301, USA Everyone is permitted to copy and distribute verbatim copies of this license document, but changing it is not allowed. www.smax.com.tw P 95