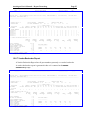
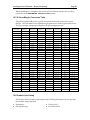
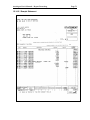
1
Autologue User’s Manual – Report Processing
Page i
Table Of Contents
12. Introduction – Report Processing ................................................................................... 1
12.1 Accessing The Report Processing Menu ..................................................................... 2
12.2 Inventory Price List ......................................................................................................... 3
12.2.1 Product Line Summary Totals ............................................................................. 3
12.2.2 Price Lists................................................................................................................. 5
12.2.3 Customer Price List................................................................................................ 5
12.2.4 Inventory Quantities Report................................................................................ 6
12.2.5 Inventory Parts List................................................................................................ 7
12.2.6 Printing Inventory Price List Reports ................................................................ 8
12.3 Print Customer Reports .................................................................................................. 12
12.3.1 Mailing Labels........................................................................................................ 13
12.3.2 Index Cards ............................................................................................................. 13
12.3.3 Standard List ........................................................................................................... 14
12.3.4 Customer Sales Analysis Report......................................................................... 15
12.3.5 Limited Customer Sales Analysis....................................................................... 16
12.3.6 Customer Sales Analysis – Current Month....................................................... 16
12.3.7 Customer Pricing Matrix ...................................................................................... 17
12.3.8 Printing A Customer Report ................................................................................ 18
12.4 Gross Margin Pricing Reports....................................................................................... 20
12.4.1 Printing A Gross Margin Pricing Report........................................................... 20
12.4.1.1 Sample Gross Margin Pricing Report....................................................... 22
12.5 Print Price Labels............................................................................................................. 23
12.5.1 Printing Labels ....................................................................................................... 24
12.5.1.1 Print By Product Line................................................................................... 25
12.5.1.2 Print From Purchase Order ......................................................................... 25
12.5.1.3 Print One Part Number................................................................................ 26
12.5.2 Part Label Pricing................................................................................................... 26
12.5.2.1 Sample Part Number Labels....................................................................... 28
12.6 Stock Status Report ......................................................................................................... 29
12.6.1 All Parts Report ...................................................................................................... 29
12.6.2 Over Stock Report.................................................................................................. 30
12.6.3 Stock Out Report.................................................................................................... 31
12.6.4 Return Stock Status Report .................................................................................. 32
12.6.5 Zero Sales Report ................................................................................................... 33
12.6.6 Stock On Order Report ......................................................................................... 34
12.6.7 Vendor Backorder Report..................................................................................... 35
12.6.8 Customer Backorder Report................................................................................. 36
12.6.9 Negative Quantity On Hand Report .................................................................. 36
12.6.10 Frozen Min/Max Report...................................................................................... 37
12.6.11 Suggested Min/Max Formula ............................................................................ 38
12.6.12 Printing A Stock Status Report ......................................................................... 39
12.6.12.1 Calculating Suggested Min/Max2 Values.............................................. 40
12.6.12.2 Swapping Min/Max2 & Min/Max1 Values............................................ 41
12.7 Automatic Price Adjustment ......................................................................................... 42
12.7.1 Performing A Price Adjustment For A Product Line Range.......................... 42
12.7.2 Performing A Price Adjustment For A Part Number Range.......................... 44
Revision 11/06
Linux Version 7.1
Autologue User’s Manual – Report Processing
Page ii
12.7.3 Entering & Saving A Price Adjustment Formula............................................. 46
12.7.3.1 Deleting A Price Adjustment Formula Line............................................ 47
12.7.4 Selecting A Price Adjustment Formula ............................................................. 47
12.7.5 Deleting A Price Adjustment Formula .............................................................. 48
12.7.6 Gross Margin Conversion Table......................................................................... 49
12.8 Product Line Listing........................................................................................................ 49
12.8.1 Printing A Product Line List ................................................................................ 50
12.9 Print Kits, Alternates & Supersessions ....................................................................... 51
12.10 Customer Backorder Report ........................................................................................ 51
12.10.1 Printing A Customer Backorder Report........................................................... 52
12.10.2 Displaying Customer Backorder Records ....................................................... 53
12.10.3 Deleting Customer Backorders ......................................................................... 53
12.10.4 Editing Customer Backorder Quantities ......................................................... 54
12.11 Print Open Order (Workspace) Report...................................................................... 54
12.11.1 Accessing The Printing Open Workspaces Program..................................... 55
12.11.2 Filtering Options.................................................................................................. 55
12.11.3 Status Box .............................................................................................................. 56
12.12 Best Seller Report .......................................................................................................... 56
12.12.1 Printing A Best Seller Report............................................................................. 57
12.12.2 Interpreting The Best Seller Report ................................................................. 60
12.12.2.1 Sample Best Seller Report ........................................................................ 62
12.12.3 Updating The Popularity Codes........................................................................ 63
12.12.4 Creating A Return Purchase Order For Zero Sales Merchandise ............... 64
12.13 Product Line Sales Report............................................................................................ 65
12.13.1 Printing A Product Line Sales Report .............................................................. 65
12.13.1.1 Sample Product Line Sales Report .......................................................... 66
12.14 Print Statements............................................................................................................. 66
12.14.1 Printing Statements ............................................................................................. 66
12.14.1.1 Printing Statements For A Range Of Customers.................................. 68
12.14.1.2 Printing Statements For A Range Of Vendors...................................... 68
12.14.1.3 Printing Statements By Salesman Code................................................. 68
12.14.1.4 Printing Statements By Report Code ...................................................... 69
12.14.2 Additional Notes On Statements ...................................................................... 70
12.14.2.1 Sample Statement....................................................................................... 71
12.15 Print Aged A/R Balance................................................................................................ 72
12.15.1 Printing An Aged A/R Balance Report ............................................................ 72
12.15.1.1 Sample Aged A/R Balance Report........................................................... 75
12.15.2 Additional Notes On The Age Report ............................................................. 76
12.16 A/R Adjustment Report................................................................................................ 76
12.16.1 Printing An A/R Adjustment Report................................................................ 76
12.16.1.1 Sample A/R Adjustment Report .............................................................. 78
12.17 Print/Clear Sales Tax..................................................................................................... 78
12.17.1 Printing The Sales Tax Report........................................................................... 79
12.17.1.1 Sample Sales Tax Report........................................................................... 80
12.18 Print Audit Reports ....................................................................................................... 80
12.18.1 Printing An Audit Report................................................................................... 80
12.18.1.1 Inventory Audit Field Change Codes..................................................... 82
12.18.1.2 Customer Audit Field Change Codes ..................................................... 83
Revision 11/06
Linux Version 7.1
Autologue User’s Manual – Report Processing
Page iii
12.18.1.3 Sample Audit Reports ............................................................................... 84
Revision 11/06
Linux Version 7.1
Autologue User’s Manual – Report Processing
Page 1
12. Introduction – Report Processing
Through the Report Processing Menu, access is given to several powerful programs for
various types of reports to be generated and fields of information to be updated. All
programs within the Report Processing Menu can be run on demand even while point
of sale and purchasing are being used.
Below is a short summary of each program available from the Report Processing
Menu:
Inventory Price List
Allows price lists, inventory listings and product line summary totals
to be printed by beginning and ending product lines and includes the
options of doing so by popularity and report codes, stocked parts
only, zero cost parts only and by a specific customer number using
the customer’s standard and exception pricing matrix.
Print Customer Reports
Allows mailing labels, index cards, standard lists, sales analysis,
limited sales analysis, and current month sales analysis reports to be
generated by one of three options: customer numbers, salesman
codes or report codes.
Gross Margin Pricing Report
Allows gross profit margins to be reviewed by part number, price
level, popularity code and product line.
Print Price Labels
Allows part, shelf or barcode labels to be printed by product line,
purchase order or part number.
Stock Status Report
Allows inventory price levels to be adjusted by a percentage and or
an add on value by popularity code and product line number.
Automatic Price Adjustment
Allows a manufacturer’s price sheet changes to be applied to
matching part numbers within the inventory file.
Product Line Listing
Lists product line number, name, sell-up message, first part number,
vendor net % and customer sales history level by beginning and
ending product lines entered.
Print Kits, Alternates &
Supersessions
Allows all kits, alternates and supersessions to be printed for review
and salesman interchange lists. An ordering information report can
also be generated when printing. (This program is reviewed in detail
under the section Kits, Alternates & Supersessions.)
Customer Backorder Report
Allows customer backorder information to be screen displayed one
record at a time or the entire backorder file to be printed.
Print Open Order
(Workspace) Report
Allows all open workspaces outstanding to be printed or screen
viewed by a range of customers, range of counterman codes, range of
dates, or a specific customer PO number or document ID.
Best Seller Report
Determines the rank of part numbers based upon sales history and
then lists the items in sequential order from greatest to least number
of units sold. Optionally the popularity codes of all part numbers can
be updated with their new rank code and automatically creates a
Return PO for parts without sales history.
Autologue User’s Manual – Report Processing
Page 2
Product Line Sales Report
Lists month to date net sales, cost of sales, gross profit dollars, and
gross profit % margins by product line number.
Print Statements
Allows statements to be printed by customer number, vendor
number, salesman code, or report code for either the current month
or prior month (if prior month is setup).
Print Aged A/R Report
Allows you to select customers with open balances by current, 30, 60,
90 day balances for either the current month or prior month (if prior
month is setup). Displays salesman codes, service totals, credit limit,
you can select by non-payment this month. You also have the option
to have it calculate service charges.
A/R Adjustment Report
Lists by customer all transactions other than regular point of sale
invoices and applied receipts, such as, back office posting, deleted
A/R detail, service charges paid or canceled, statement discounts,
and any manual adjustments made to a customers 30, 60, 90-day
balances. Totals for each category will be given by customer with
grand totals at the end of the report.
Print/Clear Sales Tax
Lists out the total taxable sales, and total tax collected by state code.
Print Audit Reports
Allows specific auditing information to be printed or screen viewed.
Optionally can be filtered by date range, customer range, specific
product line or part number, and can include time and date changes
were made.
This chapter of the user’s manual will aid and instruct in the correct method of
creating various inventory and customer reports in addition to adjusting inventory
prices quickly through the use of the automatic price adjustment program.
12.1 Accessing The Report Processing Menu
•
From the Autologue Main Menu, enter 11 (Report Processing) and press <Return>.
Autologue User’s Manual – Report Processing
Page 3
The Report Processing Menu screen will appear as shown:
•
With the cursor positioned at the Enter a number: prompt, enter the number of
the menu option to access and press <Return>.
•
Press the <F11> (Exit) key to return to the Autologue Main Menu.
12.2 Inventory Price List
The Inventory Price List menu option is used to generate several different types of
reports based upon the available options. Below is a listing of the different reports:
♦
♦
♦
♦
♦
Product Line Summary Totals
Price Lists
Customer Price List
Inventory Quantities Report
Inventory Parts List
All reports can be printed by beginning and ending product line numbers, include
only specific popularity and report codes, stocked/non-stocked parts, parts with a
zero cost, and reflect the vendor discount (Vendor Net %) in the inventory values
and price 0, if desired.
12.2.1 Product Line Summary Totals
The Inventory Price List program allows product line summary totals to be quickly
generated and printed for a single product line or a group of product lines.
A Product Line Summary Report will supply the following information by product
line for all product lines printed:
Autologue User’s Manual – Report Processing
♦
♦
♦
♦
Value of Inventory
Core Value of Inventory
Value of Warranty Returns
Core Value of Warranty Returns
♦
♦
♦
♦
Page 4
Value of Core Returns
Number of Items
Number of Items Out of Stock
Unit Quantity Totals (quantity on
hand, on order, vendor backorder, core
returns, warranty returns)
Part numbers with the 4 decimal field set will print all 4 decimal places although
they will not be properly aligned.
When the USE AVERAGE COST FOR COST CALCULATIONS system setup option is
enabled, the Inventory Price List screen will not display the INCLUDE VENDOR
DISCOUNT prompt. All values will be calculated based on the average cost.
The ability to print the average cost field has been added. When all prices are
requested, the average cost will not be printed because there is not enough room on
the report. If all the prices are not requested, then the average cost will print to the
left of price level zero.
If the ENABLE BACKGROUND PRINTING (SPOOLING) ON ALL REPORTS system
setup option is disabled, the Inventory Price List screen will not display the ENABLE
SPOOLING prompt. All reports will not be printed as a background process.
A Product Line Summary Report can also be printed by popularity code, which
allows for the determination of inventory value invested into popular and slowing
moving items.
Autologue User’s Manual – Report Processing
Page 5
12.2.2 Price Lists
The Inventory Price List program allows price lists to be generated using only the
price levels selected.
A Price List will supply the following information by part number:
♦ Part Number
♦ Price Levels Selected
♦ Description (optional)
Below is a sample Inventory Price List report:
INVENTORY PRICE LIST
PRODUCT LINE
PART NUMBER
EATEAT-B6
EAT-B8
EAT-B9
EAT-B11
EAT-B12
EAT-C3
EAT-CH2
EAT-CH3
EAT-CH4
EAT-CH7
EAT-CH8
EAT-CH9A
EAT-CH11
EAT-CH12
EAT-CH13
59
EAT CAM BRGS
PRICE 0
100.00
4.67
7.32
5.03
7.44
4.12
6.61
4.40
4.34
5.33
4.06
5.13
6.06
4.20
6.21
4.79
/ GASKETS
PRICE 1
0.00
7.84
9.76
8.44
9.92
6.92
11.12
7.40
7.28
8.96
6.80
8.64
10.20
7.04
10.44
8.04
PRICE 2
0.00
15.08
18.76
16.23
19.08
13.31
21.39
14.23
14.00
17.23
13.08
16.62
19.62
13.54
20.08
15.46
CATALOG DATE MM/YY
PRICE 3
0.00
15.08
18.76
16.23
19.08
13.31
21.39
14.23
14.00
17.23
13.08
16.62
19.62
13.54
20.08
15.46
PRICE 4
0.00
0.00
0.00
0.00
0.00
0.00
0.00
0.00
0.00
0.00
0.00
0.00
0.00
0.00
0.00
0.00
PRICE 5
0.00
20.81
25.90
22.40
26.33
18.37
29.51
19.64
19.32
23.78
18.05
22.93
27.07
18.68
27.71
21.34
MM/DD/YY HH:MM:SS
CORE
CORE
COST
SELL
0.00
0.00
0.00
0.00
0.00
0.00
0.00
0.00
0.00
0.00
0.00
0.00
0.00
0.00
0.00
0.00
0.00
0.00
0.00
0.00
0.00
0.00
0.00
0.00
0.00
0.00
0.00
0.00
0.00
0.00
0.00
0.00
PAGE
1
Sample Inventory Price List Report
12.2.3 Customer Price List
The Inventory Price List program allows price lists to be generated for a specific
customer according to their standard and exception pricing matrix setup within the
Customer/Vendor file. When a customer has an alternate pricing matrix setup, the
user selects either the standard or alternate pricing matrix’s to use when creating the
Customer Price List.
A Customer Price List will supply the following information by part number:
♦ Part Number
♦ Description (optional)
♦ Cost Price
♦ List Price
♦ Core Sell Price
Autologue User’s Manual – Report Processing
Page 6
Below is a sample Customer Price List report:
INVENTORY PRICE LIST FOR SMOKIN JOE'S RADIATOR SUPPLY
PRODUCT LINE
PART NUMBER
ABN-AP1
ABN-AP1SBK
ABN-AP2
ABN-AP3
ABN-AP4
ABN-AP5
ABN-AP6
ABN-AP7
ABN-AP9
ABN-AP10
ABN-AP12
ABN-AP13
ABN-AP14
ABN-AP15
ABN-AP16
ABN-AP17
2
AUTOPRO BEARI / GREASE
DESCRIPTION
BEARINGS
BEARINGS
BEARINGS
BEARINGS
BEARINGS
BEARINGS
BEARINGS
BEARINGS
BEARINGS
BEARINGS
BEARINGS
BEARINGS
BEARINGS
BEARINGS
BEARINGS
BEARINGS
CATALOG DATE MM/DD
COST
4.78
11.46
4.74
5.90
5.84
5.96
6.88
16.84
19.58
21.50
5.22
6.38
5.86
6.02
5.52
6.36
PRICE 5
5.98
14.32
5.92
7.37
7.30
7.45
8.60
21.05
24.47
26.87
6.52
7.97
7.32
7.52
6.90
7.95
MM/DD/YY HH:MM:SS
PAGE
CORE
SELL
0.00
0.00
0.00
0.00
0.00
0.00
0.00
0.00
0.00
0.00
0.00
0.00
0.00
0.00
0.00
0.00
Sample Customer Inventory Price List Report
12.2.4 Inventory Quantities Report
The Inventory Price List program allows Inventory Quantities Reports to be
generated for quick inventory counting purposes or for reviewing and comparing
min1/max1 versus min2/max2 values.
An Inventory Quantities Report will supply the following information by part
number:
♦ Part Number
♦ Quantity On Hand
♦ Description (optional)
♦ Min1 / Max1
♦ Popularity Code
♦ Min2 / Max2
1
Autologue User’s Manual – Report Processing
Page 7
INVENTORY PRICE LIST
PRODUCT LINE
PART NUMBER
EATEAT-B6
EAT-B8
EAT-B9
EAT-B11
EAT-B12
EAT-C3
EAT-CH2
EAT-CH3
EAT-CH4
EAT-CH7
EAT-CH8
EAT-CH9A
EAT-CH11
EAT-CH12
EAT-CH13
EAT-CO3
EAT-CO8
59
EAT CAM BRGS
/ GASKETS
DESCRIPTION
EATON CAM INV
CAM BEARINGS
CAM BEARINGS
CAM BEARINGS
CAM BEARINGS
CAM BEARINGS
CAM BEARINGS
CAM BEARINGS
CAM BEARINGS
CAM BEARINGS
CAM BEARINGS
CAM BEARINGS
CAM BEARINGS
CAM BEARINGS
CAM BEARINGS
CAM BEARINGS
CAM BEARINGS
CAM BEARINGS
ON
POP HAND MIN1
A
10
6
A
10
6
A
0
6
A
10
6
A
10
6
A
10
6
A
10
6
A
10
6
A
10
6
A
10
6
A
8
6
A
32
6
A
10
6
A
10
6
A
10
6
A
10
6
A
10
6
A
10
6
CATALOG DATE MM/YY
MAX1 MIN2
10
1
10
1
10
1
10
1
10
1
10
1
10
1
10
1
10
1
10
1
10
1
10
1
10
1
10
1
10
1
10
1
10
1
10
1
MM/DD/YY HH:MM:SS
STR1
PAGE
1
MAX2
1
1
1
1
1
1
1
1
1
1
1
1
1
1
1
1
1
1
TOTALS:
QUANTITY
VENDOR
ON HAND
ON ORDER
BACKORDER
320
0
0
VALUE OF INVENTORY
2669.24
CORE VALUE OF INVENTORY
0.00
VALUE OF WARRANTY RETURNS
0.00
CORE VALUE OF WARRANTY RETURNS
0.00
VALUE OF CORE RETURNS
0.00
CUSTOMER
BACKORDER
0
OUT OF
STOCK
1
CORE
RETURNS
0
WARRANTY
RETURNS
0
NUMBER
OF ITEMS
31
Sample Inventory Quantities Report
12.2.5 Inventory Parts List
The Inventory Price List program allows an Inventory Parts List to be generated for
the year-end inventory count. This report is also useful as a counter aid by
supplying a listing of how part numbers have been entered into the inventory file.
An Inventory Parts List Report will list the following information by part number:
♦ Part Number
♦ Description (optional)
Autologue User’s Manual – Report Processing
Page 8
INVENTORY PRICE LIST
PRODUCT LINE
PART NUMBER
EATEAT-B6
EAT-B8
EAT-B9
EAT-B11
EAT-B12
EAT-C3
EAT-CH2
EAT-CH3
EAT-CH4
EAT-CH7
EAT-CH8
EAT-CH9A
EAT-CH11
EAT-CH12
EAT-CH13
EAT-CO3
EAT-CO8
EAT-DA1
EAT-DA2
EAT-F1
EAT-F7
EAT-F9A
EAT-F15
EAT-F16
EAT-F18
EAT-F19
EAT-F22
EAT-F23A
EAT-F24
EAT-F26
59
EAT CAM BRGS
/ GASKETS
CATALOG DATE MM/YY
MM/DD/YY HH:MM:SS
STR1
PAGE
DESCRIPTION
EATON CAM INV
CAM BEARINGS
CAM BEARINGS
CAM BEARINGS
CAM BEARINGS
CAM BEARINGS
CAM BEARINGS
CAM BEARINGS
CAM BEARINGS
CAM BEARINGS
CAM BEARINGS
CAM BEARINGS
CAM BEARINGS
CAM BEARINGS
CAM BEARINGS
CAM BEARINGS
CAM BEARINGS
CAM BEARINGS
CAM BEARINGS
CAM BEARINGS
CAM BEARINGS
CAM BEARINGS
CAM BEARINGS
CAM BEARINGS
CAM BEARINGS
CAM BEARINGS
CAM BEARINGS
CAM BEARINGS
CAM BEARINGS
CAM BEARINGS
CAM BEARINGS
Sample Inventory Parts List Report
12.2.6 Printing Inventory Price List Reports
•
From the Report Processing Menu, enter 1 (Inventory Price List) and press <Return>.
The Inventory Price List screen will appear as shown:
1
Autologue User’s Manual – Report Processing
•
Page 9
With the cursor positioned at the PRINT PRODUCT LINE SUMMARY TOTALS ONLY
prompt, enter Y or N and press <Return>.
To generate a report listing product line summary totals only, enter Y and press
<Return> and the cursor would then be positioned at the BEGINNING PRODUCT
LINE prompt.
To generate a report listing individual part numbers, enter N and press <Return>.
•
With the cursor positioned at the USE CUSTOMER NUMBER prompt, enter a
customer number and press <Return> or just press <Return> to skip past this
prompt. Note: the field is defaulted to ALL upon entering this field.
If a customer number was entered and the customer is not setup with an alternate
pricing matrix, the cursor will then be positioned at the PRINT DESCRIPTIONS
prompt.
If a customer number was entered and the customer is setup with an alternate
pricing matrix, a pop up selection window will be displayed as shown:
The window will contain the two separate pricing matrix labels that were setup in
the customer’s account. Refer to the Customer/Vendor File - Setting Up An Alternate
Pricing Matrix section of the user’s manual.
•
Using the Ï and Ð arrow keys, highlight the desired matrix and press <Return>.
If the first menu item (STANDARD MATRIX) is selected, prices will be calculated
based upon the customer’s standard pricing. If the second menu item (ALTERNATE
MATRIX) is selected, prices will be calculated based upon the customer’s alternate
matrix number setup.
The cursor will then be positioned at the PRINT DESCRIPTIONS prompt.
Autologue User’s Manual – Report Processing
•
Page 10
With the cursor positioned at the LIST ALL PRICES prompt, enter Y or N and press
<Return>.
Enter Y and the report will print all eight-price levels, but will exclude the Average
Cost field.
Enter N and the cursor will be positioned at the AVERAGE COST prompt. Enter Y or
N to each price level and press <Return>. The report will only include price levels
with a Y entered next to each of their respective prompt.
•
With the cursor positioned at the LIST ALL QUANTITIES prompt, enter Y or N and
press <Return>.
Enter Y and the report will include the following information for each part number:
Pop Code, Quantity on Hand, Min1/Max1 and Min2/Max2.
Enter N and the report will omit printing quantities information for each part
number as well as summary totals for each product line.
•
With the cursor positioned at the PRINT DESCRIPTIONS prompt, enter Y or N and
press <Return>.
Enter Y and the report will include the description for each part number.
Enter N and the report will not print the description for each part number.
•
With the cursor positioned at the BEGINNING PRODUCT LINE prompt, enter the
first product line number to be printed and press <Return>.
•
With the cursor positioned at the ENDING PRODUCT LINE prompt, enter the last
product line number to be printed and press <Return>.
The report will include only those product lines in the range just entered.
To print one product line only, enter the same product line number for both the
beginning and ending product line prompts.
•
With the cursor positioned at the ZONE BIN prompt, enter the zone/bin location to
be matched within part records to be included in this report and press <Return> or
just press <Return> to skip past this prompt. Note: The field is defaulted to NONE
upon entering this field.
Examples:
.*12
Finds parts with 12 anywhere within
the zone bin;
..12
Finds parts with 12 specifically
starting at the 3rd character position
within the zone bin;
12
Finds parts with 12 at the beginning of
the zone bin;
[0-1].*
Finds parts with 0 or 1 at the
beginning of the zone bin;
Autologue User’s Manual – Report Processing
Page 11
If nothing is entered at the ZONE BIN prompt, the report will include all parts
regardless of the specific zone bin location within the part records.
•
With the cursor positioned at the BY POP CODE (S) prompt, enter Y or N and press
<Return>.
Enter N to include all part numbers in the product lines selected, regardless of
popularity code.
Enter Y to include only those part numbers with specific popularity codes on the
report. The cursor will move to the prompt A_. Enter Y and press <Return> for
each pop code type to be included in the report. Enter N and press <Return> to
exclude all part numbers with this popularity code from the report.
•
With the cursor positioned at the INCLUDE VENDOR DISCOUNT prompt, enter Y or
N and press <Return>. Note: If using average cost for all cost calculations, this
option will not appear.
Enter Y and the inventory values and price 0, if printed, will reflect the vendor
discount (vendor net%) as entered in the Product Line file.
Enter N and the inventory values and price 0 will be based upon 100% of price 0 in
the Inventory file for each part number.
•
With the cursor positioned at the DOUBLE SPACE REPORT prompt, enter Y or N and
press <Return>.
Enter Y and the report will be double-spaced.
Enter N and the report will be single-spaced.
•
With the cursor positioned at the ENABLE SPOOLING prompt, enter Y or N and press
<Return>. Note: If spooling for reports is not enabled, this option will not appear.
Enter Y and the report will be spooled (sent to the printer and the screen cleared
without waiting for the report to print before freeing up the screen).
Enter N and the report will not be spooled.
•
With the cursor positioned at the STOCKED PARTS ONLY prompt, enter Y or N and
press <Return>.
Enter Y and the report will print only parts that are stocked. A part is classified as
stocked when the following is true: ((min1 + max1) > 0 or (quantity on hand > 0)).
Enter N and the report will include both stocked and non-stocked parts.
•
With the cursor positioned at the REPORT CODE(S) prompt, enter up to 10 different
report codes to be included in this report and press <Return> or just press
<Return> to skip past this prompt. Note: The field is defaulted to NONE upon
entering this field.
•
With the cursor positioned at the ZERO COST ONLY prompt, enter Y or N and press
<Return>.
Autologue User’s Manual – Report Processing
Page 12
Enter Y and the report will only include parts that have a zero cost within its price
level 0 field.
Enter N and the report will print all parts regardless of the value within the price
level 0 field.
•
With the cursor positioned at the BEGIN PRINTING prompt, enter Y or N and press
<Return>.
Enter Y and the report will begin printing.
Enter N and the cursor will move back to the PRINT PRODUCT LINE SUMMARY
TOTALS ONLY prompt.
The Ï arrow key can be used to return the cursor to the previous prompts when a
change needs to be made.
12.3 Print Customer Reports
The Print Customer Reports menu option allows seven different types of customer
reports to be printed using three different options. These reports can be generated
on demand during any time of the day. Listed below are the available reports:
♦
♦
♦
♦
Mailing Labels
Index Cards
Standard List
Sales Analysis
♦ Limited Sales Analysis
♦ Sales Analysis -- Current Month
♦ Customer Matrix
All reports can be printed by one of three options:
♦ Customer Numbers
♦ Report Codes
♦ Salesman Codes
Autologue User’s Manual – Report Processing
Page 13
12.3.1 Mailing Labels
The print customer report program allows mailing labels to be printed for
customers/vendors. Each label measures 15/16” x 3” and will contain the following
information for each customer/vendor printed:
♦ Name
♦ First 2 Bill Address Lines
12.3.2 Index Cards
Index cards can be printed for customers/vendors. Each index card measures
3” x 5” and will contain the following information for each customer/vendor
printed:
♦ Customer Number
♦ Name
♦ 3 Bill Address Lines
♦ Salesman Code
♦ Credit Limit
♦ Telephone Number
Index cards are useful for countermen looking up customer numbers during point of
sale invoicing.
Autologue User’s Manual – Report Processing
Page 14
12.3.3 Standard List
The Print Customer Report menu option allows a Standard Customer List Report to
be printed for customers/vendors. The report is a 132-column report and requires
14 7/8” x 11” stock paper (unless condensed print is used). The report will contain
the following information for each account printed:
♦ Customer Number
♦ Customer Name
♦ 3 Billing Address Lines
♦ Phone Number
Autologue User’s Manual – Report Processing
Page 15
STANDARD CUSTOMER LIST
CUST
102
118
126
130
134
142
150
158
166
174
182
190
198
NAME
DATE MM/DD/YY
ADDRESS
A & B AUTO PARTS
AC WAREHOUSE SUPPLIES
ACE HARDWARE
AGILE SPORTS INC.
ALL TRANSMISSION PRODUCTS
ALLCO FENCE COMPANY
ALLEN BRAKING SUPPLY
ALLEN PARTS AND EQUIP
ALLIED EQUIPMENT
ALLOY ALIGNMENT/BRAKE SUPP
A-1 LOU'S RENTALS
AL'S TRANSMISSION SERVICE
ANAHEIM TRANSPORTATION
PHONE #
2232 RAMEL ST.
3325 HILTON BLVD.
16504 RAGE ROAD
3910 EAST 17TH ST
9013 MAIN STREET
1819 WEST HAMPSHIRE
5210 NORTH 16TH ST.
PO BOX 688
3210 PALOMA ROAD
539-A W VALENCIA
2415 CANYON ROAD
7741 CERRITOS WAY
5891 RAILROAD STREET
MILPITAS, CA 95035
HONOLULU, HI 96816
BUENA PARK, CA 90621
SANTA ANA, CA 92701
RIVERSIDE, CA 92509
LOGAN, UT 84061
LAYTON, UT 84011
SALEM, OR 97440
SAN BERNARDINO, CA 92511
FULLERTON, CA 92632
SAN FRANCISCO, CA 94117
CYPRESS, CA 90630
ANAHEIM, CA 91741
P.O. BOX 1324
CONTACT RON
C.O.D. ONLY
(714)946-3880
(808)735-2214
(714)522-3520
(714)831-5900
(909)781-3241
(801)822-3105
(801)544-0191
(503)672-0114
(909)824-1622
(714)879-2890
(415)923-0156
(714)827-0741
(714)681-2741
P.O. BOX 1093
CONTACT RICK
P.O. BOX 597
***** TOTAL NUMBER OF CUSTOMERS PRINTED: 13 *****
Sample Standard Customer List
12.3.4 Customer Sales Analysis Report
The Customer Sales Analysis Report is a valuable management tool for evaluating
the sales and profitability of specific customers, salesman or a group of customers
(using report codes). The report will contain the following information for each
customer and grand totals of all customers printed:
♦
♦
♦
♦
♦
♦
♦
♦
Net Sales
Number of Invoices
Core Sales
Average Items Per Invoice
Cost of Sales
Customer Product History
Profit Percent
Current Month Return Status
All information is given for the current month plus the previous 24 months except
customer product history and current month return status.
STR1
250
C U S T O M E R
AMERICAN ACRYLIC
SALESMAN/GROUP A
CURR MO
NET SALES
355.77
COST OF
SALES
PROFIT %
CORE SALES
INVOICES
LINES/INVOICE
SALES LEVELS 1
H I S T O
SALES LEVELS 13
H I S T O
M O N T H L Y
1257 ORANGETHORPE
158.78
55.37%
S A L E S
FULLERTON
A N A L Y S I S
DATE MM/DD/YY
CA 91775-2555
DEC
7450
2220
NOV
3350
1960
OCT
3300
2130
SEP
2970
2220
AUG
2870
1790
JUL
2910
1150
JUN
2790
1260
MAY
2570
1400
APR
2500
1760
MAR
2460
1100
FEB
2570
970
JAN
2380
1420
4630
1510
2070
1310
2050
1450
1840
1440
1810
1230
1750
810
1760
870
1590
980
1600
1210
1550
780
1690
680
1550
980
38%
32%
38%
33%
38%
32%
38%
35%
37%
31%
40%
30%
37%
31%
38%
30%
36%
31%
37%
29%
34%
30%
35%
31%
0.00
410
-80
80
100
160
70
-80
60
110
0
50
60
-80
40
20
-10
-180
0
190
20
120
30
-10
0
3
8
32
63
52
57
32
56
34
45
44
31
34
61
29
29
28
48
27
47
34
42
25
39
35
10
1
2
4
2
3
3
2
1
3
1
3
1
3
2
2
1
2
1
1
1
1
1
1
1
THRU 12
R Y
THRU 24
R Y
1
430
13
100
2
180
14
450
3
400
15
80
4
270
16
130
5
0
17
260
6
0
18
270
7
300
19
100
8
100
20
90
9
70
21
50
10
0
22
150
11
170
23
180
12
30
24
310
CORE RETURNS
UNITS
0
VALUE $
0.00
INVENTORY RETURNS
UNITS
0
VALUE $
0.00
WARRANTY RETURNS
UNITS
0
VALUE $
0.00
=========================================================================================================================
Sample Customer Sales Analysis Report
Autologue User’s Manual – Report Processing
Page 16
The customer product history displays a customer’s purchases in each of the 24
different sales history levels and can optionally be cleared during the month end
closing procedures. (The sales history levels are setup in the Product Line File)
The current month return status displays the units and dollar value of core,
inventory and warranty returns made during the month. This field is automatically
cleared during the month end closing procedures.
The grand totals supplied are a valuable tool in developing and calculating salesman
commission plans. Detailed information is supplied for net sales, profit percent and
returns.
The information listed on the Customer Sales Analysis Report can also be
graphically screen displayed except for the current month return status. For
additional information see Viewing A Customer's Sales History within the Customer
Update user’s manual section.
12.3.5 Limited Customer Sales Analysis
The Limited Customer Sales Analysis Report prints 3 of the 8 fields of information
available on the Customer Sales Analysis Report. The Limited Customer Sales
Analysis Report can be used to review customer purchases for specific product
history levels. The report will contain the following information for each customer
and grand totals of all customers printed:
♦ Net Sales
♦ Customer Product History
STR1
250
C U S T O M E R
AMERICAN ACRYLIC
SALESMAN/GROUP A
CURR MO
NET SALES
355.77
SALES LEVELS 1
H I S T O
SALES LEVELS 13
H I S T O
THRU 12
R Y
THRU 24
R Y
CORE RETURNS
INVENTORY RETURNS
WARRANTY RETURNS
L I M I T E D
1257 ORANGETHORPE
♦ Current Month Return Status
M O N T H L Y
FULLERTON
S A L E S
A N A L Y S I S
DATE MM/DD/YY
CA 91775-2555
DEC
7450
2220
NOV
3350
1960
OCT
3300
2130
SEP
2970
2220
AUG
2870
1790
JUL
2910
1150
JUN
2790
1260
MAY
2570
1400
APR
2500
1760
MAR
2460
1100
FEB
2570
970
JAN
2380
1420
1
430
13
100
2
180
14
450
3
400
15
80
4
270
16
130
5
0
17
260
6
0
18
270
7
300
19
100
8
100
20
90
9
70
21
50
10
0
22
150
11
170
23
180
12
30
24
310
UNITS
UNITS
UNITS
0
0
0
VALUE
VALUE
VALUE
$
$
$
0.00
0.00
0.00
=======================================================================================================================
Sample Limited Customer Sales Analysis Report
12.3.6 Customer Sales Analysis – Current Month
The Customer Sales Analysis Report -- Current Month prints out 8 fields of
information. The report can be summarized for a range of customer accounts or can
be printed in a detail format with separate figures by individual customer. The
report will contain the following information for each customer and grand totals of
all customers printed:
♦ Net Sales
♦ Cost of Sales
♦ Profit Dollars
♦ Number of Invoices
Autologue User’s Manual – Report Processing
♦ Core Sales
♦ Average Items Per Invoice
STORE:
STR1
C U S T O M E R
S A L E S
Page 17
♦ Profit Percent
♦ Previous 12 Month Sales Total
A N A L Y S I S
--
CURRENT
MONTH
ONLY
DATE MM/DD/YY
PAGE 1
CUST #
250
251
252
253
254
255
256
257
258
259
260
261
262
263
264
265
NAME
AMERICAN ACRYLIC
CERTIFIED APPLIANCE
CHUCK AND SAMS AUTOMOTIVE
CONE CHEVROLET
CONTINENTAL RADIATOR
DATSUN CAR SERVICE
DIETERS V W REPAIR
DUNCAN AUTOMOTIVE
FRIENDLY AUTO REPAIR
FULLERTON TRANSMISSION
A C D AUTO REPAIR
HORNSBY GARAGE
VICKS AUTOMOTIVE
KURTS TIRES
KENS MOTORS
LES AUTOMOTIVE
NET SALES
355.77
0.00
0.00
18.00
0.00
9.35
0.00
0.00
0.00
0.00
0.00
0.00
0.00
0.00
0.00
0.00
COST
OF SALES
158.78
0.00
0.00
12.00
0.00
6.60
0.00
0.00
0.00
0.00
0.00
0.00
0.00
0.00
0.00
0.00
G.P.$
G.P.%
CORE
SALES
196.99
0.00
0.00
6.00
0.00
2.75
0.00
0.00
0.00
0.00
0.00
0.00
0.00
0.00
0.00
0.00
55.4
0.0
0.0
33.3
0.0
29.4
0.0
0.0
0.0
0.0
0.0
0.0
0.0
0.0
0.0
0.0
0.00
0.00
0.00
0.00
0.00
0.00
0.00
0.00
0.00
0.00
0.00
0.00
0.00
0.00
0.00
0.00
# OF
INVOICES
3
0
0
1
0
1
0
0
0
0
0
0
0
0
0
0
AVG LINES
PER INVOICE
3
0
0
20
0
11
0
0
0
0
0
0
0
0
0
0
PREV. 12 MON.
SALES TOTAL
38120
39480
38070
39280
38070
38070
38070
38070
38070
38070
40670
38070
38070
27340
38070
38070
=================================================================================================================================
GRAND TOTAL:
383.12
177.38
205.74
53.7
0.00
5
603660
***** FROM CUSTOMER 250 TO CUSTOMER 265
Sample Customer Sales Analysis – Current Month Report
12.3.7 Customer Pricing Matrix
The Customer Matrix Report prints out all pricing information stored in the
customer record for the specified range of customers. The report will print out the
standard pricing matrix, which defines what price level the customer buys at for
each product line number, the exception pricing information and the popularity
pricing information.
Autologue User’s Manual – Report Processing
Customer Matrix ReporW: Cust 100 - 101
Mon Sep 14 HH:MM:SS Page
Page 18
1
**Customer 100 AAA RETAIL DEPCO INC**
|Lvl
0 Pop|Lvl
1 Pop|Lvl
2 Pop|Lvl
3 Pop|Lvl
4 Pop|Lvl
5 Pop|
+-----------+-----------+-----------+-----------+-----------+-----------+
| 100.00
| 100.00
| 100.00
| 100.00
| 100.00
| 100.00
|
0
3333333333
70
3333333333
140
3333333333
210
3333333333
10
3333333333
80
3333333333
150
3333333333
220
3333333333
20
3333333333
90
3333333333
160
3333333333
230
3333333333
30
3333333333
100
3333333333
170
3333333333
240
3333333333
40
3333333333
110
3333333333
180
3333333333
250
333333
50
3333333333
120
3333333333
190
3333333333
60
3333333333
130
3333333333
200
3333333333
Prod Type
Mfr-Part Number
Pct/Price Price Level
Notes
-------------------------------------------------------------------------------1 Percent
119.00% 0 Example Note Entry
103 Fixed
HEL-4550
$ 10.00
Special for Depco Only !!
**Customer 101 AB MOTORS**
|Lvl
0 Pop|Lvl
1 Pop|Lvl
2 Pop|Lvl
3 Pop|Lvl
4 Pop|Lvl
5 Pop|
+-----------+-----------+-----------+-----------+-----------+-----------+
| 100.00
| 100.00
| 100.00
| 100.00
| 100.00
| 100.00
|
0
3333333333
70
3333333333
140
3333333333
210
3333333333
10
3333333333
80
3333333333
150
3333333333
220
3333333333
20
3333333333
90
3333333333
160
3333333333
230
3333333333
30
3333333333
100
3333333333
170
3333333333
240
3333333333
40
3333333333
110
3333333333
180
3333333333
250
333333
50
3333333333
120
3333333333
190
3333333333
60
3333333333
130
3333333333
200
3333333333
Prod Type
Mfr-Part Number
Pct/Price Price Level
Notes
-------------------------------------------------------------------------------4 Percent
80.00% 5 Example of 20% off of List Price
Sample Customer Pricing Matrix Report
12.3.8 Printing A Customer Report
•
From the Report Processing Menu, enter 2 and press <Return>.
Autologue User’s Manual – Report Processing
Page 19
The Customer Report screen will appear as shown:
•
With the cursor positioned at the ENTER 1, 2 OR 3 _ prompt, enter a 1, 2 or 3
and press <Return>.
Enter a 1 to generate a customer report for a range of customer numbers. The
prompts BEGINNING CUSTOMER and ENDING CUSTOMER will appear.
•
Enter the beginning customer number and press <Return>.
•
Enter the ending customer number and press <Return>.
The cursor will move to the ENTER SELECTION _ prompt.
•
Enter a 2 to generate a customer report for a range of salesman codes. The prompts
BEGINNING SALESMAN: and ENDING SALESMAN: will appear.
•
Enter the beginning salesman code (A - 9) and press <Return>.
•
Enter the ending salesman code (A - 9) and press <Return>.
The report will only include customers with matching salesman codes entered. To
generate individual salesman reports (and totals), print separate reports for each
salesman.
The cursor will move to the ENTER SELECTION _ prompt.
•
Enter a 3 to generate a customer report for a specific report code. The prompt
ENTER REPORT CODES(S) will appear.
•
Enter any combination of report codes (numeric) and press <Return>.
The cursor will move to the ENTER SELECTION _ prompt.
The number entered should correspond to the type of report to be generated.
Example: Entering 1 will print customer-mailing labels.
Autologue User’s Manual – Report Processing
Page 20
If 1 was entered at the ENTER SELECTION _ prompt, the cursor will move to the
NUMBER OF COPIES (LABELS ONLY) _ prompt.
•
Enter the number of copies to be printed and press <Return>.
•
With the cursor positioned at the ANSWER 'Y' TO BEGIN PRINTING prompt,
enter Y or N and press <Return>.
Enter Y and the report will begin printing. The message REPORT IN PROGRESS
will appear on the screen. When the report is complete, the cursor will return to the
ENTER 1, 2 OR 3 _ prompt.
Enter N and the cursor will return to the ENTER 1, 2 OR 3 _ prompt.
The Ï arrow key can be pressed to return the cursor to the previous prompt to
change a response. Press the <F11> (Exit) key to return to the Report Processing
Menu.
12.4 Gross Margin Pricing Reports
The Gross Margin Pricing Report presents, by part number or popularity code
summary, the gross margin profit percents of each price level. Various options allow
several different report formats to be generated for use in fine tuning prices.
The report may be printed for all part numbers, only part numbers with a specific
popularity code or by popularity code summary. Printing a gross margin pricing
report by popularity code summary allows for a quick review of the present
inventory-pricing scheme.
Reviewing the effects of new price changes can be quickly accomplished by printing
a Gross Margin Pricing Report by popularity code summary before and after the
price increase goes into effect. Using the Automatic Price Adjustment program, gross
profit margins can be adjusted when needed.
The gross margin percentage is calculated by dividing the profit (sale price minus
cost) by the sale price as shown:
$.80 (Sale Price) - $.50 (Cost)
$.30 (Profit)
$.80 (Sale Price)
=
=
$.30 (Profit)
37.50 % (Gross Margin %)
Gross profit margins can be calculated with or without a vendor discount included
(VENDOR NET % - Product Line Update).
12.4.1 Printing A Gross Margin Pricing Report
•
From the Report Processing Menu, enter 3 (Gross Margin Pricing Report) and press
<Return>.
Autologue User’s Manual – Report Processing
Page 21
The Gross Margin Pricing Report screen will appear as shown:
•
With the cursor positioned at the BEGINNING PRODUCT LINE prompt, enter the
beginning product line (0 - 255) and press <Return>.
•
With the cursor positioned at the ENDING PRODUCT LINE prompt, enter the ending
product line (0 - 255) and press <Return>.
The report will only include part numbers within the entered product line range.
•
With the cursor positioned at the INCLUDE ALL POP CODES ? prompt, enter Y or
N and press <Return>.
Enter Y to include all part numbers regardless of their popularity code. The cursor
then be positioned at the PRINT DETAIL BY PART NUMBERS ? prompt.
Enter N to only include specific popularity coded part numbers. The cursor then be
positioned at the SELECT POP CODE : prompt.
•
Enter Y or N to each popularity code and press <Return>.
The report will include only those part numbers with the selected popularity codes.
•
With the cursor positioned at the PRINT DETAIL BY PART NUMBERS ? prompt,
enter Y or N and press <Return>.
Enter Y to print all part numbers of the product lines and popularity codes selected.
Enter N to print a summarized popularity code report for each product line selected.
•
With the cursor positioned at the INCLUDE VENDOR DISCOUNT ? prompt, enter Y
or N and press <Return>.
Enter Y to have the cost of an item on based upon price level 0 multiplied by the
vendor discount (Vendor Net%).
Autologue User’s Manual – Report Processing
Page 22
Enter N to have the cost of an item on base upon price level 0.
•
With the cursor positioned at the BEGIN PRINTING? prompt, enter Y or N and press
<Return>.
Enter Y and the report will begin printing.
Enter N and the cursor again be positioned at the BEGINNING PRODUCT LINE
prompt.
The price 0 printed for the gross margin pricing report by pop code summary is the
cost of one unit for every part number with that pop code.
The Ï arrow key can be pressed to return the cursor to the previous prompt to
change a response. Press the <F11> (Exit) key to return to the Report Processing
Menu.
12.4.1.1 Sample Gross Margin Pricing Report
DATE MM/DD/YY
PRODUCT LINE #
A: 0
B: 0
GROSS MARGIN PRICING REPORT -- DETAIL BY PART NUMBER
4
JTT LIFTERS /GASKETS
C: 0
D: 0
W: 0
R: 0
PART NUMBER
PRICE 0
PRICE 1
S: 0
O: 0
PRICE 2
CATALOGUE DATE
PRICE 3
STR1
PAGE 1
MM/YY
PRICE 4
PRICE 5
CORE
COST
CORE
SELL
POP
JTT100.00
30.07%
40.12%
50.00%
50.00%
60.00%
0.00
0.00%
A
JTT-708
3.78
30.13%
40.10%
50.00%
50.00%
62.01%
0.00
0.00%
A
JTT-761
3.06
30.14%
40.12%
50.00%
50.00%
65.81%
0.00
0.00%
A
JTT-770
2.73
30.00%
40.13%
50.00%
50.00%
72.56%
0.00
0.00%
A
JTT-812
2.30
30.09%
40.10%
50.00%
50.00%
76.88%
0.00
0.00%
A
JTT-817
1.58
39.23%
48.03%
56.59%
56.59%
77.27%
0.00
0.00%
A
JTT-817R
2.29
25.89%
36.57%
46.99%
46.99%
71.19%
0.00
0.00%
A
JTT-846
2.38
30.00%
40.05%
50.00%
50.00%
70.06%
0.00
0.00%
A
JTT-855
2.66
30.00%
40.09%
50.00%
50.00%
73.27%
0.00
0.00%
A
JTT-872
1.47
30.00%
40.00%
50.00%
50.00%
78.85%
0.00
0.00%
A
JTT-874
1.86
30.08%
40.19%
50.00%
50.00%
79.22%
0.00
0.00%
A
JTT-879
2.23
30.09%
40.05%
50.00%
50.00%
75.08%
0.00
0.00%
A
JTT-886
2.93
30.07%
40.08%
50.00%
50.00%
70.55%
0.00
0.00%
A
JTT-887
3.82
30.04%
40.13%
50.00%
50.00%
65.11%
0.00
0.00%
A
JTT-892
1.88
30.11%
40.13%
50.00%
50.00%
76.35%
0.00
0.00%
A
JTT-896
2.32
30.12%
40.05%
50.00%
50.00%
74.08%
0.00
0.00%
A
JTT-900
1.70
39.29%
48.01%
56.63%
56.63%
71.24%
0.00
0.00%
A
JTT-937
1.43
29.90%
40.17%
50.00%
50.00%
79.42%
0.00
0.00%
A
JTT-949
1.75
39.02%
47.92%
56.47%
56.47%
80.45%
0.00
0.00%
A
JTT-951
2.01
29.97%
40.18%
50.00%
50.00%
77.54%
0.00
0.00%
A
JTT-951R
2.47
30.03%
40.05%
50.00%
50.00%
72.40%
0.00
0.00%
A
JTT-957
2.80
30.00%
40.17%
50.00%
50.00%
71.86%
0.00
0.00%
A
JTT-969
1.82
30.00%
40.13%
50.00%
50.00%
77.11%
0.00
0.00%
A
JTT-976
2.28
30.06%
40.16%
50.00%
50.00%
74.53%
0.00
0.00%
A
JTT-992
1.70
30.04%
40.14%
50.00%
50.00%
78.62%
0.00
0.00%
A
JTT-2011
1.79
39.32%
47.97%
56.55%
56.55%
80.00%
0.00
0.00%
A
JTT-2012
2.89
30.02%
40.17%
50.00%
50.00%
70.95%
0.00
0.00%
A
-------------------------------------------------------------------------------------------------------------------------------AVERAGE
$
5.92
31.25%
41.15%
50.86%
50.86%
73.42%
0.00
0.00%
HIGHEST
$
100.00
39.32%
48.03%
56.63%
56.63%
80.45%
0.00
0.00%
LOWEST
$
1.43
25.89%
36.57%
46.99%
46.99%
60.00%
0.00
0.00%
DATE MM/DD/YY
PRODUCT LINE #
A: 0
B: 0
POP
GROSS MARGIN PRICING REPORT -- AVERAGE BY POP CODE
4
JTT LIFTERS /GASKETS
C: 0
D: 0
W: 0
R: 0
O: 0
PAGE 2
CATALOGUE DATE MM/YY
PRICE 1
PRICE 2
PRICE 3
PRICE 4
PRICE 5
AVG. CORE
COST
CORE
SELL
ITEMS
A
$
5.92
30.45%
B
$
0.00
0.00%
C
$
0.00
0.00%
D
$
0.00
0.00%
W
$
0.00
0.00%
R
$
0.00
0.00%
S
$
0.00
0.00%
O
$
0.00
0.00%
Sample Gross Margin Pricing Report - Detailed
40.45%
0.00%
0.00%
0.00%
0.00%
0.00%
0.00%
0.00%
50.28%
0.00%
0.00%
0.00%
0.00%
0.00%
0.00%
0.00%
50.28%
0.00%
0.00%
0.00%
0.00%
0.00%
0.00%
0.00%
66.52%
0.00%
0.00%
0.00%
0.00%
0.00%
0.00%
0.00%
0.00
0.00
0.00
0.00
0.00
0.00
0.00
0.00
0.00%
0.00%
0.00%
0.00%
0.00%
0.00%
0.00%
0.00%
27
0
0
0
0
0
0
0
CODE
AVERAGE
PRICE 0
S: 0
STR1
Autologue User’s Manual – Report Processing
Page 23
12.5 Print Price Labels
The Print Price Label program allows part number labels to be printed on
pre-printed Autologue or APS labels (condensed print). Shelf labels can be printed
on pre-printed Autologue shelf labels (condensed print). Optionally, both types of
labels can also be printed on standard size mailing labels (standard print). The
program also has the ability to have the cost price printed on price labels in a user
defined encoded format. All these options can be printed by product line, purchase
order or by individual part number. Listed below are each label type and the
options available:
Parts Label
•
prints on pre-printed Autologue or APS small part labels (condensed print) or on
large standard size mailing labels (standard print)
•
option to print a specific number of labels for one part number
•
option to print the alternate part number (assuming the part number is an alternate),
master alternate part number & description, unit cost, date printed and the vendor
number (if by P.O. #) on large part labels only!
•
option to print labels for each part’s quantity on hand, unit pack or one for each part
(by product line)
•
option to print the quantity ordered or received for each part (by P.O. #)
•
option to only print parts with a particular pop code(s) (by product line)
•
option to print a specific price level and optionally have it discounted
•
option to only print parts with a particular report code (by product line)
•
option to have the cost price encoded (large labels only and COST_CIPHER uservar
option must be setup and enabled!)
Shelf Label
•
prints on pre-printed Autologue shelf labels (condensed print) or on standard size
mailing labels (standard print) when answering N to all price levels (part number &
description only)
•
option to print the alternate part number (assuming the part number is an alternate),
master alternate part number, description and a specific price level
•
option to print a specific number of labels by part number
•
option to only print parts with a particular pop code(s) (by product line)
•
option to print a specific price level and optionally have it discounted
•
option to only print parts with a particular report code (by product line)
Standard Autologue part labels are printed on pre-printed computer labels with 7
labels across. APS (Automotive Parts System) part labels are printed on pre-printed
computer labels with 5 labels across.
Autologue User’s Manual – Report Processing
Page 24
Autologue shelf labels are printed on pre-printed computer labels with one label
across.
When printing shelf labels by product line, one label will be printed for each part
number.
12.5.1 Printing Labels
•
From the Report Processing Menu, enter 4 (Print Price Labels) and press <Return>.
The Print Price Label screen will appear as shown:
•
With the cursor positioned at the ENTER OPTION NUMBER DESIRED prompt, enter
1 (Parts Label), 2 (Shelf Label), or 3 (Barcode Label) and press <Return>.
If 1 (Parts Label) was entered, the cursor will be positioned at the SMALL OR LARGE
LABEL? (S/L) prompt.
•
With the cursor positioned at the SMALL OR LARGE LABEL? (S/L) prompt, enter
S (small pre-printed labels) or L (large standard address mailing labels – not
condensed) and press <Return>.
If 2 (Shelf Label) was entered, the cursor will be positioned at the PRINT PART AND
MASTER? (Y/N) prompt.
•
With the cursor positioned at the PRINT PART AND MASTER? (Y/N) prompt,
enter Y or N and press <Return>.
If Y was entered and the part number to be printed is a slave alternate part number,
the label will print the alternate’s part number, the alternate’s master part number,
the master’s description, unit cost, date printed and the vendor number.
Autologue User’s Manual – Report Processing
Page 25
If 3 (Barcode Label) was entered, the cursor will be positioned at the ENTER OPTION
1, 2 OR 3 prompt.
) Note: Bar code labels will only print up to 18 character part numbers. This is a
limitation of the printer and label itself.
12.5.1.1 Print By Product Line
•
With the cursor positioned at the ENTER OPTION 1, 2 OR 3 prompt, enter 1
(Print By Product Line) and press <Return>.
•
With the cursor positioned at the BEGINNING PRODUCT LINE prompt, enter the
beginning product line number and press <Return>.
•
With the cursor positioned at the ENDING PRODUCT LINE prompt, enter the ending
product line number and press <Return>.
•
With the cursor positioned at the PRINT LABEL FOR EACH (1)PART,(2)UNIT
PACK OR (3)PART NUMBER prompt, enter 1 to print one label for each quantity on
hand of each part number, enter 2 to print one label for each unit pack of each part
number or enter 3 to only print one label for each part number within the product
line range and press <Return>.
•
With the cursor positioned at the ALL POP CODES ? prompt, enter Y or N and press
<Return>.
Enter Y and the cursor will move to the PRICE 0 prompt.
Enter N and the cursor will move to the A_ prompt. Enter Y and press <Return> for
each pop code to have labels printed for. Enter N and press <Return> for each pop
code to be excluded.
Part
Number
ACD-46
ACD-R45TS
BCA-A3
CSP-N9YC
MAE-2022
Quantity
On Hand
Unit
Pack
Parts Labels Printed
(Option 1)
Shelf Labels Printed
(Option 2)
24
60
3
3
0
8
8
3
8
2
24
60
3
3
0
3
13
1
1
0
12.5.1.2 Print From Purchase Order
•
With the cursor positioned at the ENTER OPTION 1, 2 OR 3 prompt, enter 2
(Print From Purchase Order) and press <Return>.
•
With the cursor positioned at the PURCHASE ORDER NUMBER: prompt, enter the
purchase order number and press <Return>.
•
With the cursor positioned at the ORDERED/RECEIVED(O/R) prompt, enter O
(Ordered) or R (Received) and press <Return>. Note: Pressing the <Return> key
without entering a value will automatically enter a default value of O.
Autologue User’s Manual – Report Processing
Page 26
•
With the cursor positioned at the PRINT LABEL FOR EACH (1)PART,(2)UNIT
PACK OR (3)PART NUMBER prompt, enter 1 to print one label for each quantity on
hand of each part number, enter 2 to print one label for each unit pack of each part
number or enter 3 to only print one label for each part number on the purchase order
and press <Return>.
•
With the cursor positioned at the ALL POP CODES ? prompt, enter Y or N and press
<Return>.
Enter Y and the cursor will move to the PRICE 0 prompt.
Enter N and the cursor will move to the A_ prompt. Enter Y and press <Return> for
each pop code to have labels printed for. Enter N and press <Return> for each pop
code to be excluded.
) Note: Labels are NOT printed for items that have negative quantities
ordered/received!
12.5.1.3 Print One Part Number
•
With the cursor positioned at the ENTER OPTION 1, 2 OR 3 prompt, enter 3
(Print One Part Number) and press <Return>.
•
With the cursor positioned at the PART NUMBER prompt, enter the part number and
press <Return>.
•
With the cursor positioned at the QUANTITY TO PRINT prompt, enter the number
of labels to print for the part number entered and press <Return>.
12.5.2 Part Label Pricing
The next six prompts are used to define price to print as your price on the labels.
•
With the cursor positioned at the PRICE 0 _ prompt, enter Y to use price level 0 as
the price or N to use a different price level and press <Return>.
Enter N to each price prompt until a Y has been entered at the price prompt to be
used. The cursor will then be positioned at the ENTER DISCOUNT PERCENT
prompt.
•
With the cursor positioned at the ENTER DISCOUNT PERCENT prompt, enter a
discount percent from 0 to 320.00 or just press <Return> to use the default value of
100.00.
The discount percent will be multiplied against the price level selected to determine
your price.
•
With the cursor positioned at the REPORT CODE(S) prompt, enter the desired
report codes and press <Return> or just press <Return>.
•
With the cursor positioned at the ENTER PRINTER TYPE prompt, enter 0 (APS), 1
(TI), 2 (OKI), or 3 (FUJI) and press <Return>.
Autologue User’s Manual – Report Processing
Page 27
) Note: This prompt will be skipped when printing barcode labels because there is
a special type of barcode printer!
If using APS price labels, select 0. If using a TI-810 printer, select 1 and set the
management printer to 16.5 CPI (characters per inch). If using an Okidata printer,
select 2. If using a Fujitsu printer, select 3.
•
With the cursor positioned at the TEST FORM ALIGNMENT(Y/N) prompt, enter Y or
N and press <Return>.
Enter Y and a test form pattern will print.
Enter N and the cursor will be positioned at the BEGIN PRINTING LABELS(Y/N)
prompt.
•
With the cursor positioned at the BEGIN PRINTING LABELS(Y/N) prompt, enter Y
or N and press <Return>.
Enter Y and the labels requested will begin printing.
Enter N and the cursor again be positioned at the ENTER OPTION NUMBER
DESIRED prompt.
The Ï arrow key can be pressed to return the cursor to the previous prompt to
change a response. Press the <F11> (Exit) key to return to the Report Processing
Menu.
Autologue User’s Manual – Report Processing
12.5.2.1 Sample Part Number Labels
Page 28
Autologue User’s Manual – Report Processing
Page 29
12.6 Stock Status Report
The Stock Status Report program is a very powerful inventory management tool.
Over nine different types of reports can be generated. The Stock Status Report can
also calculate and assign min2/max2 stocking levels based upon sales history levels.
Optionally the calculated min2/max2 stocking levels can be swapped with the
min1/max1 stocking levels. Listed below are the reports available:
♦
♦
♦
♦
♦
All Parts Report
Over Stock Report
Stock Out Report
Return Stock Status Report
Zero Sales Report
♦
♦
♦
♦
♦
Stock On Order Report
Vendor Backorder Report
Customer Backorder Report
Negative Quantity On Hand Report
Frozen Min/Max Report
All reports can be generated for a range of product lines, include or exclude nonstocked parts (optional), include specific popularity and report codes for the part
numbers selected.
12.6.1 All Parts Report
The All Parts Report will list all part numbers for the entered product line range.
This report is commonly used for updating min/max 2 stocking levels based upon
the selected sales history quarters and the number of days minimum and maximum
stock is required.
This report is generated when 1 is entered at the ENTER SELECTION prompt.
Autologue User’s Manual – Report Processing
PAGE
1
----------
Page 30
STOCK STATUS REPORT
----------------------------------
MM/DD/YY HH:MM:SS
-----------------
STR1
------
WEEKS INTO QTR: 4, QTRS INCLUDED:1st=Y 2nd=Y 3rd=Y 4th=N 5th=N 6th=N, WORK DAYS/WEEK:6.0, SUGG. MIN DAYS:60, SUGG. MAX DAYS:120
REPORT CODES: NON-STOCKED PARTS: I
-----------------------------------------------------------------------------------------------------------------------------------
*** PRODUCT LINE #
*** EAT CAM BRGS
59
DESCRIPTION
PART NUMBER
ON
POP HAND
EATON CAM
EATCAM BEARINGS
EAT-B6
EAT-B8
EAT-B9
EAT-B11
EAT-B12
EAT-F22
EAT-F23A
EAT-F24
EAT-F26
SELL-UP MESSAGE:
GASKETS
POP PRICE PERCENTAGES: A:0
B:0
PRESENT
MIN1 MAX1
SUGGESTED
MIN
MAX
C:0
CATALOGUE DATE: MM/YY
D:0
W:0
R:0
S:0
O:0
----------SALES HISTORY---------CUR OCT JUL APR JAN OCT JUL STOCK UNIT UNIT ON
BACK CUST CORE WARR
QTR
YY
YY
YY
YY
YY
YY OUTS MEAS PACK ORDER ORD BACK RET RET
A
10
6
10
0
0
0
0
0
0
0
1
1
0
0
0
0
0
A
A
A
A
A
A
A
A
A
10
0
10
10
10
10
10
10
10
6
6
6
6
6
6
6
6
6
10
10
10
10
10
10
10
10
10
8
4
0
3
0
0
0
0
0
17
8
0
6
0
0
0
0
0
0
10
0
0
0
0
0
0
0
20
0
0
0
0
0
0
0
0
10
3
0
0
0
0
0
0
0
6
5
0
12
0
0
0
0
0
0
0
0
0
0
0
0
0
0
1
1
1
1
1
1
1
1
1
1
1
1
1
1
1
1
1
1
0
0
0
0
0
0
0
0
0
0
0
0
0
0
0
0
0
0
0
0
0
0
0
0
0
0
0
0
0
0
0
0
0
0
0
0
0
0
0
0
0
0
0
0
0
*** TOTALS FOR PRODUCT LINE # 59 ***
*** EAT CAM BRGS
***
QUANTITY
ON HAND
320
VALUE OF INVENTORY:
CORE VALUE OF INVENTORY:
VALUE OF WARRANTY RETURNS:
WARRANTY RETURNS - CORE VALUE:
VALUE OF CORE RETURNS:
VALUE OF STOCKOUTS:
VALUE OF OVERSTOCKS:
VALUE OF ZERO SALES:
VALUE OF NEGATIVE QUANTITY ON HAND:
QUANTITY
ON ORDER
0
2669.24
0.00
0.00
0.00
0.00
25.65
112.86
2077.30
0
VENDOR
BACKORDER
0
CUSTOMER
BACKORDER
0
ITEMS OUT
OF STOCK
1
ITEMS
31
CORE
RETURNS
0
WARRANTY
RETURNS
0
UNIT SALES TOTALS
----------------CURRENT
QUARTER
OCT
YY
JUL
YY
APR
YY
10
23
00
00
JAN
YY
OCT
YY
O
S
JUL
YY
Sample All Parts Report
12.6.2 Over Stock Report
An Over Stock Report will only list part numbers with a quantity on hand plus on
order plus vendor backorder quantities greater than the maximum stocking level
selected (max 1 or max 2).
The actual over stock quantity will print under the last column (O/S) for each part
number. The dollar value of over stocks will be listed by product line.
An Over Stock Report is generated when a 2 is entered at the ENTER SELECTION
prompt.
Autologue User’s Manual – Report Processing
PAGE
1
----------
Page 31
OVERSTOCK
REPORT
----------------------------------
MM/DD/YY HH:MM:SS
-----------------
STR1
------
WEEKS INTO QTR: 4, QTRS INCLUDED:1st=Y 2nd=Y 3rd=Y 4th=N 5th=N 6th=N, WORK DAYS/WEEK:6.0, SUGG. MIN DAYS:60, SUGG. MAX DAYS:120
REPORT CODES: NON-STOCKED PARTS: I
-----------------------------------------------------------------------------------------------------------------------------------
*** PRODUCT LINE #
*** EAT CAM BRGS
59
DESCRIPTION
PART NUMBER
ON
POP HAND
CAM BEARINGS
EAT-CH8
A
SELL-UP MESSAGE:
GASKETS
POP PRICE PERCENTAGES: A:0
B:0
32
PRESENT
MIN1 MAX1
6
10
*** TOTALS FOR PRODUCT LINE # 59 ***
*** EAT CAM BRGS
***
QUANTITY
ON HAND
32
VALUE OF INVENTORY:
CORE VALUE OF INVENTORY:
VALUE OF WARRANTY RETURNS:
WARRANTY RETURNS - CORE VALUE:
VALUE OF CORE RETURNS:
VALUE OF STOCKOUTS:
VALUE OF OVERSTOCKS:
VALUE OF ZERO SALES:
VALUE OF NEGATIVE QUANTITY ON HAND:
Sample Overstock Report
SUGGESTED
MIN
MAX
7
CATALOGUE DATE: MM/YY
D:0
W:0
R:0
S:0
O:0
----------SALES HISTORY---------CUR OCT JUL APR JAN OCT JUL STOCK UNIT UNIT ON
BACK CUST CORE WARR
QTR
YY
YY
YY
YY
YY
YY OUTS MEAS PACK ORDER ORD BACK RET RET
13
QUANTITY
ON ORDER
0
164.16
0.00
0.00
0.00
0.00
25.65
112.86
0.00
0.00
C:0
28
0
0
0
VENDOR
BACKORDER
0
5
CUSTOMER
BACKORDER
0
1
ITEMS OUT
OF STOCK
0
1
0
ITEMS
1
0
0
CORE
RETURNS
0
0
0 22
WARRANTY
RETURNS
0
UNIT SALES TOTALS
----------------CURRENT
QUARTER
OCT
YY
JUL
YY
APR
YY
28
0
0
0
JAN
YY
OCT
YY
JUL
YY
12.6.3 Stock Out Report
A Stock Out Report will list only those part numbers with stock out quantities
greater than zero. Stock outs are recorded in point of sale when the quantity to be
sold is greater than the quantity on hand available. Stock outs are accumulated
within the inventory file until cleared (an option during month end closing
procedures).
The actual stock out quantity will print under the STOCK OUTS column for each part
number. The dollar value of stock outs will be listed by product line.
A Stock Out Report is generated when a 3 is entered at the ENTER SELECTION
prompt.
O
S
Autologue User’s Manual – Report Processing
PAGE
1
----------
Page 32
STOCKOUT
REPORT
----------------------------------
MM/DD/YY HH:MM:SS
-----------------
STR1
------
WEEKS INTO QTR: 4, QTRS INCLUDED:1st=Y 2nd=Y 3rd=Y 4th=N 5th=N 6th=N, WORK DAYS/WEEK:6.0, SUGG. MIN DAYS:60, SUGG. MAX DAYS:120
REPORT CODES: NON-STOCKED PARTS: I
-----------------------------------------------------------------------------------------------------------------------------------
*** PRODUCT LINE #
*** EAT CAM BRGS
59
DESCRIPTION
PART NUMBER
ON
POP HAND
CAM BEARINGS
EAT-CH8
A
SELL-UP MESSAGE:
GASKETS
POP PRICE PERCENTAGES: A:0
B:0
32
PRESENT
MIN1 MAX1
6
10
*** TOTALS FOR PRODUCT LINE # 59 ***
*** EAT CAM BRGS
***
QUANTITY
ON HAND
32
VALUE OF INVENTORY:
CORE VALUE OF INVENTORY:
VALUE OF WARRANTY RETURNS:
WARRANTY RETURNS - CORE VALUE:
VALUE OF CORE RETURNS:
VALUE OF STOCKOUTS:
VALUE OF OVERSTOCKS:
VALUE OF ZERO SALES:
VALUE OF NEGATIVE QUANTITY ON HAND:
Sample Stock Out Report
SUGGESTED
MIN
MAX
7
CATALOGUE DATE: MM/YY
D:0
W:0
R:0
S:0
O:0
----------SALES HISTORY---------CUR OCT JUL APR JAN OCT JUL STOCK UNIT UNIT ON
BACK CUST CORE WARR
QTR
YY
YY
YY
YY
YY
YY OUTS MEAS PACK ORDER ORD BACK RET RET
13
QUANTITY
ON ORDER
0
164.16
0.00
0.00
0.00
0.00
25.65
112.86
0.00
0.00
C:0
28
0
0
0
VENDOR
BACKORDER
0
5
CUSTOMER
BACKORDER
0
1
ITEMS OUT
OF STOCK
0
1
0
ITEMS
1
0
0
CORE
RETURNS
0
0
OCT
YY
JUL
YY
APR
YY
28
0
0
0
JAN
YY
OCT
YY
JUL
YY
12.6.4 Return Stock Status Report
The Return Stock Status Report will list all core and/or warranty returns according
to the returns options selected.
Core and warranty return quantities will print under the CORE RET and WARR RET
columns. The dollar values of core returns and warranty returns will be listed by
product line.
A Return Stock Status Report is generated when a 4 is entered at the ENTER
SELECTION prompt.
0 22
WARRANTY
RETURNS
0
UNIT SALES TOTALS
----------------CURRENT
QUARTER
O
S
Autologue User’s Manual – Report Processing
PAGE
1
----------
Page 33
RETURN STOCK STATUS REPORT
----------------------------------
MM/DD/YY HH:MM:SS
-----------------
STR1
------
WEEKS INTO QTR: 4, QTRS INCLUDED:1st=Y 2nd=Y 3rd=Y 4th=N 5th=N 6th=N, WORK DAYS/WEEK:6.0, SUGG. MIN DAYS:60, SUGG. MAX DAYS:120
REPORT CODES: NON-STOCKED PARTS: I
-----------------------------------------------------------------------------------------------------------------------------------
*** PRODUCT LINE #
*** REB ELECTRIC
65
DESCRIPTION
PART NUMBER
ON
POP HAND
ALTERNATOR
REB-7057
A
STARTERS
REB-3131
A
REB-3132
A
USE 3257 3256
REB-3250
A
STARTERS USE 3256
REB-3257
A
STARTERS
REB-3258
A
SELL-UP MESSAGE:
SOLENOID REG
POP PRICE PERCENTAGES: A:0
B:0
PRESENT
MIN1 MAX1
SUGGESTED
MIN
MAX
C:0
CATALOGUE DATE: MM/YY
D:0
W:0
R:0
S:0
O:0
----------SALES HISTORY---------CUR OCT JUL APR JAN OCT JUL STOCK UNIT UNIT ON
BACK CUST CORE WARR
QTR
YY
YY
YY
YY
YY
YY OUTS MEAS PACK ORDER ORD BACK RET RET
5
2
2
0
0
0
0
0
0
0
1
1
0
0
0
1
0
0
1
2
2
2
2
6
2
11
4
24
8
0
0
0
0
0
0
32
0
1
1
1
1
0
0
0
0
0
0
9
3
0
0
-7
2
2
4
8
18
0
0
0
8
1
1
0
0
0
15
1
0
2
2
1
2
5
0
0
0
0
1
1
0
0
0
2
0
2
2
2
1
2
3
0
0
0
0
1
1
0
0
0
3
0
*** TOTALS FOR PRODUCT LINE # 65 ***
*** REB ELECTRIC
***
QUANTITY
ON HAND
1
VALUE OF INVENTORY:
CORE VALUE OF INVENTORY:
VALUE OF WARRANTY RETURNS:
WARRANTY RETURNS - CORE VALUE:
VALUE OF CORE RETURNS:
VALUE OF STOCKOUTS:
VALUE OF OVERSTOCKS:
VALUE OF ZERO SALES:
VALUE OF NEGATIVE QUANTITY ON HAND:
Sample Return Stock Status Report
QUANTITY
ON ORDER
0
103.00
100.00
10.69
13.60
481.60
490.32
34.50
57.50
-74.83
VENDOR
BACKORDER
0
CUSTOMER
BACKORDER
0
ITEMS OUT
OF STOCK
3
ITEMS
6
CORE
RETURNS
33
UNIT SALES TOTALS
----------------CURRENT
QUARTER
OCT
YY
JUL
YY
APR
YY
58
0
0
0
JAN
YY
OCT
YY
JUL
YY
12.6.5 Zero Sales Report
A Zero Sales Report lists part numbers with zero sales in the selected quarters of
sales history. Current quarter is always included but user’s can select any
combination of the previous six quarters of sales history.
A Zero Sales Report is generated when a 5 is entered at the ENTER SELECTION
prompt.
O
S
3
WARRANTY
RETURNS
1
Autologue User’s Manual – Report Processing
PAGE
1
----------
Page 34
ZERO SALES REPORT
----------------------------------
MM/DD/YY HH:MM:SS
-----------------
STR1
------
WEEKS INTO QTR: 0, QTRS INCLUDED:1st=Y 2nd=Y 3rd=Y 4th=N 5th=N 6th=N, WORK DAYS/WEEK:0.0, SUGG. MIN DAYS:0, SUGG. MAX DAYS:0
REPORT CODES: NON-STOCKED PARTS: I
-----------------------------------------------------------------------------------------------------------------------------------
*** PRODUCT LINE #
*** EAT CAM BRGS
59
DESCRIPTION
PART NUMBER
ON
POP HAND
EATON CAM
EATCAM BEARINGS
EAT-B9
EAT-B12
EAT-CH2
EAT-CH4
EAT-CH13
EAT-CO3
EAT-CO8
EAT-DA1
EAT-DA2
EAT-F1
EAT-F7
EAT-F9A
EAT-F15
EAT-F16
EAT-F18
EAT-F19
EAT-F22
EAT-F23A
EAT-F24
EAT-F26
SELL-UP MESSAGE:
GASKETS
POP PRICE PERCENTAGES: A:0
B:0
PRESENT
MIN1 MAX1
SUGGESTED
MIN
MAX
C:0
CATALOGUE DATE: MM/YY
D:0
W:0
R:0
S:0
O:0
----------SALES HISTORY---------CUR OCT JUL APR JAN OCT JUL STOCK UNIT UNIT ON
BACK CUST CORE WARR
QTR
YY
YY
YY
YY
YY
YY OUTS MEAS PACK ORDER ORD BACK RET RET
A
10
6
10
0
0
0
0
0
0
0
1
1
0
0
0
0
0
A
A
A
A
A
A
A
A
A
A
A
A
A
A
A
A
A
A
A
A
10
10
10
10
10
10
10
10
10
10
10
10
10
10
10
10
10
10
10
10
6
6
6
6
6
6
6
6
6
6
6
6
6
6
6
6
6
6
6
6
10
10
10
10
10
10
10
10
10
10
10
10
10
10
10
10
10
10
10
10
0
0
0
0
0
0
0
0
0
0
0
0
0
0
0
0
0
0
0
0
0
0
0
0
0
0
0
0
0
0
0
0
0
0
0
0
0
0
0
0
0
0
0
0
0
0
0
0
0
0
0
0
0
0
0
0
0
0
0
0
0
0
0
0
0
0
0
0
0
0
0
0
0
0
0
0
0
0
0
0
0
0
0
0
0
0
0
0
0
0
0
0
0
0
0
0
0
0
0
0
0
0
0
0
0
0
0
0
0
0
0
0
0
0
0
0
0
0
0
0
0
0
0
0
0
0
0
0
0
0
0
0
0
0
0
0
0
0
0
0
1
1
1
1
1
1
1
1
1
1
1
1
1
1
1
1
1
1
1
1
1
1
1
1
1
1
1
1
1
1
1
1
1
1
1
1
1
1
1
1
0
0
0
0
0
0
0
0
0
0
0
0
0
0
0
0
0
0
0
0
0
0
0
0
0
0
0
0
0
0
0
0
0
0
0
0
0
0
0
0
0
0
0
0
0
0
0
0
0
0
0
0
0
0
0
0
0
0
0
0
0
0
0
0
0
0
0
0
0
0
0
0
0
0
0
0
0
0
0
0
0
0
0
0
0
0
0
0
0
0
0
0
0
0
0
0
0
0
0
0
*** TOTALS FOR PRODUCT LINE # 59 ***
*** EAT CAM BRGS
***
QUANTITY
ON HAND
210
VALUE OF INVENTORY:
CORE VALUE OF INVENTORY:
VALUE OF WARRANTY RETURNS:
WARRANTY RETURNS - CORE VALUE:
VALUE OF CORE RETURNS:
VALUE OF STOCKOUTS:
VALUE OF OVERSTOCKS:
VALUE OF ZERO SALES:
VALUE OF NEGATIVE QUANTITY ON HAND:
Sample Zero Sales Report
QUANTITY
ON ORDER
0
2077.30
0.00
0.00
0.00
0.00
0.00
0.00
2077.30
0.00
VENDOR
BACKORDER
0
CUSTOMER
BACKORDER
0
ITEMS OUT
OF STOCK
0
ITEMS
21
CORE
RETURNS
0
UNIT SALES TOTALS
----------------CURRENT
QUARTER
OCT
YY
JUL
YY
APR
YY
0
0
0
0
JAN
YY
OCT
YY
JUL
YY
12.6.6 Stock On Order Report
A Stock On Order Report lists all part numbers presently on order. (Vendor
backorders appear on a separate report.)
A Stock On Order Report is generated when a 6 is entered at the ENTER
SELECTION prompt.
O
S
WARRANTY
RETURNS
0
Autologue User’s Manual – Report Processing
PAGE
1
----------
Page 35
STOCK ON ORDER REPORT
----------------------------------
MM/DD/YY HH:MM:SS
-----------------
STR1
------
WEEKS INTO QTR: 0, QTRS INCLUDED:1st=Y 2nd=Y 3rd=Y 4th=Y 5th=Y 6th=Y, WORK DAYS/WEEK:0.0, SUGG. MIN DAYS:0, SUGG. MAX DAYS:0
REPORT CODES: NON-STOCKED PARTS: I
-----------------------------------------------------------------------------------------------------------------------------------
*** PRODUCT LINE #
*** MICHIGAN BRGS
53
DESCRIPTION
PART NUMBER
ON
POP HAND
ENGINE BEARINGS
DAB-R1663STD
DAB-R1663-10
DAB-R1663-20
DAB-R7555STD
DAB-R7555-10
DAB-R7555-20
A
A
A
A
A
A
SELL-UP MESSAGE:
CRANKSHAFT
POP PRICE PERCENTAGES: A:0
B:0
39
40
43
0
76
10
PRESENT
MIN1 MAX1
48
48
48
48
48
48
SUGGESTED
MIN
MAX
96
96
96
96
96
96
0
0
0
0
0
0
0
0
0
0
0
0
CATALOGUE DATE: MM/YY
D:0
W:0
R:0
S:0
C:0
O:0
----------SALES HISTORY---------CUR OCT JUL APR JAN OCT JUL STOCK UNIT UNIT ON
BACK CUST CORE WARR
QTR
YY
YY
YY
YY
YY
YY OUTS MEAS PACK ORDER ORD BACK RET RET
12
23
17
50
126
138
0
0
0
0
0
0
0
0
0
0
0
0
0
0
0
0
0
0
0
0
0
0
0
0
0
0
0
0
0
0
0
0
0
0
0
0
0
0
0
7
72
48
1
1
1
1
8
1
8
8
8
8
8
8
56
56
56
96
32
88
0
0
0
0
0
0
0
0
0
0
8
0
0
0
0
0
0
0
O
S
0
0
0 3
0
0 12
0 2
***** TOTALS FOR PRODUCT LINE # 53 *****
QUANTITY
ON HAND
208
VALUE OF INVENTORY:
CORE VALUE OF INVENTORY:
VALUE OF WARRANTY RETURNS:
WARRANTY RETURNS - CORE VALUE:
VALUE OF CORE RETURNS:
VALUE OF STOCKOUTS:
VALUE OF OVERSTOCKS:
VALUE OF ZERO SALES:
VALUE OF NEGATIVE QUANTITY ON HAND:
Sample Stock On Order Report
QUANTITY
ON ORDER
384
VENDOR
BACKORDER
0
1011.64
0.00
0.00
0.00
0.00
106.68
34.86
0.00
0.00
CUSTOMER
BACKORDER
8
ITEMS OUT
OF STOCK
1
CORE
RETURNS
0
ITEMS
6
WARRANTY
RETURNS
0
UNIT SALES TOTALS
----------------CURRENT
QUARTER
OCT
YY
JUL
YY
APR
YY
JAN
YY
OCT
YY
JUL
YY
366
0
0
0
0
0
0
12.6.7 Vendor Backorder Report
A Vendor Backorder Report lists all part numbers presently on vendor backorder.
A vendor backorder report is generated when a 7 is entered at the ENTER
SELECTION prompt.
PAGE
1
----------
VENDOR BACKORDER REPORT
----------------------------------
MM/DD/YY HH:MM:SS
-----------------
STR1
------
WEEKS INTO QTR: 0, QTRS INCLUDED:1st=Y 2nd=Y 3rd=Y 4th=Y 5th=Y 6th=Y, WORK DAYS/WEEK:0.0, SUGG. MIN DAYS:0, SUGG. MAX DAYS:0
REPORT CODES: NON-STOCKED PARTS: I
-----------------------------------------------------------------------------------------------------------------------------------
*** PRODUCT LINE #
*** FRAM FILTERS
50
DESCRIPTION
PART NUMBER
ON
POP HAND
PCV VALVE
FRM-FV104
A
SELL-UP MESSAGE:
OIL WRENCHES
POP PRICE PERCENTAGES: A:-10
1
PRESENT
MIN1 MAX1
2
11
*** TOTALS FOR PRODUCT LINE # 50 ***
*** FRAM FILTERS
***
QUANTITY
ON HAND
1
VALUE OF INVENTORY:
CORE VALUE OF INVENTORY:
VALUE OF WARRANTY RETURNS:
WARRANTY RETURNS - CORE VALUE:
VALUE OF CORE RETURNS:
VALUE OF STOCKOUTS:
VALUE OF OVERSTOCKS:
VALUE OF ZERO SALES:
VALUE OF NEGATIVE QUANTITY ON HAND:
Sample Vendor Backorder Report
SUGGESTED
MIN
MAX
0
C:0
CATALOGUE DATE: MM/YY
D:10
W:22
R:0
S:0
O:0
----------SALES HISTORY---------CUR OCT JUL APR JAN OCT JUL STOCK UNIT UNIT ON
BACK CUST CORE WARR
QTR
YY
YY
YY
YY
YY
YY OUTS MEAS PACK ORDER ORD BACK RET RET
0
QUANTITY
ON ORDER
10
2.76
0.00
0.00
0.00
0.00
0.00
13.80
2.76
0.00
B:-5
0
0
0
0
VENDOR
BACKORDER
5
0
0
CUSTOMER
BACKORDER
0
0
0
1
ITEMS OUT
OF STOCK
0
10
10
ITEMS
1
5
0
CORE
RETURNS
0
UNIT SALES TOTALS
----------------CURRENT
QUARTER
OCT
YY
JUL
YY
APR
YY
JAN
YY
OCT
YY
JUL
YY
0
0
0
0
0
0
0
0
0
O
S
5
WARRANTY
RETURNS
0
Autologue User’s Manual – Report Processing
Page 36
12.6.8 Customer Backorder Report
A Customer Backorder Report lists all part numbers presently backordered by
customers.
A Customer Backorder Report is generated when 8 is entered at the ENTER
SELECTION prompt.
PAGE
1
----------
CUSTOMER BACKORDER REPORT
----------------------------------
MM/DD/YY HH:MM:SS
-----------------
STR1
------
WEEKS INTO QTR: 0, QTRS INCLUDED:1st=Y 2nd=Y 3rd=Y 4th=Y 5th=Y 6th=Y, WORK DAYS/WEEK:0.0, SUGG. MIN DAYS:0, SUGG. MAX DAYS:0
REPORT CODES: NON-STOCKED PARTS: I
-----------------------------------------------------------------------------------------------------------------------------------
*** PRODUCT LINE #
*** MICHIGAN BRGS
DESCRIPTION
PART NUMBER
ENGINE BEARINGS
DAB-R7555-10
53
SELL-UP MESSAGE:
CRANKSHAFT
POP PRICE PERCENTAGES: A:0
B:0
ON
POP HAND
A
76
PRESENT
MIN1 MAX1
48
96
*** TOTALS FOR PRODUCT LINE # 53 ***
*** MICHIGAN BRGS ***
QUANTITY
ON HAND
76
VALUE OF INVENTORY:
CORE VALUE OF INVENTORY:
VALUE OF WARRANTY RETURNS:
WARRANTY RETURNS - CORE VALUE:
VALUE OF CORE RETURNS:
VALUE OF STOCKOUTS:
VALUE OF OVERSTOCKS:
VALUE OF ZERO SALES:
VALUE OF NEGATIVE QUANTITY ON HAND:
SUGGESTED
MIN
MAX
0
0
CATALOGUE DATE: MM/YY
D:0
W:0
R:0
S:0
O:0
----------SALES HISTORY---------CUR OCT JUL APR JAN OCT JUL STOCK UNIT UNIT ON
BACK CUST CORE WARR
QTR
YY
YY
YY
YY
YY
YY OUTS MEAS PACK ORDER ORD BACK RET RET
126
QUANTITY
ON ORDER
32
63.84
0.00
0.00
0.00
0.00
60.48
10.08
0.00
0.00
C:0
0
0
0
VENDOR
BACKORDER
0
0
0
CUSTOMER
BACKORDER
8
0
72
8
ITEMS OUT
OF STOCK
0
8
32
ITEMS
1
0
8
CORE
RETURNS
0
0
OCT
YY
JUL
YY
APR
YY
JAN
YY
OCT
YY
JUL
YY
126
0
0
0
0
0
0
0 12
WARRANTY
RETURNS
0
UNIT SALES TOTALS
----------------CURRENT
QUARTER
O
S
Sample Customer Backorder Report
12.6.9 Negative Quantity On Hand Report
A Negative Quantity on Hand Report lists all part numbers that have a quantity on
hand less than zero. Quantities on hand become negative when inventory overrides
are performed through point of sale invoicing.
A Negative Quantity On Hand Report is generated when 9 is entered at the ENTER
SELECTION prompt.
Autologue User’s Manual – Report Processing
PAGE
1
----------
Page 37
NEGATIVE QUANTITY ON HAND REPORT
----------------------------------
MM/DD/YY HH:MM:SS
-----------------
STR1
------
WEEKS INTO QTR: 4, QTRS INCLUDED:1st=Y 2nd=Y 3rd=Y 4th=N 5th=N 6th=N, WORK DAYS/WEEK:6.0, SUGG. MIN DAYS:60, SUGG. MAX DAYS:120
REPORT CODES: NON-STOCKED PARTS: I
-----------------------------------------------------------------------------------------------------------------------------------
*** PRODUCT LINE #
*** FILKO IGN
51
DESCRIPTION
PART NUMBER
ON
POP HAND
CONTACT SET
FKO-75S
CAP
ROTOR
FKO-FO-99
FKO-FO-100
SELL-UP MESSAGE:
PLUGS TOOLS
POP PRICE PERCENTAGES: A:0
B:0
PRESENT
MIN1 MAX1
SUGGESTED
MIN
MAX
C:0
CATALOGUE DATE: MM/YY
D:0
W:0
R:0
S:0
O:0
----------SALES HISTORY---------CUR OCT JUL APR JAN OCT JUL STOCK UNIT UNIT ON
BACK CUST CORE WARR
QTR
YY
YY
YY
YY
YY
YY OUTS MEAS PACK ORDER ORD BACK RET RET
W
-4
1
1
3
5
11
0
0
0
2
1
1
4
0
0
0
0
A
A
-2
-3
1
1
1
1
1
1
3
3
6
6
0
0
0
0
0
0
0
0
1
1
1
1
3
3
0
0
0
0
0
0
0
0
*** TOTALS FOR PRODUCT LINE # 51 ***
*** FILKO IGN
***
QUANTITY
ON HAND
-9
VALUE OF INVENTORY:
CORE VALUE OF INVENTORY:
VALUE OF WARRANTY RETURNS:
WARRANTY RETURNS - CORE VALUE:
VALUE OF CORE RETURNS:
VALUE OF STOCKOUTS:
VALUE OF OVERSTOCKS:
VALUE OF ZERO SALES:
VALUE OF NEGATIVE QUANTITY ON HAND:
QUANTITY
ON ORDER
10
0.00
0.00
0.00
0.00
0.00
4.42
0.00
0.00
-18.91
VENDOR
BACKORDER
0
CUSTOMER
BACKORDER
0
ITEMS OUT
OF STOCK
3
ITEMS
3
CORE
RETURNS
0
WARRANTY
RETURNS
0
UNIT SALES TOTALS
----------------CURRENT
QUARTER
OCT
YY
JUL
YY
APR
YY
23
0
0
0
JAN
YY
OCT
YY
JUL
YY
Sample Negative Quantity On Hand Report
12.6.10 Frozen Min/Max Report
A Frozen Min/Max Report lists all part numbers with their FREEZE MIN/MAX
fields set to Y (frozen). When this field is set, a part number records min/max values
are not updated and are thus “frozen”.
A Frozen Min/Max Report is generated when 10 is entered at the ENTER
SELECTION prompt.
O
S
Autologue User’s Manual – Report Processing
PAGE
1
----------
Page 38
FROZEN MIN/MAX REPORT
---------------------
MM/DD/YY HH:MM:SS
-----------------
STR1
------
WEEKS INTO QTR: 4, QTRS INCLUDED:1st=Y 2nd=Y 3rd=Y 4th=N 5th=N 6th=N, WORK DAYS/WEEK:6.0, SUGG. MIN DAYS:60, SUGG. MAX DAYS:120
REPORT CODES: NON-STOCKED PARTS: I
-----------------------------------------------------------------------------------------------------------------------------------
*** PRODUCT LINE #
*** FILKO IGN
51
DESCRIPTION
PART NUMBER
ON
POP HAND
CONTACT SET
FKO-76S
CAP
ROTOR
FKO-FA-99
FKO-FO-100
SELL-UP MESSAGE:
PLUGS TOOLS
POP PRICE PERCENTAGES: A:0
B:0
PRESENT
MIN1 MAX1
SUGGESTED
MIN
MAX
CATALOGUE DATE: MM/YY
D:0
W:0
R:0
S:0
C:0
O:0
----------SALES HISTORY---------CUR OCT JUL APR JAN OCT JUL STOCK UNIT UNIT ON
BACK CUST CORE WARR
QTR
YY
YY
YY
YY
YY
YY OUTS MEAS PACK ORDER ORD BACK RET RET
S
1
1
1
3
5
11
0
0
0
2
1
1
4
0
0
0
0
B
A
1
1
1
1
1
1
1
1
3
3
6
6
0
0
0
0
0
0
0
0
1
1
1
1
3
3
0
0
0
0
0
0
0
0
*** TOTALS FOR PRODUCT LINE # 51 ***
*** FILKO IGN
***
QUANTITY
ON HAND
3
VALUE OF INVENTORY:
CORE VALUE OF INVENTORY:
VALUE OF WARRANTY RETURNS:
WARRANTY RETURNS - CORE VALUE:
VALUE OF CORE RETURNS:
VALUE OF STOCKOUTS:
VALUE OF OVERSTOCKS:
VALUE OF ZERO SALES:
VALUE OF NEGATIVE QUANTITY ON HAND:
QUANTITY
ON ORDER
10
15.21
0.00
0.00
0.00
0.00
0.00
0.00
0.00
0.00
VENDOR
BACKORDER
0
CUSTOMER
BACKORDER
0
ITEMS OUT
OF STOCK
3
ITEMS
3
CORE
RETURNS
0
WARRANTY
RETURNS
0
UNIT SALES TOTALS
----------------CURRENT
QUARTER
OCT
YY
JUL
YY
APR
YY
23
0
0
0
JAN
YY
OCT
YY
JUL
YY
Sample Frozen Min/Max Report
12.6.11 Suggested Min/Max Formula
Suggested min/max stocking levels are calculated based upon a combination of
previous sales history quarters selected, number of weeks in the current quarter and
the minimum / maximum days stock required.
Below are a series of calculations that are made by the Stock Status Report program
to calculate a suggested min/max2:
Unit Sales of Current Quarter plus Quarters Examined
(Weeks in Current Quarter) + (Number of Quarters Examined x 13)
=
Average Weekly Sales
Average Weekly Sales
Number of Days in Week
=
Average Daily Sales
Average Daily Sales x Minimum Days To Reorder
=
Suggested Minimum
Average Daily Sales x Maximum Days To Reorder
=
Suggested Maximum
The suggested minimum and maximum stocking levels are rounded to the closest
multiple of each part number’s per car quantity.
If the per car quantity of a part number is two, the suggested minimum and
maximum stocking levels will be a multiple of two.
If the per car quantity of a part number is zero, the suggested minimum and
maximum stocking levels will be zero.
O
S
Autologue User’s Manual – Report Processing
Page 39
If the suggested maximum is one or greater, the suggested minimum will also be at
least one. (This prevents having a minimum of 0 and maximum of 2).
To update the min/max 2 fields within the Inventory file, enter Y to the UPDATE
MIN/MAX 2 IN THE INVENTORY FILE (Y/N) prompt.
) Note: min/max 2 values can be updated without printing a report!
Using the Stock Status Report program to generate stocking levels based upon sales
history helps in reducing obsolete and slow moving merchandise within your
inventory and maintain proper stocking levels for popular and fast moving
merchandise.
Using the pop code option, different minimum and maximum days of stock can be
maintained by popularity code. By establishing greater minimum and maximum
days of stock for slower moving (D and W pop codes) items, you will be able to
maintain depth and high turnover ratios within your inventory.
Average Stock Maintained
Expected Turnover Ratio
30 Days
45 Days
60 Days
90 Days
120 Days
180 Days
12
8
6
4
3
2
12.6.12 Printing A Stock Status Report
•
From the Report Processing Menu, enter 5 (Stock Status Report) and press <Return>.
The Stock Status Report screen will appear as shown:
Autologue User’s Manual – Report Processing
Page 40
•
With the cursor positioned at the BEGINNING PRODUCT LINE prompt, enter the
beginning product line (0 - 255) and press <Return>.
•
With the cursor positioned at the ENDING PRODUCT LINE prompt, enter the ending
product line (0 - 255) and press <Return>.
The report will only include part numbers within the entered product line range.
•
With the cursor positioned at the ENTER SELECTION prompt, enter the number
(1-10) corresponding the type of report desired and press <Return>.
•
With the cursor positioned at the INCLUDE ALL POP CODES (Y/N) prompt, enter
Y or N and press <Return>.
Enter Y to include all popularity codes.
Enter N to not include all popularity codes. Enter Y or N and press <Return> to each
of the specific popularity codes. The report will include only those part numbers
with its popularity code answered Y.
•
With the cursor at the REPORT CODE(S) prompt, enter up to 10 different report
codes and press <Return> or just <Return> to skip past this prompt.
•
With the cursor positioned at the SHOW MIN/MAX 1 OR 2? prompt, enter 1 to
show min/max1 or 2 to show min/max2 values on the report.
•
With the cursor positioned at the CALCULATE SUGGESTED MIN/MAX 2 ? (Y/N)
prompt, enter Y or N and press <Return>.
12.6.12.1 Calculating Suggested Min/Max2 Values
•
With the cursor positioned at the WEEKS IN CURRENT QUARTER (13 MAX)
prompt, enter the number of weeks (1 - 13) since the previous sales quarter ended
and press <Return>.
Sales quarters typically end in March, June, September and December.
•
With the cursor positioned at the BUSINESS DAYS / WEEK (7 MAX) prompt,
enter the number of days (1.0 - 7.0) your business is open on a weekly basis and
press <Return>.
Example: If your business is open Monday through Saturday 8am-6pm and on
Sunday’s 10am-3pm enter 6.5 as the number of days in week.
•
With the cursor positioned at the QUARTERS TO EXAMINE (Y/N): prompt, enter Y
or N to each sales quarter prompt and press <Return>.
1st refers to the previous sales quarter, 4th to the corresponding current quarter last
year and 6th refers to the sales quarter of 18 months past. Only the sales quarters
selected will print on the report or be included in the suggested min/max 2
calculation.
When generating a Zero Sales Report, only part numbers with zero units sold in all
of the quarter selected plus current will print.
Autologue User’s Manual – Report Processing
Page 41
•
With the cursor positioned at the MINIMUM DAYS TO REORDER prompt, enter the
minimum days stock desired (1 - 365) and press <Return>.
•
With the cursor positioned at the MAXIMUM DAYS TO REORDER prompt, enter the
maximum days stock desired (1 - 365) and press <Return>.
•
With the cursor positioned at the MAXIMUM STOCKING LEVEL TO BE AT LEAST
150% OF UNIT PACK prompt, enter Y or N and press <Return>.
This prompt should be answered Y when calculating suggested min/max stocking
levels on product lines with unit packs greater than 1. This feature adjusts the
maximum stocking level in order for purchasing to automatically reorder this item
when the quantity on hand is below 1 unit pack.
When the NEW_MAX_STOCK uservar option enabled, the screen would display a
MAXIMUM STOCKING LEVEL TO BE AT LEAST 100% OF UNIT PACK (Y/N)
prompt instead of the usual MAXIMUM STOCKING LEVEL TO BE AT LEAST
150% OF UNIT PACK (Y/N) prompt. The calculated max values would then be
multiples of the unit pack.
•
With the cursor positioned at the NON-STOCKED PARTS (E/I/O) prompt, enter E
(to exclude) or I (to include) or O (to only include) non-stocked part numbers and press
<Return>. Note: simply press <Return> to use the default value of I that includes
all non-stocked parts!
To only print the non-stocked parts, enter O. Enter E to only print the stocked parts.
To only print both stocked and non-stocked parts, enter I.
A part is classified as stocked when the following is true: ((min1 + max1) > 0 or
(quantity on hand > 0)).
•
With the cursor positioned at the BEGIN PRINTING REPORT (Y/N) prompt, enter
Y or N and press <Return>.
Enter Y and a report will be generated and then printed based upon the entered
responses. When the report is done printing, the cursor will be positioned at the
prompt UPDATE MIN/MAX 2.
Enter N and the cursor will be positioned at the prompt UPDATE MIN/MAX 2. The
updating of min/max 2 stocking levels can be performed without printing a report.
•
Enter Y or N to the UPDATE MIN 2/ MAX 2 prompt and press <Return>.
Entering Y will update the min/max 2 stocking levels with the suggested min/max
stocking levels. Only those part numbers included within the responses entered
above will be updated.
The Report Processing Menu will be displayed after the Stock Status Report program
is completed.
12.6.12.2 Swapping Min/Max2 & Min/Max1 Values
•
When having the system calculate suggested stocking levels based upon sales
history through the Stock Status Report program, the user now has the ability to
Autologue User’s Manual – Report Processing
Page 42
swap the min/max1 and min/max2 values for each “unfrozen” part number by
pressing the <F6> (Swap Min/Max 1 & 2) key. When a part has its FREEZE MIN/MAX
flag set within its part record, it’s protected from having its min/max1 values
swapped!
12.7 Automatic Price Adjustment
The Automatic Price Adjustment program allows management to adjust prices in a
variety of ways that include:
♦ Part number or product line range
♦ Parts with a specific popularity and or report code
♦ Parts with a cost price within a specified dollar amount range can be aggregately
priced
♦ Price levels can be rolled up or down a percentage off of any price level, including
itself!
♦ A rounding factor can also be used during price calculations which allows prices to
be rounded to the nearest penny value
♦ A specific dollar amount can be automatically added onto the calculated dollar
amount when assigning the price level. The add-on factor allows positive or negative
dollar values from 0.01 to 99.99 to be added on.
♦ Formula’s can be entered and saved for future price adjustments.
12.7.1 Performing A Price Adjustment For A Product Line Range
•
From the Report Processing Menu, enter 6 (Automatic Price Adjustment) and press
<Return>.
The Automatic Price Adjustment screen will appear as shown:
Autologue User’s Manual – Report Processing
Page 43
•
With the cursor positioned at the BEGINNING PRODUCT LINE prompt, enter the
beginning product line (0 - 255) and press <Return>.
•
With the cursor positioned at the ENDING PRODUCT LINE prompt, enter the ending
product line (0 - 255) and press <Return>.
Note: The beginning product line number entered will automatically be the default
value for the ending product line. Simply pressing <Return> at the ENDING
PRODUCT LINE prompt uses the default value!
•
With the cursor positioned under the POP CODE prompt, enter the specific
popularity code (A B C D W R S O) to be adjusted and press <Return> or press
<Return> to use the default value of ALL and adjust all pop codes for this price
level.
Example: Enter an A if only the prices of all part numbers with a pop code of A are to
be adjusted.
•
With the cursor positioned under the REPT CODE prompt, enter the specific report
code(s) to be adjusted and press <Return> or press <Return> to use the default
value of ALL and adjust all report codes for this price level.
Example: Enter an R7 if only the prices of all part numbers with a report code of R7
are to be adjusted.
•
With the cursor positioned under the FROM COST prompt, enter a minimum cost
dollar value to be adjusted and press <Return> or press <Return> to use the
default value of 0.00 and adjust parts with cost prices greater than $0.00 for this
price level.
Example: Enter 10.00 if only the prices of parts with a cost greater than $10.00 are to
be adjusted.
•
With the cursor positioned under the TO COST prompt, enter a maximum cost
dollar value to be adjusted and press <Return> or press <Return> to use the
default value of 999999.99 and adjust parts with cost prices up to $999999.99 for
this price level.
Example: Enter 200.00 if only the prices of parts with a cost up to $200.00 are to be
adjusted.
•
With the cursor positioned under the PRICE LEVEL prompt, enter the price level
(0-8) to be adjusted and press <Return> or press <Return> to use the default
value of 0 and adjust price level 0.
The following table displays the price level number for each field:
Price Level Number
Price Level Description
0
1
2
3
4
5
Price 0
Price 1
Price 2
Price 3
Price 4
Price 5
Autologue User’s Manual – Report Processing
6
7
8
Page 44
Core Cost
Core Sell
Average Cost
•
With the cursor positioned under the % OF (percentage of) prompt, enter the
adjustment percent (0.00 - 655.35) and press <Return> or press <Return> to
use the default percentage of 100.00.
•
With the cursor positioned under the PRICE LEVEL prompt, enter the price level
(0-8) on which the percentage adjustment is to be based upon and press <Return>
or press <Return> to use the default value of 0.
•
With the cursor positioned under the ROUNDING FACTOR prompt, enter a rounding
factor (i.e. 0.05, 0.10, 0.25, 0.50 or 1.00) to have prices rounded to and press
<Return> or press <Return> to use the default value of 0.01.
•
With the cursor positioned under the ADD ON $ (dollar add on) prompt, enter an
add-on value ($0.00 - $99.99 positive or negative) and press <Return> or press
<Return> or press <Return> to use the default value of 0.00.
After completing this line, the cursor will be positioned under the POP CODE
prompt, below the line just entered.
•
Continue entering all price adjustments, up to a maximum of ten adjustment lines.
•
When all price adjustments formulations have been entered, press the <F6> (Update
Inventory) key to update the prices within the Inventory file.
As the price adjustments are being applied, the screen will display the message
PROCESSED XXX PARTS. When the update is completed, the formula information
will be cleared and the cursor will be positioned at the BEGINNING PRODUCT LINE
prompt.
Use the Ï arrow key to return the cursor to prior fields for correcting any incorrect
responses.
Press the <F11> (Exit) key to return to the Report Processing Menu.
12.7.2 Performing A Price Adjustment For A Part Number Range
•
From the Report Processing Menu, enter 6 (Automatic Price Adjustment) and press
<Return>.
•
With the cursor positioned at the BEGINNING PRODUCT LINE prompt within the
Automatic Price Adjustment screen, press <Return> and the cursor will be positioned
at the BEGINNING PART #: prompt.
•
With the cursor positioned at the BEGINNING PART #: prompt, enter the
beginning part number and press <Return>.
•
With the cursor positioned at the ENDING PART #: prompt, enter the ending part
number and press <Return>.
Autologue User’s Manual – Report Processing
Page 45
Note: The beginning part number entered will automatically be the default value for
the ending part number. Simply pressing <Return> at the ENDING PART #:
prompt uses the default value!
•
With the cursor positioned under the POP CODE prompt, enter the specific
popularity code (A B C D W R S O) to be adjusted and press <Return> or press
<Return> to use the default value of ALL and adjust all pop codes for this price
level.
•
With the cursor positioned under the REPT CODE prompt, enter the specific report
code(s) to be adjusted and press <Return> or press <Return> to use the default
value of ALL and adjust all report codes for this price level.
•
With the cursor positioned under the FROM COST prompt, enter a minimum cost
dollar value to be adjusted and press <Return> or press <Return> to use the
default value of 0.00 and adjust parts with cost prices greater than $0.00 for this
price level.
•
With the cursor positioned under the TO COST prompt, enter a maximum cost
dollar value to be adjusted and press <Return> or press <Return> to use the
default value of 999999.99 and adjust parts with cost prices up to $999999.99 for
this price level.
•
With the cursor positioned under the PRICE LEVEL prompt, enter the price level
(0-8) to be adjusted and press <Return> or press <Return> to use the default
value of 0 and adjust price level 0.
•
With the cursor positioned under the % OF (percentage of) prompt, enter the
adjustment percent (0.00 - 655.35) and press <Return> or press <Return> to
use the default percentage of 100.00.
•
With the cursor positioned under the PRICE LEVEL prompt, enter the price level
(0-8) on which the percentage adjustment is to be based upon and press <Return>
or press <Return> to use the default value of 0.
•
With the cursor positioned under the ROUNDING FACTOR prompt, enter a rounding
factor (i.e. 0.05, 0.10, 0.25, 0.50 or 1.00) to have prices rounded to and press
<Return> or press <Return> to use the default value of 0.01.
•
With the cursor positioned under the ADD ON $ (dollar add on) prompt, enter an
add-on value ($0.00 - $99.99 positive or negative) and press <Return> or press
<Return> or press <Return> to use the default value of 0.00.
After completing this line, the cursor will be positioned under the POP CODE
prompt, below the line just entered.
•
Continue entering all price adjustments, up to a maximum of ten adjustment lines.
•
When all price adjustments formulations have been entered, press the <F6> (Update
Inventory) key to update the prices within the Inventory file.
As the price adjustments are being applied, the screen will display the message
PROCESSED XXX PARTS. When the update is completed, the formula information
Autologue User’s Manual – Report Processing
Page 46
will be cleared and the cursor will be positioned at the BEGINNING PRODUCT LINE
prompt.
Use the Ï arrow key to return the cursor to prior fields for correcting any incorrect
responses.
Press the <F11> (Exit) key to return to the Report Processing Menu.
12.7.3 Entering & Saving A Price Adjustment Formula
•
With the cursor positioned at the BEGINNING PRODUCT LINE prompt within the
Automatic Price Adjustment screen, press the <F3> (Enter Formulas) key and the cursor
will be positioned at the POP CODE prompt.
•
With the cursor positioned under the POP CODE prompt, enter the specific
popularity code (A B C D W R S O) to be adjusted and press <Return> or press
<Return> to use the default value of ALL and adjust all pop codes for this price
level.
•
With the cursor positioned under the REPT CODE prompt, enter the specific report
code(s) to be adjusted and press <Return> or press <Return> to use the default
value of ALL and adjust all report codes for this price level.
•
With the cursor positioned under the FROM COST prompt, enter a minimum cost
dollar value to be adjusted and press <Return> or press <Return> to use the
default value of 0.00 and adjust parts with cost prices greater than $0.00 for this
price level.
•
With the cursor positioned under the TO COST prompt, enter a maximum cost
dollar value to be adjusted and press <Return> or press <Return> to use the
default value of 999999.99 and adjust parts with cost prices up to $999999.99 for
this price level.
•
With the cursor positioned under the PRICE LEVEL prompt, enter the price level
(0-8) to be adjusted and press <Return> or press <Return> to use the default
value of 0 and adjust price level 0.
•
With the cursor positioned under the % OF (percentage of) prompt, enter the
adjustment percent (0.00 - 655.35) and press <Return> or press <Return> to
use the default percentage of 100.00.
•
With the cursor positioned under the PRICE LEVEL prompt, enter the price level
(0-8) on which the percentage adjustment is to be based upon and press <Return>
or press <Return> to use the default value of 0.
•
With the cursor positioned under the ROUNDING FACTOR prompt, enter a rounding
factor (i.e. 0.05, 0.10, 0.25, 0.50 or 1.00) to have prices rounded to and press
<Return> or press <Return> to use the default value of 0.01.
•
With the cursor positioned under the ADD ON $ (dollar add on) prompt, enter an
add on value ($0.00 - $99.99 positive or negative) and press <Return> or press
<Return> or press <Return> to use the default value of 0.00.
Autologue User’s Manual – Report Processing
Page 47
After completing this line, the cursor will be positioned under the POP CODE
prompt, below the line just entered.
•
Continue entering all price adjustments, up to a maximum of ten adjustment lines.
•
When all price adjustments formulations have been entered, press the <F10> (Save
Formula) key to save the entered formula calculations.
•
With the cursor positioned under the ENTER A DESCRIPTION TO DESCRIBE
THIS FORMULA prompt, enter a formula description (any alphanumeric characters)
and press <Return>.
When the saving of the formula is completed, the cursor will return to the screen.
12.7.3.1 Deleting A Price Adjustment Formula Line
•
To delete the last line of a price adjustments formula, press the <F4> (Delete Line) key
and the screen will be redrawn with the last formula calculation line removed.
12.7.4 Selecting A Price Adjustment Formula
•
With the cursor positioned at the BEGINNING PRODUCT LINE prompt within the
Automatic Price Adjustment screen, press the <F2> (Select Formula) key.
A Select Formula pop up selection list window will be displayed and the first formula
will be highlighted as shown:
•
Using the Ï and Ð arrow keys, highlight the desired formula or enter the
corresponding number and press <Return>.
Autologue User’s Manual – Report Processing
Page 48
The <F8> (Scroll Forward) and <F9> (Scroll Backward) keys can be used to scroll
through pages of formula’s. The <F10> key can be used to automatically position
the cursor on the last formula section item.
•
With all price adjustments formulations displayed, press the <F6> (Update Inventory)
key to update the prices within the Inventory file.
As the price adjustments are being applied, the screen will display the message
PROCESSED XXX PARTS. When the update is completed, the formula information
will be cleared and the cursor will be positioned at the BEGINNING PRODUCT LINE
prompt.
Use the Ï arrow key to return the cursor to prior fields for correcting any incorrect
responses.
Press the <F11> (Exit) key to return to the Report Processing Menu.
12.7.5 Deleting A Price Adjustment Formula
•
With the cursor positioned at the BEGINNING PRODUCT LINE prompt within the
Automatic Price Adjustment screen, press the <F5> (Delete Formula) key.
A Select Formula pop up selection list window will be displayed and the first formula
will be highlighted.
•
Using the Ï and Ð arrow keys, highlight the desired formula to be deleted or enter
the corresponding number and press <Return>.
The <F8> (Scroll Forward) and <F9> (Scroll Backward) keys can be used to scroll
through pages of formula’s. The <F10> key can be used to automatically position
the cursor on the last formula section item.
Autologue User’s Manual – Report Processing
Page 49
When the deletion is completed, the screen will be redrawn and the cursor will be
positioned at the BEGINNING PRODUCT LINE prompt.
12.7.6 Gross Margin Conversion Table
The following table allows for a quick conversion from mark up percent to gross
margin. The Automatic Price Adjustment program uses a mark up percent increase.
The gross margin pricing report displays the gross margin percent.
MARK UP
PERCENT
100%
101%
102%
103%
104%
105%
106%
107%
108%
109%
110%
111%
112%
113%
114%
115%
116%
117%
118%
119%
120%
121%
122%
123%
124%
125%
126%
127%
128%
129%
130%
GROSS
MARGIN
0%
1%
2%
2.9%
3.8%
4.8%
5.7%
6.5%
7.4%
8.3%
9.1%
9.9%
10.7%
11.5%
12.3%
13.4%
13.8%
14.5%
15.3%
16.0%
16.7%
17.4%
18.3%
18.7%
19.4%
20.0%
20.6%
21.3%
21.9%
22.5%
23.7%
MARK UP
PERCENT
131%
132%
133%
134%
135%
136%
137%
138%
139%
140%
141%
142%
143%
144%
145%
146%
147%
148%
149%
150%
151%
152%
153%
154%
155%
156%
157%
158%
159%
160%
161%
GROSS
MARGIN
23.7%
24.2%
24.8%
25.4%
25.9%
26.5%
27.0%
27.5%
28.1%
28.6%
29.1%
29.6%
30.1%
30.6%
31.0%
31.5%
32.0%
32.4%
32.9%
33.3%
33.8%
34.2%
34.6%
35.1%
35.5%
35.9%
36.3%
36.7%
37.1%
37.5%
37.9%
MARK UP
PERCENT
162%
163%
164%
165%
166%
167%
168%
169%
170%
171%
172%
173%
174%
175%
176%
177%
178%
179%
180%
181%
182%
183%
184%
185%
186%
187%
188%
189%
190%
191%
192%
GROSS
MARGIN
38.3%
38.7%
39.0%
39.4%
39.8%
40.1%
40.5%
40.8%
41.2%
41.5%
41.9%
42.2%
42.5%
42.9%
43.2%
43.5%
43.8%
45.0%
44.4%
44.8%
45.1%
45.4%
45.7%
46.0%
46.2%
46.5%
46.8%
47.1%
47.4%
47.6%
47.9%
MARK UP
PERCENT
193%
194%
195%
196%
197%
198%
199%
200%
205%
210%
215%
220%
225%
230%
235%
240%
245%
250%
300%
350%
400%
450%
500%
550%
600%
650%
655%
GROSS
MARGIN
48.2%
48.5%
48.7%
49.0%
49.2%
49.5%
49.8%
50.0%
51.2%
52.4%
53.5%
54.6%
55.6%
56.5%
57.5%
58.3%
59.2%
60.0%
66.7%
71.4%
75.0%
77.8%
80.0%
81.8%
83.3%
84.6%
84.7%
12.8 Product Line Listing
The Product Line List menu option prints the following information for the product
line number range specified:
♦ Description
♦ Sell-Up Message
♦ Vendor Net %
♦ Price Sheet Date
Autologue User’s Manual – Report Processing
♦ First Part Number
Page 50
♦ Customer Sales History Level
The report can be generated for a range of product line numbers.
12.8.1 Printing A Product Line List
•
From the Report Processing Menu, enter 7 (Product Line Listing) and press <Return>.
The Product Line List Program screen will appear as shown:
•
With the cursor positioned at the BEGINNING PRODUCT LINE: prompt, enter the
beginning product line (0 - 255) and press <Return>.
•
With the cursor positioned at the ENDING PRODUCT LINE: prompt, enter the
ending product line (0 - 255) and press <Return>.
•
With the cursor positioned at the BEGIN PRINTING REPORT? (Y,N) prompt,
enter Y, press <Return> and the report will begin printing and the message
REPORT IN PROGRESS will be displayed. When complete, the cursor will return to
the BEGINNING PRODUCT LINE: prompt.
) Note: Product line numbers that do not contain part numbers will be skipped on
the report!
If N is entered, the cursor will return to the BEGINNING PRODUCT LINE: prompt.
•
Press the <F11> (Exit) key to return to the Report Processing Menu.
Autologue User’s Manual – Report Processing
DATE:
PRODUCT
LINE #
50
51
52
53
54
55
56
57
58
59
60
61
62
63
64
65
66
67
68
MM/DD/YY
DESCRIPTION
Page 51
PRODUCT
LINE
LIST
=====================
SELL-UP
MESSAGE
FRAM FILTERS
OIL WRENCHES
FILKO IGN
PLUGS TOOLS
FILKO CARB KT
CARB CLEANER
MICHIGAN BRGS
CRANKSHAFT
SAF PISTONS
RINGS
LIN TIMING
GASKETS
FEL PRO FS
GASKET SEALER
CSP PLUGS
POINTS COND
BCA BEARING
SEALS GREASE
EAT CAM BRGS
GASKETS
MTC SPK PLUGS
POINTS COND
GRB GATES
CLAMPS AFREEZ
NTS SEALS
BRGS GREASE
SPW PER RINGS
ENG BRGS TOOL
SAF OIL PUMPS
SCREEN SHAFT
REB ELECTRIC
SOLENOID REG
PTX CHEMICALS
HAND CLEANER
HLP PRODUCTS
REB WATER PMP
BELTS A FREEZ
Sample Product Line List Report
STR1
FIRST
PART #
VENDOR
NET %
FRMFKOFKO-3
DABSAF-2
MOT-CA5523
FEL-3
CSPBCAEATMTCGRBNTSSPW-2
SAFREBPTXHLPREB-3
70.00
72.00
72.00
100.00
100.00
100.00
100.00
82.00
100.00
100.00
80.00
100.00
100.00
100.00
100.00
100.00
100.00
100.00
100.00
PRICE SHEET
DATE
MM/YY
MM/YY
MM/YY
MM/YY
MM/YY
MM/YY
MM/YY
MM/YY
MM/YY
MM/YY
MM/YY
MM/YY
MM/YY
MM/YY
MM/YY
MM/YY
MM/YY
MM/YY
MM/YY
PAGE
1
CUSTOMER SALES
HISTORY LEVEL
7
8
8
3
18
12
6
24
24
4
24
9
24
19
17
15
2
5
24
12.9 Print Kits, Alternates & Supersessions
The Print Kits, Alternates & Supersessions program is not covered in the Report
Processing section. See the section titled Kits, Alternates & Supersessions.
12.10 Customer Backorder Report
The Customer Backorder Report menu option allows customer backorder detail
records to be screen displayed or printed. The following information is stored for
each customer backorder detail record:
♦
♦
♦
♦
♦
Counterman Code
Customer Number
Customer Name
PO Number
Part Number
♦
♦
♦
♦
♦
Part Description
Quoted Price
Backordered Quantity
Quantity On Hand
Quantity On Order
Customer backorders are created through point of sale invoicing when a customer
requests a quantity to purchase that is greater than presently on hand. If the
customer is allowed to backorder items, the screen will prompt BACKORDER
REMAINDER? (Y/N). Enter Y and press <Return> to create a customer backorder
record.
The ability to backorder merchandise is established in each customer’s record.
Customer backorders are only allowed for customers with a Y in the BKORD field.
(For more information see the Customer Update section of the user's manual)
Customer backorders are included in the purchasing min/max formula calculation
and will be ordered when the quantity on hand is below the minimum stocking level
being used to create a purchase order. Management also has the option of creating a
Special Purchase Order or adding the item to an existing purchase order. (For more
information see the Purchasing section of the user's manual)
Autologue User’s Manual – Report Processing
Page 52
12.10.1 Printing A Customer Backorder Report
•
From the Report Processing Menu, enter 9 (Customer Backorder Report) and press
<Return>.
The Customer Backorder Update screen will now appear with the cursor positioned at
the Item number prompt and the last customer backorder detail created displayed:
•
Press the <F7> (Print Report) key and the cursor will be positioned at the Customer
number prompt.
•
With the cursor positioned at the Customer number prompt, enter a customer
number to print a report for and press <Return> or just press <Return> to use the
default value of ALL and the report will be generated for all customers.
•
With the cursor positioned at the Product line prompt, enter a product number
to print a report for and press <Return> or just press <Return> to use the default
value of ALL and the report will be generated for all product lines.
•
With the cursor positioned at the ARE YOU SURE (Y/N)? prompt, enter Y and
press <Return>.
The report will be generated and upon completion a REPORT COMPLETED
message will be displayed in the lower right hand corner of the screen.
The report is sorted by customer number and part number.
•
Press the <F11> (Exit) key to return to the Report Processing Menu.
The Customer Backorder Report is an excellent tool for staying on top of customer
backorders when purchase orders are being received. Using the F7 Purchasing
Report and the Customer Backorder Report, it is easy to determine when
Autologue User’s Manual – Report Processing
Page 53
backordered merchandise is received and whom the merchandise was backordered
for.
Page
1
CUSTOMER BACKORDER REPORT
Product Line ALL
Customer Number ALL
MM/DD/YY
CN CUST
DATE
CUST PO NUMBER CUSTOMER NAME
QOH
BK ORD PART #
DESCRIPTION
PRICE EA PRICE EXT
------------------------------------------------------------------------------------------------------------------------------A
120 MM/DD/YY
FREEHOLD EXXON
0
8 ACD-R45TS
SPARK PLUGS
2.09
16.72
B
121 MM/DD/YY 1230
BILLS AUTO REPAIR
0
1 WIX-24071
FILTER
7.25
7.25
D
226 MM/DD/YY
GOODYEAR AUTOMOTIVE
0
1 CHV-350MK
MASTER KIT
329.99
329.99
E
229 MM/DD/YY 9951
CHUCKS GARAGE
0
1 TRW-22514
PUSH RODS
26.59
26.59
Sample Customer Backorder Report
12.10.2 Displaying Customer Backorder Records
•
From the Report Processing Menu, enter 9 (Customer Backorder Report) and press
<Return>.
The Customer Backorder Update screen will now appear with the cursor positioned at
the Item number prompt and the last customer backorder detail created displayed.
The customer backordered records can be displayed by using the <F8> (Scroll
Forwards) and <F9> (Scroll Backwards) keys to scroll through the customer backorder
file. Use the <F1> (Call Item #) key to display a particular item number.
•
Press the <F11> (Exit) key to return to the Report Processing Menu.
12.10.3 Deleting Customer Backorders
•
From the Report Processing Menu, enter 9 (Customer Backorder Report) and press
<Return>.
The Customer Backorder Update screen will now appear with the cursor positioned at
the Item number prompt and the last customer backorder detail created displayed.
•
Using the <F8> (Scroll Forwards) and <F9> (Scroll Backwards) or the <F1> (Call Item
#) keys, display the customer backordered detail to be deleted.
•
Press the <F4> (Delete Record) key to delete the customer backordered detail.
The program will automatically call up a workspace within point of sale for the
counterman code and customer number of the backorder record.
If the backordered item was already on the open workspace, the cursor will be
positioned under the MFR-PART NO heading prompt.
If the backordered item was not already on the open workspace, the item will be
automatically called up (with the quoted price and quantity) and cursor will be
positioned under the QTY heading prompt. The part can be either extended or
removed using the <F16> (Delete Line) key.
•
The user has the option to finalize the workspace (<F6> - Cash Sale/<F7> - Charge
Sale) or up arrowing to the already extended backordered line and pressing the
<F16> (Delete Line) key to remove the part from the workspace.
Autologue User’s Manual – Report Processing
Page 54
If the item was extended on the workspace and the invoice was finalized, the
customer backorder record will be automatically deleted and the cursor will be
positioned at the Item number prompt.
•
If the item was deleted from the workspace and the <F11> (Exit) key was pressed,
with the cursor positioned at the ARE YOU SURE (Y/N)? prompt, enter Y or N and
press <Return>.
Enter Y and the customer backorder detail will be deleted. Note that deleting a
customer backorder detail does NOT update the customer backorder quantity within
the inventory record. If the inventory record needs to be adjusted, this change must
be performed manually.
•
Press the <F11> (Exit) key to return to the Report Processing Menu.
12.10.4 Editing Customer Backorder Quantities
Customer backordered quantities may need to be edited due to partial shipments
received or other reasons.
•
From the Report Processing Menu, enter 9 (Customer Backorder Report) and press
<Return>.
The Customer Backorder Update screen will now appear with the cursor positioned at
the Item number prompt and the last customer backorder detail created displayed.
•
Using the <F8> (Scroll Forwards) and <F9> (Scroll Backwards) or the <F1> (Call Item
#) keys, display the customer backordered detail to be edited.
•
Press the <F2> (Change Qty) key to edit the customer backorder quantity.
•
With the cursor positioned next to the Quantity field, enter the new quantity to be
backordered, press <Return> and then the <F10> (Record Change) key to record the
new quantity. The next backorder record will be displayed.
Editing the backordered quantity does not update the inventory record. If the
inventory record needs to be updated, the changes will have to be entered manually.
12.11 Print Open Order (Workspace) Report
The Print Open Order (Workspace) Report menu option is designed to let
management review in process orders with greater flexibility than Point of Sale can
give. The user has the ability to screen view or print out open workspace
information. There are several report filters that can be used to isolate a group of
open workspaces as may be needed. The reporting filters include:
♦ Counterman Range
♦ Date Range
♦ Reference Number
♦ Customer Range
♦ Customer PO Number
The counterman and customer ranges can also include individual entries as well as
the specified range.
Autologue User’s Manual – Report Processing
Page 55
Example: If management wants to see all workspaces from counterman codes A
through D and also J, M and P.
12.11.1 Accessing The Printing Open Workspaces Program
•
From the Report Processing Menu, enter 10 (Print Open Order(Workspace) Report) and
press <Return>.
The Print Open Workspaces screen will be displayed as follows:
Status Box
Filtering Options
12.11.2 Filtering Options
The center section of the screen contains the filtering option prompts. The user can
input filtering information in order to produce the desired output report. The first
two lines, Counterman Range and Customer Range, include a section shown as
also which can be used to enter up to 3 individual entries to include in the report.
Example: To include counterman K, this can be accomplished in 2 ways:
1) Counterman from
K
2) Counterman from
to
K
to
also
<blank> <blank> <blank>
also
K
<blank> <blank>
Example: To include just customer # 200 only, this can be accomplished in 2 ways:
1) Counterman from
2) Counterman from
200
to
to
200
also
<blank> <blank> <blank>
also
200
<blank> <blank>
Example: To include all countermen from A through F, H, K, and S for customer
#100 through #561, 1010, 1053, and 1098:
Autologue User’s Manual – Report Processing
Page 56
Counterman from
A
to
F
also
H
K
S
Counterman from
100
to
561
also
1010
1053
1098
Example: To include a listing of all workspaces, both regular and layaway, simply
press the <F10> (Print) key without entering anything!
The Date Range filtering prompts allow the user to specify a particular range of
Workspace Creation Dates. To see just the workspaces created today, enter today’s
date in both fields. To see workspaces over 6 months old, enter a beginning date of a
couple of years ago, and an ending date of today’s date less 6 months.
The Customer PO Number and Reference Number lines are a substring search
type of filter. We use this type of filter when selecting a customer name in point of
sale. These filters work the same way.
Example: Enter WO 35 in the Reference Number field and only those workspaces
that have WO 35 anywhere in the reference number associated with that workspace
are displayed on the report.
Once all the desired filtering fields have been entered, pressing the <F10> (Print)
key will send the report to the specified device (Output To: prompt).
Pressing the <F1> (Restart) key will clear all filtering options but not the modes in
the Status Box section of the screen.
12.11.3 Status Box
The status box area of the screen is located in the top right corner of the screen. The
Output To: prompt shows where the report will be printed. The default value for
this field is Screen. To change the output destination, press the <F2> (Printer) key.
The description of the <F2> function key, at the bottom of the screen, will change to
reflect the next change that will take place if <F2> were to be pressed again. Notice
that the printer number is displayed to the right of the word Printer! Use the
Flexible Printing Option (14, 13 from the Autologue Main Menu) to change the printer
number.
The Totals Only: prompt shows whether or not report details will be printed.
The default value for this field is Yes. When Yes is displayed, report details are not
printed. Pressing the <F3> (Totals Y/N) key will toggle the field to either No or Yes!
12.12 Best Seller Report
The Best Seller Report is powerful management tool that is used to identify what
merchandise is selling, slow moving inventory items and how new merchandise is
selling. It can be used to rank and compare popularity codes of items based upon
sales history. Carefully review the amount of inventory of slow moving
merchandise as well as what is not selling. Reviewing rank code totals provides a
quick overview of your inventory investment. Hopefully the majority of your
inventory investment is placed with popular high volume part numbers.
Autologue User’s Manual – Report Processing
Page 57
The Best Seller Report program allows the popularity codes of part numbers to be
assigned based upon unit sales history. The report will rank the listed items in
sequential order from greatest to least number of units sold.
Additional options include:
♦ Items can be filtered by Report Code
♦ Ability to enter specific ranking percentages for popularity code assignments
♦ Ability to select the specific sales history quarters to be included when calculating
ranking codes
♦ Ability to update the popularity code of listed items with the assigned ranking code
♦ Ability to have the report printed to screen
♦ Ability to print a summarized or detailed report or only print the top N number of
items or by rank code
♦ Ability to rank items with zero sales with an R and optionally create a return
purchase order for all R ranked items
The Best Seller Report is broken up into 3 sections:
1. Ranked Parts (Items with sales history)
2. New Parts (Items with NEW within the first quarter sales history field)
3. Zero Sales Parts (Items with zero sales history)
For each part number listed, the Best Seller Report will display the following
information:
♦
♦
♦
♦
♦
Rank Number
Description
Popularity Code
Total Units Sold
Cumulative Percentage
♦
♦
♦
♦
Part Number
Qty On Hand
Rank Code
Percent of the Total
A summary of each Rank Code will be listed with the following information:
♦
♦
♦
♦
Rank Code
Inventory Value (Investment)
Quantity on Hand
Percent of Total Units Sold
♦
♦
♦
♦
Number of Items in Rank
Percent of the Total Value
Number of Units Sold
Cumulative Percent of Total Units Sold
12.12.1 Printing A Best Seller Report
•
From the Report Processing Menu, enter 11 (Best Seller Report) and press <Return>.
Autologue User’s Manual – Report Processing
Page 58
The Best Seller Report screen will now be displayed as shown:
•
With the cursor positioned at the Beginning Product Line prompt, enter the
beginning product line number (0 - 255) and press <Return>.
•
With the cursor positioned at the Ending Product Line prompt, enter the ending
product line number (0 - 255) and press <Return>.
The report will only include those product lines with part numbers in the range
entered.
•
With the cursor positioned at the Report Codes(s) prompt, enter any report
codes to be used or just press <Return> to leave it blank.
If a report code is entered, only parts that have the entered report code will be
processed.
The next five prompts allow the user to enter specific percentages of parts to be
ranked for each ranking code. When generating a Best Seller Report, the system first
ranks all parts in sequential order from highest to lowest units sold and then assigns
a rank code for each part number based upon the percentage break points entered.
•
With the cursor positioned at the A prompt, enter a percentage and press <Return>
or just press <Return> to use the default value of 23%.
•
Continue entering percentages for each rank code and press <Return>.
) Note: The entered percentages must total up to 100%!
Autologue User’s Manual – Report Processing
Page 59
Listed below is an example of percentages entered for each rank code and an
explanation of how the system will assign rank codes. This example is based upon a
total of 490 part numbers.
Rank
Code
Percentile
Assigned
A
B
C
D
W
23%
22%
20%
20%
15%
Percent Range
Part Numbers Assigned
Top 23%
24-45%
46-65%
66-85%
86-100%
Total Part Numbers =
56 Part Numbers
84 Part Numbers
105 Part Numbers
140 Part Numbers
105 Part Numbers
490 Part Numbers
The division of rank codes is based upon the total number of parts examined and the
percentile break points.
The cursor will be positioned under the INCLUDE FOLLOWING SALES HISTORY
QUARTERS (Y/N) prompt.
The next five prompts allow the user to enter specific percentages of parts to be
ranked for each ranking code. When generating a Best Seller Report, the system first
ranks all parts in sequential order from highest to lowest units sold and then assigns
a rank code for each part number based upon the percentage break points entered.
•
With the cursor positioned at the Current prompt, press the <Space Bar> to
toggle the value from Y to N and press <Return> or just press <Return> to include
the current quarter history.
•
Continue this process for each of the quarterly history prompts and press
<Return>.
When a Y is set, the units sold in this quarter will be included in the total units for
each part number. When an N is set, the Best Seller Report will ignore the sales totals
from this quarter.
Autologue User’s Manual – Report Processing
Page 60
•
Press the <F7> (Print Report) key and a Print Report pop up window will be
displayed in the middle of the screen as shown:
•
With the cursor positioned at the Output to: prompt, press the <Space Bar> to
toggle the value from Screen to Printer X and press <Return> or just press
<Return> to output the report to the screen.
With the cursor positioned within the Print the top parts prompt, four
different actions can be performed. Each will be described below:
1. Just press <Return> and leave the entry field blank to output all items on the
report.
2. Enter a specific number to only report the top number of items and press <Return>.
3. Enter a specific rank code and press <Return>to only report the items that fell
within the specified rank code percentage.
4. Enter an N (New Parts) or S (Summary) or Z (Zero Sales) code and press <Return>
to only report the items that fell within the specified section of the report.
The Best Seller Report will begin printing to the screen or to the specified printer.
12.12.2 Interpreting The Best Seller Report
The Best Seller Report is broken up into three sections. The first is the “Ranked
Parts” section that contains all items that have sales history and does NOT have NEW
within the first quarter sales history field. A summary of rank code information is
listed which shows per each ranking code the following information:
♦ Number of Items
♦ Value of Inventory
♦ Percentage of Total Value
♦ Sales Units
♦ Percentage of Total Units Sold
♦ Percentage of Total Units Cumulative
Autologue User’s Manual – Report Processing
Page 61
♦ Quantity on Hand
Grand Totals are also listed for the following:
♦ Number of Items
♦ Value of Inventory
♦ Sales Units
The second is the “New Parts” section that contains all items that have sales history
and also has NEW within the first quarter sales history field. A summary of totals
information is listed which shows the following information:
♦ Number of Items
♦ Value of Inventory
♦ Sales Units
The third is the “Zero Sales” section that contains all items that have zero sales
history and does NOT have NEW within the first quarter sales history field. A
summary of totals information is listed which shows the following information:
♦ Number of Items
♦ Value of Inventory
♦ Sales Units
Listed below is an explanation of the Best Seller Report columns:
CD:
Rank:
Part Number:
Description:
QOH:
P:
R:
Sales:
Total:
Cumm:
The code field which denotes if a part number is stocked or non-stocked. It will only show
a code of “N” for non-stocked part numbers. Stocking part numbers will not display a
code.
The ranking number assigned to an item based upon the ranking code percentages, totals
sold and number of part numbers examined per section.
The part number.
The part number description.
The current quantity on hand.
The current popularity code of each part number as presently found in the Inventory file.
The ranking code assigned to an item based upon the rank code percentages, totals sold
and number of part numbers examined per section.
The total units sold in all sales history quarters examined.
The individual percentage of total units sold based upon the grand total of units sold per
section.
The cumulative percentage of total units sold based upon the grand total of units sold per
section.
Autologue User’s Manual – Report Processing
Page 62
12.12.2.1 Sample Best Seller Report
B E S T
S E L L E R
R E P O R T
Page
X
R A N K E D
P A R T S
Product Lines: 58 - 58 Report Codes:
Printed on: MM/DD/YY
Rank Code Percentages A: 23% B: 22% C: 20% D: 20% W: 15%
Include Following Sales History Quarters ?
Current: Y 1st: Y 2nd: Y 3rd: Y 4th: Y 5th: Y 6th: Y
CD Rank Part Number
Description
QOH P R
Sales
Total
Cumm
------------------------------------------------------------------------------1 BCA-A12
TAPR BEARN
5 A A
36
5.573%
5.573%
2 BCA-A13
TAPR BEARN
2 A A
29
4.489% 10.062%
3 BCA-A35
TAPR BEARN
2 A A
28
4.334% 14.396%
.
.
.
.
N
120 BCA-HM-903249
BEARING
0 S W
1
0.155% 99.845%
N
121 BCA-KB11786-Y
BEARING
0 S W
1
0.155% 100.000%
% of Total
% of Total Units
Rank Code
Items
Value
Value
Qoh
Sales
Sold
Cumm
------------------------------------------------------------------------------A
28
736.92
33.771%
62
402 62.229% 62.229%
B
27
446.95
20.483%
41
143 22.136% 84.365%
C
24
478.99
21.951%
22
55
8.514% 92.879%
D
24
415.99
19.064%
21
28
4.334% 97.214%
W
18
103.25
4.732%
2
18
2.786% 100.000%
------------------------------------------------------------------------------121
2182.10
646
B E S T
S E L L E R
R E P O R T
Page
X
N E W
P A R T S
Product Lines: 58 - 58 Report Codes:
Printed on: MM/DD/YY
Rank Code Percentages A: 23% B: 22% C: 20% D: 20% W: 15%
Include Following Sales History Quarters ?
Current: Y 1st: Y 2nd: Y 3rd: Y 4th: Y 5th: Y 6th: Y
Rank Part Number
Description
QOH P R
Sales
Total
Cumm
------------------------------------------------------------------------------1 BCA-A37
TAPR BEARN
0 A A
16 17.021% 17.021%
N
2 BCA-107DD
BEARING
0 C A
6
6.383% 23.404%
.
.
.
.
N
102 BCA-WPS102GRC
AG BEARING
0 S A
0
0.000% 100.000%
Items
Value
Sales
------------------------------------------------------------------------------102
278.54
94
B E S T
S E L L E R
R E P O R T
Page
X
Z E R O
S A L E S
Product Lines: 58 - 58 Report Codes:
Printed on: MM/DD/YY
Rank Code Percentages A: 23% B: 22% C: 20% D: 20% W: 15%
Include Following Sales History Quarters ?
Current: Y 1st: Y 2nd: Y 3rd: Y 4th: Y 5th: Y 6th: Y
Rank Part Number
Description
QOH P R
Sales
Total
Cumm
------------------------------------------------------------------------------N
1 BCA-02135C
BOWER/BCA BEA
0 A R
0
0.000%
0.000%
.
.
.
.
210 BCA-A40
TAPR BEARN
1 D R
-1 100.000% 100.000%
Items
Value
Sales
------------------------------------------------------------------------------210
582.14
-1
Sample Best Seller Report
Autologue User’s Manual – Report Processing
Page 63
12.12.3 Updating The Popularity Codes
•
Once all the entry fields have been input as described in the previous section, press
the <F10> (Update) key.
A Perform Rank => Pop Code Update pop up window will be displayed in the middle
of the screen as shown:
•
With the cursor positioned at the Print Report ? prompt, press the <Space
Bar> to toggle the value from No to Yes and press <Return> or just press
<Return> to use the default value of No and not print a detailed report.
) Autologue recommends printing a report that will show what the ranking code of
each item will be changed to when updating the popularity codes.
•
With the cursor positioned at the What to do with Zero Sales item ?
prompt, press the <Space Bar> to toggle the value from Set the Pop Code to
R to Leave Pop Code alone and press <Return> or just press <Return> to use
the default value of Set the Pop Code to R and thus set the pop code of zero
sales items to an R.
•
With the cursor positioned at the Create Return P.O. for all R items ?
prompt, press the <Space Bar> to toggle the value from No to Yes and press
<Return> or just press <Return> to use the default value of No and not create a
return purchase order for zero sales items.
•
With the cursor positioned at the Are You Sure ? prompt, press the <Space
Bar> to toggle the value from No to Yes and press <Return>.
The program will then update the popularity codes of the selected items with the
rank code they fell within. After updating the pop codes, the cursor will be
positioned at the Beginning Product Line prompt.
Autologue User’s Manual – Report Processing
Page 64
12.12.4 Creating A Return Purchase Order For Zero Sales Merchandise
•
Once all the entry fields have been input as described in the previous section, press
the <F10> (Update) key.
A Perform Rank => Pop Code Update pop up window will be displayed in the middle
of the screen.
•
With the cursor positioned at the Print Report ? prompt, press the <Space
Bar> to toggle the value from No to Yes and press <Return> or just press
<Return> to use the default value of No and not print a detailed report.
) Autologue recommends printing a report that will show what the ranking code of
each item will be changed to when updating the popularity codes.
•
With the cursor positioned at the What to do with Zero Sales item ?
prompt, just press <Return> to use the default value of Set the Pop Code to
R and thus set the pop code of zero sales items to an R.
•
With the cursor positioned at the Create Return P.O. for all R items ?
prompt, press the <Space Bar> to toggle the value from No to Yes and press
<Return> to create a return purchase order for zero sales items.
•
With the cursor positioned at the Vendor Name or Number: prompt, enter the
vendor number or any portion of their name (e.g. SUPPLY)to be used when creating
the return purchase order and press <Return>.
Entering a portion of the vendor’s name will display a sorted list of all vendor names
that have the entered string (letters) within any part of their name. For example,
entering SUPPLY will display a selection list of all vendors with the SUPPLY string
within any part of their name.
•
Use the Ï and Ð arrow keys to move the highlighted bar to the desired vendor and
press <Return> to select the vendor.
) Note: User’s may also enter the vendor’s number that is beside the vendor’s name
and press <Return>. When there are many vendor’s matching the entered string,
the <F8> (Forward) and <F9> (Backward) keys can be used to scroll forward and
backward a page at a time through the selection list window.
•
With the cursor positioned at the Are You Sure ? prompt, press the <Space
Bar> to toggle the value from No to Yes and press <Return>.
The program will then create a return purchase order for each item that had a
ranking code of R (Zero Sales) and will return the current quantity on hand. Upon
completion, the cursor will be positioned at the Beginning Product Line
prompt.
Use the purchasing program to view the newly created purchase order.
Autologue User’s Manual – Report Processing
Page 65
12.13 Product Line Sales Report
The Product Line Sales Report will show the current month sales activity for a single
or range of product lines. This report will help management in identifying what
product lines are moving and also whether the gross margin % is close to what
management projects it to be.
12.13.1 Printing A Product Line Sales Report
•
From the Report Processing Menu, enter 12 (Product Line Sales Report) and press
<Return>.
The Product Line Sales Report Generator screen will now be displayed as shown:
•
With the cursor positioned at the BEGINNING PRODUCT LINE prompt, enter the
beginning product line number (0 - 255) and press <Return>.
•
With the cursor positioned at the ENDING PRODUCT LINE prompt, enter the ending
product line number (0 - 255) and press <Return>.
•
With the cursor positioned at the BEGIN PRINTING REPORT? (Y/N) prompt,
enter Y and press <Return>.
The report will begin printing and the message REPORT IN PROGRESS will be
displayed. When complete, the cursor will return to the BEGINNING PRODUCT
LINE prompt.
•
Press <F11> to return to the Report Processing Menu.
The report will only include those product lines in the range entered.
Autologue User’s Manual – Report Processing
Page 66
12.13.1.1 Sample Product Line Sales Report
STORE NAME:
DATE:
TIME:
PRODUCT
LINE #
Autologue Demonstration Software
MM/DD/YY
16:59
/ STR1
PRODUCT
LINE
SALES
REPORT - MONTH TO DATE
===============================================
DESCRIPTION
NET SALES
COST OF SALES
G.P. $
PAGE
1
G.P. %
1
AC SPARK PLUG
60.33
36.16
24.17
40.1
2
DAYCO HOSES
0.00
0.00
0.00
0.0
3
FRAM FILTERS
49.61
33.27
16.34
33.0
4
MICHIGAN BRGS
59.68
40.06
19.62
32.9
5
LINK BELT TIM
68.42
45.92
22.50
32.9
==============================================================================================
** TOTALS **
238.04
FROM PRODUCT LINE # :
1
TO PRODUCT LINE # :
Sample Product Line Sales Report
155.41
82.63
34.8
5
12.14 Print Statements
The Print Statements program allows customer/vendor statements to be printed
based upon the present information available. Each statement will contain current
month detail information. If the account is set for balance forward, summary totals
of 30, 60, 90+ days and service charge balances will also be reported. If the account is
set for open item, 30, 60, 90+ day detailed information as well as service charge
balances will also be reported.
Statements can be printed for the current month (or prior month if setup) at any time
and be generated using one of four methods:
1. Beginning and Ending Customer Numbers
2. Beginning and Ending Vendor Numbers
3. Salesman Codes
4. Report Codes
Statement detail information can be screen viewed using the through the <F3>(Show
Statement Detail) / <F5>(Show Payment Detail function keys within the Customer
Update program. The Statements are printed on pre-printed computer forms that
can be purchased from Autologue.
12.14.1 Printing Statements
•
From the Report Processing Menu, enter 13 (Print Statements) and press <Return>.
Autologue User’s Manual – Report Processing
Page 67
The following screen will now be displayed as shown:
•
With the cursor positioned at the ENTER ‘1’ OR ‘2’ prompt, enter 1 (Current
Month) or 2 (Prior Month) and press <Return>.
The Customer/Vendor Statements screen will now be displayed as shown:
•
With the cursor positioned at the PRINT STATEMENT TEST PATTERN? (Y/N)
prompt, enter Y or N and press <Return>.
Entering Y will print several rows of XXXXXX’s that allows the user to check that the
statements are properly loaded and aligned.
Autologue User’s Manual – Report Processing
Page 68
Entering N will move the cursor to the prompt PRINT ZERO BALANCE
STATEMENTS? (Y/N).
•
With the cursor positioned at the PRINT ZERO BALANCE STATEMENTS? (Y/N)
prompt, enter Y or N and press <Return>.
Entering Y will print statements for customers that have an open balance of zero and
have had A/R activity.
Entering N will not print statements for customers that have an open balance of zero.
12.14.1.1 Printing Statements For A Range Of Customers
•
With the cursor positioned at the ENTER 1, 2, 3, OR 4 prompt, enter a 1
(Customer) and press <Return>.
•
With the cursor positioned at the BEGINNING CUSTOMER: prompt, enter the
beginning customer number and press <Return>.
•
With the cursor positioned at the ENDING CUSTOMER: prompt, enter the ending
customer number and press <Return>.
The cursor will move to the prompt PRINT STATEMENT MESSAGE AW: (1)TOP
(2)MIDDLE (3)BOTTOM.
12.14.1.2 Printing Statements For A Range Of Vendors
•
With the cursor positioned at the ENTER 1, 2, 3, OR 4 prompt, enter a 2
(Vendors) and press <Return>.
•
With the cursor positioned at the BEGINNING VENDOR: prompt, enter the
beginning vendor number and press <Return>.
•
With the cursor positioned at the ENDING VENDOR: prompt, enter the ending
vendor number and press <Return>.
The cursor will move to the prompt PRINT STATEMENT MESSAGE AW: (1)TOP
(2)MIDDLE (3)BOTTOM.
12.14.1.3 Printing Statements By Salesman Code
•
With the cursor positioned at the ENTER 1, 2, 3, OR 4 prompt, enter a 3
(Salesman) and press <Return>.
•
With the cursor positioned at the BEGINNING SALESMAN: prompt, enter the
beginning salesman code and press <Return>.
•
With the cursor positioned at the ENDING SALESMAN: prompt, enter the ending
salesman code and press <Return>.
) Valid salesman codes are (A - Z and 0 - 9).
•
With the cursor positioned at the CUSTOMER (C) OR VENDOR (V) prompt, enter a
C or V to print customer or vendor statements and press <Return>.
Autologue User’s Manual – Report Processing
Page 69
The cursor will move to the prompt PRINT STATEMENT MESSAGE AW: (1)TOP
(2)MIDDLE (3)BOTTOM.
12.14.1.4 Printing Statements By Report Code
•
With the cursor positioned at the ENTER 1, 2, 3, OR 4 prompt, enter a 4 (Report
Code) and press <Return>.
•
With the cursor positioned at the REPORT CODE: prompt, enter the report code and
press <Return>.
) Valid report codes are (A - Z and 0 - 9).
•
With the cursor positioned at the CUSTOMER (C) OR VENDOR (V) prompt, enter a
C or V to print customer or vendor statements and press <Return>.
The cursor will move to the prompt PRINT STATEMENT MESSAGE AW: (1)TOP
(2)MIDDLE (3)BOTTOM.
•
With the cursor positioned at the PRINT STATEMENT MESSAGE AW: (1)TOP
(2)MIDDLE (3)BOTTOM prompt, enter a 1, 2, or 3 and press <Return>.
•
With the cursor positioned at the PRINT YOUR STORE'S NAME AT TOP? (Y/N)
prompt, enter Y or N and press <Return>.
Entering Y will print the name and address information of customer #0 on the top of
each statement page.
•
With the cursor positioned at the AT BOTTOM? (Y/N) prompt, enter Y or N and
press <Return>.
Entering Y will print the name of customer #0 on the bottom of each statement.
•
With the cursor positioned at the SHOW THIS MONTH'S SERVICE CHARGES?
(Y/N) prompt, enter Y or N and press <Return>.
Entering Y will calculate a service charge for all statements printed with an unpaid
old balance and a service charge percentage greater than zero.
) Note: Service charges are only calculated on customer statements. The service
total dollar amount within the customer records is NOT updated! This prompt
should be answered Y when printing statements as part of the month end
procedure.
•
With the cursor positioned at the PRINT ONLY NON-COMMON CUSTOMER
STATEMENTS? (Y/N) prompt, enter Y or N and press <Return>.
This prompt should only be answered Y by Multi-Store locations that want to only
print statements for those customers not transmitted to the Host for consolidation.
•
With the cursor positioned at the BEGIN PRINTING (Y/N) prompt, enter Y and
press <Return> to begin printing statements.
When printing is completed, the screen will return to the Report Processing Menu.
Autologue User’s Manual – Report Processing
Page 70
12.14.2 Additional Notes On Statements
Customer statements will print available discounting terms, based upon the
customer's current balance, days and net percentage setup within their customer
record on the bottom of each statement.
Example: IF PAID BY MM/DD/YY
YOU MAY DEDUCT $13.32
By default, detail printed on statements will print the PO information first. If there is
no PO information and there is Reference information, then the Reference
information prints. Management has the ability print both the PO and Reference
information for each detail on the statement when the PrntBothPoRef uservar
option is enabled.
) Note: A limitation of this feature is that only seven characters per field can be
printed for PO and Reference information.
Autologue User’s Manual – Report Processing
12.14.2.1 Sample Statement
Page 71
Autologue User’s Manual – Report Processing
Page 72
12.15 Print Aged A/R Balance
The Aged A/R Balance Report will print a current listing of all outstanding customer
and vendor balances for either the current month or the prior month (if set up).
Through the use of selected filtering options, the report can be printed for a range of
customers, vendors or by customers with a specific Salesman Code or Report Code.
The report can also be generated for only those customers/vendors with balances in
a specific accounting period.
An additional option will generate a report of those customers with an open balance
that failed to make a payment during the current month. This option may also be
based upon customers with a balance in selected accounting periods.
The Aged A/R Balance Report will list the following information for each
customer/vendor printed:
♦
♦
♦
♦
♦
♦
Account Number
Account Name
Salesman Code
Service Charge Total
Credit Limit
Open Balance
♦
♦
♦
♦
♦
♦
30 Days Balance
60 Days Balance
90+ Days Balance
Telephone Number
Last Payment Date
Last Payment Amount
The Aged A/R Balance Report will also total receivables and payables by period and
supply such information as total balance, number of days outstanding and
percentage distribution of receivables by period.
12.15.1 Printing An Aged A/R Balance Report
•
From the Report Processing Menu, enter 14 (Print Aged A/R Balance) and press
<Return>.
Autologue User’s Manual – Report Processing
Page 73
The following screen will now be displayed as shown:
•
With the cursor positioned at the ENTER ‘1’ OR ‘2’ prompt, enter 1 (Current
Month) or 2 (Prior Month) and press <Return>.
The Print Aged A/R Balance screen will now be displayed as shown:
•
With the cursor positioned at the CUSTOMERS/VENDORS(C/V) prompt, enter C or V
and press <Return>.
Entering C will print the report by customers. Entering V will print the report by
vendors.
Autologue User’s Manual – Report Processing
Page 74
•
With the cursor positioned at the BEGINNING prompt, enter the beginning
customer/vendor number and press <Return>.
•
With the cursor positioned at the ENDING prompt, enter the ending
customer/vendor number and press <Return>.
•
With the cursor positioned at the SALESMAN CODE prompt, enter Y or N and press
<Return>. Entering Y will prompt for a salesman code. With the cursor positioned
at the SALESMAN CODE prompt, enter the salesman code to have the report printed
by and press <Return>. The cursor will now be positioned at the CURRENT prompt.
If N was entered at the SALESMAN CODE prompt, the cursor will be positioned at the
prompt REPORT CODE.
•
With the cursor positioned at the REPORT CODE prompt, enter Y or N and press
<Return>. Entering Y will prompt for a report code. With the cursor positioned at
the REPORT CODE prompt, enter the report code to have the report printed by and
press <Return>.
If N was entered at the REPORT CODE prompt, the cursor will now be positioned at
the CURRENT prompt.
•
With the cursor positioned at the CURRENT prompt, enter Y or N and press
<Return>.
Entering Y will include all customers/vendors with a current balance on this report.
•
With the cursor positioned at the 30 DAYS prompt, enter Y or N and press
<Return>.
Entering Y will include all customers/vendors with a 30-day balance on this report.
•
With the cursor positioned at the 60 DAYS prompt, enter Y or N and press
<Return>.
Entering Y will include all customers/vendors with a 60-day balance on this report.
•
With the cursor positioned at the 90 DAYS prompt, enter Y or N and press
<Return>.
Entering Y will include all customers/vendors with a 90-day balance on this report.
•
With the cursor positioned at the SERVICE CHARGE prompt, enter Y or N and press
<Return>.
Entering Y will include all customers/vendors with a service total balance on this
report.
•
With the cursor positioned at the ONLY PRINT CUSTOMERS THAT HAVENT PAID
THIS MONTH? prompt, enter Y or N and press <Return>.
Entering Y will generate a report of those customers, with a balance in the selected
periods, which have not made a payment since the last month end. An excellent
time to generate a Non-Payment report is the 15th of each month.
Autologue User’s Manual – Report Processing
Page 75
Entering N to this prompt will generate a report of those customers, with a balance in
the periods selected above, regardless of their Last Payment Date.
) During month end, users may choose to run two separate age reports. The first
age report would include all customers with an open balance and the second
report would only include those customers who have not made a payment in the
past 30 days.
•
With the cursor positioned at the CALCULATE SERVICE CHARGES? prompt, enter Y
or N and press <Return>.
Entering Y will calculate service charges based upon the account's outstanding old
balance and service charge percent. Typically this prompt is only answered Y as part
of a month end closing procedure.
•
With the cursor positioned at the APPLY RECEIPTS? prompt, enter Y or N and press
<Return>.
Entering Y will print out balances that are owed after applying receipts.
Entering N will print out balances as they show in the customer/vendor record.
•
With the cursor positioned at the REPORT SPACING (1-9) prompt, enter the
number of lines (0-9) to space between each line and press <Return>.
•
With the cursor positioned at the BEGIN PRINTING REPORT? prompt, enter Y or N
and press <Return>.
Before answering this prompt, review the entered prompts. To change any
responses, press the <F1> (Restart) key to return the cursor to the first prompt and
re-enter all responses.
After printing the report, the screen will return to the Report Processing Menu.
12.15.1.1 Sample Aged A/R Balance Report
ACCOUNTS
CUST
250
251
252
253
254
255
256
257
258
259
260
261
262
263
264
265
CUSTOMER NAME
SERVICE CREDIT
SLSM TOTAL LIMIT
AMERICAN ACRYLIC
A
CERTIFIED APPLIANCE
CHUCK AND SAMS AUTOM
CONE CHEVROLET
CONTINENTAL RADIATOR
DATSUN CAR SERVICE
DIETERS V W REPAIR
DUNCAN AUTOMOTIVE
FRIENDLY AUTO REPAIR
FULLERTON TRANSMISSI
A C D AUTO REPAIR
HORNSBY GARAGE
VICKS AUTOMOTIVE
KURTS TIRES
KENS MOTORS
LES AUTOMOTIVE
TOTAL BALANCE
PERCENTAGE DISTRIBUTION
# OF DAYS OUTSTANDING
10.64 100000
130.06
7000
47.49
5000
92.06
5000
166.86
5000
77.45 70000
55.87
0
83.02
5000
161.32
5100
24.98
5000
30.56 99000
79.89
5000
27.64
5000
70.66
5000
78.16
5000
82.70
5000
1219.36
2 %
1.43
THIS MONTH FINANCE CHARGE
Sample Aged A/R Balance Report
1075.95
6752.98
1773.50
4523.38
5876.99
5190.67
2030.85
2912.50
8158.58
1136.10
1049.37
2855.45
948.77
2539.62
2800.67
3354.52
52979.90
100 %
62.55
769.81
RECEIVABLE AGED A/R BALANCE
OPEN
BALANCE
CURRENT
355.77
0.00
0.00
74.00
0.00
9.35
0.00
0.00
0.00
0.00
0.00
0.00
0.00
0.00
0.00
0.00
439.12
1 %
0.51
30
DAYS
4767.21
4574.96
286.01
2577.32
296.13
5044.32
224.98
124.48
5239.72
556.98
0.00
224.86
0.00
227.19
234.32
1030.33
25408.81
48 %
30.00
STR1
60
DAYS
90+ DAYS
4183.03CR
1350.00
1200.00
1050.00
2698.00
0.00
1250.00
1466.00
2745.00
358.78
1018.81
1565.24
365.89
1256.35
1489.65
1256.25
14886.94
28 %
17.57
125.36
697.96
240.00
730.00
2716.00
59.55
500.00
1239.00
12.54
195.36
0.00
985.46
555.24
985.42
998.54
985.24
11025.67
21 %
13.01
TELEPHONE #
714-524-5888
714-587-7485
714-527-4784
714-987-6547
714-687-7431
213-924-4718
714-658-8754
213-947-4765
714-657-9840
714-584-4101
714-652-2547
714-527-8430
714-658-9874
714-527-6541
714-524-7144
714-524-4610
MM/DD/YY
LAST PAYMENT
DATE
AMOUNT
MM/DD/YY
MM/DD/YY
MM/DD/YY
MM/DD/YY
MM/DD/YY
MM/DD/YY
MM/DD/YY
1212.00
5439.77
20.00
20.00
0.00
1100.00
0.00
0.00
500.00
0.00
500.00
0.00
0.00
0.00
0.00
0.00
Autologue User’s Manual – Report Processing
Page 76
12.15.2 Additional Notes On The Age Report
The formula for calculating the number of days outstanding is:
Prior Month’s Charge Sales
30 Days
Balance per Period
Average Daily Charge Sales
=
Average Daily Charge Sales
=
Number of Days Outstanding
The Number of Days Outstanding Ratio is an excellent way of measuring the ability to
collect monies from charge accounts. The lower the number of days outstanding the
better. A ratio of 15 days outstanding and below on your 60 day and older balances
is excellent.
The Percentage Distribution Ratio allows a quick review of receivables by accounting
period and as a percentage of open balance.
The ratios, Number of Days Outstanding and Percentage Distribution, are only accurate
when a report listing all customers with an open balance is generated.
Entering Y to the ONLY PRINT CUSTOMERS THAT HAVENT PAID THIS MONTH?
prompt will generate a report of those customers with an outstanding balance in the
periods selected, who have not made a payment since the last month end closing.
12.16 A/R Adjustment Report
The Accounts Receivable Adjustment Report is designed to assist management with
the balancing of accounts receivables. It can be run at any time during the month,
but will be most useful if run as part of the month end closing procedure.
The report will list by customer all transactions, other than regular point of sale
invoices and applied receipts, such as back office posting, deleted A/R details,
service charges paid or canceled, statement discounts, and adjustments to a 30, 60 or
90 day balance. Totals for each category will be given by customer with grand totals
at the end of the report. The details for this report are stored in the prior month
directory (if set up). Therefore, if currently using the prior month feature to run
statements and an Aged A/R Balance Report after month end, this report is also
available for prior month.
) Note: This report must be run before month end if prior month is NOT set up!
Once month end is run, the information needed to print this report is no longer
available!
12.16.1 Printing An A/R Adjustment Report
•
From the Report Processing Menu, enter 15 (A/R Adjustment Report) and press
<Return>.
Autologue User’s Manual – Report Processing
Page 77
A screen will appear asking:
•
With the cursor positioned at the ENTER ‘1’ OR ‘2’ prompt, enter 1 (Current
Month) or 2 (Prior Month) and press <Return>.
The A/R Adjustment Report screen will now be displayed as shown:
•
With the cursor positioned at the CUSTOMER: prompt, enter a specific customer
number to print information for and press <Return> or just press <Return> to use
the default value of ALL to print information for all customers/vendors.
Autologue User’s Manual – Report Processing
Page 78
•
With the cursor positioned at the DATE: prompt, enter a specific date to print
information for and press <Return> or just press <Return> to use the default value
of ALL to print information for all dates.
•
With the cursor positioned at the START PRINTING REPORT (Y/N)? prompt,
enter Y and press <Return> to start the report.
12.16.1.1 Sample A/R Adjustment Report
ACCOUNTS RECEIVABLE ADJUSTMENT REPORT
PAGE
1
------------------------------------------------------------------------------CUSTOMER 250
RICK'S CAM & SPEED SHOP
DATE
MM/DD/YY
REF
0
AMOUNT
30.00
TYPE
CUST UPDATE - 60 DAY
TOTAL FOR CUSTOMER 2
DETAILS DELETED:
DISCOUNTS TAKEN:
BACK OFFICE POSTS:
SERVICE CHARGES PAID:
SERVICE CHARGES CANCELED:
CUSTOMER UPDATE - 30 DAY ADJ:
CUSTOMER UPDATE - 60 DAY ADJ:
CUSTOMER UPDATE - 90 DAY ADJ:
0.00
0.00
0.00
0.00
0.00
0.00
30.00
0.00
------------------------------------------------------------------------------GRAND TOTALS FOR CUSTOMERS:
TOTAL DETAILS DELETED:
TOTAL DISCOUNTS TAKEN:
TOTAL BACK OFFICE POSTS:
TOTAL SERVICE CHARGES PAID:
TOTAL SERVICE CHARGES CANCELED:
TOTAL CUSTOMER UPDATE - 30 DAY ADJ:
TOTAL CUSTOMER UPDATE - 60 DAY ADJ:
TOTAL CUSTOMER UPDATE - 90 DAY ADJ:
0.00
0.00
0.00
0.00
0.00
0.00
30.00
0.00
TOTAL ADJUSTMENT TO ACCOUNTS RECEIVABLE:
30.00
------------------------------------------------------------------------------GRAND TOTALS FOR VENDORS:
TOTAL DETAILS DELETED:
TOTAL DISCOUNTS TAKEN:
TOTAL BACK OFFICE POSTS:
TOTAL SERVICE CHARGES PAID:
TOTAL SERVICE CHARGES CANCELED:
TOTAL CUSTOMER UPDATE - 30 DAY ADJ:
TOTAL CUSTOMER UPDATE - 60 DAY ADJ:
TOTAL CUSTOMER UPDATE - 90 DAY ADJ:
0.00
0.00
0.00
0.00
0.00
0.00
0.00
0.00
TOTAL ADJUSTMENT TO ACCOUNTS RECEIVABLE:
Sample A/R Adjustment Report
0.00
12.17 Print/Clear Sales Tax
The Print/Clear Sales Tax program totals and prints the taxable sales and tax
collected by each of the 256 state tax codes and supplies grand totals. It can also be
used to clear all tax totals.
The taxable sales and tax collected totals are retrieved from the Customer file. The
Customer file contains the following information for each customer: State Code,
Taxable Sales and Tax Collected.
Autologue User’s Manual – Report Processing
Page 79
12.17.1 Printing The Sales Tax Report
•
From the Report Processing Menu, enter 16 (Print/Clear Sales Tax) and press
<Return>.
The Print Sales Tax Totals By State screen will now be displayed as shown:
•
With the cursor positioned at the PREPARE CUSTOMER TAX REPORT ? (Y/N)
prompt, enter Y and press <Return>.
The message COLLECTING CUSTOMER TAX INFORMATION will be displayed as
the program is gathering the needed information.
•
With the cursor positioned at the BEGIN PRINTING REPORT? (Y/N) prompt,
enter Y and press <Return>.
A one page report will be generated on the management printer. The report will list
by State Code the following information: Tax Percent, Total Taxable Sales and Total
Tax Collected. After printing the report, the prompt ANOTHER REPORT NEEDED?
(Y,N) will appear. Enter Y and another report will be generated. Enter N and the
prompt ZERO OUT ALL TAX TOTALS ? (Y/N) will appear.
•
With the cursor positioned at the ZERO OUT ALL TAX TOTALS ? (Y/N) prompt,
enter Y or N and press <Return>.
Entering Y will clear the Customer file of all taxable sales and tax collected
information by customer. The message DELETING TAX TOTALS will be displayed.
When complete the screen will return to the Report Processing Menu.
Entering N will not clear the Customer file of tax information and the screen will
return to the Report Processing Menu.
Autologue User’s Manual – Report Processing
Page 80
Typically tax totals are cleared monthly or quarterly based upon your local tax laws
and taxable sales volume.
12.17.1.1 Sample Sales Tax Report
MM/DD/YY HH:MM:SS
STR1
<<
STATE
CODE
REPORT - SALES TAX BY STATE
===========================
TAX
PERCENT
TOTAL TAXABLE
SALES
>>
TOTAL TAX
COLLECTED
0
6.500
210905.06
13708.83
1
6.750
10211.02
689.24
==================================================
GRAND TOTALS *
Sample Sales Tax Report
221116.08
14398.07
12.18 Print Audit Reports
When auditing has been enabled on the system, through the assistance of a
Customer Service Representative, the Print Audit Report menu option can be used to
report the following:
♦
♦
♦
♦
♦
♦
♦
Lost Sales generated through point of sale
Stock Outs generated through point of sale
Purchase Order Receipts applied through purchasing
New Purchase Orders created through purchasing
Inventory Changes created through various programs
Receipts applied through point of sale
Customer Changes created through various programs
Optionally, the following options can be used to filter down information reported:
♦
♦
♦
♦
♦
♦
Beginning & Ending Date range
Output can be sent to the screen or the printer
Show Times/Dates Changes were made
Beginning & Ending Customer/Vendor range
Specific Product Line number to show changes for
Specific Part Number to show changes for
12.18.1 Printing An Audit Report
•
From the Report Processing Menu, enter 17 (Print Audit Report) and press <Return>.
Autologue User’s Manual – Report Processing
Page 81
The Audit Report screen will now be displayed as shown:
•
With the cursor positioned on the Lost Sales prompt within the selection
window, highlight the desired report, by arrowing down or by entering the
corresponding number, and press <Return>.
•
With the cursor positioned at the Beginning Date prompt, enter the beginning
date and press <Return> or just press <Return> to use the default current date.
•
With the cursor positioned at the Ending Date prompt, enter the ending date and
press <Return> or just press <Return> to use the default current date.
Autologue User’s Manual – Report Processing
Page 82
•
With the cursor positioned at the Direct Output to Printer? prompt, press
the <Space Bar> to toggle the value from No to Yes and press <Return> or just
press <Return> to use the default of No and thus output the report to the screen.
•
With the cursor positioned at the Show Times/Dates changes were made?
prompt, press the <Space Bar> to toggle the value from Yes to No and press
<Return> or just press <Return> to use the default of Yes and thus output the
times and dates changes were made.
If a report type of 0 – 4 was selected:
•
With the cursor positioned at the Beginning Customer/Vendor prompt, enter a
beginning customer/vendor number and press <Return> or just press <Return>
to leave the field blank and thus output information for all customers on the report.
•
With the cursor positioned at the Ending Customer/Vendor prompt, enter the
ending customer/vendor number and press <Return> or just press <Return> to
leave the field blank and thus output information for all customers on the report.
A report will be generated to the specified output.
If a report type of 5 – 6 was selected:
•
With the cursor positioned at the Product Line prompt, enter a specific product
line number and press <Return> or just press <Return> to leave the field blank
and thus output information for all product lines on the report.
•
With the cursor positioned at the Part Number prompt, enter a specific part
number and press <Return> or just press <Return> to leave the field blank and
thus output information for all part numbers on the report.
A report will be generated to the specified output.
12.18.1.1 Inventory Audit Field Change Codes
Listed below are a table of inventory change field codes and descriptions:
Field Code
PARTNR
PRODLN
QOH
UNITPK
MIN1
MAX1
MIN2
MAX2
PRCLVL0
PRCLVL1
PRCLVL2
PRCLVL3
PRCLVL4
PRCLVL5
PRCLVL6
PRCLVL7
TRAKING
Description
Part Number
Product Line
Quantity On Hand
Unit Pack
Minimum 1
Maximum 1
Minimum 2
Maximum 2
Price Level 0
Price Level 1
Price Level 2
Price Level 3
Price Level 4
Price Level 5
Core Cost
Core Sell
Tracking Flag
Autologue User’s Manual – Report Processing
SERTRK
4DEC
LABMISC
POPCD
HIST1
HIST2
HIST3
HIST4
HIST5
HIST6
DESC
CURPERUN
CURQTRSLS
CURQTYUN
CURBKO
FILLBO
WARNTS
CORRET
STKOUT
PERCAR
WEIGHT
RPTCD
ZNBIN
PRCLVL8
Page 83
Serial Number Tracking Flag
Four Decimals Point Flag
Labor/Misc Code
Popularity Code
Previous Quarters - 4th
3rd
2nd
1st
4th Last Year
3rd
Description
Current Period Units
Net Sales (In Dollars) Current Qtr
Net Sales (Units) Current Qty
Customer Backorder
Fill Backorder
Warranties
Core Return
Stock Outs
Per Car/Unit Of Measure
Weight In Ounces
Report Codes
Zone Bin
Average Cost
12.18.1.2 Customer Audit Field Change Codes
Listed below are a table of customer change field codes and descriptions:
Field Code
CUSTVENDFLAG
CUSTNAME
BILLADDR1
BILLADDR2
BILLADDR3
SHIPADDR1
SHIPADDR2
SHIPADDR3
PHONE1
PHONE2
PHONE3
PONUM
CREDITLIMT
CURMONRCPT
BAL00
BAL30
BAL60
BAL90
LASTPAYAMT
TAXCOL
TAXABLESLS
NETSLS
NTCORSLS
COSTOFSLS
TAXCODE
Description
Customer/Vendor flag
Customer Name
Billing Address 1
Billing Address 2
Billing Address 3
Shipping Address 1
Shipping Address 2
Shipping Address 3
Phone 1
Phone 2
Phone 3
Purchase Order Number
Credit Limit
Current Month’s Receipts
Current Balance
30-Day Balance
60-Day Balance
90-Day Balance
Last Payment Amount
Tax Collected
Taxable Sales
Net Sales
Net Core Sales
Cost Of Sales
Tax Code
Autologue User’s Manual – Report Processing
MONTHSONSYS
CORETQTY
INVRETQTY
WARRETQTY
SLSMANCD
NETDAYS
NROFINV
MOINVHST
BALTYPE
BILLTERM
SRVCHGPD
NRLNITEM
MNNRLNITM
MNNETSLS
XCLUDISC
LASTPAY
SRVCHG
SRVCHGPCT
TAXRATE
COD
MNNETCRSLS
MNNETCOST
CORERET
INVRET
WARRET
TAXID
MNNETSLSLVL
DISCPCT
RPTCD
COMCUSNR
MISCFLD1
MISCFLD2
MATRIXNR
LISTLVL
LISTDSC
COREBANK
MATRIX
Page 84
Months On System
Core Return Qty
Inventory Return Qty
Warranty Return Qty
Salesman Code
Net Days
Number Of Invoices
24 Months # Of Invoice History
Balance Type (B/O)
Billing Terms
Service Charges Paid
Number Of Line Items
24 Months # Of Line Items
24 Months Net Sales
6 Product Line Exclusion Discounts
Last Payment Date
Current Service Charge
Service Charge Percentage
Tax Rate
C.O.D.
24 Month Net Core Sales
24 Month Net Cost Of Sales
Core Return Amount
Inventory Return Amount
Warranty Return Amount
Tax Identification
24 Month Net Sales Level $
Discount Percentage
Report Code
Common Customer Number
Misc Flag 1
Misc Flag 2
Matrix Number
List Level
List Discount
Core Bank Customer Number
Std Matrix Offset
12.18.1.3 Sample Audit Reports
Audit File Report
Cust No
250
Part Number
Qty
Date
JAT-TP1133
2
MM/DD/YY HH:MM:SS
Lost Sales MM/DD/YY HH:MM:SS
Time
Total Lost Sales from MM/DD/YY to MM/DD/YY ALL Customers/Vendors
Sample Lost Sales Audit Report
2
Page
1
Autologue User’s Manual – Report Processing
Audit File Report
Cust No
Part Number
Qty
Date
Time
1030
HAT-PF3905
1
MM/DD/YY
HH:MM:SS
Page 85
Stock Outs MM/DD/YY HH:MM:SS
Total Stock Outs from MM/DD/YY to MM/DD/YY ALL Customers/Vendors
Page
1
Page
1
Page
1
Page
1
Page
1
1
Sample Stock Outs Audit Report
Audit File Report
POType Vend No
PO No
Part Number
Qty
PO
113
VAB-UFB-6901
2
50
Total Purchase Order Receipts from
Purchase Order Receipts MM/DD/YY HH:MM:SS
B/O
N
Date
Time
MM/DD/YY
HH:MM:SS
to MM/DD/YY ALL Customers/Vendors
2
Sample Purchase Order Receipts Audit Report
Audit File Report
Vend No
25
PO No
Part Number
120
POP-KK244
New Purchace Orders MM/DD/YY HH:MM:SS
Qty
Date
Time
1
MM/DD/YY
HH:MM:SS
Total New Purchace Orders from MM/DD/YY to MM/DD/YY ALL Customers/Vendors
1
Sample New Purchase Orders Audit Report
Audit File Report
Int
IU
IU
IU
IU
IU
IU
IU
IU
IU
IU
IU
IU
IU
IU
IU
IU
IU
IU
IU
IU
IU
Part Number
AAA-70023
AAA-70023
AAA-70023
AAA-70023
AAA-70023
AAA-70023
AAA-70023
AAA-70023
AAA-70023
AAA-70023
AAA-70023
AAA-70023
AAA-70023
AAA-70023
AAA-70023
AAA-70023
AAA-70023
AAA-70023
AAA-70023
AAA-70023
AAA-70023
Total
Inventory Changes MM/DD/YY HH:MM:SS
Previous Value
Current Value
*
0
0
0
0
N
0
NO DESCRIPTION
0
0
1
1
0
0
0
0
0
0
0
0
1
AAA-70023
1
1
1
1
Y
-32768
NO DESCRIPTION
10
1
4
5
100
200
300
400
500
600
200
200
0
Inventory Changes from MM/DD/YY to MM/DD/YY
Date
Time
Field
MM/DD/YY
MM/DD/YY
MM/DD/YY
MM/DD/YY
MM/DD/YY
MM/DD/YY
MM/DD/YY
MM/DD/YY
MM/DD/YY
MM/DD/YY
MM/DD/YY
MM/DD/YY
MM/DD/YY
MM/DD/YY
MM/DD/YY
MM/DD/YY
MM/DD/YY
MM/DD/YY
MM/DD/YY
MM/DD/YY
MM/DD/YY
HH:MM:SS
HH:MM:SS
HH:MM:SS
HH:MM:SS
HH:MM:SS
HH:MM:SS
HH:MM:SS
HH:MM:SS
HH:MM:SS
HH:MM:SS
HH:MM:SS
HH:MM:SS
HH:MM:SS
HH:MM:SS
HH:MM:SS
HH:MM:SS
HH:MM:SS
HH:MM:SS
HH:MM:SS
HH:MM:SS
HH:MM:SS
PARTNR
QOH
UNITPK
MIN1
MAX1
TRAKING
HIST1
DESC
FILLBO
PERCAR
MIN1
MAX1
PRCLVL0
PRCLVL1
PRCLVL2
PRCLVL3
PRCLVL4
PRCLVL5
PRCLVL6
PRCLVL7
CORRET
21
Sample Inventory Changes Audit Report
Audit File Report
Cust No
450
450
Cust Name
Inv #
Chk #
ABC REPAIR SVC
ABC REPAIR SVC
158
158
812
812
Ref #
Receipts MM/DD/YY HH:MM:SS
Amount
0
0
Total Receipts from MM/DD/YY to MM/DD/YY ALL Customers/Vendors
Sample Receipts Audit Report
50.00
2.50
Date Time
MM/DD/YY HH:MM:SS
MM/DD/YY HH:MM:SS
62.50
Autologue User’s Manual – Report Processing
Audit File Report
Int
Cust No
*
*
*
*
*
*
*
*
*
*
*
*
*
*
*
250
250
250
250
250
250
250
250
250
250
250
250
250
250
250
Previous Value
SPEEDY PRESS
44532 ARMSTRONG RD
RIVERSIDE, CA 92509
909-681-3446
1000
0
150
*
0
3
3
3
3
3
Customer Changes MM/DD/YY HH:MM:SS
Current Value
JOE DOE AUTO REPAIR
9921 RESERVOIR STREET
LOS ANGELES, CA 90001
213-999-0123
200
R
10
200
SREH 99811231
200
2
2
2
2
2
Total Customer Changes from MM/DD/YY to MM/DD/YY ALL Customers/Vendors
Sample Customer Changes Audit Report
Page 86
15
Page
Date
Time
Field
MM/DD/YY
MM/DD/YY
MM/DD/YY
MM/DD/YY
MM/DD/YY
MM/DD/YY
MM/DD/YY
MM/DD/YY
MM/DD/YY
MM/DD/YY
MM/DD/YY
MM/DD/YY
MM/DD/YY
MM/DD/YY
MM/DD/YY
HH:MM:SS
HH:MM:SS
HH:MM:SS
HH:MM:SS
HH:MM:SS
HH:MM:SS
HH:MM:SS
HH:MM:SS
HH:MM:SS
HH:MM:SS
HH:MM:SS
HH:MM:SS
HH:MM:SS
HH:MM:SS
HH:MM:SS
CUSTNAME
BILLADDR1
BILLADDR2
PHONE1
CREDITLIMT
SLSMANCD
NETDAYS
SRVCHGPCT
TAXID
DISCPCT
MATRIX481
MATRIX482
MATRIX483
MATRIX484
MATRIX485
1