1
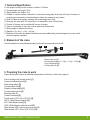
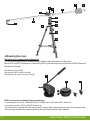
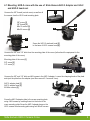
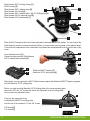
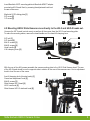
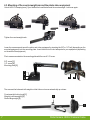
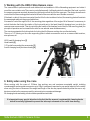
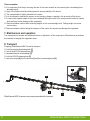
User
Manual
Light camera crane intended
for mounting on fluid video heads.
It allows to perform smooth
movements of the camera both
horizontally and vertically within
the range of 360° around the axis.
Slide Kamera HKR-2
Camera Crane
PDF version of the manual available for download: www.slidekamera.eu
Before you start your work with HRK-2 camera crane we strongly recommend to read the manual
carefully in order to avoid any errors or equipment failures due to improper operation.
Please note that using the crane in a manner inconsistent with this manual may cause a damage
or any malfunction the manufacturer is not responsible for.
Table of contents
1. Technical Specification.......................................................................................................................................2
2. Elements of the crane.........................................................................................................................................2
3. Preparing the crane to work................................................................................................................................2
4. Mounting the crane.............................................................................................................................................3
4.1. Mounting HKR-2 crane using Slide Kamera AKC-3 Adapter and HG-2 and HGO-2 heads set........................4
4.2. Mounting HKR-2 crane directly to the HG-2 and HGO-2 heads set...................................................................6
4.3. Mounting counterweight arm and photo-video equipment................................................................................7
5. Working with Slide Kamera HRK-2 crane............................................................................................................8
6. Safety when using the crane...............................................................................................................................8
7.Maintenance and operation.................................................................................................................................9
8.Transport............................................................................................................................................................9
9.Terms of warranty..............................................................................................................................................10
Slide Kamera ®
High Engineering Technology CNC s.c.
Sebastian Pawelec Karol Mikulski
Glina 45
82-522 Sadlinki
Vat Identification Number: 581-188-33-32
Slide Kamera Office
80-175 Gdańsk (Poland)
Ul. Kartuska 386
tel./fax (+48) 58 710 41 04
e-mail: [email protected] / [email protected]
www.slidekamera.pl / www.slidekamera.eu
1
Slide Kamera HKR-2 Camera Crane
1. Technical Specification
R Arm length counting from the center of rotation: 1530mm.
R Counterweight arm length: 73cm.
R Weight without the weights: 7kg.
R Camera or a photo camera is secured to a special mounting plate at the end of the arm. A number of
mounting grooves made in the plate allows to fasten the camera at any location
R Used for cameras and photo cameras with a total weight up to 3kg
R Mounting the crane with 3/8” thread (this is a standard for most of the tripods)
R Position of the arm can be locked with the use of clamps
R There is a possibility to block the rotation against the vertical axis.
R Sliding weight to balance the device
R Weights of: 2 x 2kg, 1 x 1kg, 1 x 0,5kg.
R Elements of the crane are made of aluminum and were additionally protected against corrosion, what
ensures long-term operation.
2. Elements of the crane
Once the shipment is received please make sure that all the components are inside.
4
3
2
1
Camera crane arm [1]
Counterweight weights of 2 x 2kg, 1 x 1kg, 1 x 0,5kg [2]
1.5 kg sliding weight [3]
Counterweight arm [4]
3. Preparing the crane to work
Figure showing the location of individual components and function of the knobs (page 3)
Arm tilt locking knob (thruster brake) [1]
Crane level adjusting knob [2]
Steel sliding weight [3]
Counterweight arm [4]
Weights (counterweight) [5]
Counterweight locknut [6]
Mounting plate [7]
Camera crane arm [8]
Tripod socket (HCZ-100 or HCZ-75) [9]
AKC-3 Slide Kamera Adapter [10]
HG-2 Slide Kamera head [11]
HGO-2 Slide Kamera rotational head [12]
Slide Kamera HSZ-2 quick mounting screw [13]
Slide Kamera HST-2 Tripod (700 or 920) [14]
Slide Kamera HKR-2 Camera Crane
2
5
2
3
6
4
1
10
11
8
7
12
9
13
14
4. Mounting the crane
Manufacturer's recommended configuration.
The crane should be mounted on a head and a tripod that provides stable support for the device.
Mount HG-2 and HGO-2 heads set on a tripod using HSZ-2 quick mounting screw or Manfrotto 520 Ball 75mm half
ball (with short handle).
Slide Kamera HG-2 head [1]
Slide Kamera HGO-2 rotational head [2]
Slide Kamera HSZ-2 quick mounting screw [3]
1
2
3
HKR-2 crane can be assembled in two possible ways:
R mounting with the use of Slide Kamera AKC-3 Adapter and HG-2 and HGO-2 heads set
R mounting directly to HG-2 and HGO-2 heads set
The crane can be mounted with other video heads, however Slide Kamera producer cannot be held responsible
for the damage caused to the heads produced by other manufacturers due to their overload.
3
Slide Kamera HKR-2 Camera Crane
4.1 Mounting HKR-2 crane with the use of Slide Kamera AKC-3 Adapter and HG-2
and HGO-2 heads set
Unscrew the 3/8'' thread (central screw) as well as all
the screws from the HG-2 head mounting plate
3/8'' screw [1]
3/8" thread [2]
M4x12 screws [3]
M4x20 screws [4]
1
2
3
4
6
5
Screw the HGO-2 rotational head [5]
to the base of HG-2 camera head [6].
Unscrew the 3/8'' and 1/4'' bolts from the mounting plate of the crane (bolts attach the equipment to the
mounting plate of the crane)
3
Mounting plate of the crane [1]
3/8" screw [2]
1/4" screw [3]
1
2
Unscrew the 3/8'' and 1/4'' bolts and M4 screws in the AKC-3 adapter. Loosen the clamping knobs of the plate
and eject the plate from the adapter (use Allen wrench 2.5 mm and 3 mm).
2
1
AKC-3 adapter plate [1]
AKC-3 adapter base [2]
M4 Allen screws [3]
3
Screw the AKC-3 adapter plate to the crane mounting plate
using 4 M4 screws by inserting them into the holes in the
crane mounting plate.Screw the AKC-3 adapter base on the
HG-2 camera head mounting plate using four M4x20 screws.
Slide Kamera HKR-2 Camera Crane
1
4
Slide Kamera AKC-3 locking clamps [1]
M4x20 screws [2]
Slide Kamera AKC-3 adapter base [3]
1
Slide Kamera HG-2 head [4]
Slide Kamera AKC-3 adapter plate / AK-101 Sliding plate [5]
Slide Kamera HGO-2 rotational head [6]
Slide Kamera HG-2 head handle [7]
2
3
4
5
6
7
Slide the AKC-3 adapter plate into its base mounted on the head and lock the clamps. You can remove the
head handle for a more convenient assembly. Before you insert crane mounting plate on the adapter base it
is crucial that the adjustment knob is maximally unscrewed.Use the adjustment knob to level the arm of the
crane.
1
Level adjustment knob [1]
Crane mounting plate with Slide Kamera
AKC-3 adapter plate attached [2]
2
3
3
4
Manfrotto MN577 Adapter [3]
Manfrotto 501PL sliding plate [4]
Alternatively, you can replace the AKC-3 Slide Kamera adapter with Manfrotto MN577 Adapter equipped
with the Manfrotto 501PL sliding plate.
Before you start mounting Manfrotto 501PL sliding plate to the crane mounting plate,
remove the 3/8" and 1/4" screws that attach the equipment to the mounting plate.
Next unscrew the adjustment knob.
1
Then turn the crane and screw
the Manfrotto MN501PL mounting plate
with the use of tho standard 1/4 "and 3/8" screws.
3/8" thread [6]
1/4" thread [5]
6
5
4
5
Slide Kamera HKR-2 Camera Crane
Insert Manfrotto 501PL mounting plate into Manfrotto MN577 adapter
mounted on HG-2 head. Next, by screwing the adjustment knob level
the arm of the crane.
Manfrotto 501PL sliding plate [1]
3/8" screw [2]
1/4" screw [3]
1
3
2
4.2 Mounting HKR-2 Slide Kamera crane directly to the HG-2 and HGO-2 heads set.
Unscrew the 3/8'' thread (central screw) as well as all the screws from the HG-2 head mounting plate.
To make the mounting easier, remove the head handle and the head tilt clamping lever.
3/8" bolt [1]
3/8" thread [2]
M4x12 screws [3]
M4x20 screws [4]
Head handle [5]
H tilt clamping lever [6]
2
1
4
3
6
5
With the use of four M4 screws assemble the crane mounting plate to the HG-2 Slide Kamera head. The arm
of the HG-2 head should be on the opposite side in ralation to the arm of the camera crane. Use to adjustment
knob to level the arm of the crane.
2
Arm tilt clamping knob (thruster brake) [1]
Crane level adjustment knob [2]
3
M4x20 screws [3]
1
Slide Kamera HG-2 head [4]
HG-2 head level [5]
4
Slide Kamera HGO-2 rotational head [6]
5
6
Slide Kamera HKR-2 Camera Crane
6
4.3. Mounting of the counterweight arm and the photo video equipment
Unlock HG3-Z3 clamping lever [1] and deflect the head that mounts the counterweight. Lock lever again.
1
Tighten the counterweight neck.
Lower the crane arm and mount the photo and video equipment by inserting the 3/8'' or 1/4'' bolt (depending on the
mounted equipment) into the mounting plate. Insert the bolt into the slot adequate for your equipment (depending
on the width of the equipment).
Photo camera mounted on the mounting plate with the use of 1/4" screw.
3/8" screw [1]
1/4" screw [2]
Mounting plate [3]
1
3
2
3
3
2
The arm must be balanced with weights so that it does not move autmatically up or down.
Counterweight locking knob [1]
Weights (counterweight) [2]
Steel sliding weight [3]
3
2
1
7
Slide Kamera HKR-2 Camera Crane
5. Working with the HKR-2 Slide Kamera crane
The crane allows to perform smooth and stable shots and enables to lift the filmmaking equipment and rotate it
round the crane rotation axis.The crane is controlled manually. Left hand controls the handle of the head, on which
the camera crane was mounted, whereas the right hand controls the tilt of the crane arm. The design also allows to
control the tilt of the mounting plate located at the end of the crane with the use of flexible connector.
If the head, on which the crane is mounted, has the tilt in the horizontal axis locked, the mounting plate will maintain
the same angle relative to the ground whole time.
If we want to control the angle of tilt of the mounting plate regardless of the angle of tilt of the arm it is necessary to
unlock the brake that locks the rotation of the horizontal axis in the head (head tilt clamping lever) on which the
camera crane was mounted. Then by controlling the handle of the head we control the tilt of the mounting plate (the
principle of operation can be viewed on the video on our website: www.slidekamera.eu).
The crane is equipped with a locking knob for locking the tilt of the arm working also as a thruster brake.
There is a 1/4'' opening on the crane supporting plate to attach accessories such as on-camera field monitors,
microphones, etc.
HG-2 head tilt clamping lever [1]
Head handle [2]
1/4'' socket for mounting the accessories [3]
Arm tilt clamping knob (resistance brake) [4]
3
4
1
2
6. Safety when using the crane
When working with the crane of 1530mm long working arm and maximum acceptable weight including
counterweights and mounted accessories up to 25kg it is extremely important to pay special attention to the safety
when using the device. Because of the weight and length of the arm any impact caused by either the arm or any
device mounted on the crane may result in serious injuries or equipment damage.
All clamping knobs and safety pins should be operated as instructed.
It is important to pay special attention to the fact that the arm and counterweight clamping knobs
should be securly tightened to prevent the telescopic elements of the crane from moving.
Slide Kamera HKR-2 Camera Crane
8
Please remember
R It is compulsory that the pin securing the arm of the crane as well as nuts securing the counterweight are
placed properly
R Legs of the tripod should be widely spaced to ensure stability of the device
R The crane should be tightly attached to the tripod
R It is not allowed to operate the crane in a way causing danger to people in the proximity of the device
R In case of any impact weight of the crane combined with high inertia of the arm present a hazard to human
body and may cause damage of the equipment
R Exercise extreme caution while mounting weights on the counterweight neck. Falling weight can cause
serious injury
R Exercise extreme caution during the transport of the crane. Any impact can damage the equipment
7. Maintenance and operation
The crane does not require any additional service or lubrication of the components. Maintainance procedures
are reduced to keeping the equipment clean.
8. Transport
Preparing Slide Kamera HRK-2 crane for transport:
R lock the crane level adjusting knob [1]
R unlock the HG3-Z3 clamping lever [2]
R assemble the arm counterweight [3]
R lock the HG3-Z3 clamping lever [2]
R use velcro straps [4] to join crane arm [5] and the counterweight arm [6]
1
5
4
3
Slide Kamera HKR-2 camera crane properly assembled for transport.
9
2
Slide Kamera HKR-2 Camera Crane
9. Terms of warranty
All products are covered with Slide Kamera warranty for a period of 12 months from the date of sale. Warranty
covers defects in design and material.
The warranty covers repair, or if the repair is impossible, replacing the product with a new one. However the cost of
replacing the product cannot overrun the catalog value of the product.The warranty does not cover damage and /
or product defects resulting from improper use, as well as non-compliance with maintenance of the product.
The warranty is also void if:
R unauthorized attempts to repair or modify
R mechanical damage caused during transport and operation of such features, scratches,
dents, pits, dirt, etc ...
R flooding, moisture
To obtain warranty service the purchaser should deliver the damaged product with proof of purchase and proof of
payment (invoice, receipt, cash) to the point where the equipment was purchased. At the end of each guarantee
period, you can purchase a replacement part from the manufacturer or in selected retail outlets listed on
www.slidekamera.pl / www.slidekamera.eu
Producer after sales service is also available at: HET-CNC sc, 80-175 Gdańsk, Ul. Kartuska 386
Slide Kamera HKR-2 Camera Crane
10