1
;Wr
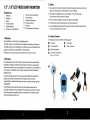
6. Camera set up &
5. Product features
I
2
3
4
5
6
7
I
9
I
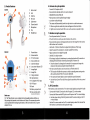
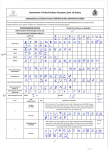
lnfra-red led
Lens
Antenna
DC
input
Light sensor
Channel switch
Microphone
Clip
Flexible hose
ru
i
I
I
:€
Monitor
P,. {.
L
0*
w
\6
* \rt
'I
2
3
4
5
6
, 7
8
9
Power button
monitor
Voice control tune
Channel indicator
LowpowerindicatorLED
-
lmage Bright
lmage Dim
Charge indicator
10 Channel button
11 ACadapter5VDCinput
12 A/VOutput
l3
7.
-
Volume button
TFT-LCD
-
Stand
14 Batterycompartment
15 Voice control switch
{lo.ated behind battery)
Before use
1.5",1.8" Baby Monitor is pre-installed with rechargeable batteries. Before use
fully recharge the batteries in the Monitor and Camera. The camera and monitor
can be operated while recharging the battery or left connected to the DC power
adaptors for use.
operation
Connect6VACadaptorwith(4)
Ensurethatthechannel switch (6) is settochannel
Make(8)of the comera fired well
Place camera on a firm surface facing the baby
1
upordowntofacethe baby
The camera will automatically switch to night vision in a dark environment.
.
.
When in night vision mode the picture will appear in black and white.
Night vision mode will switch off as soon as the camera is exposed to light.
Monitor set up & operation
Press
the power button
(1) to
turn on
lf the CH'l LED (5) is not lit press the CH button (10) until it is
Ensure that the camera is recharged and turned on. The image from the camera
will be shown on the monitor
Use the Bri - (7) & Bri+ (8) buttons to adjust the brightness of the image
Open the stand (13) and place in a location suitable for viewing
Adjust camera to show baby if required
Use dial (2)to adjust volume
lf the image is subject to interference try moving the location of the monitor or
changing the transmission channel by pressing the CH button (1 0)
o Once the channel is changed on the monitor it is necessary to change the
channel on the camera using the Channel Switch (1 0)
The voice control function can be turned on or off with switch (1 5)
o This function will allow the camera to switch to standby power saving mode
after a short period oftime if no sound is detected.
o The camera will switch back to active mode after sound is detected
Use the Voice Control Tune dial (4) to adjust the sensitivity of the voice control
feature.
.
I
\
8. AV Connection
The monitor can be connected to a TV or other visual display by using the AV cable
-
Connect the AV cable 3.5mm jack to the AV output (1 2) on the monitor
Connect the Yellow and red RCA jacks to an AV input on the TV or visual display.
Use the colour coding of the RCA jacks to match the colour coding on theTV
or visual display
Use the AV or source select on the TV or visual display to select the channel that
the monitor is connected to and display the image.
.