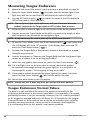
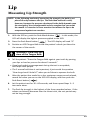
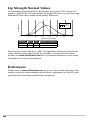
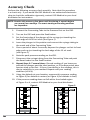
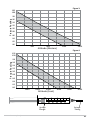
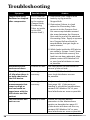
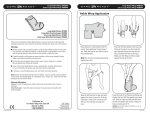
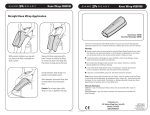
1
Iowa Oral
Performance
Instrument
Model 2.3
IOPI User
Manual
®
IOPI® Medical LLC
11920 198th Ave NE
Redmond, WA 98053
Phone: +1 (425) 549-0139
FAX: +1 (425) 558-4596
www.IOPImedical.com
IOPI® Icons
Symbol
Identity
Notes:
Catalogue Number
Serial Number
Manufacturing Date
Consult Instructions
Before Use
Caution
Type B patient applied
part according to IEC
60601-1
9 Volt Alkaline Battery
Do Not Dispose of in
Household Refuse
EU Authorized
Representative
Manufactured By
Conformity European
IOPI Medical LLC is certified to ISO 13485:2003 under the Canadian Medical Device Regulation
2
www.IOPIMedical.com
Table of Contents
Indications for Use............................................................................. 4
Warnings............................................................................................ 4
Components....................................................................................... 5
Control Buttons.................................................................................. 6
Safety and Care.................................................................................. 8
How Does the IOPI Work?................................................................. 9
Set Up.............................................................................................. 10
Tongue
Measuring Tongue Strength.................................................... 10
Tongue Strength Normal Values..............................................11
Measuring Tongue Endurance................................................. 12
Tongue Endurance Normal Values........................................... 12
Lip
Measuring Lip Strength........................................................... 13
Lip Strength Normal Values..................................................... 14
References....................................................................................... 14
Maintenance.................................................................................... 15
Troubleshooting............................................................................... 18
Technical Specifications................................................................... 19
Limited Warranty............................................................................. 20
Phone: +1 (425) 549-0139
PN 800-2301-02 2014.05
3
Indications for Use
Tongue and lip strength and endurance measurement in patients with oral
motor problems, including dysphagia and dysarthria.
Contraindications:
• Do not use with children under the age of 3.
• Do not put the Tongue Bulb in a patient’s mouth if there is a risk of the
patient having a seizure.
• Do not use the Tongue Bulb with a patient who has any current or past
problem with pain disorders involving the jaw muscles or joint of the
mandible (“TMJ Disorder,” “Myofacial Pain Disorder”).
Warnings
• The medical professional should ensure the patient is healthy enough
to perform a maximal motor task, recognizing that it may produce a
generalized effort response.
• The medical professional should hold on to the Tongue Bulb tube
any time it is in a patient’s mouth.
• The Tongue Bulbs, as supplied by IOPI Medical LLC, are not sterile
and are not intended for sterilization.
• The Tongue Bulbs, as supplied by IOPI Medical LLC, are intended for
single patient use only. Please read the IOPI Tongue Bulb Directions
for Use for cleaning instructions between uses with the same patient.
• Keep Tongue Bulbs out of the reach of children.
• The medical professional should inform any patient who is to perform
the tongue endurance measurement at 50% or more of the Peak
pressure that they may experience the sensation of “throat” soreness
following the measurement. This condition may persist for as long as
24 hours.
4
IOPI® Medical LLC
IOPI® Components
Included in The IOPI System (PN 1-2300):
Component
Item
PN
A
Iowa Oral Performance
Instrument (IOPI)
Model 2.3
8-2301
Device measures and displays
pressure from an air-filled bulb.
Pressure In port is a short stainless
steel tube to which the Connecting
Tube is attached (C).
Description
B
Box of Tongue Bulbs
5-6010
Squeezed by the tongue to measure
tongue strength and endurance.
C
Connecting Tube
5-0001
Connects the Tongue Bulb to the
Pressure In port.
D
Carrying Case
5-0002
Padded case for storing and
transporting the IOPI device.
E
Accuracy Check Syringe
5-0101
Syringe used in the Accuracy
Check procedure.
IOPI® Medical LLC approved accessories:
5-6010 Box of Tongue Bulbs
5-0001 Connecting Tube
5-0101 Accuracy Check Syringe
NOTE: Only use IOPI® Medical LLC approved accessories with The IOPI System.
D
A
C
B
E
Fax: +1 (425) 558-4596
PN 800-2301-02 2014.05
5
IOPI® Control Buttons
#
Symbol
Identity
Description
Lights Mode
Toggles the column of lights On and Off. The LCD display shows the target pressure
required to illuminate the top (green) light of
the light array. When entering Lights Mode,
the LCD displays the default target pressure
of fifty (50) and one light will be illuminated.
Set Maximum
Pressure
Identifies the buttons for adjusting the target
pressure that corresponds to the top (green)
light of the light array in Lights Mode.
3
Adjust Maximum
Up
Increases the target pressure corresponding
to the top (green) light of the light array in
Lights Mode.
4
Adjust Maximum
Down
Decreases the target pressure corresponding
to the top (green) light of the light array in
Lights Mode.
5
Timer Mode
When pressed, the LCD display shows the
elapsed time, in seconds, between pressing
the Start Timer [
] and Stop Timer [
]
buttons.
6
Start Timer
7
Stop Timer
8
Timer Reset
This button will reset the Timer to zero (0).
9
Peak Mode
Activates a peak-finding function. Displays
the maximum pressure achieved when an
attached bulb is compressed.
10
Peak Reset
This button will reset the peak-finding
function to zero (0).
11
Power
12
Pressure In
13
Type B
1
2
6
SET MAX
This button will start the Timer.
This button will stop the Timer.
Toggles the battery power between On
and Off. The IOPI will turn itself off after
15 minutes without a button push or
pressure response.
Short stainless steel tube that connects to
female end of Connecting Tube.
Patient Isolation:
Type B patient applied part according to
IEC 60601-1.
www.IOPIMedical.com
3
1
4
6
7
5
8
9
10
11
13
Phone: +1 (425) 549-0139
12
PN 800-2301-02 2014.05
7
Safety & Care Instructions
Safety precautions
Please observe the following safety precautions when setting up
and using your IOPI:
• This device is only intended for measuring oral motor structures.
• This device is sold only to medical professionals assisting patients with
oral motor problems, including dysphagia and dysarthria. The medical
professional is in charge of supervising a patient’s use of the IOPI in order
to ensure that it is only used as intended.
• To avoid measurement errors, carefully read this manual before using
the IOPI.
• Prior to using IOPI accessories (such as the IOPI Tongue Bulb) with the IOPI
device, carefully read the Directions for Use for the accessory.
Caring for your IOPI
To ensure that you receive the maximum benefit from using this device,
please abide by the following care guidelines:
• When not in use, store the IOPI device in the carrying case provided with
the device.
• Do not immerse the IOPI device in water. If the surface of the device
comes into contact with water, dry it immediately with a soft cloth.
• To clean the exterior of the IOPI device, wipe it with a soft slightly
moistened cloth. Use of mild soaps or disinfectants is suitable. Do not
use abrasive or corrosive cleaning agents, as these may damage the unit.
• Remove the 9V battery whenever you plan to store the IOPI device
for a long period of time.
• When replacing the battery, only use a new 9V alkaline battery. Do not use
a rechargeable battery.
• Do not expose the IOPI device to strong electromagnetic fields,
excessive force, shock, dust, temperature changes, or humidity. These
environmental conditions may result in malfunction, a shorter electronic
life span, or damage to the device.
• Do not open up the IOPI and tamper with the internal components; doing
so will terminate the product warranty and may cause damage.
• At the end of its useful life, dispose of the IOPI device and its accessories in
accordance with local or national disposal or recycling laws. 8
IOPI® Medical LLC
How Does the IOPI Work?
How does the IOPI measure strength?
The IOPI measures the Peak pressure a patient can produce in an IOPI
Tongue Bulb by pressing the bulb against the roof of the mouth with the
tongue. Peak pressure is a measure of strength, expressed in units
of pressure, the kiloPascal (kPa).
How does the IOPI measure endurance?
For patients with dysphagia or dysarthria, oral motor fatigability may be of
interest. The IOPI can be used to assess tongue fatigability by measuring its
endurance, which is inversely proportional to fatigability. Low endurance
values are an indicator of a high fatigability.
Endurance is measured with the IOPI by quantifying the length of time that
a patient can maintain 50% of his or her Peak pressure. This procedure is
conducted by setting the maximum pressure in the Lights Mode to 50% of
the patient’s Peak pressure and timing how long the patient can hold the top
(green) light on.
How is the IOPI used for exercise therapy?
In Lights Mode, the pressure required to illuminate the green light at the top of
the light array can be adjusted using the Set Max arrow buttons. This green light
is used as a target for the patient. The medical professional determines what
target value is appropriate for exercise therapy purposes and provides specific
instructions to the patient for a particular exercise protocol. A protocol
should include the number of times to illuminate the green light and, for
each repetition, how long the green light should be illuminated before
releasing pressure on the bulb.
Please visit our website (www.IOPImedical.com) for a list of articles providing
information about exercise therapy for oral motor structures.
E
T = Pmax x (100 )
T= Target value, Pmax = Peak tongue pressure, E = Effort (%)
Fax: +1 (425) 558-4596
PN 800-2301-02 2014.05
9
Set Up
1. Remove the IOPI device from the carrying case and place on a flat surface.
2. Remove the Connecting Tube from the package and notice that it has two
ends: a female end (plastic tubing) and a male end (metal).
3. Connect the female end (plastic tubing) to the Pressure Port [ ] on the
IOPI® device by sliding the tubing over the metal port as far as it will go.
4. Look at the Tongue Bulb and notice that one end is a blue bulb and the
other end is tubing. 5. Use scissors to cut the seal off
the end of the tubing by cutting
across the package while the
Tongue Bulb is still in its package.
(See image to the right).
6. Insert the metal (male) end of the Connecting Tube only
2–3 mm into the opened end of the Tongue Bulb tube.
7. Remove the Tongue Bulb from its package to use it with a patient, taking care
not to touch the parts of the Tongue Bulb that go into the patient’s mouth. 8. Turn the IOPI device on by pressing the Power button [ ]. The display will
show 0 (+/- 1 kPa).
Tongue
Measuring Tongue Strength
1. With the IOPI® turned on, push the Peak Mode button [ ]. In this mode, the LCD displays the highest pressure applied to the IOPI. NOTE: When the IOPI is first turned on, the LCD display shows pressure in a
continuous mode.
2. Press the Peak Reset button [ ]. The LCD display will read “0”.
3. Position the Tongue Bulb against the patient’s hard palate (see image to the below).
WARNING: Hold onto the
stem of the Tongue Bulb.
4. Tell the patient: “Press the Tongue Bulb
with your tongue as hard as you can for
about 2 seconds.”
•Visual and verbal encouragement during the test is acceptable, and helps
some people.
• The 2 second hold time is not important; it just avoids the question “How long should I hold it?” when you tell them
tosqueeze the bulb.
10
www.IOPIMedical.com
5. After the patient has made his or her maximum response and relaxed,
record the value you see on the IOPI LCD display, and then push the
Peak Reset button [ ]. 6. Let the patient rest for 30 –60 seconds, and then repeat Steps 3–5 two
more times.
7. The Peak tongue strength is the highest of the three recorded values. If the values consistently decrease over the three trials, the rest period
may not be long enough.
Tongue Strength Normal Values
These normal values are derived from 10 studies conducted on the US population. New research indicates there may be national variation in these normal values,
perhaps dependent on the language spoken by the subjects/patients. For the
latest studies that IOPI Medical is aware of, please visit our website.
Young
Middle
Old
Probability
Estimated normal
probability distributions
of maximum tongue
pressure of three age
groups of normal U.S.
subjects are shown to
the right:
0
10
20
30
40
50
60
70
80
90
100
110
Max Pressure (kPa)
These data were
derived from the
Group Mean SD Age (years) Number of Subjects
weighted average
Young
63
13.6
20 –39
276
of the means and
Middle
63
12.5
40 –60
219
standard deviations
Old
56
13.5
>60
198
of tongue strength
of normal subjects reported in 10 publications. Consult “Normal Values” in
www.IOPImedical.com for references and details of the numerical procedures.
Most groups contained approximately equal numbers of males and females.
In some studies, males were somewhat stronger than females, by about 5-10
kPa, but only for young subjects. For middle-aged and old subjects, there was no
consistent gender difference.
Peak tongue strength values corresponding to various percentiles from the
estimated normal distributions are shown below. It is common to consider
values below the 5th percentile to be “abnormal” (shaded table cells).
Group
Young
Middle
Old
1%
31
34
25
Phone: +1 (425) 549-0139
5%
41
43
34
Tongue Strength (kPa)
10%
20%
46
52
47
53
39
44
25%
54
55
48
50%
63
63
56
PN 800-2301-02 2014.05
11
Measuring Tongue Endurance
1. Measure and record the patient’s Peak pressure as described on page 11.
2. Press the Lights Mode button [ ] and note that the bottom light of the
light array will turn on and the LCD will display the value 50 (kPa).
3. Use the SET MAX arrows [ ] to adjust the value in the LCD display to
50% of the patient’s Peak pressure.
NOTE: The top (green) light of the light array will now illuminate when the
patient compresses the Tongue Bulb to 50% of their Peak pressure.
4. Place the IOPI so that the light array can be seen easily by the patient.
5. Prepare to use the Timer Mode on the IOPI to measure the length of time
that the patient can illuminate the top (green) light.
NOTE: A stopwatch may be used in place of the IOPI’s timer feature.
6. To use the Timer Mode, press the Timer Mode button [ ] and notice that
the LCD display will show “0” seconds. If the display does not show “0”,
press the Timer Reset button [ ].
7. Position the Tongue Bulb in the patient’s mouth as described for tongue
strength measurement.
8. Instruct the patient to “Squeeze the Tongue Bulb until the top (green) light
comes on, and keep it on for as long as possible.” 9. When the top (green) light comes on, press the Start Timer button [ ].
10. If if a red light turns on for more than a second, remind the patient
to squeeze hard enough to keep the green light on. It is acceptable to
encourage the patient “to keep going as long as possible”.
11. If the patient cannot illuminate the green light within about 2 seconds,
press the Stop Timer button [ ] and tell the patient to relax.
12. Record the time shown in the LCD display.
NOTE: Usually this test is done only once per session with each patient.
Tongue Endurance Normal Values
The data is as yet insufficient to assume the statistical normality of the
endurance distributions in the normal population, so an estimate of a normal
probability function is not yet warranted. However, the U.S. studies published
so far suggest an average endurance of about 30 – 35 seconds for the tongue.
Endurance times of 10 seconds or less would be an indication that a patient
probably has low endurance; it may be useful to consider that fatigability
is a contributing factor to this patient’s oral motor problems.
12
IOPI® Medical LLC
Lip
Measuring Lip Strength
NOTE: In the following method of measuring lip strength, the bulb is not
placed directly between the lips. The described method is valid,
however, because the pressure developed in the bulb depends upon
the strength of the circumferential muscle complex that surrounds
the mouth. It is tension in these muscles that allows the lips to be
compressed against one another.
1. With the IOPI on, push the Peak Mode button [ ]. In this mode, the
LCD will display the highest pressure applied to the IOPI. 2. Press the Peak Reset button [ ]. The LCD display will read “0”.
3. Position an IOPI Tongue Bulb inside the patient’s cheek just lateral to
the corner of the mouth.
WARNING: Hold onto the
stem of the Tongue Bulb.
4. Tell the patient: “Press the Tongue Bulb against your teeth by pursing
your lips as hard as you can for about 2 seconds.”
•Visual and verbal encouragement during the test is acceptable,
and helps some people.
•The 2 second hold time is not important; it just avoids the question
“How long should I hold it?” when you tell them to squeeze the bulb.
5. After the patient has made his or her maximum response and relaxed,
record the value you see on the IOPI LCD display, and then push the
Peak Reset button [ ]. 6. Let the patient rest for 30 – 60 seconds, and then repeat Steps 3 – 5
two more times.
7. The Peak lip strength is the highest of the three recorded values. If the
values consistently decrease over the three trials, the rest period may
not be long enough.
Fax: +1 (425) 558-4596
PN 800-2301-02 2014.05
13
Lip Strength Normal Values
An estimated normal probability distribution of a group of 171 normal U.S. persons, aged 18–89, is shown below. Although there were no consistent age
differences there was a pronounced gender difference. Probability
Male
Female
0
10
20
30
40
Max Pressure (kPa)
50
60
70
Gender Mean SD Number of Subjects
Male
35
10.3
88
Female
28
7.7
83
Data are taken from Clark et al., 2012. No significant differences were found
when comparing the right and left lip strengths, so these data have been
pooled. See www.IOPImedical.com for the complete reference of this study,
and details of numerical procedures.
References
Please refer to www.IOPImedical.com for a list of up-to-date references that
may be useful for understanding normal values, applications of the IOPI, and
protocols that have been published by researchers.
14
www.IOPIMedical.com
IOPI Maintenance
®
Replacing the Battery
1. Replace the battery if the display shows a low battery icon [LO BAT], the display is dim, or if the display does not illuminate when the Power button has been pressed.
2. To replace the battery, slide the battery cover on the back of the IOPI to its
fully open position.
3. Install a new 9V alkaline non-rechargeable block battery and connect it to
the battery connector, being sure to correctly match the polarity.
4. Slide the battery cover to its fully closed position.
NOTE: Contact your local waste disposal authority for instructions on how to
dispose of used alkaline batteries. In Europe, used batteries should be recycled in
accordance with council directive 2006/66/EC as transposed into national laws.
Do not dispose of in clinic trash.
Phone: +1 (425) 549-0139
PN 800-2301-02 2014.05
15
Accuracy Check
Perform the following accuracy check monthly. Note that this procedure is a check only. If you would like IOPI Medical or an authorized electronics shop to check the calibration rigorously, contact IOPI Medical or your local distributor for instructions.
NOTE: Practice this process a few times until the timing is smooth before
you record your readings. The exact starting and ending positions
are important.
1. Connect the Connecting Tube to the Pressure Port on the IOPI.
2. Turn on the IOPI and press the Peak button.
3. Set the front edge of the plunger of the syringe just touching the back edge of the 30 ml mark (see Figure 1).
4. Leave the plunger in this position and connect the syringe tubing to the metal end of the Connecting Tube.
5. Over a period of about 5 seconds, depress the plunger so that its front edge ends up just touching the back edge of the 15 ml mark
(see Figure 2).
6. Note the peak pressure reading on the IOPI. 7. Disconnect the syringe tubing from the Connecting Tube and push the Reset button on the Peak function.
8.
Repeat Steps 3–7 several times. Discard readings if you know you
pushed the plunger past the ideal position, or if the depression time
was too slow or too fast. If there is variability in the readings, this is due to variability in your method. Repeat until your reading
stabilizes (±1 kPa).
9. Using the altitude at your location, compare this pressure reading
to Figure 3 (for altitude in meters) or Figure 4 (for altitude in feet).
10. If the pressure reading does not fall within the shaded region of Figure 3 or 4, contact IOPI Medical or your local distributor.
Figure 1.
16
Figure 2.
www.IOPIMedical.com
Figure 3.
102
100
Pressure Reading
98
96
94
92
90
88
86
84
82
80
400
800
Altitude (Meters)
1200
1600
Figure 4.
102
100
Pressure Reading
98
96
94
92
90
88
86
84
82
80
1000
2000
Syringe
Plunger
Phone: +1 (425) 549-0139
3000
Altitude (Feet)
4000
5000
6000
Syringe
Tubing
PN 800-2301-02 2014.05
17
Troubleshooting
Symptom
Tongue Bulb stays
flattened or dimpled
after compression
Possible Cause
Actions
An air leak can 1. Determine if the Tongue bulb
occur anywhere
leaks by trying another
in the system
Tongue Bulb.
(Tongue Bulb,
2. Determine if there is a leak
Connecting
where the Connecting Tube
Tube, or inside
connects to the Pressure Port.
in the IOPI
Put some soap bubbles around
device itself.)
the seam between the Pressure
Port and the end of the attached
Connecting Tube. Apply a squeeze
to a Tongue Bulb and look for
soap bubbles that get larger or
move around.
3. While leaks inside the IOPI device
are unlikely, if steps 1 and 2 have
been tried and the cause of the
leak has not been detected, then
please contact IOPI Medical LLC
or your local distributor as soon
as possible.
Abnormally short
endurance values.
18
A small air leak
See steps above to determine the
source of the air leak.
The LCD display reads A change in
>2 kPa when there is accuracy
no bulb attached to
the IOPI device.
Contact IOPI Medical LLC or
your local distributor as soon
as possible.
Peak pressure
measurements that
seem too high or
too low based on
experience with the
IOPI device and the
patient.
A change of
accuracy
Perform an Accuracy Check
(see page 16). If the pressure
reading is not within specifications,
contact IOPI Medical LLC or your
local distributor as soon as possible.
The IOPI device will
not turn on.
Battery is dead
Follow the Replace Battery
procedure in the Maintenance
section as described on page 15.
If the device still does not turn on,
contact IOPI Medical LLC or your
local distributor as soon as possible.
IOPI® Medical LLC
Technical Specifications
Application
Measuring method
Pressure in an air-filled bulb (in kPa).
Indications for use
Tongue and lip strength and endurance measurement
in patients with oral motor problems, including
dysphagia and dysarthria.
Applied Standards
EN 60601-1, 2nd Ed.
EN 60601-1-2:2007
EN 60601-1-6:2007
ISO 14971:2012
Dimensions of IOPI device
Height x Width x Depth
18 cm x 10 cm x 2.5 cm
Weight
258 g
Measuring range
Pressure
0 to 100 kPa
Accuracy
Pressure
±2 kPa
Power
Power supply
9V alkaline battery
Classifications
Protection against electric shock
According to IEC 60601-1; Type B
Protection against ingress of water
None
Mode of operation
Continuous duty
Device Classification
FDA/US
I
HC/Canada EC - MDD TGA/Australia
II
I
I
Operating environment
Temperature
16°C to 27°C (60°F to 80°F)
Humidity
10% to 83% relative humidity
Storage/Transport environment
Temperature
-20°C to 49°C (-4°F to 120°F)
Humidity
10% to 83% relative humidity
Manufacturer
IOPI® Medical LLC
11920 198th Ave NE Redmond, WA 98053 U.S.A.
Tel: +1 (425) 549-0139 FAX: +1 (425) 558-4596
EU Authorized Representative
EMERGO EUROPE
Molenstraat 15, 2513 BH, The Hague, The Netherlands
Australian Sponsor
EMERGO AUSTRALIA
Level 20 Tower II, Darling Park, 201 Sussex Street
Sydney, NSW 2000 Australia
Fax: +1 (425) 558-4596
PN 800-2301-02 2014.05
19
Limited Warranty
Warranty
IOPI Medical LLC warrants your product to be free from defects in material and
workmanship for a period of two years from the original date of purchase. If you
discover a defect in a product covered by this warranty, we will repair it using
new or refurbished components, or if repair is not possible, replace the item.
EXCLUSIONS
This warranty covers defects in manufacturing discovered while using the
product as recommended by the manufacturer. The warranty does not cover
loss or theft, nor does coverage extend to damage caused by misuse, abuse,
unauthorized modification, improper storage conditions, and other failures to
use or maintain in accord with the manufacturer’s instructions. The warranty
does not cover parts that are subject to normal wear and tear.
LIMITS OF LIABILITY
Should the product(s) fail, your sole recourse shall be repair or replacement,
as described in the preceding paragraphs. IOPI Medical LLC will not be held
liable to you or any other party for any damages that result from the failure of
this product. Damages excluded include, but are not limited to, the following:
lost profits, lost savings, loss of or injury to data, damage to person or property,
and incidental or consequential damages arising from the use, or inability to
use, this product. In no event will IOPI Medical LLC be liable for more than the
amount of your purchase price, not to exceed the current list price of the
product, and excluding tax, shipping, and handling charges.
IOPI Medical LLC disclaims any and all other warranties, express or implied. By using the product, the user accepts all terms described herein.
HOW TO OBTAIN SERVICE UNDER THIS WARRANTY
Before sending the unit for repair, contact IOPI Medical LLC:
+1 (425) 549-0139 [email protected]
REQUIREMENTS
The cost of shipping to the manufacturer and payment of any customs
clearance fees or duties are the responsibility of the user. These costs may
be credited to the user’s account if the product is determined to be under
warranty. Return shipping costs for products repaired or replaced under this
warranty will be paid for by IOPI Medical LLC.
20
www.IOPIMedical.com
Notes:
Phone: +1 (425) 549-0139
PN 800-2301-02 2014.05
21
Notes:
22
www.IOPIMedical.com
Phone: +1 (425) 549-0139
PN 800-2301-02 2014.05
23
IOPI® Medical LLC
11920 198th Ave NE
Redmond, WA 98053 U.S.A.
Phone: +1 (425) 549-0139
FAX: +1 (425) 558-4596
© Copyright 2013 IOPI Medical, LLC. All rights reserved.
www.IOPImedical.com