1
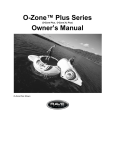
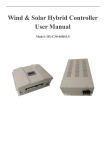
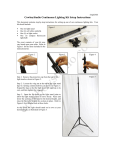
ASSEMBLY AND OPERATING INSTRUCTIONS BEACH ACCESS CHAIR 250 LB. MAXIMUM CAPACITY MANDATORY –LEAVE THIS MANUAL WITH OWNER - READ CAREFULLYCheck entire box and inside all packing materials for parts. Before beginning assembly, read the instructions and identify parts using the figures and parts listed in this document. It is critical that all parts be carefully inspected by the installer prior to installation to ensure that no damage occurred in transit and that a damaged part is not used. Proper installation cannot be overstressed, as an improper i ns t a l l a t i o nv oi dsAqu aCr e e k ’ swarranty and may affect the safety of the user. AQUA CREEK PRODUCTS 9889 GARRY MORE LANE MISSOULA, MT 59808 1-888-687-3552 FAX: 406-549-2602 WARNING 1. DO NOT USE BEACH ACCESS CHAIR WITHOUT CHECKING TIRES FOR PROPER INFLATION PRESSURE. CHAIR MAY BE UNSTABLE OR UNSAFE IF TIRE PRESSURE IS TOO LOW OR TOO HIGH. 2. NEVER OPERATE THE BEACH ACCESS CHAIR IN WATER. THIS PRODUCT IS NOT A FLOTATION DEVICE. 3. SAVE A COPY OF THESE INSTRUCTIONS. AQUA CREEK, LLC 2003 JULY 2008 1 ASSEMBLY INSTRUCTIONS: The Beach Access Chair comes fully assembled on a crate. All the user needs to do is to check the tire inflation, assemble the umbrella and install it on the chair. The instructions below explain how this is done. PARTS LIST: CRATE 1 1. 2. BEACH ACCESS CHAIR UMBRELLA & UMBRELLA POLE UNLOADING THE CRATE: The shipping crate is held together with wood screws. Remove the screws and open the crate as shown in photos 1 and 2. PHOTO 1: SHIPPING CRATE PHOTO 2: CRATE OPEN 2 CHECKING THE TIRE PRESSURE: The tire pressure should be checked and adjusted if needed before the first use of the BEACH ACCESS CHAIR, and periodically afterwards to ensure that the chair is and remains safe and stable. To check the tire pressure, remove the tire valve cap from the tire to be checked and check the tire pressure using a standard tire pressure gauge (not included). The tire pressure range is listed on the side of each tire, but is typically 2 to 4 PSI. If the tire pressure is low, use an air pump to increase the pressure to within the rated range. Use the pressure gauge to check the pressure after inflation. IMPORTANT: Be sure to replace the tire valve cap after checking and adjusting the tire pressure. PHOTO 3: REMOVING TIRE VALVE CAP 3 ASSEMBLY AND INSTALLATION OF UMBRELLA: The umbrella comes in a separate plastic bag, and needs to be assembled before use. To assemble the umbrella, insert the umbrella (top section) into the umbrella pole as shown in PHOTO 4. Adjust the umbrella to the desired height and lock it in place using the locking handle as shown in PHOTO 5. Now the umbrella can be installed into the umbrella hole (back right corner of the BEACH ACCESS CHAIR) and opened. PHOTO 4: UMBRELLA ASSEMBLY PHOTO 5: LOCK IN PLACE FIGURE1: INSTALLING THE UMBRELLA 4 OPERATING INSTRUCTIONS: The BEACH ACCESS CHAIR operates in an assisted mode; one person rides in the chair while another pushes it from behind. ALWAYS USE THE SAFETY BELT WHEN RIDING IN THE BEACH ACCESS CHAIR. USING THE PARKING BRAKE: When the BEACH ACCESS CHAIR is stopped the parking brake should always be engaged. To engage the parking brake, rotate the brake lever back and insert the stainless steel nut into the hole in the side tube as shown in PHOTO 6. To release the brake, pull the brake lever nut out of the hole (sideways) and allow the brake handle to rotate forwards as shown in PHOTO 8. PHOTO 6: ENGAGING THE PARKING BRAKE PHOTO 7: PARKING BRAKE ENGAGED PHOTO 8: PARKING BRAKE RELEASED 5 USING THE RETRACTABLE FOOTREST: The BEACH ACCESS CHAIR comes with a retractable footrest, which needs to be extended to be used. To extend the leg-rest, pull the footrest forwards until it is fully extended as shown in FIGURE 2. When not in use the footrest can be retracted again. FIGURE 2: RETRACTABLE FOOTREST 6