1
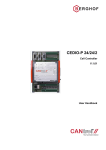
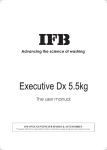
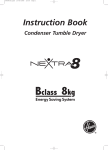
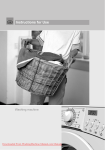
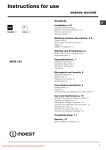
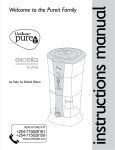
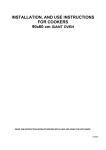
The user manual
WELCOME
Dear Customer,
Congratulations for buying India’s No. 1 fully automatic washing machine!
We welcome you to the proud IFB owner’s club.
Your machine, you will see, is as efficient as washing machine can be. It uses
less amount of water, detergent, electricity and yet, gives a better wash than
any other machine. What makes this possible is pureGerman logic.
Your machine, with its unique features such as tumble wash, shower system
and cool down cycle, is fully automatic, meaning you only have to spend few
minutes with it, after which, it takes over.
As you read this manual you’ll understand what this washing machine can
do for you.
For any futher information, please contact your nearest dealer or IFB
service centre. We’ll be happy to give you all the help you require.
That said, now we’ll let the machine take over. Happy washing, and
congratulations once again.
Yours sincerely,
Chief Executive
1
CONTENTS
KNOW YOUR MACHINE............................................................................................... 6
INSTALLATION................................................................................................................ 7
l
Pre Installation
l
Unpacking
l
Setting up
l
Water inlet
l
Water outlet
l
Electrical connection
USING YOUR MACHINE............................................................................................... 9
l
Control panel
l
Program selector
l
Spin cancel & Spin speed selector
l
Optional buttons
l
Digital display
l
Child lock safety provision
l
Automatic detergent dispenser tray
l
Kinds of wash programs
l
Exclusive programs
l
Exclusive in-built features
l
Programme chart
OPERATION..................................................................................................................... 16
l
Sorting of garments
l
Loading the machine
l
Detergent to be used & quantity
l
Fabric conditioner
l
Treatment of stains
l
Fabric care symbols
l
Cloth weights
l
Check points
l
Programming the machine
l
Switching OFF the machine
MAINTENANCE.............................................................................................................. 20
l
Coin Trap
l
Drum
l
Sieves
l
Frost protection
l
Draining during emergencies
TROUBLE SHOOTING.................................................................................................... 22
l
Why does it happen?
l
Error interpretation
SAFETY PRECAUTIONS................................................................................................ 24
TECHNICAL DATA.......................................................................................................... 25
2
Top Lid
Detergent
Dispenser Tray
Start / Pause
SOAK
RINSE
HOLD
TIME
DELAY
Pre
Wash
Soak
Quick
Wash
WASH
RINSE
SPIN
No
Final
Spin
1000
Cold
900
600
Intensive
Wash
Water
Plus
Additional
Rinse
Synthetic
1100
Time Delay
Rinse
Hold
Control Panel
800
Spin
Silk
Porthole Door
Cold
Door Open
45
60
60
Saree
95
Wool
Delicsate
6kg
Cotton
Off
45
60
40
Spin
30
Rinse Drain
& Spin
Eco
Mini
Program C
Special powder
coated
galvanized steel
Cabinet
Bottom Door
ADVANTAGES OF TUMBLE WASH
l
M O S T E F F E C T I V E C L E A N I N G A S T H E C L O T H E S PA S S T H R O U G H
SOAPY WATER AND ALSO FALL ON SOAP SOLUTION IMPROVING
WETTING OF CLOTHES.
l
RESEMBLES THE THUMPING AND RUBBING ACTION OF GENTLE
HAND WASH.
l
USES LESS WATER COMPARED TO TUB TYPE TOP LOADERS.
l
LESS WATER MEANS LESS DETERGENT AND ELECTRICITY CONSUMPTION.
l
WASHING IS EFFECTIVE BY DETERGENT, SOAKING, HEATING, TUMBLING AND
SQUEEZING.
l
GIVES BETTER DRYING EFFECT BY SPINNING.
3
PRE - INSTALLATION
l
l
l
Make sure there is a 16 amp. 3-pin electrical point preferably with a 16
amp. fuse, within 1 meter of the machine. Make sure it has proper
earthing.
Fixed plumbing is recommended for the machine. The water inlet of
the machine has a collar with 3/4’’ parallel internal threads. The water
supply point with an external thread 3/4’’ parallel thread should be
available within 1 meter of machine location.Please refer the figures
(page. no. 8) under the topics WATER INLET and WATER OUTLET.
Please contact our service centre for installation and demonstration of
the machine after the above mentioned points have been completed.
UNPACKING
l
l
l
l
l
l
l
l
Remove the carton.
Remove the thermocol supports and the wooden base. Keep the
machine on the floor or on a trolley.
Place the machine at the site at which it is to be installed.
Remove the transit bolts.
Do not operate the machine till the transit bolts have been removed.
Insert plastics caps provided into holes vacated and press till they click
into place.
Keep packaging material and transit bolts carefully. You will need it
while shifting the machine to another location.
For shifting and re-installation at a new site, please contact our service
personnel.
SETTING UP
The machine should be levelled properly on the floor. However, it can be
installed on any suitable platform or trolley, as desired.
Install machine in a room with adequate ventilation.Avoid a room with no
windows. The back of the machine should be at least 4 inches (100 mm)
away from the wall.
1.
Level the machine by using the adjustable screws provided at the
bottom for levelling.
2.
Loosen securing nut. Adjust the screw to change level. Tighten
securing nut to ensure that screw is locked into place.
3.
Make sure that the machine rests on all four feet on a level surface, at all
times.
4.
Machine should be leveled again in case it is moved to a new site.
5.
Machine is provided with ventilating openings on the base. Hence it is
always recommended to put the machine on the floor after removing
the carpet.
4
WATER
SUPPLY
REDUCER
STOP
LOCK
1/2
3/4
MACHINE
WATER
INLET
WATER INLET
l
Connect inlet hose to water tap/line.
l
Do not connect machine to a hot water supply
WATER INLET
DRAIN
PIPE
WATER OUTLET
l
A drain pump is provided in the machine to pump out used water.
l
The end of the outlet should be placed near a drain. If necessary, it can
be placed over the sink at a maximum height of 1 meter from the floor
level.
l
Allow free flow of water from the outlet pipe.
DRAIN
PIPE
WATER INLET
15 AMPS
ELECTRICAL CONNECTION
l
Check that the electrical line can take the required load.
l
Connect to a 230 V, 50 Hz single phase AC supply. The appliance must
be positioned so that the plug is accessible.
l
Machine must be earthed properly before operation. This can be done
by using a 3-pin plug and a properly earthed socket of 16 Ampere
rating.
l
If the supply cord is damaged, it must be replaced by the manufacturer
or its service agent or a similarly qualified person in order to avoid a
hazard.
l
Use of extension cord not recommended.
l
Use standard sockets of reputed make for preventing loose contact of
power supply cable.
5
X
X
DETERGENT DISPENSER TRAY
6
Soak
Quick
Wash
Intensive
Wash
OPTIONAL BUTTONS
AND INDICATORS
Pre
Wash
SOAK
RINSE
HOLD
TIME
DELAY
DIGITAL DISPLAY
Rinse
Hold
Time Delay
Start / Pause
600
No
Final
Spin
CHILD LOCK
Water Additional
Plus
Rinse
SPIN
RINSE
WASH
800
Delicates
Wool
Silk
900
1000
Saree
60
Cold
Spin
40
45
Synthetic
Cold
30
45
Rinse Drain
& Spin
Off
Cotton
SPIN CANCEL AND
SPIN SELECTOR KNOB
Spin
1100
60
Program C
Mini
Eco
Door Open
ON/OFF SWITCH WITH
PROGRAMME
SELECTOR KNOB
95
60
DOOR OPEN
BUTTON
CONTROL PANEL
Let’s take a look at the control panel and understand the working of each of its features. Each feature serves a
specific purpose in the complete operation of the machine.
PROGRAM SELECTOR
l
l
l
l
The program selector is used to choose the desired program. The knob can be rotated in both
clockwise and anti-clockwise directions.
The time required to complete the selected program will be shown on the digital display.
A choice of 15 basic programs is available according to the fabric being washed and extent
of soilage. For more details please refer the topic “Kinds of wash programs”.
Program selection should be done before pressing the “Start/Pause” button.
Attention: To choose a different program during program run of the machine, switch
off the machine , wait for few seconds and then select a new program.
Synthetic
Cold
Cotton
Off
Cold
45
45
60
Silk
60
Saree
95
Wool
60
Delicates
40
30
Spin
Rinse Drain
& Spin
Eco
Mini
Program C
SPIN CANCEL & SPIN SPEED SELECTOR
l
l
l
l
l
To select ‘No final spin’, turn the knob in clockwise direction to ‘No final spin’ position.
When ‘No final spin’ is selected, the machine will not spin during final spinning operation.
Spin speeds between 600 rpm to 1100-rpm max. can be selected by rotating the knob in anticlockwise direction.
The maximum spin speeds are automatically limited to the following for better fabric care.
Program
Maximum spin speed (rpm)
Cotton, Eco
1100
Synthetic, Mini
800
Delicate
600
Wool, Silk
600
Knob should not be turned beyond ‘No final spin’ and 1100 rpm marking.
1100
1000
No
Final
Spin
900
600
800
Spin
OPTIONAL BUTTONS
l
l
l
The program selected can be further supplemented by choosing the various options available
as listed below.
After the machine is powered ON, available options to a selected program will be shown by
the flashing of the corresponding LED of the optional button. Non-flashing LED’s refer to the
non-applicable options to that program.
With the selection of optional buttons, the total time required for washing is automatically
readjusted and can be viewed on the digital display.
PRE WASH
l
l
l
l
If pre wash is selected, the clothes are given a preliminary wash before the main wash.
Useful for the Cotton / Synthetic clothes which are highly soiled, stained, long wearing like
outdoor sports wear, kitchen wear,jeans etc.
When chosen, the symbol
is shown to indicate that the detergent is to be filled in
compartment marked I of the detergent dispenser tray.
At the end of the pre wash, the dirty water is pumped out automatically.
Pre
Wash
SOAK
l
l
Soaks clothes in soapy water for a calculated amount of time to dislodge dirt particles from
the clothes during main wash cycle. After this, it automatically continues with the normal
cycle.
Useful for Cotton / Synthetic clothes which are highly soiled or stained (blood / sweat / tea/
coffee / chemicals etc).
QUICK WASH
l
l
Quick wash reduces the total time including washing and rinsing time by about 20 to 35
minutes depending upon the program chosen.
More suitable for Cotton / Synthetic clothes which are lightly soiled, once worn,
undergarments, shirts, blouses, guest towels or less quantity of clothes (max. 3 kg)
INTENSIVE WASH
l
l
If the option is selected, the mechanical tumbling action during washing is
increased / extended to give more vigorous action onto the clothes.
Suitable for the Cotton / Synthetic clothes that are highly soiled and / or long garments like
jeans, bed sheets, etc.
7
Soak
Quick
Wash
Intensive
Wash
WATER PLUS
l
Water
Plus
Heavy laundry such as curtains, bed sheets, jeans etc uses excess water than normal
clothes. The water plus button compensates this by providing an additional 15-25%
water.
ADDITIONAL RINSE
l
l
An additional rinse cycle is executed to remove any left over detergent on the clothes to
give a better feel to the fabric.
Useful in places of soft water or for highly soiled clothes or for rinsing delicate fabrics,
net curtains etc.
Additional
Rinse
RINSE HOLD
l
l
l
l
Rinse hold option will prevent clothes from creasing by holding them in water before
final spin.
After the Rinse hold stage the program can be continued further to either drain out the
water or spin the clothes.
To do this, Press Pause button è Press Rinse hold button è Set the spin knob to No
final spin or desired spin speed è Press Start
In addition to “Rinse Hold” option, an inbuilt anti-crease action of tumbling takes place
after final spin to reduce creasing.
Rinse
Hold
TIME DELAY
l
l
l
l
l
l
l
If you desire to delay the start of the program choose ‘Time delay’ option.
Each press advances ‘Time delay’ by half an hour (30 minutes). The messages ‘TIME
DELAY’, ‘Clock symbol’ and ‘00:30’ will be shown on the display. If the button is kept
pressed continuously, the time delay gets incremented at a faster rate.
The time delay can be set from 30 minutes to 24 hours.
To set the Time Delay, Select the program and options è Press Time delay button
till desired delay time is displayed è Press Start button.
The time delay set will start decreasing the time in minutes. After time delay is over, the
washing machine will automatically start the chosen program and time required for
completing the chosen program would be displayed.
To cancel the “Time Delay” option when the machine is in Time Delay mode, Press
“Start/Pause” button.
Time delay does not proceed during power failure.
Time
Delay
TIME
DELAY
00:30
START/PAUSE
l
l
l
l
After choosing the desired program and options press this button to start the program. A
beep sound will be heard and the LED of ‘Start / Pause’ will glow.
To change the program during the machine run, Press Pause button è Switch OFF
the machine è Switch ON è Select a new program.
To select / deselect the options during the program run, Press Pause button è Change
the options è Press Start button.
Pause mode is indicated by the flashing of ‘Start / Pause’ LED and the intermittent
buzzer tone.
Start / Pause
DOOR OPEN
l
l
l
l
l
It is used to open the door of the machine.
Only when the LED of ‘Door Open’ button glows, the door can be opened by pressing
the Door Open button. After the door is opened, “door” message will be shown on the
display and the LED of Door Open button will be OFF.
To open the door during program run, pause the machine and then press Door Open
button.
To Prevent any untoward incidents to you, additional protection is provided in which the
door cannot be opened even if paused when the water temperature in drum is above 500
C or if the washing machine is in rinse mode or if the washing machine is in spinning
operation.
In case of emergency during power failure, the door can be opened by pulling the
emergency lever provided on the base of the washing machine on the front right hand
side.
8
Door Open
EMERGENCY LEVER
INBUILT ANTICREASE
l
l
In order to reduce the wrinkles on the laundry after final spin cycle, the machine is
provided with an ‘Inbuilt Anticrease’ feature.
Subsequent fluffing of the clothes will be done thereby it helps you to unload the
laundry from the drum with ease!
NOTE:
1. If Quick wash option is chosen, Intensive wash and Additional rinse options are
automatically disabled.
2. In the “Eco” program, the “Intensive wash” option is not applicable.
3. Buzzer tones can be heard while selecting the options - one for applicable and the
other for non-applicable options.
DIGITAL DISPLAY
l
l
l
l
l
l
Intelligent display gives you the complete information while setting of the
program, stages of program sequence, fault indications if any etc.
As shown in the picture, the digital panel can be distributed into three sections. The right
section tells about the program sequence i.e. “ WASH”, “RINSE” or “SPIN”. For
example, if the washing machine is in rinsing mode, then “RINSE” will be displayed.
The middle section has the 7 segment display for showing the program time and five
symbols - “Clock”
, “Key”
, “Thermometer”
,”Rinse hold”
and “Press-wash
.
.
The left section shows when the ‘Soak’ or ‘Rinse hold’ option is being executed. For
example, if you have chosen “Soak” option then “SOAK” will be displayed when the
washing machine reaches that stage.
If you have chosen “child lock” option, then “Key” symbol will be displayed. Similarly,
during washing cycle, whenever heater is ON “Thermometer” symbol will be displayed.
If the washing machine encounters a problem during program run then the corresponding
error code will be displayed. For further details, please refer the topic ‘ Trouble shooting’
on page 23.
SOAK
RINSE
HOLD
TIME
DELAY
WASH
RINSE
SPIN
CHILD LOCK SAFETY PROVISION
l
l
l
l
l
You can safeguard your washing machine to prevent any unintentional changes to the
selected options and to the program sequence by activating Child lock feature.
To activate “Child lock” feature press “Pre wash” and “Rinse hold” optional buttons
simultaneously. The glow of the symbol
on the display indicates that the Child lock
option is activated. Child lock is to be set after starting the program.
Child lock feature makes all the optional buttons inoperative.
To deactivate the child lock, press the same two buttons simultaneously.
Symbol
will disappear.
If child lock is opted, it has to be disabled to make any changes in the options during
program run or to open the door at the end of the program.
Pre
wash
Rinse
Hold
AUTOMATIC DETERGENT DISPENSER TRAY
Designed for automatic dispensing of detergent & additives as required which avoids manual
filling at each stage. The detergent dispenser tray should be filled with detergent & additives
before the start of a program. The tray has three chambers.
1. Pre wash chamber:(Marked-I) To be filled with detergent in case a pre wash program
has been chosen.
2. Main wash chamber: (Marked-II) to be filled with detergent for every wash program.
3. Fabric conditioner additive chamber:(Marked “
”) to be used for additives
only. It should be filled as per instructions mentioned in the topic “operation”.
The detergent tray must be pulled out, filled as required and shut before the machine is switched
ON.
9
II
I
KINDS OF WASH PROGRAMS
IFB Digital washing machine provides you number of combination on main programs and options to get wash quality to your
satisfaction.
To select the right program, you should know the basic group of wash programs.
1.
l
l
l
Cottons - Cold, 45, 60, 95 0C
The washing action is more vigorous/gentle for a longer duration to clean clothes better.
To be used for whites, cottons and coloureds, average soiled cottons, bed sheets, curtains, under garments, towels,
shirts, trousers ets.
Not to be used for Woolens and Delicate fabrics.
Selectable additional options:
Pre wash, Soak, Quick wash, Intensive wash, Water plus, Additional rinse, Rinse hold , No final spin.
Intensive wash is not applicable to Cotton 95 degrees program.
2.
l
l
Synthetics - Cold, 45, 600C
The washing action is less vigorous / gentle for a shorter duration.
To be used for easy care fabrics made from cotton, synthetics, lightly soiled blouses, shirts etc made of polyester
or similar blends.
Selectable additional options:
Pre wash, Soak, Quick wash , Intensive wash, Water plus, Additional rinse, Rinse hold, No final spin.
3.
l
l
l
Eco- 600C
This gives an environmental friendly and energy saving operation of washing.
In this program, the mechanical tumbling action during wash is increased in such a way that a lower temperature
and power consumption, the same quality of wash is achieved as that with high temperature & less mechanical
action.
This program can be used for washing heavily soiled Cotton/ Synthetic clothes such as whites, cottons and
coloureds, bed sheets, curtains, towels, shirts, trousers.
Selectable additional options:
Pre wash, Soak , Quick wash, Water plus, Additional rinse, Rinse hold, No final spin.
4.
l
l
Delicates - 400C
The washing action is less vigorous/gentle for a shorter duration.
To be used for washing sensitive easy care fabrics like skirts, blouses, shirts, net curtains, mixed fibre fabrics or
Turkish towels.
Selectable additional options:
Rinse hold. No final spin.
5.
l
l
Woolen - 400C
The washing action is very gentle for a short duration.
Most suitable for washing hand washable fabrics or machine washable fabrics made from wool or wool blend.
Selectable additional options:
Rinse hold. No final spin.
6.
l
Silk Saree - Cold
Suitable for machine washable silk textiles.
Selectable additional options:
Rinse Hold. No Final Spin.
Note:- Please refer page 17 for detergent usage for machine washable silk textiles.
7.
l
Mini - 300C
Useful for washing the laundry which is very lightly soiled like once worn/ daily wear garments.
Selectable additional options:
Water plus, Rinse hold, No final spin.
10
EXCLUSIVE PROGRAMS
The washing machine is provided with exclusive programs as follows
1.
Drain
This program is used for draining out the water from the washing machine.
l
Selectable additional options: Nil
2.
Rinse & Spin
l
Exclusive rinse cycles with subsequent spin cycle and suitable for rinsing hand-washed items.
l
Maximum spin speed upto 1100 rpm can be chosen.
Selectable additional options: Rinse hold, No final spin.
3.
Spin
l
l
This is an exclusive spinning program and is useful for squeezing out water from hand washed / rinsed items.
Maximum spin speed upto 1100 rpm can be chosen.
Selectable additional options: Nil
EXCLUSIVE IN-BUILT FEATURES:
A UNIQUE SHOWER SYSTEM:
Scoops on the inner drum pick up water and shower through perforated fins on the
laundry as the drum rotates. This ensures a thorough wetting of the laundry, What’s more,
the process requires less water and thus less energy to heat it.
COOL DOWN CYCLE:
Hot water drained after main wash cycle can be harmful for people and environment. Hot water is cooled down by taking
additional cold water automatically, which also reduces the concentration of detergent, thus ensuring better rinsing efficiency
and Eco friendly environment. The cool down cycle takes place only if the temperature of water inside the washing machine is
high thus saving water.
UNBALANCE DETECTION & CORRECTION:
If the wash load is very much unbalanced, the washing machine will try to distribute for balancing the load inside the drum. In
this process, the washing machine will stop in between and try to distribute the load. Some times the washing machine will
spin at lower spin speed to reduce stresses on the dynamic parts of washing machine. This in turn will increase the life of the
mechanical components of washing machine.
BUILT IN MEMORY:
The washing machine has an inbuilt memory thus ensuring the machine will start from the same point where it had stopped, on
resumption of power supply.
11
12
SORTING OF GARMENTS
l
Machine washable fabrics only should be washed in machine (look for wash
symbols given on your garments).
l
Sort garments as per the darkness or intensity of colours. Lighter garments can pick
up dyes from darker ones.
l
Separate Man-man fabrics (like polyester) from natural fibres ( c o t t o n ) . M a n made fibres can attract the oils that are released from natural fibres during washing.
These oils can build up and make spots more noticeable.
l
Wash heavily soiled, dirty items separately from slightly soiled items. This will
retain the brightness of colours of fabrics washed.
l
Try to have a mix of large & small clothes in each wash load. This will move the
clothes freely in the drum during the wash cycle thus ensuring better wash.
l
Sort delicate fabrics and loose knits from ‘tougher’ fabrics.
l
Garments which give lint ( e.g. woolens, socks, coarse cotton fabrics, etc )should be
washed separately from garments that attract lint (e.g. synthetic fibres and
corduroys).
l
Check the pockets for any loose items like coins, keys, key chains, etc. Remove
these articles as these can damage the drum/tub of washing machine.
l
Wash woolens and silk only if label on garment permits it.
LOADING THE MACHINE
l
Open the front porthole door place garments loosely inside the drum. For best
results load garments one by one.
l
A wash load should preferably be a mix of large and small clothes.
l
Turn knitted garments inside out. Remove loose hooks, rings and pins found on
curtains etc.
l
If pins/hooks cannot be removed tie a knot around them with the garment itself.
l
Close door and press till you hear a ‘click’. Ensure that no cloth is jammed
between door and rubber gasket.
l
For large garments like bed covers and curtains etc. open out the garments and hold
from the centre to load.
l
Ensure that volume of load allows the clothes to tumble freely in the drum for best
wash results.
l
Over-loading the drum will affect wash quality. It can also damage the machine
and clothes in the long run.
l
Running the machine under - loaded may cause excessive vibration , noise and
damage.
13
DETERGENT TO BE USED AND QUANTITY
l
l
l
l
l
l
l
l
l
The best washing results will be achieved by using the correct dosage of detergent.
Use the detergent as per the instructions on the detergent packaging.
Use liquid detergent dispenser tray available with your machine only while using liquid detergent. It is not to be used
for powder detergent.
Use 20-25 ml of Genteel or Ezee liquid detergent for machine washable silk textiles. Pour the liquid detergent into
the detergent dispenser tray and place the tray in the main wash chamber (Marked-II) of the detergent dispenser tray
before the start of the program.
The quantity of detergent will depend on
a. Quantity of clothes being washed
b. Degree of soilage of clothes
c. Water hardness
Hard water and heavily soiled clothes require more then recommended quantity of detergents.
Do not use dry cleaning agents.
Frequent use of insufficient detergent will be noticeable as follows:
a. Washing appears grey or not properly clean
b. Grey/ brown stains appear on the clothes.
Excess use of detergent will result in
a. Higher environment pollution
b. Generation of too much foam
c. Building up of scales
d. Poor rinse quality
FABRIC CONDITIONER
l
l
l
l
l
l
l
l
l
Fabric softener, Whitening, Enzyme, Disinfectants, Bleaching , etc.
Fill in the middle chamber of detergent dispenser tray marked
Conditioner should be in liquid/solution form only (powders to be mixed in water)
Fabric softener gives a soft feel and smooth surface to fabrics.
Whitener gives ‘Whiteness” to white clothes and brightness to coloured clothes.
Enzymes help to remove stains of sweat, blood etc.
Chlorine bleach is used for white clothes and oxygen bleach is used for coloured clothes.
A strong bleaching agent is not recommended for direct use in the washing machine.
Extremely dirty areas in clothes can be pretreated with bleach and then to be loaded in the machine for a r e g u l a r
wash.
TREATMENT OF STAINS
l
l
l
l
Stains need to be treated immediately while they are fresh. Usually stains are categorized as absorbed stains, builtup
stains, and compound stains.
Absorbed stains can be removed by rubbing gently a pad containing a suitable solvent over the stain from outer edge
towards centre by keeping stained cloth on absorbent fabric.
Built up and compound stains may be removed by first carefully brushing off stained area. Then rub gently with pad
containing solvent from the back of fabric.
It is advisable to try out the solvent on hidden part of the garment to verify its effect on clothes.
FABRIC CARE SYMBOLS
WASHING SYMBOLS
0
WASH TEMP MAX C
ACTION
95, 60, 40
Normal
30
Gentle
Do not machine- wash
Handwash
Do not wash in water
14
15
CHECK POINTS:
Before switching your machine ‘ON’ check if .....
l
The power supply plug is connected to a 230 V, 50 Hz supply with proper earthing.
l
The water inlet stopcock is fully open.
l
The inlet and exhaust hoses are straight and free from twist.
l
The coin trap is closed firmly and exhaust pipe is connected to drain.
PROGRAMMING THE MACHINE:
1. Switch ON the mains supply.
2. Rotate the programmer knob to the desired program.
3. Set the final spin speed required.
4. Select the options preferred for the chosen program from the flashing options. After selection, the indicator light of
the chosen options will glow.
The chosen options can be deselected by pressing the button again.
Non-flashing options indicate that they are not applicable for the corresponding program.
5.
Press ‘Door Open’ button to open the door and load the clothes inside the drum. After the door is opened, the
indicator light of Door Open button will turn OFF.
6.
Put the detergent in the respective chamber.
7.
Press the “Start/Pause” buttons to start the washing cycle. The LED corresponding to “Start/Pause” button will
be ON. Flashing of optional button indicator lights will turn OFF.
8.
If required enable the ‘Child lock’ feature to prevent any tampering of option chosen.
9. To change the options, Pause the machine è Select / Deselect the options è Press Start button. The machine
will acknowledge the changes done automatically.
10. To change/ cancel the program during the machine run, Press Pause button
Switch ON è Select a new program
è Switch OFF the machine è
11. Washing, Soaking, Rinsing & Spinning can be seen through the porthole door.
12. The time remaining to complete the washing cycle can be seen on digital display at any time during washing.
SWITCHING OFF THE MACHINE:
l
At the end of the program “End” message will be shown on the digital display. Also LED of “Door Open” b u t t o n
will glow and beep sound will be heard for 15 seconds.
l
Press the “Door open” button to remove the clothes from the machine.
l
Switch OFF the machine by rotating the program selector knob to “OFF” position.
Leave door slightly ajar to dry out the inside of the machine.
16
BEFORE USING THE MACHINE AGAIN,
RUN THE MACHINE WITHOUT CLOTHES
AND DETERGENT BY SELECTING ANY
SHORT WASH PROGRAMME. THIS WILL
ENSURE THAT THE WATER SYSTEM LINE
GETS FILLED WITH WATER.
COIN TRAP
1
ALTERNATELY POUR TWO MUGS OF
WATER ( APPROX. 1.5 LTS.) DIRECTLY
INTO THE DRUM.
DO NOT OPEN THE COIN TRAP
DURING A PROGRAMME RUN.
Open the bottom door which is
detachable by pressing the top portion
of it.
2
Drain Hose
Drain plug
Container
Place a shallow container near the
bottom door. Pull out the drain hose
and open the drain plug to drain out the
water from the machine in the
container.
3
After draining out the water through
the drain plug, open the coin trap by
rotating in anti-clockwise direction
and remove the foreign particles like
coins, pins, hooks, present if any.
Tighten the coin trap and push the
drain plug to their original positions
and close the bottom door.
17
DRUM
Rust Stains
Never leave metal items e.g. paper clips, safety pins etc. in the drum as there is
a danger of rusting. If there are any rust stains remove with a non-chlorine
agent. Special non-metal sponges (never use steel wool) may also be used.
SIEVES
Cleaning of Water Connection Sieves, filter
=
Turn off Taps. Disconnect Power supply to the machine. Unscrew inlet hose
from machine as well as from the tap and drain out water from the hose.
=
Pull the sieve out of the magnetic valve with a pair of flat nosed pliers and
clean under running water with a brush.
=
Fit Sieve back to the valve.
=
Remove the filter mesh from the tap end of the inlet hose and clean under
running water with a brush.
=
Fit the filter mesh back to inlet hose.
=
Screw inlet hose back to the machine and the tap. Ensure that both the sieves
and filter are in place.
=
Turn on the tap.
Cleaning of Porthole Door Area:
=
=
After every wash clean vapour off porthole door.
Lift the fold in the rubber gasket under porthole periodically to remove
lint and dirt preferably after every wash.
FROST PROTECTION
=
=
If the machine is being operated in very cold temperature, all the water
should be drained out after use.
Locate the drain hose and drain the water.
Disconnect inlet hose from the tap and drain.
DRAINING DURING EMERGENCIES
In case of a long power failure during a programme run, the water can be
drained from the drum through the drain hose
=
=
=
=
=
Allow the water in the machine to cool down sufficiently.
Locate the drain hose and pull out the drain hose to drain water in a large
shallow container.
Before restarting machine, ensure that drain plug is fixed to the drain
hose properly and coin trap water line is filled with water by running the
machine without any clothes or detergent.
Spillage of water can rust the base plate. Draining through drain hose
prevents rusting.
If the clothes are to be removed in case of power failure, an emergency
lever is provided on the right hand side of the base of the washing
machine. Pull this lever to open the door. Please ensure to drain out the
water first through drain hose before pulling the emergency lever.
18
Drain Hose
Drain Plug
Container
EMERGENCY LEVER
WHY DOES IT HAPPEN?
DIGITAL DISPLAY DOES NOT GLOW.
=
=
=
Check if the machine is ON.
Check for loose connections in plug / socket
Check if the programmer selector knob is in OFF position.
WASHING MACHINE DOOR DOES NOT OPEN
=
=
=
Check if “Door open” LED is ON.
Check if child lock option is chosen.
For reasons of safety, the washing machine door can’t be opened when the water level, temperature or the speed is too
high.
MACHINE DOES NOT START
=
=
=
=
Check if machine is powered ON.
Check if the “Start/Pause” button is ON. The LED will glow when it is pressed.
Check water supply.
Porthole door not closed properly.
WATER DOES NOT ENTER MACHINE/DETERGENT NOT BEING FLUSHED INTO DRUM
=
=
=
=
=
Check water supply
Porthole door not firmly closed
Water tap not turned on
Bent inlet hose
Sieve on inlet valve / inlet hose clogged.
SUDS ESCAPING FROM DETERGENT DISPENSER TRAY.
=
=
Detergent used is not a washing machine detergent
Excessive detergent used
WATER LEAKAGE FROM THE MACHINE.
=
=
=
Inlet/Outlet hose connection loose
Coin trap not screwed on properly
Inlet hose leaking
MACHINE DOES NOT DRAIN.
=
=
Coin trap clogged
Outlet hose end above 1 meter from floor level
MACHINE DOES NOT SPIN.
=
=
=
Check if the Spin speed selector knob is set to ‘No Final Spin’ position.
Rinse Hold button is pressed.
Coin trap is clogged.
MACHINE VIBRATES MORE DURING SPINNING.
=
=
=
Machine not levelled properly
Coin trap clogged partially.
Clothes not loaded as instructed
MOTOR NOISE
=
It is normal for noises to be heard while motor is running. However wash load belt tension and motor
mounting bolt should be checked for specified limits.
PUMP NOISE
=
It is normal for noises to be heard from the pump during the start-up and final stage of draining. However check for fluff
filter clogging.
PROGRAM CYCLE TIME DELAYED
=
=
Not a fault.
It is normal as the washing time may vary depending upon the type and quantity of laundry, inlet water pressure,
inlet water temperature, variations in power supply and other usage conditions.
19
ERROR INTERPRETATION
Check the following before asking if the error message is displayed during the programme run:-
ERROR
MESSAGE
POSSIBLE CAUSE
SOLUTION
Door is not closed properly
Open and then close the door properly
Water tap turned off.
Turn the water tap ON.
Water supply not available
Machine will start automatically on
resumption of water supply.
Sieve/filter blocked in water inlet hose.
Clean Sieve/Filter (Refer Page 20 for details)
Water pressure too low
Eliminate Cause.
Bent/damaged Water inlet hose
Remove bend / damage
Power supply cable plug not fitted
Fit the plug properly/replace the socket with
properly to the socket
standard one.
Power supply rating is not suitable
Connect to 230 V, 15 A, 50 Hz. Single phase
A.C. supply with proper earthing
Overloading of washing machine
The washer restarts after about 30 min.
Programme time is extended due to low inlet
water temperature / low input voltage.
Coin trap is blocked.
Clean Coin trap (Refer page 20 for details)
Exhaust hose clogged/bent
Clean the exhaust hose / Remove bend.
If the error message could not be solved with the aid of the above table:
*Switch OFF the appliance è
*Wait for 15 seconds. è
If the error message repeats, please call service personnel.
20
*Switch ON the appliance. è *Select and start a program
=
Ensure that the machine is properly balanced on four adjustable feet.
=
Ensure that the machine is connected to 3 pin socket with earth and 16 Amp fuse.
=
The machine is tested with water during assembly for performance checking. Condensed of droplets of water may remain
inside the drum. It is advisable to run the machine without wash load in Cotton 60 program with detergent for the first time
after installation.
=
Programme / temperature selection must be done prior to pressing the “Start/Pause” Button. For altering/ modifying the
options, press “Start/Pause” button again to bring the machine in “Pause” mode. The LED will start blinking & beep sound
will be heard. Modify the options and restart the washing machine by pressing “Start/Pause” button.
=
Servicing should be handled by the Company’s authorized personnel only.
=
The door can be opened at the end of the program when “Door open” LED is ON.
=
Check label on garments for determining conditions under which fabrics are to be washed.
=
Use detergent recommended for washing machine.
=
Ensure that the electrical line on which the machine is used can take the required load.
=
Check the inside of drum before loading the clothes.
=
Protect the machine from direct sunlight and do not splash water on it. Clean with a damp cloth.
=
Keep your machine dry to avoid corrosion / rusting. Take special care to wipe the machine after cleaning the Coin trap.
=
The machine should ideally be installed on the floor. It can be installed on any suitable platform or trolley, if desired by the
customer.
=
Clean the shell lower and detergent tray periodically by taking out the detergent tray.
SPECIAL NOTE:
ONLY USE A DETERGENT RECOMMENDED FOR FRONT LOADING WASHING MACHINES. A
DETERGENT WHICH FOAMS EXCESSIVELY CAN DAMAGE THE MOTOR AND
DETERIORATE THE RINSE QUALITY.
INSTALL MACHINE IN A ROOM WITH ADEQUATE VENTILATION. AVOID A ROOM WITH NO
WINDOWS. THE BACK OF THE MACHINE SHOULD BE AT LEAST 4 INCHES (100 mm ) AWAY
FROM THE WALL.
IF YOU USE A COVER OR TABLE CLOTH ON THE TOP LID, MAKE SURE THAT THE
VENTILATION SLOTS AT THE BACK ARE NOT COVERED OR BLOCKED. THIS PRECAUTION
WILL PROLONG THE LIFE OF ELECTRICAL AND RUBBER COMPONENTS.
21
22
23
24
ALSO FROM IFB
DISHWASHER
CAPACITY:- 12 PLACE SETTING
MICROWAVE OVEN
CAPACITY - 17 to 30 LITERS
CLOTHES DRYER
CAPACITY - 5.5KG
IFB Industries Limited, Plot No. IND - 5, Sector - 1, East Calcutta Township, Calcutta - 700 078
Visit us at www.ifbappliances.com