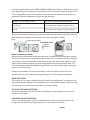
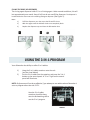
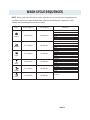
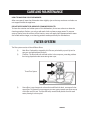
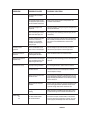
1
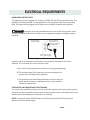
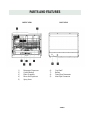
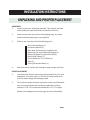
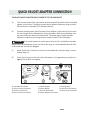
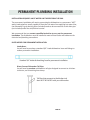
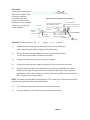
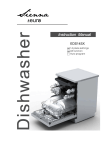
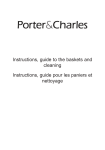
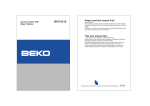
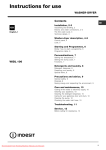
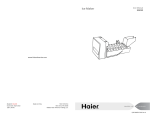
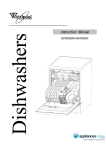
COUNTE RTOP DIS HWA SHE R User Manual MODEL MCSCD6W3 CONTENTS IMPORTANT SAFEGUARDS ............................................................................................... 2 PARTS AND FEATURES ...................................................................................................... 5 INSTALLATION INSTRUCTIONS .......................................................................................... 7 RECOMMENDATIONS FOR USE ........................................................................................ 13 OPERATIONAL INSTRUCTIONS ........................................................................................ 16 CARE AND MAINTENANCE .............................................................................................. 23 TROUBLESHOOTING ....................................................................................................... 26 WARRANTY .................................................................................................................... 28 IMPORTANT SAFETY INSTRUCTIONS Inside you will !nd many helpful informa"on on how to use and maintain your dishwasher properly. Following these guidelines can save you a great deal of "me and money over the life of your dishwasher. Addi"onal answers to common problems can be found in the chart of Troubleshoo"ng Tips. ! WARNING To prevent the risk of !re, electric shock, or injury to user and other people, the following safety and electrical instruc"ons must be followed when using this appliance. DO NOT USE THIS APPLIANCE FOR OTHER THAN ITS INTENDED USE. FAILURE TO ADHERE TO THESE INSTRUCTIONS AND PRECAUTIONS WILL VOID THE MANUFACTURERS WARRANTY. CAUTION: 1. Contact MC Appliance Corp. Customer Service or an authorized service technician for repair or maintenance of this unit. 2. For service, support, and warranty informa"on, visit www.mcappliance.com or call 888-775-0202. 3. The dishwasher is not intended for use by young children or in!rm persons without supervision. 4. If the power cord is replaced, replacement work must be performed by authorized personnel only. 5. Permanent installa"on work must be peformed in accordance with all local codes and ordinances for electrical and plumbing connec"ons by authorized personnel only. -PAGE 1- IMPORTANT SAFEGUARDS READ THIS MANUAL AND ALL INSTRUCTIONS BEFORE USE. 1. Do not use this appliance for other than its intended use. 2. Do not unplug your appliance by pulling on the power cord. Always grasp the plug !rmly and pull it straight out from the outlet. 3. Do not operate your appliance in the presence of explosive fumes. 4. Do not add or mix any "ammable or explosive substances to wash. 5. Do not operate your appliance when parts are missing or broken. 6. Do not abuse, sit on or stand on the door or the dishwasher rack. 7. Do not use this appliance for commerical dishwashing purposes. 8. Do not wash plas#c items unless they are marked dishwasher safe or the equivalent. For plas#c items without such markings, check the manufacturers recommenda#ons. 9. Do not operate this appliance unless all enclosure panels are properly in place. 10. Do not tamper with controls. 11. Do not touch the HEATING ELEMENT during or a$er immediate use. 12. Do not allow children to play in or on the appliance. To reduce risk of injury, close supervision and observa#on of children is needed around the dishwasher. 13. Do not repair or replace any part of the appliance or a%empt any servicing unless speci!cally recommended in the user repair instruc#ons that you understand and the necessary skills to carry out such dishwasher servicing. 14. Do not use this dishwasher outdoors. 15. Do not use extension cords or adapters to connect the unit to any electrical power source. -PAGE 2- 16. Use only detergents or we!ng agents recommended for use in a dishwasher and keep them out of the reach of children. 17. When loading items to be washed: A) Locate sharp items to prevent any damage to the door seal. B) Load sharp knives with the handles up to reduce the risk of any personal injuries. 18. This appliance must be properly installed in accordance with the installa"on instruc"ons before its use. 19. This appliance must be connected to a proper electrical outlet with the correct electrical supply. 20. Proper grounding must be ensured to reduce the risk of shock and #re. DO NOT CUT OR REMOVE THE GROUNDING PLUG. If you do not have a three-prong electric receptacle outlet in the wall, have a cer"#ed electrician install the proper receptacle. The wall receptacle MUST be properly grounded. 21. To reduce the risk of injury, immediately replace worn power cords, loose plugs and/or power outlets. 22. Disconnect electrical power and water intake hose to dishwasher before cleaning and/or servicing. 23. If your old appliance is not being used, we recommend that you store the unit out of the reach of children or remove its door. This will reduce the risk of injury to children. 24. Hydrogen gas may be produced if the water heater has not been used in more than two weeks. This could be explosive and can explode under certain circumstances. If this is the case, before using this appliance, turn on all the hot faucets and let the hot water run for a few minutes. This will let the trapped hydrogen escape. During this process do not turn on an electric appliance, smoke, light a match or lighter, or use a $ame to avoid serious injury, due to the highly $ammable nature of hydrogen gas. -PAGE 3- ELECTRICAL REQUIREMENTS GROUNDING INSTRUCTIONS This appliance must be plugged into at least a 15 AMP 120 Volt 60 Hz grounded outlet. This appliance must be grounded. It is equipped with a 3-prong power cord with a grounding plug. The plug must be plugged into an outlet that is properly installed and grounded. Improper use of the grounded wire can result in the risk of electric shock. Consult a quali!ed electrician if necessary. Do not a"empt to tamper or modify the plug in any form. ! WARNING Wall outlet with a 3-prong receptacle. Do not, under any circumstances, cut, remove, or bypass the grounding prong. Power supply cord with 3-prong grounding plug. Avoid the use of an extension cord because it may overheat and cause a risk of !re. However, if it is necessary to use an extension cord: A) Use only a 3-prong extension cord with a 3-prong grounding plug. B) The marked ra"ng of the extension cord must be equal to or greater than the ra"ng of this appliance. C) The extension cord should be posi"oned such that it does not drape over the counter or tabletop where it can be pulled by children or tripped over. ATTEMPTING ANY MAINTENANCE OR CLEANING To minimize the possibility of electric shock, unplug this appliance from the power supply or disconnect at the household electrical panel by removing the fuse or switching o# the circuit breaker before a$emp"ng any maintenance or cleaning. NOTE: Pressing the Power ON/OFF bu"on to an OFF posi#on does NOT disconnect the appliance from the power supply. -PAGE 4- SPECIFICATIONS PARTS AND FEATURES CONTROL PANEL 6 1 7 8 3 2 4 5 FRONT VIEW 1) 2) 3) 4) Power Light (ON/OFF) Power Bu!on (ON/OFF) Wash Cycle Selector Delayed Start Bu!on 5) 6) 7) 8) Start/Reset Bu!on Delay Feature Intake Warning Light Rinse Aid Warning Light -PAGE 5- PARTS AND FEATURES INSIDE VIEW $ETERGENT$ISPENSER #UTLERY"ASKET &ILTER!SSEMBLY 2INSE!ID$ISPENSER 3PRAY!RMS BACK VIEW #UP3HELF "ASKET $RAIN0IPE#ONNECTOR )NLET0IPE#ONNECTOR - PAGE 6- INSTALLATION INSTRUCTIONS UNPACKING AND PROPER PLACEMENT UNPACKING 1. Inspect and remove all packing materials. This includes the foam and any adhesive tape both inside and outside of the unit. 2. Inspect and remove any remains of packaging, tape, or printed materials before powering on your appliance. 3. Check to see if you have all of the following parts: Quick Faucet Adapter (1) Instruc!on Manual (1) Drain Hose for Permanent Installa!on (1) Measuring Cup for Powdered Detergent (1) Measuring Spoon for Liquid Rinse Aid (1) Outlet Hose Clamps (2) Clip on Basket for 3-in-1 Tablets (1) Rack (1) Cutlery/Silverware Basket (1) 4. Clean the interior surface with lukewarm water using a so" cloth. PROPER PLACEMENT 1. First determine the best countertop surface loca!on for your new dishwasher. It must be close to a 120 Volt (15 Amp) outlet and a sink with water supply and drainage system. 2. The minimum height clearance required to install your dishwasher on a countertop surface with overhead cupboards or kitchen cabinets is 17.8. This countertop dishwasher is 17.2 in height. (Reference the diagram on the next page for more informa!on) -PAGE 7- DIAGRAM OF PROPER APPLIANCE PLACEMENT Minimum height between tabletop to kitchen cabinet/cupboard: 17.8 Countertop Dishwasher Height: 17.2 NOTE: Recommended dishwasher loca!on is next to the sink. Make sure there is an electrical power supply within easy reach of the machine. The power cord is 6-feet long. The dishwasher must be installed on a solid, level surface. To level the dishwasher, adjust the four legs under the dishwasher. Carefully posi!on the dishwasher on the countertop that you determined as your "nal loca!on. There are two types of dishwasher installa!ons: 1. Quick Faucet Adapter Connec!on 2. Permanent Plumbing Installa!on NOTE: The suggested way is to install and operate this countertop dishwasher using the Quick Faucet Adapter Connec!on. -PAGE 8- QUICK FAUCET ADAPTER CONNECTION THE QUICK FAUCET ADAPTER EASILY CONNECTS TO THE SINK FAUCET. A) First remove aerator from your faucet nozzle and a!ach the quick connect threaded adapter to the faucet. The quick connect faucet adapter allows easy snap-on/snapo" connec#on to standard (7/8 diameter) faucets. B) Connect the dishwasher Quick Connect Faucet Adapter to the faucet $rst to ensure the hose length $ts the dishwashers selected loca#on. Both hose and $%ngs must be connected to the back of the dishwasher. The plas#c water intake and drain $%ngs are unique to each design and are made to easily $t the dishwasher. ! WARNING A hose that a!aches to a sink spray can burst if it is installed on the same water line as the dishwasher. If your sink has a sink spray, it is recommended that the hose be disconnected and the hole plugged. C) Water Intake Hose: Connect to the rear of the dishwasher using the large, 4-corner shaped wing nut. D) Drain Hose: Connect to the rear of the dishwasher. It is suggested you use pliers to #ghten ghten but DO NOT over #ghten. 1) Drain Port ort Connec#on 2) Quick Connect Connec#on 3) Inlet Port Connec#on 4) Quick Connect Connec#on 5) Faucet Adapter 6) Faucet Washer 7) Pressure Relief Value 8) Faucet Adapter Connec#on 9) Locking Collar 10) Inlet Hose Connec#on 11) Drain Hose Connec#on -PAGE 9- E) With both hoses connected, make sure you can plug the power cord into a 120 volt, grounded AC outlet, then turn the dishwasher so it is facing forward. F) Red Pressure Release Bu!on: This red bu!on, located on the Quick Release Faucet Adapter, is used to release the water line pressure. When you "rst connect to the water faucet, you can press the red bu!on to check the water is at the desired temperature or to use the faucet normally without removing the whole Quick Release Faucet Adapter. Red Pressure Release Bu!on Water Hose Drain Hose Red Pressure Release Bu"on This part can be unscrewed into two parts to adjust for di!erent faucet sizes. This end connects to the sink faucet. G) With all the "#ngs connected, open the water tap to test to make sure there are no leaks. Connect the A/C power cord and use the dishwasher as outlined in the manual. H) When "nished using the dishwasher, you need to close the water supply at the tap and disconnect the power supply cord. # WARNING The water intake hose is now pressurized. Press the Red Pressure Release Bu!on on the Quick Release Faucet Adapter, which will depressurize the water intake hose to easily remove without squir"ng water, which can be very hot and cause scalding or personal injury. The Quick Release Faucet Adapter should then be disconnected from the faucet and stored for its next use. CAUTION: Do not let children disconnect the dishwasher. Close supervision of children is always important around the appliance. -PAGE 10- PERMANENT PLUMBING INSTALLATION INSTALLATION REQUIRES A HOT WATER LINE TAPPED FROM THE SINK. The permanent installa!on will require connec!ng the dishwasher to a permanent HOT water intake pipeline, usually tapped o" from the sink water line supplying hot water. Also, the dishwashers gray draining hose (included) needs to be connected to a sink drain pipe (not included) under the sink/kitchen counter. We recommend that you contact a quali!ed technician to carry out the permanent installa"on. The dishwasher must be installed to meet all local codes and ordinances for electrical and plumbing connec!ons. PARTS NEEDED FOR PERMANENT INSTALLATION Intake Hose: You will need to purchase a standard 3/4 intake dishwasher hose and #$ngs to make a permanent installa!on. 3TANDARDvINTAKEDISHWASHINGHOSEFORPERMANENTINSTALLATION Direct Connect Dishwasher Tail Pipe: You will need to purchase a dishwasher tail pipe designed to connect to a kitchen sink drain, and a matching hose clamp. 4AIL0IPETHATCONNECTSTOTHEKITCHENSINK DRAIN./4).#,5$%$WITHYOURDISHWASHER -PAGE 11- Drain Hose: ay This unit has a special gray u drain hose included. If you choose a permanent installa!on, you must connect this hose to the d dishwasher drain threaded connector. Use the hose clamp supplied. Outlet Hose Clamp Hose Connec!ons for Permanent Installa!on Sink Drain Change intake valve to standard 3/4 dishwasher inlet hose Back of Dishwasher Water Hose Connect to HOT water pipe Dishwasher Tail Pipe (not included) Hose Clamp (not included) Gray L Hose: Connect ends to dishwasher and tail pipe. Place clamp here Outlet Hose Clamp ld be b done do by b a quali!ed ali!ed professional fe io l installe CAUTION: This work should installer. 1) Decide the best loca!on to run the hoses under the sink. Make sure both hoses will reach before cu"ng into the countertop. 2) The quick connect faucet adapter and hoses must be removed from the unit for both the intake and drain connec!ons. 3) Change the intake hose to a 3/4 and secure it !ghtly. 4) Using the special gray hose supplied, !ghten the hose to the drain connector. 5) Run both hoses below the sink and a#ach as a permanent installa!on for water intake and drainage. The special drain hose should be a#ached at one end to the dishwasher, and the other end to the sink tail pipe (not included). Secure both ends with a clamp (one clamp provided). NOTE: The intake hose should be connected to the HOT water pipe. The drain hose should be below the height of the base of the dishwasher. 6) Test the water connec!ons to ensure that there are no leaks 7) Connect dishwasher to a 120 volt household, grounded outlet. -PAGE 12- RECOMMENDATIONS FOR USE WATER, PRESSURE, AND TEMPERATURE For the best opera!ng results, the incoming water should be HOT and the pressure should be between 0.03~1.00 Mpa. Incoming water supply for the dishwasher is controlled by a low water switch applica!on, in the event your household water ceases, the dishwasher will stop. We only recommend using HOT water for maximum e"ciency and op!mal results. HOW IT WORKS: Your dishwasher cleans by spraying a mixture of clean HOT water and detergent (under pressure) against the soiled surface of your dishes. The water is pumped through a rota!ng spray arm, drained through a #lter removing food and soiled par!cles, then pumped back through the spray arm. Soiled water is pumped out and replaced with clean water at the end of each cycle. For the best cleaning results, the water temperature must be at least 120$F. To prevent damage to your dishwasher, the temperature of the incoming water supply should not exceed 150$F NOTE: Hard Water condi!ons will adversely a"ect the performance of your dishwashers washing ability. Hard water condi!ons will also contribute to Lime (white #lm substance) deposits, and/or Scaling on the stainless steel surface of the dishwasher tub and Heater Element located in the sump underneath the removable #lter screen. To assist in minimizing these condi!ons, it is recommended to periodically operate/rinse the inside of an empty dishwasher using one cup of white vinegar (at least once a week) or special cleaning products that clean calcium and lime deposits. DISHWASHING PREPARATIONS PREPARING TO WASH DISHES: For best results, rinse dishware and perform the following steps before loading your dishes: A) Discard any big chunks of food from the plate. B) Remove any oils and grease. C) Remove s!cky food residues and loosen burned-on residues. D) Empty liquids such as soups and beverages from glassware and cups. -PAGE 13- TIPS TO AVOID STAINS AND FILMS: The following sugges!ons are recommended to prevent stains and "lms from forming on dishware and utensil items: A) You must rinse all dishware, silverware, glassware, and food containers immediately a#er use. Some citric based food products, co$ee, tea, and iron deposits in water can cause yellow or brown "lming on the inside surfaces when le# on for long dura!ons. B) Rinse o$ acid-based liquids, such as vinegar or lemon juice immediately. This may cause discolora!on over !me to your plates, food containers, or internal cabinets. C) Always check the manufacturers recommenda!ons prior to washing items. D) You must check your water hardness to see whether you need to use more or less detergent when washing. If your water is extremely hard then it may be causing stains on items. You may need to use a water so#ener. E) Do not overload the dishwasher. F) Avoid improper loading by nes!ng plates together. G) Do not use too li%le detergent. H) Do not use old or damp powered detergent. I) Make sure the water temperature is at the recommended level to wash your dishwares. J) Do not load aluminum utensils improperly. Aluminum utensils can cause gray or black marks to porcelain utensils if they touch during the washing cycle. LOADING DISHWASHER LOADING YOUR DISHWASHER: The dishwasher is designed for a standard 6 place se&ng. NOTE: The standard plate size is 10. For ease of loading/unloading larger sized dinner plates from the dish rack, it may be necessary to (temporarily) remove the cutlery basket. When loading and unloading is complete, a!ach the cutlery basket to its original posi"on. Do not let any items ms extend et. through the basket. CUTLERY BASKET: Silverware should be placed in the basket with handles at the bo%om. If the rack has side baskets, the spoon should be loaded individually into the correct slots. Excep!onally long utensils should be placed in the horizontal posi!on on the cup shelf. ! WARNING Do not let any item extend through the bo!om of the rack or cutlery basket. ! WARNING Load sharp utensils with the sharp end pointed downward. -PAGE 14- OPTIMUM CAPACITY: Dishwasher Rack 1. Cups 6. Oval Pla!er 2. Serving Bowls 7. Dinner Plates 3. Glassware 8. Bread/Bu!er Plates 4. Saucers 9. Cutlery Basket 5. Fruit Bowls HOW TO LOAD ITEMS: A) Locate sharp items so that they are not likely to damage the door seal. B) Do not load plas!c items unless they are marked Dishwasher Safe or the equivalent. For plas!c items without such markings, check the manufacturers recommenda!ons. C) Cups, glasswares, and bowls must have their openings facing downwards in the dishwasher rack. D) Do not load glasswares over the dish rack pins. Glasses loaded over dish rack pins are not properly supported and are likely to get damaged. Certain types of glasses can become dull a"er a large number of washes. E) Arrange all items with recessed or curved sec!ons on a slant to drain water away from the items. F) Do not nest utensils together or overload the basket. They need to be evenly distributed. Make sure any cutlery items have not fallen through the basket, which can stop the spray arm from rota!ng. G) Items with wooden or bone handles, and items joined together with glue are unsuitable for the dishwasher, as they cannot withstand the hot water used. H) Place silverware with handles facing down, with the excep!on of knives and other poten!ally dangerous utensils which should have handles facing up. Do not load silverware with steel construc!ons that are subject to rus!ng. I) Do not load pewter or copper items, crystal glassware, wooden pla#ers, or items made from synthe!c $bers. J) Silver and aluminium parts have a tendency to discolor a"er washing. K) Glazed pa#erns may fade over !me if they are frequently machine washed. -PAGE 15- ADDITIONAL RECOMMENDATIONS: 1) Consider purchasing utensils that are labeled dishwasher safe. 2) Use mild detergents that are labeled for dishwasher use. If necessary seek further informa!on from detergent manufacturers. 3) 4) 5) For par!cular items, select a wash cycle with a low temperature se%ng. To prevent any damage, do not take glassware and cutlery immediately out of the dishwasher a"er the wash cycle has ended. Excep!onally small items should not be washed in the dishwasher. OPERATIONAL INSTRUCTIONS OPERATING YOUR DISHWASHER: 1) 2) 3) 4) 5) 6) 7) 8) Ensure that all electrical, water, and drain connec!ons have been installed correctly before proceeding. Load the dishwasher (see the Loading Dishwasher sec!on). Make sure that the water supply is turned on to full pressure. Add the appropriate amount of dishwasher detergent to the dispenser (see Dishwashing Detergent sec!on). Close the door and ensure that the door latch has engaged. Turn the dishwasher ON by pressing the ON/OFF bu#on. Select the appropriate wash cycle/program (see Wash Cycle Sequence sec!on). Press the Start/Reset bu#on. The indiciator lights will $ash intermi#ently to indicate the dishwasher is in RUN mode. NOTE: When you press the Start/Reset bu#on to pause the unit during washing, the indicator lights will stop blinking and the dishwasher will stop working un"l the Start/Reset bu#on is pressed again. DISHWASHING DETERGENT AND RINSE AID NOTE: Use ONLY detergent speci!cally made for automa"c dishwashers. Check the product packaging to be certain. Keep your detergent fresh and dry. Do not put powder detergent into the dispenser un"l you are ready to wash dishes. The amount of dishwashing detergent used is dependent on the condi!on of your household water supply. Extra detergent is required for hard water condi!ons, while less detergent is needed for so" water condi!ons. Your water u!li!es company should be able to tell you the condi!on of your household water supply. -PAGE 16- For heavily soiled loads, use the HEAVY, NORMAL WASH cycle. Fill one or both of the interior cups, depending on the hardness of your water, as well as the open cup on the dispenser lid. For an easy guideline, use the informa!on in the table below to determine the amount of automa!c dishwasher detergent to place into the dispenser: Number of Place Se&ngs Loaded Dishwasher Detergent Recommenda!ons Less than 4 Fill compartment marked A (15g or 0.53 oz) 4 to 6 Fill compartment marked B (25g or 0.88 oz) To open the detergent storage cover, press the bu"on and the cover will #ip open. A$er you %nish loading the detergent, securely close the cover. (See Figure 1 Below) FIG. 1 PUSH LATCH TO OPEN DETERGENT TYPES: FIG. FIG. 1 POWDER TABLETS FIG. F A2 B USING A RINSING AID AGENT Using a specially formulated rinsing agent will help rinse away food and detergent residues that can be le$ behind on your dishes during the %nal rinse. This helps to prevent unslightly spots, %lms on dishes and glassware, and reduce drying !me. When used regularly, a rinse agent will automa!cally provide you with cleaner dishes every !me you wash them. The rinse aid will automa!cally be added during the %nal rinse, ensuring thorough rinsing, and spot or streak free drying. Always use a branded rinse aid for dishwashers, and never dilute or %ll the rinse aid dispenser with any other substances (e.g. detergent), as it will damage the appliance. RINSE AID SETTING The amount of rinse agent released into the %nal wash can be adjusted. The dispenser has four se&ngs (factory se&ng is at the midpoint; the recommended se&ng). If there are rings of hard water (e.g. calcium) spots on dishes, try a higher se&ng. TO ADJUST THE RINSE AID SETTING Remove the dispenser cap, and then turn the adjuster counterclockwise to increase the amount of rinse agent. LOW RINSE AID LEVEL INDICATOR As the rinse aid diminishes, the size of the black dot on the rinse aid level indicator will change un!l the black do no longer appears in the rinse aid level indicator. -PAGE 17- FILLING THE RINSE AID DISPENSER The rinsing agent dispenser holds 3.5 oz. of rinsing agent. Under normal condi!ons, this will last approximately one month. Keep it full, but do not over"ll the dispenser. The dispenser is located inside the door next to the washing detergent dispenser (See Figure 2). FIG. 2 1) To "ll the dispenser, turn the cap to the le# and li# it out. 2) Add rinse agent un!l the indicator level turns completely black. 3) Replace the dispenser cap and close the dishwasher door. USING THE 3-IN-1 PROGRAM Your dishwasher has ability to u!lize 3-in-1 tablets. 1) 2) Hang the 3-in-1 tablet container onto the rack (see the visual below) Put the 3-in-1 tablet into the container and press the 3-in-1 bu$on on the control panel. A 3-in-1 light on the control panel will illuminate. NOTE: Performance will not be as a!ec"ve if you a#empt pt to use tablets when dishwasher is set to a program other than the 3-in-1. How the 3-in-1 tablet container should be hung onto the dishwashing rack to use the 3-in-1 program. -PAGE 18 18- WASH CYCLE SEQUENCES NOTE: Wash cycle !mes listed here are for reference use only as they can change based on condi!ons such as inlet water temperature, whether the dishwasher is par!ally or fully loaded, and the hea!ng element power ra!ng. Cycle Water (Approx.) Time (Approx.) Sequence Pre-Wash Heavy 3.83 Gallons 100 Minutes 3.17 Gallons 85 Minutes 3.17 Gallons 75 Minutes 2.56 Gallons 70 Minutes 3.17 Gallons 45 Minutes 1.32 Gallons 24 Minutes Normal Light Glass Speed Pre-Wash Wash Wash Rinse Rinse Dry Pre-Wash Pre-Wash Wash Rinse Rinse Dry Pre-Wash Pre-Wash Wash Rinse Rinse Dry Pre-Wash Wash Rinse Rinse Dry Pre-Wash Pre-Wash Wash Rinse Rinse Pre-Wash Rinse -PAGE 19- USING THE DELAY FEATURE The start of the dishwasher can be delayed between 1 and 24 hours, using one hour increments. To u!lize this feature: 1) Press ON/OFF bu"on to ON posi!on 2) Press PROGRAM bu"on 3) Press DELAY bu"on once for each hour of delay (e.g. press bu"on 3 !mes to delay start by 3 hours) To cancel the delay feature: 1) Press ON/OFF bu"on to OFF posi!on. PAUSING THE WASH CYCLE SEQUENCE In order to make any changes to the selected wash cycle sequence, load addi!onal items, or remove previously loaded items, the dishwasher must be put into PAUSE mode. The dishwasher can be put into PAUSE mode at any !me during the wash cycle. To temporarily pause the washing process: 1) Press and hold the START/RESET bu"on for approximately 3 seconds to cancel the exis!ng program mode. 2) Make the necessary changes to the wash cycle sequence selec!on or add/remove items from the dishwasher. 3) Ensure that the door is closed and the latch is fully engaged. 4) Press the START/RESET bu"on once. 5) The dishwasher will immediately resume opera!on using the most recently selected wash cycle sequence. NOTE: The dishwasher will automa!cally go into PAUSE mode if the door is opened. The door must be closed and the latch engaged for the dishwasher to resume opera!on. Always use the above steps. -PAGE 20- CHANGING THE WASH CYCLE SEQUENCE If you need to change the selected wash cycle sequence at any !me during the washing process, then follow these steps: 1) Press and hold the START/RESET bu"on for approximately 3 seconds. (The START/RESET indicator light turn on and the unit is now in PAUSE mode). 2) Select the desired wash cycle sequence by pressing the program bu"on. 3) Press the START/RESET bu"on again to resume opera!on using the newly selected wash cycle sequence. NOTE: If you change the wash cycle sequence a!er the detergent has been dispensed, or the dishwasher has already drained the water, you will need to re"ll the detergent dispenser for the newly elected wash cycle sequence, accordingly. END OF THE WASH CYCLE PROCEDURE Once the dishwasher has completed the selected wash cycle sequence, a buzzer will sound for 8 seconds, indica!ng the end of they wash cycle. 1) Shut o# the water supply. 2) Turn the dishwasher OFF by pressing the ON/OFF bu"on. 3) Open the door ajar slowly to allow residual steam to escape. 4) Wait a few minutes (approximately 15 minutes) before unloading the dishwasher as the dishes and cutlery will be hot. This also aids in the drying process. 5) The interior of the dishwasher will be wet, this is normal and will dry naturally. ! WARNING It is dangerous to open the door when the dishwasher is in opera#on, as the hot water may cause scalding or injury. -PAGE 21- CHECKING THE WATER TEMPERATURE For the most e!ec"ve cleaning and to prevent damage to the dishware being cleaned, the hot water supplied to the dishwasher should be at a temperature of at least 120#F (49#C) and no more than 150#F (66#C). CHILD SAFETY LOCK The child safety lock will prevent the unit from func"oning and the door from being able to open (the door needs to be completely closed). ENGAGE CHILD SAFETY LOCK: To engage the lock, press the 3-in-1 bu$on and the Delay bu$on at the same "me. The LOCK icon will illuminate in the control panel when the child safety lock is ac"vated. DISENGAGE CHILD SAFETY LOCK: To disengage, press the 3-in-1 bu$on and the Delay bu$on at the same "me. The LOCK icon will turn o! in the control panel when the child safety lock is deac"vated. -PAGE 22- CARE AND MAINTENANCE HOW TO MAINTAIN YOUR DISHWASHER: A er!every!wash,!leave!the!dishwasher!door!slightly!ajar!so!that!any!moisture!and!odor!are! not!trapped!inside!the!appliance. DO NOT USE SOLVENTS OR ABRASIVE CLEANING PRODUCTS: To!clean!the!exterior!and!rubber!parts!of!the!dishwasher,!do!not!use!solvents!or!abrasive! cleaning!products.!Rather,!use!only!a!so !wash!cloth!and!warm!soapy!water.!To!remove! spots!or!stains!from!the!surface!of!the!interior,!use!a!so !wash!cloth!dampened!with!water! and!a!li"le!white!vinegar,!or!a!cleaning!product!made!speci#cally!for!dishwashers. FILTER SYSTEM The!#lter!system!consists!of!three!di$erent!#lters: ! 1)! Main!#lter:!Food!par%cles!trapped!by!this!#lter!are!pulverized!by!a!special!jet!on!the! ! ! spray!arm!and!washed!down!the!drain. ! 2)! Fine!#lter:!This!#lter!holds!soil!and!food!residue!in!the!sump!area,!preven%ng!residues! ds!soil!and!food!residue!in!the!sump!area,!preven%ng!residue ! ! from!being!deposited!on!the!dishes!during!wash!cycle. the!dishes!during!wash!cycle. Three!Filter!System ! ! ! ! 3)! ! ! ! Coarse!#lter:!Larger!items,!such!as!those!that!could!block!the!drain,!are!trapped!in!the! ms,!such!as!those!that!could!block!the!drain,!are!trapped!in!the coarse!#lter.!To!remove!the!items!caught!by!this!#lter,!gently!squeeze!the!tap!at!the!top! of!this!#lter!and!li !it!out.!The!#lter!e&ciently!removes!food!par%cles!from!the!used!! water,!allowing!it!to!be!recycled. -PAGE 23- For the best performance and op!mal results, the "lter assembly must be cleaned regularly. For this reason, it is a good idea to remove larger food remnants trapped inside the "lter a#er each wash cycle by rinsing the "lter assembly under running water. To clean the coarse "lter and the "ne "lter, use a so# cleaning brush. Reassemble the "lter parts as shown in the diagram and reinsert the en!re assembly into the dishwasher by posi!oning the "lter into its seat and pressing downward. Filter Assembly Parts To remove the "lter assembly, grab the handle of the "ne "lter, rotate it counter clockwise, and then pull the "lter in an upward direc!on. Step 1: Rotate the "ne "lter counter clockwise. Step 2: Li# "ne "lter up. Step 3: Li# main "lter up. NOTE: Reverse the above procedure to reinstall the !lter. Summary: A) B) Inspect and clean the "lters a#er every dishwashing use. By unscrewing the coarse "lter you can remove the "lter system. Remove any food remnants and clean the "lters under running water. ! WARNING Never run the dishwasher without the !lters installed. Improper replacement of the !lters may reduce overall performance of the appliance, and subsequently damage dishware and utensils. The en"re !lter system should be cleaned at least once a week. When cleaning the !lters do so carefully, otherwise !lters may lose their shape, degrading the performance and overall e#ec"veness of the dishwasher. -PAGE 24- CLEANING THE SPRAY ARM It is ne necessary to clean the spray arm regularly for hard water chemicals that can clog the spray arm jets and bearings. bearin Wash the arm in warm, soapy water using a so! brush br to clean the jets. Dishwasher Spray Arm Li! Spray Arm Up and Out to Clean CLEANING THE CONTROL PANEL A. To clean the control panel, use a lightly dampened cloth. To clean the exterior, use a good appliance polish wax. Never use sharp objects, scouring pads, or harsh cleaners on any part of the dishwasher (exterior or interior). B. CLEANING THE DISHWASHER DOOR To clean the edge around the dishwasher door, you should use only a so! rag that is dampened with warm water. Never use a spray cleaner to clean the door panel, as it may damage the door lock and electrical components of the unit. It is not recommended to use abrasive cleaners or rough surface paper towels since it carries the risk of scratching or leaving marks on the stainless steel surface. ! WARNING Dishwasher Door Panel Do not let water penetrate into the door lock and any electrical components when cleaning. Never use a cleaning spray of any kind. -PAGE 25- TROUBLESHOOTING TROUBLESHOOTING GUIDELINES PROBLEM POSSIBLE CAUSES POSSIBLE SOLUTION Dishwasher does not start. Fuse is blown or the circuit breaker has tripped. Replace the fuse or reset the circuit breaker. Remove any other appliances sharing the same circuit with the dishwasher. Power supply is not turned on. A) Make sure the dishwasher is turned on and the door is closed securely. B) Make sure the power cord is properly plugged into the wall socket. Dishwasher door is not closed properly. Close the door securely by ensuring that the door latch is completely engaged. Drain hose is kinked. Check the drain hose and ensure that there are no kinks or obstruc!ons. Filter is clogged. Check the "lter assembly and remove any debris, if any, and ensure nothing is blocking the "lter. Kitchen sink is clogged. Check the kitchen sink for adequate drainage. If the kitchen sink is not draining you may need to contact a plumber to inspect your drainage pipe. Improper detergent used. Use only detergent speci"cally designed and marked for use with dishwashers. Spilled rinse aid. Always wipe away rinse aid spills immediately. Stained tub interior. Detergent with a colorant was used. If suds occur, open the dishwasher and let the suds evaporate. Wipe away any residue. White "lm on the inside surface of dishwasher. Hard water mineral deposits. Add approximately one gallon of cold water to the tub, then close and secure the door. Rust stains on the silverware/cutlery. The a#ected items are not corrosion resistant. Select the PREWASH program. Press the Start/Reset bu$on to drain out the water. Repeat the selected program, if necessary. Knocking noise in the washing cabinet. The spray arm is knocking against an item loaded in the rack. Pause the wash cycle and rearrange the items accordingly, following the guidelines listed in the user manual. Water is not pumped from the dishwasher. Suds in the tub. -PAGE 26- PROBLEM POSSIBLE CAUSES POSSIBLE SOLUTION The dishes are not clean. The dishes were not loaded correctly. See Loading Dishwasher sec!on of the user manual. The selected program was not the appropriate cycle sequence for the condi!on of the dishes. Select a more intense program to compensate for the condi!on of the dishware. Not enough detergent was dispensed. Use more detergent, or change the type of detergent being used by the dishwasher. Items are blocking the rota!on path of the water spray arm. Rearrange the items accordingly so that the spray arm can rotate freely. The "lter assembly at the base of the unit is not clean, is clogged, or is not installed correctly. This may clog the spray arm jets. Clean and properly secure the "lter into its seat and "t the "lter assembly correctly into the unit. Clean the spray arm jets. See the Care and Maintenance sec!on of this manual. Cloudiness on the glassware. This is a combina!on of so# water and too much detergent. Use less detergent if you have so# water, and select a shorter wash cycle sequence to clean the glassware. Black or gray marks on dishware. Aluminum utensils have rubbed against the dishes. Use a mild abrasive cleaner to remove the marks. Detergent le# inside the dispenser cups. Dishware blocked the detergent cups, preven!ng them to open fully during the wash cycle. Rearrange the dishes accordingly and rerun the wash cycle sequence. The dishes are not dry. Improper loading of dishware. See Loading Dishwasher sec!on of the user manual. Too li$le rinse aid. Increase the amount of rinse aid dispensed or re"ll the rinse aid dispenser if empty. Dishes were removed from the washer too soon. Do not empty your dishwasher immediately a#er the cycle ends. Open the door slightly, so that the steam can escape. Begin unloading the dishwasher once the dishes are barely warm to the touch. Wrong wash cycle sequence selected. Shorter wash cycle sequences use lower temperatures with lower cleaning performance capabili!es. Choose a wash cycle with a longer wash !me to resolve this issue. Using cutlery with a low quality coa!ng. Water drainage is more di%cult with these items. Cutlery or dishes of this type are not suitable for dishwasher use. E1: Water Intake Problem. E4: Over&ow Problem. E1: Faucet is not open, restricted intake, or low pressure. E4: Some element of the dishwasher is leaking. Turn main water supply o', immediately( Clean water around base. ERROR CODE: E1 E4 -PAGE 27- LIMITED WARRANTY MC Appliance Corpora!on warrants each new Countertop Dishwasher to be free from defects in material and workmanship, and agrees to remedy any such defect or to furnish a new part(s), at the companys op!on, for any part(s) of the unit that has failed during the warranty period. Parts and labor expenses are covered on this unit for a period of one year from the date of purchase. A copy of the dated sales receipt or invoice is required to receive warranty service by an authorized service agent. This warranty covers appliances in use within the con!nental United States, Puerto Rico, and Hawaii. The warranty does not cover the following: Damages due to shipping damage or improper installa!on. Damages due to misuse or abuse. Content losses due to failure of the unit. Inside components such as "lters, etc. Repairs performed by unauthorized service agents. Service calls that do not involve defects in material and workmanship such as instruc!ons on proper use of the product or improper installa!on. Replacement or rese#ng of house fuses or circuit breakers. Failure of this product if used for other than for its intended purpose. Disposal costs for any failed unit not returned to our factory. Any delivery costs incurred as the result of a unit that fails to perform as speci"ed. Expenses for travel and transporta!on for product service if your appliance is located in a remote area where service by an authorized service technician is not available. The removal and reinstalla!on of your appliance if it is installed in an inaccessible loca!on or is not installed in accordance with published installa!on instruc!ons. Limita!ons of Remedies and Exclusions: Product repair in accordance with the terms herein, is your sole and exclusive remedy under this limited warranty. Any and all implied warran!es including merchantability and "tness for a par!cular purpose are hereby limited to one year or the shortest period allowed by law. MC Appliance Corpora!on is not liable for incidental or consequen!al damages and no representa!ve or person is authorized to assume for us any other liability in connec!on with the sale of this product. Under no circumstances is the consumer permi$ed to return this unit to the factory without prior wri$en consent of MC Appliance Corpora!on. Some states prohibit the exclusion or limita!on of incidental or consequen!al damages, or limita!ons on implied warran!es. This warranty gives you speci"c legal rights, and you may also have other rights which very from state to state. Model MCSCD6W1 Parts One-Year Labor One-Year Type of Service Carry In For Service or Assistance, call 888-775-0202. Or visit us on the web at www.mcappliance.com to request warranty service or order parts. -PAGE 28-