1
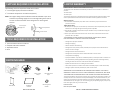
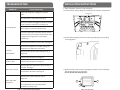
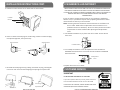
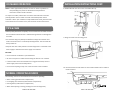
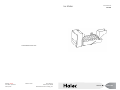
Ice Maker User Manual HI6LMK www.HaierAmerica.com Model # HI6LMK Issue Date: April 2013 120 V, 60 Hz Made in China Haier America New York, NY 10018 ©2013 Haier America Trading, LLC. P/N 0060517641 Rev A TABLE OF CONTENTS SAFETY INFORMATION Important Safety Instruc ons 3 SET UP & CARE Supplies Required for Installa on 4 Tools Required for Installa on 4 Parts Included 4 Installa on Instruc ons 5‐8 Water Supply Connec on 9 Ice Maker Opera on 10 Tips & Care 10 Normal Opera ng Sounds 10 TROUBLESHOOTING & WARRANTY Ice Maker Fill Adjustment 11 Customer Service 11 Troubleshoo ng 12 Limited Warranty 13 PRODUCT REGISTRATION Thank you for purchasing our Haier product. This easy‐to‐use manual will guide you in ge ng the best use of your product. Model Number Remember to record the model and serial numbers. They are located on a label on Date of Purchase the ice maker. Staple your receipt to your manual. You will need it to obtain warranty service. PAGE 15 ● NOTES P/N 0060517641 Rev A IMPORTANT SAFETY INSTRUCTIONS ! WARNING TO AVOID ELECTRICAL SHOCK, WHICH CAN CAUSE DEATH OR SEVERE PERSONAL INJURY, DISCONNECT THE POWER SUPPLY BEFORE CONNECTING A WATER SUPPLY LINE TO THE REFRIGERATOR. ! WARNING DO NOT PLACE FINGERS OR HAND ON THE AUTOMATIC ICE MAKING MECHANISM WHILE THE REFRIGERATOR IS PLUGGED IN. THIS WILL HELP PROTECT YOU FROM POSSIBLE INJURY AS WELL AS PREVENT INTERFERENCE WITH MOVING PARTS OF THE EJECTOR MECHANISM AND THE HEATING ELEMENT THAT RELEASES THE CUBES. PROFESSIONAL INSTALLATION IS RECOMMENDED. TO AVOID PROPERTY DAMAGE: Copper tubing is recommended for the water supply line. Water supply tubing should be 1/4". Plas c is not recommended since it greatly increases the poten al for water leaks. Do not install water supply tubing in areas where the temperature falls below freezing. Connect the ice maker to a drinkable water source that is not connected to a water so ening system. Chemicals from the so ener may damage the ice maker, causing it to malfunc on. SAVE THESE INSTRUCTIONS HOUSEHOLD USE ONLY PAGE 14 ● NOTES PAGE 3 ● SAFETY INFORMATION P/N 0060517641 Rev A SUPPLIES REQUIRED FOR INSTALLATION LIMITED WARRANTY The following items are required to install the ice maker. In‐Home Service ‐ What is covered and for how long? ¼‐inch copper supply line with shut off valve. This warranty covers all defects in workmanship or materials of the automa c ice maker for a period of: ¼‐inch brass compression nut and ferrule (sleeve). 12 months labor 12 months parts NOTE: The copper tubing and shut‐off valve should be available at your local hardware or plumbing supply store. Coil enough tubing in the back of the unit to allow movement of the refrigerator for cleaning and The warranty commences on the date the item was purchased and the original purchase receipt must be presented to the authorized service center before warranty repairs are rendered. service. What is covered? 1. The mechanical and electrical parts, which serve as a func onal, purpose of this kit for a period of 12 months. What will be done? ¼‐inch Copper Supply Line ¼‐inch Compression Nut 1. We will repair or replace, at our discre on any mechanical or electrical part which proves to be defec ve in normal usage during the warranty period so specified. ¼‐inch Ferrule 2. There will be no charge to the purchaser for parts and labor on any covered items during the ini al 12 month period. 3. Contact your nearest authorized service center. For the name of the nearest service center please call 1‐877‐337‐3639 TOOLS REQUIRED FOR INSTALLATION 1/4‐inch socket wrench or nut driver Phillips & Flathead screwdriver Adjustable wrench Pliers THIS WARRANTY COVERS WITHIN THE CONTINENTAL UNITED STATES, PUERTO RICO AND CANADA. IT DOES NOT COVER THE FOLLOWING: − Damages from improper installa on. − Damages in shipping. − Defects other than manufacturing. − Damage from misuse, abuse, accident, altera on, lack of proper care and maintenance or incorrect current or voltage. − Damage from other than household use. − Damage from service by other than an authorized dealer or service center. − Transporta on and shipping. − Improper installa on. If you have an installa on problem, contact your dealer or installer. You are responsible for providing adequate electrical, plumbing and other connec ng facili es, including the water line to the ice maker and the water line installa on. PARTS INCLUDED − Replacement of house fuses or rese ng of circuit breakers. − Failure of the product if it is used for other than its intended purpose or used commercially. − Damage to product caused by accident, fire, floods or Acts of God. Ice Maker Ice Bucket Water Supply Clamp Hex Head Screws Qty: 2 WARRANTOR IS NOT RESPONSIBLE FOR CONSEQUENTIAL DAMAGES. THIS LIMITED WARRANTY IS GIVEN IN LIEU OF ALL OTHER WARRANTIES, EXPRESSED OR, INCLUDING THE WARRANTIES OF MERCHANTABILITY AND FITNESS FOR A PARTICULAR PURPOSE. The remedy provided in this warranty is exclusive and is granted in lieu of all other remedies. This warranty does not cover incidental or consequen al damages, so the above limita ons may not apply to you. Some States do not allow limita ons on how long an implied warranty lasts, so the above limita ons may not apply to you. This warranty gives you specific legal rights, and you may have other rights, which vary, from state to state. User Manual Installa on Checklist PAGE 4 ● SET UP & CARE Moun ng Screw Washer Haier America New York, NY 10018 PAGE 13 ● TROUBLESHOOTING & WARRANTY P/N 0060517641 Rev A INSTALLATION INSTRUCTIONS TROUBLESHOOTING PROBLEM CAUSE/SOLUTION 1. Move refrigerator away from wall and unplug. 2. Remove freezer shelf by li ing up and sliding it out of freezer compartment. Ensure that refrigerator is plugged in to power source Freezer Shelf Wire control arm is fully raised. See Page 9. Check that ice maker is plugged into electrical socket in rear of freezer compartment. See Pages 5‐6. No ice produced Water supply is turned off or disconnected. Disconnect refrigerator from power source, remove rear access cover, then check to see that water valve is plugged into wiring harness in rear bo om compartment. 3. Remove plas c plug above electrical socket by grasping firmly and pulling end of plug down. Check water connec ons on water valve. See Page 8. Adjust freezer temperature to colder se ng. See Refrigerator User Manual for instruc ons. Low/slow Check for leaks or kinks in water tubing on rear of refrigerator. ice produc on Increase water fill amount. See Page 11. Small ice cubes Increase water fill amount. See Page 11. Check that fill tube is aligned into fill cup on rear of ice maker. See Page7. Water leak in freezer Decrease water fill amount. See Page 11. Water leak under refrigerator 4. Remove electrical socket cover by grasping both sides of cover and pulling le side towards front of refrigerator. (Do not discard electrical plug cover) Check for leaks in water tubing on rear of refrigerator. Disconnect refrigerator from power supply, remove rear compartment cover, then check water connec ons on water valve. PAGE 12 ● TROUBLESHOOTING & WARRANTY 1 1 2 PAGE 5 ● SET UP & CARE P/N 0060517641 Rev A INSTALLATION INSTRUCTIONS CONT. 5. Posi on ice maker harness in ice maker hook as shown below: Ice Maker Harness ICE MAKER FILL ADJUSTMENT THESE INSTRUCTIONS SHOULD ONLY BE USED IF THE HOME HAS UNUSUALLY LOW WATER PRESSURE THAT RESULTS IN LOW ICE PRODUCTION OR SMALL ICE CUBE SIZE. CHANGES TO HOME PLUMBING COULD AFFECT ICE MAKER FILL AMOUNT AND RESULT IN OVERFLOWED WATER IN THE FREEZER COMPARTMENT. If your ice maker is making small ice cubes or isn’t producing a sa sfactory amount of ice, it is possible to improve this by adjus ng the amount of water used to fill the ice cube tray in the ice maker. NOTE: Increasing the water fill amount could cause water to overflow out of the ice maker. Make half‐turn adjustments un l ice cube size or ice produc on amount is sa sfactory. Be sure to closely monitor the freezer compartment for water overflow a er adjus ng the fill adjustment screw. Hook 1. Use flathead screwdriver to pry front cover of ice maker. Do not discard 6. Insert ice maker electrical plug into socket using notches in socket and plug to help with alignment, then press firmly. Alignment Notch front cover. Alignment Notch Ice Maker Bo om 2. Use a Phillips screwdriver to turn fill adjustment screw clockwise to DECREASE water fill amount. Turn screw counter‐clockwise to INCREASE water fill amount. Fill Adjustment Screw 3. Replace front cover of ice maker. 7. Re‐install electrical plug cover by pushing cover down on plug, inser ng tab into slot on rear cover and then snapping front prongs into square holes. CUSTOMER SERVICE IMPORTANT Tab DO NOT RETURN THIS PRODUCT TO THE STORE CUSTOMER SERVICE If you have a problem with this product, please contact the Haier Customer Sa sfac on Center at 1‐877‐337‐3639 SERVICIO AL CLIENTE Front Prong Slot Square Hole PAGE 6 ● SET UP & CARE DATED PROOF OF PURCHASE, MODEL NUMBER AND SERIAL NUMBER REQUIRED FOR WARRANTY SERVICE PAGE 11 ● TROUBLESHOOTING & WARRRANTY Hotline 1-877-337-3639 P/N 0060517641 Rev A ICE MAKER OPERATION NOTE: It takes approximately 24 hours for the ice maker to produce ice. New plumbing may cause ice discolora on and poor flavor. Discard ice made in the first 24 hours. To stop the ice maker, li the wire arm un l it clicks and locks in the OFF (raised) posi on. The ice maker turns OFF automa cally when the ice container is full. If your model has an adjustable freezer shelf, place the shelf so that when the ice container is full, the ice will hit the wire control arm. INSTALLATION INSTRUCTIONS CONT. 8. Posi on fill tube into slot in rear of ice maker fill cup. Fill Tube Fill Cup TIPS & CARE Water quality determines ice quality. Do not connect the ice maker to water that is so ened. Chemicals from a malfunc oning so ener can damage the ice maker. 9. Hang ice maker from moun ng posts. Ice stored too long may develop an odd flavor. Empty the container and make sure the wire arm is in the ON (lowered) posi on. The ice maker will then produce ice. Keep the wire arm in OFF posi on un l the refrigerator is connected to the water supply or whenever the water supply is turned OFF. CAUTION: Do not wash the ice bucket in your dishwasher. Be sure to stop the ice maker when cleaning the freezer or on vaca on. If the ice maker has to be turned OFF for a long period of me, turn the water supply valve to the closed posi on. Do not store anything on top of or in the ice maker or the ice bucket. 10. Use hex head screw and washer to secure tab on bo om of ice maker to inside of freezer. NORMAL OPERATING SOUNDS The following sounds are normal when the ice maker is opera ng: Motor running (inside freezer compartment) Ice dropping into ice bucket (inside freezer compartment) Running water (inside freezer compartment) Water valve opening or closing (clicking from rear of refrigerator) PAGE 10 ● SET UP & CARE PAGE 7 ● SET UP & CARE P/N 0060517641 Rev A INSTALLATION INSTRUCTIONS CONT. 13. Re‐install freezer shelf on lowest rail as shown and place ice bucket under the ice maker. Raise wire control arm on ice maker to OFF posi on. Wire Control Arm WATER SUPPLY CONNECTION ! WARNING This water supply installa on is not covered under warranty by the refrigerator or ice maker manufacturer(s). Follow these instruc ons carefully to minimize the risk of expensive water damage. Supplies Required for Installa on: Access to a household cold water line with water pressure between 20psi and 120psi. A water supply line made of 1/4‐inch Outside Diameter, copper tubing. To determine Lowest Rail the length of the copper tubing needed, you will need to measure the distance from the ice maker water valve at the back of the refrigerator to your cold water line. Then add approximately 7 feet for the refrigerator to be moved out for cleaning and service. A shut‐off valve to connect the water supply line to your household water system. NOTE: Do not use a self‐piercing type shut‐off valve. A compression nut and ferrule (sleeve) for connec ng the water supply line to the ice 14. Locate water valve on rear of refrigerator. Valve protrudes slightly through rear compartment cover. maker inlet valve. See page 4 for picture. 1. Turn off water supply at shut‐off valve. 2. Connect copper water supply line to household water system. 3. Turn ON water supply and ghten any connec ons that leak. 4. Coil excess water supply line behind refrigerator, as shown below and arrange coils so they do not vibrate or wear against other surfaces. Use water supply clamp and hex head screw to secure water supply line to rear of refrigerator. Hex Head Screw 15. Insert supply line fully into water valve inlet. Slide ferrule (sleeve) into valve inlet and finger‐ ghten compression nut onto valve being careful not to cross‐thread. Tighten another half‐turn with a wrench. Do not over‐ ghten. Do not use Teflon tape on threads. Water Supply Clamp 6. Reconnect refrigerator to power supply. 7. Move refrigerator back into place and level it using instruc ons in User Manual. 8. Turn ice maker ON by lowering wire control arm. Wire Control Arm Water Supply Line Valve Inlet PAGE 8 ● SET UP & CARE PAGE 9 ● SET UP & CARE P/N 0060517641 Rev A