1
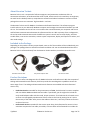
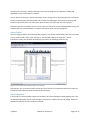
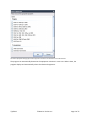
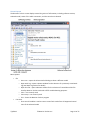
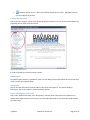
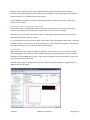
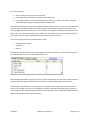
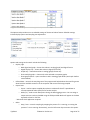
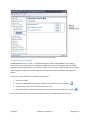
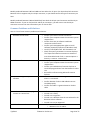
Diagnostic Software for BMW – User Guide Contents About Bavarian Technic ........................................................................................................................... 3 Included in the Package ........................................................................................................................... 3 Product Versions ...................................................................................................................................... 3 How the Program Works ......................................................................................................................... 4 System Requirements .............................................................................................................................. 4 Installing the Software ............................................................................................................................. 6 Getting Started ........................................................................................................................................ 6 Connecting the Cables ......................................................................................................................... 6 Launching the Program ........................................................................................................................ 6 Using Bavarian Technic ............................................................................................................................ 7 Customer / Vehicle Information .......................................................................................................... 7 Choose Vehicle .................................................................................................................................... 8 Choose Equipment ............................................................................................................................... 8 Main User Interface ........................................................................................................................... 10 Screen Layout .................................................................................................................................... 11 Control Unit Functions ....................................................................................................................... 13 Identification .................................................................................................................................. 13 Information .................................................................................................................................... 13 Fault Codes/Shadow Fault Codes .................................................................................................. 13 Erase Fault Codes/ Erase Shadow Fault Codes .............................................................................. 14 Actual Values ................................................................................................................................. 14 Activations ..................................................................................................................................... 17 Coding ............................................................................................................................................ 18 Commands ..................................................................................................................................... 18 Command Console ......................................................................................................................... 18 Reset Service Reminders ................................................................................................................... 18 Condition Based Service (CBS) ....................................................................................................... 19 Short Test ........................................................................................................................................... 20 Set Workshop Information ................................................................................................................ 21 Work Log ............................................................................................................................................ 22 To Enable the Work Log ................................................................................................................. 22 To Review a Work Log .................................................................................................................... 22 Updating the Software ........................................................................................................................... 22 Automatic Updates ........................................................................................................................ 22 Manual Updates ............................................................................................................................. 23 Updating the Cable Firmware ................................................................................................................ 23 Language Settings .................................................................................................................................. 23 BMW Diagnostic Connector Locations ................................................................................................... 23 Common Problems and Solutions .......................................................................................................... 24 Send Log to Bavarian Technic ............................................................................................................ 25 Index ...................................................................................................................................................... 27 7/3/2013 ©Bavarian Technic LLC Page 2 of 27 About Bavarian Technic Bavarian Technic LLC is comprised of software engineers and automotive enthusiasts alike. As automotive enthusiasts, we understand the value of solid, effective tools in the workshop. As engineers, we work hard to develop intuitive, comprehensive software and robust hardware to create an overall package that meets our customers’ high standards – and ours. The Bavarian Technic tool for BMW is a hardware and software-‐based tool. The software program installs and runs on your Microsoft Windows computer and manages communication between you and the car. The hardware consists of one or more cables that connect between your computer and the car and facilitates communications between the software and the car. With a primary focus on diagnostics, the tool provides communications with the different systems’ control units to read, display, and clear trouble codes, reset service reminders, activate system components, display and capture live values, and alter code settings. Included in the Package Depending on the product version you purchased, some or all of these cables will be included with your package. Your package does not include a software installation CD. You must download and install the Bavarian Technic software directly from the Bavarian Technic web site, www.bavariantechnic.com. Standard interface cable Early-‐model adapter cable 50’ extension cable Product Variations Bavarian Technic offers two diagnostic kits for BMW: Enthusiast and Professional. With the exception of Coding and Command Console features, both kits provide the same diagnostic capabilities across the same range of cars. The Coding and Command Console features are available with the Professional version only. • • Enthusiast Version: Intended for the private owner of BMW, the Enthusiast kit comes complete with one USB-‐to-‐ODBII standard interface cable. If purchased, your kit might also include the early-‐model adapter cable with the round, 20-‐pin connector. The Enthusiast kit is limited to use on three cars managed by VIN. Bavarian Technic enforces this limit by storing the car’s VIN in the memory of the cable. After you use the cable on three cars, it will only continue to function on those three cars. Professional Version: Intended for the service repair shop, the Professional kit comes in three variations comprised of one cable, two cables, or three cables. All Professional kits include the 7/3/2013 ©Bavarian Technic LLC Page 3 of 27 USB-‐to-‐ODBII standard interface cable. You might also purchase a Professional kit that includes the early-‐model adapter cable and the 50’ OBDII-‐to-‐OBDII extension cable. You can use the Professional version on an unlimited number of cars. How the Program Works With the release of the diagnostic software for BMW, Bavarian Technic launches a completely new software platform. The platform has three main components: 1) the “Framework” 2) the “Car files,” and 3) the “ECU files.” The Framework is the core of the new software. It maintains control over all other components of the tool including the car files, ECU files, user interface, and communication with the standard interface cable and car. The Framework gets information from the Car files to reference control units associated with chassis types and models. It also gets information from the ECU files so it can communicate effectively with the many control units supported by BMW automobiles. Each BMW chassis type – and each model built upon each chassis type – comes equipped with a number of electronic control units that support many of the car’s systems. The Car files are simple XML files that list supported electronic control units for each chassis type and/or model. The Framework uses the Car files to reference the Bavarian Technic ECU files. The ECU files are XML files that contain control unit address information, unit ID and descriptions, possible fault codes and descriptions, activation options, and other ECU-‐specific details. The Framework uses the information in the ECU files to connect to the control unit. The Bavarian Technic user interface displays some of the information contained in the ECU file, such as fault code descriptions. With the introduction of this software platform, Bavarian Technic can support a greater number of control units in a wider range of cars at a faster pace of release. System Requirements The following is a list of the minimum system requirements for the effective use of the software: • • • • • • • • • Windows XP, Vista, 7, or 8 (All versions, including both 32-‐ and 64-‐bit). WinRT not supported. 1 GB Memory (RAM) 1.8 GHz dual-‐core processor or faster (ARM processor such as on Windows Surface running WinRT not supported) 1 GB available hard disk space Internet Explorer 6.0 or newer Available USB 2.0 Port (Infrequently, computers supporting USB 3.0 not compatible. Contact us for details.) Available Internet connection (for program installation and software updates) Screen resolution of 800x600 or greater Microsoft® .NET Framework 3.5 sp1 (free download). Not required with Windows 7. Enabled through Control Panel | Programs | Turn Windows features on or off in Windows 8. 7/3/2013 ©Bavarian Technic LLC Page 4 of 27 • Adobe Acrobat Reader (for reading and printing documentation) 7/3/2013 ©Bavarian Technic LLC Page 5 of 27 Installing the Software The software installs directly to your computer from Bavarian Technic’s download page; you will not receive an installation CD with the cables. Install the software before plugging in the cable. To install the software: 1. 2. 3. 4. 5. 6. 7. Go to http://www.bavariantechnic.com. Select Downloads from the left column. If needed, click Microsoft® Internet Explorer to install Internet Explorer version 6.0 or later. If needed, click Microsoft® .NET framework to install .NET Framework version 3.5 sp1. Click Bavarian Technic cable drivers to install the necessary cable drivers. Click Bavarian Technic software program to start the Bavarian Technic installation. When prompted with the security warning, click Install. Getting Started Upon successful installation of the software, you are ready to connect the cables and start the program. The following sections provide detailed instructions for this procedure. Connecting the Cables WARNING: Do NOT use a power inverter to power your computer when using Bavarian Technic. Depending upon the kit you ordered, you will have one, two, or three cables. With the car’s ignition on and before launching the software, connect the cables between your computer and car as follows. • • • • Connect the standard interface cable’s USB connector to the USB port on your computer. Connect the OBDII-‐end of the standard interface cable to the diagnostic port on your car. If you purchased the 50’ extension cable, you can connect it between the male ODBII-‐end of the standard interface cable and the car. If you are working on early-‐model cars and have the early-‐model adapter cable, connect it between the standard interface cable and car or between the 50’ extension cable and the car. After you connect the cables, start the Bavarian Technic program. If the car is an E60, E65, E70, E90, R56, or later model, enable the hazard lights for the duration of diagnostics after turning the car’s ignition on. Launching the Program Start the Bavarian Technic program only after you connect the cables. To start the program, double-‐click on the Bavarian Technic desktop icon or: 1. Click the Windows Start button. 2. Select All Programs |Bavarian Technic. Upon starting the program, you will see the Bavarian Technic logo screen followed by the Choose Vehicle screen. Users of the Professional kits will see the Customer / Vehicle Information screen appear first. 7/3/2013 ©Bavarian Technic LLC Page 6 of 27 Using Bavarian Technic Bavarian Technic is equipped with many of the same capabilities included with the BMW factory tools. The following sections guide you through the many available features so you can get the most from your kit. Customer / Vehicle Information Upon starting the program with a Professional cable attached, the Customer / Vehicle Information dialog appears. At this time, the program automatically attempts to communicate with the car to access the car’s VIN. If the program is able to access the information, the last seven characters appear in the VIN field of the dialog. The program then attempts to decode the VIN automatically using an available internet connection. If the software cannot access the car’s VIN, you can enter the last seven characters of the VIN manually. Decode the VIN by clicking the Decode VIN button that appears. An internet connection is required for decoding. The Customer / Vehicle Information dialog appears by default when the software starts 7/3/2013 ©Bavarian Technic LLC Page 7 of 27 Complete the Customer / Vehicle Information screen by entering the car’s odometer reading and applicable customer information as desired. You can hide the Customer / Vehicle Information screen during start-‐up by selecting the Don’t show this screen on startup option and clicking OK. You can open the dialog again at any time by selecting Add Customer Information from the Tools menu option found at the top of the main user interface. Click OK to save the information for the current session or Cancel to close the dialog without saving. The software does not save VIN details or customer information after closing the program. Choose Vehicle The next dialog to appear after launching the program is the Choose Vehicle dialog. Here you can choose a car by make, model, chassis type, and year. If you decoded a VIN on the Customer / Vehicle Information screen, the software automatically pre-‐selects the matching model for you. Bavarian Technic Choose Vehicle dialog and main user interface Alternatively, you can choose specific control units from the list of all supported control units from the Individual Control Modules tab of the Choose Vehicle dialog. Choose Equipment If the model you select includes equipment variations, the Choose Equipment dialog appears with a list of selectable equipment options such as engine, transmission, stability control, and airbags. Select the appropriate option(s) for your model and click OK. 7/3/2013 ©Bavarian Technic LLC Page 8 of 27 The Choose Equipment dialog appears when equipment variations are available for the model selected The program can automatically determine the equipment variations in some cars. When it does, the program displays and automatically selects the detected equipment. 7/3/2013 ©Bavarian Technic LLC Page 9 of 27 Main User Interface The main user interface now appears. When you select a model from the Choose Vehicle dialog, the program displays a list of supported control units in the left-‐hand pane. If you select a single control unit from the Individual Control Modules tab of the Choose Vehicle dialog, the software displays only that control unit. Double-‐click a control unit in the left-‐hand pane of the main user interface to reveal available functions for that control unit. Alternatively, click the “+” sign next to any of the control units to reveal the same list of functions. Select from supported control units in the left-‐hand pane of the main user interface. 7/3/2013 ©Bavarian Technic LLC Page 10 of 27 Screen Layout The Bavarian Technic screen displays several key points of information, including software version, selected model, status of the cable connection, and the control unit selected. Menu options • • File o o Start over – opens the Choose Vehicle dialog to select a different model Open work log – opens a Browse window for the selection of a previously-‐saved work log (see Work Log section for details) o Open ECU file – opens a Browse window for the selection of a stand-‐alone ECU file. Used by Bavarian Technic technical staff for troubleshooting purposes. o Print – not currently used o Print setup – not currently used o Exit – closes the Bavarian Technic program Functions o Short test all modules– used to return current fault codes from all supported control units of the selected model 7/3/2013 ©Bavarian Technic LLC Page 11 of 27 o o o o • • Clear faults in all modules – used to clear all fault codes in all supported control units of the selected model Refresh current view – used to request updated fault codes are live data from a control unit Set workshop information – opens the Set Workshop Information dialog (see Set Workshop Information section for details) Condition based service – opens the Condition Based Service feature for models that support condition based service (see Condition Based Service section for details) Tools o Tool information – opens the Tool Information screen that provides cable type, cable status, cable serial number, and software / firmware version details o Logging § Logging enabled – enables logging for troubleshooting purposes § Send log to Bavarian Technic – opens the Send Communications Log screen (see Send Log to Bavarian Technic section for details) o Add customer information – opens the Customer / Vehicle Information dialog (see Customer / Vehicle Information section for details) o Check for update – uses an available internet connection to check for software updates (see Updating the Software section for details) o Language – used to change the text of the user interface to one of many supported languages Help o Documentation – opens this guide in PDF format o Bavarian Technic WIKI – uses an available internet connection to open the Bavarian Technic WIKI pages that cover car-‐specific troubleshooting information and more o About… -‐ opens information about the program and the program version Icons at the top of the Bavarian Technic user interface provide access to common functions. These include: • New – opens the Choose Vehicle dialog to select a new vehicle • Open –opens saved work logs • Print – print the current page • Print Preview – preview the current page prior to printing • Refresh – refresh the current view • Short test all units • Clear faults in all units 7/3/2013 ©Bavarian Technic LLC Page 12 of 27 • Condition based service – opens the Condition based service screen -‐ highlighted only for cars that support this feature Control Unit Functions Each control unit supports one or more of several different functions. You can access these functions by expanding the list under each control unit. View of control unit functions In order of appearance, these functions include: Identification The Identification function is available for each unit and displays information about the control unit such as part number and supplier name. Information You can find the Information function under control units that support it. This options displays information such as the vehicle’s VIN and assembly number. Fault Codes/Shadow Fault Codes Fault codes, shadow fault codes, their descriptions, and fault status information are included in the display when supported by the control unit. The fault codes displayed are the same fault codes used by the factory tool. 7/3/2013 ©Bavarian Technic LLC Page 13 of 27 Bavarian Technic is different from generic OBD2 tools that only show emissions-‐related engine problems. When displaying fault codes, Bavarian Technic displays all faults and displays any additional fault information if it is available from the control unit. To find additional information on faults, troubleshooting steps, and repair information, refer to the factory service manuals. Erase Fault Codes/ Erase Shadow Fault Codes To clear fault codes or shadow fault codes from the control unit’s memory, click on the Erase Fault Codes or Erase Shadow Fault Codes option, respectively, for the control unit selected. Alternatively, you can select to erase fault codes in all units at once by selecting the Functions menu option and clicking Clear faults in all units. It is not possible to erase only one fault code. If faults remain after attempting to clear them, it indicates problems still exist. For example, if the fault code you see is “Seat belt buckle receptacle,” and you have not repaired the problem, you will not be able to clear the fault. Actual Values With Actual Values, also known as “diagnostic requests,” you can monitor in near real-‐time live data values managed by the control unit. The available value options are predominantly the same as those available in the latest BMW factory tool. In many cases, the Bavarian Technic tool supports many more value options than the factory tool. Upon selecting a value or multiple values, the data values automatically appear on a graph and/or in digital format as seen below. 7/3/2013 ©Bavarian Technic LLC Page 14 of 27 To use actual values: 1. Select a control unit from the left-‐hand pane. 2. Click Actual Values (found on supported control units only). 3. In the right-‐hand pane under the Available Actual Values tab, select a listed value. Live data values will appear in graph and digital format automatically. Note: Avoid selecting more values than needed. The Actual Values process is very resource intensive for the control unit and the computer running the program. Selecting more options than necessary can seriously degrade program performance. For this reason, the program is limited to the selection of ten values. Also, note that sample rates vary by control unit. The newest control units sample much faster than earlier versions. Faster sampling rates require more computer resources. There are three tabs found on the Actual Values screen: • • • Available Actual Values Activations Options The tabs pane can be hidden to view a larger graph. To hide the tabs pane, click the Hide Selection link. To reveal the tabs pane, select the Display Selection link. Select the desired actual value(s) under the Available Actual Values tab The Available Actual Values tab gives you a list of values supported by the control unit. Select a value or multiple values to request the data from the control unit. Data sampling begins automatically. The Activations tab provides an easy access point to activate vehicle components that the selected control unit manages. You can use the activations to affect the Actual Values data output, giving you truly comprehensive troubleshooting capabilities and greater ease of use. Read more about activations under the Activations section of this document. 7/3/2013 ©Bavarian Technic LLC Page 15 of 27 Using the Activations tab, you can activate supported components The Options tab provides access to editable settings of the Actual Values feature. Editable settings include display options and sampling rate adjustment. The Options tab provides access to editable settings Options tab settings and controls include the following: • Display Type o Both digital and graph – shows data values in analog (graph) and digital format o Digital display only – shows data values in digital format only o Graph only – shows data values in analog (graph) format only o Show multiple graphs – shows each value selected on separate graphs o Show graph toolbar – opens a toolbar to aid in viewing graph details (see Graph Toolbar section below) • Refresh Rate – controls the sampling rate of the program and helps balance the need for greater detail with the available resources of the computer and control unit being sampled • Export Data o Export -‐ used to export sampled data values to a Microsoft Excel®* spreadsheet or comma-‐separated values (CSV) file for further analysis o Mark (F2) – used to mark data points during the data logging process. You can assign a unique name to each mark added using the field provided. Marks will appear in the data exported to Excel or CSV files. * Microsoft Excel application required • Other o Stop / Start – controls sampling by stopping the process if it is running, or starting the process if it is not running. Alternatively, use the F6 function key to execute this option. 7/3/2013 ©Bavarian Technic LLC Page 16 of 27 Clear samples – clears previously sampled data values from memory Save settings – saves to an XML file the current settings based on the control unit selected o Recall settings – opens a Browse window to select an XML file containing previously saved settings The graph toolbar provides additional controls for use with Actual Values graphs. o o Actual Values graph toolbar From left to right, the graph toolbar includes: • • • • • • • • • Crosshairs – used to hover the mouse over a graph position to see the exact values of a point Zoom in/out – used to alternately magnify or diminish an area of the graph to show detail. Left-‐ click and drag the mouse over the section you want enlarged. Zoom out all – used to zoom the graph back to full size Stop – used to stop sampling data values to view an event more closely Save – captures the current graph view to a graphic file Export data – saves sampled data values to a plain text file Page setup – portrait / landscape orientation settings for use with Print Print preview – displays preview of screen details to be printed Print – captures and sends a picture of the current graph to an available printer Hot Keys provide easy access to the most frequently used functions in Actual Values. Using hot keys, you can quickly capture values, insert markers, and export those values to a spreadsheet. The available hot keys and their function are as follows: • • • • • • F6 -‐ Stop/Start F5 -‐ Export data F3 -‐ Save settings F4 -‐ Recall settings F7 -‐ Clear results F2 -‐ Insert a marker into the Excel file Activations The Activations option allows you to start and stop supported available components within the car for troubleshooting purposes. The tool supports components ranging from the engine fan to injection valves. For example, to confirm all indicators of the instrument cluster are working properly, use this feature to turn them on, or “activate” them. To activate supported components: 1. Select your model. 7/3/2013 ©Bavarian Technic LLC Page 17 of 27 2. Select a control unit that supports activations. 3. Select Activation 4. Click the Start button found to the right of the components listed in the right-‐hand pane. Warning! Use Activation options with caution and only with complete knowledge of their function. For example, it is not a good idea to activate the coolant shutoff valve of a hot car for risk of damaging the engine. Coding Available in the Professional kit only, the Coding option provides a way to back-‐up, restore, and change settings within supported control units. For example, you can save the settings of an old control unit you must replace and restore those settings to a new control unit. Bavarian Technic relies on internal part numbers and metrics to ensure you do not restore settings to unintended, incompatible control units. Coding options on supported control units vary. Commands Many control units support the ability to receive single, non-‐repetitive requests to alter the status of settings. Separate from coding changes, the Commands feature includes such control unit requests as adaptation resets. On many models, you will use the Commands feature of the Instrument Cluster to reset the service interval. Command Console Available in the Professional kit only, the Command Console is a means to send low-‐level, manually configured requests to a control unit and see the response. Intended only for those who understand the low-‐level communication language of BMW control units, you can use this feature for a deeper level of troubleshooting. Reset Service Reminders Later-‐model cars have service interval indicators (SII) for oil service and inspections on the instrument cluster. These cars display the reminder when service is due. Depending on the model, you can reset the service interval in one of two ways: 1) via the Commands option for the instrument cluster, or 2) via the Condition Based Service (CBS) option if your car supports CBS. To reset the service reminder via the Commands option: 1. 2. 3. 4. Select your model. Select the instrument cluster. Select Commands. Click Send next to the Service Interval Indicator option you want to reset. 7/3/2013 ©Bavarian Technic LLC Page 18 of 27 Find Service Interval Indicator resets under the instrument cluster Commands option Condition Based Service (CBS) Condition Based Service, or “CBS”, is a sophisticated system used in newer BMW cars for tracking maintenance status information. It is included on all E60, E65, E90, and E70 models. Bavarian Technic supports Condition Based Service on all of these models. You can use the Condition Based Service option of the program to check, reset and/or adjust the status of service items on models that support this feature. To reset the service indicators via Condition Based Service: 1. Select your model. 2. Click the Condition Based Service icon found at the top of the main user interface. 3. Click Reset next to the service option you want to reset. 4. Refresh the page by clicking the Refresh icon found at the top of the main user interface. Note: Reset results may not be immediate. Allow from 5 – 10 seconds for the reset to occur. 7/3/2013 ©Bavarian Technic LLC Page 19 of 27 The Condition Based Service screen with the Adjust Value dialog open To adjust values via Condition Based Service: 1. Select your model. 2. 3. 4. 5. Click the Condition Based Service button found at the top of the main user interface. Click the Adjust Value button adjacent to the appropriate service component. Enter the service number (an integer indicating the number of services the car has had). Enter the remaining service percentage. Note: The vehicle displays to the driver both time and distance until the next service for each service component. Internal to the control units, however, these values are stored as single percentages. When adjusting values, you must consider both time and distance until the next service. Short Test The tool is capable of running a short test on any model selected. The short test scans the car for supported control units and queries each control unit found for trouble codes. Upon completion of the scan, the program returns a list of control units included in the search and any faults found. The program groups the trouble codes it finds by control unit and includes a brief description of the fault to aid in troubleshooting. To perform a short test: 7/3/2013 ©Bavarian Technic LLC Page 20 of 27 1. 2. 3. 4. Select a model from the Choose Vehicle dialog. Select any equipment variations. Select the Functions menu option. Click Short test all modules. Set Workshop Information Included with the Bavarian Technic Professional Kit only, you can customize the software for your business through the Set Workshop Information feature. With this feature, you can enter details such as your business name, address, phone number, and company logo. The information will appear on screens within the software and when you print data to a printer. To set workshop information: 1. 2. 3. 4. 5. 6. Select the Functions menu option. Click Set Workshop Information. Enter shop name, address, phone number, path to your logo, and dealer code (if applicable). Select any of the available display options. Click Save. Close and re-‐open the program to affect the change. Workshop Information edit screen 7/3/2013 ©Bavarian Technic LLC Page 21 of 27 Work Log The Bavarian Technic tool includes a work log that can save Identification, Information, Fault Codes, Shadow Fault Codes, and Short Test information. You can use this feature to review diagnostic and work history data after using the tool. The program saves work logs as HTML files so you can share the information with others as needed. To Enable the Work Log 1. Open the Choose Vehicle dialog. 2. Select a model. 3. Select the Create work log for this session option. 4. Click OK. The program now creates a work log using the date and time of the diagnostic session. The program creates a separate work log each time you start the program. To Review a Work Log 1. Select the File menu option. 2. Click Open Work Log. 3. Select a log from the list based on the date / time stamp. 4. Click Open. When saved, work log files are marked automatically with a date / time stamp for easy reference. Updating the Software You can get software updates for Bavarian Technic, when available, using an available internet connection. You can check for software updates manually, or have the software check for updates automatically. The update process lasts only a few moments depending on the speed of your internet connection. Automatic Updates When you open the Bavarian Technic software and have a connection to the internet, the software will automatically check for new software. This automatic check occurs once every 48 hours. If no internet 7/3/2013 ©Bavarian Technic LLC Page 22 of 27 connection is available, the software will wait another 48 hours before checking again. When the software finds an update, it will prompt you to install the next time you start the software. Manual Updates You can check for updates manually when the computer that hosts Bavarian Technic has a connection to the internet. To check for updates: 1. Open the Bavarian Technic software. 2. Click the Tools menu option. 3. Click Check for Update. If an update exists, the Bavarian Technic program will update automatically. Updating the Cable Firmware The standard interface cable manages communication between the Bavarian Technic software and your car’s control units. Periodically, Bavarian Technic releases firmware updates to ensure every cable continues to perform as expected across various models and software versions. To update the firmware: 1. Click the Tools menu item. 2. Click Tool Information from the menu. 3. Click the Update Firmware button. Updating the firmware takes approximately 45 seconds. The standard interface cable must remain connected to the computer for the update to occur. Do not disconnect the cable during the firmware update. Language Settings The Bavarian Technic user interface supports several different languages. To change the language setting: 1. 2. 3. 4. Open the Tools menu. Click Language. Select one of the language options that appear. Restart the program. BMW Diagnostic Connector Locations Through the present time, BMW has used three different connectors for diagnosis of internal electronic systems, roughly separated by model years. Bavarian Technic supports only the 20-‐pin and 16-‐pin connectors. • • • 1982 – 1988: 15-‐pin round data link connector located under the car’s hood – not supported 1987 – 2003: 20-‐pin round data link connector located under the car’s hood – supported 1996 – present: 16-‐pin OBDII connector located under the driver’s side dashboard – supported 7/3/2013 ©Bavarian Technic LLC Page 23 of 27 Models produced between 1987 and 1988 can have either the 15-‐pin or the 20-‐pin data link connector. Bavarian Technic supports only the 20-‐pin connector, so you should confirm the type of connector you have. Models produced between 1996 and 2000 likely have both the 20-‐pin round connector and the 16-‐pin OBDII connector. If your car has both 20-‐ and 16-‐pin connectors, you will want to use the 20-‐pin connector to access the most information your car has to offer. Common Problems and Solutions Here is a list of some common problems and solutions. Software will not install • • • • • • Software will not start • • • • Cable not recognized by the software • • • Initialization failure when trying to connect to a control unit Cable LED turns red 7/3/2013 • • • • • • Confirm you have an internet connection Confirm your computer meets the minimum system requirements Confirm there are no software installation restrictions at the firewall Confirm you have appropriate rights to install software (especially important on Windows Vista) Install (re-‐install) Microsoft .NET Framework 2.0 Check the security parameters in Internet Explorer. The “Open files based on contents not extension” must be enabled under Tools -‐> Internet Options -‐> Security -‐> Internet -‐ Custom level. Restart your computer Confirm your computer meets the minimum system requirements Confirm you used Microsoft Internet Explorer to install the program direct from the Bavarian Technic site Reinstall the software using Microsoft Internet Explorer Confirm Windows Device Manager “sees” the cable when it is connected. Confirm Bavarian Technic USB cable drivers are installed properly Confirm the cable is a genuine Bavarian Technic cable Cable is not securely connected Control unit is faulty Control unit not present Control unit is different than the one selected in the Bavarian Technic software Control unit not yet supported Indicates an electrical short o Between K1 or K2 and B+ ©Bavarian Technic LLC Page 24 of 27 • • Cable LED won’t turn green • • • • “Cable not plugged in” message • • • • • Cannot update the software • • • • • o Between K1 or K2 and Ground Check for appropriate continuity between the ground, power, and communication pins at the diagnostic connector at the car Check for electrical shorts by clicking Tools à Tool Information àTest K-‐lines in the program when connected to the car Confirm there is a secure connection between the Bavarian Technic standard interface cable and the car Confirm the car’s ignition is in the ‘on’ position Confirm the car’s battery is fully charged For CAN bus based cars, awaken the CAN network by switching the key to ‘off’ and then to ‘on’. Keep the CAN bus alive during diagnostics by turning on the emergency flashers Confirm the cable is securely plugged into the USB port on your computer Confirm there is power from the car to the cable and the LED on the cable is green Confirm Bavarian Technic USB cable drivers are installed properly Confirm Windows Device Manager “sees” the cable when it is connected Confirm the cable is a genuine Bavarian Technic cable Confirm there is an update available Confirm you have an internet connection on the computer that runs the Bavarian Technic software Confirm you have the appropriate administrative rights to install software First uninstall Bavarian Technic through Windows Control Panel If uninstall does not succeed, manually remove the program folder (contact Support for details) Send Log to Bavarian Technic Note: Use this option only upon direct request of Bavarian Technic technical staff. When working with Bavarian Technic technical staff, they may ask you to submit troubleshooting logs using the Send Log to Bavarian Technic option found under the Tools menu. Care should be taken to complete as much information as possible, most importantly the car’s VIN and your contact information. To send a communications log to Bavarian Technic: 1. Click Tools | Logging | Enable Logging. 7/3/2013 ©Bavarian Technic LLC Page 25 of 27 2. Restart the program. 3. Perform any processes or functions previously found to fail. This ensures the program captures the communication details between the program and the car. 4. Select a log from the list. The program lists the logs in chronological order, based on the time of creation. 5. Enter your name, email, and details about the car. Be sure to include a detailed description of the problem. 6. Send the log by clicking Send Data. 7/3/2013 ©Bavarian Technic LLC Page 26 of 27 Index Activations ....................................................... 16 Activations tab ........................ See Actual Values Actual Values ................................................... 13 Hot Keys ....................................................... 16 Markers ........................................................ 15 Tabs .............................................................. 14 Available Actual Values tab ..... See Actual Values Bavarian Technic ................................................ 3 Cables 50’ extension cable ........................................ 3 Connections ................................................... 5 Early-‐model adapter cable ............................. 3 Standard interface cable ................................ 3 Car files .............................................................. 4 Choose Equipment ............................................. 7 Choose Vehicle ................................................... 7 Clear faults in all modules ................................ 11 Clear faults in all units ..................................... 13 Coding .............................................................. 17 Command Console ........................................... 17 Commands ....................................................... 17 Common Problems and Solutions .................... 23 Condition Based Service .................................. 18 Resets ........................................................... 18 Value adjustment ......................................... 19 Connector Locations ........................................ 22 Control Unit Functions ..................................... 12 Activations ................................................... 16 Actual Values ............................................... 13 Coding .......................................................... 17 Command Console ....................................... 17 Commands ................................................... 17 Condition based service (CBS) .. See Condition Based Service Erase Fault Codes ......................................... 13 Erase Shadow Fault Codes ........................... 13 Fault codes ................................................... 12 Identification ................................................ 12 Information .................................................. 12 Service reminder reset ......... See Reset Service Reminders Shadow Faults Codes ................................... 12 Short test .................................. See Short Test Customer / Vehicle Information ..................... 6, 7 7/3/2013 Decode VIN ................................................... 6 Digital format ........................... See Actual values ECU files ............................................................ 4 Erase Fault Codes ............................................ 13 Erase Shadow Fault Codes .............................. 13 Fault Codes ...................................................... 12 Framework ........................................................ 4 Graph ...................................... See Actual Values How the Software Works .................................. 4 Icons ...................................... See Main Interface Identification ................................................... 12 Individual Control Modules tab ......... See Choose Vehicle Information ..................................................... 12 Installing the Software ...................................... 5 Security warning ........................................... 5 Language Settings ........................................... 22 Main Interface Icons ............................................................ 11 Menus ......................................................... 10 Markers ................................... See Actual Values Options tab ............................. See Actual Values Product Versions ............................................... 3 Enthusiast version ......................................... 3 Professional version ...................................... 3 Reset Service Reminders ................................. 17 Screen Layout .................................................. 10 Send Log to Bavarian Technic ......................... 24 Service Reminders Condition Based Service .............................. 18 Resets .......................................................... 17 Set Workshop Information .............................. 20 Shadow Fault Codes ........................................ 12 Short Test .................................................. 10, 19 System Requirements ....................................... 4 Troubleshooting ...... See Common Problems and Solutions Updating the Cable Firmware ......................... 22 Updating the Software .................................... 21 Version Enthusiast ...................................................... 3 Professional ................................................... 3 Software ............................. See Screen Layout Work Log ......................................................... 21 ©Bavarian Technic LLC Page 27 of 27