1
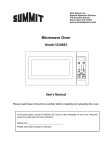
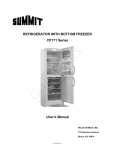
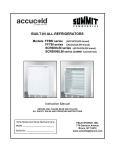
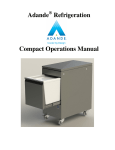
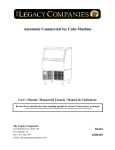
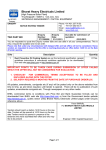
COMPACT REFRIGERATOR Instruction Manual Model FF41ES Model FF43ES BEFORE USE, PLEASE READ AND FOLLOW ALL SAFETY RULES AND OPERATING INSTRUCTIONS Write Model and Serial Numbers here: ______________________________ FELIX STORCH, INC. 770 Garrison Avenue Bronx, NY 10474 www.summitappliance.com TABLE OF CONTENTS Important Safeguards .......................................................................2 – 3 Location of Parts .....................................................................................4 Installation ..........................................................................................5 – 7 Test Run ...............................................................................................5 Reversing the Door Swing ..............................................................6 – 7 Operation ..................................................................................................8 Temperature control How to remove ice cubes from the tray Defrosting .................................................................................................9 Cleaning and Maintenance ...................................................................10 Limited Warranty ........................................................................... 11 - 12 1 IMPORTANT SAFEGUARDS Your safety and the safety of others are very important to us. We have provided several important safety messages in this manual. Always read and obey all safety messages. Serious injury or even death can result if you do not follow these instructions. To reduce the risk of fire, electrical shock or injury when using the refrigerator, follow basic precautions, including the following: Plug into a grounded 3-prong outlet. Do not remove grounding prong, nor use a 3/2 adapter. Do not use an extension cord. This appliance is designed for free-standing installation only. It should not be recessed or built in. It is recommended that a separate circuit, serving only your refrigerator, be provided. Use receptacles that cannot be turned off by a switch or pull chain. Disconnect power before servicing. After service, replace all parts and panels before operating. Never clean refrigerator parts with flammable fluids. These fumes can create a fire hazard or explosion. And do not store or use gasoline or other flammable items in the area of this or any appliance, as the fumes can create a fire hazard or explosion. Do not use flammable sprays in the vicinity of the refrigerator. When replacing a light bulb, unplug the appliance or turn off power at the circuit breaker or fuse box in order to avoid touching a live wire. Turning the thermostat to OFF turns off the compressor, but does not disconnect power to other electrical components. Do not connect or disconnect the electric plug when your hands are wet. Never unplug your appliance by pulling on the power cord. Always grip the plug firmly and pull straight out from the socket. Be careful not to roll over or damage the cord when moving the appliance. If the power cord is damaged, it must be replaced by the manufacturer, its service agent or similarly qualified persons in order to avoid a hazard. Unplug the refrigerator or disconnect power before making repairs or cleaning. Failure to do so can result in electrical shock or death. Do not attempt to repair or replaced any part of your refrigerator unless it is specifically recommended in this manual. All other servicing should be referred to a qualified technician. DANGER! RISK OF CHILD ENTRAPMENT ! Old appliances can represent a suffocation hazard to children. Remove door(s) from your old appliance. Leave shelves or baskets in place. If an old appliance contains refrigerants, it must be recycled by a licensed service or disposal agency. 2 This unit is not designed to operate in enclosed spaces. When placing your unit, make sure you allow adequate airflow on all sides. Use two or more people to move and install this appliance. Failure to do so can result in back or other injury. To ensure proper ventilation for you refrigerator, the front end of the unit must be completely unobstructed. Choose a well-ventilated area with temperatures above 60ºF (16ºC) and below 90ºF (32ºC). This unit must be installed in an area protected from the elements, such as wind, rain, water spray or drips. The refrigerator should not be located next to ovens, grills or other sources of high heat. The refrigerator must be installed with all electrical, water and drain connections in accordance with state and local codes. A standard electrical supply (115 V AC only, 60 Hz), properly grounded in accordance with the National Electrical Code and local codes are ordinances is required. Do not pinch, knot or bend the power cord in any manner. The fuse or circuit breaker size should be 15 amperes. It is important for the refrigerator to be leveled in order to work properly. You may need to make several adjustments to level it. Check for leaks after connection. Never allow children to operate, play with or crawl inside the refrigerator. This appliance is not intended for use by persons (including children) with reduced physical, sensory or mental capabilities, or lack of experience and knowledge, unless they have been given supervision or instruction concerning use of the appliance by a person responsible for their safety. IMPORTANT: Do not use mechanical devices or other means to accelerate the defrosting process, other than those recommended by the manufacturer. IMPORTANT: Do not damage the refrigerant circuit. IMPORTANT: Do not use electrical appliances inside the food storage compartment of the appliance, unless they are of the type recommended by the manufacturer. Do not use solvent-based cleaning agents or abrasives on the interior. These cleansers may damage or discolor the interior. Do not use this appliance for other than its intended purpose. If your electricity goes off, follow this procedure: Call your power company to see how long the power will be out. If service is to be interrupted for less than 24 hours, keep the appliance closed as much as possible. This will help keep food from spoiling. If service is to be interrupted for more than 24 hours, remove food and store in a refrigerated food locker or other refrigerator. ‒ SAVE THESE INSTRUCTIONS ‒ 3 LOCATION OF PARTS 1. Freezer Compartment – plastic ice cube tray included 2. Drip Tray – catches melt water during defrosting 3. Temperature Control Knob – rotate this to adjust refrigerator temperature and to defrost 4. Slide-out Shelves – odor resistant, rustproof, plastic-coated steel 5. Crisper with Glass Cover – keeps vegetables fresh 6. Adjustable Feet – help to level the refrigerator 7. Bottle Racks 8. Rack for small items 4 INSTALLATION To use the refrigerator with the most efficiency and safety, select a suitable place to install it according to the following guidelines: 1. This refrigerator is designed for free-standing installation only and should not be recessed or built in. 2. The refrigerator should be installed on a sturdy, level floor or counter. If the floor is not quite level, adjust the front feet of the unit. 3. Allow 4 inches of space between the back of the refrigerator and the wall behind. 4. Avoid any direct sunlight, heat or moisture. 5. The refrigerator is equipped with a three-prong plug and is grounded to minimize electrical hazards. To make it effective, the refrigerator must be plugged into a grounded electrical socket. 6. Do not use an extension cord. Test Run Before using the refrigerator, clean it and make a test run to see if it follows the behavior described here. If not, check the electricity supply. If the cause of the trouble cannot be located, contact your Summit dealer. 1. Set the Temperature Control Knob at the OFF position and then plug the power cord into an electrical outlet of 115 volts, 60Hz. The compressor should not run. 2. Set the Temperature Control Knob at the MAX position and let the refrigerator operate for 20 minutes. The freezer compartment should get slightly frosted and the compressor should run smoothly with no noise but a soft hum. 3. Then rotate the Temperature Control Knob counter-clockwise toward the MIN position. Before the pointer of the knob reaches MIN, the compressor should turn off. ATTENTION Your refrigerator is equipped with a special thermostat control device. If the unit is turned off or unplugged, YOU MUST ALLOW THREE (3) MINUTES BEFORE RESTARTING OR REPLUGGING THE UNIT. The unit will not start if you attempt to restart it in less than three (3) minutes. 5 Reversing the Door Swing Refer to the Disassembly Diagram on page 7 and change the door hinges following this procedure: (The numbers in the diagram indicate the procedure order in the instructions.) 1. Remove the hinge cap by twisting it off. 2. Remove the upper hexagonal head screws. The refrigerator door can now be removed. 3. Tilt the refrigerator back or lay it on its back for steps 4, 5 and 6. Use a pad or blanket to protect the floor and to avoid scratching the painted finish. 4. Remove the leveling legs by turning them counter-clockwise. Remove the lower hexagonal head screws, two on the hinge side and one near the front corner of the other side. 5. Attach the left side leg spacer to the other side hole which is positioned symmetrically. 6. Attach the bottom hinge symmetrically to the other side of the cabinet. 7. Remove the upper hinge plastic pins and insert them in the holes from which the screws were removed in procedure 2. 8. Take off the hinge collar caps using a screwdriver and insert them in the hinge collar on the opposite side. 9. Attach the shaft to the refrigerator door. Attach the door to the bottom hinge and secure them with the screws from procedure 4. 10. Attach the upper hinge to the refrigerator door. Do not tighten the screws completely. 11. The direction in which the door opens has now been changed. However, the following points should be checked: a. Make sure the door is on straight. b. Make sure there is no space between the door gasket and the refrigerator unit itself when the door is closed. c. Make sure the gasket on the hinge side is not caught between the door and the unit when the door is opened or closed. (If the door is forced closed when the gasket is caught, the gasket may be damaged.) When checking the above points, if it is discovered that the door is not installed properly (this is apt to happen on the first try), loosen the screws holding the upper hinge, straighten the door and tighten the screws slowly with the socket wrench. After making sure the door is installed correctly, tighten all the screws holding the hinge. If they are not tightened, the door may slip out of position or there may be an opening between the door and the unit. 12. Stand the unit back in the upright position. 6 Disassembly Diagram for Reversing the Door Swing Upper Hexagonal Head Screw Hinge Cap Top Hinge Door Hinge Cap Hinge Cap Door Shaft Bottom Hinge Leg Spacer Leg 7 Lower Hexagonal Head Screw OPERATION Temperature Control The temperature in the refrigerator compartment can be adjusted colder or warmer by turning the Temperature Control Knob. Colder temperatures can be achieved by turning the knob clockwise toward the MAX position. Warmer temperatures can be selected by turning the knob counter-clockwise toward the MIN position. The refrigerator temperature will vary depending on the quantity of food stored and on the frequency with which the door is opened. Set the Control Knob at the MAX position only when ice cubes are needed in a hurry. This refrigerator may turn on and off more frequently than regular-size refrigerators. This is normal for a compact refrigerator. Normally the Temperature Control Knob should be set at the MED position. How to remove ice cubes from the tray The ice cube tray is flexible. Twist the tray to remove ice cubes. Do not use boiling water or a metal instrument such as a knife or screw driver to remove the ice cube tray because this could damage plastic parts or the evaporator. 8 DEFROSTING The automatic defrost timer must be set prior to the operation of the refrigerator. 1. Plug the power cord into a 115 volt electric power outlet. 2. Set the timer to local time: a. Using a pen or other similar nonconductive object, push the black button and hold for three seconds until the LED illuminates. b. Set the timer to local time by pushing the black button following the instructions in the table below: NOTE: This step must be completed within 10 seconds once the LED illuminates. Local Time 1:00 2:59 3:00 4:59 5:00 6:59 7:00 8:59 Setting Time 2:00 4:00 6:00 8:00 Switch Pushing Times 1 2 3 4 9:00 10:59 11:00 12:59 13:00 14:59 15:00 16:59 17:00 18:59 19:00 20:59 21:00 22:59 23:00 0:59 10:00 12:00 14:00 16:00 18:00 20:00 22:00 24:00 5 6 7 8 9 10 11 12 c. Once the time is set, the LED will blink the number of times the knob was pushed. Example: If the local time is 16:00 at the time of the installation, the following procedure would be followed: a. Push the black button and hold for three seconds until the LED illuminates. b. Then push the black button 8 consecutive times within 10 seconds. c. Confirm that the LED blinks 8 times. After the timer is set, the refrigerator will defrost automatically between 1:00AM and 4:00AM daily. 9 CLEANING AND MAINTENANCE Turn off your refrigerator and remove all food, shelves, trays, etc. Wash interior liner with a solution of two tablespoons of baking soda and a quart of warm water. Then rinse and wipe it out. Do not use soaps, detergents, scouring powders, spray cleaners or the like for cleaning the interior liner, as these may cause odors in the refrigerator compartment. Wash the ice cube tray, drip tray and shelves in a mild detergent solution and dry with a soft cloth. Wipe the exterior surface with a soft cloth dampened with soapy water and dry it with a soft cloth. Normal appliance spray cleaners may be used for the exterior only. Use only mild soap and water to clean the door gasket. Never use acid, chemical thinners, gasoline, benzene or the like to clean any part of the refrigerator. Boiling water and benzene may deform or damage the plastic parts. Your Summit refrigerator does not require any maintenance. 10 LIMITED WARRANTY PARTS AND LABOR WARRANTY INFORMATION SUMMIT appliances are manufactured to provide outstanding value, and your satisfaction is our goal on every product. All SUMMIT major appliances carry a one year limited warranty on both parts and labor. All refrigerators and freezers carry an additional four years on the compressor. Certain exclusions may apply. For details on specific warranty issues, please refer to the warranty packed with the product, or contact us. GENERAL PARTS AND LABOR WARRANTY Summit warrants to the original purchaser of every new unit that the cabinet and all parts thereof be free from defects in material or workmanship under normal and proper use and maintenance service as specified by Summit and upon proper installation and start-up in accordance with the instruction packet supplied with each Summit unit. Summit’s obligation under this warranty is limited to a period of 12 months from the date of original purchase. Any parts covered under this warranty that are determined by Summit to have been defective within the above said period are limited to the repair or replacement, including labor charges, of defective parts or assemblies. The labor warranty shall include pre-approved standard straight time labor charges only and reasonable travel time, as determined by Summit. COMPRESSOR WARRANTY In addition to the warranty period stated above, Summit warrants its hermetically sealed compressor to be free from defects in both material and workmanship, under normal and proper use and maintenance, for a period of 60 months from the date of original purchase. Compressors determined by Summit to have been defective within this extended time period will, at Summit’s option, be either repaired or replaced with a compressor or compressor parts of similar design and capacity. The above-mentioned extended compressor warranty applies only to hermetically sealed parts of the compressor and DOES NOT apply to any other parts or components, including, but not limited to, cabinet, paint finish, temperature control, refrigerant, metering device, driers, motor starting equipment, fan assembly or any other electrical component. WARRANTY CLAIMS All claims for labor or parts must be made directly through Summit. All claims should include: model number of the unit, the serial number of the cabinet, proof of purchase, date of installation, and all pertinent information supporting the existence of the alleged defect. All claims should be filed within 30 days of completed repair or the warranty claim could be refused. THINGS NOT COVERED BY THIS WARRANTY Summit’s sole obligation under this warranty is limited to either repair or replacement of parts, subject to the additional limitations below. This warranty neither assumes nor authorizes any person to assume obligations other than those expressly covered by this warranty. ● ● NO CONSEQUENTIAL DAMAGES: Summit is not responsible for economic loss; profit loss; or special, direct, indirect, or consequential damages, including without limitation, losses or damages arising from food or product spoilage claims, whether or not on account of refrigeration failure. WARRANTY IS NOT TRANSFERRABLE: This warranty is not assignable and applies only in favor of the original purchaser/user to whom delivered. Any such assignment or transfer shall void the warranties herein made and shall void all warranties, express or implied, including any warranty of merchantability or fitness for a particular purpose. 11 ● IMPROPER USE: Summit assumes no liability for parts or labor coverage for component failure or other damages resulting from improper usage or installation or failure to clean and/or maintain product as set forth in the warranty packet provided with the unit. ● ALTERATION, NEGLECT, ABUSE, MISUSE, ACCIDENT, DAMAGE DURING TRANSIT OR INSTALLATION, FIRE, FLOOD, ACTS OF GOD: Summit is not responsible for the repair or replacement of any parts that Summit determines have been subjected after the date of manufacture to alteration, neglect, abuse, misuse, accident, damage during transit or installation, fire, flood, or act of God. ● IMPROPER ELECTRICAL CONNECTIONS: Summit is not responsible for the repair or replacement of failed or damaged components resulting from electrical power failure, the use of extension cords, low voltage, or voltage drops to the unit. ● NO IMPLIED WARRANTY OF MERCHANTABILITY OR FITNESS FOR A PARTICULAR PURPOSE: There are no other warranties, expressed, implied or statutory, except the parts & labor warranty specifically described above. These warranties are exclusive and in lieu of all other warranties, including implied warranty and merchantability or fitness for a particular purpose. There are no other warranties which extend beyond the description on the face hereof. ● OUTSIDE CONTIGUOUS UNITED STATES: This warranty does not apply to, and Summit is not responsible for, any warranty claims made on products sold or used outside the contiguous (48) United States. To be clear, this warranty excludes the states of Alaska and Hawaii and all offshore territories. REQUESTING SERVICE If you are in need of service, please either fill out a service request on our website, http://www.summitappliance.com/support, or call us at 800-932-4267 or 718-893-3900. Please be prepared to give us the following information: your name, address, phone, email, model, serial number, date of purchase, place of purchase, and the problem you are having. 12 13