1
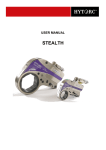
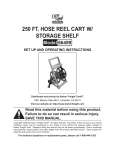
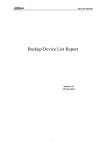
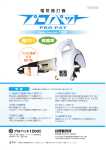
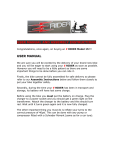
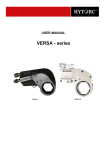
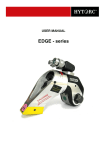
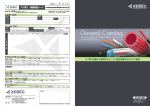
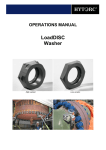
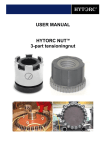
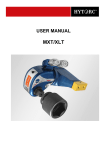
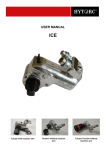
USER MANUAL AVANTI Torque with reaction arm Tension without reaction arm Torque Tension without reaction arm INDEX 1. WELCOME AT HYTORC .............................................................................................................. 3 2. GENERAL INFORMATION ........................................................................................................... 3 3. SAFETY INSTRUCTIONS............................................................................................................. 3 4. INTRODUCTION ........................................................................................................................... 6 5. BEFORE USE: .............................................................................................................................. 7 6. CONNECTING THE HYDRAULIC PUMP UNIT ........................................................................... 7 6.1 6.2 6.3 BEFORE USE - CHECK PUMPS ........................................................................................................ 7 HOSE CONNECTION ....................................................................................................................... 7 AFTER USE ................................................................................................................................... 8 7. SETTING OF TORQUE VALUE / BOLT LOAD ........................................................................... 9 8. USE OF SOCKET WRENCH ...................................................................................................... 10 8.1 8.2 8.3 8.4 8.5 9. SETTING ROTATION DIRECTION .................................................................................................... 10 REACTION ARM ........................................................................................................................... 10 TO TIGHTEN A BOLTED CONNECTION ............................................................................................ 11 THE REACTION PAWL ................................................................................................................... 12 TO LOOSEN A BOLTED CONNECTION ............................................................................................. 12 MALFUNCTIONS AND SOLUTIONS ......................................................................................... 13 9.1 TORQUE WRENCH .......................................................................................................................... 13 9.2 PUMPS .......................................................................................................................................... 13 9.2.1 Air pump units ....................................................................................................................... 13 9.2.2 Electrical pump units ............................................................................................................ 13 10. MAINTENANCE .......................................................................................................................... 14 10.1 INSPECTION BEFORE EACH USE ..................................................................................................... 14 10.2 SMALL MAINTENANCE ................................................................................................................... 14 10.3 MAINTENANCE AT HYTORC ......................................................................................................... 14 11. PART LIST AVANTI-SERIE ........................................................................................................ 15 FOR MORE INFORMATION HYTORC Nederland BV | Platinawerf 8 - 6641 TL Beuningen - NEDERLAND | Tel: +31(0)24 - 3 660 660 | www.hytorc.nl HYTORC Benelux BVBA | Ysselaarlaan 65B - 2630 Aartselaar - BELGIË ENG- Usermanual Avanti.docx Version 2.5 / feb-14 | Tel : +32(0)38 - 705 220 | www.hytorc-benelux.be 2 1. WELCOME AT HYTORC Thank you for buying HYTORC equipment. This user manual and safety instructions is designed to provide you with the basic knowledge required to operate and maintain your new HYTORC equipment. Please read this manual carefully and follow the instructions provided. If you still have any questions regarding HYTORC bolting equipment, please do not hesitate and call us at +31 (0) 24 3660 660 or contact us at [email protected]. You also find more information on our website www.hytorc.nl. 2. GENERAL INFORMATION Your purchase of HYTORC equipment entitles you to the following HYTORC services: 3. Instructions to your employees within your organization by a HYTORC specialist Free annual inspection of your HYTORC equipment 24-hour service When you need help abroad? No problem! We help you! HYTORC equipment according to the newest technology A full year complete warranty In case of failure under warranty of standard tools, substitutional rental equipment can be supplied at request Qualified work force employable for solutions at difficult challenges SAFETY INSTRUCTIONS Warning: Your HYTORC torque machine is a power tool, and as with any power tool, certain safety precautions should be observed to avoid accidents or personal injury. The following instructions will assist you. Read all instructions. Keep work area clean and well lit. Consider work area environment. Electrical Pumps should never be used in an atmosphere that can be considered potentially volatile. If there is any doubt, use an air pump. Note: Metal-to-metal contact can cause sparks, precautions should be taken. Avoid premature tool starting. The Pump Remote Control is for the TOOL OPERATOR only. Stay clear during operation. In most cases, the tool will allow “hands free” operation. If the tool must be held or steadied during operation, use alternative means of securing the tool to the application. FOR MORE INFORMATION HYTORC Nederland BV | Platinawerf 8 - 6641 TL Beuningen - NEDERLAND | Tel: +31(0)24 - 3 660 660 | www.hytorc.nl HYTORC Benelux BVBA | Ysselaarlaan 65B - 2630 Aartselaar - BELGIË ENG- Usermanual Avanti.docx Version 2.5 / feb-14 | Tel : +32(0)38 - 705 220 | www.hytorc-benelux.be 3 Guard against electric shock. Ensure the pump is properly grounded and the proper voltage is being used. Store equipment properly. When not in use, tools and accessories should be properly stored to avoid deterioration. Use right tool. Do not force small tools or attachments to do the job of a larger tool. Do not use a tool for purposes not intended. Proper safety attire. When handling/operation hydraulic equipment use work gloves, hard hats, safety shoes and other applicable clothing. Use safety glasses with side covers. Moving equipment. Do not use hydraulic hoses, uni-swivels, pump power or remote cords as means of moving the equipment. Maintain your HYTORC equipment with care. For top performance, inspect tools, power pack and accessories for visual damage frequently and always prior to use. Always follow instruction for proper tool and pump maintenance. Refer to the Operations Maintenance Section in chapter 10 for further clarification. Stay alert! Watch what you are doing. Use Common sense. Do not use power equipment under the influence of any mood altering substances. Prior to operation: - Ensure that all hydraulic connections are securely connected and there is no leakage; - Verify that the hydraulic hoses are not kinked or otherwise damaged; - Ensure the square drive and its retainer are fully and securely engaged; - Be certain that all connectors, elbows, fitting and swivels are not bent, loose or damaged. Prior to use: - Check sockets for size, quality and flaws (do not use if questionable); - Cycle tool to ensure proper function; - Locate a solid, secure reaction point; - Be sure the reaction arm retaining clamp is fully engaged; - Be sure the hydraulic hoses are free of the reaction point; - Pressurize the system momentarily; if the tool tends to “ride up" or to “creep", stop and re-adjust the reaction arm to a more solid and secure position. FOR MORE INFORMATION HYTORC Nederland BV | Platinawerf 8 - 6641 TL Beuningen - NEDERLAND | Tel: +31(0)24 - 3 660 660 | www.hytorc.nl HYTORC Benelux BVBA | Ysselaarlaan 65B - 2630 Aartselaar - BELGIË ENG- Usermanual Avanti.docx Version 2.5 / feb-14 | Tel : +32(0)38 - 705 220 | www.hytorc-benelux.be 4 Stay away of the reaction points. Remain clear of the reaction arm during operation and never punt body parts between reaction arm and reaction surfaces Always use quality accessories. Always use top quality impact sockets in good condition that are the correct size and fully engage the nut. Hidden flaws, however, remain a possibility that could cause breakage, so stay clear of sockets during operation. Do not use other equipment to enhance performance. For example a hammer on the socket or tool. Comment: HYTORC pumps are designed to operate HYTORC tools only and otherwise. Damage may occur to the pump or the product that is being operated due to misuse. You can find a version of the instructions on the reverse side of the torque charts. STORE THESE SAFETY INSTRUCTIONS WITH YOUR HYTORC TOOL! FOR MORE INFORMATION HYTORC Nederland BV | Platinawerf 8 - 6641 TL Beuningen - NEDERLAND | Tel: +31(0)24 - 3 660 660 | www.hytorc.nl HYTORC Benelux BVBA | Ysselaarlaan 65B - 2630 Aartselaar - BELGIË ENG- Usermanual Avanti.docx Version 2.5 / feb-14 | Tel : +32(0)38 - 705 220 | www.hytorc-benelux.be 5 4. INTRODUCTION The AVANTI-series is an advanced torque tool developed in the way that the tool and the reaction arm can be positioned separately around the midpoint. The Avanti can be used in the following situations: As a torque tensioner to tighten on bolt load with a LoadDISC With the HYTORC NUT, the AVANTI changes in a precision tensioner To tighten by torque with a reaction arm against a solid point or against an adjacent nut HYTORC has different low clearance tool to tighten or loosen nuts with limited clearance, such as the Stealth, XLCT and Versa. FOR MORE INFORMATION HYTORC Nederland BV | Platinawerf 8 - 6641 TL Beuningen - NEDERLAND | Tel: +31(0)24 - 3 660 660 | www.hytorc.nl HYTORC Benelux BVBA | Ysselaarlaan 65B - 2630 Aartselaar - BELGIË ENG- Usermanual Avanti.docx Version 2.5 / feb-14 | Tel : +32(0)38 - 705 220 | www.hytorc-benelux.be 6 5. BEFORE USE: All HYTORC products have been tested and are ready for use at delivery. In some cases, you need to fill the supplied hydraulic oil in the pump unit before use. The system accuracy of your HYTORC tool is within ± 3%. This accuracy can be certified through calibration by our own calibration system. All new tools are delivered with a calibration certificate. A HYTORC torque tool is only complete with a hydraulic pump and a high-pressure twin hose. To assure a safe and good operation of your equipment it is necessary to operate correctly and maintain regularly. 6. CONNECTING THE HYDRAULIC PUMP UNIT Important Before use you have to fill the HYTORC pump units with separate delivered hydraulic oil (if not done prior to delivery). If you operate your HYTORC torque tool with another pump brand, please note the restricted pressure of 700 BAR maximum. 6.1 Before use - Check pumps Air driven pump units Use as minimum ¾” air hose and ½” couplers. The working pressure is 6-10 BAR. During running the air pressure is not allowed to drop under the 4,5 BAR. Check the water separator by opening the drain. Check if the oil level in the lubricator is sufficient. And check during running if the lubricator drops the subscribed drops of oil, approximately 4-6 drops per minute for most pumps. Electrical driven pump units Assure yourself of using the right voltage according the pump specifications. You find these on the pump cover or electrical box. Beware of overvoltage and undervoltage! (too long or too thin extension cable will cause a voltage decrease). Use the hydraulic pomp only if the green/yellow grounding cables are connected. If needed, use an 2,5 mm² electrical extension cable, unreel the cable wince completely. 6.2 Hose connection A twin hose connects the torque wrench and the hydraulic pump unit. Each hose has couplers at each end. One hose has female couplers at both ends and the other hose has male couplers at both ends. To avoid tool malfunction, do not reverse connectors! PUMP TOOL FOR MORE INFORMATION HYTORC Nederland BV | Platinawerf 8 - 6641 TL Beuningen - NEDERLAND | Tel: +31(0)24 - 3 660 660 | www.hytorc.nl HYTORC Benelux BVBA | Ysselaarlaan 65B - 2630 Aartselaar - BELGIË ENG- Usermanual Avanti.docx Version 2.5 / feb-14 | Tel : +32(0)38 - 705 220 | www.hytorc-benelux.be 7 We have three different types of couplers; rotating couplers, rotating couplers with locking devices and quick couplers. The different types cannot be connected between each other. IMPORTANT You cannot connect 2 or 4 hoses to each other. If necessary, you can connect 3 or 5 hoses. Use always an odd number of hoses. WRONG PUMP RIGHT PUMP TOOL TOOL Push the hose parts and couplers to each other. Screw the couplers hand tight. Do not use locking pliers. If you want to detach, disconnect the return hose first. If impossible, press briefly once on the remote control push button. Attention! During operation the couplers can become loose unnoticed, what makes oil flow impossible. The tool operates no longer. ASSURE YOURSELF THAT ALL COUPLERS ON THE PUMP AS WELL AS ON THE TOOL ARE TIGHTENED PROPERLY! THIS IS THE MOST COMMON OPERATION FAILURE! 6.3 After use Reel the hoses. Protect the couplers against dirt and damage by connecting the end parts of the hose to each other. FOR MORE INFORMATION HYTORC Nederland BV | Platinawerf 8 - 6641 TL Beuningen - NEDERLAND | Tel: +31(0)24 - 3 660 660 | www.hytorc.nl HYTORC Benelux BVBA | Ysselaarlaan 65B - 2630 Aartselaar - BELGIË ENG- Usermanual Avanti.docx Version 2.5 / feb-14 | Tel : +32(0)38 - 705 220 | www.hytorc-benelux.be 8 7. SETTING OF TORQUE VALUE / BOLT LOAD The HYTORC hydraulic pump unit has a working range of 20 BAR until maximum 700 BAR. Within this range the pressure is infinitely adjustable. Follow the next steps to adjust the right torque: 1. Every tool type has his own pressure/torque chart, supplied with your HYTORC tool. Search for the right torque in the preferable column (Nm, kgm or ft.lbs.) in the chart and read the right pressure to adjust the pump in BAR (right) or PSI (left). 2. Turn the wing nut (on the tank cover of the pomp unit) completely leftwards = upwards. If a locking knob exists, please release this one first. 3. Put the torque tool somewhere on the ground or another safe place without placing on a nut. 4. Pick up the remote control and push the start/run button. The pump starts running and the tool makes one stroke. Repeat twice and check if the tool turns fine. 5. NEXT: AS FROM NOW KEEP THE START BUTTON PRESSED! 6. Turn the wing nut to the right until the pressure gauge presents the desirable pressure. After setting, you can release the start button. 7. Push the button after several seconds again and check the pressure. Fix the locking if adjustment is fine. Finally, check the pressure again. Important To change the pressure you first have to turn the wing nut back to lower pressure (0). Next you can set the desired pressure like explained in this chapter. FOR MORE INFORMATION HYTORC Nederland BV | Platinawerf 8 - 6641 TL Beuningen - NEDERLAND | Tel: +31(0)24 - 3 660 660 | www.hytorc.nl HYTORC Benelux BVBA | Ysselaarlaan 65B - 2630 Aartselaar - BELGIË ENG- Usermanual Avanti.docx Version 2.5 / feb-14 | Tel : +32(0)38 - 705 220 | www.hytorc-benelux.be 9 8. USE OF SOCKET WRENCH Secure the socket with the locking pin to the torque tool. Place tool and socket on the nut and be aware that the socket covers the nut as far as possible. Even so when rust and paint are covering the nut! Never use a socket with extension piece! Never use a 12 points socket when not required! Never use any thin wall or turned off socket! In above mentioned cases it is possible something brakes or causes injury! 8.1 Setting rotation direction Push the button of the drive retainer which fixes the square drive to the tool. Pull the square drive axle out of the tool and place it back on the other side of the tool. Place the fixation retainer. Some HYTORC types have the possibility to push the square drive through the tool to the other side. Tighten 8.2 Loosening Reaction arm All HYTORC torque tools have an universal changeable reaction arm. This reaction arm bears the reaction forces that have been generated by the tool. The reaction arm needs to be retracted in the same direction as the square drive and, if necessary, changed of placement when the square drive changes of direction (if the reaction arm is fixed to the square drive this will happen simultaneously). Place the tool on the bolted connection and place the reaction arm to a reaction point by hand. Check if hoses and tool are free of obstacles. Ensure if the steel endpoint of the reaction arm abuts solidly to the chosen reaction point. Stay clear of the tool and reaction point with your fingers or other body parts! Push the start button for one second to find out if everything is working properly. FOR MORE INFORMATION HYTORC Nederland BV | Platinawerf 8 - 6641 TL Beuningen - NEDERLAND | Tel: +31(0)24 - 3 660 660 | www.hytorc.nl HYTORC Benelux BVBA | Ysselaarlaan 65B - 2630 Aartselaar - BELGIË ENG- Usermanual Avanti.docx Version 2.5 / feb-14 | Tel : +32(0)38 - 705 220 | www.hytorc-benelux.be 10 Optional we have a special 360 degrees reaction arm which is developed special for the Avanti tool. This reaction arm makes sure that the reaction forces do not go through the tool housing. Adjusting the reaction arm into every angle is possible. However, the most ideal way is to support the reaction arm at the same height as the socket on the nut. To adjust as follows: Push the button at the back of the reaction arm and at the same time pull the light metal leg out of the spline connection. Choose a better position for supporting the arm and place the light metal leg back. Keep the button pushed. Ensure if the connection is secured by pulling the metal leg. If the chosen position is incorrect because the tool tends to “ride up" or to “creep", stop and re-adjust the reaction arm to a more solid and secure position. Alongside an Avanti tool with an ideal reaction arm position. 8.3 To tighten a bolted connection By pushing down on the remote control button in the advance position, the tool starts turning until the reaction arm will contact its reaction point. That is why you have to place the reaction arm to the reaction point first, ensuring reaction arm and reaction point are free of any obstacles. Continue to hold down the advance button as the nut turns until you hear a “click” which will signify the hydraulic cylinder inside the tool is fully extended and will not turn the nut further. Continuing to hold down the remote control button will result in a rapid buildup of pressure to the point of where the gauge reads what was pre-set prior to applying the wrench. FOR MORE INFORMATION HYTORC Nederland BV | Platinawerf 8 - 6641 TL Beuningen - NEDERLAND | Tel: +31(0)24 - 3 660 660 | www.hytorc.nl HYTORC Benelux BVBA | Ysselaarlaan 65B - 2630 Aartselaar - BELGIË ENG- Usermanual Avanti.docx Version 2.5 / feb-14 | Tel : +32(0)38 - 705 220 | www.hytorc-benelux.be 11 Attention: The rising of the oil pressure till the pre-set value does not mean that the desired torque value is reached. It only indicates that the cylinder is fully extended and cannot turn the nut further until the tool automatically resets itself. Release the remote control button and the cylinder will retract. The tool will automatically reset itself and the operator will hear a “click”. Push the button again for the next stroke. Repeat this step till the nut stops turning. Successive cycles are made until the tool “stalls” at the desired torque value with accuracy within ±3%. 8.4 The reaction pawl The reaction pawl is a blocking system for the driving ratchet. It can happen that the reaction pawl, while reaching the desired torque value, gets stuck in the in the sprocket wheel. The tool is under pressure and cannot be taken from the nut. The built-in reaction pawl is doing its job by intercepting the torsion and tolerance. Press again the start button of the remote control and keep it pressed till the oil pressure is build up to adjusted maximum. Move the little lever attached to the reaction pawl upwards.. Release the remote control button. Move the button on the reaction pawl downwards. The tool is loose and can be taken of the nut. 8.5 To loosen a bolted connection Adjust the pressure of the pomp to its maximum of 700 BAR or 10.000 PSI. Check the rotating direction of the hexagon or square drive and change if necessary. Check the position of the reaction arm and change if necessary. Ensure that the reaction arm is secured. Place the tool on the bolted connection. Press the button of the remote control and keep it pressed till the socket or ratchet turns and stops again. As the cylinder extends fully, you will hear a “click”. Release the remote control button and wait till the cylinder automatically retracts, you again will hear a “click”. Press the button again till the “click” and repeat this as long as necessary till the connection is loose. Comment: If the bolted connection does not loosen, it is an indication that you may require the next larger size tool to loosen the bolt. If you do not have this in your possession, please contact HYTORC to find a good solution. FOR MORE INFORMATION HYTORC Nederland BV | Platinawerf 8 - 6641 TL Beuningen - NEDERLAND | Tel: +31(0)24 - 3 660 660 | www.hytorc.nl HYTORC Benelux BVBA | Ysselaarlaan 65B - 2630 Aartselaar - BELGIË ENG- Usermanual Avanti.docx Version 2.5 / feb-14 | Tel : +32(0)38 - 705 220 | www.hytorc-benelux.be 12 9. MALFUNCTIONS AND SOLUTIONS 9.1 Torque wrench The tool does not operate anymore check if all couplers (as well on tool as on the pump) are tightened properly. The coupling nut of the female coupler has to be tightened completely to the collar of the male coupler. 9.2 Pumps The pump pressure at a fixed adjustment repeats inaccurately pump pressure adjusting valve is dirty or damaged loose the valve and cover the hole with a towel, start the motor for 2 seconds, clean valve and assemble it again renew the valve if the problem is not solved. Pump runs and produces pressure but the tool does not turn check coupler connections. The tool turns in the wrong direction probably two or an even number of hoses is connected to each other or the male and female couplers are interchanged. The tool is running slower than usually adjust pump pressure to 700 BAR and shut off the pump when the start button is pressed the pressure drops quickly to about 100 BAR but has to remain there. If the pressure drops to zero, it indicates an internal leakage. Please contact HYTORC Nederland B.V. +31 (0)24-3660660 9.2.1 Air pump units Pump motor does not start kink in the air hose of the remote control unreel the hose completely. Pump motor does not start starter valve (position 21) is defect press small knob of the starter valve while ON/OFF handle (position 9) stands at ON. Pump runs slowly or irregular too low air pressure minimum of 4 BAR with running motor clean dirty filter dirt in the air motor. The motor does not run or switch this indicates a defect of the control valve in the pump unit. If necessary, contact HYTORC Nederland B.V. at +31 (0)24-3660660. 9.2.2 Electrical pump units Motor makes strange noise and produces no pressure check rotating direction. Motor runs to slow or stops automatically after starting voltage drop in the power. Usually too thin or too long extension cable is used. Check pump unit with the main plug directly in the electric point. Motor runs but does not switch from forward to reverse rupture in the remote control cable valve block defect. Motor does not run no electrical power or rupture in supply cable. FOR MORE INFORMATION HYTORC Nederland BV | Platinawerf 8 - 6641 TL Beuningen - NEDERLAND | Tel: +31(0)24 - 3 660 660 | www.hytorc.nl HYTORC Benelux BVBA | Ysselaarlaan 65B - 2630 Aartselaar - BELGIË ENG- Usermanual Avanti.docx Version 2.5 / feb-14 | Tel : +32(0)38 - 705 220 | www.hytorc-benelux.be 13 10. MAINTENANCE 10.1 Inspection before each use Check if both oil levels of the pump unit are sufficient. Check power supply (air pressure minimum 5 BAR or the right E-voltage). Check if the cables and air hose supply of the remote control are not damaged. Unreel the hose of the remote control at air pumps completely. Bending of the small air hose can cause failures. Check if supply cables are not damaged. Check if the hydraulic hoses are not damaged. The working pressure is 700 BAR. Adjust pump pressure at 200 BAR. Check if the needle returns repeatable. Resume at 400 BAR and 700 BAR. Drain if there is water in the separator. Oil pressure gauges are filled with glycerine. If glycerine level drops, you have a leakage and repair is needed. When gauge is getting filled with hydraulic oil, this is also an indication of internal leakage. After each time the tool is used, clean it and check the grease inside the tool. 10.2 Small maintenance Hydraulic oil: Change the oil after 40 operation hours completely or at least 2 times a year. Use only High-grade oil, ISO VG 46 or 32. Filter at the pump: This filter must be changed 3 times a year at normal use and more often if the unit is used each day. Quick couplers hoses: Clean dirty or rigid couplers or replace them. Coal brush assembly (electrical unit): Check and if necessary renew. 10.3 Maintenance at HYTORC Torque wrench: Depending of the usage, but at least once a year, disassemble the complete tool, clean, inspect, change small springs and lubricate again. Inspection on capacity at 100, 200, 300 and 700 BAR. Pump unit: Calibrate pump pressure gauge 1 time a year and fill glycerine level. Motor (electrical and air driven): The rotor axle and bearings; 1 time a year cleaning and lubrication. Remote control (air driven unit): Check the air hoses at flow obstructions and if necessary repair. The operation buttons are supplied with a small spring and have to open and close easily. Clean the control valves. FOR MORE INFORMATION HYTORC Nederland BV | Platinawerf 8 - 6641 TL Beuningen - NEDERLAND | Tel: +31(0)24 - 3 660 660 | www.hytorc.nl HYTORC Benelux BVBA | Ysselaarlaan 65B - 2630 Aartselaar - BELGIË ENG- Usermanual Avanti.docx Version 2.5 / feb-14 | Tel : +32(0)38 - 705 220 | www.hytorc-benelux.be 14 11. PART LIST AVANTI-SERIE FOR MORE INFORMATION HYTORC Nederland BV | Platinawerf 8 - 6641 TL Beuningen - NEDERLAND | Tel: +31(0)24 - 3 660 660 | www.hytorc.nl HYTORC Benelux BVBA | Ysselaarlaan 65B - 2630 Aartselaar - BELGIË ENG- Usermanual Avanti.docx Version 2.5 / feb-14 | Tel : +32(0)38 - 705 220 | www.hytorc-benelux.be 15 ITEM QTY. Description AV-.7 AV-1 AV-3 AV-5 AV-8 AV-10 1 1 Housing AV-.7-01 AV-01-01 AV-03-01 AV-05-01 AV-08-01 AV-10-01 2 1 Piston Assembly AV-.7-25 AV-01-25 AV-03-25 AV-05-25 AV-08-25 AV-10-25 3 1 End Cup MXT-.7-26 MXT-01-26 MXT-03-26 MXT-05-26 AV-08-34 AV-10-34 4 1 Disengagement Lever (R/L) AV-.7-15A AV-01-15A AV-03-15A AV-05-15A AV-08-15A AV-10-15A 4-A 1 Disengagement Lever Pivot Shaft AV-.7-15B AV-01-15B AV-03-15B AV-05-15B AV-08-15B AV-10-15B 4-ASM 1 Disengagement Lever Assembly AV-.7-15 AV-01-15 AV-03-15 AV-05-15 AV-08-15 AV-10-15 4-B 1 Reaction Pawl Push Pin Spring AV-.7-18 AV-01-18 AV-03-18 AV-05-18 AV-08-18 AV-10-18 5 1 Reaction Pawl Assembly AV-.7-10 AV-01-10 AV-03-10 AV-05-10 AV-08-10 AV-10-10 6 1 Reaction Pawl Push Pin AV-.7-42 AV-01-42 AV-03-42 AV-05-42 AV-08-42 AV-10-42 7 1 Square Drive Assembly AV-.7-05 AV-01-05 AV-03-05 AV-05-05 AV-08-05 AV-10-05 8 1 Ratchet 2 Drive Plates (Left / Right) 1 Drive Pawl Assembly AV-03-06 AV-0304L/R AV-03-63 AV-05-06 AV-0504L/R AV-05-63 AV-08-06 AV-0804L/R AV-18-63 AV-10-04/R 10 AV-01-06 AV-0104L/R AV-01-63 AV-10-06 9 AV-.7-06 AV-.704L/R AV-.7-63 11 1 Shroud AV-.7-31 AV-01-31 AV-03-31 AV-05-31 AV-08-31 AV-10-31 12 1 Uniswivel Assembly AV-001CL AV-001CL AV-003CL AV-003CL AV-003CL AV-010CL 13 1 Rod Pin AV-.7-19 AV-01-19 AV-03-19 AV-05-19 AV-08-19 AV-10-19 14 1 Drive Retainer Assembly AV-.7-11 AV-01-11 AV-03-11 AV-05-11 AV-08-11 AV-10-11 15 1 Drive Spline Sleeve Assembly AV-.7-07 AV-01-07 AV-03-07 AV-05-07 AV-08-07 AV-10-07 16 1 Reaction Arm AV-.7-03 AV-01-03 AV-03-03 AV-05-03 AV-08-03 17 1 Uniswivel Cap AV-01-001P AV-01-001P AV-03-001P AV-03-001P AV-03-001P AV-10-03 AV-10001P AV-.7-20 AV-01-20 AV-03-20 AV-05-20 AV-08-20 18 1 19 1 Drive Plate Retaining Ring Backup Ring Drive Plate Retaining Ring 20 1 Sq. Drive Set Screw 21 1 22 2 AV-10-63 AV-10-20 AV-.7-30 AV-01-30 AV-03-30 AV-05-30 AV-08-30 AV-10-30 AV-.7-5A AV-01-5A AV-03-5A AV-05-5A AV-08-5A AV-10-5A Reaction Arm Set Screw AV-.7-22 AV-01-22 AV-03-22 AV-05-22 AV-08-22 AV-10-22 Uniswivel Cover Screw AV-01-13 AV-01-13 AV-03-13 AV-03-13 AV-03-13 AV-10-13 23 1 Drive Pawl Spring Pin AV-.7-40 AV-01-40 AV-03-40 AV-05-40 AV-08-40 AV-10-40 23A 1 Drive Plate Dowl Pin AV-.7-41 AV-01-41 AV-03-41 AV-05-41 AV-08-41 AV-10-41 24 2 Drive Pawl Spring AV-.7-27 AV-01-27 AV-03-27 AV-05-27 AV-08-27 AV-10-27 25 2 Access Plug with O-Ring AV-.7-02 AV-01-02 AV-03-02 AV-05-02 AV-08-02 AV-10-02 26 1 Shroud Spring AV-.7-59 AV-01-59 AV-03-59 AV-05-59 AV-08-59 AV-10-59 27 1 Shroud Spring Screw AV-.7-58 AV-01-58 AV-03-58 AV-05-58 AV-08-58 AV-10-58 28 2 Disengagement Lever Screw AV-.7-39 AV-01-39 AV-03-39 AV-05-39 AV-08-39 AV-10-39 29 2 Shroud Screw AV-.7-32 AV-01-32 AV-03-32 AV-05-32 AV-08-32 AV-10-32 30 2 Reaction Pawl Pin Set Screw AV-.7-65 AV-01-65 AV-03-65 AV-05-65 AV-08-65 AV-10-65 31 1 Reaction Pawl Pin AV-.7-43 AV-01-43 AV-03-43 AV-05-43 AV-08-43 AV-10-43 32 1 Male Coupler 090155-1/8 090155-1/8 090155-1/4 090155-1/4 090155-1/4 090155-1/4 33 1 Female Coupler 090156-1 090156-1 90156 90156 90156 90156 34 1 Housing Seal Kit (Not Shown) AV-.7-62 AV-01-62 AV-03-62 AV-05-62 AV-08-62 AV-10-62 35 1 Uniswivel Seal Kit (Not Shown) AV-01-00 AV-01-00 AV-03-00 AV-03-00 AV-03-00 AV-10-00 36 1 MAINTENANCE KIT (Not Shown) MK-AV.7 MK-AV1 MK-AV3 MK-AV5 MK-AV8 MK-AV10 FOR MORE INFORMATION HYTORC Nederland BV | Platinawerf 8 - 6641 TL Beuningen - NEDERLAND | Tel: +31(0)24 - 3 660 660 | www.hytorc.nl HYTORC Benelux BVBA | Ysselaarlaan 65B - 2630 Aartselaar - BELGIË ENG- Usermanual Avanti.docx Version 2.5 / feb-14 | Tel : +32(0)38 - 705 220 | www.hytorc-benelux.be 16 ITEM QTY. Description AV-20 AV-35 AV-50 AV-80 AV-130 1 1 Housing AV-20-01 AV-35-01 AV-50-01 AV-80-01 AV-130-01 2 1 Piston Assembly AV-20-25 AV-35-25 AV-50-25 AV-80-25 AV-130-25 3 1 End Cup MXT-20-26 MXT-35-26 AV-50-34 AV-80-34 AV-130-34 4 1 Disengagement Lever (R/L) AV-20-15A AV-35-15A AV-50-15A AV-80-15A AV-130-15A 4-A 1 Disengagement Lever Pivot Shaft AV-20-15B AV-35-15B AV-50-15B N/A AV-130-15B 4-ASM 1 Disengagement Lever Assembly AV-20-15 AV-35-15 AV-50-15 AV-80-15 AV-130-15 4-B 1 Reaction Pawl Push Pin Spring AV-20-18 AV-35-18 AV-50-18 AV-80-18 AV-130-18 5 1 Reaction Pawl Assembly AV-20-10 AV-35-10 AV-50-10 AV-80-10 AV-130-10 6 1 Reaction Pawl Push Pin AV-20-42 AV-35-42 AV-50-42 N/A AV-130-42 7 1 Square Drive Assembly AV-20-05 AV-35-05 AV-50-05 AV-80-05 AV-130-05 8 1 Ratchet 2 Drive Plates (Left / Right) 1 Drive Pawl Assembly AV-50-06 AV-5004L/R AV-50-63 AV-80-06 AV-8004L/R AV-80-63 AV-130-04L/R 10 AV-35-06 AV-3504L/R AV-35-63 AV-130-06 9 AV-20-06 AV-2004L/R AV-20-63 11 1 Shroud AV-20-31 AV-35-31 AV-50-31 AV-80-31 AV-130-31 12 1 Uniswivel Assembly AV-010CL AV-010CL AV-010CL MXT-010A AV-130-001 13 1 Rod Pin AV-20-19 AV-35-19 AV-50-19 AV-80-19 AV-130-19 14 1 Drive Retainer Assembly AV-20-11 AV-35-11 AV-50-11 AV-80-11 AV-130-11 15 1 Drive Spline Sleeve Assembly AV-20-07 AV-35-07 AV-50-07 AV-80-07 AV-130-07 16 1 Reaction Arm 17 1 18 1 19 1 Uniswivel Cap Drive Plate Retaining Ring Backup Ring Drive Plate Retaining Ring AV-20-30 AV-35-30 AV-50-30 AV-80-30 AV-130-30 20 1 Sq. Drive Set Screw AV-20-5A AV-35-5A AV-50-5A AV-80-5A AV-130-5A 21 1 Reaction Arm Set Screw AV-20-22 AV-35-22 AV-50-22 AV-80-22 AV-130-22 22 2 Uniswivel Cover Screw AV-10-13 AV-10-13 AV-10-13 N/A AV-10-13 23 1 Drive Pawl Spring Pin AV-20-40 AV-35-40 AV-50-40 AV-80-40 AV-130-40 23A 1 Drive Plate Dowl Pin AV-20-41 AV-35-41 AV-50-41 AV-80-41 AV-130-41 24 2 Drive Pawl Spring AV-20-27 AV-35-27 AV-50-27 AV-80-27 AV-130-27 25 2 Access Plug with O-Ring AV-20-02 AV-35-02 AV-50-02 AV-80-02 AV-130-02 26 1 Shroud Spring AV-20-59 AV-35-59 AV-50-59 AV-80-59 AV-130-59 27 1 Shroud Spring Screw AV-20-58 AV-35-58 AV-50-58 AV-80-58 AV-130-58 28 2 Disengagement Lever Screw AV-20-39 AV-35-39 AV-50-39 AV-80-39 AV-130-39 29 2 Shroud Screw AV-20-32 AV-35-32 AV-50-32 AV-80-32 AV-130-32 30 2 Reaction Pawl Pin Set Screw AV-20-65 AV-35-65 AV-50-65 AV-80-65 AV-130-65 31 1 Reaction Pawl Pin AV-20-43 AV-35-43 AV-50-43 AV-80-43 AV-130-43 32 1 Male Coupler 090155-1/4 090155-1/4 090155-1/4 090155-1/4 090155-1/4 33 1 Female Coupler 90156 90156 90156 90156 90156 34 1 Housing Seal Kit (Not Shown) AV-20-62 AV-35-62 AV-50-62 AV-80-62 AV-130-62 35 1 Uniswivel Seal Kit (Not Shown) AV-10-00 AV-10-00 AV-10-00 MXT-010-00 AV-10-00 36 1 MAINTENANCE KIT (Not Shown) MK-AV20 MK-AV35 MK-AV50 MK-AV80 MK-AV130 AV-130-63 AV-20-03 AV-35-03 AV-50-03 AV-80-03 AV-130-03 AV-10-001P AV-10-001P AV-10-001P N/A AV-10-001P AV-20-20 AV-35-20 AV-50-20 AV-80-20 AV-130-20 FOR MORE INFORMATION HYTORC Nederland BV | Platinawerf 8 - 6641 TL Beuningen - NEDERLAND | Tel: +31(0)24 - 3 660 660 | www.hytorc.nl HYTORC Benelux BVBA | Ysselaarlaan 65B - 2630 Aartselaar - BELGIË ENG- Usermanual Avanti.docx Version 2.5 / feb-14 | Tel : +32(0)38 - 705 220 | www.hytorc-benelux.be 17