1
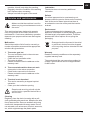
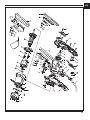
Precision Belt sander EFM4001 Manual ORIGINAL INSTRUCTIONS EN 10 Fig. A Fig. B 2 Fig. C EN Fig. D Fig. E Fig. F Fig. G Fig. H Fig. I Fig. J 3 EN Precision Belt sander Thank you for buying this Rhyas product. All our products are manufactured to the highest standards of performance and safety. As part of our brand commitment we provide excellent customer service and a 12 month warranty. We hope you will enjoy using this product for many years to come. The numbers in the following text refer to the pictures on page 2-3 ead the operating instructions R carefully before using this device. Familiarise yourself with its functions and basic operation. Service the device as per the instructions to ensure that it always functions properly. The operating instructions and the accompanying documentation must be kept in the vicinity of the device. Contents 1. Machine data 2. Safety instructions 3.Operation 4. Service and maintenance 1. Machine data Technical specifications Voltage Frequency Power input No load sander paper speed Sanding belt size Weight Lpa (Sound pressure) Lwa (Sound power level) Vibration 230-240 V~ 50 Hz 400 W 1070-1650 m/min 455x8 mm / 455x13 mm 1.32 kg 82+3 dB(A) 93+3 dB(A) 3.8 m/s2 K=1.5 m/s2 Vibration level The vibration emission level stated in this instruction manual has been measured in accordance with a standardised test given in EN 60745; it may be used to compare one tool with another and as a preliminary assessment of exposure to vibration when using the tool for the applications mentioned 4 - - using the tool for different applications, or with different or poorly maintainted accessories, may significantly increase the exposure level the times when the tool is switched off or when it is running but not actually doing the job, may significantly reduce the exposure level Protect yourself against the effects of vibration by maintaining the tool and its accessories, keeping your hands warm, and organising your work patterns. Product information Fig. A The sander has been designed for sanding wood, plastics and filler as well as painted surfaces. 1. On/Off switch 2. Lock-off button 3. Front handle 4. Wide arm 5. Belt tensioning lever 6. Belt tracking knob 7. Speed control 8. Dust bag 9. Narrow arm 10. Angled arm Contents of the package 1 Precision Belt sander 1 Wide arm 1 Narrow arm 1 Angled arm 12 Sanding belts 1 Dust collection bag 1 Instruction manual 1 Safety instructions 1 Guarantee card Check the machine, loose parts and accessories for transport damage. 2. Safety instructions Explanation of symbols enotes risk of personal injury, loss of D life or damage to the tool in case of nonobservance of the instructions in this manual. EN I ndicates the presence of an electrical voltage. lways check that the power supply A corresponds to the voltage on the rating plate. Wear safety goggles. Wear hearing protection. lass ll machine. Your machine is C double insulated; therefore no earthwire is required. Specific safety instructions Hold the machine by the insulated gripping surfaces where the accessory may contact hidden wiring or the mains cable. If the accessory contacts a ‘live’ wire, the exposed metal parts of the machine can also become ‘live’. Risk of electric shock. • • • • • • If you are working with the sanding machine, wear always ear protectors and dust mask. The sanding machine is not suitable for wet sanding. Check if the switch is not in position “ON”, before you connect the mains plug to the mains voltage. Keep the mains lead always away from moving parts of the tools. Use safety glasses, especially when you sand above your head. Do not bring pressure to your machine, this will only delay the sanding. ontact or inhalation of dust coming free C during sanding (e.g. lead painted surfaces, woods and metals), can endanger the health of operator and bystanders. Always wear appropriate personal equipment as a dust mask and use the dust bag during sanding. Immediately switch off the machine when: • Excessive sparking of the carbon brushes and verticiliosis in the collector. • Interruption of the mains plug, mains lead or mains lead damage. • Defect switch • Smoke or stench of scorched isolation Electrical safety When using electric machines always observe the safety regulations applicable in your country to reduce the risk of fire, electric shock and personal injury. Read the following safety instructions and also the enclosed safety instructions. Replacing cables or plugs Immediately throw away old cables or plugs when they have been replaced by new ones. It is dangerous to insert the plug of a loose cable in the wall outlet. Using extension cables Only use an approved extension cable suitable for the power input of the machine. The minimum conductor size is 1.5 mm2. When using a cable reel always unwind the reel completely. 3. Operation lways observe the safety instructions A and applicable regulations. Choice of the sand-paper Coarse sand-paper (grain 40) removes in general the bigger part of the material and fine sand-paper is used for the finishing. If the surface is not even, then start with rough sand-paper. Further you use middle coarse sand-paper(grain 80) to remove the scratches left behind by the coarse sand-paper and finally you take fine sand-paper (grain 120) for the finishing. efore assembly the sanding belt B always remove the plug from the mains. Mounting and removing the sanding arms Fig. B + C Removing the sanding arm • Move the belt tensioning lever (5) to the B position. • Loosen and remove the belt tracking knob (6). Caution! Be careful not to lose the spring. • Remove the spring (11). • Remove the sanding arm (4). 5 EN Mounting the sanding arm • Place the spring (11) in the mounting hole. • Position the sanding arm (4). • Tighten the belt tracking knob (6) until the sanding arm (4) is alligned with the tool. Do not set the speed during use. • Fitting and removing the sanding belt Fig. C Fitting the sanding belt • Move the belt tensioning lever (5) to the A position. • Make sure the arrows on the inside of the sanding belt face the same direction as the arrow (15) on the housing. • Slide the sanding belt through the slot in the housing. • Place the sanding belt over the rear (14) and front (13) pulley. • Move the belt tensioning lever (5) to the B position. Adjusting the sanding belt tracking Fig. D • Switch the machine on • Turn the tracking belt (6) as required until the sanding belt runs straight along the length of the sanding arm (4) Removing the sanding belt Fig. C • Move the belt tensioning lever (5) to the A position. • Slide the sanding belt off the pulleys. Switching on and off Fig. G • To switch on the machine in continuous mode, keep the lock-off button (2) pressed and press the on/off switch (1). • To switch off the machine, press the on/off switch (1) again. Setting the speed Fig. F The speed adjustment wheel is used for setting the speed. The speed adjustment wheel can be set to 6 positions. The ideal speed depends on the required grain size and on the material to be worked. • Mounting dustbag Fig. E A complete dust bag is enclosed. Put the wirebracket (inside the dust bag) into to the adapter of the dust bag (when not mounted). The end of the bracket has to point upwards. Use the dust bag to collect dust which is released during sanding. • • Put the dust bag on the dust collection opening Empty the dust bag regularly in order to obtain an efficient dust extraction. Grip The use of the belt sander is made easier because of the two grips one on the front side and one on the back. Through that you can hold the machine with two hands, you have a better control of the machine and there is less risk to becoming in touch with the moving parts. Hold the belt sander always with both hands. Operating instructions Make sure that the machine has reached its full speed before placing the machine on the work piece. This will prevent an overload of the machine. The wide arm is for general use, for slotting and for making joints. (Fig. H) The narrow arm is finer detail, for cutting and for carving. (Fig. I) The angled arm is for grooving and sanding in the centre of workpieces and in confined areas (A). Use section B for curved surfaces. (Fig. J) • • 6 Turn the speed adjustment wheel (7) to the required position. •For hard materials, use a sanding belt with a fine grain size and select a lower speed. •For soft materials, use a sanding belt with a coarse grain size and select a higher speed. After working for longer periods at low speed you should allow the machine to cool down by running it at maximum speed with no-load for approx. 3 minutes. Do not bend the sanding belts Do not bring too much pressure to your EN • • machine, this will only delay the sanding. Regularly check the condition of the sanding belt. Replace when necessary. Always sand with the grain of the wood. 4. Service and maintenance ake sure that the machine is not live M when carrying out maintenance work on the motor. This machine has been designed to operate over a long period of time with a minimum of maintenance. Continuous satisfactory operation depends upon proper machine care and regular cleaning. Malfunction Should the machine fail to function correctly, a number of possible causes and the appropriate solutions are given below: 1.The motor gets hot • The cool ventilation slots in the motor are stopped up with dirt. • Clean the cool ventilation slots. • The motor is defect. • Please contact the service address on the warranty card. Lubrication The device does not need any additional lubrication. Defects If a defect appears due to a part wearing out, please contact the service center on the warranty card. At the end of these instructions there is an exhaustive overview of the parts that can be ordered. Environment To prevent damage during transport, the appliance is delivered in a solid packaging which consists largely of reusable material. Therefore please make use of options for recycling the packaging. amaged and/or disposed of electrical D or electronic devices must be dropped off at recycling stations intended for that purpose. Warranty Read the warranty conditions on the separately supplied warranty card. The product and the user manual are subject to change. Specifications can be changed without further notice. 2.The connected machine does not work • Interruption in the mains connection. • Check mains connection for fracture. • Please contact the service address on the warranty card. 3.The dust is not absorbed • This can be caused by a stopped up dust extraction • Clean your dust collection opening epairs and servicing should only be R carried out by a qualified technician or service firm. Cleaning Regularly clean the device’s casing with a soft cloth, preferably after each use. Keep the fan slits free of dust and dirt. Remove stubborn dirt using a soft cloth, dampened with soapy water. Do not use solvents such as benzene, alcohol, ammonia, etc, which might damage the plastic parts. 7 EN Spare parts list PositionDescriptionNo. 104224Switch 9 104225 Speed control 10 104226 Rear pulley 13 104227 Wide arm 24 - 29 104228 Angled arm 27 - 29, 53 - 57 104229Spring 31 104230 Tracking knob 33 104231 Carbon brush holder 42 104232 Carbon brush set 43 104233 Narrow arm 49 - 52, 46, 47 8 EN 9 EN General Safety INSTRUCTIONS Warning! Read all instructions. Failure to follow all instructions listed below may result in electric shock, fire and/or serious injury. The term “power tool” in all of the warnings listed below refers to your mains operated (corded) power tool or battery operated (cordless) power tool. Save these instructions. 1) Work area a.Keep work area clean and well lit. Cluttered and dark areas invite accidents. b.Do not operate power tools in explosive atmospheres, such as in the presence of flammable liquids, gasses or dust. Power tools create sparks which may ignite the dust of fumes. c.Keep children and bystanders away while operating a power tool. Distractions can cause you to lose control. 2)Electrical safety a.Power tool plugs must match the outlet. Never modify the plug in any way. Do not use any adapter plugs which earthed (grounded) power tools. Unmodified plugs and matching outlets will reduce risk of electric shock. b.Avoid body contact with earthed or grounded surfaces such as pipes, radiators, ranges and refrigerators. There is an increased risk of electric shock if your body is earthed or grounded. c.Do not expose power tools to rain or wet conditions. Water entering a power tool will increase the risk of electric shock. d.Do not abuse the cord. Never use the cord for carrying, pulling or unplugging the power tool. Keep cord away from heat, oil, sharp edges or moving parts. Damaged or entangled cords increase the risk of electric shock. e.When operating a power tool outdoors, use an extension cord suitable for outdoor use. Use of a cord suitable for outdoor use reduces the risk of electric shock. Always use tool in conjunction with a residual circuit breaker device. 3) Personal safety a.Stay alert, watch what you are doing and use common sense when operating a power tool. Do not use a power tool while you are tired or under the influence of drugs, alcohol or medication. A moment of inattention while operating power tools may result in serious personal injury. b.Use safety equipment. Always wear eye protection. Safety equipment such as dust mask, non-skid safety shoes, hard hat, or hearing protection used for appropriate conditions will reduce personal injuries. 10 c.Avoid accidental starting. Ensure the switch is in the off position before plugging in. Carrying power tools with your finger on the switch or plugging in power tools that have the switch on invites accidents. d.Remove any adjusting key or wrench before turning the power tool on. A wrench or a key left attached to a rotating part of the power tool may result in personal injury. e.Do not overreach. Keep proper footing and balance at all times. This enables better control of the power tool in unexpected situations. f.Dress properly. Do not wear loose clothing or jewellery. Keep your hair, clothing and gloves away from moving parts. Loose clothes, jewellery or long hair can be caught in moving parts. g.If devices are provided for the connection of dust extraction and collection facilities, ensure these are connected and properly used. Use of these devices can reduce dust related hazards. h.Use clamps or a vice to hold work. It’s safer than using your hand and it frees both hands to operate tool. 4) Power tool use and care a.Do not force the power tool. Use the correct power tool for your application. The correct power tool will do the job better and safer at the rate for which it was designed. b.Do not use the power tool if the switch does not turn it on and off. Any power tool that cannot be controlled with the switch is dangerous and must be repaired. c.Disconnect the plug from the power source before making any adjustments, changing accessories, or storing power tools. Such preventive safety measures reduce the risk of starting the power tool accidentally. d.Store idle power tools out of the reach of children and do not allow persons unfamiliar with the power tool or these instructions to operate the power tool. Power tools are dangerous in the hands of untrained users. e.Maintain power tools. Check for misalignment or binding of moving parts, breakage of parts and any other condition that may affect the power tools operation. If damaged, have the power tool repaired before use. Many accidents are caused by poorly maintained power tools. f.Keep cutting tools sharp and clean. Properly maintained cutting tools with sharp cutting edges are less likely to bind and are easier to control. g.Use the power tool, accessories and tool bits etc., in accordance with these instructions and in the manner intended for the particular type of power tool, taking into account the working conditions and the work to be performed. Use of the power tool for operations different from intended could result in hazardous situation. EN h.Damaged switches must be replaced at a customer service repair centre. Do not use power tools that cannot be switched on and off. i.Do not leave power tools unattended while they are switched on. Always switch off the tool and wait until it has come to a full standstill before leaving. j.If the mains cable has been damaged, it must be replaced with a special mains cable. These can be obtained from the manufacturer or the manufacturer’s customer service department. The mains cable may only be replaced by the manufacturer, the manufacturer’s customer service department or equally qualified persons. c.Use power tools only with specifically designated battery packs. Use of any other battery packs may create a risk of injury and fire. d.When battery pack is not in use, keep it away from other metal objects like paper clips, coins, keys, nails, screws, or other small metal objects that can make a connection from one terminal to another. Shorting the battery terminals together may cause burns of a fire. e.Under abusive conditions, liquid may be ejected from the battery; avoid contact. If contact accidentally occurs, flush with water. If liquid contacts eyes, additionally seek medical help. Liquid ejected from the battery may cause irritations or burns. 5) Battery tool use and care a.Ensure the switch is in the off position before inserting battery pack. Inserting the battery pack into power tools that have the switch on invites accidents. b.Recharge only with the charger specified by the manufacturer. A charger that is suitable for one type of battery pack may create a risk of fire when used with another battery pack. 6)Service a.Please use a qualified expert who uses original replacement parts to repair your power tool. This will ensure proper functioning of the power tool. b.Caution! The use of any accessories or additional tools other than those recommended in this manual may lead to an increased risk of injury. Only use original replacement parts. DECLARATION OF CONFORMITY EFM4001 (EN)We declare under our sole responsibility that this product is in conformity with directive 2011/65/EU of the European parliament and of the council of 9 June on the restriction of the use of certain hazardous substances in electrical and electronic equipment is in conformity and accordance with the following standards and regulations: EN 55014-1, EN 55014-2, EN 60745-1, EN 60745-2-4, EN 61000-3-2, EN 61000-3-3 2006/42/EC, 2006/95/EC, 2004/108/EC, 2002/96/EC, 2011/65/EU Zwolle, 01-05-2014 W. Dekens CEO Mactool Industrial BV It is our policy to continuously improve our products and we therefore reserve the right to change the product specification without prior notice. Mactool Industrial BV • Lingenstraat 6 • 8028 PM • Zwolle The Netherlands 11 1406-05