1
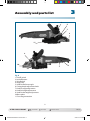
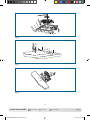
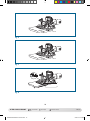
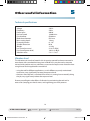
ONTENTS
ointer
g
uits included
900W biscuit jointer
Original manual
Now you have purchased a Workzone® product
you can rest assured in the knowledge that as
well as your 3 year parts and labour guarantee
you have the added peace of mind of dedicated
helplines and web support.
AFTER SALES SUPPORT
GB
IRL
0203-5142281
1800-719901
www.servotool.eu
MODEL: WBJ-900, 06/2012, 50932
BJM6003 Ma EN-IRL 1202-22.indd 1
1
YEAR WARRANTY
2/22/12 4:26 PM
Contents
03 Introduction
04 General Information and safety instructions
09 Assembly and parts list
14Instructions
18 Other useful information
22 CE Declaration
23 Warranty card
AFTER SALES SUPPORT
BJM6003 Ma EN-IRL 1202-22.indd 2
GB
0203-5142281
IRL
1800-719901
www.servotool.eu
WBJ-900
2/22/12 4:26 PM
AF
900
1
Introduction
Congratulations!
You have made an excellent choice with the purchase of this quality Workzone®
product. By doing so you now have the assurance and peace of mind which comes
from purchasing a product that has been manufactured to the highest standards of
performance and safety, supported by the high quality standards of ALDI. We want
you to be completely satisfied with your purchase so this Workzone® product is
backed by a comprehensive manufacturer’s 3 year warranty and an outstanding after
sales service through our dedicated Helpline. We hope you will enjoy using your
purchase for many years to come. If you require technical support or in the unlikely
event that your purchase is faulty please telephone our Helpline for immediate
assistance. Faulty product claims made within the 3 year warranty period will be
repaired or replaced free of charge provided that you have satisfactory proof of
purchase (keep your till receipt safe!). This does not affect your statutory rights.
However, be aware that the warranty will become null and void if the product is found
to have been deliberately damaged, misused or disassembled.
3
AFTER SALES SUPPORT
BJM6003 Ma EN-IRL 1202-22.indd 3
GB
0203-5142281
IRL
1800-719901
www.servotool.eu
WBJ-900
2/22/12 4:26 PM
General Information and
Safety Instructions
2
F or your own safety and that of others, we recommend that you read this
instruction manual carefully before using this machine. Keep this instruction
manual and the documentation provided with the machine for future reference.
Explanation of the symbols
enotes risk of personal injury, loss of life or damage to the tool in case of nonD
observance of the instructions in this manual.
Indicates electrical shock hazard.
Contact with or inhalation of dust generated during use (e.g. lead-painted
surfaces, wood and metal) can endanger your health and the health of
bystanders.Always wear appropriate protective equipment, such as a dust mask.
Always use proper dust extraction during use.
Wear safety goggles. Wear hearing protection.
General safety instructions
Warning! Read all instructions. Failure to follow all instructions listed below may result
in electric shock, fire and/or serious injury. The term “power tool” in all of the warnings
listed below refers to your mains operated (corded) power tool or battery operated
(cordless) power tool. Save these instructions!
1) Work area
a. Keep work area clean and well lit. Cluttered and dark areas invite accidents.
b. Do not operate power tools in explosive atmospheres, such as in the presence of
flammable liquids, gasses or dust. Power tools create sparks which may ignite the
dust or fumes.
c. Keep children and bystanders away while operating a power tool. Distractions can
cause you to lose control.
2) Electrical safety
a. Power tool plugs must match the outlet. Never modify the plug in any way. Do not
4
AFTER SALES SUPPORT
BJM6003 Ma EN-IRL 1202-22.indd 4
GB
0203-5142281
IRL
1800-719901
www.servotool.eu
WBJ-900
2/22/12 4:26 PM
AF
900
b.
c.
d.
e.
f.
use any adapter plugs with earthed (grounded) power tools. Unmodified plugs and
matching outlets will reduce risk of electric shock.
Avoid body contact with earthed or grounded surfaces such as pipes, radiators,
ranges and refrigerators. There is an increased risk of electric shock if your body is
earthed or grounded.
Do not expose power tools to rain or wet conditions. Water entering a power tool
will increase the risk of electric shock.
Do not abuse the cord. Never use the cord for carrying, pulling or unplugging the
power tool. Keep cord away from heat, oil, sharp edges or moving parts. Damaged
or entangled cords increase the risk of electric shock.
When operating a power tool outdoors, use an extension cord suitable for outdoor
use. Use of a cord suitable for outdoor use reduces the risk of electric shock.
If operating a power tool in a damp location is unavoidable, use a residual current
device (RCD) protected supply. Use of an RCD reduces the risk of electric shock.
3) Personal safety
a. Stay alert, watch what you are doing and use common sense when operating a
power tool. Do not use a power tool while you are tired or under the influence of
drugs, alcohol or medication. A moment of carelessness while operating power
tools may result in serious personal injury.
b. Use safety equipment. Always wear eye protection. Safety equipment such as dust
mask, non-skid safety shoes, hard hat, or hearing protection used for appropriate
conditions will reduce the risk of personal injuries.
c. Avoid accidental starting. Ensure the switch is in the off position before plugging in.
Carrying power tools with your finger on the switch or plugging in power tools that
have the switch on invites accidents.
d. Remove any adjusting key or wrench before turning the power tool on. A wrench or
a key left attached to a rotating part of the power tool may result in personal injury.
e. Do not overreach. Keep proper footing and balance at all times. This enables better
control of the power tool in unexpected situations.
f. Dress properly. Do not wear loose clothing or jewellery. Keep your hair, clothing and
gloves away from moving parts. Loose clothes, jewellery or long hair can be caught
in moving parts.
g. Use clamps or a vice to hold work. It’s safer than using your hand and it frees both
hands to operate the tool.
4) Power tool use and care
a. Do not force the power tool. Use the correct power tool for your application. The
correct power tool will do the job better and more safely at the rate for which it was
designed.
b. Do not use the power tool if the switch does not turn it on and off. Any power tool
that cannot be controlled with the switch is dangerous and must be repaired.
c. Disconnect the plug from the power source before making any adjustments,
changing accessories, or storing power tools. Such preventive safety measures
5
AFTER SALES SUPPORT
BJM6003 Ma EN-IRL 1202-22.indd 5
GB
0203-5142281
IRL
1800-719901
www.servotool.eu
WBJ-900
2/22/12 4:26 PM
reduce the risk of starting the power tool accidentally.
d. Store idle power tools out of the reach of children and do not allow persons
unfamiliar with the power tool or these instructions to operate the power tool.
Power tools are dangerous in the hands of untrained users.
e. Maintain power tools. Check for misalignment or binding of moving parts,
breakage of parts and any other condition that may affect the power tools
operation. If damaged, have the power tool repaired before use. Many accidents are
caused by poorly maintained power tools.
f. Use the power tool, accessories and tool bits etc., in accordance with these
instructions and in the manner intended for the particular type of power tool,
taking into account the working conditions and the work to be performed.
g. Damaged switches must be replaced at a customer service repair centre. Do not use
power tools that cannot be switched on and off.
h. Do not leave power tools unattended while they are switched on. Always switch off
the tool and wait until it has come to a full standstill before leaving.
i. If the mains cable has been damaged, it must be replaced by a suitably qualified
person with a special mains cable. These can be obtained from the manufacturer or
the manufacturer’s customer service department.
5)Service
a. Please use a qualified expert who uses original replacement parts to repair your
power tool.
b. Caution! The use of any accessories or additional tools other than those
recommended in this manual may lead to an increased risk of injury and may
invalidate your warranty. Only use original replacement parts.
Additional safety instructions.
•
•
•
•
•
•
•
•
•
•
•
Sawdust and splinters must not be removed while the machine is running.
Do not use cutting discs or circular saw blades in the machine.
Protect saw blades against shocks and impacts.
Only use properly sharpened blades, otherwise increased cutting forces will shatter
the work piece.
Before use, inspect the saw blade for any damage. Do not use saw blades which are
cracked, ripped or otherwise damaged.
Make sure that the work piece is sufficiently supported or clamped. Keep your hands
away from the surface to be cut.
Use the machine only with the auxiliary handle
When saw blades have to be mounted on the thread of the spindle, make sure that
the spindle has sufficient thread.
Make sure that the saw blade has been mounted and fastened properly. Do not use
reducing rings or adapters to make the saw blade fit properly.
Apply the machine to the work piece only when the machine is switched on.
When working with the machine always hold the machine firmly with both hands
and provide for a secure stance.
6
AFTER SALES SUPPORT
BJM6003 Ma EN-IRL 1202-22.indd 6
GB
0203-5142281
IRL
1800-719901
www.servotool.eu
WBJ-900
2/22/12 4:26 PM
AF
900
• Persons under 16 years of age are not permitted to operate this machine.
• Always wear safety goggles and hearing protection. If desired or required also use
another protection for example an apron or helmet.
• Always disconnect the plug from the socket before carry out any work on the
machine. Only plug-in when the machine is switched off.
• Keep mains lead clear from working range of the machine. Always lead the cable
away behind you.
• Do not stop the blade by hand after switching off.
• The base plate must not be clamped down while the blade is extended. Lowering
and raising the blade must be a smooth operation.
• Always use the protective shields on the machine.
• Use only cutting discs whose allowable speed is at least as high as the highest noload
speed of the machine.
Electrical safety
lways check that the voltage on the machine corresponds to the voltage on the
A
rating plate. Also check that your mains voltage corresponds to the input voltage
of the battery charger.
The machine is double insulated; therefore no earth wire is required.
• Do not use the machine if the mains cable or the mains plug is damaged.
• Only use extension cables that are suitable for the power rating of the machine with a
minimum thickness of 1.5 mm2. If you use an extension cable reel, always fully unroll
the cable.
Mains plug replacement
If the moulded 3-pin plug attached to the unit is damaged and needs replacing, it is
important that it is correctly removed and replaced by an approved BS 1363/13A fused
plug and that the following wiring instructions are followed.
The wires in the mains cable are coloured in accordance with the following code:
blue neutral
brown live
As the colours of the wires in the mains cable of the unit may not correspond to the
coloured markings identifying the terminals in the plug, proceed as follows:
• The wire which is coloured blue must be connected to the terminal which is marked
with the letter N or coloured black.
• The wire which is coloured brown must be connected to the terminal which is
marked with the letter L or coloured red.
7
AFTER SALES SUPPORT
BJM6003 Ma EN-IRL 1202-22.indd 7
GB
0203-5142281
IRL
1800-719901
www.servotool.eu
WBJ-900
2/22/12 4:26 PM
3
Assembly and parts list
3
5
7
4
11
8
10
1
6
9
2
Fig. A
1. On/off switch
2. Lock off button
3. Spindle lock
4. Angle stop
5. Scale for the fence angle
6. Cutting depth adjustment knob
7. Knob for angle adjustment
8. Knob for height adjustment
9. Scale for the height adjustment
10. Base plate
11. Dust bag connection
8
AFTER SALES SUPPORT
BJM6003 Ma EN-IRL 1202-22.indd 8
GB
0203-5142281
IRL
1800-719901
www.servotool.eu
WBJ-900
2/22/12 4:26 PM
AF
900
Fig. B
10 - 15
cm
10 - 15
cm
Fig. C
|
l l l
| l
ll
ll
l|
ll
| l l l l | l l
l l | l
l l l
| l
l l
l |
l l
ll
|
l
| l l l l | l l
l l | l
l l l
| l
l l
l |
l l
ll
|
l
Fig. D
AFTER SALES SUPPORT
BJM6003 Ma EN-IRL 1202-22.indd 9
GB
0203-5142281
IRL
|
l l l
| l
ll
ll
l|
ll
9
1800-719901
www.servotool.eu
WBJ-900
2/22/12 4:26 PM
l
| l l l l | l l
l l | l
l l l
| l
l l
l |
l l
ll
|
|
l l l
| l
ll
ll
l|
ll
|
l l l
| l
ll
ll
l|
ll
|
l l l
| l
ll
ll
l|
ll
| l l l l | l l
l l | l
l l l
| l
l l
l |
l l
ll
|
l
| l l l l | l l
l l | l
l l l
| l
l l
l |
l l
ll
|
l
Fig. E
| l l l l | l l
l l | l
l l l
| l
l l
l |
l l
ll
|
l
| l l l l | l l
l l | l
l l l
| l
l l
l |
l l
ll
|
l
Fig. F
|
l l l
| l
ll
ll
l|
ll
|
l l l
| l
ll
ll
l|
ll
4
5
4
5
Fig. G
10
AFTER SALES SUPPORT
BJM6003 Ma EN-IRL 1202-22.indd 10
GB
0203-5142281
IRL
1800-719901
www.servotool.eu
WBJ-900
2/22/12 4:26 PM
AF
900
l
| l l l l | l l
l l | l
l l l
| l
l l
l |
l l
ll
|
ll
l|
ll
4
5
Fig. H
Before assembly, always switch off the machine and remove the mains plug
from the wall outlet.
Part no
Description
102038
Saw blade screw M6x16
102039Flange
102040
Spindle lock
102041
Carbon brush set
102042Switch
102043Dustbag
Position
39
40
52 - 54 + 56 + 57
72
74
-
11
AFTER SALES SUPPORT
BJM6003 Ma EN-IRL 1202-22.indd 11
GB
0203-5142281
IRL
1800-719901
www.servotool.eu
WBJ-900
2/22/12 4:26 PM
12
AFTER SALES SUPPORT
BJM6003 Ma EN-IRL 1202-22.indd 12
GB
0203-5142281
IRL
1800-719901
www.servotool.eu
WBJ-900
2/22/12 4:26 PM
AF
900
Adjusting the cutting depth
Fig.A
• Move the motor base as far as possible backwards.
• Set the cutting depth by turning the cutting depth adjustment knob (6).
• Move the motor base forwards and check if the pin will fall in the notch of the
adjustment knob.
The following table shows the relationship of the markings on the adjustment knob
to cutting depth, thickness of material and associated biscuit dowel.
Marking Thickness of material
0
0 - 12 mm
10
12 - 15mm
20
>15 mm
M-
Biscuit dowel
No. 0
No. 10
No. 20
-
Cutting depth in mm
8.0
10.0
12.3
19.0
Adjusting the cutting angle
Fig. A
• The cutting angle can be set by unlocking the Angle adjustment knob (7) and put
the angle stop (4) in the required angle.
Adjusting the height
Fig. A
• The correct height can be set by turning the knob for the height adjustment (8) to
the desired height with aid of the scale (9).
• The height must corresponds to half of the material thickness of the working piece,
the groove for the biscuit dowel must always be in the middle of the working piece.
Prior to mounting an accessory always unplug the tool.
Mounting the saw blade
Fig. B
• Loosen the allen screw with the supplied allen wrench and open the top of the base
plate.
• Press the spindle lock and turn the spindle until it engages in the lock. Keep the
spindle lock pressed during this procedure.
• Remove the flange nut from the spindle using the wrench.
• Position the saw blade on the flange.
• Be aware that the arrow on the sawblade indicates the same direction as the arrow
on the inside of the housing.
• Place the flange nut on the spindle and tighten it with the wrench.
• The flange nut has two sides. One for sawblades with bore 20 mm and the otherside
for sawblades with bore 22 mm. Take care that the flange nut will be placed with
the correct side on the spindle.
13
AFTER SALES SUPPORT
BJM6003 Ma EN-IRL 1202-22.indd 13
GB
0203-5142281
IRL
1800-719901
www.servotool.eu
WBJ-900
2/22/12 4:26 PM
• Release the spindle lock and check that the spindle is unlocked by rotating it.
• Close the top of the base plate and fasten the allen screw with the supplied allen
wrench.
Make sure that the top of the base plate is securely closed before operating the
machine.
Mounting the dust bag
Fig. A
For dust extraction the dust bag can be used.
Insert the dust bag into the vacuuming connection (11). Empty the dust bag regularly
so that the vacuuming performance remains intact.
14
AFTER SALES SUPPORT
BJM6003 Ma EN-IRL 1202-22.indd 14
GB
0203-5142281
IRL
1800-719901
www.servotool.eu
WBJ-900
2/22/12 4:26 PM
AF
900
4
Instructions
Never use the spindle lock while the machine is working.
Switching on and off
Fig. A
• This machine is equipped with a safety switch. To switch the machine on, first press the
lock off button (2) and then press the on/off switch (1).
• To switch the machine off, depress the on/off switch, the switch will automatically move
to the ‘off’ position.
Never use the spindle lock to stop the motor.
Marking the workpieces
Fig. C
Before starting with the Biscuit Jointer the workpieces must be marked as following.
• Place the two workpieces, which must be connected, on top of each other.
• Fasten the workpieces and mark the center of the groove.
• The space between two grooves should be 10-15 cm, this doesn’t concerns for smaller
workpieces. Smaller workpieces don’t have to be marked.
Positioning of the machine
Based on the size of the workpieces the machine can be positioned in several ways.
Large workpieces
Fig. D
• Place the machine near the workpiece.
• The middle of the base plate (this point is marked on the base plate) must facing the
centre of the groove in the workpiece (see marking the workpiece).
Small workpieces
Fig. E
• Place the machine near the workpiece.
• The side of the machine must be facing the side of the workpiece.
Workpieces thinner than 16 mm
Fig. F
• Place the machine near the workpiece.
15
AFTER SALES SUPPORT
BJM6003 Ma EN-IRL 1202-22.indd 15
GB
0203-5142281
IRL
1800-719901
www.servotool.eu
WBJ-900
2/22/12 4:26 PM
• Place the adjustment plate on the angle stop (4).
• Take care for setting the height, the groove for the biscuit dowel must be in the middle of
the workpiece. For workpieces thinner than 16mm it is not possible to make the groove
for the biscuit dowel in the middle of the workpiece without the aid of the adjustment
plate.
Sawing grooves
•
•
•
•
•
•
Move the motor base backward.
Place the machine near the workpiece.
Position the machine (see positioning of the machine)
Hold the machine with both hands and switch the machine on.
Push the motor base carefully forward as far as possible.
Move the motor base backward and switch the machine off.
Move the machine in the same direction as the direction of rotation. See arrow on top
of the machine.
Joining the workpieces
When the grooves in both workpieces have been made the workpieces can be joined
together.
• Put glue in both grooves.
• Place the biscuit dowel in the groove of one workpiece.
• Place the other workpiece on the biscuit dowel.
• Fasten the workpieces and wait till the glue is dry.
User tip for connecting two workpieces
Fig. H
• Saw a groove as big as one biscuit into the first workpiece
• Place the biscuit with good glue (according the material) into the groove
• Saw a longer groove into the other workpiece
• Now both workpieces can be positioned easily towards each other (clearance to correct)
• Fasten the workpieces and wait till the glue is dry
Checking the cutting depth
Fig. G
Always check the cutting depth after mounting a saw blade.
• Disconnect the plug from the socket.
• Move the motor base as far as possible backwards.
• Set the cutting depth in the maximum position by turning the depth adjustment knob
(6).
• Move the motor base forwards till the pin will fall in the notch of the adjustment knob (7).
Turn the saw blade till one tooth of the saw blade is in the front position.
• Measure the distance from the side of the base plate to the tooth of the saw blade
16
AFTER SALES SUPPORT
BJM6003 Ma EN-IRL 1202-22.indd 16
GB
0203-5142281
IRL
1800-719901
www.servotool.eu
WBJ-900
2/22/12 4:26 PM
AF
900
• Check if the distance is 18 mm. the maximum position is 18 mm.
Setting the cutting depth
When the cutting depth is not correct, it can be adjusted as following.
• Move the motor base (15) as far as possible backwards.
• Loosen the pin.
• Set the cutting depth by turning the screw, the screw is positioned at the back of the pin.
• Repeat the procedure till the cutting depth is correct
• Fasten the pin.
These machines have been designed to operate over a long period of time with a minimum
of maintenance. Continuous satisfactory operation depends upon proper machine care
and regular cleaning.
Cleaning
Keep the ventilation slots of the machine clean to prevent overheating of the motor.
Regularly clean the machine housing with a soft cloth, preferably after each use. Keep the
ventilation slots free from dust and dirt. If the dirt does not come off use a soft cloth
moistened with soapy water. Never use solvents such as petrol, alcohol, ammonia water,
etc. These solvents may damage the plastic parts.
Lubrication
The machine requires no additional lubrication.
Faults
Should a fault occur, e.g. after wear of a part, please contact the service address on the
warranty card. On page 10 and11 of this manual you will find an exploded view showing
the parts that can be ordered.
Environment
To prevent damage during transport, the appliance is delivered in packaging which
consists largely of reusable material. Therefore please make use of options for recycling the
packaging.
F aulty and/or discarded electrical or electronic apparatus has to be disposed of at
the appropriate recycling locations. Do not dispose of power tools into domestic
waste. According to the European Guideline 2002/96/EC for Waste Electrical and
Electronic Equipment and its implementation into national right, power tools
that are no longer usable must be collected separately and disposed of in an
environmentally friendly way.
The product and the user manual are subject to change. Specifications can be changed
without further notice.
17
AFTER SALES SUPPORT
BJM6003 Ma EN-IRL 1202-22.indd 17
GB
0203-5142281
IRL
1800-719901
www.servotool.eu
WBJ-900
2/22/12 4:26 PM
Other useful information
5
Technical specifications
Voltage
Frequency
Power input
No-load speed
Disc diameter
Blade bore diameter
Max. cutting depth
Fence adjustment
Spindle dimension
Weight
Lpa (sound pressure)
Lwa (sound power level)
Vibration value
230 V~
50 Hz
900 W
10.800 /min
Ø100 mm
Ø22 mm
19 mm
0 - 1350
M10
3.12 kg
91.9 + 3 dB(A)
104.9 + 3 dB(A)
5.3 + 1.5 m/s2
Vibration level
The vibration emission level stated in this instruction manual has been measured in
accordance with a standardised test given in EN 60745; it may be used to compare
one tool with another and as a preliminary assessment of exposure to vibration when
using the tool for the applications mentioned
• u
sing the tool for different applications, or with different or poorly maintainted
accessories, may significantly increase the exposure level
• the times when the tool is switched off or when it is running but not actually doing
the job, may signifi cantly reduce the exposure level
Protect yourself against the effects of vibration by maintaining the tool and its
accessories, keeping your hands warm, and organizing your work patterns
18
AFTER SALES SUPPORT
BJM6003 Ma EN-IRL 1202-22.indd 18
GB
0203-5142281
IRL
1800-719901
www.servotool.eu
WBJ-900
2/22/12 4:26 PM
AF
900
Contents of packing
1 Biscuit Jointer
1 Saw blade
30 biscuits (10x0 + 10x10 + 10x20)
1 Wrench
1 Carbon brush set
1 Allen wrench
1 Dust collection bag
1 Instruction manual
1 Quick start guide
1 After sales support card
Check the appliance, any loose parts and accessories for damage caused during
transport.
19
AFTER SALES SUPPORT
BJM6003 Ma EN-IRL 1202-22.indd 19
GB
0203-5142281
IRL
1800-719901
www.servotool.eu
WBJ-900
2/22/12 4:26 PM
20
AFTER SALES SUPPORT
BJM6003 Ma EN-IRL 1202-22.indd 20
GB
0203-5142281
IRL
1800-719901
www.servotool.eu
WBJ-900
2/22/12 4:26 PM
AF
900
21
AFTER SALES SUPPORT
BJM6003 Ma EN-IRL 1202-22.indd 21
GB
0203-5142281
IRL
1800-719901
www.servotool.eu
WBJ-900
2/22/12 4:26 PM
CE DECLARATION OF
CONFORMITY
7
9
We declare under our sole responsibility that this product
WBJ-900, 900W biscuit jointer
is in conformity and accordance with the following standards and regulations:
EN60745-1, EN60745-2-19, EN55014-1, EN55014-2, EN61000-32, EN61000-3-3
2006/42/EC, 2006/95/EC, 2004/108/EC, 2002/95/EC, 2002/96/EC
01-01-2012
ZWOLLE NL
Authorized to compile the technical file:
I. Mönnink
CEO Ferm BV
It is our policy to continuously improve our products and we therefore reserve the
right to change the product specification without prior notice.
Ferm BV • Lingenstraat 6 • 8028 PM Zwolle • The Netherlands
22
AFTER SALES SUPPORT
BJM6003 Ma EN-IRL 1202-22.indd 22
GB
0203-5142281
IRL
1800-719901
www.servotool.eu
WBJ-900
2/22/12 4:26 PM
900W biscuit jointer
Your details:
name
address
E mail
Date of purchase*
* We recommend you keep the receipt with this warranty card
Location of purchase
Description of malfunction:
return your completed warranty card to:
Circuit Tech ltd.
Units 1/9 Stanley Mill • Kirkebrok Road • Deane,
Bolton, Lancs, England • BL3 4JE
aFTEr SalES SuPPOrT
GB
IRL
0203-5142281
1800-719901
www.servotool.eu
MODEL: WBJ-900, 06/2012, 50932
Contact and internet:
www.servotool.eu
Fax: (+44)(0)1204-659607
YEar WarranTY
900
BJM6003 Ma EN-IRL 1202-22.indd 23
2/22/12 4:26 PM
1202-16
BJM6003 Ma EN-IRL 1202-22.indd 24
2/22/12 4:26 PM