1
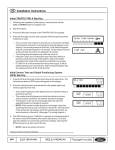
Our manufacturing plants have been producing and distributing pipe threading, drain cleaning machines, and core drill tools for over twenty years. Feel comfortable knowing that Steel Dragon Tools
are CE approved and government tested to the highest quality standards. We have controlled our
quality over the twenty years using the latest technology to build our tools. Our original production
plants are in Japan and Taiwan, and now we have manufacturing plants all over the world. We currently distribute products to our distributors in Asia, Europe, Africa, Australia and North America. Our
products are known worldwide for dependability reliability and universality.
Steel Dragon Tools distributes a wide range of pipe threading machines, parts, and accessories to many different markets around the world. SDT also manufactures a wide range of Handheld
pipe threading kits, pipe chain vices, drain cleaning machines / accessories, core drill rigs and core
drill bits.
One Year Warranty Program:
Steel Dragon Tools warrants to the original purchaser, which may include such brand names “Steel
Dragon Tools” to be free of manufacturing defects in material and workmanship for a period of 1
YEAR from the date of purchase by such user. The company you purchased this item from will decide
at its option, either repair or replace, free of charge; any product found to be defective upon company
inspection. Please contact your retailer for any questions or claims process.
I. Introduction
This machine is for threading of various water, electric or gas pipes ranging form 1/2”- 4”. It is efficient
and can be widely used in equipment installation and construction industries and is an ideal device
for increasing efficiency, shortening construction time, securing construction quality, and decreasing
working intensity. Read this manual carefully before using the machine.
Caution: The electric threader is for threading. Follow directions and instructions of the Electric
Threader User’s Manual to avoid danger to operate it.
II. Specifications:
● Range of Work: ½”-4” NPT
● Electric Motor : 2 Speed 60hz Heavy Duty 110 volt 750 Watt
● Die Rockwell Hardness (HRC) 58-62
2
www. steeldragontools.com
● Maximum Rotation Speed: 24 RPM
● Maximum Chuck Capacity: 4.925 inches or 125mm
● Sledge Travel: 7 inches or 180 mm
● Dimensions: 36” (L) x 22” (H) x 17” (D)
● Weight: 425 lbs or 193 KG
III. Special Safety Requirements
1. Keep the working site clean and bright for disorder and darkness may cause accidents.
2. Do not expose the machine to the rain or operate it in moist workshops to avoid electric shock.
3. Operators are only allowed to wear tight clothing. Operators should take off the gloves, jewelry,
watch or likewise and should not loosen his or her long hair without permission.
4. When the threading machine (including its accessories) is installed in the working site, use only the
30mA leakage resistance switch.
5. The following is forbidden when the machine is running:
● Touching or grabbing the workpieces.
● Replacing or removing components (pipe accessories, livers, or pipes etc)
● Cutting or sawing pipes using hand tools.
6. If the dangerous areas in the machine or its workpieces can not be examined closely, the spinning
workpieces or the dangerous areas should be protected. The protective devices must be reliably and
stably placed. The supporting devices must be stable if they are used. Install three support legs and
adjust three screws to ensure height and stability.
7. Keep children away when the machine is running. They are forbidden to operate the machine or
drag the cables and wires.
8. Avoid overload operation. The unsuitable accessories, overload operation and blunt or damaged
screwing die must not used for fear that the machine would be damaged.
9. Extending too long pipes to operate the machine is forbidden. Keep this machine balanced and
stable all the time. Calculate the danger caused by suddenly-broken workpieces (based on the
length of the workpieces, the section, the material and the rotational speed) and use enough supports
to avoid danger.
10. Maintain this machine with care. Lubricate the machine and replace the accessories according
to the instructions of this manual to make it more safely operated. Check the cables of this machine
regularly. If there is any danger, it must be repaired by the technician. Keep various handles clean
and tidy all the time. Keep them out of oil pollution.
11. Turn the power off. Pull the attaching plug out when the machine is not in use.
12. Starting the motor carelessly is forbidden. Make sure the switch is at the position of “off ” before
the plug is connected with the machine.
13. Do not operate the machine when the operator is tired, or if he has touched any drugs.
14. Check the damaged spares: Check any cutting tools and spares carefully before using them,
and see if they are in normal working condition and able to function. Any damaged spares must be
repaired and replaced by the specially trained technicians.
15. Operation is forbidden when any switch can not be properly turned on or off.
IV. Directions
Unpacking: When Unpacking the case, check if the accessories below are attached:
1. One barrier of cutting oil (5 liters);
2. Two sets of screwing dies in a tool box (4 pieces each set);
www.steeldragontools.com
3
3. One inner hexagon spanner and one screwdriver;
4. One set of die head ranging from 21/2 – 4 inches;
5. One support leg.
Assembling:
1. Put the accessories aside and install the support leg into the hole at the bottom of the machine;
2. Fasten it with the screw safely and reliably;
3. Suspend the threader and make it stable with supporting legs and ready for use.
Preparations to threading:
Replacinging screwing die with the correct size screwing die. There are three sets of screwing dies,
each of which threads different pipes: 1/2” - 3/4” 14 threads/inch, 1” - 2 “ 11 threads/inch, and 2 1/2”4” 11 threads/inch
1. Select a set of screwing die that matches the diameter of the pipe. There are two groups of figures
on each screwing die, one of which represents its specification; another representing the assembly
sequential numbers (such as 1, 2, 3, 4).
2. Remove the die head from the sledge (Fig.1), loosen the nut of the handle, turn the curve disk
around to the maximal position of the scale.
3. Put the selected screwing dies into die grooves according to their sequential numbers, and its lock
notch will fit curved disk. Then pull the curved disk until the scale indicatrix of the curved disk points at
the scale on the ruler of the job. Then the screwing die is fixed.
Note: 1/2”-3/4“, 1”-2“ dies are installed in small die head, while 2 1/2”- 4” ones in big die head.
4. Place the assembled die heads on the sledge.
5. Turn the adjustable plate to the position as required (see Fig. 3)
Check cutting oil:
1. Check whether there is enough cutting oil in the tank;
2. Add oil when needed through the oil disk;
3. Cutting oil will overflow over the die head after the machine starts;
Note: Use thread cutting oil only to ensure to produce high-quality threads.
4
www. steeldragontools.com
Threading operation:
1. Any operation requiring non-rotating condition should be done only when the machine stop running;
2. Rotate the fore and rear chucks clockwise. Then loosen three claws, install the pipe from beside
the rear chuck, make it pass through the fore chuck and extend by 100 mm.
3. Hold the pipe in right hand, and fix it by wheeling tight the fore and rear chucks, and then
moderately tighten the hammer disk by hammering it counterclockwise (see Fig. 4);
4. Pull up the cutting knife rack and beveling rack to make room. Then push down the screwing die
head, make it touch the copying block (see Fig. 5), and lock it tight with locking pin. Push the button
to start the machine after the die head is fixed in its proper position.
Caution: To keep the machine in order, gear shift hand should be placed at the position of the bottom
gear when threading the pipes with a diameter bigger than two inches, otherwise, place the gear shift
hand on the position of the top gear (see Fig. 6).
5. Turn the Machine on pressing the forward button, rotating the pipe counter clockwise. Then rotate
the sledge handle moving the die head towards the pipe.
6. Apply force on the sledge hand wheel until 3 - 4 threads are made on the pipe.
7. Stop applying force. The machine begins to thread automatically until the roller of the die head
passes the copying block and falls down.
Caution: Two steps should be followed when threading the pipes with a diameter bigger than 2
www.steeldragontools.com
5
inches. Firstly, place the scale indicatrix one scale lower than the scale required; secondly, make the
scale indicatrix point to the scale required.
8. Stop the machine, quit the die head to the right unused position.
9. Loosen the fore and rear chucks clockwise, and remove the pipe from the rear chuck.
Cutting the pipe:
1. Pull up the die head and the beveling device so that the fore and rear chucks fasten the pipe.
2. Push down the cutting knife rack and rotate the handle. Open the rack to let the cutting knife roller
straddle on the pipe.
3. Rotate the sledge handle to move the cutting knife to the cutting position (see Fig. 8)
4. Rotate the cutting knife handle to move the cutting knife to the pipe.
5. Start the machine. Switch the gear shift hand to the top gear and make the knife cut into the pipe.
Cut about 0.15 – 0.25 mm for one turn of the pipe, i.e. for each turn of the basic shaft the cutting knife
handle forwards about 1/10 turn. Quit the cutting knife and pull up the rack to its position after cutting.
Caution: Cut with moderate speed and force to avoid the distortion of the pipe and the damage of the
cutting knife.
Inner diameter beveling:
1. Pull up the screwing die head and cutting knife rack and push down the beveling rack to make the
fore and rear chucks fasten the pipe.
2. Start the machine. Move the gearshift hand to the top gear. Rotate the sledge hand wheel and
drive the beveling device to the inside of the pipe.
3. Stop the machine after the beveling. Move the beveling rack to its position.
V. Maintenance:
1. Turn the master switch to the “off” position or unplug the power when the machine is maintenanced.
2. The shell of this machine is cast with a whole piece of aluminum alloy. Its reduction gearbox keeps
lubricating permanently. Do not impact the shell violently.
3. Cooling oil system: Clean the oil filter disk and oil suction filter disk after running for 8 – 12 hours.
Clean the oil tank and refill if the oil is dirty or turns black.
4. Small iron filings may fell into the oil tank when threading. It is therefore essential to clean the filter
disk once a week to keep the machine in order.
6
www. steeldragontools.com
5. Check the cutting blade each week. Replace it when it is blunt.
6. Check the attrition of the claw points in the claw one a month. If the claw points are worn, replace
them (three each set) to ensure to produce the threads of high quality.
7. Clean screwing dies and die heads every shift. Check if the teeth of the screwing die are broken.
If they are, remove the cuttings between the teeth. If the die is already broken, replace a set of dies
instead of the broken one only.
8. There are two oil cups on the shell of main shaft. Oil at least twice each shift to lubricate the fore
and rear bearings.
9. Unplug the power when the machine is not in use. Coat corrosion resistant oil on both fore and rear
guideposts and other working surfaces. Store it in a dry and airing place.
VI. Problem and Remedy
Problem
The motor does not run or makes
breaking sounds when running.
The pipe can not be fastened or it
slips when threading.
The cutting knife can not cut.
The cutting dies don’t work when
threading.
The fore chuck body is loose.
The main shaft heats up.
The cooling oil can not be sufficiently provided.
The cooling oil leaks into the motor.
Cause
The fuse is blown.
A poor power contact
The inside of the cable is broken.
Electric capacity is broken down.
Less forceful stroke.
The claw point is upside-down.
One of claw points is broken.
Cutting knife is worn and dull.
The roll of the knife is worn down.
Applying not enough force when
starting to cut.
The dies don’t open wide enough.
A few teeth of the dies are broken.
Size of the die is not right.
Filings in the grooves of the dies.
M6 bolts are loose.
Lack of oil
The oil circuit is blocked.
The oil hole is not installed properly after the fulcrum shaft of the
screwing die head is removed.
The oil in the oil pump has leaked
out.
The oil seal of the oil pump PD8 x
22 x 8 has been damaged.
www.steeldragontools.com
Remedy
Replace the fuse.
Replace the plug wire.
Locate break with a multimeter.
Replace the electric capacity.
Hammer with force.
Adjust the claw point.
Replace the claw point.
Replace the blade.
Replace the pin roll.
Cut with force.
Use the die head properly.
Replace the dies.
Reinstall the knife.
Clean the screwing die head.
Check at all times.
Oil regularly.
Remove the beam barrel and
scratch the shaft.
Clean the oil circuit.
Reinstall it.
Fill some cooling oil in the oil
pump.
Replace the oil seal.
7