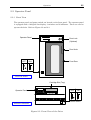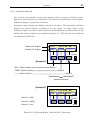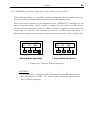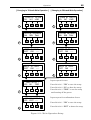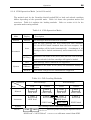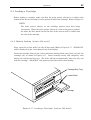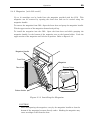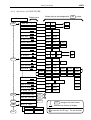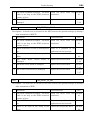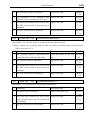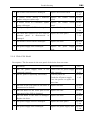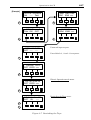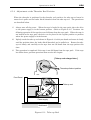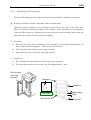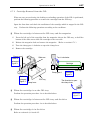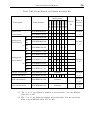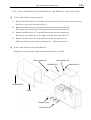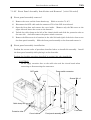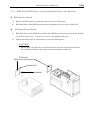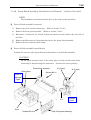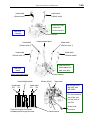
1
MS-8400 Series
MP-8400
Series
1 2 inch Cartridge Tape Subsystem
Maintenance Manual
KAS-M009-004
Thank You For Your Use.
Revision : 5.20
6/30/1999
# All company names and brand names used in this manual are the registered
trademarks, trademarks and product names of the respective companies.
# The contents of this manual are subject to change without notice.
#
The contents of this manual may not be reproduced or quoted without the
express written permission of this company.
i
Table of Contents
Page
Table of Contents
i
List of Tables
iii
List of Figures
iii
Accessory and Contents List
vi
Revision Record
viii
Chapter 1 GENERAL DESCRIPTION
1.1 Overview
1
1.2
Features
1
1.3
Model Name
2
1.4
Specifications
3
Chapter 2 OPERATION
2.1 Inspecting the Cartridge
9
2.2
Operator Panel
11
2.3
Powering Up
20
2.4
Loading a Cartridge
27
2.5 Unloading the Cartridge
34
~36
Chapter 3 MAINTENANCE
3.1 Cleaning the Tape Head
3.2 Repairing the Leader Block
3-
1
3-
2
~ 2
Chapter 4 INSTALLATION and SETUP
4.1 Installation
4-
1
3
4.2
Setup
4-
4.3
Diagnostics
4 - 10
4.4
Hierarchic Structure of Setup
4 - 12
~16
Comments :
The most part of contents in this page is same as the User Manual.
ii
( Table of Contents 2 )
Page
4.5
Detail of the Setup Items
4 - 17
~20
Chapter 5 TROUBLE SHOOTING
5.1 Error Display
5-
1
5.2 Countermeasures
5-
1
5.3
Error Code and Processing
5-
4
5.4
Control Circuit Board (Control Function Block) Errors
5-
7
5.5
Control Circuit Board (Formatter Function Block) Errors
5 - 38
5.6
SCSI Circuit Board Errors
5 - 49
5.7
Servo Circuit Board Errors
5 - 60
5.8
CSL Circuit Board Errors [with CSL model]
5 - 72
5.9
Other Errors
5 - 79
~84
Chapter 6 OPERATIONS for the CE
6.1 Firmware
6-
1
6.2
Drive Adjustment Procedures
6 - 10
6.3
Unloading by Electric Operation Part-1
6 - 12
6.4
Unloading by Electric Operation Part-2
6 - 14
6.5
Unloading by Manual Operation
6 - 21
6.6
CSL Adjustment Procedure
6 - 29
6.7
CSL Operation by Manual Operation
6 - 35
6.8
CSL Maintenance
6 - 38
6.9
Error Logs
6 - 41
~44
Chapter 7 Parts Installation and Removal
7.1 Parts Configuration
7-
1
9
7.2
Tools for Maintenance, Installation and Removal
7-
7.3
Major Parts Installation and Removal
7 - 10
~27
iii
[ List of Tables ]
Page
10
Table 2-1
Tape Length
Table 2-2
“Status-Line” Display (Part 1)
13
Table 2-3
“Status-Line” Display (Part 2)
14
Table 2-4
“Status-Line” Display (Part 3)
15
Table 2-5
“2-Line-Message” Display
16
Table 2-6
“Switch-Line” Display and Switch Function
18
Table 2-7
Indicators
19
Table 2-8
CSL Operation Mode
26
Table 2-9
CSL Loading Methods
26
Table 2-10
Cartridge Loading Sequence
31
Table 4-1
Setup Values
4-
4.5.1
Setup Items for SCSI
4 - 17 #
4.5.2
Setup Items for DRIVE
4 - 18 #
4.5.3
Emulation Mode
4 - 20 #
Table 5-1
4 digit Error Codes
5- 2
Table 5-2
Error Processing
5- 3
Table 5-3
Error Code Jump Guide
5- 6
6.1.2
Firmware Revision
6- 2 #
6.1.3
Hardware Revision
6- 4
Table 6-51
Error Log Items
6 - 41
Table 7-1S
Parts Configuration [without CSL model]
7- 3
Table 7-1C
Parts Configuration [with CSL model]
7- 4
Table 7-2A
Common Assembly Kit
7- 5
Table 7-2B
Circuit Boards in Common Assembly Kit
7- 6
Table 7-2C
CSL Common Assembly
7- 7
Table 7-3
SCSI panel
7- 8
Table 7-4
Tool List
7- 9
Figure 2-1
Half-inch Tape Cartridge
Page
9
Figure 2-2
Front View of the Drive
11
Figure 2-3
Operator Panel
12
Figure 2-4
Rear View of the Drive
12
Figure 2-5
Relationship of “Switch-Line” Positions
17
3
[ List of Figures ]
iv
Figure 2-6
On-line Mode to Off-line Mode
21
Figure 2-7
Off-line Mode to On-line Mode
21
Figure 2-8
Switching the Recording Format
22
Figure 2-9
Current Write Operation
23
Figure 2-10
Write Operation Setup
25
Figure 2-11
Door Lock
28
Figure 2-12
Installing the Magazine
29
Figure 2-13
Inserting a Cartridge
30
Figure 2-14
Slot Number Select
32
Figure 2-15
Completion of the Loading
33
Figure 2-16
Unloading the Cartridge
35
Figure 2-17
Loading a Cartridge [without CSL model]
27
Figure 4-1
SCSI Cable Connection
4-
2
Figure 4-2
SCSI ID Setup
4-
5
Figure 4-3
Emulation Mode Setup
4-
7 #
Figure 4-4
CSL Operation Mode Setup
4-
9
Figure 4-5
Write-Test Procedure
4 - 11
4.4.1
General Structure
4 - 12
4.4.2
Structure of CONFIGURE
4 - 13 #
4.4.3
Structure of DIAGNOSTICS
4 - 14 #
4.4.4
Structure of STATISTICS
4 - 15 #
4.4.5
Structure of CSL DIAGNOSTICS
[with CSL model]
4 - 16 #
Figure 6-1A Firmware Diagram
6- 1
Figure 6-1B Current Firmware Revision
6- 3
Figure 6-1C Current Hardware Revision
6- 5
Figure 6-2A Firmware Update
6- 7
Figure 6-2B Standard Setup Values
6- 9 #
Figure 6-3
Drive Adjustment Procedures
6 - 11
Figure 6-4
Unloading and Error Recovery
6 - 13
Figure 6-5
Tape Path
6 - 14
Figure 6-6
Flowchart of Unloading by Electric Operation
6 - 15
Figure 6-7
Rewinding the Tape
6 - 17
Figure 6-8
Adjustment at the Threader Reel Position
6 - 18
Figure 6-9
Return to the Threader Home Position
6 - 19
Figure 6-10
Raising the Tray
6 - 20
Figure 6-11
Flowchart of Unloading by Manual Operation
6 - 22
Figure 6-12
Bottom View
6 - 23
Figure 6-13
Take-up Reel
6 - 24
v
Figure 6-14
Threader
6 - 25
Figure 6-15
Elevator Mechanism
6 - 26
Figure 6-16
Tape Path and Tape Guide
6 - 27
6.6.1
Adjustment of the CSL Tray Home Position
6 - 29
6.6.2
Adjustment of the Drive Horizontal Position
6 - 30
Figure 6-17
CSL Home Position Mode
6 - 32
6.6.4
Checking the Front Panel
6 - 33
6.7.1
Releasing the Magazine Lock
6 - 35
6.7.2
Vertical Moving the CSL Tray
6 - 36
6.7.3
Cartridge Removal from the CSL
6 - 37
6.8.1
CSL tray
6 - 38
6.8.2
Up-down mechanism assembly
6.8.3
Magazine
Figure 6-51
Error Log Display
6 - 43
Figure 7-1S
Block Diagram [without CSL model]
7- 1
(Maintenance)
(Maintenance)
(Maintenance)
Figure 7-1C Block Diagram [with CSL model]
7.3.1S
7.3.1C
7.3.2S
7.3.2C
6 - 40
7- 2
Cover and Chassis Top Installation and Removal
[without CSL model]
7 - 10
[with CSL model]
7 - 11
Front Panel Assembly Installation and Removal
[without CSL model]
7 - 12
[with CSL model]
7 - 13
7.3.3
SCSI Panel Installation and Removal
7.3.4S
Power Block Assembly Installation and Removal
[without CSL model]
7.3.4C
6 - 39
7 - 14
7 - 15
Drive Installation and Removal
[with CSL model]
7 - 16
7.3.5
Thread Plate Assembly Installation and Removal
7 - 18
7.3.6
FRU Installation and Removal
7 - 19
7.3.7
Major Circuit Boards Installation and Removal
7 - 22
7.3.8
Fuse Replacement
7 - 26
7.3.9
Power Supply Unit Installation and Removal
[with CSL model]
7 - 27
vi
[ Accessory and Contents List ]
Accessory and Contents
Quantity
1
User Manual
1
2
Power Cable
1
3
SCSI Cable
4
SCSI Terminator
1
5
Clamp Filter
2
6
Cartridge
1
7
Cleaning Cartridge
1
8
Key
Comments
Option
(2)
for test purposes
Option
(with CSL model)
vii
[ Notes ]
viii
[ Revision Record ]
Revision
Date
2.11
Apr, 1997
3.10
Sep, 1997
5.00
02/20/1998
5.10
Manual
(1)
U
U
05/20/1998
All pages
Description
Initial Release
M All pages
Change the all pages.
M Chapter 1,2,4
Change these pages.
Section 3.3
Move to section 6.8 and change these
pages.
Section 4.5
Add the new section.
Section 5.4 to 5.9
Change part of the pages.
Section 5.6
Add the new error codes.
Section 6.1
Change these pages.
M Section 6.2 to 6.5
U
5.20
Page or Section
Correct part of the pages.
Section 6.6 to 6.7
Change these pages.
Section 6.9
Add the new section.
Section 7.1
Change these pages.
Section 7.2
Change part of the pages.
Section 7.3
Change these pages.
Section 7.4
Deleted section.
Section 2.3.5
Add the “FORCE” operation.
M Section 4.2.2
Change the password entry.
06/30/1999
M
Section 4.4
Change the menu items.
Section 4.4.5
Add the new section.
Section 4.5
Change the menu items.
Section 6.1 to 6.2
Correct part of the pages.
Section 6.1.5
Change the password entry.
(1) “U” is for the User Manual, “M” is for the Maintenance Manual.
General Description
1
Chapter 1 GENERAL DESCRIPTION
1.1 Overview
The MS-8418 is a 18 track, 1/2 inch cartridge tape drive that is fully compatible with the
IBM 3480/3490.
The MS-843x is a 36 track drive fully compatible with the IBM 3490E.
Both drives are equipped with the industry standard SCSI interface, which enables
simple connection to computers. In addition, both drives support IDRC, the industry
standard for data compression. Average of 600MB of data can be stored onto a cartridge
with the MS-8418 and average of 2.4GB can be stored with the MS-843x using the
extended cartridge (332m tape).
The device quipped with a Cartridge Stack Loader(CSL) that can store up to 10 cartridges
for continuous automatic loading.
1.2 Features
These tape drives have the following features (the features differ depending on the
specifications).
High-speed Backup
Continuous data transfers are possible at a speed of 6MB/sec., even without the use of
compression. Maximum burst transfer speed is 20MB/sec.
Large-volume Backup
An average of 24GB of data can be stored per 10 cartridges when IDRC compression is
used.
Compatibility
The drives are compatible with IBM 3480/90/90E, thus facilitating the exchange of data
with host computers.
Easy Connection
The SCSI-2/3 interface is used for easy connection to work stations, personal computers
and other types of computers.
Expandability
The drive firmware is stored in the flash ROM; to improve the functions, firmware
updates are also possible from tape. The 18-track specifications can be changed to 36track specifications and the SCSI-2 specifications can be changed to SCSI-3, etc.
2
General Description
10 cartridges Magazine [with CSL model]
Up to 10 cartridges can be loaded into the removable magazine. Separate magazines
can be used for different applications and for portability.
1.3 Model Name
1.3.1 Model Names by Track Specification
Track Specifications
MS-8418
Tape Speed
Standard Speed
MS-843x
18 track Drive
18/36 track Drive
36 track Drive
MS-8418
MS-843E
MS-8436
MS-843F
MS-843H
MS-843M
MS-843D
Double Speed
1.3.2 Model Names by SCSI Specification
Model Name
SCSI Connector Specifications
LS
Low-density 50pin (Amphenol)
NS
Hi-density 50pin
MS-8418
WS
Hi-density 68pin (Wide SCSI)
MS-843x
LD
Low-density 50pin (Amphenol)
ND
Hi-density 50pin
WD
Hi-density (Wide SCSI)
SCSI Electrical Specifications
Single-ended
Differential
1.3.3 Model Names by CSL Specification
Model Name
MS-8418##MS-843x##Marks :
Door Specification
D1, X1 or Z1
without CSL model
DA, XA or ZA
with CSL model (no door lock)
DL, XL or ZL
with CSL model (door lock included with key)
“##” as the model names by SCSI specification.
3
General Description
1.4 Specifications
1.4.1 Performance Specifications
Number
Parameter
MS-843x
MS-8418
Standard Speed
Read / Write
Tape Speed
Rewind
1
Speed Variation
2
4
(79 ips)
(157 ips)
4 m/s
6 m/s
(157 ips)
(236 ips)
4%
(Long Term)
7%
(Short Term)
100 ms
200 ms
(Standard)
Rewind
200 ms
600 ms
Load Time
(average)
20 sec [without CSL model]
45 sec
35 sec
(1)
Data Transfer Rate
(tape head)
6
Block Size (max.)
7
Data Buffer Size
8
Cartridge Loader
45 sec
3 sec (from EOT)
18 track
Interface
(SCSI synchronous)
[with CSL model]
90 sec
45 sec
Read / Write Head
Burst Transfer Rate
[with CSL model]
18 sec [without CSL model]
Unload Time (average)
(SCSI asynchronous)
(1)
4 m/s
Read / Write
Burst Transfer Rate
5
2 m/s
Access Time
Rewind Time (max.)
3
Double Speed
36 track
Fast SCSI - 2
(A Cable)
SCSI - 3
(P Cable)
(Single-ended or Differential)
5 MB/s (Narrow:8 bit)
10 MB/s
(Wide:16 bit)
10 MB/s (Narrow:8 bit)
20 MB/s
(Wide:16 bit)
3 MB/s
6 MB/s
256 kB
2 MB
10 cartridges in the Removal Magazine
[with CSL model only]
Equipped with one type of interface per your specification. Refer to section 1.3.2.
4
General Description
1.4.2 Read/Write Operation
Number
MS-8418
Parameter
MS-843x
18 track Drive
18/36 track Drive
36 track Drive
18-track Format
1
Write Operation
(2) 36-track Format
18-track Format
36-track Format
2
Read Operation
18-track Format
18-track Format
36-track Format
(2) The 18-track write operation is IBM compatible but does not conform to
ANSI.
Use caution when exchanging data with the drives of other
companies.
1.4.3 Format Specifications
Number
Parameter
Uncompressed
Recording
Format
Compressed
1
Compression Mode
Error Correction
2
Record Density
3
Medium Length
4
18-track Format
36-track Format
IBM 3480
IBM 3490E
Compatible
Compatible
(ANSI X3B5)
(ANSI X3B5)
IBM 3490
IBM 3490E
Compatible
Compatible
(ANSI X3B5)
(ANSI X3B5)
IBM IDRC Compaction Compatible
(Improved Data Recording Capability)
Cross Parity
1491 cpmm
165 m
(541 ft.)
Reed Solomon
(37871 bpi)
165 m
(541 ft.)
332 m
(1100 ft.)
Capacity :
Uncompressed
200 MB
(max.)
800 MB
(max.)
1 cartridge
Compressed
600 MB
(3:1)
2.4 GB
(3:1)
Capacity :
Uncompressed
2 GB
(max.)
8 GB
(max.)
10 cartridges
Compressed
6 GB
(3:1)
24 GB
(3:1)
5
General Description
1.4.4 Reliability Specifications
Number
Parameter
Specification
1
MTBF
30000 hours
(25% duty cycle)
2
MTTR
Under 30 minutes
3
Head Life
3000 hours
(Tape motion)
1.4.5 Power Specifications
Number
Parameter
Specification
100 to 120 V, AC
1
Voltage
2
Line Frequency
50/60 Hz
3
Power Consumption
110 W
220 to 240 V, AC
(Automatic ranging)
1.4.6 Environmental Specifications
Number
1
Parameter
Operating
2
Operating
3
Non-operating
4
Non-operating
Specification
Dry Bulb Temperature
10°C to 40°C
Temperature Gradient
10°C / hour
Wet Bulb Temperature
Max. 26°C
Relative Humidity
20% to 80%
Humidity Gradient
20% / hour
Dry Bulb Temperature
-10°C to 60°C
Temperature Gradient
10°C / hour
Relative Humidity
5% to 95%
Humidity Gradient
20% / hour
(non-condensing)
(non-condensing)
NOTE
The applicable proposed ANSI specification for half-inch tape cartridge
requires operation in the range of 16°C to 32°C, 20% relative humidity and a
maximum wet bulb temperature of 25.6°C. Operation of this device beyond
these limits may result in a degradation of media reliability.
6
General Description
1.4.7 Acoustical Noise
Number
Parameter
without CSL model
with CSL model
1
Power-on Idle
55 dB A (max.)
50 dB A (max.)
2
Operating
55 dB A
55 dB A
3
Load / Unload
55 dB A (max.)
(max.)
(max.)
70 dB A (max.)
Machine Noise
Sound power level : less than 70 db (A) according to DIN45635 part 19 (EN27779).
Maschinengeräusche
Geräuschpegel : weniger als 70 db (A) entsprechend DIN45635 Teil 19 (EN27779).
1.4.8 Mechanical Specifications
Number
1
Parameter
Dimensions
without CSL model
with CSL model
Height
176 mm
(6.9 in.)
429 mm
(16.9 in.)
Width
281 mm
(11.1 in.)
227 mm
(8.9 in.)
Depth
387 mm
(15.2 in.)
649 mm
(25.6 in.)
2
Weight
15 kg
(33 lb.)
29 kg
(64 lb.)
3
Shipping Weight
19 kg
(42 lb.)
36 kg
(79 lb.)
General Description
7
1.4.9 Regulation
FCC Notice
This equipment has been tested and found to comply with the limits for a Class A digital
device, pursuant to Part 15 of the FCC rules.
These limits are designed to provide reasonable protection against harmful interference
when the equipment is operated in a commercial environment.
This equipment
generates, uses and can radiate radio frequency energy and, if not installed and used in
accordance with the instruction manual, may cause harmful interference to radio
communications. Operation of this equipment in a residential area is likely to cause
harmful interference in which case the user will be required to correct the interference at
his own expense.
General Description
[ Notes ]
8
9
Operation
Chapter 2 OPERATION
2.1 Inspecting the Cartridge
The MS-8400 drive uses the industry-standard 3480-tape cartridge defined by ANSI
Standard X3B5. Refer to Figure 2-1.
Top View of Cartridge
When cartridge is
properly inserted, this
edge of the cartridge
faces outward.
Cartridge Label
Ensure that labels are
properly positioned within
indentations.
Write protect selector
When the white dot(key
mark) is showing, as
depicted here, cartridge
is write protected.
When the white dot is not
showing, cartridge is
write enable.
Leader block
Circular Metal Hub
Bottom View of Cartridge
Figure 2-1 Half-inch Tape Cartridge
10
Operation
Prior to inserting the tape cartridge into the drive, inspect the cartridge for damage to
prevent problems. A defective cartridge may prohibit successful loading of the cartridge
or may damage the drive mechanism. Look for these defects:
• cracked or broken cartridge casing
• water or dirt on cartridge casing
• foreign material or obvious loose parts within the cartridge
• broken leader block or leader block not properly attached
• damaged write protect selector
• any other obvious damage
• cartridge label not properly affixed
• cartridge with other materials affixed rather than the label
The tape length that can be used differs depending on the specifications and operation.
Table 2-1 shows the tape cartridges that can be used with this drive.
Table 2-1 Tape Length
Format Specification
Operation
Write
Read
Cartridge Name
Tape Length
18-track
36-track
Format
Format
3480 (Standard)
165m (541ft.)
Recommended
OK
Long (x1.5)
246m (807ft.)
OK
OK
3490E (Extended)
332m (1100ft.)
NG
Recommended
3480 (Standard)
165m (541ft.)
Recommended
OK
Long (x1.5)
246m (807ft.)
OK
OK
3490E (Extended)
332m (1100ft.)
OK
Recommended
CAUTION
The drive cannot load the cartridge is the contained tape is of insufficient
length.
11
Operation
2.2 Operator Panel
2.2.1 Front View
The operator panel and power switch are located on the front panel. The operator panel
is equipped with a 16-digit:2-line display, 3 switches and 2 indicators. These are used to
operate the drive. Refer to Figure 2-2 and 2-3.
Operator Panel
Door-Lock
(Optional)
Door Knob
OFF
ON
Front Door
Power Switch
with CSL model
Cartridge Slot (Tray)
Operator Panel
OFF
ON
Power Switch
without CSL model
Figure 2-2 Front View of the Drive
12
Operation
16-character 2-Line
STAND BY 18
OFL Sel LOAD
Alphanumeric
LCD Display
COMP.
Indicator
ALERT
Switch-1
Switch-2
Switch-3
Operation Switch
Figure 2-3 Operator Panel
2.2.2 Rear View
The SCSI connectors, maintenance port and AC power connector are located on the rear
panel (Refer to Figure 2-4). The two SCSI connectors can be used for either input or
output.
The maintenance port is used only for troubleshooting and should not be
connected during normal operation.
with CSL model
Portable Handle
Maintenance Port
SCSI Connectors
Fuse
AC Power Connector
Figure 2-4 Rear View of the Drive
without CSL model
13
Operation
2.2.3 Display
The 16-character 2-line alphanumeric LCD display with backlight on the front operator
panel displays various messages regarding drive operation and status.
The upper row of the display is called the “Status-Line”. It displays status information,
error codes, etc.. The lower row of the display is called the “Switch-Line”. Operation
switch functions are displayed here. Furthermore, the combination of the Status-Line
and Switch-Line is referred to as the “Menu-Display”.
The message of the display using both upper and lower row is called the “2-Line-Message”.
This message is only displayed temporarily (approx. 3 sec.).
Various “Status-Line” displays are explained in Table 2-2, 2-3 and 2-4. Various “2-LineMessage” displays are explained in Table 2-5.
Table 2-2 “Status-Line” Display (Part 1)
Display
Description
The drive is powering up and running the diagnostics.
ENABLE
The drive is loading.
LOADING
Drive Status
Marks : “# ” as slot number.
REWINDING
The drive is rewinding.
UNLOADING
The drive is unloading.
CLEAN
The drive requires cleaning with a cleaning cartridge.
CLEANING
The drive is being cleaned with the cleaning cartridge.
POWER-ON RELOAD
After again turning on the power, the drive is reloading the
inserted cartridge.
POWER-ON UNLOAD
After again turning on the power, the drive is unloading the
inserted cartridge.
PwrOn UNLD TO 10
After again turning on the power, the CSL return the inserted
CSL Status
cartridge to slot 10.
LOADING FROM #
The CSL is loading from the magazine.
UNLOADING TO #
The CSL is unloading to the magazine.
CSL INITIALIZING
The CSL is in operation.
WAITING CSL RDY
The CSL is in operation.
END OF STACK
The front door is open.
DOOR OPEN
REMOVE CART
All cartridges have been processed and unloaded.
#
Remove the cartridge from the magazine.
14
Operation
Table 2-3 “Status-Line” Display (Part 2)
Display
Description
STAND BY 18
Marks : “# ” as slot number.
This drive is only for 18-track cartridge.
[ MS-8418 ]
The cartridge is not loaded.
The drive will be ready after loading.
STAND BY 18w/36
This drive is set to the write operation for 18-track.
The cartridge is not loaded.
The drive will be ready after loading.
On-line Status
STAND BY 18/36w
STAND BY 36
[ MS-843x ]
< Option >
This drive is set to the write operation for 36-track.
The cartridge is not loaded.
The drive will be ready after loading.
[ MS-843x ]
< Option >
This drive is only for 36-track cartridge.
[ MS-843x ]
The cartridge is not loaded.
The drive will be ready after loading.
BOT ONLINE WE#
Loaded cartridge is write enable.
The drive is ready for on-line operation.
Tape is positioned at BOT.
BOT ONLINE FP#
Loaded cartridge is write protected (file protected).
The drive is ready for on-line operation.
Tape is positioned at BOT.
BOT
EOT
The cartridge is loaded and in use.
The drive is ready for on-line operation.
Tape is not positioned at BOT.
The “
” mark indicates
amount of tape used.
OFFLINE UNLOADED
The cartridge is not loaded.
Off-line Status
The drive is not-ready for off-line operation.
BOT OFFLINE WE
Loaded cartridge is write enable.
The drive is not ready for off-line operation.
Tape is positioned at BOT.
BOT OFFLINE FP
Loaded cartridge is write protected (file protected).
The drive is not ready for off-line operation.
Tape is positioned at BOT.
OFFLINE WE
The drive is not ready for off-line operation.
Tape is not positioned at BOT.
15
Operation
Table 2-4 “Status-Line” Display (Part 3)
Status
Off-line
Display
Description
ONL AFTER REWIND
The drive will be ready when
complete.
UNLOAD AFTER REW
SCSI ID
5
MENU FUNCTIONS
CONFIGURE
Setup Mode
The drive is rewinding.
DIAGNOSTICS
STATISTICS
ENTER PASSWORD
SAVE SETUP ?
ARE YOU SURE ?
The drive is unloading.
“SCSI ID” Setup menu. (for example; SCSI ID=5)
Setup mode. (Menu functions)
Configuration menu.
Diagnostics menu.
Statistics menu.
Request for password entry.
Input request to save in this menu.
Input request to confirm in this menu.
Error
Refer to items of each menu for details on the setup mode.
WRT PROTECT 1018
Cannot write to write protected cartridge.
18Thin Tape 1026
18-track format cannot write to extended cartridges.
NO MAGAZINE
NO CARTRIDGE
No magazine in the CSL.
No cartridge in the inserted magazine.
INVALID PASSWORD
Entered password is invalid.
DIAGNOSTIC ERROR
Error detected during powering up diagnostics.
Refer to Chapter 5 for details on errors with the lighted ALERT indicator.
Operation
Table 2-5 “2-Line-Message” Display
Display
DIAGNOSTICS
COMPLETED OK
Setup Mode
WILL SAVE SETUP
IN FLASH ROM
Description
Powering up diagnostics have successfully completed.
Can save to Flash-ROM.
SETUP SAVED
IN FLASH ROM
Saved to Flash-ROM.
NO CHANGES
TO CONFIG SETUP
Cannot change setup.
WILL SAVE SETUP
UNTIL POWER DOWN
Settings can be used until turning off power.
SETUP SAVED
UNTIL POWER DOWN
Settings stored until turning off power.
MUST POWER DOWN
BEFORE EFFECTIVE
Turn off the power.
DON'T POWER DOWN
Do not turn off the power.
16
17
Operation
2.2.4 Operation Switch
The 3 button type switches on the front operator panel are used to control the drive.
Operation switch function are displayed on the lower row (Switch-Line) of the display.
Follow the display to operate the 3 switches.
Pressing a switch changes the display contents of the menu. The Switch-Line will then
display new switch functions according to the new menu.
In other words, switch
functions change every time a switch is pressed. Relationship of the position between the
Switch-Line and the switches are explained in Figure 2-5. The function of the switches
are explained in Table 2-6.
“Status-Line” Display
“Switch-Line” Display
BOT
OFL
ONLINE WE 1
COMP --COMP.
ALERT
[Example-1]
“OFL” Switch Function
Switch-1
“COMP” Switch Function
Switch-2
“---“ Switch Function
Switch-3
Operation Switches
[Example-2]
BOT OFFLINE WE
ONL UNLD func
Switch-1 : “ONL”
COMP.
Switch-2 : “UNLD”
Switch-3 : “func”
Figure 2-5 Relationship of “Switch-Line” Positions
ALERT
Operation
NOTE
The display of each function is punctuated with 1 or more blank spaces.
Table 2-6 “Switch-Line” Display and Switch Function
Display
Switch Function
---
The switch is not defined.
>>>
Change to the next menu.
EXIT
Exit menu of the current layer.
YES
Permit input request of the Status-Line.
NO
Decline input request of the Status-Line.
TEMP
Temporarily use input request of the Status-Line.
OFL
Enter the off-line operation.
Sel
Select the magazine slot number.
LOAD
Load a cartridge into the slot having the selected number.
COMP
Switch the data compression mode.
ONL
Return to the on-line operation.
REW/UNL
Rewind.
UNLD
Unload.
DEN
The write operation can be switched for 18/36 track drive.
func
The “SCSI ID” setup.
func
The setup mode.
CHG
Change the “SCSI ID”.
EXIT
Return to the on-line operation.
CONF
The configure mode.
DIAG
The diagnostics mode.
STAT
The statistics mode.
Setup
FUNLD
Recover from servo error.
Mode
CSL
The CSL operation mode.
CHG
Change setup.
NEXT
Advance to the next display.
Common
On-line
Off-line
“SCSI ID”
Setup
Refer to items of each menu for details on the setup mode.
18
Operation
19
2.2.5 Indicator
The 2 indicators on the front operator panel show the drive status. The conditions for the
indicators lighting are explained in Table 2-7.
Table 2-7 Indicators
Indicator
Color
Description
When the LED is lighted, the drive writes in the compressed
mode(IDRC). When the LED is not lighted, the drive writes in the
COMP.
Green
uncompressed mode.
This LED indicates the writing mode and does not reflect the read
mode.
ALERT
Red
This LED is lighted when an error is detected. At this time, error
code etc. will be displayed on the Status-Line (upper row).
20
Operation
2.3 Powering Up
2.3.1 Installing Cables and Interfaces
Connect the attached AC power cable to the AC power connector located on the rear panel,
then insert the plug to an AC power outlet.
Refer to section 4.1 and connect the SCSI cable to the SCSI connector.
2.3.2 Turning in the Power
Turn the power switch on the front panel from off [ O ] to on [| ] (Refer to Figure 2-2) to
supply AC power to the drive. The backlight of the operator panel display will light
(yellow).
Self-diagnostics will be executed for approximately 20 seconds after turning the drive on.
During this time, “ENABLE...” will be displayed on the Status-Line of the display and
communication with interface and operator panel operations are disabled.
“STAND BY” is displayed on the Status-Line of the display when the self-diagnostics is
successfully complete and use of the drive is enabled.
If an error has been detected
during the self-diagnostics, the ALERT indicator will light and an error message will
appear on the display.
CAUTION
When turning off the power, wait at least 10 seconds before turning the
power back on.
2.3.3 On-line Mode / Off-line Mode
There are 2 types of operating modes: the on-line mode and off-line mode. The on-line
mode displays an on-line status on the Status-Line, indicating that the drive is ready.
The off-line mode displays an off-line status on the Status-Line, indicating that the drive
is not ready. Refer to Table 2-3.
The operation mode (on-line / off-line) can be switched using the operation switch on the
front panel. Figure 2-6 shows the procedure to switch from the on-line mode to the offline mode. Figure 2-7 shows the procedure to switch from the off-line mode to the on-line
mode.
21
Operation
[Example-1]
STAND BY 18
OFL Sel LOAD
OFFLINE UNLOADED
ONL --- func
1
1
2
Press Switch-1 ”OFL” to enter the Off-line mode.
[Example-2]
BOT
OFL
ONLINE WE 1
COMP ---
BOT OFFLINE WE
ONL UNLD func
1
1
2
Press Switch-1 ”OFL” to enter the Off-line mode.
Figure 2-6 On-line Mode to Off-line Mode
[Example-1]
OFFLINE UNLOADED
ONL --- func
STAND BY 36
OFL Sel LOAD
1
1
2
Press Switch-1 ”ONL” to enter the On-line mode.
[Example-2]
BOT OFFLINE WE
ONL UNLD func
BOT
OFL
1
1
2
Press Switch-1 ”ONL” to enter the On-line mode.
Figure 2-7 Off-line Mode to On-line Mode
ONLINE WE 7
COMP ---
22
Operation
During the on-line mode, tapes can be read/write when a cartridge is loaded. During the
on-line mode, a cartridge can be load from the magazine when a cartridge is not loaded.
The off-line mode enables unload and drive setup.
2.3.4 Switching the Recording Format
When the operation mode is in the on-line mode and when a cartridge is loaded, recording
format can be switched to uncompressed or compressed. Switching of recording format is
valid only tape positioned at BOT with write enable status and switching is automatic
when reading data. The COMP indicator also shows the recording format during writing
of data.
When the COMP indicator is lit, the drive will write in compressed format. Pressing the
center Switch-2 “COMP” will turn off the indicator and the drive will write in
uncompressed format. Refer to the left side of Figure 2-8.
When the COMP indicator is not lit, the drive will write in uncompressed format.
Pressing the center Switch-2 “COMP” will turn on the indicator and the drive will write in
compressed format. Refer to the right side of Figure 2-8.
[ Compressed Recording Format ]
BOT
OFL
ONLINE WE 2
COMP --2
[ Uncompressed Recording Format ]
BOT
OFL
ONLINE WE 2
COMP --2
Press Switch-2 ”COMP” to switch between uncompressed and compressed.
Figure 2-8 Switching the Recording Format
23
Operation
2.3.5 Switching the Write Operation [for 18/36 track drive only]
With 18/36 track drive, it is possible to switch between the 18-track and 36-track write
operation using the operation switches on the front of the operator panel.
The current write operation can be determined when “STAND BY” is displayed on the
center of the Status-Line. When “18/36w” is displayed on the right of the Status-Line,
the 36-track write operation is selected. When “18w/36” is displayed on the right of the
Status-Line, the 18-track write operation is selected.
In other words, the letter “w”
following the number of tracks indicates which operation is selected. Refer to Figure 2-9.
STAND BY 18/36w
OFL Sel LOAD
STAND BY 18w/36
OFL Sel LOAD
[ 36-track Write Operation ]
[ 18-track Write Operation ]
Figure 2-9 Current Write Operation
CAUTION
The 18-track write operation of the 18/36 track drive is IBM compatible but
does not conform to ANSI. Use caution when exchanging data with the
drives of other companies.
24
Operation
The following procedure to change the “Write Operation Setup”. Refer to Figure 2-10.
1)
First, unload the cartridge. If the operation mode is in the on-line mode, change to the
off-line mode. Refer to Figure 2-6.
2)
“DEN” will be displayed on the center Switch-Line of the display. Pressing the center
Switch-2 “DEN” displays the current write operation on the Status-Line of the display.
This menu is the Write Operation setup.
3)
To change the Write Operation, pressing the center Switch-2 “CHG” each time displays
another Write Operation on the Status-Line.
When “WRITE 18” is displayed on the center of the Status-Line, the 18-track write
operation is selected. When “WRITE 36” is displayed on the center of the Status-Line,
the 36-track write operation is selected.
When “TRACK” is displayed on the right of the Status-Line, the SCSI command is
enabled the write operation to change. When “(FORCE)” is displayed on the right of
the Status-Line, the SCSI command is disabled the write operation to change.
4)
To complete the setup, press the left Switch-1 “EXIT”.
displayed on the Status-Line.
5)
Press the Switch-1 “YES” to save the current setup.
“SAVE SETUP?” will be
Press the Switch-2 “NO” to abort and use the previous setup.
Press the Switch-3 “TEMP” to use the current setup until turning off the power.
Pressing the Switch-2 returns this menu. Pressing the Switch-1 or Switch-3 “ARE
YOU SURE ?” will be displayed on the Status-Line.
6)
Press the Switch-1 “YES” to save the current setup.
Press the Switch-2 “EXIT” to abort and use the previous setup.
Pressing either switch, this menu will be exited and the off-line mode will return.
25
Operation
[ Changing to 18-track Write Operation ]
[ Changing to 36-track Write Operation ]
STAND BY 18/36w
OFL Sel LOAD
STAND BY 18w/36
OFL Sel LOAD
1
1
1
1
OFFLINE UNLOADED
ONL DEN func
OFFLINE UNLOADED
ONL DEN func
2
2
2
2
WRITE 36 TRACK
EXIT CHG ---
WRITE 18 TRACK
EXIT CHG ---
2
2
3
3
WRITE 18 TRACK
EXIT CHG ---
WRITE 36 TRACK
EXIT CHG ---
1
1
4
4
SAVE SETUP ?
YES NO
TEMP
Input request for save.
Press Switch-1 “YES” to save the setup.
Press Switch-2 “NO” to abort the setup.
1
2
3
5
until turning off the power.
ARE YOU SURE ?
YES EXIT --1
6
Press Switch-3 “TEMP” to use the setup
2
Input request for confirmation of save.
Press Switch-1 “YES” to save the setup.
Press Switch-2 “EXIT” to abort the setup.
Figure 2-10 Write Operation Setup
26
Operation
2.3.6 CSL Operation Mode [with CSL model]
The method used by the Cartridge Stack Loader(CSL) to load and unload cartridges
differs depending on the operation mode.
overviews.
Table 2-8 shows the operation modes and
Table 2-9 explains the loading methods.
Refer to section 4.2.3 for the
operation mode setting method.
Table 2-8 CSL Operation Mode
Mode
Display
Manual
Manual
Description
The cartridges must be loaded one at a time.
After the first cartridge has been loaded and then unloaded
with the SCSI Unload command from the host computer, the
Auto
next cartridge will be loaded automatically. A maximum of 10
cartridges can be loaded continuously and automatically in this
Automatic
way.
AUTOcyc
SYS
System
Operation is the same as for [Auto] but, when the last cartridge
has been unloaded, the first cartridge will again be loaded.
SCSI cartridge loader commands are supported.
SYSauto
Random
Operation is the same as for [SYS] but automatic loading is
possible.
SCSI media changer device commands are supported.
Table 2-9 CSL Loading Methods
Operation
First Cartridge
Mode
Manual
Automatic
Next Cartridge
Load
Unload
Load
Unload
LOAD
UNLD
LOAD
UNLD
SCSI Load
SCSI Unload
SCSI Load
SCSI Unload
LOAD
UNLD
LOAD
UNLD
SCSI Load
SCSI Load
SCSI Unload
System
Marks :
Auto Load
SCSI Unload
Any cartridge can be loaded and unloaded.
LOAD
UNLD
“SCSI Load” / “SCSI Unload”
Manual operation using the Operator Panel.
Remote control from SCSI.
27
Operation
2.4 Loading a Cartridge
Before loading a cartridge, make sure that the write protect selector is on either write
enable (white dot not showing) or write protected (white dot showing). Refer to Figure 2-1.
NOTE
The write protect selector on the cartridge protects data from being
overwritten. When the write protect selector is on the write protect position,
the white dot (key mark) on the flat side of the selector will be visible from
the side of the cartridge.
2.4.0 Manual Loading [without CSL model]
First, enter the on-line mode if in the off-line mode (Refer to Figure 2-7). “STAND BY”
will be displayed on the center Status-Line of the display.
Insert the cartridge facing in the correct direction (leading block away from you) into the
cartridge slot, as shown in Figure 2-17. Insert cartridge slowly and completely until
hitting the wall beyond the tray. The drive will then automatically lower the tray and
load the cartridge. “LOADING” will appear on the Status-Line when loading.
Cartridge Slot (Tray)
Leader Block
Cartridge
Figure 2-17 Loading a Cartridge [without CSL model]
28
Operation
“ONLINE” will appear on the center of the Status-Line when loading is complete and
drive will be ready. The drive is now read/write enabled. Refer to Figure 2-15.
2.4.1 Front Door [with CSL model]
It is possible to lock/unlock the front door by using the supplied keys (door-lock and keys
are optional). To lock the front door, insert the key in the door-lock keyhole located on the
front panel and turn counterclockwise. To unlock the front door, insert the key in the
door-lock keyhole located on the front panel and turn clockwise. Refer to Figure 2-11.
The front door can be opened by pulling the door knob when unlocked. “DOOR OPEN”
will be displayed on the Status-Line when the front door is open. To close the front door,
push it back to the original position.
NOTE
The front door can be opened or closed regardless whether the power is on.
The CSL mechanism will automatically stop operation if the door is opened.
The CSL mechanism will resume operation when the door is once again
closed, however, operation may take some time since cartridges will be rescanned.
Key
Keyhole
Key
[ Unlock ]
[ Lock ]
Figure 2-11 Door Lock
29
Operation
2.4.2 Magazine [with CSL model]
Up to 10 cartridges can be loaded into the magazine provided with the CSL.
This
magazine can be removed by opening the front door and can be carried using the
magazine handle.
To remove the magazine from CSL: Open the front door and grasp the magazine handle.
Tilt the upper section of the magazine forward and pull up.
To install the magazine into the CSL:
Open the front door and while grasping the
magazine handle, let the bottom of the magazine rest on the bottom holder. Push the
upper section of the magazine until it locks in position. Refer to Figure 2-12.
Magazine Handle
Front Door
Magazine
Door Knob
Zoomed View
Magazine
Bottom Holder
Bottom Holder
Figure 2-12 Installing the Magazine
CAUTION
When transporting the magazine, carry by the magazine handle so that the
bottom of the magazine becomes directly under. Shaking the magazine may
cause cartridges to fall from the slots.
30
Operation
2.4.3 Inserting a Cartridge [with CSL model]
Each of the magazine's 10 cartridge slot can hold one cartridge and is numbered 1
through 10, top to bottom. Each slot is the same and cartridges are only distinguished by
their number. Refer to Figure 2-13.
Open the front door and insert the cartridges facing in the correct direction (leading block
away from you) into the slot of the magazine, as shown in Figure 2-13. Insert cartridge
completely until hitting the stopper located on the left side of the slot.
Slot Number
Slot-1
Slot-2
Slot-3
Slot-4
Slot-5
Slot-6
Slot-7
Slot-8
Slot-9
Slot-10
Leader Block
Cartridge
Figure 2-13 Inserting a Cartridge
NOTE
Cartridges can be inserted into magazines while removed from the CSL.
Follow the same procedure as when within the CSL. Refer to Figure 2-13.
31
Operation
The order of the loading procedure is always the upper slot. When there are empty slots
midway in the magazine, empty slots are ignored and the next inserted cartridge in
sequence is loaded.
When either Automatic or Manual operation is set, the cartridge loading sequence will
be as shown in Table 2-10.
Table 2-10 Cartridge Loading Sequence
Slot Number
Example
1
2
3
4
5
6
7
8
9
10
1
1
2
3
4
5
6
7
8
9
10
2
1
2
3
4
5
3
Marks :
1
2
6
3
4
5
Possible for auto load (circled numbers are the load sequence).
Empty slot (No cartridge).
When the System operation mode is set, the loading sequence will depend on the
application program being used by the host computer.
2.4.4 Selecting a Cartridge [with CSL model]
Whether or not the slots of the magazine contain cartridges can be searched by closing
the front door. During the search, “CSL INITIALIZING” will be displayed on the StatusLine of the display. When the search is ended, “STAND BY” will be displayed on the
center of the Status-Line and a cartridge can be loaded into the top slot of the magazine.
At that time, the operation switches of the front operator panel can be used to select and
load the cartridge in any optional slot.
32
Operation
The following procedure to select the “Slot
STAND BY 18/36w
OFL Sel LOAD
Number Select setup”. Refer to Figure 2-14.
1)
2)
3)
4)
First, unload the cartridges. If the operation
mode is in the off-line mode, change to the online mode. Refer to Figure 2-7.
“Sel” will be displayed on the center SwitchLine of the display.
Pressing the center
Switch-2 “Sel” displays the currently selected
slot number on the Status-Line of the display.
This menu is the Slot Number Select setup.
To change the Slot Number, pressing the
center Switch-2 “NEXT” each time increases
slot number on the right of the Status-Line.
Only the numbers of slots where cartridges are
inserted will be displayed.
Press the Switch-1 “SAVE” to select the
currently displayed slot number.
1
2
2
SELECT CART
1
SAVE NEXT EXIT
2
3
SELECT CART
5
SAVE NEXT EXIT
1
Press the Switch-3 “EXIT”, operation will end
without changing the slot number.
5)
3
4
SELECT CART
5
SAVE NEXT EXIT
Pressing the Switch-3 “EXIT”, this menu will
be exited and the on-line mode will return.
3
5
Figure 2-14 Slot Number Select
CAUTION
When the Slot Number Select setup is exited, cartridges below the selected
slot number can be used. Consequently, cartridges above the selected slot
number will be ignored. To use cartridges above the selected slot number,
repeat the operation using the Slot Number Select setup.
33
Operation
2.4.5 Loading the Cartridge [with CSL model]
First, if the operation mode is in the off-line mode, change to the on-line mode (Refer to
Figure 2-7). “STAND BY” will be displayed on the center Status-Line of the display.
“LOAD” will be displayed on the right Switch-Line of the display. Pressing the right
Switch-3 “LOAD” begins loading the cartridge from the selected magazine slot (Refer to
Table 2-9 and 2-10). Cartridge will automatically be loaded from the magazine slot to the
tape path within the drive. “LOADING FROM xx” will be displayed on the Status-Line
during loading. The “xx” represents the slot number.
CAUTION
The front door may be opened or closed during while the device is on ready.
However, the cartridge following the one will be loaded from the upper slot
when opening the door. Thus, the order of the cartridge to load may change.
“ONLINE” will appear on the center of the Status-Line when loading is complete and
drive will be ready. The drive is now read/write enabled. Refer to Figure 2-15.
BOT
OFL
ONLINE WE 5
COMP ---
[ Write Enable ]
BOT
OFL
ONLINE FP 5
-----
[ Write Protected ]
Figure 2-15 Completion of the Loading
CAUTION
The front door may be opened or closed during while the device is on ready.
However, when the door is once opened or closed, the cartridge in the top
slot will be loaded next and the slot number selection will become invalid.
Consequently, the sequence in which the cartridges are to be loaded can be
changed by opening or closing the door.
Operation
34
2.5 Unloading the Cartridge
2.5.1S Manual Unloading [without CSL model]
First, enter the off-line mode if in the on-line mode (Refer to Figure 2-6). “OFFLINE” will
be displayed on the center Status-Line of the display.
“REW/UNL” or “UNLD” is displayed on the center of the Switch-Line. Pressing the
center Switch-2 “REW/UNL” during when the display is “REW/UNL” rewinds the tape
and the display changes to “UNLD”. Pressing Switch-2 “UNLD” at this time unloads the
cartridge. Pressing the center Switch-2 “UNLD” when “UNLD” is displayed unloads the
cartridge immediately. Refer to Figure 2-13.
“UNLOADING” or “UNLOAD AFTER REW” will appear on the Status-Line when
unloading, and the drive will become not ready. When the tray is lifted and cartridge is
ejected, “STAND BY” is displayed on the Status-Line and unloading is complete.
2.5.1C Manual Unloading [with CSL model]
First, enter the off-line mode if in the on-line mode (Refer to Figure 2-6). “OFFLINE” will
be displayed on the center Status-Line of the display.
“REW/UNL” or “UNLD” is displayed on the center of the Switch-Line. Pressing the
center Switch-2 “REW/UNL” during when the display is “REW/UNL” rewinds the tape
and the display changes to “UNLD”. Pressing Switch-2 “UNLD” at this time unloads the
cartridge. Pressing the center Switch-2 “UNLD” when “UNLD” is displayed unloads the
cartridge immediately. Refer to Figure 2-16.
“UNLOADING” or “UNLOAD AFTER REW” will appear on the Status-Line when
unloading, and the drive will become not ready. “UNLOADING TO xx” will be displayed
on the Status-Line during unloading. The “xx” represents the slot number. The cartridge
will be returned to the original slot and “STAND BY” will be displayed on the center of
the Status-Line to indicate the end of the unloading operation. When all of the cartridges
have been unloaded, “END OF STACK” will be displayed on the Status-Line.
Now that the unloading operation has ended, the door can be opened and the cartridges
removed from the magazine.
35
Operation
[Example-1]
BOT
OFL
---
EOT
---
1
OFFLINE WE
ONL REW/UNL func
2
2
1
Press Switch-1 ”OFL”
Press Switch-2 ”REW”
to enter the off-line mode.
to rewind the cartridge.
REWINDING
ONL UNLD ---
END OF STACK
OFL Sel LOAD
2
4
3
Press Switch-2 ”UNLD”
to unload the cartridge.
[Example-2]
BOT
OFL
ONLINE FP 1
-----
BOT OFFLINE FP
ONL UNLD func
1
2
2
1
Press Switch-1 ”OFL”
Press Switch-2 ”UNLD”
to enter the off-line mode.
to unload the cartridge.
Figure 2-16 Unloading the Cartridge
CAUTION
If the drive is to be relocated or reshipped, unload and remove the cartridge
first. Furthermore remove all cartridges from the magazine. If a drive is
transported with the cartridge still inserted, the media could be damaged,
resulting in loss data.
Operation
36
2.5.2S Unloading from SCSI [without CSL model]
Set the operation mode to on-line and execute the SCSI Unload Command from the host
computer.
“UNLOADING” will appear on the Status-Line of the display when unloading, and the
drive will become not ready. When the tray is lifted and cartridge is ejected, “STAND BY”
is displayed on the Status-Line and unloading is complete.
2.5.2C Unloading from SCSI [with CSL model]
Set the operation mode to on-line and execute the SCSI Unload Command from the host
computer.
“UNLOADING” or “UNLOAD AFTER REW” will appear on the Status-Line of the display
when unloading, and the drive will become not ready. “UNLOADING TO xx” will be
displayed on the Status-Line during unloading. The “xx” represents the slot number.
The cartridge will be returned to the original slot and “STAND BY” will be displayed on
the center of the Status-Line to indicate the end of the unloading operation.
After that, if there is a cartridge in the lowermost slot of the magazine, cartridges can be
loaded automatically from the slots above. Refer to section 2.3.6.
If there is no cartridge in the lowermost slot, that is, when all of the cartridges have been
unloaded, “END OF STACK” will be displayed on the Status-Line, and the door can be
opened and the cartridges removed from the magazine.
3-1
Maintenance
Chapter 3 MAINTENANCE
This drive is designed for maintenance free, except as follows.
3.1 Cleaning the Tape Head
Clean the tape head and path using the IBM 3480 cleaning cartridge (IBM P/N 4780527
or compatible).
This cleaning operation should be performed periodically to help prevent read or write
errors.
The tape head and path should be cleaned every 8 hours during continuous
operation.
They should be cleaned at least once a day, even if the operation is not
continuous.
Clean the tape head and path immediately if the operator panel display the “CLEAN”
message on the Status-Line of the display.
This message is displayed only when
rewinding, loading or unloading.
Follow the manufacturer’s recommendations for the use of the cleaning cartridge and
keep track of the number of uses.
WARNING!
Do not clean the tape head directly with cotton swabs etc..
The tape head
of the drive may be destroyed due to its thin coating structure, if the
receiving force exceeds the pressure of prescription (tape tension).
Load the cleaning cartridge into the drive as with standard cartridges (Refer to Section
2.4).
The drive automatically initiates cleaning when the cartridge is loaded.
The
cartridge is automatically unloaded when cleaning is complete.
NOTE
When cleaning is complete, the “CLEAN” display will be replaced by the
standard Status-Line display.
Marking the top face label of a cleaning cartridge whenever cleaning has finished is
convenient to keep track of the number of uses.
3-2
Maintenance
3.2 Repairing the Leader Block
Although not often, the leader block may sometimes separate from the tape.
If this
occurs, reattaching the leader block to recover previously recorded data is permitted one
time.
CAUTION
The following procedure is only permitted when the cartridge contains
important data that needs to be recovered. The leader block attachment is
a temporary part permitted to recover data one time.
After reattaching the leader block and transferring the contained important
data to a computer, destroy the cartridge.
The leader block of the cartridge can be reattached easily by using the leader block
attachment kit (IBM P/N 4780625). This kit contains a leader block, leader block pin
and clutch tool. To reattach leader block, remove tape from the cartridge then attach the
leader block to the tape in a straight line. The leader block insert kit (IBM P/N 4780624)
containing only a leader block and leader pin is also available. For procedure on the
repair, refer to the instructions enclosed with either kit.
CAUTION
Always use the clutch tool to replace the leader block.
NOTE
For repair kits, contact the cartridge manufacturer.
Install and Setup
4-1
Chapter 4 INSTALL and SETUP
4.1 Installation
4.1.1 Installation Procedure
Use the following procedure to install this drive. For details, refer to the “Installation
Notes” of the host computer.
1)
Install the drive in a safe place. Do not connect the SCSI cables yet.
2)
Operate the host computer and search for a vacant SCSI ID number.
3)
Stop the host computer system and turn off the power supply.
4)
Connect the AC power cable and SCSI terminator to the drive. (Refer to section 4.1.3.)
5)
Turn on the drive power supply. (Refer to section 2.3.2.)
6)
Set the drive SCSI ID to the vacant number, and set the emulation mode, etc., to match
those of the host computer system. (Refer to section 4.2.)
7)
Turn off the drive power supply. (Refer to section 2.3.2.)
8)
Connect the host computer system and the drive. (Refer to section 4.1.3.)
9)
Turn on the drive power supply and then start the host computer system.
10) Operate the host computer and register the drive.
4.1.2 Installation Precautions
Observe the following precautions during installation.
1)
The host computer system should be operated by the systems manager.
2)
The SCSI cable should be the minimum possible length. Also, use high-impedance
shielded cable.
3)
Always install a SCSI terminator at both ends of the SCSI system being connected.
Also, use an active SCSI terminator (ALT-2) for single-end SCSI model.
4)
Do not turn off the drive power supply while the host computer system is in use.
5)
After turning off the drive power supply, wait at least 10 seconds before turning the
power supply on again.
4-2
Install and Setup
4.1.3 SCSI Cable Connection
The two SCSI connectors on the rear panel of the drive can be used for either input or
output. Refer to Figure 4-1 and connect the SCSI cables and the SCSI terminator. Also
install a clamp filter on the SCSI cable and fasten it at the end near the SCSI connector
of the drive.
Host Computer System
Magnetic Tape Drive
SCSI Initiator
(Relay SCSI device)
(Internal SCSI Terminator)
Magnetic Tape Drive
(End of SCSI device)
SCSI
SCSI Cable
SCSI Cable
Terminator
(ALT-2)
Clamp Filter
Clamp Filter Installation
Fastening the Clamp Filter
claws
Plug into the
Tighten until
SCSI connector
the claws are
end and fasten
completely
with the band
locked.
provided.
Pull strongly
Install the cable.
Figure 4-1 SCSI Cable Connection
Cut unnecessary
parts.
4-3
Install and Setup
4.2 Setup
This drive can be set up from the operator panel on the front.
Table 4-1 shows the standard setup values. Also, when changing the standard setup
values, enter the changes in this table for reference. (Refer to section 4.5 for the values
that can be set.)
Table 4-1 Setup Values
Contents
Type
SCSI
Items
Currently
MS-8418
Set Value
5
CSL LUN
WIDE NEGT
1
SCSI-2 model : DSABL
SCSI-3 model : ENABL
SYNC NEGT
ENABL
SAVE PNTR
ENABL
LD/RWD STAT
OFLN
BUFER MODE
buff
FMK SYNC
all
BOT PRE-RD
norm
WR RETRIES
10
RD RETRIES
10
OFF
ON
TAPE PWR-ON
UNLD
EMULATION
ECHO
DEFALT CFG
FLASH
CSL
without CSL model.
norm
---
Rd AHEAD FMK
WRITE
norm
go
---
CSL MODE
UCODE
CURRENT SCSI
CURRENT SERVO
CURRENT CSL
18/36 track model.
36 TRACK
with CSL model.
Auto
CURRENT CNTL
CURRENT FORM
with CSL model.
norm rec
PERM RD ERR
ERSE W2 DID
Comments
ON
COMP SWITCH
WRT ERR
18WRT
MS-843x
SCSI ID
COMPRESSION
DRIVE
Standard Setup Value
MEC
Enter when the firmware
is updated.
MEF
MES
MEV
MEL
4-4
Install and Setup
4.2.1 SCSI ID Setup
CAUTION
The power supply of the drive must be turned off when changing the SCSI
ID setup, so operate it independently without connecting to the host
computer system.
The following procedure to set the “SCSI ID setup”. Refer to Figure 4-2.
1)
First, unload the cartridge. If the operation mode is in the on-line mode, change to the
off-line mode. Refer to Figure 2-6.
2)
“func” will be displayed on the right Switch-Line of the display. Pressing the right
Switch-3 “func” displays the current “SCSI ID” on the Status-Line of the display. This
menu is the SCSI ID setup.
3)
To change the SCSI ID, pressing the center Switch-2 “CHG” each time increases SCSI
ID number on the right of the Status-Line. SCSI ID can be any number from 0 to 15.
(The numbers from 8 to 15 are reserved for use with SCSI-3=WIDE SCSI.)
4)
To complete the setup, press the right Switch-3 “EXIT”.
displayed on the Status-Line.
5)
Press the Switch-1 “YES” to save the current setup.
“SAVE SETUP?” will be
Press the Switch-2 “NO” to abort and use the previous setup.
Pressing the Switch-2 returns the SCSI ID setup menu. Pressing the Switch-1 “ARE
YOU SURE ?” will be displayed on the Status-Line.
6)
Press the Switch-1 “YES” to save the current setup.
Press the Switch-2 “EXIT” to abort and use the previous setup.
Pressing either switch returns the SCSI ID setup menu.
7)
Turn off the power when changing the setup.
When not changing the setup, press the right Switch-3 “EXIT” to return to the off-line
mode.
CAUTION
New setup will not be valid unless turning off the power.
Install and Setup
[Example]
4-5
STAND BY 36
OFL Sel LOAD
1
1
OFFLINE UNLOADED
ONL --- func
Off-line mode menu.
Press Switch-3 “func”.
3
2
SCSI ID
5
func CHG EXIT
SCSI ID setup menu.
Press Switch-2 “CHG”
to increase SCSI ID.
3
2
3
4
Press Switch-3 “EXIT”
to end the setup.
SAVE SETUP ?
YES NO
--1
Press Switch-1 “YES” to save the setup.
Press Switch-2 “NO” to abort the setup.
2
5
ARE YOU SURE ?
YES EXIT --1
Input request for save.
Input request for confirmation of save.
Press Switch-1 “YES” to save the setup.
Press Switch-2 “EXIT” to abort the setup.
2
6
MUST POWER DOWN
BEFORE EFFECTIVE
Turning off the power.
7
Figure 4-2 SCSI ID Setup
4-6
Install and Setup
4.2.2 Emulation Mode Setup etc.
Enter the configuration mode when changing “SCSI” or “DRIVE” setup. These setup
menus will be displayed on the Status-Line when the correct password is entered.
The following procedure to set a example of “Emulation Mode setup”. Refer to Figure 4-3.
1)
First, if the operation mode is in the on-line mode, change to the off-line mode. Refer
to Figure 2-6.
2)
“func” will be displayed on the right Switch-Line of the display. Pressing the right
Switch-3 “func” displays the current SCSI ID on the Status-Line of the display.
3)
Pressing the left Switch-1 “func” displays “MENU FUNCTIONS” on the Status-Line.
4)
Select the menu displayed as “CONF” on the left of the Switch-Line. Pressing the left
Switch-1 “CONF” displays “ENTER PASSWORD” on the Status-Line. This is the
password input prompt.
5)
Press Switch-3,-2 and -3 in sequence. The “CONFIGURE” will appear on the StatusLine. This menu is the configuration mode.
6)
Select the menu displayed as “DRIVE” on the center of the Switch-Line. Pressing the
center Switch-2 “DRIVE” displays the current “COMPRESSION” on the Status-Line.
This menu is the IDRC default setup.
7)
Press the right Switch-3 “>>>” to select the menu that displays the current
“EMULATION” on the Status-Line. This menu is the Emulation Mode setup.
8)
To change the Emulation Mode, pressing the center Switch-2 “CHG” each time displays
the other mode on the Status-Line.
9)
To complete the setup, press the left Switch-1 “EXIT”.
displayed on the Status-Line.
“SAVE SETUP?” will be
10) Press the Switch-1 “YES” to save the current setup.
Press the Switch-2 “NO” to abort and use the previous setup.
Press the Switch-3 “TEMP” to use the current setup until turning off the power.
Pressing the Switch-2 returns the configuration mode. Pressing the Switch-1 or
Switch-3 “ARE YOU SURE ?” will be displayed on the Status-Line.
11) Press the Switch-1 “YES” to save the current setup.
Press the Switch-2 “EXIT” to abort and use the previous setup.
Pressing either switch returns the configuration mode.
12) Press the right Switch-3 “>>>” to select the menu that displays “EXIT” on the SwitchLine. Press this “EXIT” switch to return to the off-line mode.
4-7
Install and Setup
[Example]
OFFLINE UNLOADED
ONL --- func
MENU FUNCTIONS
CONF DIAG >>>
3
2
1
4
ENTER PASSWORD
EXIT --- ---
SCSI ID
5
func CHG EXIT
2
1
3
3
5
Password input request.
CONFIGURE
SCSI DRIVE >>>
Press Switch-3, -2 and -3 in sequence.
Configuration Mode menu.
2
6
Emulation Mode setup menu.
7
EMULATION ECHO
EXIT CHG >>>
8
1
2
3
9
SAVE SETUP ?
YES NO TEMP
Press Switch-3 “>>>”
to select the next menu.
Press Switch-2 “CHG”
to change the Emulation Mode.
Press Switch-1 “EXIT”
to end the setup.
Input request for save.
Press Switch-1 “YES” to save the setup.
Press Switch-2 “NO” to abort the setup.
1
2
3
10
until turning off the power.
ARE YOU SURE ?
YES EXIT --1
11
Press Switch-3 “TEMP” to use the setup
2
Input request for confirmation of save.
Press Switch-1 “YES” to save the setup.
Press Switch-2 “EXIT” to abort the setup.
Figure 4-3 Emulation Mode Setup
4-8
Install and Setup
4.2.3 CSL Operation Mode Setup [with CSL model]
The following procedure to set the “CSL Operation Mode setup”. Refer to Figure 4-4.
1)
First, if the operation mode is in the on-line mode, change to the off-line mode. Refer to
Figure 2-6.
2)
“func” will be displayed on the right Switch-Line of the display. Pressing the right
Switch-3 “func” displays the current SCSI ID on the Status-Line of the display.
3)
Pressing the left Switch-1 “func” displays “MENU FUNCTIONS” on the Status-Line.
4)
Press the right Switch-3 “>>>” to shift to the next menus.
5)
Select the menu displayed as “CSL” on the left of the Switch-Line. Pressing the left
Switch-1 “CSL” displays “ENTER PASSWORD” on the Status-Line. This is the
password input prompt.
6)
Press Switch-3,-2 and -3 in sequence. The current “CSL MODE” will appear on the
Status-Line. This menu is the CSL Operation Mode setup.
7)
To change the CSL Operation Mode, pressing the center Switch-2 “CHG” each time
displays the other mode on the Status-Line.
8)
To complete the setup, press the left Switch-1 “EXIT”.
displayed on the Status-Line.
9)
Press the Switch-1 “YES” to save the current setup.
“SAVE SETUP?” will be
Press the Switch-2 “NO” to abort and use the previous setup.
Press the Switch-3 “TEMP” to use the current setup until turning off the power.
Pressing the Switch-2 returns the configuration mode. Pressing the Switch-1 or
Switch-3 “ARE YOU SURE ?” will be displayed on the Status-Line.
10) Press the Switch-1 “YES” to save the current setup.
Press the Switch-2 “EXIT” to abort and use the previous setup.
Pressing either switch returns the configuration mode.
11) Select the menu displayed as “DRIVE” on the Switch-Line. Press this “EXIT” switch to
return to the off-line mode.
4-9
Install and Setup
[Example]
OFFLINE UNLOADED
ONL --- func
MENU FUNCTIONS
CONF DIAG >>>
3
2
3
4
SCSI ID
5
func CHG EXIT
MENU FUNCTIONS
CSL
EXIT >>>
1
1
3
5
ENTER PASSWORD
EXIT --- ---
Password input request.
Press Switch-3, -2 and -3 in sequence.
2
3
6
CSL MODE Auto
EXIT CHG ---
CSL Operation Mode setup menu.
Press Switch-2 “CHG”
to change the CSL Operation Mode.
7
1
Press Switch-1 “EXIT”
2
8
to end the setup.
SAVE SETUP ?
YES NO
TEMP
Input request for save.
Press Switch-1 “YES” to save the setup.
Press Switch-2 “NO” to abort the setup.
1
2
3
9
until turning off the power.
ARE YOU SURE ?
YES EXIT --1
10
Press Switch-3 “TEMP” to use the setup
2
Input request for confirmation of save.
Press Switch-1 “YES” to save the setup.
Press Switch-2 “EXIT” to abort the setup.
Figure 4-4 CSL Operation Mode Setup
4-10
Install and Setup
4.3 Diagnostics
Enter the diagnostics mode when execute the self-diagnostics for read/write. A password
is requested only when selecting “SERVO” in the diagnostics mode. The setup menu will
be displayed on the Status-Line when the correct password is entered.
The following procedure to set a example of “Write-Test”. Refer to Figure 4-5.
1)
First, load a write-enabled cartridge. If the operation mode is in the on-line mode,
change to the off-line mode. Refer to Figure 2-6.
2)
“func” will be displayed on the right Switch-Line of the display. Pressing the right
Switch-3 “func” displays the current SCSI ID on the Status-Line of the display.
3)
Pressing the left Switch-1 “func” displays “MENU FUNCTIONS” on the Status-Line.
4)
Select the menu displayed as “DIAG” on the center of the Switch-Line. Pressing the
center Switch-2 “DIAG” displays “DIAGNOSTICS” on the Status-Line and enters the
diagnostics mode.
5)
Select the menu displayed as “RWT” on the center of the Switch-Line. Pressing the
center Switch-2 “RWT” displays “READ/WRITE TESTS” on the Status-Line.
6)
Press the right Switch-3 “>>>” to shift to the next menus.
7)
Select the menu displayed as “WRT” on the left of the Switch-Line. Pressing the left
Switch-1 “WRT” displays “WRITE TEST” on the Status-Line. This menu is the WriteTest.
8)
Press the Switch-1 “SHORT” to execute the Short Write-Test.
Press the Switch-2 “LONG” to execute the Write-Test to EOT.
Pressing either switch displays “NUM REC =” on the center of the Status-Line and
initiates writing of test data to the tape.
9)
“DIAG PASSED” is displayed on the center of the Status-Line when successfully
completing the Write-Test. Refer to Chapter 5 if an error is returned.
10) Press the right Switch-3 “>>>” to select the menu that displays “EXIT” on the SwitchLine. Press this “EXIT” switch to close to each of the menus.
CAUTION
Test data is written to the tape during Write-Test.
cartridge used for Write-Test is destroyed.
Thus, data of the
4-11
Install and Setup
[Example]
BOT OFFLINE WE
ONL UNLD func
MENU FUNCTIONS
CONF DIAG >>>
3
2
2
4
SCSI ID
5
func CHG EXIT
DIAGNOSTICS
GEN
RWT >>>
1
2
3
5
READ/WRITE TESTS
RDF
RDB
>>>
Read/Write test menu.
Press Switch-3 “>>>”
3
to shift to the next menus.
6
READ/WRITE TESTS
WRT
LWR
>>>
Read/Write test menu.
Press Switch-1 “WRT”
to enter the Write-Test.
1
7
WRITE TEST
SHORT LONG EXIT
1
Write-Test menu.
Press Switch-1 “SHORT”
to execute the Short Write-Test.
Press Switch-2 “LONG”
to execute the Write-Test to EOT.
2
8
DIAG PASSED
SHORT STAT >>>
Display when write test is successful.
(Short Write-Test)
3
9
Figure 4-5 Write-Test Procedure
4-12
Install and Setup
4.4 Hierarchic Structure of Setup
Listing of setup is given below. Items for CE (Customer Engineer) are to be performed
only by persons with maintenance training.
4.4.1 General Structure
OFFLINE UNLOADED
Off-line mode menu (Refer to 2.3.3)
func
SCSI ID
func
Enter Setup
5
Current SCSI ID (Refer to 4.2.1)
MENU FUNCTIONS
CONF
CONFIGURE
DIAG
DIAGNOSTICS
STAT
STATISTICS
CONFIGURE (Refer to 4.4.2)
DIAGNOSTICS (Refer to 4.4.3)
STATISTICS (Refer to 4.4.4)
FUNLD
Recovery from Servo Error
CSL
CSL MODE Auto
Auto
AUTOcyc
SYS
SYSauto
Random
switch.
CHG
(Refer to 4.2.3)
Exit Setup
SCSI ID
CHG
6
EXIT
Change SCSI ID (Refer to 4.2.1)
SAVE SETUP ?
NO
EXIT
Values that can be changed with
Manual
EXIT
CHG
with CSL model
ARE YOU SURE ?
YES
YES
EXIT
Exit Setup
>>>
change to the next menus.
Selection by function of display.
4-13
Install and Setup
4.4.2 Structure of CONFIGURE
Values that can be changed with
Default value
CHG
switch.
CONFIGURE
SCSI
DRIVE
SCSI ID
5
0
1
15
CSL LUN
1
0
1
7
WIDE NEGT ENABL
ENABL
DSABL
SYNC NEGT ENABL
ENABL
DSABL
SAVE PNTR ENABL
ENABL
DSABL
LD/RWD STAT OFLN
OFLN
BUSY
BUFFER MODE-buff
buff
off
always
FMK SYNC - all
all
2 seq
buff
BOT PRE-RD norm
norm
rd 1
WR RETRIES
10
0
5
10
25
RD RETRIES
10
0
10
20
100
COMPRESSION ON
ON
OFF
COMP SWITCH ON
ON
OFF
TAPE PWR-ON UNLD
UNLD
LOAD
EMULATION ECHO
TAPE
RESET
18WRT
EXIT
SHOW
ECHO
STK
SUNlms
FUJTS
VDSGS
9348
LMS90E
ODI
HP4280
Kenedy
EXABT
TELEX
IBMmag
88780
IBM90e
FJ2488
I/Osys
DEFALT CFG FLASH
FLASH
ECHO
WRT ERR-norm rec
norm rec
PERM RD ERR-norm
norm
skip
ST4280
ERSE W2 DID-norm
norm
dont
JKLMS
RD AHEAD FMK go
go
stop
LD CFG FROM TAPE
YES
#
SAVE CFG TO TAPE
YES
#
SAVE TO FLASH ?
YES
leave er
>>>
WRITE 36 TRACK
FJ2483
TMSPC
change to the next menus.
Selection by function of display.
36 TRACK
36(FORCE)
18 TRACK
18(FORCE)
#
is a menu for CE only. Do not execute.
4-14
Install and Setup
4.4.3 Structure of DIAGNOSTICS
DIAGNOSTICS
GEN
USER
RWT
PWR
DISP
EXIT
WRITE TEST
READ/WRITE TESTS
RDF
SERVO
#
GENERAL TESTS
RDB
WRT
REW
EXIT
LWR
GOFWD
ENTER
WEAR TEST
2m/s
CYCLE
2m/s
WEAR TEST
4m/s
RUN CONT
4m/s
RUN CONT
2m/s
START/STOP 4m/s
START/STOP 2m/s
LOADING TESTS
EXIT
LONG
CYCLE
4m/s
#
ENTER
TUP Mo LOCK POS
ENTER
START
ELEVATOR UP/DOWN
ENTER
UP
THREADER TEST
ENTER
SUP Tension: OFF
SUP Mo SLOW CW
ON
OFF
D/A OFFSET ADJ
ENTER
START
MOTOR Kt COMPE
ENTER
START
ENCODER TEST
ENTER
START
BWD
#
DIAG/TUNING
ENTER
CSL DIAG/ADJ/MOV
EXIT
DOWN
FWD
SELECT SUP TENSN
EXIT
S/Swr
#
DRIVE TESTS
EXIT
ERASE
SHORT
#
with CSL model
ENTER
CSL DIAGNOSTICS (Refer to 4.4.5)
UCODE
UPDATE UCODE?
EXIT
#
YES
>>>
EXIT
Media
change to the next menus.
Selection by function of display.
RUN CLEAN DIAG
EXIT
#
#
is a menu for CE only.
Do not execute.
4-15
Install and Setup
4.4.4 Structure of STATISTICS
STATISTICS
UCODE
DISPLAY REVISION
EXIT
ERLOG
NEXT
CURRENT MACHINE
Release Code
CURRENT CNTL
CNTL
MEC05.50
CURRENT FORM
FORM
MEF03.00
CURRENT SCSI
SCSI
MES05.00
CURRENT SERVO
SERVO
MEV02.40
CURRENT CSL
CSL
MEL01.24
with CSL model
ERROR LOG
STATISTICS
EXIT
CLEAN
CLEAR
NEXT
PERM WRT ERR
0
TEMP WRT ERR
0
1 TRK IN REC
0
2 TRK IN REC
0
ISV ERRORS
0
CLEAN REQST
10
CLEAN CYCLE
5
REQ IGNORED
5
REC WRc
0
ST/STOP
0
CLEANING
STATISTICS
EXIT
RWT
NEXT
READ WRITE
STATISTICS
EXIT
TIME
CLEAR
NEXT
REC WRu
0
#
TIME
STATISTICS
EXIT
HARD
SAVE
NEXT
#
HARDWARE
>>>
STATISTICS
EXIT
EXIT
change to the next menus.
Selection by function of display.
NEXT
#
is a menu for CE only. Do not execute.
4-16
Install and Setup
4.4.5 Structure of CSL DIAGNOSTICS [with CSL model]
DIAGNOSTICS
#
GEN
GENERAL TESTS
RWT
READ/WRITE TESTS
SERVO
DRIVE TESTS
#
LOADING TESTS
#
DIAG/TUNING
#
CSL DIAG/ADJ/MOV
#
EXIT
ENTER
CSL TUNE/DIAG
EXIT
ENTER
SLOW LOAD TEST
ENTER
CYCLE LIMET 100
START
FAST LOAD TEST
ENTER
CYCLE LIMET 100
START
CSL SENSOR TEST
ENTER
START
CSL ADJUST HOME
ENTER
START
CSL ADJUST TRAY
ENTER
START
MOVE CSL TRAY
ENTER
UP
DOWN
MOVE CSL SLIDER
ENTER
FWD
BWD
MOVE CSL ARM
ENTER
CLK
CNCLK
CSL MOVE TESTS
EXIT
ENTER
ENTER
UPDATE UCODE
UPDATE UCODE?
EXIT
UCODE
UPDATE UCODE?
#
>>>
EXIT
Media
RUN CLEAN DIAG
YES
change to the next menus.
Selection by function of display.
#
#
is a menu for CE only.
Do not execute.
4-17
Install and Setup
4.5 Detail of the Setup Items
4.5.1 Setup Items for SCSI
Items
Setup Value
Description
0 to 7
Target SCSI ID number.
8 to 15
Target SCSI ID number.
SCSI LUN
0
Deleted.
CSL LUN
0 to 7
SCSI ID
WIDE NEGT
Target LUN (logical unit number) for CSL. This LUN use
for CSL system operation mode.
Target enable the “Wide negotiations” by a initiator.
ENABL
Target can use the Wide SCSI (16bit bus).
Target always use the Narrow SCSI (8bit bus).
DSABL
SYNC NEGT
XFER TMOUT
SAVE PNTR
(Use for SCSI-3 = Wide SCSI.)
Target enable the “Synchronous negotiations” by a initiator.
ENABL
Target can use the synchronous data transfer.
DSABL
Target always use the asynchronous data transfer.
DSABL
Deleted.
ENABL
Target use the “Save data pointer message”.
DSABL
Target doesn't use the “Save data pointer message”.
SCSI state during loading, unloading or rewinding.
LD/RWD STAT
Target returns the “Check condition” status and “Sense key”
OFLN
of “Request sense” data is “Not ready”.
Target returns the “Busy” status.
BUSY
Buffer mode until changed by SCSI “Mode select” command.
BUFER MODE
Buff
Write commands return status after data is in buffer.
off
Write commands return status after data is on tape.
always
Not supported.
all
FMK SYNC
2 seq
buff
DISC/RESEL
0
Write all buffer data to tape after receiving one “Write
filemarks” command.
Write all buffer data to tape after receiving two sequential
“Write filemarks” command.
Write all buffer contents to tape when the buffer is over the
limits. Treat filemarks the same as buffered data.
Deleted.
Install and Setup
Items
BOT PRE-RD
Setup Value
Description
norm
The position is BOT at once after loading.
rd 1
Read a first block and rewind to BOT, after loading.
WR RETRIES
0 to 25
RD RETRIES
0 to 100
4-18
Maximum number of retries to successfully write data.
(5 by 5)
Maximum number of retries to successfully read data.
(10 by 10)
4.5.2 Setup Items for DRIVE
Items
COMPRESSION
Setup Value
Description
ON
Default is compressed format.
OFF
Default is uncompressed format.
Displays the “COMP” on the center Switch-Line of the
ON
display. The drive can be changed the recording format by
the operation switch. (Refer to section 2.3.4.)
Doesn't displays the “COMP” on the display. The drive can
COMP SWITCH
OFF
be changed the recording format by SCSI “Mode select”
command.
Displays the “SHOW” instead of the “COMP” on the center
SHOW
Switch-Line of the display. Pressing the “SHOW” displays
the current loaded tape format on the Status-Line.
A tape (cartridge) if the drive is power-on with tape in the drive.
TAPE PWR-ON
LANGUAGE
UNLD
A tape will be re-tensioned then unloaded.
LOAD
A tape will be re-tensioned then loaded.
ENGL
Deleted.
Refer to section 4.5.3.
EMULATION
Power-on setup values.
DEFALT CFG
MEDIA CLEAN
FLASH
The setup values are taken from flash ROM.
ECHO
The setup values are set to ECHO default values.
OFF
Not supported.
4-19
Install and Setup
Items
Setup Value
Description
Procedure after an unrecovered write error is detected.
WRT ERR
norm rec
The drive will not continue to write.
Leave er
The drive will continue to write.
But errors left on the tape.
Procedure after a permanent read error is detected.
PERM RD ERR
norm
The drive will not continue to read.
skip
The drive will skip over the bad record and continue to read.
Erase Wrap 2 before writing density ID in 36 track format.
ERSE W2 DID
RD AHEAD FMK
norm
The drive will erase Wrap 2.
dont
The drive will not erase Wrap 2.
go
Read ahead records until an error is detected or buffer is full.
stop
Read ahead records until a filemark is detected.
Install and Setup
4-20
4.5.3 Emulation Mode
Set the emulation mode to match the host computer system. The emulation mode have
effects on the “Inquiry”, “Mode Sense”, “Request Sense” or etc. commands of SCSI. Refer
to the “Installation Note” for each host computer system.
Setup Value
Description
Standard value.
ECHO
Vendor ID=“VDS”, Product ID=“MS-8400”.
Connection under the Sun host computer system (Solaris).
STK
SUNlms
FUJTS
VDSGS
Emulation for the 18 track cartridge tape drive.
Emulation for the VDS model MS-4490 (1/2 inch cartridge tape drive).
Connection under the Sun host computer system (Sun-OS 4.x).
Emulation for the 36 track cartridge tape drive.
Emulation for the VDS model GS-7000 (1/2 inch open reel tape drive).
Vendor ID=“VDS”, Product ID=“GS-7000S”.
EXABT
Emulation for the 8mm DAT drive.
Kenedy
Emulation for the 1/2 inch open reel tape drive.
HP4280
Connection under the HP host computer system.
ODI
Emulation for the VDS model MS-5436 (1/2 inch cartridge tape drive).
LMS90E
Connection under the IBM host computer system.
9348
Connection under the IBM host computer system.
TELEX
Emulation for the 1/2 inch open reel tape drive.
IBMmag
Connection under the IBM host computer system.
88780
Emulation for the 1/2 inch open reel tape drive.
IBM90e
Connection under the IBM host computer system.
FJ2488
Emulation for the 36 track cartridge tape drive.
I/Osys
Special Specification.
FJ2483
Emulation for the 36 track cartridge tape drive.
TMSPC
Special Specification.
ST4280
Emulation for the 18 track cartridge tape drive.
JKLMS
Special Specification.
Trouble Shooting
5-1
Chapter 5 TROUBLE SHOOTING
When a malfunction occurs in this drive, operate the drive based on the directions
indicated in this chapter. When a problem cannot be solved or if there is some point that
is unclear, contact the service department or the manufacturer.
5.1 Error Display
Electrical and mechanical errors can be detected by an internally equipped
microprocessor. The error description can also be detected for the magnetic tape media.
When an error is detected, the ALERT indicator on the front operator panel lights and an
error message or an error code are displayed on the display Status-Line. The error code
is displayed as 4 decimal digits from the right side of the Status-Line.
CAUTION
The drive may not operate correctly if the setup for this drive is not executed
correctly. The error code is not displayed at this time. Execute the setup
operation so the drive corresponds to the host computer system that is
connected.
(Refer to section 4.2.)
An error code is also not displayed when there is a problem with the SCSI
cables or SCSI terminators connected to the drive. Check the SCSI bus
system.
(Refer to section 4.1.)
5.2 Countermeasures
This section (5.2) is almost the same as the contents of the “User Manual”. The next
section (5.3) provides a description of the error codes and the corresponding processing
operations, such as the contents of the “Maintenance Manual”.
When an error occurs, first make a note of the error code. Next, refer to the error code
and execute the appropriate countermeasure operations.
5.2.1 Error Code Summary
The main error descriptions are shown in Table 5-1 and the error processing procedures
are shown in Table 5-2.
5-2
Trouble Shooting
The procedures to eliminate an error are shown below.
1)
The error is eliminated if the rewind or unload operations are executed.
If the error cannot be eliminated, execute the following procedures.
2)
Unload the cartridge. When the unload operation cannot be executed, turn off the
power one time.
3)
When turning the power on again, wait more than 10 seconds.
CAUTION
Consult the system manager when turning off the power to the drive.
There is a possibility of damaging the applications of the host computer
system that is connected.
Table 5-1 4 digit Error Codes
Error
Error Description
Code
Processing
1018
Cannot write to write protected cartridge.
Unload the cartridge.
1026
Cannot write to an extended cartridge.
Operations B, E, C, G.
1xxx
2xxx
4xxx
3003
3004
A command from the host computer system could not
be executed.
The control circuit board detected an error.
Operations C, D, F, G.
A cartridge was read that contained no data.
Rewind the cartridge.
The
3107
number
of
tracks
is
different
than
the
specifications.
An unrecognized cartridge was read.
Position of the tape was read which did not contain
3xxx
Operations B, F, D, G.
recorded data.
A write operation to the tape or a read operation from
the tape could not be executed.
Rewind the cartridge.
Operations A, B, C, G.
Rewind the cartridge.
Operations A, B, C, G.
A failure occurred in a load operation.
A failure occurred in an unload operation.
5xxx
The servo circuit board detected an error.
Operations E, B, C, G.
The CSL circuit board detected an error. (This circuit
board is installed in the CSL model.
Others
Marks:
Something may be damaged.
“xxx” as the numeric value of an optional 3 digits.
Operations E, C, D, G.
Trouble Shooting
5-3
5.2.2 Error Processing Summary
The countermeasures (operations A to G) for each type of error are shown in table 5-2.
When the countermeasures are specified a multiple number of times, execute these
operations in the specified sequence. If the error is eliminated, it is not necessary to
execute the remaining countermeasures.
Table 5-2 Error Processing
Error
Countermeasure
Processing
A
Use a cleaning cartridge and clean the tape head and tape path. (Refer to
section 3.1.)
Replace the other cartridges. The following conditions may apply to these
cartridges.
1)
The number of tracks differs from the drive specifications.
(Read
operations)
B
C
D
2)
The tape length differs from the drive specifications.
3)
An unrecognized cartridge is loaded. (Read operations)
4)
The tape may be used out of the range of required operation temperature.
5)
Logical damage has occurred to the tape such as write operation residue.
6)
Physical damage such as a crack is present on the tape.
Turn the power off one time. Wait at least 10 seconds before turning the
power back on again.
Turn the power off and check the SCSI bus connections. Wait at least 10
seconds before turning the power back on again.
Make sure that there are no abnormalities in the cartridge. The following
conditions may apply to these cartridges.
E
1)
The cartridge insertion direction may be reversed.
2)
The leader block is open.
3)
There is a problem in the cartridge label.
4) Refer to section 2.1 for a description of other problems.
F
Check the setting values for the setup. (Refer to section 4.2.)
G
It is possible that the drive is damaged. (Refer to section 5.3.)
5-4
Trouble Shooting
5.3 Error Code and Processing
The sections which follow this section (5.3) describe the details of the error codes, error
descriptions and countermeasures.
When an error occurs, first make a note of the error code. Next, refer to the error code
and execute the appropriate countermeasure operations.
5.3.1 Error Code Determination
The error code determination is described below. Error code number 1018 is used in this
example.
Error code
Error description for the error display.
Error display
1018
WRT PROTECT 1018
File protected
Description: A write operation cannot be executed to the tape because the write protect
selector is set to the write protect position.
Possibility
1
Countermeasure
Ref.
The write protect selector of the cartridge Set the write protect selector of
Figure
is set to the write protect (file protect) the cartridge to the write
2-1
position.
enable position.
This describes the countermeasures.
The cause of the error is described in the
highest order of probability. Check the
sequence starting from number one.
This describes the section number
and figure number when the
This describes the error contents of the error group
countermeasure is executed for
described above. Even if the various error codes
reference.
differ, the error descriptions are combined and
explained at the same time.
Trouble Shooting
5-5
CAUTION
The error codes are arranged in numeric sequence but part of the error code
may be explained in previous or later sections.
5.3.2 Jump Guide
Observe the following precautions, refer to the jump guide in Table 5-3 and execute the
error processing.
CAUTION
Consult the system manager when turning off the power to the drive. There
is a possibility of damaging the applications of the host computer system
that is connected. Wait at least 10 seconds before turning the power back
on again.
!
WARNING!
Always turn off the power before removing the cover of the drive. Never
touch the inside of the drive when turning the power on. Even when the
power has been turned off, do not touch the area surrounding the power
supply unit and the tape head.
5-6
Trouble Shooting
Table 5-3 Error Code Jump Guide
Refer to
Description
Error Code
Section
Number
1xxx
The control circuit board (control function block) detected an
2xxx
error.
3xxx
The control circuit board (formatter function block) detected
4xxx
an error.
The servo circuit board detected an error.
A failure occurred in the load or unload operations.
The Servo circuit board detected an error.
[ without CSL model ]
555x
The CSL circuit board detected an error.
559x
[ with CSL model ]
A failure occurred in the load or unload operations.
[ with CSL mode ]
EExx
The display
malfunctions
xxxx
Section 5.5
Sections
5.7 or
5xxx
B0xx
Section 5.4
The SCSI circuit board detected an error.
A malfunction occurred in the control circuit board or the
operator panel.
Any type of error can be produced when the mother board
and power supply unit are damaged.
Marks: “x” as the numeric value (hexadecimal) of an optional 1 digits.
6.3 to 6.5
Section 5.8
Sections
5.8 or
6.6 to 6.7
Section 5.6
Section 5.9
Section 5.9
5-7
Trouble Shooting
5.4 Control Circuit Board (Control Function Block) Errors
5.4.1 Error Codes (10xx)
1002
MUST UNLOAD 1002
NOT_UNLOADED
Description: The self-diagnostics mode cannot be executed because the cartridge is not
unloaded.
1
Possibility
Countermeasure
The cartridge is not unloaded.
Unload the cartridge from the
operator panel.
1004
WRT/RD SEQ 1004
Ref.
Section
2.5
READF_AFTER_WRITE_SEQUENCE
Description: The next data block (where data is unwritten) is read immediately after the
write operation was executed.
Possibility
1
Countermeasure
The SCSI command sequence is not Check for a problem in your
correct.
2
Ref.
program on the host computer.
The SCSI command corrupted. The SCSI Check the SCSI cable and
cable is too long or the SCSI connector terminator.
Section
4.1
contact is loose.
3
The
SCSI
driver
circuit
board
is Replace this circuit board.
damaged.
4
Section
7.3.3
The SCSI circuit board is damaged.
Replace this circuit board.
Section
7.3.7
5
The control circuit board is damaged.
Replace this circuit board.
Section
7.3.7
1006
UNSUP CMD
1006
HOST_UNSUPPORTED_CMD
Description: This drive does not support the following SCSI commands.
1
Possibility
Countermeasure
Ref.
The drive setup is not correct.
Correct the setup.
Section
4.2
2
This
SCSI
specifications.
command
is
out
of Check for a problem in your
program on the host computer.
5-8
Trouble Shooting
The SCSI command corrupted. The SCSI Check the SCSI cable and
3
cable is too long or the SCSI connector terminator.
Section
4.1
contact is loose.
4
The SCSI driver circuit board is damaged Replace this circuit board.
Section
7.3.3
5
The SCSI circuit board is damaged.
Replace this circuit board.
Section
7.3.7
6
The control circuit board is damaged
Replace this circuit board.
Section
7.3.7
1008
WRT TOO BIG 1008
HOST_WRITE_TOO_BIG
Description: The block length specified by the SCSI read and write commands is too long.
Possibility
1
This
Countermeasure
SCSI
command
is
out
Ref.
of There is an error in your
specifications. (It exceeds a value that is program on the host computer.
returned by the Read Block Limits (Reduce the block length.)
command.)
2
The SCSI command corrupted. The SCSI Check the SCSI cable and
cable is too long or the SCSI connector terminator.
Section
4.1
contact is loose.
3
The
SCSI
driver
circuit
board
is Replace this circuit board.
damaged.
4
Section
7.3.3
The SCSI circuit board is damaged
Replace this circuit board.
Section
7.3.7
1012
NOT ONLINE 1012
PANEL_NOT_ONLINE
Description: The on-line mode is not set.
1
Possibility
Countermeasure
The on-line mode is not set.
Set the on-line mode from the
operator panel.
1014
MUST LOAD
1014
Ref.
Section
2.3.3
NOT_LOADED
Description: The self-diagnostics mode cannot be executed because the cartridge is not
loaded.
Possibility
Countermeasure
Ref.
5-9
Trouble Shooting
1
The cartridge is not loaded.
Load the cartridge.
Section
2.4
1016
RD REV COMP 1016
Description:
CANT_RD_REV_COMP_RECS
The reverse read operation (tape read in the reverse direction) cannot be
executed because the data is compressed.
Possibility
1
This
Countermeasure
SCSI
command
is
out
of Check for a problem in your
specifications,
2
A
3
reverse
Ref.
program on the host computer.
read
is
executed
on
a Create the tape again without
compressed data.
data compression.
The control circuit board is damaged.
Replace this circuit board.
Section
2.3.4
Section
7.3.7
4
The SCSI command corrupted. The SCSI Check the SCSI cable and
cable is too long or the SCSI connector terminator.
Section
4.1
contact is loose.
5
The
SCSI
driver
circuit
board
is Replace this circuit board.
damaged.
6
Section
7.3.3
The SCSI circuit board is damaged.
Replace this circuit board.
Section
7.3.7
1018
WRT PROTECT 1018
FILE_PROTECTED
Description: A write operation cannot be executed to the tape because the write protect
selector of the cartridge is set to the write protect position.
Possibility
1
Countermeasure
The write protect selector of the cartridge Set the write protect selector of
is set to the write protect position.
the cartridge to the write
Ref.
Figure
2-1
enable position.
2
The write protect detection switch in the Replace the drive.
drive is damaged.
3
Section
7.3.4
The cable that connects the write protect Replace the drive.
detection switch and the mother circuit
Section
7.3.4
board in the drive is disconnected or
damaged.
4
The control circuit board is damaged.
Replace this circuit board.
Section
7.3.7
5-10
Trouble Shooting
5
The servo circuit board is damaged.
Replace this circuit board.
Section
7.3.7
The SCSI command corrupted. The SCSI Check the SCSI cable and
6
cable is too long or the SCSI connector terminator.
Section
4.1
contact is loose.
7
The
SCSI
driver
circuit
board
is Replace this circuit board.
Section
damaged.
8
7.3.3
The SCSI circuit board is damaged.
Replace this circuit board.
Section
7.3.7
1022
36/18 MIX
1022
CANT_WRT_36_ON_18_MUST_REWIND
Description: A write append cannot be executed with 36 tracks on a tape that was written
in 18 tracks.
Possibility
1
Countermeasure
A write append is executed with 36 A
write
append
Ref.
must
be
tracks on a tape that was written in 18 executed with 36 track drive
tracks.
for 36 track tape and with 18
track drive for 18 track tape.
2
A write operation is executed without Check for a problem in your
rewinding to tape written in 18 tracks.
program on the host computer
such as a write operation
executed after a rewind.
3
4
The analog read circuit board or the Replace these circuit boards as
digital read circuit board is damaged.
necessary.
The control circuit board is damaged.
Replace this circuit board.
Section
7.3.7
Section
7.3.7
5
The SCSI command corrupted. The SCSI Check the SCSI cable and
cable is too long or the SCSI connector terminator.
Section
4.1
contact is loose.
6
The
SCSI
driver
circuit
board
is Replace this circuit board.
damaged.
7
Section
7.3.3
The SCSI circuit board is damaged.
Replace this circuit board.
Section
7.3.7
1024
BAD CFG PRM 1024
Description:
CONFIGURE_COMMAND_BAD_PARAMETER
A malfunction occurs during communication between the internal
5-11
Trouble Shooting
microprocessors (SCSI - Control).
Possibility
1
The
SCSI
Countermeasure
driver
circuit
board
Ref.
is Replace this circuit board.
damaged.
2
Section
7.3.3
The SCSI circuit board is damaged.
Replace this circuit board.
Section
7.3.7
3
The control circuit board is damaged.
Replace this circuit board.
Section
7.3.7
1026
18Thin Tape 1026
CANT_WRT_18_ON_THIN_TAPE
Description: A write operation cannot be executed to an extended cartridge on 18 track
drive.
Possibility
1
2
Countermeasure
A write operation cannot be executed to Use
a
standard
Ref.
length
an extended cartridge on 18 track drive.
cartridge (165m).
The tape length is out of specifications.
Use a cartridge that is a
standard product.
3
The tape in the cartridge is loose.
Use a new cartridge.
4
The servo circuit board is damaged.
Replace this circuit board.
Section
2.1
Section
2.1
Section
7.3.7
5
Either the take-up reel motor or the Replace the drive.
supply reel motor is damaged.
6
The
cable
that
connects
Section
7.3.4
the
motor Replace the drive.
described above and the mother circuit
Section
7.3.4
board is disconnected or damaged.
7
The control circuit board is damaged.
Replace this circuit board.
Section
7.3.7
1028
Short Tape 1028
CANT_WRT_SHORT_TAPE
Description: The tape length is shorter than the standard.
Possibility
1
The tape length is shorter than the Use a cartridge that is a
standard.
2
Countermeasure
standard product.
Cut the leading edge of the tape and Only change the leader block
attach a leader block, then use the tape.
one time.
Ref.
Section
2.1
Section
3.2
5-12
Trouble Shooting
3
The servo circuit board is damaged.
Replace this circuit board.
Section
7.3.7
4
Either the take-up reel motor or the Replace the drive.
Section
supply reel motor is damaged.
5
The
cable
that
connects
7.3.4
the
motor Replace the drive.
Section
7.3.4
described above and the mother circuit
board is disconnected or damaged.
6
The control circuit board is damaged.
Replace this circuit board.
Section
7.3.7
1029
36 track
1029
CANT_READ_36_ON_18
Description: A read operation cannot be executed on 18 track drive to the tape that was
written on 36 track.
Possibility
1
Countermeasure
A tape that was written in a 36 track is Read a 36 track tape on a 36
read on an 18 track drive.
2
track drive
The tape head or the head cable is Replace
damaged.
3
4
Ref.
these
parts
as
necessary.
The analog read circuit board or digital Replace these circuit boards as
read circuit board is damaged.
necessary.
The control circuit board is damaged.
Replace this circuit board.
Section
7.3.6
Section
7.3.7
Section
7.3.7
1050
LOADED_AND_UNLOADED_CLEANING
Description: The cleaning operations are completed by the cleaning cartridge.
1
Possibility
Countermeasure
The control circuit board is damaged.
Replace this circuit board.
Ref.
Section
7.3.7
5.4.2 Error Codes (11xx)
1102
PEOT HIT
1102
PEOT_ENCOUNTERED
Description: The tape position reached the physical end of the tape (PEOT).
Possibility
Countermeasure
Ref.
5-13
Trouble Shooting
1
A mandatory stop is executed at the There is a problem in your
physical EOT in order to ignore the program on the host computer
logical EOT when a write operation is system. (verify EOM of SCSI)
executed.
2
A forced stop is executed to read a tape Create
the
tape
again
to
which has completed the write operation complete the writing as far as
the logical EOT position
as far as the physical EOT.
3
Numerous write retry operations occur. Use a cleaning cartridge to
The tape head and tape path are dirty.
4
clean off the dirt.
Numerous write retry operations occur. Use
The tape media is damaged.
a
new
Section
3.1
cartridge
and
execute the write operation
again.
5
The tape head or the head cable is Replace
damaged.
6
these
parts
as
necessary.
The analog write circuit board, analog Replace these circuit boards as
read circuit board or digital read circuit necessary.
Section
7.3.6
Section
7.3.7
board is damaged.
7
The control circuit board is damaged.
Replace this circuit board.
Section
7.3.7
8
The servo circuit board is damaged.
Replace this circuit board.
Section
7.3.7
9
The SCSI command corrupted. The SCSI Check the SCSI cable and
cable is too long or the SCSI connector terminator.
Section
4.1
contact is loose.
10 The
SCSI
driver
circuit
board
is Replace this circuit board.
damaged.
Section
7.3.3
11 The SCSI circuit board is damaged.
Replace this circuit board.
Section
7.3.7
1104
1106
1108
BOT HIT
LEOT HIT
FMK HIT
1104
1106
1108
BOT_ENCOUNTERED
LEOT_ENCOUNTERED
FMK_ENCOUNTERED
Description: An unexpected internal status is generated.
1
Possibility
Countermeasure
The control circuit board is damaged.
Replace this circuit board.
Ref.
Section
7.3.7
5-14
Trouble Shooting
2
The servo circuit board is damaged.
Replace this circuit board.
Section
7.3.7
1112
1112
END OF RECORDING
END OF ALL DATA
EOD_ENCOUNTERED
EOD_ENCOUNTERED ##
Description: A read is executed behind the End of Data (EOD).
Possibility
1
Countermeasure
Ref.
A read is executed to the data behind the There is a problem in your
2
end of data.
program on the host computer.
The control circuit board is damaged.
Replace this circuit board.
Section
7.3.7
3
The SCSI command corrupted. The SCSI Check the SCSI cable and
cable is too long or the SCSI connector terminator.
Section
4.1
contact is loose.
4
The
SCSI
driver
circuit
board
is Replace this circuit board.
Section
damaged.
5
7.3.3
The SCSI circuit board is damaged.
Replace this circuit board.
Section
7.3.7
6
The servo circuit board is damaged.
Replace this circuit board.
Section
7.3.7
1114
1116
1118
1120
BF Bk ID er 1114
EX Bk ID er 1116
BUFF_BLOCK_ID_SEQUENCE_ERROR
EXPECTED_BLOCK_ID_SEQUENCE_ERROR
Explain in the next section.
RDB BLK ERR 1120
BUFF_BLOCK_ID_SEQUENCE_ERROR_RD_BACKWARD
S
Description: The data block number (BLOCK ID) or the status is abnormal. A read or
write error may have occurred.
1
Possibility
Countermeasure
Ref.
The tape head and tape path are dirty.
Use a cleaning cartridge to
clean off the dirt.
2
Tape media damage is shown when a Use
write operation is executed
a
new
cartridge
3.1
and
execute the write operation
again.
Section
5-15
Trouble Shooting
When a read operation is executed, the Use a new cartridge and create
3
data is either corrupted or there is no a new data tape again.
valid data present.
4
The control circuit board is damaged.
Replace this circuit board.
Section
7.3.7
5
The tape head or the head cable is Replace
damaged.
these
parts
as
necessary.
7.3.6
The analog write circuit board, analog Replace these circuit boards as
6
Section
read circuit board or digital read circuit necessary.
Section
7.3.7
board is damaged.
7
The servo circuit board is damaged.
Replace this circuit board.
Section
7.3.7
8
Either the take-up reel motor or the Replace the drive.
Section
supply reel motor is damaged.
9
The
cable
that
connects
7.3.4
the
motor Replace the drive.
Section
described above and the mother circuit
7.3.4
board is disconnected or damaged.
1118
POS EOD bkw 1118
EOD_ON_READ_BACKWARD
Description: When a reverse read (read in the reverse direction) is executed, the End of
Data (EOD) is detected.
1
Possibility
Countermeasure
Ref.
The tape head and tape path are dirty.
Use a cleaning cartridge to
clean off the dirt.
2
Section
3.1
When a read operation is executed, the Use a new cartridge and create
data is either corrupted or there is no a new data tape again.
valid data present.
3
The control circuit board is damaged.
Replace this circuit board.
Section
7.3.7
4
The tape head or the head cable is Replace
damaged.
5
6
these
parts
as
necessary.
The analog read circuit board or digital Replace these circuit boards as
read circuit board is damaged.
necessary.
The servo circuit board is damaged.
Replace this circuit board.
Section
7.3.6
Section
7.3.7
Section
7.3.7
7
Either the take-up reel motor or the Replace the drive.
supply reel motor is damaged.
Section
7.3.4
Trouble Shooting
8
The
cable
that
connects
the
motor Replace the drive.
5-16
Section
7.3.4
described above and the mother circuit
board is disconnected or damaged.
1120
Already explained in the previous section.
5.4.3 Error Codes (12xx to 18xx)
1200
1202
HOST DET ER 1200
HOST STOP E 1202
HOST_DETECTED_ERROR
HOST_ERR_STOP_ERASE
Description: Errors which are not to be displayed.
1
Possibility
Countermeasure
The control circuit board is damaged.
Replace this circuit board.
Ref.
Section
7.3.7
1333
R BUF EMPTY 1333
BUF_EMPTY
Description: There is no data transmitted to the host because the internal buffer is empty
when a read operation is executed.
1
Possibility
Countermeasure
The control circuit board is damaged.
Replace this circuit board.
Ref.
Section
7.3.7
2
The SCSI circuit board is damaged.
Replace this circuit board.
Section
7.3.7
1355
W BUF FULL 1355
BUF_NO_ROOM
Description: The data cannot be transmitted from the host because the internal buffer is
full when a write operation is executed.
1
Possibility
Countermeasure
The control circuit board is damaged.
Replace this circuit board.
Ref.
Section
7.3.7
2
The SCSI circuit board is damaged.
Replace this circuit board.
Section
7.3.7
1366
BUF OVRFLOW 1366
BUF_OVERFLOW
5-17
Trouble Shooting
Description: There is no empty area in the internal buffer and part of the data is lost.
1
Possibility
Countermeasure
The control circuit board is damaged.
Replace this circuit board.
Ref.
Section
7.3.7
2
The SCSI circuit board is damaged.
Replace this circuit board.
Section
7.3.7
1400
1502
1504
1506
BUF_RD_PATTERN
BUF_WRT_SYNC
BUF_RID_RD_AHEAD
BUF_DIFF_RD_TYPE
Description: An error occurs in the internal buffer control.
1
Possibility
Countermeasure
The control circuit board is damaged.
Replace this circuit board.
Ref.
Section
7.3.7
1602
P WR 349crc 1602
Description:
END_PHY_WRITE_IDRC_CRC_ERROR
A CRC error is detected in an internal buffer when a compressed write
operation is executed.
1
Possibility
Countermeasure
The control circuit board is damaged.
Replace this circuit board.
Ref.
Section
7.3.7
2
The SCSI circuit board is damaged.
Replace this circuit board.
Section
7.3.7
1604
P WR 348crc 1604
END_PHY_WRITE_3480_CRC_ERROR
Description: A CRC error is detected in an internal buffer when a non-compressed write
operation is executed.
1
Possibility
Countermeasure
The control circuit board is damaged.
Replace this circuit board.
Ref.
Section
7.3.7
2
The SCSI circuit board is damaged.
Replace this circuit board.
Section
7.3.7
5-18
Trouble Shooting
1606
1608
1610
1612
MISCOMPARE_OF_LAST_PACKET
MISCOMPARE_OF_M32_UNCOMP_COUNT
UNKNOWN_PERM_RD_ERROR
UNKNOWN_PERM_WRT_ERROR
Description: An error is detected in an internal buffer. A read or write error may have
occurred.
1
Possibility
Countermeasure
Ref.
The tape head and tape path are dirty.
Use a cleaning cartridge to
clean off the dirt.
2
Tape media damage is shown when a Use
write operation is executed
a
new
Section
3.1
cartridge
and
execute the write operation
again.
3
When a read operation is executed, the Use a new cartridge and create
data is either corrupted or there is no a new data tape again.
valid data present.
4
The control circuit board is damaged.
Replace this circuit board.
Section
7.3.7
5
The tape head or the head cable is Replace
damaged.
6
these
parts
as
necessary.
The analog write circuit board, analog Replace these circuit boards as
read circuit board or digital read circuit necessary.
Section
7.3.6
Section
7.3.7
board is damaged.
7
The servo circuit board is damaged.
Replace this circuit board.
Section
7.3.7
8
Either the take-up reel motor or the Replace the drive.
supply reel motor is damaged.
9
The
cable
that
connects
Section
7.3.4
the
motor Replace the drive.
Section
7.3.4
described above and the mother circuit
board is disconnected or damaged.
1702
FORM WC PAT 1702
FORM_WRT_BACK_CHECK_BAD_PATTERN
Description: An error (Read echo-back error) is detected when a write operation is executed.
1
Possibility
Countermeasure
The tape head and tape path are dirty.
Use a cleaning cartridge to
clean off the dirt.
Ref.
Section
3.1
5-19
Trouble Shooting
2
Tape media damage is shown when a Use
write operation is executed
a
new
cartridge
and
execute the write operation
again.
3
The tape head or the head cable is Replace
damaged.
these
parts
as
necessary.
7.3.6
The analog write circuit board, analog Replace these circuit boards as
4
Section
read circuit board or digital read circuit necessary.
Section
7.3.7
board is damaged.
5
The control circuit board is damaged.
Replace this circuit board.
Section
7.3.7
6
The servo circuit board is damaged.
Replace this circuit board.
Section
7.3.7
7
Either the take-up reel motor or the Replace the drive.
Section
supply reel motor is damaged.
8
The
cable
that
connects
7.3.4
the
motor Replace the drive.
Section
described above and the mother circuit
7.3.4
board is disconnected or damaged.
1704
ADD EOD/FCR 1704
DONT_ADD_EOD_OR_FCR_IN_ADD_PHY_READ
Description: Invalid data is detected in an internal buffer. A read or write error may have
occurred.
1
Possibility
Countermeasure
Ref.
The tape head and tape path are dirty.
Use a cleaning cartridge to
clean off the dirt.
2
Tape media damage is shown when a Use
write operation is executed
a
new
Section
3.1
cartridge
and
execute the write operation
again.
3
When a read operation is executed, the Use a new cartridge and create
data is either corrupted or there is no a new data tape again.
valid data present.
4
The control circuit board is damaged.
Replace this circuit board.
Section
7.3.7
5
The tape head or the head cable is Replace
damaged.
6
these
parts
as
necessary.
The analog write circuit board, analog Replace these circuit boards as
read circuit board or digital read circuit necessary.
board is damaged.
Section
7.3.6
Section
7.3.7
5-20
Trouble Shooting
7
The servo circuit board is damaged.
Replace this circuit board.
Section
7.3.7
8
Either the take-up reel motor or the Replace the drive.
Section
supply reel motor is damaged.
9
The
cable
that
connects
7.3.4
the
motor Replace the drive.
Section
7.3.4
described above and the mother circuit
board is disconnected or damaged.
1706
READB COMP 1706
LOG_START_OF_COMP_REV_READ
Description: Compressed data which was read reverse (a read in the reverse direction) is
detected in an internal buffer.
Possibility
1
Countermeasure
Ref.
A reverse read operation is executed to a Create the tape again without
2
compressed data.
using compression.
The control circuit board is damaged.
Replace this circuit board.
Section
7.3.7
1708
WRT/BSB ERR 1708
REPOSITION_BSB_FAILURE
Description: The data can not be recovered even though the write-retry operations are
executed.
1
Possibility
Countermeasure
Ref.
The tape head and tape path are dirty.
Use a cleaning cartridge to
clean off the dirt.
2
Tape media damage is shown when a Use
write operation is executed
a
new
Section
3.1
cartridge
and
execute the write operation
again.
3
The tape head or the head cable is Replace
damaged.
4
these
parts
as
necessary.
The analog write circuit board, analog Replace these circuit boards as
read circuit board or digital read circuit necessary.
Section
7.3.6
Section
7.3.7
board is damaged.
5
The control circuit board is damaged.
Replace this circuit board.
Section
7.3.7
6
The servo circuit board is damaged.
Replace this circuit board.
Section
7.3.7
5-21
Trouble Shooting
7
Either the take-up reel motor or the Replace the drive.
Section
supply reel motor is damaged.
8
The
cable
that
connects
7.3.4
the
motor Replace the drive.
Section
7.3.4
described above and the mother circuit
board is disconnected or damaged.
1802
1804
1806
1808
1810
1812
1814
1816
1820
1820
IDRC
IDRC
IDRC
IDRC
IDRC
IDRC
IDRC
3480
CNT 1
CNT A
CMP WR
UCMP W
Dcrc1
crc1
ODD
CLOSE
1802
1804
1806
1808
1810
1812
1814
1816
IDRC_COUNT_1_ERROR
IDRC_COUNT_A_ERROR
IDRC_COMP_WRT_CNT_A_SCSI_CNT_ERR
IDRC_UNCOMP_WRT_CNT_2_SCSI_CNT_ERR
IDRC_DCRC1_ERROR
IDRC_CRC1_ERROR
ODD_BYTES_COMP
CLOSING_3480_ERROR
IDRC_NO_SOFTWARE_DECODE
IDRC_NO_SOFTWARE_DECODE ##
Description:
An error is detected when a read or write operation is executed in data
compression mode.
1
Possibility
Countermeasure
Ref.
The tape head and tape path are dirty.
Use a cleaning cartridge to
clean off the dirt.
2
Tape media damage is shown when a Use
write operation is executed
a
new
Section
3.1
cartridge
and
execute the write operation
again.
3
When a read operation is executed, the Use a new cartridge and create
data is either corrupted or there is no a new data tape again.
valid data present.
4
The tape head or the head cable is Replace
damaged.
5
these
parts
as
necessary.
The analog write circuit board, analog Replace these circuit boards as
read circuit board or digital read circuit necessary.
Section
7.3.6
Section
7.3.7
board is damaged.
6
The control circuit board is damaged.
Replace this circuit board.
Section
7.3.7
5.4.4 Error Codes (19xx)
Trouble Shooting
1902
1904
1906
1908
1910
TO SVO cmd 1902
TO SVO done 1904
TO SVO loc 1906
5-22
WAIT_ERR_TIMEOUT_SERVO_CMD_TAKEN
WAIT_ERR_TIMEOUT_SERVO_DONE
WAIT_ERR_TIMEOUT_SERVO_LOC_SECTOR
Explain in the next section.
CLEAN FAILED1910
WAIT_ERR_TIMEOUT_CLEAN_NEVER_FINISHED
Description: An error occurs during communication with the servo circuit board.
1
Possibility
Countermeasure
The control circuit board is damaged.
Replace this circuit board.
Ref.
Section
7.3.7
2
The servo circuit board is damaged.
Replace this circuit board.
Section
7.3.7
3
Either the take-up reel motor or the Replace the drive.
supply reel motor is damaged.
4
The
cable
that
connects
Section
7.3.4
the
motor Replace the drive.
described above and the mother circuit
Section
7.3.4
board is disconnected or damaged.
1908
1910
1920
CSL LOAD FAILURE
WAIT_ERR_TIMEOUT_CSL_DIDNT_LOAD
Already explained in the previous section.
CSL not RDY 1920
WAIT_ERR_TIMEOUT_CSL_READY
Description: An error occurs during communication with the CSL circuit board. [with CSL
model]
1
Possibility
Countermeasure
The control circuit board is damaged.
Replace this circuit board.
Ref.
Section
7.3.7
2
The servo circuit board is damaged.
Replace this circuit board.
Section
7.3.7
3
The CSL circuit board is damaged.
Replace the CSL.
Section
7.3.4
4
The cables that connect the CSL circuit Replace the CSL.
board and drive are disconnected or
damaged.
5.4.5 Error Codes (20xx)
Section
7.3.4
5-23
Trouble Shooting
2002
2004
2006
2008
2010
2012
2014
2016
2018
TO
TO
TO
TO
TO
TO
TO
TO
TO
H READY
H COMPLT
Hwr DONE
Hrd DONE
FREE FLG
RDY FLAG
COUNT A
COUNT B
MSG_ACK
2002
2004
2006
2008
2010
2012
2014
2016
2018
WAIT_ERR_TIMEOUT_HOST_DATA_READY
WAIT_ERR_TIMEOUT_HOST_DATA_COMPLETE
WAIT_ERR_TIMEOUT_HOST_WRT_DONE
WAIT_ERR_TIMEOUT_HOST_RD_DONE
WAIT_ERR_TIMEOUT_HOST_FREE_FLAG
WAIT_ERR_TIMEOUT_HOST_READY_FLAG
WAIT_ERR_TIMEOUT_COUNT_A_DONE
WAIT_ERR_TIMEOUT_COUNT_B_DONE
WAIT_ERR_TIMEOUT_HOST_MSG_ACK
Description: An error occurs in the SCSI circuit board during communication with the host.
Possibility
1
Countermeasure
The SCSI command corrupted. The SCSI Check the SCSI cable and
cable is too long or the SCSI connector terminator.
Ref.
Section
4.1
contact is loose.
2
The
SCSI
driver
circuit
board
is Replace this circuit board.
damaged.
3
Section
7.3.3
The SCSI circuit board is damaged.
Replace this circuit board.
Section
7.3.7
4
The control circuit board is damaged.
Replace this circuit board.
Section
7.3.7
2020
DIAG STOP
2020
DIAGNOSTIC_STOP_PRESSED
Description: The self-diagnostics mode is interrupted from the operator panel.
Possibility
1
Countermeasure
The self-diagnostics mode is interrupted Execute
from the operator panel.
the
Ref.
self-diagnostics
mode from the operator panel
one more time.
2022
TO DIAG CMD 2022
WAIT_ERR_TIMEOUT_HOST_DIAG_CMD
Description: An error occurs during communication with the SCSI circuit board when the
self-diagnostics mode is executed.
1
Possibility
Countermeasure
The SCSI circuit board is damaged.
Replace this circuit board.
Ref.
Section
7.3.7
Trouble Shooting
2
The control circuit board is damaged.
Replace this circuit board.
5-24
Section
7.3.7
2024
TO CSL LOAD 2024
WAIT_ERR_TIMEOUT_CSL_FREE_FLAG
Description: An error occurs during communications with the CSL circuit board. [with CSL
model]
1
Possibility
Countermeasure
The control circuit board is damaged.
Replace this circuit board.
Ref.
Section
7.3.7
2
The servo circuit board is damaged.
Replace this circuit board.
Section
7.3.7
3
The CSL circuit board is damaged.
Replace the CSL.
Section
7.3.4
4
The cables that connect the CSL circuit Replace the CSL.
board and the drive are disconnected or
Section
7.3.4
damaged.
2026
TO BD EOP
2026
WAIT_ERR_TIMEOUT_BD_EOP
Description: A time-out is detected during control of the internal buffer.
1
Possibility
Countermeasure
The control circuit board is damaged.
Replace this circuit board.
Ref.
Section
7.3.7
5.4.6 Error Codes (21xx to 22xx)
2102
2103
TO FORM TSK 2102
TO FORM CMD 2103
WAIT_ERR_TIMEOUT_FORM_TASK_DONE
WAIT_ERR_TIMEOUT_FORM_SEND_CMD
Description: An error occurs in transmission with the internal formatter. A read or write
error may have occurred.
1
Possibility
Countermeasure
The tape head and tape path are dirty.
Use a cleaning cartridge to
clean off the dirt.
Ref.
Section
3.1
5-25
Trouble Shooting
2
Tape media damage is shown when a Use
write operation is executed
a
new
cartridge
and
execute the write operation
again.
3
When a read operation is executed, the Use a new cartridge and create
data is either corrupted or there is no a new data tape again.
valid data present.
4
The control circuit board is damaged.
Replace this circuit board.
Section
7.3.7
5
The tape head or the head cable is Replace
damaged.
6
these
parts
as
necessary.
The analog write circuit board, analog Replace these circuit boards as
read circuit board or digital read circuit necessary.
Section
7.3.6
Section
7.3.7
board is damaged.
7
The servo circuit board is damaged.
Replace this circuit board.
Section
7.3.7
8
Either the take-up reel motor or the Replace the drive.
supply reel motor is damaged.
9
The
cable
that
connects
Section
7.3.4
the
motor Replace the drive.
described above and the mother circuit
Section
7.3.4
board is disconnected or damaged.
2202
TO FIF EMTY 2202
WAIT_ERR_TIMEOUT_FIFO_EMPTY
Description: An error occurs during communication with the internal FIFO.
1
Possibility
Countermeasure
The control circuit board is damaged.
Replace this circuit board.
Ref.
Section
7.3.7
2
The SCSI circuit board is damaged.
Replace this circuit board.
Section
7.3.7
2204
2206
TO RD LOG 2204
TO WRT LOG 2206
WAIT_ERR_TIMEOUT_TST_RD_LOGICAL
WAIT_ERR_TIMEOUT_TST_WRT_LOGICAL
Description: A time-out is detected in the self-diagnostics mode including the tape update.
1
Possibility
Countermeasure
The control circuit board is damaged.
Replace this circuit board.
Ref.
Section
7.3.7
Trouble Shooting
2
The SCSI circuit board is damaged.
Replace this circuit board.
5-26
Section
7.3.7
2208
TO PHY REPO 2208
WAIT_ERR_TIMEOUT_FORM_PHY_POSITION
Description: An error is detected in the internal buffer control.
1
Possibility
Countermeasure
The control circuit board is damaged.
Replace this circuit board.
Ref.
Section
7.3.7
2210
2216
TO SE PEOT 2210
TO SE PEOT 2216
WAIT_ERR_TIMEOUT_PEOT_DONE
WAIT_ERR_TIMEOUT_PEOT_FORM_ERR
Description: An error is detected in the final write processing (at PEOT).
1
Possibility
Countermeasure
The control circuit board is damaged.
Replace this circuit board.
Ref.
Section
7.3.7
2
The servo circuit board is damaged.
Replace this circuit board.
Section
7.3.7
2212
2214
TO IDRC RDY 2212
TO SOFT CRC 2214
WAIT_ERR_TIMEOUT_IDRC_READY
WAIT_ERR_TIMEOUT_SOFT_IDRC_FIFO_FULL
Description: An error occurs in the internal compression buffer control.
1
Possibility
Countermeasure
The control circuit board is damaged.
Replace this circuit board.
Ref.
Section
7.3.7
2216
2221
2222
2223
2224
2225
2226
2227
Already explained in the previous section.
WAIT_ERR_TIMEOUT_FIFO_EMPTY_1
WAIT_ERR_TIMEOUT_FIFO_EMPTY_2
WAIT_ERR_TIMEOUT_FIFO_EMPTY_3
WAIT_ERR_TIMEOUT_FIFO_EMPTY_4
WAIT_ERR_TIMEOUT_FIFO_EMPTY_5
WAIT_ERR_TIMEOUT_FIFO_EMPTY_6
WAIT_ERR_TIMEOUT_FIFO_EMPTY_7
Trouble Shooting
5-27
Description: An error occurs during communication with an internal FIFO.
1
Possibility
Countermeasure
The control circuit board is damaged.
Replace this circuit board.
Ref.
Section
7.3.7
2
The SCSI circuit board is damaged.
Replace this circuit board.
Section
7.3.7
2230
WAIT_ERR_TIMEOUT_FLAPPER_STALL
Description: An error code is used by the drive with special specifications.
Possibility
Countermeasure
1
The specifications are different.
Check the specifications.
2
The control circuit board is damaged.
Replace this circuit board.
Ref.
Section
7.3.7
2280
ER FP SWTCH 2280
Description:
BAD_FILE_PROTECT_SWITCH
An malfunction is detected in the write protect detection switch during
operation.
Possibility
1
Countermeasure
The write protect selector of the cartridge Place the write protect selector
is in an incorrect position.
of the cartridge in the correct
Ref.
Figure
2-1
position.
2
The write protect detection switch in the Replace the drive.
drive is damaged.
3
Section
7.3.4
The cable that connects the write protect Replace the drive.
detection switch and the mother circuit
Section
7.3.4
board in the drive is disconnected or
damaged.
4
The control circuit board is damaged.
Replace this circuit board.
Section
7.3.7
5
The servo circuit board is damaged.
Replace this circuit board.
Section
7.3.7
5.4.7 Error Codes (23xx to 24xx)
5-28
Trouble Shooting
2302
2304
STR WR BLK 2302
WRT BLK ID 2304
START_PHY_WRT_BLOCK_ID_SEQUENCE_ERROR
WRT_BLOCK_ID_SEQUENCE_ERROR_POSITION_LOST
Description: The data block number (BLOCK ID) is abnormal. A write error may have
occurred.
1
Possibility
Countermeasure
Ref.
The tape head and tape path are dirty.
Use a cleaning cartridge to
clean off the dirt.
2
Tape media damage is shown when a Use
write operation is executed
a
new
Section
3.1
cartridge
and
execute the write operation
again.
3
The control circuit board is damaged.
Replace this circuit board.
Section
7.3.7
4
The tape head or the head cable is Replace
damaged.
5
these
parts
as
necessary.
Section
7.3.6
The analog write circuit board, analog Replace these circuit boards as
read circuit board or digital read circuit necessary.
Section
7.3.7
board is damaged.
6
The servo circuit board is damaged.
Replace this circuit board.
Section
7.3.7
7
Either the take-up reel motor or the Replace the drive.
Section
supply reel motor is damaged.
8
The
cable
that
connects
7.3.4
the
motor Replace the drive.
Section
described above and the mother circuit
7.3.4
board is disconnected or damaged.
2400
Cycle Power 2400
BAD_INTERRUPT
Description: An unexpected internal interrupt occurs.
1
Possibility
Countermeasure
The AC power is operating abnormally.
Turn the power off.
Ref.
Section
Check the AC power supply.
1.4.5
Turn the power on again one
more time.
2
The power supply unit is damaged.
Replace
the
power
supply
block.
Replace the power supply unit.
(For CSL model)
Section
7.3.4
Section
7.3.9
5-29
Trouble Shooting
3
The control circuit board is damaged.
Replace this circuit board.
Section
7.3.7
4
The SCSI circuit board is damaged.
Replace this circuit board.
Section
7.3.7
5
The servo circuit board is damaged.
Replace this circuit board.
Section
7.3.7
2444
SOFT_RESET_FAILED
Description: A soft reset fails when it is attempted from the operator panel.
1
Possibility
Countermeasure
Ref.
The control circuit board is damaged.
Replace this circuit board.
Section
7.3.7
2
The servo circuit board is damaged.
Replace this circuit board.
Section
7.3.7
3
The SCSI circuit board is damaged.
Replace this circuit board.
Section
7.3.7
5.4.8 Error Codes (25xx to 26xx)
2502
2504
PO DRAM PS2 2502
PO DRAM PS3 2504
CNTL_POWER_ON_ERR_DRAM_PASS2
CNTL_POWER_ON_ERR_DRAM_PASS3
Description: An error is detected in internal RAM when the power is turned on.
1
Possibility
Countermeasure
Ref.
The control circuit board is damaged.
Replace this circuit board.
Section
7.3.7
2506
2508
2510
PO SMR CHK 2506
CNTL_POWER_ON_ERR_SMR_CHEC
Explain in the next section.
PO SMR FORM 2510
FORM_POWER_ON_ERR_SMR_CHECK
Description: An error is detected in the internal interface when the power is turned on.
1
Possibility
Countermeasure
A failure occurs in a firmware update.
Replace
board.
the
control
Ref.
circuit
Section
7.3.7
5-30
Trouble Shooting
2
The control circuit board is damaged.
Replace this circuit board.
Section
7.3.7
3
The mother circuit board connection is Re-install the control circuit
not correct.
board, SCSI circuit board and
Section
7.3.7
servo circuit board.
4
The mother circuit board is damaged.
Replace the drive.
Section
7.3.4
5
The SCSI circuit board is damaged.
Replace this circuit board.
Section
7.3.7
6
The servo circuit board is damaged.
Replace this circuit board.
Section
7.3.7
2508
PO SMR SCSI 2508
SCSI_POWER_ON_ERR_SMR_CHECK
Description: An error is detected in the internal interface when the power is turned on.
1
Possibility
Countermeasure
A failure occurs in a firmware update.
Replace
the
control
Ref.
circuit
board.
2
The control circuit board is damaged.
Section
7.3.7
Replace this circuit board.
Section
7.3.7
3
The SCSI circuit board is damaged.
Replace this circuit board.
Section
7.3.7
4
The mother circuit board connection is Re-install the control circuit
not correct.
board, SCSI circuit board and
Section
7.3.7
servo circuit board.
5
The mother circuit board is damaged.
Replace the drive.
Section
7.3.4
6
The servo circuit board is damaged.
Replace this circuit board.
Section
7.3.7
2510
2512
Already explained in the previous section
PO SMR SRVO 2512
SERVO_POWER_ON_ERR_SMR_CHECK
Description: An error is detected in the internal interface when the power is turned on.
1
Possibility
Countermeasure
A failure occurs in a firmware update.
Replace
board.
the
control
Ref.
circuit
Section
7.3.7
Trouble Shooting
2
The control circuit board is damaged.
Replace this circuit board.
5-31
Section
7.3.7
3
The servo circuit board is damaged.
Replace this circuit board.
Section
7.3.7
4
The mother circuit board connection is Re-install the control circuit
not correct.
board, SCSI circuit board and
Section
7.3.7
servo circuit board.
5
The mother circuit board is damaged.
Replace the drive.
Section
7.3.4
6
The SCSI circuit board is damaged.
Replace this circuit board.
Section
7.3.7
2514
PO SMR WRT 2514
CNTL_POWER_ON_ERR_SMR_WRT_CHECK
Description: An error is detected in the internal interface when the power is turned on.
1
Possibility
Countermeasure
The control circuit board is damaged.
Replace this circuit board.
Ref.
Section
7.3.7
2
The mother circuit board connection is Re-install the control circuit
not correct.
board, SCSI circuit board and
Section
7.3.7
servo circuit board.
3
The mother circuit board is damaged.
Replace the drive.
Section
7.3.4
4
The SCSI circuit board is damaged.
Replace this circuit board.
Section
7.3.7
5
The servo circuit board is damaged.
Replace this circuit board.
Section
7.3.7
2602
2604
XILINX INIT 2602
XILINX DONE 2604
CNTL_POWER_ON_ERR_NO_XILINX_INIT
CNTL_POWER_ON_ERR_NO_XILINX_DONE
Description: An error is detected in an internal circuit (XILINX) initialization when the
power is turned on.
1
Possibility
Countermeasure
The control circuit board is damaged.
Replace this circuit board.
Ref.
Section
7.3.7
2606
INTR TEST
2606
INTERRUPT_TEST_FAILED
5-32
Trouble Shooting
Description: An error is detected in an internal interruption test when the power is turned
on.
1
Possibility
Countermeasure
Ref.
The control circuit board is damaged.
Replace this circuit board.
Section
7.3.7
2
The mother circuit board connection is Re-install the control circuit
not correct.
board, SCSI circuit board and
Section
7.3.7
servo circuit board.
3
The mother circuit board is damaged.
Replace the drive.
Section
7.3.4
4
The SCSI circuit board is damaged.
Replace this circuit board.
Section
7.3.7
5
The servo circuit board is damaged.
Replace this circuit board.
Section
7.3.7
2608
SCSI DEAD
2608
SCSI_PROC_NOT_RESPONDING
Description: There is no response from the SCSI circuit board when the power is turned on.
1
Possibility
Countermeasure
Ref.
The SCSI circuit board is damaged.
Replace this circuit board.
Section
7.3.7
2
A failure occurs in a firmware update.
Replace
the
control
circuit
board.
3
The control circuit board is damaged.
Replace this circuit board.
Section
7.3.7
Section
7.3.7
4
The mother circuit board connection is Re-install the control circuit
not correct.
board, SCSI circuit board and
Section
7.3.7
servo circuit board.
5
The mother circuit board is damaged.
Replace the drive.
Section
7.3.4
2610
SERVO DEAD 2610
SERVO_PROC_NOT_RESPONDING
Description: There is no response from the servo circuit board when the power is turned on.
1
Possibility
Countermeasure
The servo circuit board is damaged.
Replace this circuit board.
Ref.
Section
7.3.7
5-33
Trouble Shooting
2
A failure occurs in a firmware update.
Replace
the
control
circuit
board.
3
The control circuit board is damaged.
Section
7.3.7
Replace this circuit board.
Section
7.3.7
4
The mother circuit board connection is Re-install the control circuit
not correct.
board, SCSI circuit board and
Section
7.3.7
servo circuit board.
5
The mother circuit board is damaged.
Replace the drive.
Section
7.3.4
2612
FORM DEAD 2612
FORM_PROC_NOT_RESPONDING
Description: There is no response from the formatter when the power is turned on.
1
Possibility
Countermeasure
Ref.
The control circuit board is damaged.
Replace this circuit board.
Section
7.3.7
2
A failure occurs in a firmware update.
Replace
the
control
circuit
board.
2614
2616
FLASH 50000 2614
FLASH 50000 2616
Section
7.3.7
ERASING_FLASH_SMR_AREA_FAILED
SAVING_SMR_AREA_FAILED
Description: An error occurs in internal flash ROM when the power is turned on.
1
Possibility
Countermeasure
Ref.
The control circuit board is damaged.
Replace this circuit board.
Section
7.3.7
2
A failure occurs in a firmware update.
Replace
the
control
circuit
board.
2620
2622
SERVO SEN 1 2620
SERVO SEN 2 2622
Section
7.3.7
SERVO_SENSE_1_FAILED
SERVO_SENSE_2_FAILED
Description: An error is detected in servo circuit board when the power is turned on.
1
Possibility
Countermeasure
The servo circuit board is damaged.
Replace this circuit board.
Ref.
Section
7.3.7
2624
FORM SMR VD 2624
FORM_SMR_VALID_FAILED
5-34
Trouble Shooting
Description: An error is detected in an internal interface when the power is turned on.
1
Possibility
Countermeasure
A failure occurs in a firmware update.
Replace
the
control
Ref.
circuit
board.
2
The control circuit board is damaged.
Section
7.3.7
Replace this circuit board.
Section
7.3.7
3
The mother circuit board connection is Re-install the control circuit
not correct.
board, SCSI circuit board and
Section
7.3.7
servo circuit board.
4
The mother circuit board is damaged.
Replace the drive.
Section
7.3.4
5
The SCSI circuit board is damaged.
Replace this circuit board.
Section
7.3.7
6
The servo circuit board is damaged.
Replace this circuit board.
Section
7.3.7
2626
SCSI SMR VD 2624
SCSI_SMR_VALID_FAILED
Description: An error is detected in an internal interface when the power is turned on.
1
Possibility
Countermeasure
A failure occurs in a firmware update.
Replace
the
control
Ref.
circuit
board.
2
The control circuit board is damaged.
Replace this circuit board.
Section
7.3.7
Section
7.3.7
3
The SCSI circuit board is damaged.
Replace this circuit board.
Section
7.3.7
4
The mother circuit board connection is Re-install the control circuit
not correct.
board, SCSI circuit board and
Section
7.3.7
servo circuit board.
5
The mother circuit board is damaged.
Replace the drive.
Section
7.3.4
6
The servo circuit board is damaged.
Replace this circuit board.
Section
7.3.7
2630
2631
2642
ERASING_CNTL_CODE_FAILED
SAVING_CNTL_CODE_FAILED
ERASING_FORM_CODE_FAILED
5-35
Trouble Shooting
2643
2654
2655
2666
2667
2678
2679
SAVING_FORM_CODE_FAILED
ERASING_SCSI_CODE_FAILED
SAVING_SCSI_CODE_FAILED
ERASING_SERV_CODE_FAILED
SAVING_SERV_CODE_FAILED
ERASING_XLNX_CODE_FAILED
SAVING_XLXN_CODE_FAILED
Description: A failure occurs when a firmware update is executed using a debugger.
1
Possibility
Countermeasure
The control circuit board is damaged.
Replace this circuit board.
Ref.
Section
7.3.7
5.4.9 Error Codes (27xx to 2800)
2700
2701
2702
2703
2710
2711
2712
2713
2720
2721
CNTL LENGTH
FORM LENGTH
SCSI LENGTH
SERV LENGTH
CNTL CRC
FORM CRC
SCSI CRC
SERVO CRC
CNTL VALID
FORM VALID
2700
2701
2702
2703
2710
2711
2712
2713
2720
2721
2722
2723
2730
2740
2750
2760
2770
2780
2791
2792
2793
SCSI VALID 2722
SERVO VALID 2723
CODE_UPLOAD_LENGTH_ERROR
CODE_UPLOAD_CRC_ERROR
CODE_UPLOAD_VALID_CHECK_ERROR
TAPE_DOES_NOT_HAVE_5_FILEMARKS
ERROR_READING_HEADER_RECORD
ERROR_READING_REVISION_RECORD
ERROR_READING_LENGTH_AND_CRC_RECORD
ERROR_READING_UCODE_RECORD
DRAM_FAILED_VALIDATION_TEST
CFG LENGTH 2791
CFG TMK
2792
CFG VALID 2793
CODE_CFG_LENGTH_ERROR
CODE_CFG_MISSING_FMK_ERROR
CODE_CFG_VALID_ERROR
5-36
Trouble Shooting
Description: A failure occurs when a firmware update is executed using an update tape.
1
Possibility
Countermeasure
Ref.
The tape head and tape path are dirty.
Use a cleaning cartridge to
clean off the dirt.
2
Section
3.1
When a read operation is executed, the Use a new cartridge and create
data is either corrupted or there is no a new data tape again.
valid data present.
3
The tape head or the head cable is Replace
damaged.
4
these
parts
as
necessary.
The analog write circuit board, analog Replace these circuit boards as
read circuit board or digital read circuit necessary.
Section
7.3.6
Section
7.3.7
board is damaged.
5
The control circuit board is damaged.
Replace this circuit board.
Section
7.3.7
6
The SCSI circuit board is damaged.
Replace this circuit board.
Section
7.3.7
7
The servo circuit board is damaged.
Replace this circuit board.
Section
7.3.7
2800
ER FP SWTCH 2280
BAD_FILE_PROTECT_SWITCH
Description: An malfunction is detected in a write protect detection switch during operation.
Possibility
1
Countermeasure
The write protect selector of the cartridge Place the write protect selector
is in an incorrect position.
of the cartridge in the correct
Ref.
Figure
2-1
position.
2
The write protect detection switch in the Replace the drive.
drive is damaged.
3
Section
7.3.4
The cable that connects the write protect Replace the drive.
detection switch and the mother circuit
Section
7.3.4
board in the drive is disconnected or
damaged.
4
The control circuit board is damaged.
Replace this circuit board.
Section
7.3.7
5
The servo circuit board is damaged.
Replace this circuit board.
Section
7.3.7
Trouble Shooting
[ Notes ]
5-37
5-38
Trouble Shooting
5.5 Control Circuit Board (Formatter Function Block) Errors
5.5.1 Error Codes (30xx)
3001
3002
3003
3004
3005
3006
RD
RD
RD
RD
RD
RD
NO IBG
TIMEOUT
NO DENS
BLANK
NO DATA
NADA PAT
3001
3002
3003
3004
3005
3006
RD_ERR_NO_IBG_BLANK_TAPE_BIT_ON
RD_ERR_NADA_IBG_BLANK_RD_TIMEOUT
RD_ERR_NO_DENSITY_ID_TIMEOUT
RD_ERR_NO_PAT_DATA_BLANK_TAPE_BIT_ON
RD_ERR_NADA_PAT_DATA_BLANK_RD_TIMEOUT
RD_ERR_NADA_PAT_DATA_IN_1_0_MSEC
Description: A blank (no data) tape is read.
Possibility
Countermeasure
Ref.
1
A blank (no data) tape is read.
Execute rewind operation
2
The tape head and tape path are dirty.
Use a cleaning cartridge to
clean off the dirty.
3
The tape head or the head cable is Replace
damaged.
4
these
3.1
parts
as
necessary.
The analog read circuit board or digital Replace these circuit boards as
5
Section
read circuit board is damaged.
necessary.
The control circuit board is damaged.
Replace this circuit board
Section
7.3.6
Section
7.3.7
Section
7.3.7
6
The servo circuit board is damaged.
Replace this circuit board.
Section
7.3.7
7
Either the take-up reel motor or the Replace the drive.
supply reel motor is damaged.
8
The
cable
that
connects
Section
7.3.4
the
motor Replace the drive.
described above and the motherboard is
Section
7.3.4
disconnected or damaged.
3007
3008
RD TOO IBG 3007
RD FAR TMK 3008
RD_ERR_TOO_MUCH_IBG
RD_ERR_TMK_TOO_FAR_MISSING_REC
Description: An invalid IBG or filemark is detected when a read or write operation is
executed.
1
Possibility
Countermeasure
The tape head and tape path are dirty.
Use a cleaning cartridge to
clean off the dirty.
Ref.
Section
3.1
5-39
Trouble Shooting
2
Tape media damage is shown when a Use
write operation is executed.
a
new
cartridge
and
execute the write operation
again.
3
When a read operation is executed, the Use a new cartridge and create
data is either corrupted or there is no a new data tape again.
valid data present.
4
The tape head or the head cable is Replace
damaged.
5
these
parts
as
necessary.
Section
7.3.6
The analog write circuit board, analog Replace these circuit boards as
read circuit board or digital read circuit necessary.
Section
7.3.7
board is damaged.
6
The control circuit board is damaged.
Replace this circuit board
Section
7.3.7
7
The servo circuit board is damaged.
Replace this circuit board.
Section
7.3.7
8
Either the take-up reel motor or the Replace the drive.
Section
supply reel motor is damaged.
9
The
cable
that
connects
7.3.4
the
motor Replace the drive.
Section
described above and the motherboard is
7.3.4
disconnected or damaged.
3009
RD WRT CUR 3009
RD_ERR_WRT_CUR_ON_WHEN_READING
Description: A malfunction is detected in a write circuit during a read operation.
Possibility
1
The
analog
Countermeasure
write
circuit
board
Ref.
is Replace this circuit board.
Section
damaged.
2
7.3.7
The control circuit board is damaged.
Replace this circuit board
Section
7.3.7
3
The digital read circuit board is damaged. Replace this circuit board.
Section
7.3.7
4
The tape head or the head cable is Replace
damaged.
5
The
analog
these
parts
necessary.
read
circuit
damaged.
5.5.2 Error Codes (31xx to 34xx)
board
is Replace this circuit board.
as
Section
7.3.6
Section
7.3.7
5-40
Trouble Shooting
3101
3102
3104
3105
3106
3107
3108
3109
RD
RD
RD
RD
RD
RD
RD
RD
NO EDM
ECC UNC
NO IBG D
NO IBG F
NO IBG W
SPEC ID
ERR FAKE
NO IBG E
3101
3102
3104
3105
3106
3107
3108
3109
RD_ERR_MISSING_EDM_IBG_SEEN
RD_ERR_ECC_UNCORRECTABLE
RD_ERR_NO_IBG_AFTER_DATA
RD_ERR_NO_IBG_AFTER_FMK
RD_ERR_NO_IBG_AFTER_WRAP
RD_ERR_BAD_FCR_OR_EOD_BLOCK_ID
RD_ERR_FAKE_ERROR
RD_ERR_NO_IBG_AFTER_EG
Description: A format error is detected when a read or write operation is executed.
1
Possibility
Countermeasure
Ref.
The tape head and tape path are dirty.
Use a cleaning cartridge to
clean off the dirty.
2
Tape media damage is shown when a Use
write operation is executed.
a
new
Section
3.1
cartridge
and
execute the write operation
again.
3
When a read operation is executed, the Use a new cartridge and create
data is either corrupted or there is no a new data tape again.
valid data present.
4
The tape head or the head cable is Replace
damaged.
5
these
parts
as
necessary.
The analog write circuit board, analog Replace these circuit boards as
read circuit board or digital read circuit necessary.
Section
7.3.6
Section
7.3.7
board is damaged.
6
The control circuit board is damaged.
Replace this circuit board.
Section
7.3.7
3111
3112
3113
3114
3116
RD
RD
RD
RD
RD
BLK
BLK
BLK
BLK
BLK
ID
ID
ID
ID
ID
3111
3112
3113
3114
3116
RD_ERR_3480_FWD_BLK_ID_NOT_IN_ORDER
3117
3118
3119
3199
RD BLK ID
RD BLK ID
RD BLK ID
3117
3118
3119
RD_ERR_3480_BWD_BLK_ID_OFF_BY_ONE
RD_ERR_3480_BWD_BLK_ID_NOT_IN_ORDER
RD_ERR_3490_FWD_BLK_ID_NOT_IN_ORDER
RD_ERR_3490_BWD_BLK_ID_NOT_IN_ORDER
RD_ERR_3480_FWD_BLK_ID_OFF_BY_ONE
RD_ERR_3490_FWD_BLK_ID_OFF_BY_PACKET
RD_ERR_3490_BWD_BLK_ID_OFF_BY_PACKET
RD_ERR_OK_SKIP_RD_ERRORS
5-41
Trouble Shooting
Description: A position error is detected when a read or write operation is executed.
1
Possibility
Countermeasure
Ref.
The tape head and tape path are dirty.
Use a cleaning cartridge to
clean off the dirty.
2
Tape media damage is shown when a Use
write operation is executed.
a
new
Section
3.1
cartridge
and
execute the write operation
again.
When a read operation is executed, the Use a new cartridge and create
3
data is either corrupted or there is no a new data tape again.
valid data present.
4
The tape head or the head cable is Replace
damaged.
5
these
parts
as
necessary.
Section
7.3.6
The analog write circuit board, analog Replace these circuit boards as
read circuit board or digital read circuit necessary.
Section
7.3.7
board is damaged.
6
The control circuit board is damaged.
Replace this circuit board
Section
7.3.7
7
The servo circuit board is damaged.
Replace this circuit board.
Section
7.3.7
8
Either the take-up reel motor or the Replace the drive.
Section
supply reel motor is damaged.
9
The
cable
that
connects
7.3.4
the
motor Replace the drive.
Section
described above and the motherboard is
7.3.4
disconnected or damaged.
3202
3203
3204
RD DSK2 UNC 3202
RD DSKW CRC 3203
RD_ERR_DESKW_UNCORRECTABLE
RD_ERR_DESKW_CRC
RD_ERR_ISV_ERROR
Description: A data error is detected when a read or write operation is executed. (The
deskew circuit is detected the error factor.)
1
Possibility
Countermeasure
Ref.
The tape head and tape path are dirty.
Use a cleaning cartridge to
clean off the dirty.
2
Tape media damage is shown when a Use
write operation is executed.
a
new
cartridge
3.1
and
execute the write operation
again.
Section
5-42
Trouble Shooting
When a read operation is executed, the Use a new cartridge and create
3
data is either corrupted or there is no a new data tape again.
valid data present.
4
The tape head or the head cable is Replace
damaged.
these
parts
as
necessary.
7.3.6
The analog write circuit board, analog Replace these circuit boards as
5
Section
read circuit board or digital read circuit necessary.
Section
7.3.7
board is damaged.
6
The control circuit board is damaged.
Replace this circuit board
Section
7.3.7
7
The servo circuit board is damaged.
Replace this circuit board.
Section
7.3.7
8
Either the take-up reel motor or the Replace the drive.
Section
supply reel motor is damaged.
9
The
cable
that
connects
7.3.4
the
motor Replace the drive.
Section
described above and the motherboard is
7.3.4
disconnected or damaged.
3300
3301
RD NO GAPIN 3300
RD STP GAPN 3301
RD_ERR_GAPIN_TIMEOUT
RD_ERR_GAPIN_WAITING_STOPPED
Description: A position error is detected when a read or write operation is executed. In
other cases, the read or write operations cannot be executed.
1
Possibility
Countermeasure
Ref.
The tape head and tape path are dirty.
Use a cleaning cartridge to
clean off the dirty.
2
Tape media damage is shown when a Use
write operation is executed.
a
new
Section
3.1
cartridge
and
execute the write operation
again.
3
When a read operation is executed, the Use a new cartridge and create
data is either corrupted or there is no a new data tape again.
valid data present.
4
The tape head or the head cable is Replace
damaged.
5
these
parts
as
necessary.
The analog write circuit board, analog Replace these circuit boards as
read circuit board or digital read circuit necessary.
board is damaged.
Section
7.3.6
Section
7.3.7
5-43
Trouble Shooting
6
The control circuit board is damaged.
Replace this circuit board
Section
7.3.7
7
The servo circuit board is damaged.
Replace this circuit board.
Section
7.3.7
8
Either the take-up reel motor or the Replace the drive.
Section
supply reel motor is damaged.
9
The
cable
that
connects
7.3.4
the
motor Replace the drive.
Section
7.3.4
described above and the motherboard is
disconnected or damaged.
34xx
RD PAT TO
34xx
RD_ERR_PATTERN_TIMEOUT
Description: A pattern detection can not be executed and caused an error in a read or write
operation.
1
Possibility
Countermeasure
Ref.
The tape head and tape path are dirty.
Use a cleaning cartridge to
clean off the dirty.
2
Tape media damage is shown when a Use
write operation is executed.
a
new
Section
3.1
cartridge
and
execute the write operation
again.
3
When a read operation is executed, the Use a new cartridge and create
data is either corrupted or there is no a new data tape again.
valid data present.
4
The tape head or the head cable is Replace
damaged.
5
these
parts
as
necessary.
The analog write circuit board, analog Replace these circuit boards as
read circuit board or digital read circuit necessary.
Section
7.3.6
Section
7.3.7
board is damaged.
6
The control circuit board is damaged.
Replace this circuit board
Section
7.3.7
7
The servo circuit board is damaged.
Replace this circuit board.
Section
7.3.7
8
Either the take-up reel motor or the Replace the drive.
supply reel motor is damaged.
9
The
cable
that
connects
7.3.4
the
motor Replace the drive.
described above and the motherboard is
disconnected or damaged.
Section
Section
7.3.4
5-44
Trouble Shooting
5.5.3 Error Codes (35xx to 37xx)
3500
RDBK DEN ID 3500
RDBK_ERR_DENSITY_ID_ERR
Description: A write error of density-ID is detected when a write operation is executed from
BOT.
1
Possibility
Countermeasure
Ref.
The tape head and tape path are dirty.
Use a cleaning cartridge to
Section
clean off the dirty.
2
Tape media damage is shown when a Use
write operation is executed
a
new
3.1
cartridge
and
execute the write operation
again.
3
The tape head or the head cable is Replace
damaged.
4
these
parts
as
Section
necessary.
The analog write circuit board, analog Replace these circuit boards as
7.3.6
Section
read circuit board or digital read circuit necessary.
7.3.7
board is damaged.
5
The control circuit board is damaged.
Replace this circuit board
Section
7.3.7
6
The servo circuit board is damaged.
Replace this circuit board.
Section
7.3.7
7
Either the take-up reel motor or the Replace the drive.
Section
supply reel motor is damaged.
8
The
cable
that
connects
7.3.4
the
motor Replace the drive.
Section
described above and the motherboard is
disconnected or damaged.
3601
3602
3603
3604
3605
3607
3608
3609
3610
3611
RDBK
RDBK
RDBK
RDBK
RDBK
RDBK
RDBK
RDBK
RDBK
RDBK
NO BDM
NO EOD
CRC ER
BLK ID
Q FULL
EG IBG
EODibg
WR CUR
ID REC
ID FCR
3601
3602
3603
3604
3605
3607
3608
3609
3610
3611
RDBK_ERR_MISSING_BDM
RDBK_ERR_MISSING_EOD
RDBK_ERR_CRC_MATCH_ERR
RDBK_ERR_BLOCK_ID_NOT_REC_EOD_FCR
RDBK_ERR_QUEUE_FULL
RDBK_ERR_NO_TRAILING_IBG_ON_ERG
RDBK_ERR_NO_TRAILING_IBG_ON_EOD
RDBK_ERR_NO_WRT_CUR_ON_WHEN_WRITING
RDBK_ERR_BLOCK_ID_MATCH_ERR_REC
RDBK_ERR_BLOCK_ID_MATCH_ERR_FCR
7.3.4
5-45
Trouble Shooting
3612
3613
3614
3616
3617
3618
RDBK
RDBK
RDBK
RDBK
RDBK
ID EOD
SM IBG
FAKE
10 IBG
WRAP
3612
3613
3614
3616
3617
RDBK_ERR_BLOCK_ID_MATCH_ERR_EOD
RDBK_ERR_LEADING_IBG_TOO_SHORT
RDBK_ERR_FAKE_ERROR
RDBK_ERR_10_PERCENT_IBG_TIMEOUT
RDBK_ERR_WRAP_PATTERN
RDBK_ERR_NO_TRAILING_IBG_ON_WRAP4
Description: An error (read echo-back error) is detected when a write operation is executed.
1
Possibility
Countermeasure
Ref.
The tape head and tape path are dirty.
Use a cleaning cartridge to
Section
clean off the dirty.
2
Tape media damage is shown when a Use
write operation is executed.
a
new
3.1
cartridge
and
execute the write operation
again.
3
When a read operation is executed, the Use a new cartridge and create
data is either corrupted or there is no a new data tape again.
valid data present.
4
The tape head or the head cable is Replace
damaged.
5
these
parts
as
Section
necessary.
The analog write circuit board, analog Replace these circuit boards as
7.3.6
Section
read circuit board or digital read circuit necessary.
7.3.7
board is damaged.
6
The control circuit board is damaged.
Replace this circuit board
Section
7.3.7
7
The servo circuit board is damaged.
Replace this circuit board.
Section
7.3.7
8
Either the take-up reel motor or the Replace the drive.
Section
supply reel motor is damaged.
9
The
cable
that
connects
7.3.4
the
motor Replace the drive.
Section
described above and the motherboard is
7.3.4
disconnected or damaged.
3700
RDBK T IBG 3700
RDBK_ERR_NO_TRAILING_IBG_GAPOUT_SENT
Description: A position error is detected when a read or write operation is executed.
1
Possibility
Countermeasure
The tape head and tape path are dirty.
Use a cleaning cartridge to
clean off the dirty.
Ref.
Section
3.1
5-46
Trouble Shooting
2
Tape media damage is shown when a Use
write operation is executed.
a
new
cartridge
and
execute the write operation
again.
3
When a read operation is executed, the Use a new cartridge and create
data is either corrupted or there is no a new data tape again.
valid data present.
4
The tape head or the head cable is Replace
damaged.
5
these
parts
as
necessary.
The analog write circuit board, analog Replace these circuit boards as
read circuit board or digital read circuit necessary.
Section
7.3.6
Section
7.3.7
board is damaged.
6
The control circuit board is damaged.
Replace this circuit board
Section
7.3.7
7
The servo circuit board is damaged.
Replace this circuit board.
Section
7.3.7
8
Either the take-up reel motor or the Replace the drive.
supply reel motor is damaged.
9
The
cable
that
connects
Section
7.3.4
the
motor Replace the drive.
described above and the motherboard is
Section
7.3.4
disconnected or damaged.
5.5.4 Error Codes (4xxx)
4001
4100
4200
4301
4302
4303
4304
4305
LWR
LWR
LWR
LWR
LWR
LWR
LWR
LWR
ILLIGAL
TONES
ONES
DSKW CT
NO WIRQ
NO BDM
NO RIRQ
NO IBG
4001
4100
4200
4301
4302
4303
4304
4305
LWR_ERR_WF_FAILED_ILLEG_CMDS
LWR_ERR_TONES_FAILED
LWR_ERR_ONES_FAILED
LWR_ERR_DESKEW_CNTRS_NOT_ZERO
LWR_ERR_NO_WF_WIRQ_TIMEOUT
LWR_ERR_NO_BDM_TIMEOUT
LWR_ERR_NO_RF_RIRQ_TIMEOUT
LWR_ERR_NO_IBG_AFTER_DATA
Description: An error is detected in the loop test in the self-diagnostics mode.
Possibility
1
Countermeasure
The digital read circuit board is damaged. Replace this circuit board.
Ref.
Section
7.3.7
Trouble Shooting
2
The control circuit board is damaged.
Replace this circuit board
5-47
Section
7.3.7
3
The SCSI circuit board is damaged.
Replace this circuit board.
Section
7.3.7
4
The motherboard is damaged.
Replace the drive.
Section
7.3.4
4401
4402
4403
WIRQ REJECT 4401
WIRQ LATE 4402
WIRQ CRC
4403
WRT_ERR_CMD_REJ
WRT_ERR_CMD_LATE
WRT_ERR_CRC_ERR
Description: An error is detected during the execution of the write command.
1
Possibility
Countermeasure
The control circuit board is damaged.
Replace this circuit board
Ref.
Section
7.3.7
2
The digital read circuit board is damaged. Replace this circuit board.
Section
7.3.7
4500
4501
PWRON MEM
PWRON MEM
4500
4501
POWER_ON_ERR_MEMORY_TEST
POWER_ON_ERR_MEMORY_CHECK
Description An error is detected in the internal RAM when the power is turned on.
1
Possibility
Countermeasure
The control circuit board is damaged.
Replace this circuit board
Ref.
Section
7.3.7
4510
4511
PWRON XLNX 4510
PWRON XLNX 4511
POWER_ON_ERR_NO_XILINX_INIT
POWER_ON_ERR_NO_XILINX_DONE
Description: An error is detected in the initialization of the internal circuit (XILINX) when
the power is turned on.
1
Possibility
Countermeasure
The control circuit board is damaged.
Replace this circuit board
Ref.
Section
7.3.7
4600
4601
4602
COMM UNKN 4600
CNTL LWR IL 4601
CNTL CFG IL 4602
CNTL_ERR_UNKNOWN_CMD
CNTL_ERR_ILLEGAL_LWR_CMD
CNTL_ERR_ILLEGAL_CFG_CMD
5-48
Trouble Shooting
Description: An error occurs during communication with internal control.
1
Possibility
Countermeasure
Ref.
The control circuit board is damaged.
Replace this circuit board
Section
7.3.7
2
A failure occurs in a firmware update.
Replace
board.
the
control
circuit
Section
7.3.7
Trouble Shooting
5-49
5.6 SCSI Circuit Board Errors
Refer to a SCSI specification book such as ANSI for a description of the vocabulary used
in this section.
The SPC (SCSI-Protocol-Chip) means a SCSI control LSI.
5.6.1 Error Codes (B0xx)
B000
OLD_SPC_VERSION
Description:
Transmission of block length larger than 64K bytes cannot be executed
because the SPC version is old.
1
Possibility
Countermeasure
The SPC version is old.
Replace the SCSI circuit board.
Ref.
Section
7.3.7
2
This
SCSI
command
is
out
specifications.
of Decrease the block length to
solve the problems of your
(It exceeded the value returned by the program on the host
Read Block Limits command.)
5.6.2 Error Codes (EEE0 to EEED)
EEE3
MSGIDE_RCVD_IN_DIN ##
Description:
A initiator detected error messages is detected during a read data
transmission (DIN).
Possibility
1
Countermeasure
The SCSI command corrupted. The SCSI Check the SCSI cable and
cable is too long or the SCSI connector terminator.
Ref.
Section
4.1
contact is loose.
2
Other SCSI drive is reset or turned power There is a problem in an
on.
3
application on the host side.
There is an error in the setup of the Correct the setup of the drive.
drive.
4
The
Section
4.2
SCSI
damaged.
driver
circuit
board
is Replace this circuit board.
Section
7.3.3
Trouble Shooting
5
The SCSI circuit board is damaged.
Replace this circuit board.
5-50
Section
7.3.7
6
The control circuit board is damaged.
Replace this circuit board.
Section
7.3.7
7
The mother circuit board is damaged.
Replace the drive.
Section
7.3.4
EEE4
WAIT_WAIT_READ_DATA_XFR_TMOERR_IN_DOUT ##
Description: A time-out is detected during a read data transmission (DIN).
Possibility
1
Countermeasure
The SCSI command corrupted. The SCSI Check the SCSI cable and
cable is too long or the SCSI connector terminator.
Ref.
Section
4.1
contact is loose.
2
Other SCSI drive is reset or turned power There is a problem in an
on.
3
application on the host side.
There is an error in the setup of the Correct the setup of the drive.
drive.
4
The
4.2
SCSI
driver
circuit
board
is Replace this circuit board.
damaged.
5
Section
Section
7.3.3
The SCSI circuit board is damaged.
Replace this circuit board.
Section
7.3.7
6
The control circuit board is damaged.
Replace this circuit board.
Section
7.3.7
EEE5
FIFO_PARITY_ERROR_IN_DIN ##
Description: A parity error in the data from the control circuit board is detected during a
data transmission (DIN).
1
Possibility
Countermeasure
The SCSI circuit board is damaged.
Replace this circuit board.
Ref.
Section
7.3.7
2
The control circuit board is damaged.
Replace this circuit board.
Section
7.3.7
3
The mother circuit board is damaged.
Replace the drive.
Section
7.3.4
Trouble Shooting
The SCSI command corrupted. The SCSI Check the SCSI cable and
4
cable is too long or the SCSI connector terminator.
5-51
Section
4.1
contact is loose.
5
The
SCSI
driver
circuit
board
is Replace this circuit board.
damaged.
Section
7.3.3
EEE6
FAS_RESET_IN_DOUT
Description: A forced reset is executed to the SPC because the operation hangs up during a
data transmission (DOUT).
Possibility
1
Countermeasure
The SCSI command corrupted. The SCSI Check the SCSI cable and
cable is too long or the SCSI connector terminator.
Ref.
Section
4.1
contact is loose.
2
Other SCSI drive is reset or turned power There is a problem in an
on.
3
application on the host side.
There is an error in the setup of the Correct the setup of the drive.
drive.
4
The
4.2
SCSI
driver
circuit
board
is Replace this circuit board.
damaged.
5
Section
Section
7.3.3
The SCSI circuit board is damaged.
Replace this circuit board.
Section
7.3.7
6
The control circuit board is damaged.
Replace this circuit board.
Section
7.3.7
EEE7
FAS_RESET_IN_DIN
Description: A forced reset is executed to the SPC because the operation hangs up during a
data transmission (DIN)
Possibility
1
Countermeasure
The SCSI command corrupted. The SCSI Check the SCSI cable and
cable is too long or the SCSI connector terminator.
Ref.
Section
4.1
contact is loose.
2
Other SCSI drive is reset or turned power There is a problem in an
on.
3
application on the host side.
There is an error in the setup of the Correct the setup of the drive.
drive.
Section
4.2
5-52
Trouble Shooting
4
The
SCSI
driver
circuit
board
is Replace this circuit board.
damaged.
5
Section
7.3.3
The SCSI circuit board is damaged.
Replace this circuit board.
Section
7.3.7
6
The control circuit board is damaged.
Replace this circuit board.
Section
7.3.7
EEE8
WAIT_CNTL_RSP_IN_SCRESET_TMOERR
Description: A communication failure with the control circuit board occurs after a receiving
a reset signal on the SCSI bus.
Possibility
1
Countermeasure
The SCSI command corrupted. The SCSI Check the SCSI cable and
cable is too long or the SCSI connector terminator.
Ref.
Section
4.1
contact is loose.
2
Other SCSI drive is reset or turned power There is a problem in an
on.
3
The
application on the host side.
SCSI
driver
circuit
board
is Replace this circuit board.
damaged.
4
Section
7.3.3
The SCSI circuit board is damaged.
Replace this circuit board.
Section
7.3.7
5
The control circuit board is damaged.
Replace this circuit board.
Section
7.3.7
EEE9
EEEA
WAIT_BUFF_DATA_READY_AFT_OK_TMOERR
WAIT_FIFO_EMPTY_TMOERR
Description: The transmission is not completed during an internal data transmission.
1
Possibility
Countermeasure
The SCSI circuit board is damaged.
Replace this circuit board.
Ref.
Section
7.3.7
2
The control circuit board is damaged.
Replace this circuit board.
Section
7.3.7
3
The
SCSI
driver
circuit
board
is Replace this circuit board.
damaged.
EEEB
Section
7.3.3
WAIT_CNTL_RSP_TMOERR
Trouble Shooting
5-53
Description: A command is not completed during communication with the control circuit
board.
1
Possibility
Countermeasure
The SCSI circuit board is damaged.
Replace this circuit board.
Ref.
Section
7.3.7
2
The control circuit board is damaged.
Replace this circuit board.
Section
7.3.7
EEEC
BUFF_ERROR_RECEIVED_IN_DIN
Description: A data buffer error is detected during a data transmission (DIN).
1
Possibility
Countermeasure
The SCSI circuit board is damaged.
Replace this circuit board.
Ref.
Section
7.3.7
2
The control circuit board is damaged.
Replace this circuit board.
Section
7.3.7
3
The
SCSI
driver
circuit
board
is Replace this circuit board.
damaged.
Section
7.3.3
EEED
BUFF_ERROR_RECEIVED_IN_DOUT
Description: A data buffer error is detected during a data transmission (DOUT).
1
Possibility
Countermeasure
The SCSI circuit board is damaged.
Replace this circuit board.
Ref.
Section
7.3.7
2
The control circuit board is damaged.
Replace this circuit board.
Section
7.3.7
3
The
SCSI
driver
circuit
board
is Replace this circuit board.
damaged.
Section
7.3.3
5.6.3 Error Codes (EEEE to EEF5)
EEEE
FASINT_TMOERR_IN_DIN
Description: An interrupt is not asserted from the SPC during a data transmission (DIN).
Possibility
Countermeasure
Ref.
Trouble Shooting
1
The SCSI circuit board is damaged.
Replace this circuit board.
5-54
Section
7.3.7
2
The
SCSI
driver
circuit
board
is Replace this circuit board.
damaged.
3
Section
7.3.3
The control circuit board is damaged.
Replace this circuit board.
Section
7.3.7
EEEF
EEF0
UKNMSG_RCVD_IN_DIN
MSGREJ_RCVD_IN_DIN
Description: An unexpected message is received during a read data transmission (DIN).
Possibility
1
Countermeasure
The SCSI command corrupted. The SCSI Check the SCSI cable and
cable is too long or the SCSI connector terminator.
Ref.
Section
4.1
contact is loose.
2
There is an error in the setup of the Correct the setup of the drive.
drive.
3
The
4.2
SCSI
driver
circuit
board
is Replace this circuit board.
damaged.
4
Section
Section
7.3.3
The SCSI circuit board is damaged.
Replace this circuit board.
Section
7.3.7
5
The control circuit board is damaged.
Replace this circuit board.
Section
7.3.7
EEF1
SCSI_PERR_IN_DIN
Description: A parity error in the SCSI bus is detected during a read data transmission
(DIN).
Possibility
1
Countermeasure
The SCSI command corrupted. The SCSI Check the SCSI cable and
cable is too long or the SCSI connector terminator.
Ref.
Section
4.1
contact is loose.
2
Other SCSI drive is reset or turned power There is a problem in an
on.
3
application on the host side.
There is an error in the setup of the Correct the setup of the drive.
drive.
4
The
Section
4.2
SCSI
damaged.
driver
circuit
board
is Replace this circuit board.
Section
7.3.3
Trouble Shooting
5
The SCSI circuit board is damaged.
Replace this circuit board.
5-55
Section
7.3.7
6
The control circuit board is damaged.
Replace this circuit board.
Section
7.3.7
EEF2
EEF3
WAIT_BUFF_CMPLT_TMOERR_IN_DIN
WAIT_BUFF_ERROR_TMOERR_IN_DIN
Description: The transmission is not completed during a data transmission (DIN).
Possibility
1
Countermeasure
The SCSI command corrupted. The SCSI Check the SCSI cable and
cable is too long or the SCSI connector terminator.
Ref.
Section
4.1
contact is loose.
2
Other SCSI drive is reset or turned power There is a problem in an
on.
3
application on the host side.
There is an error in the setup of the Correct the setup of the drive.
drive.
4
The
4.2
SCSI
driver
circuit
board
is Replace this circuit board.
damaged.
5
Section
Section
7.3.3
The SCSI circuit board is damaged.
Replace this circuit board.
Section
7.3.7
6
The control circuit board is damaged.
Replace this circuit board.
Section
7.3.7
EEF4
WAIT_DIAG_RSP_TMOERR
Description: A time-out is detected during a self-diagnostics operation.
1
Possibility
Countermeasure
The SCSI circuit board is damaged.
Replace this circuit board.
Ref.
Section
7.3.7
2
The control circuit board is damaged.
Replace this circuit board.
Section
7.3.7
3
The
SCSI
driver
circuit
board
is Replace this circuit board.
damaged.
EEF5
Section
7.3.3
DIAG_BUFF_DATA_READY_TMOERR
Description: A buffer can not be used during a self-diagnostics operation.
Trouble Shooting
1
Possibility
Countermeasure
The SCSI circuit board is damaged.
Replace this circuit board.
5-56
Ref.
Section
7.3.7
2
The control circuit board is damaged.
Replace this circuit board.
Section
7.3.7
3
The
SCSI
driver
circuit
board
is Replace this circuit board.
damaged.
Section
7.3.3
5.6.4 Error Codes (EEF6 to EEFF)
EEF6
FASINT_TMOERR_IN_DOUT
Description: An interrupt is not asserted from the SPC during a data transmission (DOUT).
1
Possibility
Countermeasure
The SCSI circuit board is damaged.
Replace this circuit board.
Ref.
Section
7.3.7
2
The
SCSI
driver
circuit
board
is Replace this circuit board.
damaged.
3
Section
7.3.3
The control circuit board is damaged.
Replace this circuit board.
Section
7.3.7
EEF7
EEF8
UKNMSG_RCVD_IN_DOUT
MSGREJ_RCVD_IN_DOUT
Description: An unexpected message is received during a write data transmission (DOUT).
Possibility
1
Countermeasure
The SCSI command corrupted. The SCSI Check the SCSI cable and
cable is too long or the SCSI connector terminator.
Ref.
Section
4.1
contact is loose.
2
There is an error in the setup of the Correct the setup of the drive.
drive.
3
The
4.2
SCSI
driver
circuit
board
is Replace this circuit board.
damaged.
4
Section
The SCSI circuit board is damaged.
Section
7.3.3
Replace this circuit board.
Section
7.3.7
5
The control circuit board is damaged.
Replace this circuit board.
Section
7.3.7
Trouble Shooting
EEF9
5-57
SCSI_PERR_IN_DOUT
Description: A parity error in the SCSI bus is detected during a write data transmission
(DOUT).
Possibility
1
Countermeasure
The SCSI command corrupted. The SCSI Check the SCSI cable and
cable is too long or the SCSI connector terminator.
Ref.
Section
4.1
contact is loose.
2
Other SCSI drive is reset or turned power There is a problem in an
on.
3
application on the host side.
There is an error in the setup of the Correct the setup of the drive.
drive.
4
The
4.2
SCSI
driver
circuit
board
is Replace this circuit board.
damaged.
5
Section
Section
7.3.3
The SCSI circuit board is damaged.
Replace this circuit board.
Section
7.3.7
6
The control circuit board is damaged.
Replace this circuit board.
Section
7.3.7
EEFA
EEFB
WAIT_BUFF_CMPLT_TMOERR_IN_DOUT
WAIT_BUFF_ERROR_TMOERR_IN_DOUT
Description: A time-out is detected during a data transmission (DOUT).
Possibility
1
Countermeasure
The SCSI command corrupted. The SCSI Check the SCSI cable and
cable is too long or the SCSI connector terminator.
Ref.
Section
4.1
contact is loose.
2
Other SCSI drive is reset or turned power There is a problem in an
on.
3
application on the host side.
There is an error in the setup of the Correct the setup of the drive.
drive.
4
The
4.2
SCSI
driver
circuit
board
is Replace this circuit board.
damaged.
5
Section
The SCSI circuit board is damaged.
Section
7.3.3
Replace this circuit board.
Section
7.3.7
6
The control circuit board is damaged.
Replace this circuit board.
Section
7.3.7
Trouble Shooting
EEFC
5-58
WAIT_FASFIFO_EMPTY_TMOERR
Description: The internal FIFO cannot be cleared.
1
Possibility
Countermeasure
The SCSI circuit board is damaged.
Replace this circuit board.
Ref.
Section
7.3.7
2
The control circuit board is damaged.
Replace this circuit board.
Section
7.3.7
3
The
SCSI
driver
circuit
board
is Replace this circuit board.
damaged.
Section
7.3.3
EEFD
WAIT_FASINT_TMOERR
Description: An interrupt is not asserted from the SPC.
1
Possibility
Countermeasure
The SCSI circuit board is damaged.
Replace this circuit board.
Ref.
Section
7.3.7
2
The control circuit board is damaged.
Replace this circuit board.
Section
7.3.7
3
The
SCSI
driver
circuit
board
is Replace this circuit board.
damaged.
Section
7.3.3
EEFE
RSPACT_CHK_TMOERR
Description:
The command completion status is not received correctly during
communication with the control circuit board.
1
Possibility
Countermeasure
The SCSI circuit board is damaged.
Replace this circuit board.
Ref.
Section
7.3.7
2
The control circuit board is damaged.
Replace this circuit board.
Section
7.3.7
EEFF
CMD_TAKEN_TMOERR
Description: The Control can not receive commands during communication with the control
circuit board.
Possibility
Countermeasure
Ref.
Trouble Shooting
1
The SCSI circuit board is damaged.
Replace this circuit board.
5-59
Section
7.3.7
2
The control circuit board is damaged.
Replace this circuit board.
Section
7.3.7
5-60
Trouble Shooting
5.7 Servo Circuit Board Errors
5.7.1 Error Codes (550x)
5501
SVO RAD SML 5501
SERVO_RADIUS_TOO_SMALL
Description: The tape radius in the cartridge is too small.
Possibility
1
2
Countermeasure
The inserted cartridge is different than Use
a
standard
Ref.
length
the standard length cartridge.
cartridge.
The servo circuit board is damaged.
Replace this circuit board.
Section
2.1
Section
7.3.7
3
Either the reel motor or the cable that Replace the drive.
Section
connects the motor and the mother circuit
7.3.4
board is damaged.
5502
SVO RAD LRG 5502
SERVO_RADIUS_TOO_LARGE
Description: The tape radius in the cartridge is too large.
Possibility
1
2
Countermeasure
The inserted cartridge is different than Use
a
standard
Ref.
length
the standard length cartridge.
cartridge.
The servo circuit board is damaged.
Replace this circuit board.
Section
2.1
Section
7.3.7
3
Either the reel motor or the cable that Replace the drive.
connects the motor and the mother circuit
Section
7.3.4
board is damaged.
5503
SVO NO EOT 5503
SERVO_NOT_FIND_EOT
Description: The EOT can not be found on the tape.
1
Possibility
Countermeasure
The servo circuit board is damaged.
Replace this circuit board.
Ref.
Section
7.3.7
2
Either the reel motor or the cable that Replace the drive.
connects the motor and the mother circuit
board is damaged.
Section
7.3.4
5-61
Trouble Shooting
5.7.2 Error Codes (554x to 5550)
5540
5541
SVO int ram 5540
SVO loc ram 5541
SERVO_INTERNAL_RAM_ERROR
SERVO_LOCAL_RAM_ERROR
Description: The RAM on the servo circuit board is abnormal.
1
Possibility
Countermeasure
Ref.
The servo circuit board is damaged.
Replace this circuit board.
Section
7.3.7
5542
SVO NOV ram 5542
SERVO_NOV_RAM_ERROR
Description: The NOV RAM on the servo circuit board is abnormal.
1
Possibility
Countermeasure
Ref.
The servo circuit board is damaged.
Replace this circuit board.
Section
7.3.7
5543
SVO DWNLD
5543
SERVO_DOWN_LOAD_ERROR
Description: The program cannot be downloaded to the servo local RAM.
1
Possibility
Countermeasure
Ref.
The servo circuit board is damaged.
Replace this circuit board.
Section
7.3.7
2
The control circuit board is damaged.
Replace this circuit board.
Section
7.3.7
5544
SVO VOLT 24 5544
SERVO_ABNORMAL_VOLTAGE_24
Description: A power voltage of +24V is abnormal.
1
Possibility
Countermeasure
The power supply unit is damaged.
Replace
the
power
Ref.
supply
block.
Replace the power supply unit.
(For CSL model)
2
The cable of the +24V is damaged.
Replace the drive.
Section
7.3.4
Section
7.3.9
Section
7.3.4
5-62
Trouble Shooting
3
The servo circuit board is damaged.
Replace this circuit board.
Section
7.3.7
4
The mother circuit board is damaged.
Replace the drive.
Section
7.3.4
5545
SVO VOLT 12 5545
SERVO_ABNORMAL_VOLTAGE_12
Description: A power voltage of +12V is abnormal.
Possibility
1
Countermeasure
Ref.
The regulator IC of the 12V power supply Replace the drive.
Section
7.3.4
of the mother circuit board or the cable is
damaged.
2
The servo circuit board is damaged.
Replace this circuit board.
Section
7.3.7
3
The power supply unit is damaged.
Replace
the
power
supply
block.
7.3.4
Replace the power supply unit.
(For CSL model)
5546
SVO VOLT m5 5546
Section
Section
7.3.9
SERVO_ABNORMAL_VOLTAGE_m5
Description: A power voltage of -5V is abnormal.
Possibility
1
Countermeasure
Ref.
The regulator IC of the -5V power supply Replace the drive.
Section
of the mother circuit board or the cable is
7.3.4
damaged.
2
The servo circuit board is damaged.
Replace this circuit board.
Section
7.3.7
3
The power supply unit is damaged.
Replace
the
power
supply
block.
Replace the power supply unit.
(For CSL model)
5547
SVO A/D er 5547
Section
7.3.4
Section
7.3.9
SERVO_A_D_AND_D_A_MALFUNCTION
Description: The A/D and D/A converter on the servo circuit board is abnormal.
Possibility
Countermeasure
Ref.
Trouble Shooting
1
The servo circuit board is damaged.
Replace this circuit board.
5-63
Section
7.3.7
5548
SVO MDA cal 5548
SERVO_MDA_CALIBRATION_ERROR
Description: The calibration of the motor drive amplifier cannot be executed on the servo
circuit board.
1
Possibility
Countermeasure
The servo circuit board is damaged.
Replace this circuit board.
Ref.
Section
7.3.7
5549
SVO cal TUP 5549
SERVO_ENCODER_ERROR_TUP
Description: The encoder of the take-up motor is abnormal.
Possibility
1
Countermeasure
Either the reel motor or the cable that Replace the drive.
connects the motor and the mother circuit
Ref.
Section
7.3.4
board is damaged.
2
The servo circuit board is damaged.
Replace this circuit board.
Section
7.3.7
5550
SVO cal SUP 5550
SERVO_ENCODER_ERROR_SUP
Description: The encoder of the supply motor is abnormal.
Possibility
1
Countermeasure
Either the reel motor or the cable that Replace the drive.
connects the motor and the mother circuit
Ref.
Section
7.3.4
board is damaged.
2
The servo circuit board is damaged.
Replace this circuit board.
Section
7.3.7
5.7.3 Error Codes (556x to 557x)
5560
SVO elev dn 5560
SERVO_ELEVATOR_NOT_COME_DOWN_RETRY_OVER
Description: The tray does not move to lower position or does not eject the cartridge when
the load operation is executed.
5-64
Trouble Shooting
Caution:
Execute the following procedures in the indicated sequence to remove the
cartridge when it cannot be unloaded, then execute the countermeasure.
(1)
Execute the setup mode FUNDL. (Refer to section 6.3)
(2)
Turn the power switch off and then turn it on after waiting more than ten
seconds to unload.
(3)
Unload the cartridge by the electric operation mode. (Refer to section 6.4)
(4)
Unload the cartridge by the manual operation mode. (Refer to section 6.5)
Possibility
1
Countermeasure
The inserted cartridge is different than Use a standard cartridge.
the standard cartridge.
2
Ref.
Section
2.1
The elevator mechanism is damaged.
Replace the drive.
Section
7.3.4
3
The tray is damaged.
Replace the drive.
Section
7.3.4
4
The servo circuit board is damaged.
Replace this circuit board.
Section
7.3.7
5561
5563
5565
SVO thread1 5561
SVO thread3 5563
SVO thread5 5565
SERVO_THREADING_ERROR_1_TAPE_CUT_OFF
SERVO_THREADING_ERROR_3_TAPE_CUT_OFF
SERVO_THREADING_ERROR_5_TAPE_CUT_OFF
Description: The tape can not be pulled out to the take-up reel when the load operation is
executed. (There is a possibility that the tape is cut.)
Caution:
Execute the following procedures in the indicated sequence to remove the
cartridge when it cannot be unloaded, then execute the countermeasure.
(1)
Execute the setup mode FUNLD. (Refer to section 6.3)
(2)
Turn the power switch off and then turn it on after waiting more than ten
seconds to unload.
1
(3)
Unload the cartridge by the electric operation mode. (Refer to section 6.4.)
(4)
Unload the cartridge by the manual operation mode. (Refer to section 6.5.)
Possibility
Countermeasure
The tape is cut during loading.
Use a normal cartridge.
Ref.
Section
2.1
2
The leader block fell out from the picker Use a normal cartridge.
according to a leader lock malfunction.
Section
2.1
5-65
Trouble Shooting
The leader block fell out from the picker Replace
3
due
to
damage
to
the
the
threader
threader mechanism.
Section
7.3.5
mechanism.
4
The servo circuit board is damaged.
Replace this circuit board.
Section
7.3.7
5562
5564
SVO thread2 5562
SVO thread4 5564
SERVO_THREADING_ERROR_STOPPPED
SERVO_THREADING_ERROR_4_COULD_NOT_RETRY
Description: The tape can not be pulled out to the take-up reel when the load operation is
executed. (There is a possibility that the tape is cut.)
Caution:
Execute the following procedures in the indicated sequence to remove the
cartridge when it cannot be unloaded, then execute the countermeasure.
(1)
Execute the setup mode FUNLD. (Refer to section 6.3)
(2)
Turn the power switch off and then turn it on after waiting more than ten
seconds to unload.
(3)
Unload the cartridge by the electric operation mode. (Refer to section 6.4.)
(4)
Unload the cartridge by the manual operation mode. (Refer to section 6.5.)
Possibility
1
Countermeasure
Ref.
The threader stopped in the middle of the Use a normal cartridge.
tape path due to a cartridge malfunction.
2
Section
2.1
The threader stopped in the middle of the Replace
the
threader
tape path due to a threader mechanism mechanism.
Section
7.3.5
malfunction.
3
The servo circuit board is damaged.
Replace this circuit board.
Section
7.3.7
5566
SVO index
5566
SERVO_COULD_NOT_DETECT_INDEX
Description: The take-up reel cannot move normally when the load operation is executed.
Possibility
1
Countermeasure
The take-up reel touches the chassis or Replace the drive.
other part and does not move.
2
The take-up motor or cable is damaged.
Ref.
Section
7.3.4
Replace the drive.
Section
7.3.4
3
The servo circuit board is damaged.
Replace this circuit board.
Section
7.3.7
5-66
Trouble Shooting
5567
SVO not rew 5567
SERVO_CANNOT_REWIND_TAPE_CUT_OFF
Description: The tape cannot rewind when the unload operation is executed.
1
Possibility
Countermeasure
Ref.
The take-up motor or cable is damaged.
Replace the drive.
Section
7.3.4
2
The servo circuit board is damaged.
Replace this circuit board.
Section
7.3.7
5568
SVO eject
5567
SERVO_CANNOT_EJECT_CARTRIDGE
Description: The cartridge cannot be ejected when the unload operation is executed.
Caution:
Execute the following procedures in the indicated sequence to remove the
cartridge when it cannot be unloaded, then execute the countermeasure.
(1)
Execute the setup mode FUNLD. (Refer to section 6.3)
(2)
Turn the power switch off and then turn it on after waiting more than ten
seconds to unload.
(3)
Unload the cartridge by the electric operation mode. (Refer to section 6.4.)
(4)
Unload the cartridge by the manual operation mode. (Refer to section 6.5.)
Possibility
1
Countermeasure
The inserted cartridge is different than Use a standard cartridge.
the standard cartridge.
2
Ref.
Section
2.1
The elevator mechanism is damaged.
Replace the drive.
Section
7.3.4
3
The tray is damaged.
Replace the drive.
Section
7.3.4
4
The servo circuit board is damaged.
Replace this circuit board.
Section
7.3.7
5569
5570
SVO sup>100 5569
SVO sup<100 5570
SERVO_THREADER_STOPPED_1_SUP_CNT_GT_100
SERVO_THREADER_STOPPED_2_SUP_CNT_LT_100
Description: The leader block is stopped on the tape path when the unload operation is
executed.
Caution:
Execute the following procedures in the indicated sequence to remove the
cartridge when it cannot be unloaded, then execute the countermeasure.
(1)
Execute the setup mode FUNLD. (Refer to section 6.3)
(2)
Turn the power switch off and then turn it on after waiting more than ten
5-67
Trouble Shooting
seconds to unload.
1
(3)
Unload the cartridge by the electric operation mode. (Refer to section 6.4.)
(4)
Unload the cartridge by the manual operation mode. (Refer to section 6.5.)
Possibility
Countermeasure
The threader mechanism is damaged.
Replace
the
Ref.
threader
mechanism.
2
The servo circuit board is damaged.
Section
7.3.5
Replace this circuit board.
Section
7.3.7
5571
SVO unthred 5571
SERVO_TAPE_IS_CUT_OFF_UNTHREADING
Description: The tape is cut when the unload operation is executed.
Caution:
Execute the following procedures in the indicated sequence to remove the
cartridge when it cannot be unloaded, then execute the countermeasure.
(1)
Execute the setup mode FUNLD. (Refer to section 6.3)
(2)
Turn the power switch off and then turn it on after waiting more than ten
seconds to unload.
1
(3)
Unload the cartridge by the electric operation mode. (Refer to section 6.4.)
(4)
Unload the cartridge by the manual operation mode. (Refer to section 6.5.)
Possibility
Countermeasure
The threader mechanism is damaged.
Replace
the
Ref.
threader
mechanism.
2
The servo circuit board is damaged.
Replace this circuit board.
Section
7.3.5
Section
7.3.7
5572
SVO tension 5572
SERVO_COULD_NOT_GENERATE_TENSION
Description: The tape tension can not be produced when the load operation is executed.
Caution:
Execute the following procedures in the indicated sequence to remove the
cartridge when it cannot be unloaded, then execute the countermeasure.
(1)
Execute the setup mode FUNLD. (Refer to section 6.3)
(2)
Turn the power switch off and then turn it on after waiting more than ten
seconds to unload.
(3)
Unload the cartridge by the electric operation mode. (Refer to section 6.4.)
(4)
Unload the cartridge by the manual operation mode. (Refer to section 6.5.)
Possibility
Countermeasure
Ref.
Trouble Shooting
1
The servo circuit board is damaged.
Replace this circuit board.
5-68
Section
7.3.7
2
The drive main unit is damaged.
Replace the drive.
Section
7.3.4
5573
SVO mtr cur 5573
SERVO_ABNORMAL_GEAR_MOTOR_CURRENT
Description: Abnormal current is supplied to the gear motor when the load operation is
executed.
Caution:
Execute the following procedures in the indicated sequence to remove the
cartridge when it cannot be unloaded, then execute the countermeasure.
(1)
Execute the setup mode FUNLD. (Refer to section 6.3)
(2)
Turn the power switch off and then turn it on after waiting more than ten
seconds to unload.
1
(3)
Unload the cartridge by the electric operation mode. (Refer to section 6.4.)
(4)
Unload the cartridge by the manual operation mode. (Refer to section 6.5.)
Possibility
Countermeasure
The servo circuit board is damaged.
Replace this circuit board.
Ref.
Section
7.3.7
2
The drive main unit is damaged.
Replace the drive.
Section
7.3.4
5.7.4 Error Codes (558x)
5581
SVO CUR SUP 5581
SERVO_ABNORMAL_MOTOR_CURRENT_SUP
Description: Abnormal current is supplied to the supply motor.
Caution:
Execute the following procedures in the indicated sequence to remove the
cartridge when it cannot be unloaded, then execute the countermeasure.
(1)
Execute the setup mode FUNLD. (Refer to section 6.3)
(2)
Turn the power switch off and then turn it on after waiting more than ten
seconds to unload.
1
(3)
Unload the cartridge by the electric operation mode. (Refer to section 6.4.)
(4)
Unload the cartridge by the manual operation mode. (Refer to section 6.5.)
Possibility
Countermeasure
Ref.
The supply motor or cable is damaged.
Replace the drive.
Section
7.3.4
Trouble Shooting
2
The servo circuit board is damaged.
Replace this circuit board.
5-69
Section
7.3.7
5582
SVO CUR TUP 5582
SERVO_ABNORMAL_MOTOR_CURRENT_TUP
Description: Abnormal current is supplied to the take-up motor.
Caution:
Execute the following procedures in the indicated sequence to remove the
cartridge when it cannot be unloaded, then execute the countermeasure.
(1)
Execute the setup mode FUNLD. (Refer to section 6.3)
(2)
Turn the power switch off and then turn it on after waiting more than ten
seconds to unload.
1
(3)
Unload the cartridge by the electric operation mode. (Refer to section 6.4.)
(4)
Unload the cartridge by the manual operation mode. (Refer to section 6.5.)
Possibility
Countermeasure
Ref.
The take-up motor or cable is damaged.
Replace the drive.
Section
7.3.4
2
The servo circuit board is damaged.
Replace this circuit board.
Section
7.3.7
5583
SVO TENSION 5583
SERVO_LOST_TENSION
Description: The tape lost tension.
Caution:
Execute the following procedures in the indicated sequence to remove the
cartridge when it cannot be unloaded, then execute the countermeasure.
(1)
Execute the setup mode FUNLD. (Refer to section 6.3)
(2)
Turn the power switch off and then turn it on after waiting more than ten
seconds to unload.
(3)
Unload the cartridge by the electric operation mode. (Refer to section 6.4.)
(4)
Unload the cartridge by the manual operation mode. (Refer to section 6.5.)
Possibility
1
Countermeasure
The tape sticks to the head due to Use a cleaning cartridge to
deterioration or quality.
clean off the dirty parts.
Ref.
Section
3.1
Use a normal cartridge.
2
Either the reel motor or the cable that Replace the drive.
connects the motor and the mother circuit
Section
7.3.4
board is damaged.
3
The servo circuit board is damaged.
Replace this circuit board.
Section
7.3.7
5-70
Trouble Shooting
4
The power supply unit is damaged.
Replace
the
power
supply
block.
7.3.4
Replace the power supply unit.
(For CSL model)
5584
SVO DISCRIM 5584
Section
Section
7.3.9
SERVO_COUNLD_NOT_DISCRIMINATE_TAPE
Description: The cartridge cannot be discriminated.
Caution:
Execute the following procedures in the indicated sequence to remove the
cartridge when it cannot be unloaded, then execute the countermeasure.
(1)
Execute the setup mode FUNLD. (Refer to section 6.3)
(2)
Turn the power switch off and then turn it on after waiting more than ten
seconds to unload.
1
(3)
Unload the cartridge by the electric operation mode. (Refer to section 6.4.)
(4)
Unload the cartridge by the manual operation mode.
Possibility
Countermeasure
The cartridge is not a standard product.
Use
a
standard
Ref.
length
cartridge.
2
The servo circuit board is damaged.
Replace this circuit board.
Section
2.1
Section
7.3.7
3
The drive main unit is damaged.
Replace the drive.
Section
7.3.4
5585
5586
5587
SVO RAMP UP 5585
SVO not 2M 5586
SVO not 4M 5586
SERVO_COULD_NOT_RAMP_UP
SERVO_NOT_REACHED_2M_PER_SEC
SERVO_NOT_REACHED_4M_PER_SEC
Description: The tape cannot start correctly or the correct speed is not reached.
Caution:
Execute the following procedures in the indicated sequence to remove the
cartridge when it cannot be unloaded, then execute the countermeasure.
(1)
Execute the setup mode FUNLD. (Refer to section 6.3)
(2)
Turn the power switch off and then turn it on after waiting more than ten
seconds to unload.
(3)
Unload the cartridge by the electric operation mode. (Refer to section 6.4.)
(4)
Unload the cartridge by the manual operation mode.
Possibility
Countermeasure
Ref.
5-71
Trouble Shooting
1
The tape sticks to the head due to Use a cleaning cartridge to
deterioration or quality.
Section
3.1
clean off the dirty parts.
Use a normal cartridge.
2
The servo circuit board is damaged.
Replace this circuit board.
Section
7.3.7
3
The drive main unit is damaged.
Replace the drive.
Section
7.3.4
4
The power supply unit is damaged.
Replace
the
power
supply
block.
Replace the power supply unit.
(For CSL model)
Section
7.3.4
Section
7.3.9
5-72
Trouble Shooting
5.8 CSL Circuit Board Errors
[with CSL model]
5.8.1 Error Codes (5551 to 5559)
5551
5552
CHECK TRAY 5551
CHECK TRAY 5552
CSL TRAY error
CSL TRAY error
Description: There is a malfunction in the CSL tray while a cartridge is carried.
Caution: Remove the cartridge from the CSL tray before executing each countermeasure.
(Refer to section 6.7.3)
Possibility
1
Countermeasure
Ref.
Dirt is attached to the cartridge and the Clean the cartridge.
Section
clamp lever of the CSL tray cannot catch
2.1
the cartridge.
2
Dirt is attached to the clamp lever of the Clean the clamp lever.
Section
CSL tray and the clamp lever cannot
6.8
catch the cartridge.
3
The drive is not positioned and adjusted Execute
correctly for the CSL tray.
4
the
drive
position
adjustment.
The sensors (front sensor, rear sensor and Clean the sensors on the CSL
cartridge sensor) are prevented from tray.
Section
6.6.3
Section
6.8
normal detection with dirt and debris.
5
The CSL tray is abnormal.
Replace the CSL.
Section
7.3.4
6
The cable that connects the CSL tray and Replace the CSL.
the CSL circuit board is disconnected or
Section
7.3.4
damaged.
7
The CSL circuit board is damaged.
Replace the CSL.
Section
7.3.4
5553
5554
CHK MAGAZIN 5553
CHK MAGAZIN 5554
CSL MAGAZINE error
CSL MAGAZINE error
Description: There is an malfunction in the magazine while a cartridge is carried.
Caution: Remove the cartridge from the CSL tray before executing each countermeasure.
(Refer to section 6.7.3)
Possibility
Countermeasure
Ref.
Trouble Shooting
1
The inserted cartridge is different than Use a standard cartridge.
the standard cartridge.
Section
2.1
Dirt is attached to the cartridge and the Clean the cartridge.
2
5-73
Section
2.1
clamp lever of the CSL tray cannot catch
the cartridge.
Dirt is attached to the clamp lever of the Clean the clamp lever.
3
Section
6.8
CSL tray and the clamp lever cannot
catch the cartridge.
4
The magazine is not positioned and Replace the CSL
adjusted correctly for the CSL tray.
5
Section
7.3.4
The sensors (front sensor, rear sensor and Clean the sensors on the CSL
cartridge sensor) are prevented from tray.
Section
6.8
normal detection with dirt and debris.
6
The holding mechanism of the cartridge Replace the magazine.
in the magazine is abnormal.
7
The cable that connects the CSL tray and Replace the CSL.
the CSL circuit board is disconnected or
Section
7.3.4
damaged.
8
The CSL circuit board is damaged.
Replace the CSL.
Section
7.3.4
5555
CSL ERROR
5555
CSL ELEVATOR time out
Description: The up-down movement of the CSL tray take longer than 30 seconds and a
time-out occurs.
Caution: Remove the cartridge from the CSL tray before executing each countermeasure.
(Refer to section 6.7.3)
Possibility
1
2
Countermeasure
There is out of grease in the up-down Supply grease to the up-down
mechanism.
mechanism.
The up-down mechanism is abnormal.
Replace the CSL.
Ref.
Section
6.8
Section
7.3.4
3
The CSL circuit board is damaged.
Replace the CSL.
Section
7.3.4
5558
5559
CSL ERROR
CSL ERROR
5558
5559
CSL receives unknown load command
CSL receives unknown load command
5-74
Trouble Shooting
Description: The CSL received a load command that is out of specifications.
Possibility
Countermeasure
Ref.
The cables that connect the CSL circuit Replace the CSL.
1
Section
7.3.4
board and drive are disconnected or
damaged.
2
The CSL circuit board is damaged.
Replace the CSL.
Section
7.3.4
3
The control circuit board is damaged.
Replace this circuit board.
Section
7.3.7
5.8.2 Error Codes (5590 to 5599)
5590
SENSOR ERR 5590
CSL REAR sensor error
Description: The rear sensor is prevented from normal detection.
Caution:
Remove
the
cartridge
from
the
CSL
tray
before
executing
each
countermeasure.(Refer to section 6.7.3)
Possibility
1
Countermeasure
The rear sensor is prevented from normal Clean the sensor on the CSL
2
detection with dirt and debris.
tray.
The rear sensor is abnormal.
Replace the CSL.
Ref.
Section
6.8
Section
7.3.4
3
The CSL tray is abnormal.
Replace the CSL.
Section
7.3.4
4
The cable that connects the CSL tray and Replace the CSL.
the CSL circuit board is disconnected or
Section
7.3.4
damaged.
5
The CSL circuit board is damaged.
Replace the CSL.
Section
7.3.4
5591
SENSOR ERR 5591
CSL HOME POSITION sensor error
Description: The home position sensor is prevented from normal detection.
Caution: Remove the cartridge from the CSL tray before executing each countermeasure.
(Refer to section 6.7.3)
Possibility
Countermeasure
Ref.
Trouble Shooting
The home position sensor is prevented Clean the sensor on the CSL
1
from normal detection with dirt and tray.
5-75
Section
6.8
debris.
2
The home position sensor is abnormal.
Replace the CSL.
Section
7.3.4
The cable that connects the CSL tray and Replace the CSL.
3
Section
7.3.4
the CSL circuit board is disconnected or
damaged.
4
The CSL circuit board is damaged.
Replace the CSL.
Section
7.3.4
5592
SENSOR ERR 5592
CSL FRONT sensor error
Description: The front sensor is prevented from normal detection.
Caution: Remove the cartridge from the CSL tray before executing each countermeasure.
(Refer to section 6.7.3)
Possibility
1
Countermeasure
The front sensor is prevented from Clean the sensor on the CSL
2
normal detection with dirt and debris.
tray.
The front sensor is abnormal.
Replace the CSL.
Ref.
Section
6.8
Section
7.3.4
3
The CSL tray is abnormal.
Replace the CSL.
Section
7.3.4
4
The cable that connects the CSL tray and Replace the CSL.
the CSL circuit board is disconnected or
Section
7.3.4
damaged.
5
The CSL circuit board is damaged.
Replace the CSL.
Section
7.3.4
5593
SENSOR ERR 5593
CSL CARTRIDGE sensor error
Description: The cartridge sensor is prevented from normal detection.
Caution: Remove the cartridge from the CSL tray before executing each countermeasure.
(Refer to section 6.7.3)
Possibility
1
Countermeasure
The cartridge sensor is prevented from Clean the sensor on the CSL
normal detection with dirt and debris.
tray.
Ref.
Section
6.8
Trouble Shooting
2
The cartridge sensor is abnormal.
Replace the CSL.
5-76
Section
7.3.4
3
The magazine is not positioned and Replace the CSL.
adjusted correctly against the CSL tray.
7.3.4
The cable that connects the CSL tray and Replace the CSL.
4
Section
Section
7.3.4
the CSL circuit board is disconnected or
damaged.
5
The CSL circuit board is damaged.
Replace the CSL.
Section
7.3.4
5594
SENSOR ERR 5594
CSL ELEVATOR sensor error
Description: The elevator sensor is prevented from normal detection.
Caution: Remove the cartridge from the CSL tray before executing each countermeasure.
(Refer to section 6.7.3)
Possibility
1
2
Countermeasure
The cartridge sensor is prevented from Clean the sensor on the CSL
normal detection with dirt and debris.
tray.
The elevator sensor is abnormal.
Replace the CSL.
Ref.
Section
6.8
Section
7.3.4
3
The cable that connects the CSL tray and Replace the CSL.
the CSL circuit board is disconnected or
Section
7.3.4
damaged.
4
The CSL circuit board is damaged.
Replace the CSL.
Section
7.3.4
5595
POWER ERR
5595
CSL abnormal voltage 15 V
Description: +15V on the CSL circuit board is abnormal.
1
Possibility
Countermeasure
The power unit is damaged.
Replace the power unit.
Ref.
Section
7.3.9
2
The cable that connects the CSL circuit Replace the CSL.
board and the power unit is disconnected
Section
7.3.4
or damaged.
3
The CSL circuit board is damaged.
Replace the CSL.
Section
7.3.4
5-77
Trouble Shooting
5596
POWER ERR
5596
CSL abnormal voltage 24 V
Description: +24V on the CSL circuit board is abnormal.
1
Possibility
Countermeasure
Ref.
The power unit is damaged.
Replace the power unit.
Section
7.3.9
The cable that connects the CSL circuit Replace the CSL.
2
Section
7.3.4
board and the power unit is disconnected
or damaged.
3
The CSL circuit board is damaged.
Replace the CSL.
Section
7.3.4
5597
CHECK TRAY 5597
CSL TRAY error
Description: There is a malfunction in the CSL tray while a cartridge is carried.
Caution: Remove the cartridge from the CSL tray before executing each countermeasure.
(Refer to section 6.7.3)
Possibility
1
Countermeasure
Ref.
Dirt is attached to the cartridge and the Clean the cartridge.
Section
clamp lever of the CSL tray cannot catch
2.1
the cartridge.
2
Dirt is attached to the clamp lever of the Clean the clamp lever.
Section
CSL tray and the clamp lever cannot
6.8
catch the cartridge.
3
The drive is not positioned and adjusted Execute
correctly for the CSL tray.
4
the
drive
position
adjustment.
The sensors (front sensor, rear sensor and Clean the sensors on the CSL
cartridge sensor) are prevented from tray.
Section
6.6.3
Section
6.8
normal detection with dirt and debris.
5
The CSL tray is abnormal.
Replace the CSL.
Section
7.3.4
6
The cable that connects the CSL tray and Replace the CSL.
Section
7.3.4
the CSL circuit board is disconnected or
damaged.
7
The CSL circuit board is damaged.
Replace the CSL.
Section
7.3.4
5598
CHK MAGAZIN 5598
CSL MAGAZINE error
Trouble Shooting
5-78
Description: There is a malfunction in the magazine while a cartridge is carried.
Caution: Remove the cartridge from the CSL tray before executing each countermeasure.
(Refer to section 6.7.3)
Possibility
1
Countermeasure
Dirt is attached to the cartridge and the Clean the cartridge.
Ref.
Section
2.1
clamp lever of the CSL tray cannot catch
the cartridge.
2
Dirt is attached to the clamp lever of the Clean the clamp lever.
Section
6.8
CSL tray and the clamp lever cannot
catch the cartridge.
3
The magazine is not positioned and Replace the CSL.
adjusted correctly for the CSL tray.
4
Section
7.3.4
The sensors (front sensor, rear sensor and Clean the sensors on the CSL
cartridge sensor) are prevented from tray.
Section
6.8
normal detection with dirt and debris.
5
The holding mechanism of the cartridge Replace the magazine.
in the magazine is abnormal.
6
The cable that connects the CSL tray and Replace the CSL.
the CSL circuit board is disconnected or
Section
7.3.4
damaged.
7
The CSL circuit board is damaged.
Replace the CSL.
Section
7.3.4
5599
CSL ERROR
5599
CSL FLASH ROM ERROR
Description: There is a malfunction in the FLASH ROM on the CSL circuit board.
Possibility
1
A failure occurs during a firmware Execute the firmware update
update.
2
Countermeasure
again.
The cables that connect the CSL circuit Replace the CSL.
board and drive are disconnected or
Ref.
Section
6.1.4
Section
7.3.4
damaged.
3
The CSL circuit board is damaged.
Replace the CSL.
Section
7.3.4
4
The control circuit board is damaged.
Replace this circuit board.
Section
7.3.7
5-79
Trouble Shooting
5.9 Other Errors
The errors that cannot be displayed on the display on the operator panel are explained in
this section.
5.9.1 W ithout CSL Model
Description: The fan motor in the rear panel of the drive does not rotate.
Possibility
1
2
Countermeasure
Ref.
The AC power supply cable is not Connect the AC power supply
connected correctly.
cable correctly.
The AC power is operating abnormally.
Turn the power off.
Section
2.3.1
Section
Check the AC power supply.
1.4.5
Turn the power on again one
more time.
3
The fuse in the rear panel of the drive is Replace the fuse.
Section
disconnected or broken.
4
5
7.3.8
The fan motor in the power supply block Replace
the
power
is damaged.
block.
The fan motor in the drive is damaged.
Replace the drive.
supply
Section
7.3.4
Section
7.3.4
6
The power supply switch is damaged.
Replace the front panel.
Section
7.3.2
7
The power supply unit is damaged.
Replace
the
power
supply
block.
8
The cable that connects the power supply Replace the front panel.
unit and the power supply switch is
Section
7.3.4
Section
7.3.2
disconnected or damaged.
9
The mother circuit board is damaged.
Replace the drive.
Section
7.3.4
Description: The display backlight in the operator panel does not light.
1
Possibility
Countermeasure
The control circuit board is damaged.
Replace this circuit board.
Ref.
Section
7.3.7
5-80
Trouble Shooting
2
The operator panel (OCP) is damaged.
Replace the front panel.
Section
7.3.2
3
The cable that connects the drive and the Replace the front panel.
operator
panel
is
disconnected
Section
7.3.2
or
damaged.
4
The power supply unit is damaged.
Replace
the
power
supply
block.
5
The mother circuit board is damaged.
Section
7.3.4
Replace the drive.
Section
7.3.4
Description: The character on the display of the operator panel is not correct.
1
Possibility
Countermeasure
Ref.
The control circuit board is damaged.
Replace this circuit board.
Section
7.3.7
2
A failure occurs during a firmware Replace
update using an update tape.
3
4
the
control
circuit
board.
A failure occurs in a firmware update Replace
Section
7.3.7
the
control
using a debugger.
board.
The operator panel (OCP) is damaged.
Replace the front panel.
circuit
Section
7.3.7
Section
7.3.2
5
The cable that connects the drive and the Replace the front panel.
operator
panel
is
disconnected
Section
or
7.3.2
damaged.
6
The mother circuit board is damaged.
Replace the drive.
Section
7.3.4
7
The power supply unit is damaged.
Replace
the
power
supply
block.
Section
7.3.4
DIAGNOSTIC ERROR
Description: The ALERT indicator on the operator panel stays turned on when the power is
turned on.
Possibility
1
Countermeasure
Error occurs when the power-on check is The error code is displayed
executed.
when the Switch-2 “INFO” in
the center of the operator
panel is pressed.
Ref.
Table
5-3
5-81
Trouble Shooting
2
The control circuit board is damaged.
Replace this circuit board.
Section
7.3.7
3
A failure occurs during a firmware Replace
update using an update tape.
4
5
the
control
circuit
board.
A failure occurs in a firmware update Replace
Section
7.3.7
the
control
using a debugger.
board.
The operator panel (OCP) is damaged.
Replace the front panel.
circuit
Section
7.3.7
Section
7.3.2
6
The cable that connects the drive and the Replace the front panel.
operator
panel
is
disconnected
Section
7.3.2
or
damaged.
7
The mother circuit board is damaged.
Replace the drive.
Section
7.3.4
8
The power supply unit is damaged.
Replace
the
power
supply
block.
Section
7.3.4
5.9.2 W ith CSL Model
Description: The fan motor in the rear panel of the drive does not rotate.
Possibility
1
2
Countermeasure
The AC power supply cable is not Connect the AC power supply
connected correctly.
cable correctly.
The AC power is operating abnormally.
Turn the power off.
Check the AC power supply.
Ref.
Section
2.3.1
Section
1.4.5
Turn the power on again one
more time.
3
The fuse in the rear panel of the drive is Replace the fuse.
disconnected or broken.
4
7.3.8
The fan motor in the lower part of the Replace the CSL.
rear panel of the CSL is damaged.
5
The fan motor in the drive is damaged. Replace the drive.
The power supply switch is damaged.
Section
7.3.4
Replace the drive.
6
Section
Section
7.3.4
Replace the front panel.
Section
7.3.2
7
The power supply unit is damaged.
Replace the power supply unit.
Section
7.3.9
5-82
Trouble Shooting
8
The cable that connects the power supply Replace the front panel.
Section
7.3.2
unit and the power supply switch is
disconnected or damaged.
9
The mother circuit board is damaged.
Replace the drive.
Section
7.3.4
Description: The display backlight in the operator panel does not light.
1
Possibility
Countermeasure
Ref.
The control circuit board is damaged.
Replace this circuit board.
Section
7.3.7
2
The operator panel (OPC) is damaged.
Replace the front panel.
Section
7.3.2
3
The cables that connect the drive and the Replace the CSL.
Section
CSL circuit board are disconnected or
7.3.4
damaged.
4
The cable that connects the CSL circuit Replace the CSL.
board
and
the
operator
panel
Section
is
7.3.4
disconnected or damaged.
5
The CSL circuit board is damaged.
Replace the CSL.
Section
7.3.4
6
The power supply unit is damaged.
Replace the power supply unit.
Section
7.3.9
7
The mother circuit board is damaged.
Replace the drive.
Section
7.3.4
Description: The character on the display of the operator panel is not correct.
1
Possibility
Countermeasure
Ref.
The control circuit board is damaged.
Replace this circuit board.
Section
7.3.7
2
A failure occurs during a firmware Replace
update using an update tape.
3
4
the
control
circuit
board.
A failure occurs in a firmware update Replace
Section
7.3.7
the
control
using a debugger.
board.
The operator panel (OCP) is damaged.
Replace the front panel.
circuit
Section
7.3.7
Section
7.3.2
5-83
Trouble Shooting
5
The cables that connect the drive and the Replace the CSL.
Section
7.3.4
CSL circuit board are disconnected or
damaged.
6
The cable that connects the CSL circuit Replace the CSL.
board
and
the
operator
panel
Section
7.3.4
is
disconnected or damaged.
7
The CSL circuit board is damaged.
Replace the CSL.
Section
7.3.4
8
The mother circuit board is damaged.
Replace the drive.
Section
7.3.4
9
The power supply unit is damaged.
Replace the power supply unit.
Section
7.3.9
DIAGNOSTIC ERROR
Description: The ALERT indicator on the operator panel stays turned on when the power is
turned on.
Possibility
1
Countermeasure
Ref.
An error occurs when the power-on check The error code is displayed
is executed.
when Switch-2 “INFO” in the
Table
5-3
center of the operator panel is
pressed.
2
The control circuit board is damaged.
Replace this circuit board.
Section
7.3.7
3
A failure occurs during a firmware Replace
update using an update tape.
4
5
the
control
circuit
board.
A failure occurs in a firmware update Replace
Section
7.3.7
the
control
using a debugger.
board.
The operator panel (OCP) is damaged.
Replace the front panel.
circuit
Section
7.3.7
Section
7.3.2
6
The cables that connect the drive and the Replace the CSL.
CSL circuit board are disconnected or
Section
7.3.4
damaged.
7
The cable that connects the CSL circuit Replace the CSL.
board
and
the
operator
panel
is
Section
7.3.4
disconnected or damaged.
8
The CSL circuit board is damaged.
Replace the CSL.
Section
7.3.4
Trouble Shooting
9
The mother circuit board is damaged.
Replace the drive.
5-84
Section
7.3.4
10 The power supply unit is damaged.
Replace the power supply unit.
Section
7.3.9
6-1
Operations for the CE
Chapter 6 OPERATIONS for the CE
This chapter is for the CE (Customer Engineer). These operations are to be performed
only by persons with maintenance training.
6.1 Firmware
6.1.1 Overview of the Firmware
The firmware in this drive can be updated in order to perform operation improvement
within the drive by adding setup items and other operations.
The 4 (without CSL model) or 5 (with CSL mode) kind of firmware are stored in the flash
ROM on the control circuit board. Turn on the drive power supply, the firmware are
transferred from the flash ROM to the memory on the each circuit boards.
The
microprocessors (MPU) on the circuit board will be started, use of the drive is enabled.
The setup values are stored in the flash ROM. The firmware diagram is shown in Figure
6-1A.
CSL circuit board
Servo circuit board
Control circuit board
SCSI circuit board
CSL MPU
Servo MPU
Control MPU
SCSI MPU
Flash ROM
Formatter MPU
with CSL model
Figure 6-1A Firmware Diagram
CAUTION
The firmware and the setup values are changed when the control circuit
board is replaced.
It may not produce the updating the firmware in the case of any hardware
version.
Operations for the CE
6-2
6.1.2 Firmware Revision
The following procedure to display the “Current Firmware Revision”. Refer to Figure 61B.
1)
First, if the operation mode is on the on-line mode, change to the off-line mode. Refer
to Figure 2-6.
2)
“func” will be displayed on the right Switch-Line of the display. Pressing the right
Switch-3 “func” displays the current SCSI ID on the Status-Line.
3)
Pressing the left Switch-1 “func” displays “MENU FUNCTIONS” on the Status-Line.
4)
Press the right Switch-3 “>>>” to shift to the next menus.
5)
Select the menu displayed as “STAT” on the left of the Switch-Line. Pressing the left
Switch-1 “STAT” displays “STATISTICS” on the Status-Line and enters the statistics
mode.
6)
Select the menu displayed as “UCODE” on the left of the Switch-Line. Pressing the
left Switch-1 “UCODE” displays “DISPLAY REVISION” on the Status-Line. This
menu is the Current Firmware Revision.
7)
Pressing each time the Switch-1 “NEXT” on the left, the name and the revision of the
firmware are displayed alternately. The following names are:
Display of the firmware revision
Name
CURRENT MACHINE
Description
Example of revision
Release Code
Revision of entire drive
CURRENT CNTL
CNTL
MEC05.50
Revision of control firmware
CURRENT FORM
FORM
MEF03.00
Revision of formatter firmware
CURRENT SCSI
SCSI
MES05.00
Revision of SCSI firmware
CURRENT SERVO
SERVO MEV02.40
Revision of servo firmware
CURRENT CSL
CSL
Revision of CSL firmware (with CSL model)
MEL01.24
Press the right Switch-3 “EXIT” returns to the statistics mode.
8)
Press the right Switch-3 “>>>” to select the menu that displays “EXIT” on the SwitchLine. Press this “EXIT” switch to close to each of the menus.
6-3
Operations for the CE
[Example]
OFFLINE UNLOADED
ONL --- func
MENU FUNCTIONS
CONF DIAG >>>
3
2
3
4
SCSI ID
5
func CHG EXIT
MENU FUNCTIONS
STAT FUNLD >>>
1
1
3
5
STATISTICS
UCODE ERLOG >>>
1
6
DISPLAY REVISION
NEXT --- EXIT
Current Firmware Revision menu.
Press Switch-1 “NEXT”
to select the next item.
1
3
7
Press Switch-3 “EXIT”
to end the menu.
CURRENT MACHINE
NEXT --- EXIT
1
3
Pre-release code
NEXT --- EXIT
1
3
CURRENT CNTL
NEXT --- EXIT
1
3
CNTL
MEC04.00
NEXT --- EXIT
1
Figure 6-1B Current Firmware Revision
3
Operations for the CE
6-4
6.1.3 Hardware Revision
The following procedure to display the “Current Hardware Revision”. Refer to Figure 61C.
1)
First, if the operation mode is on the on-line mode, change to the off-line mode. Refer
to Figure 2-6.
2)
“func” will be displayed on the right Switch-Line of the display. Pressing the right
Switch-3 “func” displays the current SCSI ID on the Status-Line.
3)
Pressing the left Switch-1 “func” displays “MENU FUNCTIONS” on the Status-Line.
4)
Press the right Switch-3 “>>>” to shift to the next menus.
5)
Select the menu displayed as “STAT” on the left of the Switch-Line. Pressing the left
Switch-1 “STAT” displays “STATISTICS” on the Status-Line and enters the statistics
mode.
6)
Press the right Switch-3 “>>>” to select the menu displayed as “HARD” on the center of
the Switch-Line. Pressing the center Switch-2 “HARD” displays “HEAD” on the left of
the Status-Line. This menu is the Current Hardware Revision.
7)
Pressing each time the Switch-1 “NEXT” on the left, the name and the revision of the
hardware are displayed together. The following names are:
Display of the hardware revision
Name
Description
Example of revision
HEAD
36 TRACK
Number of the tracks on the tape head
SPEED
2 METER/S
Tape speed
CONTROLLER
1
Revision of control circuit board
IDRC
one channel
Specification of the IDRC
BUFFER SIZE
2 meg
Data buffer size
FORMATTER
1
Revision of formatter circuit board
DIGITAL READ
2
Revision of digital read circuit board
ANALOG READ
1
Revision of analog read circuit board
ANALOG WRITE
6
Revision of analog write circuit board
SCSI CARD
9
Revision of SCSI circuit board
DRV
S.E. big 50
Specification of the SCSI connector
SERVO CARD
0
Revision of servo circuit board
CSL CARD
MEL
Revision of CSL circuit board (with CSL model)
No Erase head
Specification of the write operation
6-5
Operations for the CE
Press the right Switch-3 “EXIT” returns to the statistics mode.
8)
Press the right Switch-3 “>>>” to select the menu that displays “EXIT” on the SwitchLine. Press this “EXIT” switch to close to each of the menus.
[Example]
OFFLINE UNLOADED
ONL --- func
MENU FUNCTIONS
CONF DIAG >>>
3
2
3
4
SCSI ID
5
func CHG EXIT
MENU FUNCTIONS
STAT FUNLD >>>
1
1
3
5
STATISTICS
TIME HARD >>>
2
6
HEAD 36 TRACK
NEXT --- EXIT
Current Hardware Revision menu.
Press Switch-1 “NEXT”
to select the next item.
1
3
7
Press Switch-3 “EXIT”
to end the menu.
SPEED 2 METER/S
NEXT --- EXIT
1
3
Figure 6-1C Current Hardware Revision
Operations for the CE
6-6
6.1.4 Firmware Update
CAUTION
When updating the firmware, it is necessary to use the standard (default)
setup values. When other than the standard values are being used, note
the current values in Table 4-1 of the user manual and reconfigure them
after updating is completed.
The following update procedures that use the special cartridge for updating. Refer to
Figure 6-2A.
1)
First, load the special update cartridge. If the operation mode is on the on-line mode,
change to the off-line mode. Refer to Figure 2-6.
2)
“func” will be displayed on the right Switch-Line of the display. Pressing the right
Switch-3 “func” displays the current SCSI ID on the Status-Line.
3)
Pressing the left Switch-1 “func” displays “MENU FUNCTIONS” on the Status-Line.
4)
Select the menu displayed as “DIAG” on the center of the Switch-Line. Pressing the
center Switch-2 “DIAG” displays “DIAGNOSTICS” on the Status-Line and enters the
diagnostics mode.
5)
Press the right Switch-3 “>>>” to shift to the next menus.
6)
Select the menu displayed as “UCODE” on the center of the Switch-Line. Pressing the
center Switch-2 “UCODE” displays “UPDATE UCODE?” on the Status-Line. This
menu is the Firmware Update.
7)
Pressing the left Switch-1 “YES”, the contents of the tape will be read in the internal
buffer of the drive. During reading, the firmware revisions will be displayed one after
the other. When the update preparations have been made, “CONFIRM UPDATE?”
will be displayed on the Status-Line.
8)
Pressing the left Switch-1 “YES”, the cartridge will be unloaded and updating of the
firmware will start.
9)
During the updating, “UPDATING CODE..” will be displayed on the Status-Line.
After that, the drive will start in the same way as when the power is turned on.
10) When the updating ends normally, “STAND BY” will be displayed on the Status-Line
and updating of the firmware will be completed.
11) Always follow-up by resetting the standard (default) setup values from section 6.1.5 on
the next page.
CAUTION
Never turn off the power while performing the update. For the CSL model,
never open the door performing the update.
If the standard setup values are not reset, the drive will mis-operate and
may not be recognized by the host computer system.
6-7
Operations for the CE
[Example]
BOT OFFLINE FP
ONL UNLD func
MENU FUNCTIONS
CONF DIAG >>>
3
2
2
4
SCSI ID
5
func CHG EXIT
DIAGNOSTICS
GEN
RWT >>>
1
3
3
5
DIAGNOSTICS
SERVO UCODE >>>
2
6
Load the special update cartridge.
(If the cartridge is not loaded.)
UPDATE UCODE?
YES EXIT --1
PLEASE LOAD
UCODE TAPE NOW
2
7
CONFIRM UPDATE?
YES EXIT STAT
Firmware Update menu.
Press Switch-1 “YES”
to continue the update.
1
2
8
Press Switch-2 “EXIT” to end the menu.
UPDATING UCODE..
STAND BY
OFL ---
18
---
1
9
Figure 6-2A Firmware Update
10
Continued on the Figure 6-2B
Operations for the CE
6-8
6.1.5 Standard Setup Values
CAUTION
Setting the standard setup values, the SCSI ID will not be changed.
Changing the SCSI ID, refer to section 4.2.1.
When the firmware is updated or a circuit board is replaced, it is necessary to initialize
the setup and set to the standard (default) setup values. The following procedure to set
the “Standard Setup Values”.
Refer to Figure 6-2B
1)
If the operation mode is on the on-line mode, change to the off-line mode. Refer to
Figure 2-6.
2)
“func” will be displayed on the right Switch-Line of the display. Pressing the right
Switch-3 “func” displays the current SCSI ID on the Status-Line.
3)
Pressing the left Switch-1 “func” displays “MENU FUNCTIONS” on the Status-Line.
4)
Select the menu displayed as “CONF” on the left of the Switch-Line. Pressing the left
Switch-1 “CONF” displays “ENTER PASSWORD” on the Status-Line. This is the
password input prompt.
5)
Press Switch-3,-2 and -3 in sequence. The “CONFIGURE” will appear on the StatusLine. This menu is the configuration mode.
6)
Press the right Switch-3 “>>>” to shift to the next menus.
7)
Select the menu displayed as “RESET” on the center of the Switch-Line. Pressing the
center Switch-2 “RESET”, the message “ALL PARAMETERS BACK TO DEFAULT”
will appear briefly on the display. This menu is the Standard Setup Values. After
that, “SAVE TO FLASH?” will be displayed on the Status-Line.
8)
Press the Switch-1 “YES” to initialize the setup and save to the standard setup values.
Press the Switch-2 “EXIT” to abort the setup menu.
9)
Press the right Switch-3 “>>>” to select the menu that displays “EXIT” on the SwitchLine. Press this “EXIT” switch to close to each of the menus.
CAUTION
When other than the standard values are being used, reconfigure the
previous values in Table 4-1 of the user manual.
6-9
Operations for the CE
[Example]
OFFLINE UNLOADED
ONL --- func
MENU FUNCTIONS
CONF DIAG >>>
3
2
1
4
SCSI ID
5
func CHG EXIT
ENTER PASSWORD
EXIT --- ---
1
2
3
3
5
Password input request.
CONFIGURE
SCSI DRIVE >>>
3
Press Switch-3, -2 and -3 in sequence.
Configuration Mode menu.
6
CONFIGURE
TAPE RESET >>>
2
7
ALL PARAMETERS
BACK TO DEFAULT
Standard Setup Values menu.
7
SAVE TO FLASH?
YES EXIT --1
8
Input request for save.
Press Switch-1 “YES” to save the setup.
Press Switch-2 “EXIT” to abort the setup.
Figure 6-2B Standard Setup Values
Operations for the CE
6-10
6.2 Drive Adjustment Procedures
The drive is required to be adjusted when the servo circuit board is replaced. Enter the
diagnostics mode at this time.
The following procedure to adjust the “Drive Adjustment”. Refer to Figure 6-3.
1)
First, unload the cartridge. If the operation mode is on the on-line mode, change to
the off-line mode. Refer to Figure 2-6.
2)
“func” will be displayed on the right Switch-Line of the display. Pressing the right
Switch-3 “func” displays the current SCSI ID on the Status-Line.
3)
Pressing the left Switch-1 “func” displays “MENU FUNCTIONS” on the Status-Line.
4)
Select the menu displayed as “DIAG” on the center of the Switch-Line. Pressing the
center Switch-2 “DIAG” displays “DIAGNOSTICS” on the Status-Line and enters the
diagnostics mode.
5)
Press the right Switch-3 “>>>” and select the menu displayed as “SERVO” on the left of
the Switch-Line. Pressing the left Switch-1 “SERVO” displays “ENTER PASSWORD”
on the Status-Line. This is the password input prompt.
6)
Press Switch-3,-2 and -3 in sequence.
Status-Line.
7)
Press the right Switch-3 “>>>” and select the menu displayed as “DIAG / TUNING” on
the Status-Line. Pressing the center Switch-2 “ENTER” displays “D/A OFFSET ADJ”
on the Status-Line. This menu is the Drive Adjustment Procedures.
8)
Press the center Switch-2 “ENTER” and then press the center Switch-2 “START” in
order to execute the “D/A OFFSET ADJ”. “Adjusting ...” is displayed on the StatusLine and the adjustment operation starts.
9)
When the adjustment is completed , “COMPLETED OK” is displayed on the StatusLine. Pressing the left Switch-1 “EXIT” displays “D/A OFFSET ADJ” on the StatusLine one more time.
“DRIVE TESTS” will be displayed on the
10) Press the right Switch-3 “>>>” and select the menu displayed as “MOTOR Kt COMPE”
on the Status-Line. Press the center Switch-2 “ENTER” and then press the center
Switch-2 “START” in order to execute the “MOTOR Kt COMPE”. “Executing ...” is
displayed on the Status-Line and the adjustment operation starts.
11) When the adjustment is completed , “COMPLETED,” is displayed on the center of the
Status-Line. Pressing the left Switch-1 “EXIT” displays “MOTOR Kt COMPE” on the
Status-Line one more time.
12) Turn the power off to validate the setting.
6-11
Operations for the CE
[Example]
OFFLINE UNLOADED
ONL --- func
MENU FUNCTIONS
CONF DIAG >>>
3
2
2
4
SCSI ID
5
func CHG EXIT
DIAGNOSTICS
SERVO UCODE >>>
1
1
3
5
ENTER PASSWORD
EXIT --- ---
Password input request.
Press Switch-3, -2 and -3 in sequence.
2
3
6
DIAG/TUNING
EXIT ENTER >>>
Drive Adjustment menu.
2
7
D/A OFFSET ADJ
EXIT ENTER >>>
2
MOTOR Kt COMPE
EXIT ENTER >>>
3
8
1
COMPLETED OK
EXIT --- ---
COMPLETE, 02:03
EXIT --- ---
1
9
2
10
1
11
Figure 6-3 Drive Adjustment Procedures
Operations for the CE
6-12
6.3 Unloading by Electric Operation Part-1
If an error occurs when loading or unloading is performed, the cartridge unloading and
error recovery operations can be performed by the operation switches on the operator
panel.
The procedures to recover the drive without turning the power off are described in this
section (6.3). Execute the procedures in the next section (6.4) when the recovery cannot
be performed even if the procedures in this section are executed.
CAUTION
The following operations should be performed after removing the cover of
this drive to enable to observe the tape path.
!
WARNING!
Always turn off the power before removing the cover of the drive. Never
touch the inside of the drive when turning the power on. Even when the
power has been turned off, do not touch the area surrounding the power
supply unit and the tape head.
Refer to Chapter 7 for the disassembly procedures of the drive.
The unloading and recover procedures are described below. Refer to Figure 6-4.
1)
Make a memo of the error message and error code which is displayed on the StatusLine of the display. If the operation mode is on the on-line mode, change to the off-line
mode. Refer to Figure 2-6.
2)
“func” will be displayed on the right Switch-Line of the display. Pressing the right
Switch-3 “func” displays the current SCSI ID on the Status-Line.
3)
Pressing the left Switch-1 “func” displays “MENU FUNCTIONS” on the Status-Line.
4)
Press the right Switch-3 “>>>” to shift to the next menus.
5)
Select the menu displayed as “FUNLD” on the center of the Switch-Line. Press the
center Switch-2 “FUNLD” to execute the unloading operation. “UNLOADING” is
displayed on the Status-Line and the cartridge unloading starts. If the message “SVO
DWNLD” is displayed on the Status-Line, press the center Switch-2 “FUNLD” one more
time.
6)
When the unloading is completed, “OFFLINE UNLOADED” is displayed on the StatusLine.
7)
Press the right Switch-3 “>>>” and select the menu displayed as “EXIT” on the SwitchLine. Pressing switch “EXIT” returns the off-line mode.
8)
Set operation to the on-line mode. (Refer to Figure 2-6.) The ALERT indicator will have
gone off by this time.
Operations for the CE
[Example]
OFFLINE UNLOADED
ONL --- func
3
2
SCSI ID
5
func CHG EXIT
1
3
MENU FUNCTIONS
CONF DIAG >>>
3
4
MENU FUNCTIONS
STAT FUNLD >>>
Unloading Execution menu.
2
5
OFFLINE UNLOADED
STAT FUNLD >>>
Complete the unloading.
3
6
MENU FUNCTIONS
--EXIT >>>
2
7
Figure 6-4 Unloading and Error Recovery
6-13
6-14
Operations for the CE
6.4 Unloading by Electric Operation Part-2
If an error occurs when loading or unloading is performed, the cartridge unloading and
error recovery operations can be performed by the operation switches on the operator
panel.
The procedures to recover the drive after turning the power off and disassembling the
drive are described in this section (6.4).
CAUTION
The following operations should be performed after removing the cover of
this drive to enable to observe the tape path.
!
WARNING!
Always turn off the power before removing the cover of the drive. Never
touch the inside of the drive when turning the power on. Even when the
power has been turned off, do not touch the area surrounding the power
supply unit and the tape head.
Refer to Chapter 7 for the disassembly procedures of the drive.
6.4.1 Selecting the Unloading Procedure
The operation differs according to the tape condition. Confirm the location of the tape on
the tape path, from the threader home position, and tape head to threader reel position,
referring to Figure 6-5.
Power supply
Thread plate
Tape head
Threader
Reel position
Tape cleaner
Take-up reel
Elevator mechanism
Threader
Home position
Thread motor shaft
Tray
Front panel
Figure 6-5 Tape Path
6-15
Operations for the CE
When the tape position is determined, select the procedure according to the flowchart in
Figure 6-6 and execute the operation.
CAUTION
Be especially careful when operating this drive. If you make any mistake it
may damage the drive or tape.
Always check the tape path while operations are executed. When operation
is interrupted or an abnormal sound has occurred, turn off the power
immediately.
Turn off the Power.
Tape has
fallen down from the
Yes
Execute section 6.5
tape path.
No
Threader is
Yes
at the reel position.
Tape is
No
wound in the take-up
Yes
Execute section 6.4.2
reel.
No
Threader is
in the middle of the
tape path.
No
Yes
There is
Yes
a leader block.
No
Threader is
Execute section 6.4.3
Execute section 6.4.4
(SUP Tension: ON)
Execute section 6.4.4
(SUP Tension: OFF)
Yes
at the home position.
The tray
No
has rising.
No Execute section 6.4.5
(ELEVATOR: DOWN)
Execute section 6.4.5
(ELEVATOR: UP)
Yes
Turn on the Power.
Turn off the Power.
Figure 6-6 Flowchart of Unloading by Electric Operation
Operations for the CE
6-16
6.4.2 Rewinding the Tape
The tape must be rewound to the position where the leader block can be pulled out when
the tape is wound in the take-up reel. The procedures using the electric operation mode
are described below. Refer to Figure 6-7.
1)
Turn the power on. Please observe the drive carefully because the unloading operation
may start when the power is turned on. When the drive operation is stopped, continue
the following operation if the tape does not fall down from the tape path and continues
to be wound up in the take-up reel.
2)
If the operation mode is on the on-line mode, change to the off-line mode. Refer to
Figure 2-6.
3)
“func” will be displayed on the right Switch-Line of the display. Pressing the right
Switch-3 “func” displays the current SCSI ID on the Status-Line.
4)
Pressing the left Switch-1 “func” displays “MENU FUNCTIONS” on the Status-Line.
5)
Select the menu displayed as “DIAG” on the center of the Switch-Line. Pressing the
center Switch-2 “DIAG” displays “DIAGNOSTICS” on the Status-Line and enters the
diagnostics mode.
6)
Press the right Switch-3 “>>>” and select the menu displayed as “SERVO” on the left of
the Switch-Line. Pressing the left Switch-1 “SERVO” displays “ENTER PASSWORD”
on the Status-Line. This is the password input prompt.
7)
Press Switch-3,-2 and -3 in sequence. “DRIVE TESTS” will be displayed on the StatusLine.
8)
Press the right Switch-3 “>>>” and select the menu displayed as “LOADING TESTS”
on the Status-Line. Pressing the center Switch-2 “ENTER” displays “TUP Mo LOCK
POS” on the Status-Line and enters the electric operation mode.
9)
Press the right Switch-3 “>>>” and select the menu displayed as “SUP Mo SLOW CW”
on the Status-Line. Pressing the center Switch-2 “ENTER” displays “SUP SLOW CW:
OFF” on the Status-Line. This menu is the Rewinding the Tape.
10) Press the center Switch-2 “ON”, the supply reel starts winding the tape and the tape in
the take-up reel is rewound.
11) When all the tape in the take-up reel is rewound and the rotation stops at the position
where the leader block (threader) can be pulled out, immediately press the left Switch-1
“EXIT”. This menu ends and “SUP Mo SLOW CW” is displayed on the Status-Line
again.
CAUTION
When executing the next section (6.4.4) continuously, check the flowchart in
Figure 6-6. If the conditions are satisfied, the operation can be started from
item 9) in section 6.4.4.
6-17
Operations for the CE
[Example]
OFFLINE UNLOADED
ONL --- func
MENU FUNCTIONS
CONF DIAG >>>
3
3
2
5
SCSI ID
5
func CHG EXIT
DIAGNOSTICS
SERVO UCODE >>>
1
1
4
6
ENTER PASSWORD
EXIT --- ---
Password input request.
Press Switch-3, -2 and -3 in sequence.
2
3
7
LOADING TESTS
EXIT ENTER >>>
2
8
SUP Mo SLOW CW
EXIT ENTER >>>
Electric Operation mode menu.
2
9
SUP SLOW CW: OFF
EXIT ON
---
Rewinding the Tape menu.
10
1
2
11
Figure 6-7 Rewinding the Tape
6-18
Operations for the CE
6.4.3 Adjustment at the Threader Reel Position
When the threader is positioned in the threader reel position, the take-up reel must be
rotated so it pulls out the leader block (threader) from the take-up reel. The procedures
using the electric operation mode are described below. Refer to Figure 6-8.
1)
Turn the power on. Please observe the drive carefully because the unloading operation
may start when the power is turned on. When the drive operation is stopped, continue
the following operation if the tape does not fall down from the tape path and the
threader is at the reel position.
2)
Enter the electric operation mode from the off-line mode using the procedures described
in items 2) to 8) in the previous section (6.4.2). “TUP Mo LOCK POS” is displayed on
the Status-Line of the display.
9)
Press the right Switch-3 “>>>” and select the menu displayed as “TUP Mo LOCK POS”
on the Status-Line. Pressing the center Switch-2 “ENTER” displays “TUP Mo LOCK
POS” on the Status-Line again. This menu is the Adjustment at the Threader Reel
Position.
10) Press the center Switch-2 “START”, “RUNING
TUP MOTOR” is displayed on the Status-Line,
the take-up reel rotates and the adjustment
operation starts.
11) When the rotation stops at the position where
the take-up reel can pull out the leader block
(threader), immediately press the left Switch-1
“EXIT”. This menu ends and “TUP Mo LOCK
POS” is displayed on the Status-Line again.
TUP Mo LOCK POS
EXIT ENTER >>>
2
9
TUP Mo LOCK POS
EXIT START ---
CAUTION
When executing the next section (6.4.4)
continuously, check the flowchart in
Figure 6-6.
2
10
If the conditions are
satisfied, the operation can be started
RUNING TUP MOTOR
EXIT --- ---
from item 9) in section 6.4.4.
1
11
Figure 6-8 Adjustment at the Threader Reel Position
6-19
Operations for the CE
6.4.4 Return to the Threader Home Position
When the threader is at the threader reel position in the take-up reel or in the middle of
the tape path, the threader must return to the threader home position of the tray. The
procedures using the electric operation mode are described below. Refer to Figure 6-9.
1)
Turn the power on. Please observe the drive carefully because the unloading operation
may start when the power is turned on. When the drive operation is stopped, continue
the following operation if the tape does not fall down from the tape path and the
threader is at the reel position or in the middle of the tape path.
2)
Enter the electric operation mode from the off-line mode using the procedures described
in items 2) to 8) in the previous section (6.4.2). “TUP Mo LOCK POS” is displayed on
the Status-Line of the display.
9)
Press the right Switch-3 “>>>” and select the
menu displayed as “THREADER TEST” on the
Status-Line.
Pressing the center Switch-2
“ENTER” displays “SELECT SUP TENSN” on
the Status-Line. This menu is the Return to the
Threader Home Position.
10) If the tape is in the tape path (there is a leader
block), press the right Switch-3 “ON”. If the
tape is not in the tape path, press the center
Switch-2 “OFF”. “SUP Tension:” is displayed on
the center of the Status-Line.
11) Press the center Switch-3 “BWD”, the threader
start moving to the home position.
THREADER TEST
EXIT ENTER >>>
2
9
SELECT SUP TENSN
EXIT OFF
ON
2
3
10
12) When the threader finishes moving to the home
position, immediately press the left Switch-1
“STOP”. Then press the left Switch-1 “EXIT”,
this menu ends and “THREADER TEST” is
displayed on the Status-Line again.
SUP Tension: OFF
EXIT FWD BWD
3
11
CAUTION
When executing the next section (6.4.5)
THREADR TST: BWD
STOP STOP STOP
continuously, check the flowchart in
Figure 6-6.
If the conditions are
satisfied, the operation can be started
from item 9) in section 6.4.5.
1
12
Figure 6-9 Return to the Threader Home Position
6-20
Operations for the CE
6.4.5 Raising the Tray
When the tray does not rise, the tray must be raised by using the elevator mechanism.
The procedures using the electric operation mode are described below. Refer to Figure 610.
1)
Turn the power on. Please observe the drive carefully because the unloading operation
may start when the power is turned on. When the drive operation is stopped, continue
the following operation if the tape does not exist in the tape path and the threader is at
the home position.
2)
Enter the electric operation mode from the off-line mode using the procedures described
in items 2) to 8) in the previous section (6.4.2). “TUP Mo LOCK POS” is displayed on
the Status-Line of the display.
9)
Press the right Switch-3 “>>>” and select the
menu displayed as “ELEVATOR UP/DOWN” on
the Status-Line. Pressing the center Switch-2
“ENTER” displays “ELEVATOR UP/DOWN” on
the Status-Line again.
This menu is the
Raising the Tray.
10) If the tray is not lowered, press the right
Switch-3 “DOWN” to lower the tray completely.
“ELEV GOING DOWN” is displayed on the
Status-Line and the tray is lowered.
11) If the tray is lowered completely, press the
center Switch-2 “UP”. “ELEV GOING UP” is
displayed and the tray rises.
ELEVATOR UP/DOWN
EXIT ENTER >>>
2
9
ELEVATOR UP/DOWN
EXIT UP DOWN
10
2
3
11
12) When the tray has risen completely and stopped,
immediately press the left Switch-1 “STOP”.
Then press the left Switch-1 “EXIT”, this menu
ends and “ELEVATOR UP/DOWN” is displayed
on the Status-Line again.
ELEV GOING UP
STOP STOP STOP
1
12
Figure 6-10 Raising the Tray
Operations for the CE
6-21
6.5 Unloading by Manual Operation
If an error occurs when loading or unloading is performed, the drive mechanism must be
operated manually under the following conditions.
1) The tape has fallen down of the tape path.
2) The tape is cut off.
3) The remote control operation using switches on the operator panel failed.
4) The drive has malfunctioned.
The procedures to recover the drive manually after turning the power off and
disassembling the drive are described in this section (6.5).
CAUTION
The following operations should be performed after removing the cover of
this drive to enable to observe the tape path.
!
WARNING!
Always turn off the power before removing the cover of the drive. Never
touch the inside of the drive when turning the power on. Even when the
power has been turned off, do not touch the area surrounding the power
supply unit and the tape head.
Refer to Chapter 7 for the disassembly procedures of the drive.
6.5.1 Selecting the Unloading Procedure
The operation differs according to the tape condition. Confirm the location of the tape on
the tape path, from the threader home position, and tape head to threader reel position,
referring to Figure 6-5.
When the tape position is determined, select the procedure according to the flowchart in
Figure 6-11 and execute the operation.
CAUTION
Be especially careful when operating this drive. If you make any mistake it
may damage the drive or tape.
Always check the tape path while operations are executed. When operation
is interrupted or an abnormal sound has occurred, turn off the power
immediately.
6-22
Operations for the CE
Turn off the Power.
Tape is cut.
Yes
Execute section 6.5.7
No
Tape has
fallen down from the
Yes
Execute section 6.5.6
tape path.
No
Turn off the Power.
Failed
Execute
section 6.4
succeeded
Threader is
Turn off the Power.
Yes
at the reel position.
Tape is
No
wound in the take-up
Yes
Execute section 6.5.2
reel.
No
Threader is
in the middle of the
Execute section 6.5.3
Yes
tape path.
Execute section 6.5.4
No
Threader is
Yes
at the home position.
The tray
No
has rising.
No
Execute section 6.5.5
Yes
Turn on the Power.
Figure 6-11 Flowchart of Unloading by Manual Operation
6-23
Operations for the CE
6.5.2 Rewinding the Tape
The tape must be rewound to the position where the leader block can be pulled out when
the tape is wound in the take-up reel. The tape can be rewound by rotating the supply
reel motor under the tray. The procedures are described below.
1)
Always turn off the power. Place the drive so the power supply is in the bottom
position. (Refer to Figure 6-12.) Continue the following operation if the tape does not
fall down from the tape path.
2)
Remove the bottom cover of the drive part. (Refer to Chapter 7.)
3)
Insert the 3mm-hexagon wrench into the supply motor shaft shown in Figure 6-12. Be
careful when performing an operation so the wrench does not contact the circuit boards
around the supply motor shaft.
4)
Turn the wrench slowly clockwise while observing the tape path, which is a right turn
from the position of the tape path side. It is a counterclockwise turn, which is a left
turn when viewed from the bottom part. The supply reel starts to wind a tape by
rotating a supply reel motor and the tape in the take-up reel is rewound. Turn the
wrench slowly and carefully so the tape does not fall down from the tape path at this
time.
5)
This operation is completed when the entire tape is rewound and the take-up reel is
stopped rotating at the position where the leader block (threader) can be pulled out.
(Refer to Figure 6-5.) If the tape has fallen down, perform operations from section
6.5.6 again.
Front panel
Supply motor shaft
Power supply
Workbench
Figure 6-12 Bottom View
6-24
Operations for the CE
6.5.3 Adjustment at the Threader Reel Position
When the threader is positioned in the threader reel position, the take-up reel must be
rotated so it pulls out the leader block (threader) from the take-up reel. The procedures
are described below.
1)
Always turn off the power. When the tape is loaded in the tape path, place the drive
so the power supply is in the bottom position. (Refer to Figure 6-13.) Continue the
following operation if the tape does not fall down from the tape path. When the tape is
not loaded in the tape path, the drive can be placed in the regular position or position
where the power supply is in the bottom.
2)
Lightly touch the take-up reel shown in Figure 6-13 with your hand and rotate it slowly
until the position where the leader block (threader) can be pulled out. Rotate the takeup reel slowly and carefully so the tape does not fall down from the tape path at this
time.
3)
This operation is completed if the tape is not fall down from the tape path. If the tape
has fallen down, perform operations from section 6.5.6 again.
[ Take-up reel enlarged view ]
Threader pulled out position
Front Panel
Take-up reel
Power supply
Workbench
Figure 6-13 Take-up Reel
6-25
Operations for the CE
6.5.4 Return to the Threader Home Position
When the threader is at the threader reel position in the take-up reel or in the middle of
the tape path, the threader must return to the threader home position of the tray. The
procedures are described below.
1)
Always turn off the power. When the tape is loaded in the tape path, place the drive
so the power supply is in the bottom position. (Refer to Figure 6-14.) Continue the
following operation if the tape does not fall down from the tape path. When the tape is
not loaded in the tape path, the drive can be placed in the regular position or position
where the power supply is in the bottom.
2)
When the tape is loaded in the tape path, the threader must be moved carefully while
rewinding a tape according to the procedure described in section 6.5.2 so the tape does
not fall down from the tape path.
3)
Insert the 6mm-screwdriver or coin into the thread motor shaft shown in Figure 6-14.
Be careful because the shaft may be damaged if an incorrectly sized screwdriver is used.
4)
Turn the thread motor shaft slowly counterclockwise while observing the tape path,
which is a left turn from the position of the tape path side. Turn it slowly and
carefully so the tape does not fall down from the tape path at this time. Also be careful
so the pulley (head of the threader) does not run on or get under the thread plate.
5)
This operation is completed when the threader is moved completely to the home
position and the leader block and entire tape are stored in the cartridge. If the tape
has fallen down, perform operations from section 6.5.6 again.
CAUTION
Do not hold the picker or pulley when moving the threader.
Front panel
Thread motor shaft
Thread plate
Picker
Pulley
Power supply
Workbench
[ Pulley enlarged view ]
Figure 6-14 Threader
6-26
Operations for the CE
6.5.5 Raising the Tray
When the tray does not rise, the tray must be raised by using the elevator mechanism.
The procedures are described below.
1)
Always turn off the power. Place the drive in the regular position Continue the
following operation if the tape or leader block are not loaded in the tape path.
2)
The tray rises when the lever of the elevator mechanism (elevator cam assembly) is
turned. The following explanation indicates the order by referencing the position
when viewed from the front. (Refer to Figure 6-15.)
3)
First of all, engage the gear of the elevator motor and the lever each other by pressing
the lever. Turn the lever to the front side. The tray rises a slightly if the engagement
is correct.
4)
Next, leave the distance between the gear of the elevator motor and the lever. Turn
the lever to the rear side. The tray does not rise if the engagement is completely
released.
5)
Repeat the operations 3) and 4) described above until the gear does not turn to the
front side. Keep performing these operations even though the tray finished rising.
The cartridge in the tray is ejected by the time the gear stops turning.
CAUTION
Do not hold and raise the tray directly with your hand.
[ Engage gears ]
[ Release gears ]
Gear
Gear
Power supply
Lever
Lever
Lever
Tray
Elevator motor
Front panel
Figure 6-15 Elevator Mechanism
6-27
Operations for the CE
6.5.6 Return to the Tape Path
When the tape has fallen down from the tape path, it must be return the tape to the tape
path.
1)
The procedures are described below.
Always turn off the power. Place the drive so the power supply is in the bottom
position. (Refer to Figure 6-16.) Follow the flowchart in Figure 6-11 after that the
tape is returned by placing the drive in this position.
Perform the operations according to conditions of each number, referencing the Figure
6-16 and following the flowchart shown in Figure 6-11.
2)
Caution: Never touch the recording surface (the surface contacts the tape head) and
the tape head with your hand when moving the tape position. Be careful so the leader
block does not contact the tape head when the leader block is in the tape path.
3)
When the threader is in the reel position, move the tape so the tape passes through
guides in four locations. Turn the take-up reel clockwise viewed from the tape path
and wind the tape slack to the tape-up reel referring to section 6.5.3.
4)
When the leader block is in the tape path, move the tape so the tape passes through
each guide. Turn the supply reel clockwise viewed from the tape path and wind the
tape slack to the supply reel referring to section 6.5.2.
5)
When the leader block has fallen down from the threader, move the leader block to the
home position. Turn the supply reel clockwise viewed from the tape path and wind the
tape slack to the supply reel referring to section 6.5.2 at this time. Then raise the tray
and remove the cartridge referring to section 6.5.5. Refer to section 2.1 and install the
leader block in the cartridge securely.
Tape
3) Reel position
[ Guide enlarged view ]
Take-up roller guide
Take-up tape guide
Power supply
Tape head
Supply tape guide
Tape cleaner
5) Home position
Supply roller guide
Figure 6-16 Tape Path and Tape Guide
Operations for the CE
6-28
6.5.7 Leader Block Removal
When the tape is cut, both the tape and the leader block must be removed.
The
procedures are described below.
1)
Always turn off the power. Place the drive so the power supply is in the bottom
position. (Refer to Figure 6-16.)
Perform the operations according to conditions of each number, referencing the Figure
6-16 and following the flowchart shown in Figure 6-11.
2)
Caution: Never touch the recording surface (the surface contacts the tape head) and
the tape head with your hand when moving the tape and leader block positions. Be
careful so the leader block does not contact the tape head when the leader block is in
the tape path.
3)
When the leader block is in the take-up reel, raise the tray and remove the cartridge
refer to section 6.5.5. Remove the tape and leader block that are left in the take-up
reel by pulling the end of the tape directly and turning the take-up reel. Destroy these
cartridge and tape.
4)
When the leader block is not in the take-up reel, raise the tray and remove the
cartridge refer to section 6.5.5. Remove the tape and leader block that are left in the
tape path by pulling the end of the tape directly and turning the take-up reel. Refer to
section 3.2 for additional operation procedures.
6-29
Operations for the CE
6.6 CSL Adjustment Procedure
6.6.1 Adjustment of the CSL Tray Home Position
The CSL tray home position must be adjusted when the drive unit is replaced.
Home
position as; the CSL tray position when the cartridge is carried to the drive unit.
§ Adjustment procedure
1)
Take out the magazine, close the front door and turn on the power.
2)
The CSL tray moves to the home position and the message “STAND BY” is displayed
on the operator panel. Next open the front door.
3)
Check the height of the CSL tray and the cartridge guide from the front.
4)
If the CSL tray is lower than the cartridge guide, loosen the fixing screw by turning
counterclockwise and rise the home bracket height by turning the adjustment screw
clockwise. If the CSL tray is higher, turn the adjustment screw counterclockwise to
lower the home bracket height.
5)
Close the front door and execute the “Home position mode (Refer to section 6.6.3)” from
the operator panel, then move the CSL tray back to the home position once again.
6)
After performing the adjustment to set the
following accuracy, turn the fixing screw
counterclockwise to secure the home
bracket position. (Attach the screw lock
after the adjustment is completed.)
§ Adjustment accuracy
Adjustment screw
Fixing screw
(Attach the
screw lock after
the adjustment is
completed.)
Height difference between the CSL tray and
the cartridge guide : +0.5 to 0 mm (“+” as
Enlarged
figure 1
CSL tray is higher than cartridge guide.)
Home bracket
Refer to
enlarged
figure 2
Refer to
enlarged
figure 1
Cartridge guide
Tray of the deck
Enlarged
figure 2
CSL tray
CSL tray
(Height difference: +0.5 to 0 mm)
6-30
Operations for the CE
6.6.2 Adjustment of the Drive Horizontal Position
When the drive unit is replaced, adjust the drive horizontal position with the CSL tray.
§ Adjustment procedure
1)
Move the CSL tray to the home position. (Refer to section 6.6.3.)
2)
Observe the horizontal position of the CSL tray and the cartridge guide from the front.
3)
Loosen the M3 screws in 3 locations which secure the deck assembly.
horizontal position with the CSL tray distance.
4)
Perform the adjustment to set the following accuracy and secure it.
Adjust the
§ Adjustment accuracy
Height difference between the CSL tray and the cartridge guide : 0 to -0.5 mm (“-” as the
direction that the CSL tray leans to left from the point view of the front.)
Deck assembly
Screws M3 ×3
Cartridge guide
Refer to
enlarged
figure
Cartridge guide
Tray of the deck
Enlarged
figure
CSL tray
(horizontal difference : 0 to -0.5 mm)
Operations for the CE
6-31
6.6.3 CSL Home Position Mode
The CSL tray can be moved to the home position by using the “CSL Home Position Mode”
when the “Adjustment of the CSL Tray Home Position” (Section 6.6.1) is executed. The
procedures are described below. Refer to Figure 6-17.
1)
First, if the operation mode is on the on-line mode, change to the off-line mode. Refer to
Figure 2-6.
2)
“func” will be displayed on the right Switch-Line of the display. Pressing the right
Switch-3 “func” displays the current SCSI ID on the Status-Line.
3)
Pressing the left Switch-1 “func” displays “MENU FUNCTIONS” on the Status-Line.
4)
Select the menu displayed as “DIAG” on the center of the Switch-Line. Pressing the
center Switch-2 “DIAG” displays “DIAGNOSTICS” on the Status-Line and enters the
diagnostics mode.
5)
Press the right Switch-3 “>>>” and select the menu displayed as “SERVO” on the left of
the Switch-Line. Pressing the left Switch-1 “SERVO” displays “ENTER PASSWORD”
on the Status-Line. This is the password input prompt.
6)
Press Switch-3,-2 and -3 in sequence. “DRIVE TESTS” will be displayed on the StatusLine.
7)
Press the right Switch-3 “>>>” and select the menu displayed as “CSL DIAG / ADJ /
MOV” on the Status-Line. Pressing the center Switch-2 “ENTER” displays “CSL TUNE
/ DIAG” on the Status-Line. This menu is the CSL Adjustment Mode.
8)
Press the center Switch-2 “ENTER” displays “SLOW LOAD TEST” on the Status-Line.
9)
Press the right Switch-3 “>>>” and select the menu displayed as “CSL ADJUST
HOME” on the Status-Line. Pressing the center Switch-2 “ENTER” enter the menu of
the CSL Home Position Mode.
10) Press the center Switch-2 “START” in order to execute the “CSL ADJUST HOME”.
11) “ADJUSTING HOME” is displayed on the Status-Line and the CSL tray is moved to
the home position.
12) When the movement is completed , “CSL ADJUST HOME” is displayed on the StatusLine one more time.
13) Press the right Switch-3 “>>>” to select the menu that displays “EXIT” on the SwitchLine. Press this “EXIT” switch to close to each of the menus.
CAUTION
Don't open the door performing the movement.
6-32
Operations for the CE
[Example]
OFFLINE UNLOADED
ONL --- func
MENU FUNCTIONS
CONF DIAG >>>
3
2
2
4
SCSI ID
5
func CHG EXIT
DIAGNOSTICS
SERVO UCODE >>>
1
1
3
5
ENTER PASSWORD
EXIT --- ---
Password input request.
Press Switch-3, -2 and -3 in sequence.
2
3
6
CSL DIAG/ADJ/MOV
EXIT ENTER >>>
CSL Adjustment menu.
2
7
CSL TUNE/DIAG
EXIT ENTER >>>
2
8
CSL ADJUST HOME
EXIT START >>>
10
1
12
CSL ADJUST HOME
EXIT ENTER >>>
ADJUSTING HOME
STOP --- ---
2
9
2
11
Figure 6-17 CSL Home Position Mode
6-33
Operations for the CE
6.6.4 Checking the Front Panel
Check the following procedure when the front panel assembly is installed or removed.
§ Relative position of the cartridge and the front door
Check the relative position of the cartridge and rib in the rear side of the front door.
Make sure that the following conditions are satisfied.
If the conditions are not satisfied,
loosen the M4 screws in 4 locations that secure the front panel assembly and adjust the
front and rear position of the front panel assembly.
§ Procedure
1)
Open the front door and set sliding out the cartridge at the position approximately 15
mm in front from the magazine. (The 1st and the 10th slot.)
2)
Close the front door slowly to push in the cartridge.
3)
Open the front door to verify the cartridge position.
§ Conditions
1)
The cartridge must be within the click range of the magazine.
2)
The cartridge must be moved to the rear side approximately 1 mm.
Rib in the rear
side of the
front door.
Cartridge
Magazine
Click range
approximately
15mm
Rear side rib
Front door
6-34
Operations for the CE
§ Micro-switch check and adjustment
Check the micro-switch position when the front door is closed.
Make sure that the following conditions are satisfied.
If this conditions are not satisfied,
adjust the front and rear position of the micro-switch.
§ Conditions
1)
The micro-switch must work at 0.5 to 1.0 mm before the front door closes.
the click sounds.)
(Make sure
2)
There must be no space between the front door and the upper part of the front panel
while closing the front door. (Between the magnet surface of the front door and the
metal attracted surface)
§ A djustment
1)
Insert the phillips type screwdriver from the circuit board hole and loosen the M3 screw.
2)
Move the micro-switch front and rear and secure it in the position where the work
condition is satisfied.
CSL circuit board
Front door
Refer to
enlarged
figure
Micro-switch
Insert the phillips type screwdriver.
CSL circuit board
Screws M3 ×1
Move it front
and rear.
Magnet surface
Metal attracted surface
Enlarged
figure
Micro-switch
6-35
Operations for the CE
6.7 CSL Operation by Manual Operation
6.7.1 Releasing the Magazine Lock
This drive has a magazine lock mechanism so the magazine remains locked during
operation. The magazine lock mechanism must be released in order to take out the
magazine when the magazine is locked by some error during operation.
1)
Open the front door and check the location of the solenoid in the lock assembly from the
upper space of the magazine.
2)
Insert an appropriate stick which has a diameter approximately 2 to 3 mm such as a
hexagonal wrench from the round hole in the right side of the CSL cover.
3)
Press in the solenoid core in the magazine lock to release the lock.
Lock assembly
Insert the stick such as a hexagonal
wrench to press in the solenoid core.
Solenoid
Lock
assembly
Core
Press in the
solenoid core
at this point.
Pressed condition.
6-36
Operations for the CE
6.7.2 Vertical Moving the CSL Tray
Perform the following procedure to move the CSL tray manually in vertical direction.
1)
Remove the cover. (Refer to section 7.3.1.)
2)
Insert the finger from the window in the left side of the drive and turning the timing
pulley in front of the worm gear.
3)
If the timing pulley is turned clockwise from the point view of the front, the CSL tray is
moved down. If the timing pulley is turned counterclockwise, the CSL tray is moved
up.
Refer to Up down mechanism assembly
enlarged
figure
Left side window
CSL tray
Worm gear
Timing pulley
Up down
mechanism
assembly
Enlarged
figure
6-37
Operations for the CE
6.7.3 Cartridge Removal from the CSL
When an error occurs during the loading or unloading operation of the CSL is performed,
perform the following procedure to remove the cartridge from the CSL tray.
Open the front door and check the conditions of the cartridge which is stopped in the CSL
tray. Perform the following operations according to the conditions.
§ When the cartridge is between the CSL tray and the magazine
1)
Press the left end of the cartridge from the magazine slot on the CSL tray, or hold the
bottom of the slide arm to slide the cartridge to the rear side.
2)
Release the magazine lock and remove the magazine. (Refer to section 6.7.1.)
3)
Turn the clamp gear 1 clockwise to open the clamp lever.
4)
Remove the cartridge.
Clamp gear 1
Slide arm
Refer to
enlarged
figure 1
Turn it clockwise.
Cartridge
CSL tray
Clamp gear 1
Refer to
enlarged
figure 2 Clamp lever
CSL tray
Enlarged
figure 1
The direction to open
the clamp lever
§ When the cartridge is on the CSL tray
Perform the operation procedure 2 to 4 described above.
§ When the cartridge is between the CSL tray and the drive
Perform the operation procedure 2 to 4 described above.
§ When the cartridge is in the drive
Refer to sections 6.3, 6.4 and 6.5.
Enlarged
figure 2
6-38
Operations for the CE
6.8 CSL Maintenance
Perform the following maintenance to ensure a smooth CSL operation (approximately
once a year).
Refer to section 7.3 for the installation and removal of the parts like covers.
6.8.1 CSL tray
§ Cleaning of the clamp lever
Clean indented surface that holds a cartridge using cotton swabs
Clamp lever
and ethyl alcohol.
Indented surface
§ Cleaning of the slide arm
Clean interior metal surface that holds a cartridge using cotton swabs and ethyl alcohol.
§ Cleaning of the CSL tray
Clean cartridge sliding surfaces using cotton swabs and ethyl alcohol.
Remove any debris from sensor slits. (4 pair, 8 locations)
§ Greasing the slide shaft
Apply small amount of Molykote (refer to Table 7-4) to the sliding parts of the shaft and
the bush.
Cartridge sliding surface
Bush
CSL tray
Slide shaft
Cartridge
4)
CSL tray
Slide arm
Clamp
lever
3)
1) 2)
Interior metal surface
Sensor slits
(4 pair, 8 locations)
Cartridge
1) Elevator sensor
2) Cartridge sensor
3) Front sensor
CSL tray
Clamp lever
4) Rear sensor
Slide arm
(interior metal surface)
6-39
Operations for the CE
6.8.2 Up-down mechanism assembly
§ Greasing the worm gear
Check the worm and the worm wheel from the window on the left side of the drive.
Apply a thin coat of Lithium soup grease for extreme-pressure (refer to Table 7-4) while
turning the timing pulley using cotton swabs, brush, etc.
Timing pulley
Refer to
enlarged
figure
Up-down
mechanism
assembly
Left side window
Worm wheel
Worm
Timing pulley
Apply a thin coat of Lithium soup
grease for extreme-pressure.
Enlarged
figure
Operations for the CE
6-40
6.8.3 Magazine
§ Cleaning of the magazine slot
Clean the interior surfaces of slots using cotton swabs, etc. (upper, lower, left and right
surfaces within each slot.).
§ Cleaning of the sensor slit
Remove any debris on the sensor slits (10 locations).
Magazine
Sensor slits
(10 locations)
Magazine slots
(upper, lower, left and
right surfaces within
each slot.)
6-41
Operations for the CE
6.9 Error Logs
This drive can display error logs when the conditions of writing or reading.
These are
such thing that confirms a cause of error when an error is detected.
When an error is not recovered although error correction or retry sequence has been done,
the drive returns the error information to the host computer system via SCSI. Then the
error content and code are displayed on the Status-Line of the display. (Refer to Chapter
5.)
When an error is recovered by error correction or retry sequence, an occurrence frequency
is not seen. Then the numbers of error correction etc. are able to confirm by this Error
Log Display.
Enter the menu of Error Log Display, the error log item is displayed on the center StatusLine of the display and error counter is displayed on the right Status-Line. The error
counter can count until 255. 255 or more are displayed as “255”. The error items are
explained in Table 6-51
Table 6-51 Error Log Items
Items
Description
1
PERM WRT ERR
Number of unrecovered (permanent) write errors.
2
TEMP WRT ERR
Number of recovered (temporary) write errors.
3
PERM RDF ERR
Number of unrecovered (permanent) read forward errors.
4
TEMP RDF ERR
Number of recovered (temporary) read forward errors.
5
PERM RDB ERR
Number of unrecovered (permanent) read backward errors.
6
TEMP RDB ERR
Number of recovered (temporary) read backward errors.
7
1 TRK IN REC
Number of tracks in recovered error per record (1 of 18 tracks).
8
2 TRK IN REC
Number of tracks in recovered error per record (2 of 18 tracks).
9
3 TRK IN REC
Number of tracks in recovered error per record (3 of 18 tracks).
10
4 TRK IN REC
Number of tracks in recovered error per record (4 of 18 tracks).
11
ISV ERRORS
Number of ISV (short term speed variation) error.
TRACK 1 ERR
Number of track in error on an individual basis. Displays the
12
existing track 1 to 36 and number of errors
TRACK 36 ERR
comment at the next page.
Refer to the
Operations for the CE
Comments :
6-42
When an error track number is discovered, the errors are
corrected by using the track of others without an error. If an error track
number is not discovered, the drive execute the automatic retry sequence
because the error correction is failure.
The following procedure to display the “Error Logs”. Refer to Figure 6-51.
1)
First, if the operation mode is on the on-line mode, change to the off-line mode. Refer to
Figure 2-6.
2)
“func” will be displayed on the right Switch-Line of the display. Pressing the right
Switch-3 “func” displays the current SCSI ID on the Status-Line.
3)
Pressing the left Switch-1 “func” displays “MENU FUNCTIONS” on the Status-Line.
4)
Press the right Switch-3 “>>>” to shift to the next menus.
5)
Select the menu displayed as “STAT” on the left of the Switch-Line. Pressing the left
Switch-1 “STAT” displays “STATISTICS” on the Status-Line and enters the statistics
mode.
6)
Select the menu displayed as “ERLOG” on the center of the Switch-Line. Pressing the
center Switch-2 “ERLOG” displays “PERM WRT ERR” on the Status-Line. This menu
is the Error Log Display.
7)
Pressing each time the left Switch-1 “NEXT” on the left, the item and the log are
displayed together. Refer to Table 6-51.
Press the center Switch-2 “CLEAR” to initialize all the counters.
Press the right Switch-3 “EXIT” returns to the statistics mode.
8)
Press the right Switch-3 “>>>” to select the menu that displays “EXIT” on the SwitchLine. Press this “EXIT” switch to close to each of the menus.
CAUTION
Perform the cleaning of the tape head, when there are many numbers of an
error log, even in the case that error is recovered by error corrections or
retry sequences. Refer to Chapter 3.
Exchange to other cartridges, when there are many numbers of an error log
even after cleaning. Refer to item “B” in Table 5-2.
6-43
Operations for the CE
[Example]
OFFLINE UNLOADED
ONL --- func
MENU FUNCTIONS
CONF DIAG >>>
3
2
3
4
SCSI ID
5
func CHG EXIT
MENU FUNCTIONS
STAT FUNLD >>>
1
1
3
5
STATISTICS
UCODE ERLOG >>>
2
6
Error Log Display menu.
PERM WRT ERR
0
NEXT CLEAR EXIT
1
2
3
7
Press Switch-1 “NEXT”
to select the next item.
Press Switch-1 “CLEAR”
to initialize all the counters.
Press Switch-3 “EXIT”
TEMP WRT ERR
0
NEXT CLEAR EXIT
1
2
to end the menu.
3
PERM RDF ERR
0
NEXT CLEAR EXIT
1
2
3
Figure 6-51 Error Log Display
Operations for the CE
6-44
The condition, initializing the number of an error log is shown below.
1)
The drive is power-on.
2)
Unloading a cartridge.
3)
Pressing the center Switch-2 “CLEAR” of the display using the procedures described in
previous item 7).
4)
Receiving SCSI “Log Clear” command from host computer system.
7-1
Parts Installation and Removal
Chapter 7 Parts Installation and Removal
7.1 Parts Configuration
7.1.1 Block Diagram
The block diagram without CSL model is shown in Figure 7-1S. The block diagram with
CSL model is shown in Figure 7-1C.
The block diagram is different for each model
specifications.
Analog read
circuit board
Common
Assembly
kit
Tape head
(FRU)
Analog read
circuit board
Analog write
circuit board
Digital read
circuit board
Analog write
circuit board
MCI
Load
mechanism
Reel
motors
Servo
circuit board
(motor control)
circuit
board
IDRC
function
Formatter
function block
Control function block
Firmware
(Flash ROM)
SCSI
circuit board
Buffer
(2MB)
Control circuit board
Operator panel
Power supply block
Front panel
SCSI driver
circuit board
SCSI panel
Figure 7-1S Block Diagram [without CSL model]
7-2
Parts Installation and Removal
CSL common
Assembly
kit
Common
Assembly
kit
Analog read
circuit board
Tape head
(FRU)
Analog read
circuit board
Analog write
circuit board
Digital read
circuit board
Analog write
circuit board
Magazine
MCI
CSL
Load
mechanism
mechanism
CSL
circuit board
(motor control)
Reel
motors
Servo
circuit board
(motor control)
circuit
board
IDRC
function
Formatter
function block
Control function block
Firmware
(Flash ROM)
SCSI
circuit board
Buffer
(2MB)
Control circuit board
Operator panel
Power supply unit
Front panel
SCSI driver
circuit board
SCSI panel
Figure 7-1C Block Diagram [with CSL model]
7-3
Parts Installation and Removal
7.1.2 Each Parts Configuration
The parts configuration (assembly) without CSL model is shown in Table 7-1S. The parts
configuration with CSL model is shown in Table 7-1C. These details are shown in Table
7-2A to Table 7-3.
The periodic replacement parts are also shown in these tables.
Table 7-1S Parts Configuration [without CSL model]
KAL-MFA9001-001
KAL-MFA9002-001
MS-843M
MS-843H
MS-843F
MS-843E
MS-843D
Parts number
MS-8436
Parts name
MS-8418
Model name
Service
life
(Refer to Table 7-2B)
number
O
Section
O
(Refer to Table 7-2A)
section
O
O
Common assembly kit
Refer to
7.3.4
O
O
O
Power supply block
KAL-MSS0091-001
Common
Fan motor
KEF1021
Common
Fuse
KMF51A2-5R0S
Common
KAL-MFS0071-001
Common
KAL-MSA0095-001
Common
KAL-MSS0094-001
Common
SCSI panel
Refer to Table 7-3
Common
Cover
KKP10757-002
Common
Front panel assembly
Operator panel
(OCP)
Power switch
Section
7.3.4
6,000
hours
Section
7.3.8
Section
7.3.2
Section
7.3.3
Section
7.3.1
7-4
Parts Installation and Removal
Table 7-1C Parts Configuration [with CSL model]
KAL-MFA9001-001
KAL-MFA9002-001
MS-843M
MS-843H
MS-843F
MS-843E
MS-843D
Parts number
MS-8436
Parts name
MS-8418
Model name
(Refer to Table 7-2A)
section
number
O
Section
O
(Refer to Table 7-2B)
life
Refer to
O
O
Common assembly kit
Service
7.3.4
O
O
O
CSL common
KAL-MFA9006-001
Common
KAL-MFA0008-001
Common
Front panel
KAL-MFS0073-001
No door lock model
Section
assembly
KAL-MFS0073-002
Door lock model
7.3.1
KAL-MSA0095-002
Common
KKX10770-A01-S
Common
KAL-MSS0094-001
Common
KAL-MSS0104-001
Common
SCSI panel
Refer to Table 7-3
Common
Cover
KKP10781-001
Common
assembly kit
CSL common
assembly
(Refer to
Section
7.3.4
Table 7-2C)
Operator panel
(OCP)
Front door
assembly
Power switch
Magazine
Section
2.4.2
Section
7.3.3
Section
7.3.1
7-5
Parts Installation and Removal
Table 7-2A Common Assembly Kit
Deck assembly
FRU
(Tape head etc.)
KAL-MSA0096-001
O
KAL-MSA0096-003
O O
O
O O
E01152-00
Common
KAL-MSA0092-001
Common
KAL-MSA0093-001
Common
KAL-MSA0094-001
Common
Mother circuit board
KAL-MPS0108-001
Common
Fan motor
KEF1022
Common
Elevator cam
assembly
Tray assembly
Thread plate
assembly
Service
life
Refer to
section
number
3,000
Common
Take-up motor
MS-843M
O O O O O O O
E01152-00-SA
assembly
MS-843H
MS-843F
MS-843E
KAL-MFS0070-xxx
KAL-MSA0096-004
Supply motor
MS-843D
Parts number
MS-8436
Parts name
MS-8418
Model name
O
hours
Section
3,000
7.3.6
hours
8,000
hours
8,000
hours
100,000
times
100,000
times
100,000
Section
times
7.3.5
6,000
hours
W
KWS0394-002
O
R
KWS0394-001
O
W1
KWS0449-002
MS-843x Common
Section
W2
KWS0451-002
MS-843x Common
7.3.6
R1
KWS0450-002
MS-843x Common
R2
KWS0448-002
MS-843x Common
Head shielded plate
KJU32867-001
MS-843x Common
PWB shielded plate
KJU32898-002
MS-843x Common
Head cable
Section
7.3.6
Section
7.3.7
7-6
Parts Installation and Removal
Table 7-2B Circuit Boards in Common Assembly Kit
Digital read
KAL-MPS0099-001
circuit board
KAL-MPS0116-001
R
Analog read
R1
circuit board
R2
(1) R1
R2
KAL-MPS8098-002
KAL-MPS0118-001
W2
(2) W1
W1
MS-843M
MS-843H
MS-843F
MS-843E
O O O O O O
section
number
7.3.7
1
2
Section
2
KAL-MPS0117-001
2
2
2
2
1
1
2
Section
1
KAL-MPS0119-001
1
KAL-MPS0121-001
2
Control circuit board
KAL-MPS8097-002
Common
MCI circuit board
KAL-MPS0122-001
SCSI circuit board
KAL-MPS0107-001
Common
Servo circuit board
KAL-MPS0095-001
Common
W2
life
Refer to
Section
KAL-MPS0120-001
W1
circuit board
Service
7.3.7
KAL-MPS0117-002
W1
O
KAL-MPS8098-002
W
Analog write
MS-843D
Parts number
MS-8436
Parts name
MS-8418
Model name
1
1
2
O O
7.3.7
1
Section
7.3.7
Section
7.3.7
Section
7.3.7
(1) The “1” or “2” are defined by number of circuit boards. It is not different
either “R1” or “R2”.
(2) The “1” or “2” are defined by number of circuit boards. Use the two circuit
board, it is not different either “W1” or “W2”.
7-7
Parts Installation and Removal
Table 7-2C CSL Common Assembly
Refer to
Parts name
Parts number
Service life
section
number
CSL tray assembly
KAL-MSA0098-001
100,000 times
Tray circuit board
KAL-MPS0115-001
Slide motor
KAL-MSS0101-001
100,000 times
Clamp motor
KAL-MSS0102-001
100,000 times
KAL-MSA0099-001
100,000 times
Up-down motor
KAL-MSS0096-001
100,000 times
Encoder
KAL-MSS0105-001
CSL up-down
mechanism assembly
Flexible cable
KWS0410-001
Lock assembly
KAL-MSS0097-001
Bottom holder assembly
KAL-MSS0098-001
Micro switch assembly
KAL-MSS0099-001
Rear panel assembly
KAL-MSA0097-001
Fan motor
KEF1022
Fuse
KMF51A2-5R0S
CSL circuit board
KAL-MPS0114-001
Power supply unit
FYG131/55GP-1
1,000,000 times
50,000 times
Section
7.3.9
6,000 hours
Section
7.3.8
Section
7.3.9
7-8
Parts Installation and Removal
Table 7-3 SCSI panel
Parts name
(SCSI driver circuit board)
Large single panel
Classification by specifications
LS
WS
NS
LD
WD
SCSI LDS circuit board
Parts number
KAL-MSA0091-001
KAL-MPS0101-001
Single terminator
KET5001-050
Wide single panel
KAL-MSA0091-002
SCSI WDS circuit board
KAL-MPS0102-001
Single terminator
KET5002-068
Narrow single panel
KAL-MSA0091-003
SCSI NAS circuit board
KAL-MPS0103-001
Single terminator
KET5003-050
Large differential panel
KAL-MSA0091-004
SCSI LDD circuit board
KAL-MPS0104-001
Differential terminator
FCN-789P050-L/D
Wide differential panel
KAL-MSA0091-005
SCSI WDD circuit board
Differential terminator
KAL-MPS0105-001
KET5005-068
Service
life
Refer to
section
number
7-9
Parts Installation and Removal
7.2 Tools for Maintenance, Installation and Removal
The tools that are required to perform maintenance, installation and removal are shown
in Table 7-4. Perform operations in section 7.3 and other similar operations using these
tools.
Table 7-4 Tool List
Number
Tools or other items
Type
1
Phillips type screwdriver
Plus No.2
O
2
Screwdriver
Minus 6mm
O
3
Hexagonal wrench
Opposite side 2.5mm
O
4
Cleaning fluid
Ethyl alcohol
O
5
Cotton swab
O
6
Cotton cloth (gauze)
O
7
Scale
#
8
Cutting pliers
#
9
Tweezers
#
10
Screw lock
1401C
11
Head cap F
for the MS-8418 model
#
12
Head cap S
for the MS-843x model
#
13
Molykote
EM-30L
Dow Coring
#
TFB grease
THK
#
14
Lithium soup grease
for extreme-pressure
Mark as:
O ---------- Necessary item
# ---------- Convenient item
Remarks
Three Bond
Mark
#
7-10
Parts Installation and Removal
7.3 Major Parts Installation and Removal
7.3.1S
Cover and Chassis Top Installation and Removal [without CSL model]
§ Cover and chassis top removal
1)
Remove the M4 screws in 2 locations in the rear side of the drive that secure the cover.
Slide the cover to the rear and remove it.
2)
Remove the M3 screws in 7 locations that secure the chassis top.
Lift up the chassis top to the upper rear direction and remove it.
3)
Remove the M3 screws in 3 locations that secure the chassis cover.
Slide the chassis cover to the rear and open it. And then remove it.
4)
Stand the drive on its side and remove the M3 screws in 3 locations that secure the
bottom cover.
§ Cover and chassis top installation
Perform the reverse order of procedure described above to install this assembly.
Chassis top
Cover
Screws M4 ×2
Screws M3 ×7
Bottom cover
Chassis cover
Screws M3 ×3
Screws M3 ×3
7-11
Parts Installation and Removal
7.3.1C Cover and Chassis Top s Installation and Removal [with CSL model]
§ Cover and chassis tops removal
1)
Remove the M4 screws in 3 locations in the rear side of the drive that secure the cover.
Slide the cover to the rear and remove it.
2)
Remove the M4 screws in 6 locations that secure the front chassis top.
Lift up the front chassis top to the upper rear direction and remove it.
3)
Remove the M3 screws in 7 locations that secure the rear chassis top.
Lift up the rear chassis top to the upper rear direction and remove it.
4)
Remove the M3 screws in 3 locations that secure the chassis cover.
Slide the chassis cover to the rear and open it. And then remove it.
§ Cover and chassis tops installation
Perform the reverse order of procedure described above to install.
Rear chassis top
Front chassis top
Screws M3 ×7
Screws M4 ×3
Cover
Chassis cover
Screws M3 ×3
Screws M4 ×6
7-12
Parts Installation and Removal
7.3.2S
Front Panel Assembly Installation and Removal [without CSL model]
§ Front panel assembly removal
1)
Remove the cover. (Refer to section 7.3.1S.)
2)
Remove the M3 screws in 4 locations in the side (left and right) of the drive that secure
the front panel assembly.
3)
Slide the front panel assembly approximately 5 cm to the front and disconnect the OCP
cable connector and the power switch connector.
§ Front panel assembly installation
Perform the reverse order of procedure described above to install this assembly.
CAUTION
Do not apply excessive force to the cable wires and the circuit board when
connecting or disconnecting the connectors.
Power switch connector
Screws M3 ×4
OCP cable and connector
Front panel assembly
7-13
Parts Installation and Removal
7.3.2C Front Panel Assembly Installation and Removal
[with CSL model]
§ Front panel assembly removal
1)
Remove the cover and the front chassis top.
(Refer to section 7.3.1C.)
2)
Disconnect the OCP cable and the connector CN1 of the CSL circuit board.
3)
Open the front door and remove the cover inside. (Remove only the M3 screw on the
upper side and loosen the screw on the bottom.)
4)
Unlock the cable clamp on the left of the chassis-inside and slide the protection tube to
the rear side. And then remove the power switch connector.
5)
Remove the M4 screws in 4 locations in the side (left and right) of the drive that secure
the front panel assembly. Slide the front panel assembly to the front and remove it.
§ Front panel assembly installation
Perform the reverse order of procedure described above to install this assembly. Install
the front panel assembly while placing it to the front side.
Perform the checking procedure described in section 6.6.4 after installed it.
CAUTION
Do not apply excessive force to the cable wire and the circuit board when
connecting or disconnecting the connectors.
OCP cable
Power switch connector
Screws M4 ×4
CN1
Screws M3 ×2
Cable clamp
Front door
Protection tube
Cover inside
Front panel assembly
Parts Installation and Removal
7-14
7.3.3 SCSI Panel (SCSI driver circuit board) Installation and Removal
§ SCSI panel removal
1)
Remove the M3 screws in 4 locations that secure the SCSI panel.
2)
Hold both sides of the SCSI panel and move straight to the rear side to pull it off.
§
SCSI panel installation
1)
Hold both sides of the SCSI panel and fit the SCSI driver board connector to the mother
circuit board connector. Insert the connector straight from the rear.
2)
Tighten the M3 screws in 4 locations to secure the SCSI panel.
CAUTION
Do not apply excessive force of other direction than the inserting direction to
the circuit board when connecting or disconnecting the connector.
SCSI panel
(SCSI driver circuit board)
Screws M3× 4
Connector
7-15
Parts Installation and Removal
7.3.4S Power Block Assembly Installation and Removal [without CSL model]
NOTE
The installation and removal of the drive is the same as this procedure.
§ Power block assembly removal
1)
Remove the cover and the chassis top. (Refer to section 7.3.1S.)
2)
Remove the front panel assembly. (Refer to section 7.3.2S.)
3)
Disconnect 3 connectors J1, J2 and J4 from the mother circuit board in the rear side of
the drive.
4)
Remove the M4 screws in 2 locations that secure the power block assembly.
5)
Remove the wire from the cable clamp.
§ Power block assembly installation
Perform the reverse order of procedure described above to install this assembly.
CAUTION
Do not apply excessive force to the cable wires and the circuit board when
connecting or disconnecting the connectors.
Connect the correct polarity.
Power block assembly
J2 (3 pins)
J4 (2 pins)
Cable clamp
Screws M4 ×2
Refer to
enlarged
figure
J1
Enlarged
figure
Drive
Screws M3 ×4
Front panel assembly
Parts Installation and Removal
7-16
7.3.4C Drive Installation and Removal [with CSL model]
NOTE
The installation and removal of the CSL is the same as this procedure.
§ Drive removal
1)
Remove the cover, the front chassis top and the rear chassis top. (Refer to section
7.3.1C.)
2)
Remove the SCSI panel. (Refer to section 7.3.3.)
3)
Disconnect connectors J1, J2 and J4 from the mother circuit board in the rear side of
the drive.
4)
Remove the M3 screws in 4 locations to remove the rear panel assembly.
5)
Pull out the cable which was removed in item 3) from the hole in the bottom side of the
drive.
6)
Open the front door and remove the magazine. (Refer to section 2.4.2.)
7)
Move the CSL tray to the lowest position. (Refer to section 6.7.2.)
8)
Unlock the cable clamp in the front of the drive to disconnect the flat cable connector.
9)
Remove the fixing screws A in 4 locations on the side of the drive.
10) Loosen the fixing screws B in 2 locations on the side of the drive.
11) Pull out and remove the drive from the side chassis.
§ Drive installation
Perform the reverse order of procedure described above to install this drive. Install the
drive while placing it to the front side.
CAUTION
Do not apply excessive force to the cable wires and the circuit board when
connecting or disconnecting the connectors. Connect the correct polarity.
§ Adjustment
Perform the following adjustments.
1)
Adjustment of the CSL Tray Home Position.
(Refer to section 6.6.1.)
2)
Adjustment of the Drive Horizontal Position.
(Refer to section 6.6.2.)
7-17
Parts Installation and Removal
Drive
Cable clamp
Rear panel assembly
Refer to
enlarged
figure
Flat cable connector
Screws M3 ×4
Screws M4 ×4
(fixing screw A)
Screws M4 ×2
(fixing screw B)
J2 (3 pins)
J1
Enlarged
figure
J4 (2 pins)
7-18
Parts Installation and Removal
7.3.5 Thread Plate Assembly Installation and Removal
§ Thread plate assembly removal
1)
Remove the cover and the chassis tops.
(Refer to section 7.3.1.)
2)
Remove the M4 screws in 4 locations that secure the thread plate assembly.
3)
Disconnect the connector(J16) of the motor wire while slightly raising the assembly.
§ Thread plate assembly installation
Perform the reverse order of procedure described above to install this assembly.
#
Align the center of screw holes of the stud and holes of the thread plate assembly and
tighten them with screws (4 locations).
#
When the threader home position is not set, turn the thread motor shaft counterclockwise to return the position using a screwdriver. (Refer to section 6.5.4.)
CAUTION
Do not apply excessive force to the cable wire and the circuit board when
connecting or disconnecting the connector. Connect the correct polarity.
Thread plate assembly
Threader home position
Screws M4 ×4
Thread motor
shaft
J16 (upper side)
Stud (4 locations)
# Align the
center of
screw holes.
Refer to
enlarged
figure
Enlarged
figure
7-19
Parts Installation and Removal
7.3.6 FRU Installation and Removal
CAUTION
Perform the operation of the connection and disconnection of the connectors
when the anti-electrostatics is excused. The parts may be damaged if it is
not executed.
Do not apply excessive force to the cable wires and the circuit boards.
Connect the correct polarity.
Never touch or strike the tape head surface and the tape traveling parts.
The FRU is different for each model. (Refer to Table 7-2A.)
When removing or
installation a FRU, use caution to avoid mistaking the type.
§ FRU removal
1)
Remove the thread plate assembly. (Refer to section 7.3.5.)
2)
Fit on the head cap for the exclusive use to the tape head.
3)
For the MS-843E, MS-843F and MS-843M, disconnect the erase head connector which
is connected to the analog write circuit board.
4)
Disconnect the head cables which are connected to the analog read circuit board and
analog write circuit board. There are 2 locations for the MS-8418 and 4 locations for
the MS-843x series.
# Be careful so the stress is not applied to the soldered part of the connector. Should
be supported pinching the connector stiffening plate with pliers or any others.
5)
For the MS-843x series, cut the binder (AN-2) of the tape head and remove the head
shielded plate.
6)
Use a hexagon wrench to remove M4 screws in 3 locations that secure the FRU.
7)
Pull out the head cables from the slits of the comb bracket and remove the FRU.
8)
Remove the head cables from the tape head.
7-20
Parts Installation and Removal
Head cable
Head cable
(18track read)
(18track write)
# Insert the head
cables into
both outer slits.
MS-8418
(18track)
Comb bracket
Head cable
Head shielded plate
Head cable
(36track read 1)
(36track write 1)
Head cable
Head cable
(36track write 2)
(36track read 2)
# Insert each two
head cables into
both outer slits.
MS-843x
series
Refer to the next figure.
Comb bracket
Binder (AN-2)
Head shielded plate
Head cable
Head cable
W2
W1
R1
Tape Head
For the MS-843E,
MS-843F and
MS-843M
R2
Put the excessive
part of the wire
into the room of
the FRU.
Erase head
Pass the slit part of the head
shielded plate through the comb.
connector
Comb bracket
7-21
Parts Installation and Removal
Head
Screws M4 ×3
FRU
# Fit on the head cap when
the FRU is removed.
Deck assembly
CAUTION
Never touch or strike the tape head surface and the tape traveling parts.
Fit on the head cap for the exclusive use to the tape head while removal,
installation and traveling.
§ FRU installation
1)
Connect the head cables to the connectors of the tape head.
2)
Insert the head cables into the slits of the comb bracket and place the FRU on the deck
assembly.
3)
Tighten M4 screws in 3 locations using a hexagonal wrench to secure the FRU.
4)
For the MS-843x series, place the head shielded plate between the head cables and pass
the slit part through the comb in the center of the comb bracket.
5)
Connect the head cables to the connectors of the analog read circuit board and the
analog write circuit board. There are 2 locations for the MS-8418 and 4 locations for
the MS-843x series.
6)
For the MS-843E, MS-843F and MS-843M, connect the erase head connector to the
connector of the analog write circuit board.
7)
Lightly bind the tape head, head cables and head shielded plate with a binder (AN-2).
# Do not bind them tightly at this time. Cut off the excessive end part of the binder.
8)
Remove the head cap.
9)
Install the thread plate assembly. (Refer to section 7.3.5.)
7-22
Parts Installation and Removal
7.3.7 Major Circuit Boards Installation and Removal
CAUTION
Perform the operation of the connection and disconnection of the connectors
when the anti-electrostatics is executed. The parts may be damaged if it is
not executed.
Do not apply excessive force to the cable wires and the circuit boards.
Connect the correct polarity.
The combination of the circuit boards is different for each model. When removing or
installation circuit boards, use caution to avoid mistaking the type or location.
Refer to
Table 7-2B for combination of the circuit boards.
§ Analog read circuit board and Analog write circuit board removal
1)
Remove the cover and the chassis tops. (Refer to section 7.3.1.)
2)
Remove the M3 screws in 2 locations to remove the PWB bracket.
3)
For the MS-843x series, remove the PWB shielded plate.
4)
For the MS-843E, MS-843F and MS-843M, disconnect the erase head connector which
is connected to the analog write circuit board.
5)
Disconnect the head cables which are connected to the analog read circuit board and
analog write circuit board. There are 2 locations for the MS-8418 and 4 locations for
the MS-843x series.
# Be careful so the stress is not applied to the soldered part of the connector. Should
be supported pinching the connector stiffening plate with pliers or any others.
6)
Pull out the analog read circuit boards and analog write circuit boards.
locations for the MS-8418 and 4 locations for the MS-843x series.
# Check the location of each circuit board.
There are 2
§ Digital read circuit board removal
1)
First, remove the analog read circuit boards and analog write circuit boards.
the above procedures.)
2)
Remove the chassis cover on the left side of the drive. (Refer to section 7.3.1.)
3)
Pull out digital read circuit board straight.
(Refer to
7-23
Parts Installation and Removal
§ Control circuit board, servo circuit board and SCSI circuit board removal
1)
Remove the chassis cover on the left side of the drive.
(Refer to section 7.3.1.)
2)
Pull out the control circuit board, servo circuit board
and SCSI circuit board straight while holding the
edge of the ejectors.
# If the ejector is spread out by force when removing
these circuit boards, it may cause damage.
Ejector
Pull them out straight.
§ Circuit boards installation
Perform the reverse order of procedure described above to install these boards.
Refer to
Table 7-2B for combination of the circuit boards.
#
There are 1 analog read circuit board and 1 analog write circuit board for the MS-8418,
and 2 analog read circuit boards and 2 analog write circuit boards for the MS-843x
series. Make sure the correct locations of these boards.
#
For the MS-843x series, first connect the head cables to the circuit boards and then
insert the PWB shielded plate in the location shown in the figure. (Use caution to
prevent the end of the PWB shielded plate catching on the circuit board components.)
#
It is easy to position the connectors of digital read circuit board, control circuit board,
servo circuit board and SCSI circuit board if the drive stands on the side.
#
Be sure that the connectors are inserted all the way to the end when connecting the
circuit boards.
Analog read circuit board
Analog write circuit board
Connector
Align the notches
on both ends
of the circuit board
to the holes
when inserting the connector.
Digital read circuit board
7-24
Parts Installation and Removal
Analog write circuit board
MS-8418
(18track)
Screws M3 ×2
PWB bracket
Servo circuit
board
Analog read
circuit board
SCSI circuit
board
Digital read circuit board
Control circuit board
7-25
Parts Installation and Removal
Screws M3 ×2
PWB bracket
MS-843x Series
PWB shielded plate
Refer to
enlarged
figure
Servo circuit
W2
board
W1
R1
SCSI circuit
R2
Analog read
circuit board
board
Analog write
circuit board
Digital read circuit board
Control circuit board
not for the MS-843H and MS-843F
Control circuit board + MCI circuit board
for theMS-843H and MS-843F
Detail of shielded plates installation
Head shielded plate
Enlarged figure (top view)
PWB shielded plate
R2
W1
R1
W2
7-26
Parts Installation and Removal
7.3.8 Fuse Replacement
1)
Turn the cap of the fuse holder in the rear side of the drive counterclockwise using a
6mm-screwdriver to remove it.
2)
Pull out the fuse that is inserted in the cap.
3)
Insert the new fuse in the cap and set it while pressing in the fuse holder and turn it
clockwise to secure it.
CAUTION
Always replace the fuse with the correctly rated fuse.
!
WARNING!
Be sure to pull out the AC power cord from the AC power connector (inlet).
It may cause a electric shock if the cord is not pulled out.
Refer to
enlarged
figure
Rear view
Fuse holder
AC power connector
Rear view
Fuse holder
Fuse
Cap
Open
Close
Enlarged
figure
7-27
Parts Installation and Removal
7.3.9 Power Supply Unit Installation and Removal [with CSL model]
§
Power supply unit removal
1)
Remove the cover and the chassis tops.
2)
Pull up the drive and remove it. (Refer to section 7.3.4C.)
3)
Disconnect 4 connectors (CN1, CN2, CN3 and CN4) which are connected to the power
supply unit.
4)
Remove the M4 screws in 4 locations that secure the power supply unit.
§
(Refer to section 7.3.1C.)
Power supply unit installation
Perform the reverse order procedure described above to install this unit.
Perform the adjustments.
(Refer to section 6.6.1 and 6.6.2.)
CAUTION
Do not apply excessive force to the cable wire and the circuit board when
connecting or disconnecting the connector. Connect the correct polarity.
!
WARNING!
Be sure to pull out the AC power cord from the AC power connector (inlet).
It may cause a electric shock if the cord is not pulled out.
Refer to
enlarged
figure
CN4
CN3
Power supply unit
CN2
Screws M4 ×4
Rear panel assembly
Power supply unit
CN1
CN4
CN3
CN2
Pin 1
is not used.
Enlarged
figure
Parts Installation and Removal
[ Notes ]
7-28
©1999 VICTOR DATA SYSTEMS CO.,LTD.
KAS-M009-004