1
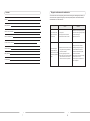
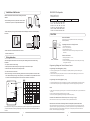
GRANDVIEW REPRODUCING GENUINE COLORS
Radio Frequency Remote Controller Operation Instruction
GRANDVIEW REPRODUCING GENUINE COLORS
Model:1GD-868MnⅢ
Grandview Crystal Screen Canada Ltd.
#11- 3751 North Fraser Way,
Marine Way Business Centre,
Burnaby, BC, Canada V5J 5G4
Tel: 1-604-412-9777 Fax: 1-604-412-9796
Website: www.grandviewscreen.ca
Thank you for choosing the Grandview remote control.
Please read the instructions carefully before using. Keep instructions for future reference.
Guangzhou Grandview Crystal Screen Co., Ltd.
P.O. 511400 Federal Ind. Zone No. 363, Yushan West Road,
Shatuo, Panyu District, Guangzhou, Guangdong, China
Tel: +8620-8489-9499 Fax: +8620-8480-3343
Website: www.grandviewscreen.com
ISO9001:2000
International Certification
Diagnosis and treatment for malfunction
Contents
Contents
1
Safety Information
2
Remote Control Functionality
2
If the remote control can't work properly, please check it according to the following steps. While if you
can't find the same symptoms and right way to solve the problems please contact with Grandview's
local distributor or our ofter-sales team.
Symptom
3
The Cable Circuitry of Receiver
3
Measure
1. Make sure connect the power properly.
The instruction LED
Receiver Installation Guide
Cause
1. Check power.
light on the receiver
2. The improper cable connection.
doesn't work
3. Disconnected for fuse in receiver.
2. Connect the cable in right way ccording
to Wire circuit diagram.
3. Replace with new fuse.
1. Change the direction of batteries
Controller Instruction
4
1. Batteries in remote controller run out or
The instruction light is
working but when you
Battery Replacing
5
6
and anode for batteries.
press the button on remote
2. Incorrect programing connection.
controller the light doesn't
3. Some parts of the receiver is damaged
twinkle.
Trouble Shooting
wrong direction of fixing the cathode
if the manual control of receiver can
make the screen move up and down.
according to the figure in set up for
controller batteries first,but if the
malfunction still exists then replace
them with new batteries.
2. Check the cable connection according
to Wire circuit for receiver.
3. Contact with your local distributor to
solve this problem.
Set up for controller's batteries
CAUTION
Please change the batteries according to the following steps when the signal of remote
cotrol becomes weak.
Model of the batteries: AAA1.5x2
1. Counter turn the remote controller and open the
battery cover according to the drection of arrow
2. Fix in the batteries according to the figure on the
left side.
3. Close the battery cover.
Match with Integrated Synchro Power Relay( hereafter be shorted as ISPR; optional)
Warning: Please do not expose the product in moist place to prevent from potential danger
of fire or electric shock
1. Please read this instruction carefully before using to prevent from potential damage to the
product cause by inappropriate operation
2. Please put the product in ventilated place and operate according to instruction
3. Please move away from heat source such as heating machine, stove and other equipment
that generate heat
4. Please only connect to the power source with earth wire
5. Never step on or clamp the power line
6. Please only use the accessories provided by supplier
7. Please unplug the power line during thunderstorm or long time lay aside
8. Please handover the maintanence work to professional after-sales staff
9. Please keep the product away from water and do not put anything with water on the product
such as vase
10. As long as the power line is connected to the power source, the product is still connected to
the alternating current power supply
Features of the Receiver
After simply learning and matching the ISPR with the projector, screen may be controlled to lower
or retract as the projector is on or off.
Model: 1 GD-868MnⅢ Receiver
Method:
The receiver is the controller between power source and the
electric screen, to control the fabric to go up, down or stop.
1. Plug in the ISPR and the receiver
2. Press SW5 learning button on the receiver, the indicator light starts flashing repeatly, then the
learning begins ( learning status will stop automatically after 15 seconds)
3. Press learning button on the ISPR emitter, then the indicator light shines
4. Learning indicator light of the receiver flashes twice rapidly, learning succeeds.
Note: For more instruction details, please refer to the user manual for ISPR.
Signal programming
1GD-868MnⅢ
The receiver can control the screen with three methods
mentioned below:
1. Using the RF emitter to control the fabric to go up, down or
stop. The receiver could only work with the 1GD-868Mn
emitter that provided by our company and the effective
working radius is 50 meters.
2. Using the button on the box to control the fabric to go up,
down or stop.
3. Can be connected to an external dry contact switch to
control the fabric to go up, down or stop
Indicator light
ISPR
Technical features of the receiver: Reliable, Energy Conservated and Environmentall Friendlly
> Using STM paster with damproof processing
> Automatically shut off power if there are no operation in one minute
> Using a certified connector to ensure the safety
> One receiver can receive maximum 20 sets of codes from eimitter which means user could
control the receiver with maximum 20 pieces of emitter
> One receiver can be only connected to one pieces of electric screen
Parameters of the receiver:
> Power source: AC230V/50Hz, 120V/60Hz The actual figure should refer to the parameter
sticker on the box
> Working Temprature: -20℃ to +80℃
> Maximum Load: 600W
> Operating Frequency: 868MHz
RS485/RS232 Configuration
Installation of the Receiver
Central Control Protocol
Please read the below instruction before installing the receiver
1. Communication Protocol:
Attention:
DATA BITS: 8 Digits
> When installing the receiver, please make sure the cable
exit face down to prevent from potential infiltrationwater
> Please keep away from large size metal objects when installing the receiver in case the frequency
is affected
2.
3.
4.
5.
6.
7.
INTIAL DIGITS: Digit 1
STOP DIGITS: Digit 1
BAUD RATE: 2400
UP: 0xFF 0xEE 0xEE 0xEE 0XDD
STOP: 0xFF 0xEE 0xEE 0xEE 0XCC
DOWN: 0xFF 0xEE 0xEE 0xEE 0XEE
MICRO-UP: 0xFF 0xEE 0xEE 0xEE 0xC9
MICRO-DOWN: 0xFF 0xEE 0xEE 0xEE 0xE9
Initial Code: 0xFF 0xXX 0xXX 0xXX 0xAA
FUNCTION:
metal
Model:1GD-868Mn
The Remote control is compatible with the receiver, transfer signal by
Radio Wave(868MHz).
UP
STOP
DOWN
MICRO-UP
MICRO-DOWN
Dimension
> Please make sure the distance between two receiver
should be at least 20 cm
Operating Instruction for Using Remote:
1. Press ▲ to lift the screen.
2. Press ○ to stop the screen
3. Press ▼ to lower the screen.
4. The Micro switch is used for retracting or lowering screen in small
increments.
Cautions for Remote:
Wiring Instruction
The below diagram showcase the wire connection, please following the below instruction during
Model:1GD-868Mn
installation
1. Working Temperature:-5℃~+40℃;
2. Protection Rate:IP40;
3. In order to avoid leakage,please take out of the battery when storing it
for a long time without use.
> The power must be cut before wiring
> Please prevent from static electricity as it may damage to some electronic parts
Programming Setting and Clear for Remote Control
> Please use cables that match the local safety standard
Programming Code Setting(Step by Step)
> The earth wire must be connected
1. Press the programming button of the receiver(SW5), the Led(FD1)will twinkle in gree and indicating it is in
programming mode.
2. Then loose the button, press up/stop switch of the remote controller until the Led(FD1) light on, then loose the
button,means the programming is sucessful.
> When connecting the control box externally, please make sure the loop resistance is less than 20Ω.
If the cable lies nearby the strong current, please try to use shielded wire. The qualified UTP cable is
recommend for total cable length within 100 meter as the resistance is around 9.2Ω.
Programming Code Cleaning(Step by step)
Wiring
Indicating Light
Learning button
SW5
Power Light
Model
Power
Line
Sw1
Sw2 Sw3 Sw4
Manual Button
Direction Exchange
Switch
Up/Down
Motor
Line
Stop
13 12
Motor
ID
Name
230V Color
1
L
Live Wire
Brown
Black
115V Color
E
Earth Wire
Yellow Green
Green
2
N
Null Wire
Blue
White
4
N
Null Wire
Blue
Blue
5
E
Earth Wire
6
R
Up/Down Wire
Brown
Brown
7
L
Up/Down Wire
Black
Black
3
8
Down/up
External
Switch
Power Source
No.
Up
Yellow Green Yellow Green
Up Wire
9
Stop
Stop Wire
10
Down
Down Wire
11
Con
Concentric Wire
12
3
RS232-TXD
13
5
RS232-GND
Attention: Please make sure the wiring is strictly following the diagram and the
diagram is only base on our product.
If you found the screen rolling in a contrary direction(when you press the up button the screen goes downwards, when
you press the down button,the screen goes upwards),you only needs to open the receiver and change the cables for
R1 and L1.
1. Press the Programming button of the receiver(SW5) in 5 seconds, the Led(FD1)will twinkle from slowly to quickly.
2. Then loose the button, press it again, the Led(FD1)will light on, which means the programming code is clear.
Note:
1. Please make sure setting the programming code in 15 second when the LED (FD1) twinkle in green,otherwise it will
be failed.
2. Pls do not start programming setting when the screen is rolling.
3. When in the process of programming code setting,the remote will stop working.
Instruction for Manual Switch of Receiver(Pls refer to Drawing of Page3)
When the remote control don’t work,you can handle the screen by Manual Switch instead.
Mannual control of Direction Exchange Switch for Motor(SW1) Manual Instruction:
When controlling the screen by mannual control, If you found the screen rolling in a contrary direction and confrim
operate the remote in a right way (that means when you press the up button the screen goes downwards,when you
press the down button,the screen goes upwards). Please just turn turn the (SW1) switch which is inside of the
Receiver , the screen will properly working again.