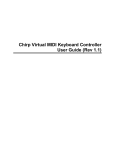
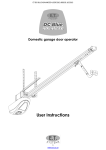
1
ZVORK
VOLT SL1
User Manual
version 2.0.0
ZVORK Volt SL1 - User Manual
Table of Contents
Introduction........................................................................................................................................3
Front Panel..........................................................................................................................................4
On / Off............................................................................................................................................4
Controls............................................................................................................................................4
Control groups.............................................................................................................................5
Sets...................................................................................................................................................5
Activating a set............................................................................................................................5
Copy / Paste of sets.....................................................................................................................5
Metering......................................................................................................................................6
Slave............................................................................................................................................6
Transitions.......................................................................................................................................6
Metering......................................................................................................................................6
Transition curves.........................................................................................................................6
Back Panel...........................................................................................................................................8
Chaining SL1's.................................................................................................................................8
Gate Inputs.......................................................................................................................................9
Gate Outputs....................................................................................................................................9
MIDI Implementation Chart...........................................................................................................10
2
ZVORK Volt SL1 - User Manual
Introduction
The Volt SL1 is a control voltage (CV) selector aimed at live performance and DJ'ing. With
it you can switch or crossfade easily and in sync with the tempo between various values of
control voltage signals.
3
ZVORK Volt SL1 - User Manual
Front Panel
On / Off
This switch is a quick way to silence all the control voltage outputs to zero value.
Controls
Up to 24 CV values (with version 2.0) can be controlled by a SL1 unit. For each control,
the value can be set from -1 to +1. For clarity you can also edit the label above each
control knob to keep track of what they are modifying. Only the controls 1 to 15 are
automatable and controls 16 to 24 have a pale green tint to help you remember this.
4
ZVORK Volt SL1 - User Manual
Control groups
To help you keep track of the signification of each controls, you can
furthermore assign them to a color coded group. There are 4 different group
colors. To change the group of a control, simply press the button at the upper
left of the control knob until you have activated the correct group color.
Sets
This section is where you can select the current set of control voltage values, from 12
(starting with version 1.1) possible sets identified by their letter: A, B, C, D, E up to L. Each
set corresponds to one setting of the 24 control knobs of the SL1. A highlighted button
corresponding to a set indicates the set currently modified by the control knobs. You can
name a set by double clicking the space above a set activation button an typing its name.
Validate by pressing the enter key.
Activating a set
To activate a set, that is, to have its control values output
from the device (see back panel section), simply press the
corresponding button. Another mean of activating a set is
through a MIDI keyboard. When a Volt SL1 has the
keyboard focus, pressing a note activates a set. Here is the
layout for each octave.
Copy / Paste of sets
Configuring each control value for every set can be tiresome when a
number of controls share the same value across sets. To facilitate this,
you can copy control values from one set to another for every controls or
for just a particular group of controls.
Start by selecting a set by pressing its set activation button. This will be
the source set. Click on “Copy Set”. Select the destination set by clicking
its respective activation button. Finally, press “Paste Set” to copy all the
control values, or “Paste Grp. 1”, “Paste Grp. 2”, “Paste Grp. 3” or “Paste
Grp. 4” to copy only the control values assigned to respectively, the first group (the default
group), second (red), third (green), and fourth (blue).
5
ZVORK Volt SL1 - User Manual
Metering
To the left of each set button is a small meter which displays the weight of the
set in the current output. When it is fully lit all the way up, the set is the one
applied to the output. This is especially useful to visualize crossfades between
sets.
Furthermore, the instantaneous value of each 24 controls as they are sent to
the CV values are represented graphically.
Slave
A “Slave” indicator is displayed at the bottom right of the set
buttonst if your SL1 has its “Set CV input” on the back panel linked
to a CV signal. In this case, set activation is no longer possible from
the front panel buttons or from a MIDI keyboard as it is overridden
by the CV signal. You can still select your sets to modify the control knobs, though.
Transitions
This section is where you define how the device should switch from one set to
another as you activate them. The default is to perform a brutal cut to the next
set, immediately after you activate it. If you set the “Duration” parameter to
anything but “Off”, the device will gently crossfade between the previous set and
the new set for the specified note duration. If the “Sync.” parameter is set to
anything but “Off”, the start of the crossfade or switch will occur at the next note
of that particular length.
So if you set “Sync.” to 1 and “Duration” to 1/2, the crossfade between two sets
will occur at the start of a measure and for half a measure.
Metering
The countdown meter lets you see when the crossfade /
switch will start. When all four dots are full, the transition
has started.
Transition curves
By default, and with previous versions of the SL1, transitions between two sets are done
with a standard linear crossfade of each control values. Starting with version 2.0, you can
specify a non-standard transition curve on a per-control basis.
6
ZVORK Volt SL1 - User Manual
To do so, start by switching to the transition curve edit
page by clicking on the left or right arrow buttons at the
bottom left of the control knobs panel.
The transition curve edit page has two sections. To the left are displayed all the available
transition curves (from left to right then top to bottom):
•
linear (the default),
•
accelerate,
•
decelerate,
•
accelerate then decelerate,
•
bounce in,
•
bounce out.
To the right are displayed for each control the current transition curves
Click on the left side section on the transition curve
you would like to apply to a control. This should
h i g h l i g h t t h e b u t t o n . T h e n cl i c k o n t h e
corresponding control zone to the right to change
the transition curve of a particular control. You can
change the curves of multiple controls with a single
stroke by “painting” / click and dragging across
multiple control zones.
7
ZVORK Volt SL1 - User Manual
Back Panel
The back panel exposes the 72 output CV signals corresponding to the 24 controls. For
each control corresponds two CV outputs and one negated CV output.
It also exposes both input and output sockets for the activation of the set.
Chaining SL1's
You can link multiple SL1's with the “Set” input / output CV signals so as to control all
SL1's from one master unit. This is particularly useful if you have exhausted all controls for
your set or if you wish to have different transition settings for some of your controls. When
doing so, the active set must be selected from the “Master” SL1. Once again, the “Slave”
LED indicator on the front panel lets you check if the device is a master or a slave.
You don't have to link the slave SL1's directly to the master. A slave unit can also be linked
to another slave unit which in turn is connected to the master. However, chaining a great
number of units may introduce some delay in the set activation on the last slaves.
8
ZVORK Volt SL1 - User Manual
Figure 1: One master SL1 controlling one slave.
Gate Inputs
You can also activate individually each set by plugging a “Gate” CV signal coming from an
external source, such as a Redrum or Matrix unit, in the corresponding “Gate” input on the
back panel. In this case, the SL1 is also considered to be a slave et its active set can no
longer be applied from the front panel. The “slave” LED will be lit if one of these “Gate” CV
inputs is linked.
Figure 2: One SL1 controled by external « Gate » CV signals.
Gate Outputs
Likewise, you can also fetch an individual set activation signal thanks to the “Gate” CV
outputs. The value of the CV signal will be +1 while a set is activated and 0 when this is
not the case.
9
ZVORK Volt SL1 - User Manual
MIDI Implementation Chart
MIDI Controller # Parameter
4
Active Set
5
Transition duration
7
Transition sync.
8
On / Off
10
Set A – Control 1
12-20
Set A – Controls 2 to 10
21-30
Set B – Controls 1 to 10
31
Set C – Controls 1
33-42
Set C – Controls 2 to 10
43-52
Set D – Controls 1 to 10
53-62
Set E – Controls 1 to 10
63
Set F – Control 1
65-73
Set F – Controls 2 to 10
74-78
Set A – Controls 11 to 15
79-83
Set B – Controls 11 to 15
84-88
Set C – Controls 11 to 15
89-93
Set D – Controls 11 to 15
94-95
Set E – Controls 11 and 12
102-104
Set E – Controls 13 to 15
105-109
Set F – Controls 11 to 15
110-119
Set G – Controls 1 to 10
128-132
Set G – Controls 11 to 15
133-147
Set H – Controls 1 to 15
148-162
Set I – Controls 1 to 15
163-177
Set J – Controls 1 to 15
178-192
Set K – Controls 1 to 15
193-207
Set L – Controls 1 to 15
10
ZVORK Volt SL1 - User Manual
More information at http://www.zvork.fr/audio
© 2013-15 Olivier Prat
11