1
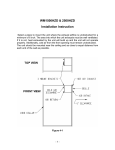
2/4-PORT
HDMI SWITCH
USER’S MANUAL
Rev 1.0
TABLE OF CONTENTS
Chapter 1 ............................................................ 3
Introduction .......................................................... 3
1.1 Features......................................................... 3
1.2 Package Contents.......................................... 4
1.3 Technical Specifications ................................. 4
Chapter 2 ............................................................ 5
Installation............................................................ 5
Chapter 3 ............................................................ 7
Troubleshooting ................................................... 7
2
Chapter 1
Introduction
The HDMI Switcher allows access to multiple HDMI devices,
such as DVD players and Satellite set-top boxes to one
HDMI display.
It’s a best choice for home theater systems and dual
computer users. No more hassles of manually plugging in
different HDMI connectors to view different HDMI sources.
1.1 Features
Easy switching of multiple HDMI sources(e.g., DVD,
Cable/Satellite receiver) using remote control or the
switch button on the switcher.
Individual LED Display of video source channels.
Supports 480i, 480p, 720p, 1080i and 1080p resolution.
Maintains highest HDMI single link video resolution.
Supports DDWG standard for HDMI compliant
monitors.
HDCP Compliant.
Low cost solution for home theater integration.
Plug-and-play. No software installation. Installs in
seconds.
1.2 Package Contents
The HDMI Switcher
Remote controller
9VDC Power Supply
User manual
1.3 Technical Specifications
Model No.
2 / 4 port HDMI Switcher
HDMI Single Link, TMDS.
HDMI Source Input Port
2/4
HDMI Single Link, TMDS.
Display Device Output Port
1
DC Power Jack X 1
Interface
HDMI Input Connector X 2
HDMI Output Connector X 1
VGA / SVGA / XGA / UXGA
Single Link Range
480i,480p,720p,1080i,1080p
HDCP Function
HDCP Compliant
Display Device Selection
Push Button or Remote
Cable Length
6 feet (In and Out respectively)
Power Adapter
9VDC,500mA
Enclosure
Metal
Dimension (mm)
170(W) x 73(D) x 25(H) mm
Net Weight (g)
320g / 330g
4
Chapter 2
Installation
1. Using standard HDMI cables to connect HDMI output
port of your video source to HDMI switch HDMI input
port. Make sure all HDMI source and the display turned
off before connecting the cables.
2. Plug 9V power supply into the switch’s power input
port
3. Plug 9V wall mount power supply into the wall outlet.
4. Turn on the display.
5. Turn on video resources
6. Use remote control unit to change channel. Or use
push button to switch channel.
5
2.1 Connector Pin Assignments
HDMI Port
HDMI 19PIN
Connector
Pin No.
Description
1
TMDS DATA 2 +
2
TMDS DATA 2 SHIELD
3
TMDS DATA 2 -
4
TMDS DATA 1 +
5
TMDS DATA 1 SHIELD
6
TMDS DATA 1 -
7
TMDS DATA 0 +
8
TMDS DATA 0 SHIELD
9
TMDS DATA 0 -
10
TMDS Clock +
11
TMDS Clock SHIELD
12
TMDS Clock -
13
CEC
14
RESERVED
15
SCL
16
SDA
17
DDC/CEC GND
18
+ 5V
19
Hot Plug Detect
••
6
Chapter 3
Troubleshooting
Problem
Solution
Switch will not operate 1. Make sure the 9V power is
plugged in the switch.
2. Check to see if the LED light is
on.
No picture or Signal
1.
Or poor picture.
Make sure your video display
is HDCP compliant.
2.
If you using HDMI copper
cable, overall length of cable
should
not
Exceeding
exceed
15ft.
15ft with HDMI
copper cable will result in no
or poor resolution. The cable
length over 15ft, please use
equalizer cable
3.
Make sure all HDMI
connectors are tightly
secured to all HDMI ports.
4.
Turn off all equipments and
restart all equipments.
7
Remote
control
unit 1. Make sure the 9V power is
will not operate.
plugged in the switch.
2. Check to see if the LED light is
on.
Programming
Universal
Control
1. Remote
Remote
unique
control
codes.
unit
To
use
program
your own universal remote
control, make sure use learn
feature
of
your
remote control unit.
••
8
universal