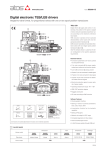
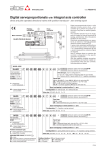
1
Operator Manual
& Parts List
MAJOR
GRASS SLASHERS
& JUNGLE BUSTER
Rev.1 230410
Head Office
Major Equipment Intl Ltd
Ballyhaunis,
Co. Mayo,
Ireland
Tel.:
Fax:
Email:
09496 30572
09496 30788
[email protected]
UK Office
Major Equipment Ltd.
Major Industrial Estate.
Middleton Rd
Heysham
Lancs.
LA3 3JJ
Tel.:
Fax:
Email:
01524 850 501
01524 850 502
[email protected]
NL & GERMANY OFFICE
Major Equipment Intl Ltd
Postbus 29
NL-7700 AA
Dedemsvaart
Nederland
Tel:
Email:
+ 31 (0) 6389 19585
[email protected]
Web:
www.major-equipment.com
Disclaimer
While every effort has been made in the production of this manual to ensure that the information
contained herein is full and correct, Major assumes no responsibility for errors or omissions.
Major reserves the right to modify the machinery and the technical data contained within the manual without prior notice.
Further to this, Major assumes no liability for any damages which may result from the use of the
information contained within this manual.
Contents
Introduction
Thank you
Using Your Operator’s Manual
Safety Issues
Product Identification
Machine Serial Numbers
Product Specifications
Register Your Product and Warranty Online
Safety
Machine Safety Labels
Operating Safely
Workstation
Regulations for use of the transmission
PTO Shaft Safety
Driving safely on public roads
Operating the Machine
Inspections before Use
Key to Main Parts
Starting Regulations
Hitching to the tractor
Operating the Machine/Mowing
Maintenance
Greasing schedule:
Trouble Shooting
Spare Parts
601 Grass Slasher
605SL Grass Slasher
Jungle Buster (JB)
Gearboxes
1
1
1
1
1
2
2
2
3
3
3
4
4
5
5
5
6
6
6
7
8
9
9
Introduction
Thank you
We appreciate having you as a customer and wish you many years of safe and satisfied use of your machine.
Using Your Operator’s Manual
This manual is an important part of your machine and should remain with the machine when you buy it. Reading
your operator’s manual will help you and others avoid personal injury or damage to the machine. Information given in
this manual will provide the operator with the safest and most effective use of the machine.
Sections in your operator’s manual are placed in a specific order to help you understand all the safety messages
so you can operate this machine safely. You can also use this manual to answer any specific operating or servicing
questions.
Safety Issues
Your manual contains special messages to bring attention to potential safety concerns, machine damage as well
as helpful operating and servicing information. Please read all the information carefully to avoid injury and machine
damage.
Product Identification
Machine Serial Numbers
If you need to contact MAJOR or your MAJOR dealer for information on servicing or spare parts, always provide the
product model and serial numbers.
We suggest that you record your machine details below:
Model No:
____________________________________
Serial No:
____________________________________
Date of Purchase:
____________________________________
Dealer Name:
____________________________________
Dealer Telephone:
____________________________________
The serial plate is located on the front side of the frame.
To show that MAJOR products conform to all the
European rules, the CE-brand is printed on the Major
identify plate.
Product Specifications
Cutting width
Cutting Range
No. of blades
Power requirements
601SL
1700mm / 5’ 7”
10 - 250mm /1/2” - 10”
2
30 - 60 HP
605SL
1830mm/ 6’
10 - 250mm /1/2” - 10”
2
30 - 60 HP
1680mm/ 5’ 6”
50 - 250mm/ 2” - 10”
3
50 - 150 HP
Jungle Buster
1
Register Your Product and Warranty Online
To register your product through the Internet, simply go to the Support section on www.major-equipment.com.
Completing the information, either online or with the product warranty card, will ensure the customer that their product
receives all post sales service and important product information.
This machine is supplied with a twelve month warranty. No warranty is given where the machine is being used as a
hire machine. Warranty is against faulty workmanship or parts. All parts must be returned to the manufacturer. No
warranty can be considered unless parts are returned. All replacement parts will be supplied on a chargeable basis
until warranty has been accepted.
Safety
Machine Safety Labels
The machine safety labels shown in this section are placed in important areas on your machine to draw attention to
potential safety hazards. Replace missing or damaged labels.
Operating Safely
Read the user manual thoroughly
before use.
Rotating blade hazard
PTO entanglement hazard. Please
keep clear of PTO drive
2
The MAJOR Topper is designed to operate at 540 RPM (1000RPM - Jungle Buster). Ensure tractor PTO output is set
at 540 RPM. The MAJOR Topper must only be used for cutting grass. Moreover, it must only be used with a suitable
tractor (see product specifications) and driven by an adequate drive-line by the tractor PTO. All other use is strictly
prohibited.
Users should become thoroughly familiar with the contents of this manual before using, servicing and
mounting the implement to the tractor and all other pertinent operations. Never wear jewellery, loose
clothing such as ties, scarves, belts, unbuttoned jackets or dungarees with open zips which could become
caught up in moving parts.
Always wear approved garments complying with accident prevention provisions such as non-slip shoes,
ear muffs, goggles and gauntlets. Wear a jacket with reflecting stickers if the implement is used near public
highways.
Consult your retailer, the Labour Health Service or your nearest equivalent authority for the information about the
current safety provisions and specific regulations with in order to ensure personal safety.
ALWAYS DISENGAGE PTO, SWITCH OFF THE TRACTOR ENGINE AND ENGAGE THE PARKING
BRAKE BEFORE MAKING ADJUSTMENT TO THE MACHINE.
NEVER PLACE LIMBS UNDER THE MACHINE WHILE ROTORS ARE TURNING. ROTORS CAN REMAIN
TURNING FOR UP TO 1 MINUTE AFTER DISENGAGING PTO.
Workstation
The operator must remain seated while working the machine. When the wings need to be raised and lowered the
operator must leave the tractor. Always ensure the PTO has been turned off and the parking brake applied before
leaving the tractor cab. The operator must always apply the parking brake, and turn off the engine before leaving
machine or carrying out maintenance.
Regulations for use of the transmission
The transmission to the gearboxes is protected throughout the machine by both PTO shafts and bolt down covers.
All guarding should be kept efficient and in good condition. If the condition is poor, the guarding should be renewed
before the implement is used.
UNLESS IT IS CORRECTLY PROTECTED THE TRANSMISSION COULD CAUSE DEATH SINCE IT CAN CATCH
ON PARTS OF THE BODY OR CLOTHING
Ensure retaining chains are correctly anchored on all PTO shafts, preventing them form turning. Ensure drive line can
turn easily within the shield. Keep spline grooves clean and greased so that PTO shaft can connect easily. Besides
being described in this manual, the method by which the PTO shaft is connected to the tractor must be checked out
with the instructions in the tractor manufacturer’s manual.
PTO Shaft Safety
MAX PTO INPUT 540 R.P.M. Contact your nearest dealer or a specialised retail outlet if the PTO must be replaced
with a longer one, since this must belong to the same power category and possess the same characteristics. An
unsuitable PTO could easily break.
The tractor PTO shaft length may be altered to suit the individual tractor model. When the machine is in operation, the
PTO shaft should have a minimum 1/3 engagement as shown in the diagrams. After the topper has been hitched to
the tractor, it should be checked in various positions that the drive line is the correct length. If the PTO is too short and
tends to slip out of place, it must be replaced with a longer one.
If the PTO shaft is too long, it should be shortened in the following way:
3
• Set the machine at a minimum distance from the tractor, then brake
the tractor and switch off the engine
• Separate the two halves of the PTO. Insert the female part into the
tractor PTO and the male part into the topper PTO, checking that the
position is correct by means of the fixing pins.
• Line up the two halves of the PTO together, keeping them parallel.
• Using a felt tip pen, match mark the place where the two halves must
be shortened as shown.
• First cut shield “1” and use part “2” as a reference to cut the splined
shaft.
• Proceed in the same way for the second half.
• Trim and chamfer the two cut ends of the PTO and clean off all swarf
and shavings.
• Grease the two profiles and join the two halves of the PTO together.
• Mount the PTO shaft and check that its length is correct as before.
The shaft must not reach the end of the tube or project from this.
Ensure the PTO does not bottom when turning
Driving safely on public roads
Check the local Highway Code regulations before driving the tractor on public highways with a towed implement.
Check the reflectors, hazard flashers and/or projecting load indicators are installed when required and efficient.
These indicators must be installed correctly and easily seen by the drivers of other vehicles. Bystanders must not be
allowed to lean against or climb onto the machine during transport or while working. Do not
allow bystanders to ride on the machine. MAXIMUM TRANSPORT SPEED MUST NOT EXCEED 30Km/Hr (18 MPH)
Operating the Machine
Inspections before Use
Always disengage PTO, Switch off tractor engine and engage the parking brake before making adjustments
to the machine.
1. With the whole machine as level as possible, check the oil level in the gearboxes. Top up as required with SAE
EP90 gear oil through the oil filler plug indicated. The correct level is at the oil level plug indicated.
2. Grease the PTO shaft universal joints, drive shaft bearing and carrying arm pivots.
3. Re-sharpen old blades with a grindstone if necessary. Replace bent blades with new ones.
4. Check the blade mounting bolts are tight
5. Ensure the gearbox shaft nuts are tight and retained in place by split pin.
6. Check tightness of all nuts, bolts and retaining screws after the first and second hours of work.
7. Ensure safety guards and flaps are in place at all times where fitted.
8. Due to the corrosive nature of grass when cut, wash down the machine when finished mowing, especially when
the machine is being stored for a long period of time.
4
Key to Main Parts
Starting Regulations
Always check that any imminently dangerous conditions have been eliminated before using the machine. Ensure all
guarding is present and the operator is fully aware of the operations of the machine.
Always ensure the pins lock the PTO shaft yoke ends onto the spline shafts on both the tractor and the
implement. An unlocked shaft could slip out of position, causing notable mechanical damage and serious
injury to both operator and bystanders.
Hitching to the tractor
ALWAYS OPERATE ON LEVEL GROUND WHEN HITCHING/UNHITCHING THE IMPLEMENT. THIS WILL
PREVENT DANGEROUS MOVEMENT. NVER ALLOW ANYONE TO STAND BETWEEN THE TRACTOR
AND THE MACHINE.
1.
2.
3.
4.
5.
Reverse the tractor,
Ensure the tractor parking brake is applied
Connect the lower link arms & Top Link. Secure both in position with correct size pin.
Fit the PTO shaft & secure the PTO cover chains.
Check all guarding is present & secured.
Transport Position
1. Check machine is hitched to the tractor as described.
2. Ensure the tractor parking brake is applied
3. Lift the machine into transport position.
5
Operating the Machine/Mowing
The MAJOR Pasture Topper is designed to operate at a max 540 rpm. Always operate on level ground when hitching
/ unhitching the implement. This will prevent dangerous movement. Never allow anyone to stand between the tractor
and the pasture topper.
1.
2.
3.
4.
Ensure the machine is hitched correctly to the tractor as previously described
Ensure cutting decks are lowered to the ground.
Start up the tractor PTO at a low RPM.
Build up to operating speed, select a suitable forward gear & proceed to cut grass.
Maintenance
The machine must always be disconnected from the tractor before any cleaning, lubricating and servicing operations
can be carried out. Ensure that the Rear and Side decks are locked up while performing maintenance. If emergency
operations are required whilst the machine is connected to the tractor, switch off the engine, engage the parking brake
and disengage the PTO. Good, regular maintenance and correct use are essential if the grass topper is to remain
safe and long lasting.
NOTE: Maintenance must be carried out by qualified personnel.
Greasing schedule:
Please grease the following:
PTO Shafts
Initially
After 8 hours work
•
•
Lubricate moveable mechanical joints when required. All nuts and bolts in the transmission including PTO shafts and
gearboxes should be checked for tightness after mowing at the following intervals:
•
•
•
1st 50 acres
1st 100 acres
1st 250 acres and every 250 acres thereafter
Trouble Shooting
FAULT
Irregular cut
Noisy machine
Excessive vibration
6
POSSIBLE CAUSE
REMEDY
Worn or broken blades
Sharpen or replace blades
Loose parts
Check all bolts are fully tightened.
Insufficient oil in gearbox.
Check oil level and top up as necessary.
Incorrect PTO R.P.M. rate.
Check PTO R.P.M. and adjust as necessary.
Loose parts.
Check all bolts are fully tightened.
Incorrect PTO rate.
Check PTO R.P.M. and adjust as necessary.
Broken or missing blade or blade bent
following impact
Check blades and replace if necessary.
Spare Parts
Use Genuine Parts
For best results you should always choose geniune parts for your machines. MAJOR spare parts are identical
to those used on our machines during assembly. They have been developed by our R&D department and tested
thoroughly to meet high quality standards. This also means that genuine MAJOR parts have the correct dimensions
and specifications as the parts originally on your machine.
601 Grass Slasher
Item Part No
Description
Qty
Item Part No
Description
Qty
1
SL61-BLDL
601 BLADE ASSY (STD)
1
15
M12x35BZP M12x35 BOLT
2
2
SL61-BOD
601 SLASHER BODY
1
16
M12x40BZP M12x40 BOLT
1
3
SL61-FG
FRONT GUARD
1
17
M12x50BZP M12x50 BOLT
2
4
SL65RG
REAR GUARD
2
18
M20
2
5
NT11
SKID (OFFSET)
2
19
M20x110BZP M20x110 BOLT
2
6
LF205
6 SPLINE “L” BOX RATIO 1.47 (205.871)
1
20
M8x16SZP
M8x16 SET BOLT
4
7
5/8F
5/8” FINE NYLOC NUT
4
21
NT20A
PTO GUARD (RND)
1
8
58x214FBZP 5/8”x2 1/4” FINE BOLT
4
22
S15707
CAT 1/2 LINK PIN
2
9
EW29A
2
23
3546
LINCH PIN DIA 9.5
2
SL601
601 SL STRAP (1600mm)
1
5/8” “D” SHACKLE
M20 NYLOC NUT
10
FWM8
M8 FLAT WASHER
4
24
11
FWM20
M20 Flat Washer
4
25
SW58
5/8” SPRING WASHER
4
T40BO-1100 PTO Shaft 601 Slasher
1
12
GM2
STANDARD A-FRAME
1
26
13
M12
M12 NYLOC NUT
13
27
12T-BBS
BLADE BACK SPACER
2
14
M12x30SZP M12x30 SET BOLT
8
28
8SM9/3
Spacer
8
601SL Grass Slasher Blade Assembly
Item Part No
Description
Qty
1/2” Nyloc Nut
Item Part No
Description
Qty
1
1/2F
12
7
FWM20
M20 FLAT WASHER
4
2
12x212FBZP 1/2”x2 1/2” FINE BOLT
4
8
M20
M20 NYLOC NUT
2
3
8SM9/2
BLADE BACK (769 CTR)
2
4
9GT-USS
Under sole skid
5
DF-BMP
BLADE MOUNT
6
FW12
12” FLAT WASHER
9
M20x60BZP M20x60 BOLT
2
10
NTSB10A
SWING BLADE (Anti-Clk)
2
1
11
8SM9/3
Spacer
8
4
12
8SM9/4
Blade bushing (std)
4
7
605SL Grass Slasher
Item Part No
Description
Qty
Item Part No
Description
Qty
1
SL61-FG
FRONT GUARD
1
14 M12x30SZP
M12x30 SET BOLT
10
2
SL65-BLD
605 BLADE ASSY (STD)
1
15 M12x35BZP
M12x35 BOLT
3
3
SL65-BOD
605 SLASHER BODY
1
16 M20
M20 NYLOC NUT
2
4
SL65RG
REAR GUARD
2
17 M20x110BZP
M20x110 BOLT
2
5
SLH16
SKID (OFFSET)
2
18 M8x16SZP
M8x16 SET BOLT
4
6
LF205
6 SPLINE “L” BOX RATIO 1.47
(205.871)
1
7
5/8F
5/8” FINE NYLOC NUT
4
8
58x214FBZP
5/8”x2 1/4” FINE BOLT
4
9
EW29A
10 FWM8
5/8” “D” SHACKLE
3
M8 FLAT WASHER
4
11 FWM20
M20 Flat Washer
4
12 GM2
STANDARD A-FRAME
1
13 M12
M12 NYLOC NUT
13
19 NT20A
PTO GUARD (RND)
1
20 S15707
CAT 1/2 LINK PIN
2
21 3546
LINCH PIN DIA 9.5
2
22 SL605
605 SL STRAP (3850mm)
1
23 SW58
5/8” SPRING WASHER
4
24 T50BO-1100
PTO Shaft 605 Slasher
1
25 8SM9/3
Spacer
8
605SL Grass Slasher Blade Assembly
Item Part No
8
Description
Qty
1
1/2F
1/2” Nyloc Nut
12
7
FW12
12” FLAT WASHER
8
2
12x212FBZP
1/2”x2 1/2” FINE BOLT
4
8
M20
M20 NYLOC NUT
2
2
9
M20x60BZP
3
6SL-NB
BLADE BACK (925 CTR)
4
9GT-USS
Under sole skid
Item Part No
10 SLH11C
Description
Qty
M20x60 BOLT
2
605 SLASHER BLADE
2
5
DF-BMP
BLADE MOUNT
1
11 6SL/B
605 BLADE BUSH
2
6
DSW45
DISC SPRING 45x22.4x2.5
4
12 8SM9/3
Spacer
8
Jungle Buster (JB)
Item Part No
Description
Qty
Item Part No
Description
Qty
1
16WT-BBA
JB WING BLADE ASSY (Front Mt)
1
16 M12
M12 NYLOC NUT
16
1
16WT-WBB
JB WING BLADE ASSY (Rear Mt)
1
17 M12x30SZP
M12x30 SET BOLT
16
2
FS18-B01
FORESTRY 180 BODY
1
18 M16
M16 NYLOC NUT
8
3
FS18-FG01
FRONT FLAP GUARD
8
19 M16x40SZP
M16x40 SET BOLT
8
4
FS18-FG04
FRONT FLAP BAR
2
20 M20
M20 NYLOC NUT
6
5
FS18-FG05
REAR CHAIN BAR
1
21 M20x130BZP
M20x130 BOLT
2
6
FS18-FG06
FRONT CHAIN BAR
1
22 M6
M6 NYLOC NUT
8
7
FS18-SK01
FS180 SKID
2
23 M8x16
M8x16 SET BOLT
4
8
FS180-STRAP01
Jungle Buster CHAIN SLING
1
24 112
CAT 2 PIN DIA 28.5x159mm
2
9
123RMA01
HEAVY A-FRAME
1
25 1373
M8xDIA 9 U-BOLT
4
LF149 GEARBOX 149.036.00
1
26 3546
LINCH PIN DIA 9.5
2
11 190000705
2 PIECE PTO GUARD
1
27 SW58
5/8” SPRING WASHER
6
12 5/8F
5/8” FINE NYLOC NUT
6
28 T601210ENC12RW6 T60 FIXED SLIP CLUTCH
10 LF149/B
1
13 58x214FBZP
5/8”x2 1/4” FINE BOLT
6
29 FS18-CG01
3/8” CHAIN MOUNT (REAR)
1
14 FS18-CH02
3/8” CHAIN STRAP
73
30 FS18-CG02
3/8” CHAIN MOUNT (FRONT)
1
15 FWM8
M8 FLAT WASHER
4
31 FS18-FG03
GUARD MOUNT (FRONT)
2
Gearboxes
Machine
Gearbox
601SL & 605SL Slashers
LF205
JB Jungle Buster
LF149/B (9.149.036.00)
Part No
Description
Breakdown on Page:
LF149/B
LF149/B (9.149.036.00)
10
LF205
6 SPLINE “L” BOX RATIO 1.47 (205.871)
11
9
LF149/B (9.149.036.00) Gearbox Breakdown
Item Part No
Qty
Price €
CASING
1
POA
13
0.149.5000.00
GEAR
8.0.9.00129
BEARING 30307
2
€35.94
14
8.0.9.00469
3
8.7.1.00315
(358010)
DOUBLE LIP SEAL 35X8
0X10
1
€3.15
15
0.244.7500.00
4
0.149.2001.00
SHAFT 1”3/8 Z6
1
POA
16
5
85200030
SNAP RING 80 UNI7437
2
€1.30
1
0.149.0301.00
2
6
0.267.7500.00
SHIM 79.9
2
POA
7
8.4.7.01111
COTTER PIN B4X55
1
POA
8
8.0.9.00128
BEARING 30308
1
€14.83
9
0.132.7106.00
NUT
1
POA
M30X1.5
10
0.149.3000.00
SHAFT
11
0.139.7100.00
PROTECTIVE WASHER
12
10
Description
8.7.1.01107
ASA DP 8/16
DOUBLE LIP SEAL
50X90X10
1
POA
1
POA
1
€5.60
Item Part No
Description
Qty
Price €
2
POA
BEARING 30210
1
€21.68
SHIM KIT 40.3x51.5
1
POA
0.259.7525.00
SHIM
35.3x2.5
1
POA
17
8.7.0.00790
CAP
80X10
1
POA
18
8.1.1.00326
BOLTM8X16 8,8
4
€0.30
19
0.149.710.000
PLUG
1
€5.85
20
0.149.1300.00
COVER
1
POA
21
0.139.7101.00
BLANK WASHER
1
POA
22
8.2.2.00555
Castle Nut M30X2 PR80
1
POA
251
0.139.7000.00
BUSH
1
POA
252
8.4.7.00146
COTTER PIN
1
€0.35
Z20 M6.25
3/8 GAS
B6X60
LF205 6 Spline “L” Box Ratio 1.92 (205.871) Gearbox Breakdown
Item Part No
Description
Qty
Price €
Item Part No
Description
Qty
Price €
1
LF135/17H
Crown Gear 23T HS box
1
€135.00
14
M10x20SZP
Bolt
1
€0.10
1
LF135/17
Crown Gear 22T Std box
1
€113.22
15
LF135/6
Snap Ring
1
€1.26
2
LF205/12
Gearbox Casing
1
€117.32
16
LF135/3
Snap Ring
1
€1.61
3
LF135/18
Input Shaft
1
€120.47
17
85200648
Circlip
1
€3.40
4
LF135/11
Pinion Shaft
1
€175.00
18
LF135/13
Plug
2
€2.86
5
LF135/10
Spacer
1
€6.55
19
40X80X12V
Double Lip Seal
1
€17.94
Double Lip Seal
6
52x7
Oil Cap (Cover)
1
€4.20
20
T4A/1 (8.7.3.00055)
1
€2.55
7
LF135/4
Protective Washer
1
€1.61
21
LF135/26 (LF205EP) Cover
1
€4.89
8
LF135/21
Bearing 6007 (35x62x14)
1
€3.81
22
LF135/8 (02447500) Shim
1
€0.76
9
LF135/15
Bearing 6207
1
€7.36
23
LF135/3 (02677500) Snap Ring
1
€1.61
10
LF135/9
Bearing 6208
2
€7.82
24
0.6.775.000
Shim
1
POA
11
LF135/1
Castle Nut
1
€5.64
25
N/A
Name Plate
1
POA
12
LF135/2
Washer
1
€0.35
26
0.248.7500.00
Shim
1
POA
13
LF135/19
Key
1
€1.54
27
85200131
Circlip
1
€1.15
11
12
To register your machine for warranty, please go to the Support section of
our website www.major-equipment.com and fill in your details.
HEAD OFFICE
Major Equipment Intl Ltd
Ballyhaunis, Co Mayo
Ireland
Tel: 094 9630572
UK OFFICE
Major Equipment Ltd
Major Ind. Estate, Heysham,
Lancs, LA3 3JJ, UK
Tel: 01524 850501
NL & GERMANY OFFICE
Major Equipment Intl Ltd
Postbus 29, NL-7700 AA
Dedemsvaart, Nederland
Tel: + 31 (0) 6389 19585