1
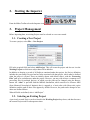
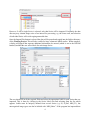
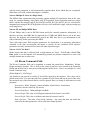
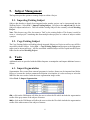
MIDAS Importer User Manual Version 1.65, 2010 J.C. Norman CONTENTS 1. Description ........................................................................................................ 1 2. Starting the Importer ......................................................................................... 2 3. Project Management .......................................................................................... 2 3.1. Creating a New Project ......................................................................... 2 3.2. Selecting an Existing Project................................................................. 2 3.3. Adding an Existing Project ................................................................... 3 3.4. Changing Project Information ............................................................... 3 3.5. Removing a Project ............................................................................... 3 4. Importing Data .................................................................................................. 3 4.1 Dicom Comments Field .............................................................................. 5 5. Subject Management ......................................................................................... 6 5.1. Importing Existing Subject.................................................................... 6 5.2. Copy Existing Subject ........................................................................... 6 6. Tools .................................................................................................................. 6 6.1. Import Segmentation ............................................................................. 6 6.1. Importing Analyze Files ........................................................................ 7 6.2. Change Subject ID ................................................................................ 8 6.3. Anonymize DICOM .............................................................................. 8 7. The AutoImport Program .................................................................................. 8 8. Implementation Details ..................................................................................... 8 8.1. Parameter Definitions and Management ............................................... 8 9. Acknowledgments ............................................................................................. 9 1. Description The MIDAS package integrates several data processing and display functions that operate on a diverse set of MRI and MRSI data types. To manage the many data sets and processing steps used for a typical study a data management system is used that organizes both the multiple data sets acquired for a single MR study of a single subject, as well as multiple studies that make up a project. Therefore, before any processing can be done under MIDAS a “Project” must be first created and the data to be processed must be “imported” into that project. An essential part of this process is to maintain a record of essential data parameters, and if necessary, to convert data into a common format suitable for processing. These functions are performed using the MIDAS Importer, which is a Java based application that interfaces with the data management system. Multiple users can share projects, although the list of Projects seen under each user account is specific to that user. Additional notes on the files used to maintain the Project and data organization can be found in the “MIDAS Project Description” document. 1 2. Starting the Importer From the Midas Toolbar select the Importer icon: 3. Project Management Before Importing data, an existing Project must be selected or a new one created. 3.1. Creating a New Project To create a project, select File -> New Project. Fill in the required fields and select Add Project. This will create the project and also set it as the Working Project to which new subject data will be added to. In addition to keeping a record of all Subjects contained under that project, the Project definition includes the processing files used and an Atlas associated with that project, which must be defined when the project is created. These are initially shown with default values, with the “Processing Files” path set to a subdirectory under the project. However, you may wish to have a common set of processing files for multiple projects, in which case the path can be changed using the Browse button. An “Atlas” is provided with the MIDAS distribution, which consists of a reference MRI (from Montreal Neurological Institute) that is mapped to a brain atlas with lobar-scale region definition, and the path to these files appears by default. However, the path can be changed to use other user-defined atlases. When all fields are defined, select “Add Project”. 3.2. Selecting an Existing Project A previously created Project can be selected in the Working Project drop down, and then becomes the current Project used for subsequent actions: 2 3.3. Adding an Existing Project Existing Projects can be made known to the list of projects associated with the user. For instance this may be a project initially created by another user, copied from another location, or that exists on a network share. Select File -> Import Existing Project. Navigate to the XXX_project.xml (where XXX is the name of the project) and select. This will also make this project the Working Project. 3.4. Changing Project Information The path for the Atlas, Processing Files, and Reference files can be changed using the “Edit Project” button, and using the Browse buttons to select new paths. 3.5. Removing a Project Projects can be removed from the user’s list of projects. This will remove the currently selected Working Project from the project management system for that user, but will not delete the project information, or any data. Only the "link" into Midas for that user account is removed. Select File -> Remove Project. If the data files associated with the removed project are no longer needed they must be deleted by the user. 4. Importing Data Once a Working Project has been created or selected, new Subject data can be imported into it. To do this, first browse to the folder containing the MRI and/or SI data by clicking the Browse button: The program will then scan the file header information and populate the Data Browser pane with a list of the data in the specified directory. The data will be organized in the Subject -> Study -> Series -> Dataset hierarchy. Note, the program will also search through subdirectories under the selected level. Select the level (e.g. Subject, Study, Series) below which all data should be selected for import, or select individual image Series, and click Import Files. For instance, if selection is made on the Subject level then all the data will be imported, as shown in the following figure: 3 However, if only a single Series is selected, only that Series will be imported. Frequently the data directory may contain image series of no interest for processing, e.g. the Scout scan, and selection of individual Series will avoid copying unneeded data. Once the Import Files button is selected the data will be parsed and copied into the Subject directory of the Working Project. This will take a while for large volumetric MRSI studies. When complete, a dialog will appear that requests additional information be entered (which is not in the DICOM headers) and that the user select labels for each image Series: The user should fill in all the required fields and select the appropriate label for each Series that was imported. This is done by clicking in the Series Label area and selecting from the list which appears. Labels must be uniquely defined from several Series (e.g. SI, SI_Ref, MRI_T1), but unrecognized image types can also be labeled with “MRI_Other”. If the program has imported data 4 with the same parameters it will automatically populate those Series labels that are recognized. When done, select OK, and the data import is complete. Note on Multiple SI Series in a Single Study The MIDAS data organization and processing support multiple SI acquisitions done in the same study, for example running a short and a long TE acquisition. Each acquisition must have unique labels, with the first being SI and SI_Ref, then SI2 and SI2_Ref, SI3 and SI3_Ref, etc. Note that for automated processing the BATCH pipelines will have to be modified to apply each processing step to all image series. Note on GE and Philips MRSI Data: GE and Philips data is not in DICOM format and lacks essential parameter information. It is therefore necessary that MRI data be imported first. If MRI and MRSI data are all in the same directory, the program will automatically process the MRI data first to get information on the Subject and Study, before processing the MRSI. There still remain some EPSI sequence parameters for which there is no parameter information contained in the data, and therefore the import is specific for the volumetric EPSI sequence parameters currently used and will not work for other acquisition types. Note on “Set UCLA Data”: Midas expects that data is collected with a single dataset per Series. If the Tools -> Set UCLA Data option is set, the Importer will automatically promote any dataset contained in a series with multiple datasets into its own series. 4.1 Dicom Comments Field The Dicom Comments field can be populated to contain the patient Race, Handedness, Weight, Height and Study Operator. This is used so that values do not have to be entered in the Parameter Dialog and the data can be auto processed through the Midas Server. Here is an example of a valid Dicom Comments entry: [White,Right,81,1.4,Jeff Alger] Any characters can precede or trail the [] and will be ignored by the Importer. The values can be placed in any order. For each entry there are a number of valid values that can be used, if the value does not meet any of the allowed entries it will be ignored. Here is a listing of valid entries for each parameter: Patient Race: White, Hispanic, American Indian, Alaska Native, Asian,Native Hawaiian, African American, No Answer Patient Handedness: Unknown,Right,Left,Both Patient Weight: This value is in Kilograms and must be between 10 and 1000. Patient Height: This value is in Meters and must be between 0 and 10. Study Operator: The name of the Study Operator. Any entry that does not match the criteria for the other parameters will be used as the Study Operator. 5 5. Subject Management The Importer provides options to manage Subjects within a Project. 5.1. Importing Existing Subject Subject data that have already been imported under another project can be incorporated into the Working Project. Select File -> Import Existing Subject. Navigate to the subject.xml file for the Subject to import and select it. This will add the existing Subject to the currently selected Working Project. Note: This does not copy files, but creates a "link" to the existing Subject. This feature is useful to create a “virtual project” containing data from multiple other projects or a subset of subjects within a project. 5.2. Copy Existing Subject The Copy Existing Subject will add an already imported Subject to a Project as well as copy all files associated with the Subject. Select File -> Copy Existing Subject and navigate to the appropriate subject.xml to import and copy. All files associated with this Subject will be copied into the Project folder for the current Working Project. 6. Tools Additional tools are provided with the Midas Importer to manipulate and import additional sources of data. 6.1. Import Segmentation Segmentation files created from external programs in Analyze format can be imported into Midas. However, because the Analyze parameter description is incomplete, it is also necessary to select the MRI files that were used to create the tissue segmentation image results. Select Tools Import Segmentation: GM, a click on the GM button will allow the user to select the file which includes the segmentation results of the gray matter of the subject of interest. WM, a click on the WM button will allow the user to select the file which includes the segmentation results of the white matter of the subject of interest. 6 CSF, a click on the CSF button will allow the user to select the file which includes the segmentation results of the CSF of the subject of interest. NONE BRAIN, a click on the “None Brain” button will allow the user to select the file which includes the segmentation results of all the pixels which do not belong to any of the WM, GM or CSF. INPUT 1, a click on the input 1 button will allow the user to specify an input node containing the data used for segmentation. INPUT 2 (OPTIONAL), a click on the input 2 button will allow the user to specify an input node containing the data used for segmentation. INPUT 3 (OPTIONAL), a click on the input 3 button will allow the user to specify an input node containing the data used for segmentation. CANCEL, abort importing of segmentation data. SAVE, initiate the importing of the segmentation data. 6.1. Importing Analyze Files Data such as DTI or perfusion results generated by other programs can be incorporated into the MIDAS data structure by importing Analyze format files. The Analyze format does not have sufficient parameter information; therefore it is necessary to have an existing Series/Volume node that contains this information. This is done using a DICOM import from any MRI used to derive the data, for example using the b=0 image for a DTI acquisition and creating the MRI_DTI Series node. To apply image registration (MSREG program) this has to be a complete data volume; however, for some applications it is sufficient to import just one DICOM file simply for the purpose of getting the information from the DICOM header. This function is under ToolsImport Analyze Files. Operation is as: - “Browse Node” Select the node where the data is to be imported into. This requires selection at the DATA node level. Select the Series type: DTI, Segmentation, or Perfusion, which will populate the list of available labels in the Labels section. Select the label for the file to be imported. Browse for the Analyze format file. Repeat the label and file selections for all files Select “Start Importing: An example is shown here: Note: There is also a utility program for importing Analyze files after they have been aligned to a common space. This is “MNI space Analyze file import’, located in the tools section of the toolbar. 7 6.2. Change Subject ID The DICOM Subject ID parameter in the MRIs and Siemens SI data can be changed before the data is imported. One example where this may be used is if a second study was done on a subject, but was identified using a different Subject ID from the first study. By making the Subject ID the same, the data will be imported as a second study under the existing subject, rather than as a new subject. Select Tools Change Subject ID. This will display a dialog to select the DICOM data in which to change the Subject ID for. Select the DICOM Path by clicking the ... button and browsing to the directory containing the DICOM data. The Current SubjectID will be displayed for the data in the directory. Enter the New Subject ID in the field and press Update. NOTE: This will modify the headers of all DICOM files under the selected directory. 6.3. Anonymize DICOM This will de-identify DICOM parameters. Please refer to LONI documentation here: http://www.loni.ucla.edu/download/DiD/DiD_Usage.pdf Note Feb 2014. There are problems running this program with MIDAS import. Needs investigation. 7. The AutoImport Program The AutoImport function provides the capability for automatic import and processing of data copied into a directory. Pease refer to the MidasServer_help document for use of the AutoImport. 8. Implementation Details 8.1. Parameter Definitions and Management The parameters used in the XML descriptor are listed in a document included in the MIDAS distribution: *:\Midas\Documents\Development\MidasParameters.pdf The mapping of the parameters from the DICOM headers, which includes vendor-specific mappings, to the MIDAS XML format is defined in an Access database “MidasDescriptor.mdb”. This database and a description of the procedures for modifying these parameter mappings and incorporating this into the Importer are available in the SVN system, for which access is given to developers on request. The document can be found under SVN directory: 8 “trunk\midas_dev\MidasDescriptor\Help_Midas_Descriptor.doc”. 9. Acknowledgments This program was developed by JC Norman based on a previous implementation by Ammar Darkazanli. This work was supported by NIH grant R01EB000822 under the MIDAS project. 9