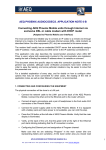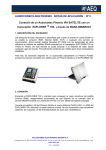
1
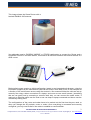
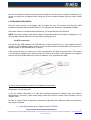
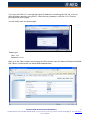
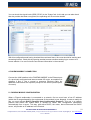
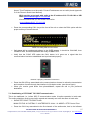
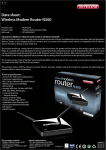
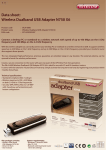
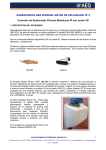
AEQ PHOENIX AUDIOCODEC. APPLICATION NOTE 5
Connecting a Phoenix Mobile audiocodec to an IP network using a 3G
wireless router
1. DESCRIPTION OF THE SCENARIO
We will describe how to connect a PHOENIX MOBILE IP audiocodec to a 3G router with modem in
order to achieve the establishment of an IP audio call with the studio. This kind of applications are
generally recommended in exterior locations where good UMTS/3G coverage is available.
Several 3G devices with Ethernet connectivity can be found in the market. We have evaluated two
of them with different application and performance levels.
The Sitecom Wireless Mobile Router 150N has internal antennas and also features a USB host
port to connect a USB internet modem that will hold the carrier SIM card. This is the lowest cost
and more portable solution among the ones we have evaluated.
+
According to the manufacturer advertisement, “the Wireless Mobile Router 150N WL-361 allows
you to share and enjoy an Internet [WiFi] wireless connection no matter where you are located. It
includes a rechargeable battery that permits up to 6 hours operation without an external power
supply or mains plug. When no WiFi connection is available, you can connect a 3G modem
through the USB 2.0 port”.
The router is equipped with two internal antennas that reduce dropouts and guarantee a wide
coverage for the WiFi network. In our case, however, we will use the RJ45 Ethernet port to
connect to the Phoenix unit.
On the other hand, the Sierra Wireless Raven XE - World holds the SIM card internally, requires a
reliable external power supply and external antenna (one connector for transmission / reception
and an additional one for diversity reception). When used with an external directive telephone
antenna it is the ideal solution for mobile units and places with weak 3G coverage.
APLICACIONES ELECTRONICAS QUASAR S.A.
1
C/ Margarita Salas 24, 28919 LEGANÉS. MADRID (SPAIN) Tel.:(34) 91 686 13 00 * FAX: (34) 91 686 44 92 .E-mail: [email protected] . Web: www.aeq.eu
N.I.F. :A-28620649
This image shows the Sierra Router with a
Lambda PAN918-10G antenna.
You obviously need a PHOENIX MOBILE or STUDIO audiocodec to connect the Router and a
PHOENIX STUDIO in the radio station, connected to an Ethernet network with Internet access or a
ADSL router.
Both studied routers require an initial configuration, based on an integrated web-browser, using the
information supplied by the manufacturer (that can be found in their web), more or less complex as
a function of the environment we are using the routers in. We recommend that the units are set up
correctly first using a direct connection to a laptop, and once we can reach Internet, (something
that we can easily test by accessing a common web site), we can connect the audio codec. If
required, an Ethernet switch can be used so we can keep to laptop connected and hence use the
connectivity testing tools.
The configurations of the router and codec have to be carried out the first time they are used, or
when you change the 3G provider, router or codec. Once everything is connected and correctly
configured, you only need to dial in the codec to establish a communication.
APLICACIONES ELECTRONICAS QUASAR S.A.
2
C/ Margarita Salas 24, 28919 LEGANÉS. MADRID (SPAIN) Tel.:(34) 91 686 13 00 * FAX: (34) 91 686 44 92 .E-mail: [email protected] . Web: www.aeq.eu
N.I.F. :A-28620649
We will next detail the setup of both equipments (Sitecom and Sierra) as a couple of examples, but
similar concepts can be applied when using the Phoenix codecs together with any other similar
device.
2. SITECOM ROUTER SETUP
First you must choose a 3G modem that is certified by your 3G provider, and that has USB
interface compatible with the SITECOM unit. The following link lists all the compatible modems:
http://www.sitecom.com/download/4730/Sitecom_3G-supported-list-20101220.pdf
NOTE: The setup must be done with the laptop connected via WiFi (according to paragraph 2.1) or
using a cable and the Ethernet port (according to paragraph 2.2).
2.1 WiFi connection
Connect the 3G USB modem to the USB Sitecom router port and turn it on. If your laptop is able to
connect to WiFi networks, please search for the Wireless Network Administrator and connect to a
network called “SITECOM ABB 504” or similar
If this is the first time you connect, you will be prompted for the WAP 2 security twice. This code is
a 12-characters alphanumeric code that can be found at the bottom of the Sitecom unit, together
with the rest of important data such as the IP address, user, password and SSID.
You must force Windows to obtain the IP address automatically.
(Explanation for Windows XP)
If you are usually connected to a LAN with manually-assigned IP address (ask your network
administrator if not sure), follow these steps (make sure that the Control Panel window is set to
“classic view”)
At Start
Control Panel
and select Properties.
•
Network Connections, right-click over “Wireless network connections”
In the General tab, select Internet Protocol (TCP/IP)
APLICACIONES ELECTRONICAS QUASAR S.A.
3
C/ Margarita Salas 24, 28919 LEGANÉS. MADRID (SPAIN) Tel.:(34) 91 686 13 00 * FAX: (34) 91 686 44 92 .E-mail: [email protected] . Web: www.aeq.eu
N.I.F. :A-28620649
•
•
•
Click on Properties.
In the General tab, check the Automatically obtain an IP address option.
Accept, apply changes and close the Control Panel (in some cases you will need to
reboot the PC).
2.2 Connecting through Ethernet Port
Connect the 3G modem to the Sitecom Router’s USB port and turn it on. Connect the Ethernet
cable from the router to the Ethernet card of your laptop and force the automatic assignation of the
IP address as described above (this time go to Start
Control Panel
Network Connections,
right-click over “Local Area connection” select Properties and continue with the same procedure)
2.3 Accessing and using the SITECOM router configuration software
(Explanation for Microsoft Internet Explorer)
If you are usually connected to a LAN with internet access through a Proxy server or you are
unsure of this, please do the following::
•
•
•
•
•
•
Open your web browser
Go to Tools / Internet options and open the tab Connections.
Click on LAN Configuration
In the Automatic Configuration area, make sure that the option “Automatically detect
configuration” is checked.
Plase make sure that the option “Use a Proxy server for LAN” is NOT activated in
the Proxy Server area.
Accept, apply changes and close the browser (you will sometimes need to reboot
the PC)
Open your internet browser and type the IP address of the Sitecom router (that can be found
written on its bottom) with the following format: “http:// 192.168.0.1”. Then press ENTER.
Next, type the user and password in (by default, “admin” / “admin”, although it can be modified
aftwerwards).
APLICACIONES ELECTRONICAS QUASAR S.A.
4
C/ Margarita Salas 24, 28919 LEGANÉS. MADRID (SPAIN) Tel.:(34) 91 686 13 00 * FAX: (34) 91 686 44 92 .E-mail: [email protected] . Web: www.aeq.eu
N.I.F. :A-28620649
User name: admin.
Password: admin
You will be shown this screen:
Check the battery status and connect the external charger if needed:
If you want, you can change the language at the right of the brown menu bar. Click on Next.
The 150N router has a Wizard that will help you configure the unit in only a few minutes. You only
need to know some required data in advance to complete the setup. Click on the brown “Wizard
(Asistente)” tab and follow the steps shown.
APLICACIONES ELECTRONICAS QUASAR S.A.
5
C/ Margarita Salas 24, 28919 LEGANÉS. MADRID (SPAIN) Tel.:(34) 91 686 13 00 * FAX: (34) 91 686 44 92 .E-mail: [email protected] . Web: www.aeq.eu
N.I.F. :A-28620649
In our tests we have had to select the option “Mobile 3G” instead of the country in the field
“Country”, and press Next.
Then next windows must be filled with the data corresponding to your Service Provider: PIN code,
APN, etc. It seems that this equipment is not compatible with PIN-less cards, so the PIN is
mandatory.
The router manual shows a list of all the service
http://www.sitecom.com/download/4721/3G_ISP_Settings.pdf
providers,
by
country:
For example, for Spain:
VODAFONE
APN:
ac.vodafone.es
Username:
vodafone
Password:
vodafone
Telephone nr.:
*99#
MOVISTAR
APN: movistar.es
ORANGE
APN: internet
YOIGO
APN: internet
Username:
movistar
User: orange
User: [blank]
Password:
orange
Password: [blank]
Password:
movistar
Telephone nr.:
*99#
SIMYO
APN: gprsservice.com
Username: [blank]
Telephone nr.:
*99#
Password: [blank]
Telephone nr.:
*99#
APLICACIONES ELECTRONICAS QUASAR S.A.
Telephone nr.:
*99#
6
C/ Margarita Salas 24, 28919 LEGANÉS. MADRID (SPAIN) Tel.:(34) 91 686 13 00 * FAX: (34) 91 686 44 92 .E-mail: [email protected] . Web: www.aeq.eu
N.I.F. :A-28620649
Fill the data in and click on “Apply”. At this moment the router is ready to access Internet.
Sometimes you will be asked to reboot the computer. Please note that the browser will then loose
the configuration URL (http:// 192.168.0.1) and you will force again the connection to the WiFi
provided by the Sitecom router if the PC automatically connects to any other at reach. You may
need to reboot the computer once again.
Click on the “Status” tab in the brown tab, then in Internet Status.
In this screen, please check that:
APLICACIONES ELECTRONICAS QUASAR S.A.
7
C/ Margarita Salas 24, 28919 LEGANÉS. MADRID (SPAIN) Tel.:(34) 91 686 13 00 * FAX: (34) 91 686 44 92 .E-mail: [email protected] . Web: www.aeq.eu
N.I.F. :A-28620649
•
•
•
•
The 3G signal indicator is above 30%.
3G USB MODEM Status is Ready (listo)
SIM Status is Ready
IP address, mask, gateway and DNS are filled with valid data.
Close the browser and disconnect your computer from the SITECOM network (WiFi or wired).
Don’t turn the router off and connect the Ethernet cable to the PHOENIX MOBILE
3. SIERRA WIRELESS ROUTER SETUP
The procedure for this router is very similar to Sitecom’s, paying attention to the following
differences:
The unit has onboard 3G network access, so no USB modem is required and the SIM card is held
inside the unit itself. You must disassemble the front panel to access the SIM card receptacle and
insert it. PIN-less card are also accepted in this case.
Close the unit, connect a suitable antenna to the coax. connector (preferably use a directive one)
and the LAN network to the PC. Next, turn the equipment on and boot the PC.
The Power LED will be lit and the Signal LED will blink or remain ON as a function of the signal
strength found.
You will find a quick manual for the unit (Raven_XE_QuickStart[1].pdf ) as well as the user’s
manual (Raven XE HSPA User Guide[1].pdf).
http://www.sierrawireless.com/en/sitecore/content/Sierra%20Wireless/Support/Downloads/AirLink/
M2M_Gateways/AirLink_Raven_XE_HSPA_World_Edition.aspx
However, we don’t recommend using the AceManager.exe software supplied at no cost in the web,
as the web-browser based procedure is simpler and incorporated in the unit.
It is very important that the router is configured in a well-controlled environment. We recommend
that the only equipments connected are the router itself and a laptop. At most, you can add a
switch and the Phoenix Audiocodec (this one should be off until we can reach Internet with the
router).
Open the explorer and type the IP address and port (9191 by default): http://192.168.13.31:9191
Please also note that the final slash (“/”) introduced by the browser should be deleted:
http://192.168.13.31:9191/
It is possible that you need to temporarily deactivate your antivirus.
If the router webpage is not displayed, please have your configuration revised by something with
network knowledge (go to Control Panel
Network Connections
Local Area Network, right click
on Properties)
APLICACIONES ELECTRONICAS QUASAR S.A.
8
C/ Margarita Salas 24, 28919 LEGANÉS. MADRID (SPAIN) Tel.:(34) 91 686 13 00 * FAX: (34) 91 686 44 92 .E-mail: [email protected] . Web: www.aeq.eu
N.I.F. :A-28620649
Try to ping 192.168.13.31, test that the Laptop IP address is something like 192.168.13.xxx or
allow automatic detection using DHCP. Check that your gateway is 192.168.13.31. Execute
ipconfig/renew and try again.
You will finally reach the access page:
Please type:
User : User
Password :12345
Next, go to the “Wan Cellular” tab and type the APN, Network User ID, Network Password and SIM
PIN. Have in mind that this unit admits SIM-disabled cards.
APLICACIONES ELECTRONICAS QUASAR S.A.
9
C/ Margarita Salas 24, 28919 LEGANÉS. MADRID (SPAIN) Tel.:(34) 91 686 13 00 * FAX: (34) 91 686 44 92 .E-mail: [email protected] . Web: www.aeq.eu
N.I.F. :A-28620649
You can check the signal levels (RSSi, EC/IO) in the “Status” tab. In this tab you can also check
that the provider has been recognized, the operating cell ID and other details.
With this configuration and having checked the mentioned items, the router should be working and
accessing Internet. Check this by opening another browser windows and trying to connect to a
known website. You can find more less relevant information in the manuals.
4. PHOENIX MOBILE CONNECTION
Connect the LAN interface to the PHOENIX MOBILE to the Ethernet port
of a previously-configured and internet-tested 3G router, as explained in
chapters 2 and 3. Use a normal or crossover Ethernet cable. No
additional connections are required (except for the audio inputs/outputs,
of course)
5.- PHOENIX MOBILE CONFIGURATION
When a Phoenix audiocodec is connected to a network, first we must have a free IP address
(within the IP range allowed for the equipments of the network) at our disposal. In order to easily do
this, we must activate DHCP (Dynamic Host Configuration Protocol). This one is a network
protocol that allows the nodes within a network to obtain their configuration parameters
automatically from a server. This way, with active DHCP, the router, that will become the DHCP
server, will provide an IP address to the Phoenix.
APLICACIONES ELECTRONICAS QUASAR S.A.
10
C/ Margarita Salas 24, 28919 LEGANÉS. MADRID (SPAIN) Tel.:(34) 91 686 13 00 * FAX: (34) 91 686 44 92 .E-mail: [email protected] . Web: www.aeq.eu
N.I.F. :A-28620649
In order to activate DHCP in the Phoenix Mobile, follow these steps:
Menu->Advanced->Communications->Ethernet Config, enable DHCP (ON)
If your firmware is not updated to one of the last versions, you must turn Phoenix Mobile off, then
on at this point. If the operation has been completed correctly, you must see that the upper left
corner icon, representing a switch, has a blue background.
Next, please connect the Phoenix Mobile and configure it to work in SIP mode, just the same way
we would do if it was directly connected to a LAN.
Go to,,,
Menu->Advanced->Communications->Sip Config->proxy
Check / correct:
“Activate”: ON
“Address”: 88.2.202.39
“Realm” and “Domain”: sip.aeq.es
“User” and “password” are alphanumeric fields and they should be filled in.
If the operation has been completed correctly, you must see that the upper left corner icon has a
blue background.
Return to main screen (showing 5 faders) by pressing BACK key repeatedly, then CLOSE central
key). If you can read “COORD” in the lower-central part, then press the CHANNEL soft key to
change to PROGRAM mode.
Make sure that the used channel (program or coordination) is assigned to Ethernet slot. In order to
check that, do the following:
Go to Menu > Advanced>Modules Config > Ch. Program > Ethernet.
To go back, press BACK button and CLOSE until you reach the main screen showing five faders.
Press CHN key (at the right side of the unit) in order to select the address of the remote unit (in this
case Phoenix Master) and make the call.
You must type:
URI: [email protected] (case sensitive)
P: G722
Max Rx Buffer Size (ms): 1000
Then press the green key to make the call
If you have a set of headphones and the incoming
audio is routed to them, you should hear music
and a voice message from phoenixMaster.
APLICACIONES ELECTRONICAS QUASAR S.A.
11
C/ Margarita Salas 24, 28919 LEGANÉS. MADRID (SPAIN) Tel.:(34) 91 686 13 00 * FAX: (34) 91 686 44 92 .E-mail: [email protected] . Web: www.aeq.eu
N.I.F. :A-28620649
Next, substitute the field “ Call to: contact” in the
main screen by your reporter’s URI and you will
establish a communication with him after pressing
the green key.
6. PHOENIX STUDIO CONNECTION
Connect the LAN1 interface at the back of the Phoenix Studio to the LAN port of a previouslyconfigured and internet-tested 3G router, as explained in chapters 2 and 3. Use a normal or
crossover Ethernet cable. No additional connections are required, except, of course, for the
required audio inputs/outputs.
7.- PHOENIX STUDIO CONFIGURATION
When a Phoenix audiocodec is connected to a network, first we must have a free IP address
(within the IP range allowed for the equipments of the network) at our disposal. In order to easily do
this, we must activate DHCP (Dynamic Host Configuration Protocol). This one is a network
protocol that allows the nodes within a network to obtain their configuration parameters
automatically from a server. This way, with active DHCP, the router, that will become the DHCP
server, will provide an IP address to the Phoenix.
In order to activate DHCP for the Phonixx Studio, enter MAIN MENU
SYSTEM
8.SETTINGS
ETHETNET SETTINGS
ETHERNET MODULE 1, where we will set DHCP = ON. The rest of
parameters shown in this screen will be filled in automatically.
IP configuration screen
We have described in chapter 5 how to set up a Phoenix Mobile to operate in PROXY SIP mode,
using the AEQ SIP server. Now, we will explain how to do it with a Phoenix Studio and,
additionally, how to operate in two more modes that don’t require the services of the AEQ SIP
server: SIP DIRECT (also supported by Phoenix Mobile) and RTP PUNTO A PUNTO (not available
in Phoenix Mobile)
In a nutshell, as a function of the call type and the network environment, there are three IP modes
APLICACIONES ELECTRONICAS QUASAR S.A.
12
C/ Margarita Salas 24, 28919 LEGANÉS. MADRID (SPAIN) Tel.:(34) 91 686 13 00 * FAX: (34) 91 686 44 92 .E-mail: [email protected] . Web: www.aeq.eu
N.I.F. :A-28620649
in AEQ Phoenix Studio: PROXY SIP, DIRECT SIP and RTP POINT TO POINT. All of them are
selectable from MAIN STATUS
SYSTEM
5 - INTERFACES
Net 1 STATUS
MODE. We
recommend that you try to establish the communications in the suggested order, and move to the
next operating mode only if problems are found.
7.1. Making a call in PROXY SIP mode
In this operating mode, the IP address of the AEQ Phoenix Studio units that are implied in the
communication is a parameter the user shouldn’t care, as the connection makes use of the AEQ
SIP server resources to translate the specified URI to a particular IP address.
•
Setup the PROXY SIP call mode:
MAIN STATUS
•
SYSTEM
5 - INTERFACES
Net 1
MODE = PROXY SIP
Press the CALL key associated to the first channel of the audiocodec, that is, the leftmost
among both CALL keys in the AEQ Phoenix Studio front panel. The display will show the
Connection Configuration menu. Verify that all the fields contain valid data:
o
Check that the assigned IP logical interface is: INTERFACE = Net 1
o
Select an audio coding profile. For this test, G722 may be good enough: CODING
(List): ONLY G722
o
Once the connection is established, you can repeat it whenever necessary and
change the coding algorithm CODING (List): press and select, edit until you reach
the best possible quality allowed by the network.
Detail of the coding algorithm list selection screen
o
Select the adaptive RX buffer mode and specify the buffer size:
RX BUFFER MODE: ADAPTATIVE. RX BUFFER (MAX): 1000 . This is a good
number to start with. Similarly to the coding algorithm, you can repeat and adjust
this parameter as many times as you need to reach the best possible delay allowed
by the network without dropouts.
o
•
You can configure a backup mode. The corresponding menu is BACK UP. By the
moment we won’t use backup and hence we’ll set BACK UP
OFF NO
INTERFACE
Using the front alphanumeric keyboard, type the remote equipment’s URI with the following
format: <equipment_name>@sip.aeq.es
AEQ provides a test unit with audio at the IP address 212.170.163.189 or URI
name [email protected]. A free SIP server is also available at
88.2.202.39 (sip.aeq.es) that is guaranteed to operate under the official SIP
standard.
We recommend that you first make a test call to: [email protected]. Press
the corresponding CALL key at the front of the unit or select the DIAL option with the
proper soft key to launch the call.
APLICACIONES ELECTRONICAS QUASAR S.A.
13
C/ Margarita Salas 24, 28919 LEGANÉS. MADRID (SPAIN) Tel.:(34) 91 686 13 00 * FAX: (34) 91 686 44 92 .E-mail: [email protected] . Web: www.aeq.eu
N.I.F. :A-28620649
•
Call status will be continuously shown in the OLED screen. It should be CALLING, then
CONNECTING, SYNCHRONIZING and finally CONNECTED.
•
Verify that the SYNC LED under the CALL button is lit green as a signal that the
communication has been established and synchronised properly:
Detail of a properly established connection
•
•
Press the ON AIR key associated to the communications channel to allow the transmission
and reception of audio through that interface in full-duplex mode. (see above figure)
When you receive good audio from phoenixMaster, repeat the call to your preferred
destination.
7.2. Making a DIRECT SIP call
In this operating mode no AEQ resources (SIP server, sip.aeq.es) are used. Conversely, the
dialling is made using the destination IP address. It still has the advantage of using the SIP protocol
to establish and synchronising the connection and manage the coding profiles.
•
Set the operating mode to DIRECT SIP:
MAIN STATUS
•
SYSTEM
5 - INTERFACES
Net 1
MODE = DIRECT SIP
Press the CALL key associated to the first channel of the audiocodec, that is, the leftmost
among both CALL keys in the AEQ Phoenix Studio front panel. The display will show the
Connection Configuration menu. Verify that all the fields contain valid data:
o
Check that the assigned IP logical interface is: INTERFACE = Net 1
o
Select an audio coding profile. For this test, G722 may be good enough: CODING
(List): ONLY G722
o
Once the connection is established, you can repeat it whenever necessary and
change the coding algorithm CODING (List): press and select, edit until you reach
the best possible quality allowed by the network.
o
Select the adaptive RX buffer mode and specify the buffer size:
RX BUFFER MODE: ADAPTATIVE. RX BUFFER (MAX): 1000 . This is a good
number to start with. Similarly to the coding algorithm, you can repeat and adjust
this parameter as many times as you need to reach the best possible delay allowed
by the network without dropouts.
o
•
You can configure a backup mode. The corresponding menu is BACK UP. By the
moment we won’t use backup and hence we’ll set BACK UP
OFF NO
INTERFACE
Type
the
destination
equipment’s
URI
with
the
following
format:
<dest_equipment_name>@<dest_IP_address> with the IP address in the usual X.X.X.X
APLICACIONES ELECTRONICAS QUASAR S.A.
14
C/ Margarita Salas 24, 28919 LEGANÉS. MADRID (SPAIN) Tel.:(34) 91 686 13 00 * FAX: (34) 91 686 44 92 .E-mail: [email protected] . Web: www.aeq.eu
N.I.F. :A-28620649
format. This IP address must be public. Private IP addresses are not valid (check Appendix
C of the Phoenix Studio User Manual)
AEQ provides a test unit with audio at the IP address 212.170.163.189 or URI
name [email protected]
We recommend that you first make a test call to:
[email protected]
•
Press the corresponding CALL key at the front of the unit or select the DIAL option with the
proper soft key to launch the call.
Detail of a calling AEQ Phoenix Studio
•
Call status will be continuously shown in the OLED screen. It should be CALLING, then
CONNECTING, SYNCHRONIZING and finally CONNECTED.
•
Verify that the SYNC LED under the CALL button is lit green as a signal that the
communication has been established and synchronised properly:
Detail of a properly established connection
•
Press the ON AIR key associated to the communications channel to allow the transmission
and reception of audio through that interface in full-duplex mode. (see above figure)
•
When you receive good audio from phoenixMaster, repeat the call to your preferred
destination.
7.3. Establishing a RTP POINT TO POINT communication
This is the traditional (i.e., before SIP) IP communication mode. It implies operation in both ends.
The coding algorithm must be previously agreed and manually set to be the same in both units.
•
Set the RTP POINT TO POINT mode:
MAIN STATUS
•
SYSTEM / 5
INTERFACES
Net 1
MODE = RTP Point to Point
Press the CALL key associated to the first channel of the audiocodec, that is, the leftmost
APLICACIONES ELECTRONICAS QUASAR S.A.
15
C/ Margarita Salas 24, 28919 LEGANÉS. MADRID (SPAIN) Tel.:(34) 91 686 13 00 * FAX: (34) 91 686 44 92 .E-mail: [email protected] . Web: www.aeq.eu
N.I.F. :A-28620649
among both CALL keys in the AEQ Phoenix Studio front panel. The display will show the
Connection Configuration menu. Verify that all the fields contain valid data:
o
Check that the assigned IP logical interface is: INTERFACE = Net 1
o
Select an audio coding algorithm. For this test, G722 may be good enough:
CODING: G722
o
Once the connection is established, you can repeat it whenever necessary and
change the coding algorithm CODING (List): press and select, edit until you reach
the best possible quality allowed by the network.
o
Select the adaptive RX buffer mode and specify the buffer size:
RX BUFFER MODE: ADAPTATIVE. RX BUFFER (MAX): 1000 . This is a good
number to start with. Similarly to the coding algorithm, you can repeat and adjust
this parameter as many times as you need to reach the best possible delay allowed
by the network without dropouts.
o
You can configure a backup mode. The corresponding menu is BACK UP. By the
moment we won’t use backup and hence we’ll set BACK UP
OFF NO
INTERFACE
•
Type the destination IP address in, in the usual X.X.X.X format. Note that this address must
always be public. Private IP addresses are not valid. valid (check Appendix C of the
Phoenix Studio User Manual)
•
Press the corresponding CALL key at the front of the unit or select the DIAL option with the
proper soft key to launch the call.
•
Repeat the above steps in the unit at the other end.
•
Call status will be continuously shown in the OLED screen. It should be CALLING, then
CONNECTING, SYNCHRONIZING and finally CONNECTED.
•
Verify that the SYNC LED under the CALL button is lit green as a signal that the
communication has been established and synchronised properly:
•
Press the ON AIR key associated to the communications channel to allow the
transmission and reception of audio through that interface in full-duplex mode.
APLICACIONES ELECTRONICAS QUASAR S.A.
16
C/ Margarita Salas 24, 28919 LEGANÉS. MADRID (SPAIN) Tel.:(34) 91 686 13 00 * FAX: (34) 91 686 44 92 .E-mail: [email protected] . Web: www.aeq.eu
N.I.F. :A-28620649