1
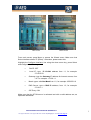
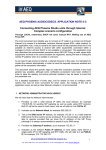
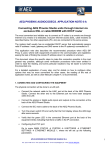
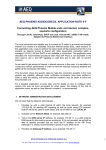
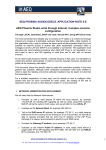
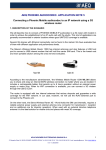
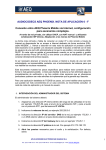
AEQ PHOENIX AUDIOCODECS. APPLICATION NOTE 0-D
Connecting AEQ Phoenix Mobile units via Internet, complexscenario configuration
Through LOCAL network(s), DHCP not used, manual NAT. Making use of AEQ
Proxy SIP. Adapted to Phoenix Mobile User Interface
The most convenient and reliable way to connect an IP codec to a remote one through
Internet is by means of a dedicated, exclusive Internet access (DSL, cable modem). In
this application note, a way to achieve the same result will be proposed when this is not
possible as Internet access is shared with other equipments connected within a
managed, LOCAL LAN and DHCP is not available or convenient. This application note
also describes the recommended procedure when AEQ SIP Proxy is used, where both
equipments involved in the communication are registered, easing the task of finding the
remote IP address when it is variable or unknown.
As we need to get access to Internet, a shared resource in this case, it is mandatory to
contact the network administrator in order to have the required resources enabled and
gather all the necessary information.
This document shows the specific steps to make this connection possible in the most
general way possible, although some verification procedures have been omitted in
order to ease the reading, and some particular situations may be easier to solve that
the presented one.
For a detailed explanation of every step, and for details on how to configure other
options that may be more convenient for other cases, the reading of the rest of
application notes, as well as User Manual’s chapter 4, is recommended.
1. NETWORK ADMINISTRATION INVOLVEMENT
We will need that the Network Administrator…
1. Provides us with a valid internal IP within the local network, for example
172.26.5.59, for sending SIP signaling as well as audio using RTP protocol.
Both IP will be the same in both cases, and we will refer to it as LOCAL IP.
2. Indicates us the Network Mask, for example 255.255.0.0
3. Tell us the DNS server IP address, for example 172.26.1.1 or a valid external
DNS server for the country we are working at. If it is not provided, we will still be
able to operate provided that we know the IP address of the SIP Proxy
(although it is always recommended to specify it by its DNS name)
4. Provides the Gateway IP address, as an example 172.26.1.1
5. Indicates us the network Public IP address. In most cases, there will be a
single public IP for SIP signaling and RTP traffic. We will refer to it as PUBLIC
IP, for example, 212.170.180.170
APLICACIONES ELECTRONICAS QUASAR S.A.
TEL: (34) 91 686 13 00 - FAX: (34) 91 686 44 92 - E-mail: [email protected] - Web:
1
www.aeq.eu
6. Opens the required ports for audio and signaling. These ports are, by default:
•
SIP signaling PORT (SIP LOCAL PORT): 5060
•
Ports for audio transmission and control (RTP and RTCP protocols): 5004
and 5005, respectively.
•
STUN ports: 3478 & 3479.
2. CONNECTING AND CONFIGURING THE EQUIPMENT
The physical connection will be done to a LAN port.
•
Connect the network cable to the LAN1 port at the back of the AEQ Phoenix
Mobile. Connect the other end to the Ethernet port to the router LAN port.
•
Connect at least a microphone and a pair of headphones to the front audio XLR
connectors of the Phoenix Mobile
•
Connect the power supply cable to the AEQ Phoenix Mobile. If it is equipped
with a battery pack and mains power is not available, you can omit this step.
•
Press the ON button at the left side of AEQ Phoenix Mobile. Verify that the main
display is illuminated.
•
Verify, at the back of the unit, that the green LED at the right of the Ethernet
port starts blinking indicating that the IP connection is active.
•
Configuring the Ethernet port and assignation of Program channel:
Make sure that we are selecting “Program” in the main screen (the one
representing faders and vumeters). At the lower center area you should read
“Program”. Also, by pressing MENU we enter the Wizard menu that should
have a PROGRAM legend at the top center area. If COORDINATION appears
instead in any of both places, just press Channel key and channel will be shifted
to PROGRAM.
APLICACIONES ELECTRONICAS QUASAR S.A.
TEL: (34) 91 686 13 00 - FAX: (34) 91 686 44 92 - E-mail: [email protected] - Web:
2
www.aeq.eu
Main screen
Wizard screen
From main screen press Menu to access the Wizard menu. Make sure that
Select Interface shows “IP (Ether)”. Otherwise, please select this.
Highlight the Configure Interface, line using the down arrow key, press Select
and configure the following:
•
DHCP: OFF
•
Local IP: type IP LOCAL address from 1.1, for example:
172.26.5.59
•
Gateway: type the Gateway IP address for Internet access, from
1.4. For example: 172.26.1.1
•
Mask: type a valid Net Mask from 1.2, for example: 255.255.0.0
•
DNS Server: type a DNS IP address, from 1.3, for example:
172.26.1.1
•
SIP Proxy: ON
Make sure that the STUN server is activated and with a valid address set, as
explained afterwards.
APLICACIONES ELECTRONICAS QUASAR S.A.
TEL: (34) 91 686 13 00 - FAX: (34) 91 686 44 92 - E-mail: [email protected] - Web:
3
www.aeq.eu
3. OTHER POINTS TO CHECK
We are now going to quickly overview the rest of configuration menus where it is
recommended to check that every parameter is correctly configured.
Coding Algorithm
At the Wizard menu Sel.Codec should be G722, for a start, although you can
change this at a later stage for better quality. In order to change the coding
algorithm by another pre-selected one, just select the Sel.codec line, press
Select and select one within the new window shown. In order to choose the
particular coding modes in each list shown in the Sel.codec menu, go to Menu
ADVANCED
6. Link profiles
Select
Options.
The audio routing will be most likely correct by default to send Mic 1 audio to
the transmission and send the received stream to HP1 headphone output. You
can, however, make sure of this from Menu
ADVANCED
3. Audio Settings
Select.
Configure the rest of parameters after reading the manual according to your particular
needs.
PROXY SIP Configuration
You can make sure that this is correct from the main screen: Menu
ADVANCED
5. Communications
3. SIP config
1. Paramteters:
Check that User Name is filled with a user identifier that is previously registered
at the AEQ SIP server (for example: phoenix_123).
STUN Protocol
2 Activate ON
This is important and recommended, as it will ease connecting to other
equipment that is behind a router in a local network.
3 Server: At the moment of writing this document, the following STUN server is
recommended: “stun.voxgratia,org” (IP=83.103.82.85)
If the DNS Server field in the communications menu hasn’t been configured,
you must substitute the STUN name by its IP.
4 Port : 3478
Press “back” key in order to go to 3. SIP config
2. Proxy and check:
1 Activate ON
2 Address: sip.aeq.es.
APLICACIONES ELECTRONICAS QUASAR S.A.
TEL: (34) 91 686 13 00 - FAX: (34) 91 686 44 92 - E-mail: [email protected] - Web:
4
www.aeq.eu
If the DNS Server field in the communications menu hasn’t been configured,
you must substitute the SIP server name (“sip.aeq.es”) by its IP,
82.165.157.20 at the moment of writing this document.
3 USER must have the same text value as USER NAME from the former menu,
followed by “@sip.aeq.es”, for example: [email protected]
4 Check that a correct password is typed in. (“aeq” by default)
5 Check that REALM is “sip.aeq.es”.
6 Check that DOMAIN is “sip.aeq.es”.
7 Check that EXPIRES = 60
Press “back” in order to go to 3. SIP config, go to 4. Call Settings and
check that Media PORT is the one opened by the Network Administrator
(paragraph 1.6, 5004 by default)
4. REGISTERING AT THE AEQ SIP SERVER
If everything is correctly configured, after these steps the unit should have registered at
the AEQ SIP server and the top line of every screen should display the current time.
In case it is not registered, if the equipment power is cycled, the sequence of legends
ad the top line should be:
<Current time>
Inicializing
Finding Nat Tipe
Register Error
If this happens, just double-check that the configuration is correct and, if necessary,
ask one of our technical assistance services for support.
If the unit registers correctly, the sequence will be:
<Current time>
Inicializing
Finding Nat Tipe
<Current time>
5. SENDING A TEST CALL TO PHOENIX MASTER
We are going to go through the correct configuration of the system and prepare it to
make a test call to a unit called [email protected] that AEQ maintains for our
APLICACIONES ELECTRONICAS QUASAR S.A.
TEL: (34) 91 686 13 00 - FAX: (34) 91 686 44 92 - E-mail: [email protected] - Web:
5
www.aeq.eu
customers and that continuously transmits audio at the public IP address
212.170.163.189 .
Check that a set of headphones are connected to the front HP1 connection.
Check that AEQMaster_IP entry is listed in the Call Book and launch the call. In order
to do so…
From main screen: press Menu. Observe the “Select contact” line. If it is:
Select contact:
AEQMaster_IP
…everything is ready and the call is sent only by pressing the green key.
If the line “Select contact” presents a different name than AEQMaster_IP at its right, just
select this line and press “select” key. The call book will be presented. Just select
AEQMaster_IP from the list, press OK to close the list and then finally press the green
key.
If the contact was not already created in the Call Book, you can create it from the
menu:
Main screen
Menu
ADVANCED
2. Contacts. With the help of the user manual,
create a new contact with the following parameters:
Contact: AEQMaster_IP
Module Type: IP
URI: [email protected]
(when PROXY SIP = ON , the unit understands that, if “@sip.aeq.es” is omitted,
the destination is registered in the same server as this unit.
Speed Dial (n): (leave it as it was).
•
The top line at the screen displays (usually very fast) the status of the call, and
the different phases it goes through: Calling, Synchronizing and finally
Connected.
•
The second line should show AEQMaster_IP
•
The third line should show G722 or the current audio coding scheme.
If the remote unit is busy, the top line will show “Busy (486)”
•
Verify that the LED at the side of “TX PROG SYNC” key is lit green, as an
indication that the communication has been successfully established and
synchronized. If the key above HP1 is activated (illuminated) and the
APLICACIONES ELECTRONICAS QUASAR S.A.
TEL: (34) 91 686 13 00 - FAX: (34) 91 686 44 92 - E-mail: [email protected] - Web:
6
www.aeq.eu
corresponding fader is open, the audio received from Phoenix Master should be
heard at the headphones.
Once the connection is OK, you can retry as many times as needed varying the
selected audio coding scheme in order to get the best possible quality allowed by the
network (Wizard Menu
Sel Codec.)
The list of available coding algorithms can be created in Menu
Link Profiles
Select
ADVANCED
6.
6. SENDING A CALL TO ANOTHER PHOENIX OR N/ACIP COMPATIBLE CODEC
The test call sent to AEQMaster_IP has been automatically answered. In order to make
a manual call to other codec, you must configure the second one the same way as the
first unit, provided that it is also connected directly to a LAN with managed router. If it is
not, just follow the corresponding Internet access application note AN0A or AN0B.
Once the reporter equipment connects properly to AEQMaster_IP, you can create for
convenience new entries in the call book: Menu
ADVANCED
2. Contacts , with
the name and URI of the remote unit, the same way it was done for Phoenix Master in
the previous chapter, and then easily make calls to them.
You can of course also send the calls without having previously created a Call Book
entry from the main screen, by pressing Menu to go to the Wizard. Select the Call to
line, press Select and “URI” is selected. Then type the desired destination URI in the
line below (select “Enter URI”, then press OK and type the URI in). For this
communications mode based on a SIP server, you only need to introduce the name of
the unit (for example, “Phoenix_123”).
The call indications (optical and also acoustical, if enabled) will be activated at the
destination codec, that will either wait for the user to answer the call or automatically
off-hook (if this mode is enabled), and then establish the connection. The LED next to
TX PROG should become green lit and audio should be heard through the
headphones.
The three first screen lines should be:
Connected
<equipment name>@sip.aeq.es
<coding scheme>
APLICACIONES ELECTRONICAS QUASAR S.A.
TEL: (34) 91 686 13 00 - FAX: (34) 91 686 44 92 - E-mail: [email protected] - Web:
7
www.aeq.eu
For more information and other configuration options, please read the User Manual and
Application Notes corresponding to other scenarios. If you still have doubts, please
don’t hesitate to contact one of our assistance services:
[email protected]
[email protected]
APLICACIONES ELECTRONICAS QUASAR S.A.
TEL: (34) 91 686 13 00 - FAX: (34) 91 686 44 92 - E-mail: [email protected] - Web:
8
www.aeq.eu