1
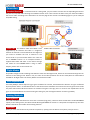
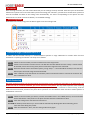
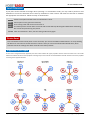
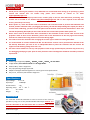
X6 User Manual V1.0
Parameters
After entering a function, the color of the LED shows you the settings currently selected. Each short press of the button
advances the option to the next value. When you finish making your selections, just wait for 5 seconds then system will
save the modified and back to the setting menu automatically. The colors corresponding to the options for each
parameter are as shown in the chart below. (* is the default setting).
Exit Setting Mode
When back to the menu, long press the button again to exit the setting mode.
Throttle Range Calibration for ESCs
To obtain the best throttle linearity it is recommended to perform a range calibration for all ESCs after first-time
installation or replacing of new ESCs. The steps are as follows.
Step 1
Step 2
Switch on the transmitter, move the throttle stick to the top position.
Power on the controller and the receiver. The LED will turn Blue & Red. Then two “beep-“ sounds should
be emitted, means that the top point position of throttle range has been confirmed.
Step 3 Move the throttle stick to the bottom quickly, a long “beep----“ sound should be emitted, means that the
bottom point of throttle range has been detected.
Step 4 After calibration, keep the throttle at its bottom position and wait for about 5 seconds the controller will
start initialization as usual.
Stick Centering
Normally you don’t need to use the trim and sub-trim functions of your transmitter. Especially in 3D flight mode, the
X6 will see trim as a control command, just set all of them to zero please. You only need to perform stick centering
once after first-time installation or replacing of a new radio system. However, sometimes a small trimming could be
used to fine-tune the level position of the plane when operation it in auto-balance mode. You don’t need to perform a
recalibration in this case.
Step 1
Switch on the transmitter, put aileron, elevator and rudder sticks in the middle position, move the throttle
stick to the bottom. Then power on the plane and wait until the initialization is done.
Step 2 Enter the setting menu and choose the function 4.
Step 3 The whole process takes only 1 second and the LED will keep blinking Blue while calibrating, don’t
move the sticks during this period.
Step 4 After the calibration is done, exit the setting mode and fly again.
http://www.hobbyeagle.com
3/4
[email protected]