1
CSUCI Student Housing TV Service Students living in residential housing at CSUCI will find a conveniently located television wall jack in each
bedroom. This cable TV connection is always live, and currently includes a variety of 60 channels of
programming. To help you enjoy this television service, please consider the following information when
preparing to move into Santa Cruz or Anacapa Village:
Before coming to campus, be sure to pack the following items to make your experience with CSUCI cable
TV an easy one:
•
•
•
•
Cable-ready TV (Older television sets that are not “cable ready” can use a VCR as a tuner if
needed. Follow Manufacturer’s instructions for this setup.)
The original remote control unit for your TV.
A coaxial cable
Your owner's manual(s)
The CSUCI Student Housing Cable TV system allows residents to simply and directly connect their
televisions to the cable outlet in each residence hall room. CSUCI in conjunction with Dish Network
insures that there is a good signal at the wall jack when students arrive. It is the individual user's
responsibility to have working equipment and to do any required setup of their equipment (which is where
the appropriate user manuals come in.) Below, you will find basic information on connecting and setting
up your television for proper operation on the CSUCI Student Housing Cable TV system.
Connecting a television set to the CSUCI Cable system is an easy process, but one that may be new to
many students. The best way to insure your ability to start enjoying your CSUCI Cable TV service right
away is to bring along the User’s Manual for your television and other related equipment. CSUCI Student
Housing and CSUCI IT staff are not able to provide setup assistance for television service, so it is
important to have a manual to help you figure out how to set up your TV.
Since we understand that some students may not have the owner's manual, we have compiled this short
primer to aid students in resolving their individual connections to the CSUCI Student Housing Cable TV
System.
I. SELECT THE PROPER COAXIAL CABLE:
A 75-ohm coaxial ("coax") cable with “F” style connectors is what you will be using to connect your
television to the cable outlet found on your wall. It is absolutely necessary that the cable be a known
working cable. As with any cord, it is very important that the cord be maintained properly. Do not string
the cord taut across your room or stretch it beyond its limits. This could cause damage to the cord, the
end connectors, to your equipment and the wall outlet as well. Local retailers (Target, Wal-Mart, Radio
Shack, Home Depot and Fry’s Electronics, to name a few) sell coax cables in various lengths. If you need
a longer or shorter cord, they are widely available for purchase. We recommend the purchase and usage
of cables that use SCREW TYPE HEX CONNECTORS. Do not purchase "push-on" coaxial cables since
they are more likely to fall off your wall or equipment jack. To prevent damage, do not pinch the coax
cable behind or under furniture or rugs. Also make sure that the bare copper wire in the end of your coax
cable is straight, and not bent over. You may find cables in RG-6 or RG-59 size. RG-6 is preferred, but
RG-59 will work fine. The color of the cable does not matter, but you will typically find them available in
black or white.
II. HOW TO CONNECT TO THE CABLE TELEVISION SYSTEM:
Most modern television sets are capable of receiving signals from several different input jacks built into
their cabinets. A careful examination of your TV set should enable you to locate the proper jack to
connect your coaxial cable to. The input jack that you are looking for on your television should look just
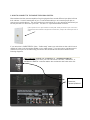
like the jack that is on the wall of your room. This is the “F” style coaxial cable connector.
(This is a photo of an “F” style connector in a wall plate. What you will see in your room and on
your television will look similar to the jack that is shown here, except it will most likely be silver in
color.)
If your television is CABLE-READY (Note: “Cable-ready” means your television set has a built in tuner
capable of tuning in the channels available on your cable system. If you are unsure, read the owner's
manual to see if your set is cable-ready), the back of the set should look like some variation of the
following diagrams:
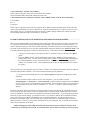
1. One connection "ANT IN" Or "ANTENNA" or “ANTENNA/CABLE IN”
If this is the case, plug one end of your coax cable into the "ANT IN", “ANTENNA”, or
“ANTENNA/CABLE IN” connection and the other end into the cable outlet on the wall.
“F” Style Coaxial Connector: “Antenna/Cable In” 2. Two connections "ANT IN" and "CABLE"
If this is the case, plug one end of your coax cable into the "CABLE"
connection and the other end into the cable outlet on the wall.
3. One connection or two connections "ANT IN" and "CABLE" and/or a switch-- that can look like:
a. TV/CABLE
b. 1 / 2
c. ON /OFF
If this is the case, plug one end of your coax cable into the "CABLE" connection and the other end into the cable
outlet on the wall and read your owner's manual to see where the switch needs to be in order for your set to receive
cable signals. Also, it is a good idea to turn the set off after you make changes and then turn it back on to make
sure the change takes place and is stored in the TV set memory.
III. HOW TO SETUP YOUR TV TO OPERATE ON THE CABLE TELEVISION SYSTEM:
After you have appropriately connected both ends of the coax cable (one end to the wall, one end to the
TV set) there is just a little bit more preparation required before you can watch your favorite shows. In
order to operate properly on the CSUCI Student Housing Television System, your television will have to
be setup to serve as the tuner for all of the available cable stations by putting it into Cable TV mode. This
is a setting that can typically be found in an onscreen menu. Follow this procedure:
1.
Using your remote control, (or buttons on the TV set itself,) look for and select the “Menu”
option.
2. From the “Menu” option, you should be able to choose the “Source” of the signal that is
feeding into the set. You will want to choose either “Cable” or “Analog Cable” depending on
the exact parameters of your model of television. (Make sure that the program is set for
"Cable" not "Antenna" or "Air", as this determines which jack on the set that the TV looks at
for signal.)
Once you have put your television into the “Cable TV Mode”, the television will need to scan the cable to
see what channels are available. There are two ways that this typically happens:
1. Your set will automatically start to run an “auto program” sequence to recognize the cable
channels.
2. If the television doesn’t start to run an “auto sequence,” you will need to choose
"Autoprogram" or "Autoscan” or “Scan Channels” (or some similar command) from the “Menu”
on your TV set so it can recognize the cable channels. From the “Menu” option, you may have to
select another menu level, such as “Channels”, or “Picture” or “Setup” to find the Autoprogram
options.
Be aware that every television set takes a varying length of time to run through an Autoscan sequence.
Some sets can take 30 minutes or more to complete a scan, whereas other models can finish a scan in
just a few moments. The key here is to be patient and let the process finish. If you interrupt the process
because you get tired of waiting, you will likely have to run it again to capture all 60 available channels.
Once your set has successfully completed a scan of available channels, you should not have to go
through this procedure again until such time as you put the television on a different signal source in a
different location. Even if you lose power sometime during your semester, the TV should still remember
where all the channels are located.
If after reading your User’s Manual and these instructions you are unable to receive all 60
channels, try checking with a friend or roommate who may be able to assist you in this process.