1
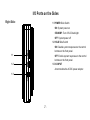
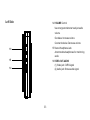
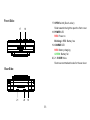
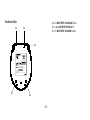
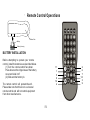
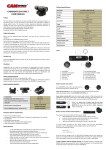
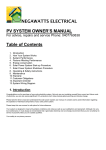
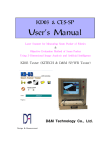
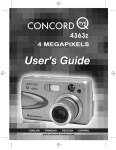
User's Manual
Portable DVD Player
All Rights Reserved
This user manual contains proprietary information,
which is protected by copyrights. All rights are reserved.
No part of this manual may be photocopied, reproduced
or translated to another language without prior written
permission of Microtek International.
Microtek International Inc.
No. 6, Industrial East Road 3, SBIP
Hsinchu, Taiwan
Important Notice
Safety Instructions
This device complies with FCC Rules Part 15.
Operation is subject to the following two
conditions: (1) This device may not cause harmful
interference and (2) this device must accept any
interference that may be received, including
interference that may cause undesired operation.
(1) This DVD player is a portable, class I-laser
product. It uses a visible/invisible laser beam
which could cause hazardous radiation exposure
if beamed or directed incorrectly. Should you
open the upper cover of the DVD player, make
sure you do not place your eyes too close to the
opening or peer into the inside of the player, as
this may be harmful to your sight and health.
(2) To reduce the risk of fire or electric shock,
follow these instructions carefully:
!Confirm the voltage available at each
country location before using this product. The
provided AC/DC adapter operates on
100~240VAC.
!For connection to a power supply not
compatible with the power used in the United
States or Canada, use an adapter with the
proper power configuration.
!For assistance in selecting an alternate
plug adapter, contact your local electrical
parts distributor .
-1-
Product Features
t Built-in Charging Circuit
t OSD(On Screen Display) Control
t MP3 playback with folder management
t JPEG picture playback
t Anti-shock memory
t 3.5 inch TFT-LCD Panel with 4:3 aspect ratio
t Built-in top-loading DVD player
t 36-key Infrared Remote Control
t 11 Control Buttons on the Front Panel:
PLAY, STOP, NEXT, PREV, MENU, SELECT,
PIX, UP/DOWN, RIGHT/LEFT
t A/V Output Jacks
t Stereo Headphone Jack
t DC Power Input Jack
t Volume Control with Rotary Potentiometer
t Battery LED Indicator
RED: Battery Charging
GREEN: Battery Full
t Power LED Indicator:
RED: Power On
Blinking: Battery Low
t Hold Switch
Lock/Unlock the function of control buttons
t Standby Switch
Turn on/off the backlight of the LCD panel
DVD: 3 seconds
MP3: 35 seconds
VCD: 20 seconds@128K bps
t AC/ DC Adapter for Indoor use
t Door Locker
t Stand
t Built-in Lithium -Ion Polymer Battery
Protection Circuit
-2-
Table of Contents
01.
02.
03.
04.
05.
06.
07.
08.
09.
Control Buttons on Front Panel ..............................
IO/Ports on the Sides ......................................
Remote Control Operations ...................................
General Operating Instructions .............................
DVD Basics .................................................
Playing Audio CDs ...........................................
Playing MP3 CDs .............................................
Warnings/Troubleshooting ...................................
Specifications .............................................
-3-
04
07
11
15
18
24
25
27
28
Control Buttons on Front Panel
9
10
1
2
3
7
4
8
5
6
-4-
Description of Functions
1. PLAY
6. SELECT
Press this button to play or pause DVD
Press this button to make a selection or to
playing.
play the disc.
2. STOP
Press this button to stop DVD playing.
STOP -> STOP -> PLAY: Play disc from the
beginning
STOP -> PLAY: Resume from the point where
playing stopped.
7. UP/DOWN/RIGHT/LEFT
(1) Direction use: Navigate the OSD
(2) Adjustment use: Increase/decrease the
quality of video in BRIGHTNESS, TINT,
COLOR, and CONTRAST.
3. NEXT
Play next chapter or track.
4. PREV
Play previous chapter or track.
5. MENU
Show the Root Menu in the DVD for users to
navigate.
-5-
8. PIX (Picture Selection)
Each time this button is pressed, the picture
adjustment OSD cycles through selections for
BRIGHTNESS, CONTRAST, COLOR, and
TINT. Once the desired adjustment bar is
displayed, use the RIGHT/ LEFT button to
adjust the setting. The bar display will
automatically disappear if no adjustments are
made within 6 seconds or if any other button
is pressed.
9. IR Sensor - Forward Sensor Eye
Allow remote controller to navigate the OSD
(On Screen Display) on this unit and to
control other accessories.
10. LCD Panel
-6-
I/O Ports on the Sides
Right Side:
11. POWER Slide Switch
ON: System power on
STANDBY: Turn off LCD backlight.
ON
11
POWER
STAND BY
OFF
OFF: System power off
12. HOLD Slide Switch
ON: Disable system responses to the control
buttons on the front panel.
OFF: Enable system responses to the control
buttons on the front panel.
13. DC INPUT
Accommodate the AC/DC power adapter.
12
DC I NP U T
13
-7-
Left Side:
14. VOLUME Control
Use rotary potentiometer to adjust audio
volume.
Clockwise: Increase volume
Counterclockwise: Decrease volume
15. Stereo Headphone Jack
Accommodate headphones for monitoring
audio.
16. VIDEO-OUT-AUDIO
(1) Video jack: CVBS signal
(2) Audio jack: Stereo audio signal
16
15
VOLUME
14
-8-
Front Side:
17. OPEN Switch (Door Locker)
17
Slide towards the right to open the front cover.
18. POWER LED
RED : Power on
Blinking in RED: Battery low
19. CHARGE LED
RED : Battery charging
GREEN : Battery full
20, 21. VISOR Holes
Slots to accommodate hooks for the sun visor.
18
POWER
Rear Side:
CHA RG E
21
20
19
-9-
Bottom Side:
23
22, 23. BATTERY HOLDING Holes
24. 2-pin BATTERY CONTACT
25, 26. BATTERY SLIDING Holes
24
22
This Class B digital apparatus
complies with Canadian ICES-003
USE OF ANY CONTROLS OR ADJUSTMENTS OR PROCEDURES
OTHER THAN THOSE SPECIFIED HEREIN MAY RESULT IN HAZARDOUS
RADIATION EXPOSURE.
TO REDUCE THE RISK OF ELECTRIC SHOCK,
DO NOT REMOVE COVER. NO USER-SERVICEABLE PARTS INSIDE.
REFER SERVICING TO QUALIFIED SERVICE PERSONNEL.
Microtek International Inc.
No. 6, Industrial East Road 3, SBIP
Hsinchu, Taiwan
Manufactured: April, 2004
THIS PRODUCT COMPLIES WITH FDA RADIATION PERFORMANCE STANDARDS,
21CFR SUBCHAPTER J.
25
24
-10-
Remote Control Operations
Battery
Bottom Side
Battery Housing
BATTERY INSTALLATION
Before attempting to operate your remote
control, install the batteries as described below.
(1) Turn the remote control face down.
Press down on the ridged area of the battery
cover and slide it off.
(2) Slide another battery in.
11
1
5
8
12
4
The remote control will operate the unit.
Please take note that this is not a universal
remote control and will not control equipment
from other manufacturers.
-11-
2
6
7
10
3
9
Description of Functions
6. UP
1. Setup
While playing the disc, use this button to scroll up the
OSD menu.
While watching TV, use this button to move up to higher
channels.
Navigate the SETUP MENU. There are 4 pages to
configure the system:
(1) Language Settings
(2) Graphic Settings
(3) Audio Settings
(4) Favorite Settings
7. RIGHT
(1) Shift right or go up the OSD menu.
(2) Adjust the voice volume up
2. Menu
8. LEFT
Go to the Root Menu included in the disc.
3. Display
(1) Shift left or go down the OSD menu.
(2) Adjust the voice volume down.
Show information on the top left corner on the screen,
including title, chapter/track, time elapsed, and time
remaining, or turn off the display.
4.
9. DOWN
While playing the disc, use this button to scroll down the
OSD menu.
While watching TV, use this button to move down to lower
channels.
PIX(Picture Selection)
Each time this button is pressed, the picture adjustment
OSD cycles through selections for BRIGHTNESS,
CONTRAST COLOR, and TINT. Once the desired
adjustment bar is displayed, use the RIGHT/ LEFT
button to adjust the setting. The bar display will
automatically disappear if no adjustments are made
within 6 seconds or if any other button is pressed.
10. Select
Make a selection or begin disc playing.
11. ZOOM
Enlarge the picture in the movie by 1x, 2x and 4x.
5. Rotate
12. PBC (Video CD only)
Press this button to activate up/down and left/right
rotation of image on the LCD panel.
Turn the PBC(Playback Control) on or off.
-12-
23
25
22
24
13. PLAY/PAUSE
Press this button to play or pause a movie while disc is
loaded into the disc compartment. For more information,
consult the DVD Basics section.
27
14. STOP
20
Stop playing the movie or songs.
STOP -> PLAY: Resume playing,
STOP -> STOP -> PLAY: Resume from the point where
playing stopped.
26
21
19
13
14
16
15. PREV
15
17
18
16. NEXT
Play the previous chapter or track.
Play the next chapter or track.
17. FF (Fast Forward)
Press this button to search disc forward continuously.
There are 5 speed options to choose from: 2X, 4X,
8X,16X, and 32X.
18. FR (Fast Rewind)
Press this button to search disc backward continuously.
There are 5 speed options to choose from, such as
FF(Fast Forward).
19. Slow
Play the disc forward in slow motion.
-13-
20. REPEAT (Except VCD with PBC on)
Repeat part or all of a chapter, title, track, or an entire
disc.
21. A- B (Except MP3)
Repeat from point A to point B.
22. Title
Navigate the Title Menu included in the disc.
23. Subtitle
Change the subtitle language to another available
language (only if the disc contains multiple subtitle
languages).
24. Angle
Allow views with a different camera angle. This button
takes effect only on DVDs that support frames with
multiple angles.
25. Audio
Change the audio language to another available
language (only if the disc contains multiple audio
languages).
26. NUMBERS
Decimal number: 0 to 9
27. MUTE
Press this button to shut off the sound at the
headphone station. The screen will display that the
sound has been turned off . Pressing the button again
restores sound to the previously set Level.
-14-
General Operating Instructions
Supplying the AC Power to the Unit
Turning the unit ON or OFF
1. To turn on the system, slide the POWER
switch on the right side of the unit to the
position labeled "ON".
2. To turn off the system, slide the POWER
switch on the right side of the unit to the
position labeled "OFF".
3. To save power, slide the POWER switch to the
position labeled "STANDBY". This can be
done while you are listening to music or
sound on the disc, and will turn off the LCD
backlight to save energy.
DC Plug
AC Plug
POWER Switch
1. Insert the DC plug into the "DC INPUT" jack on
the right side of the unit.
2. Attach the AC plug to the AC outlet.
-15-
Charging the Battery Pack
Battery Pack
CHARGE LED
POWER
POWER Switch
POWER LED
When the "POWER LED" starts to blink in red, the
battery will stop supplying power to the system in
10 minutes. At this time, the user needs to charge
the battery. Please follow the steps below and
refer to the diagram at the right-hand side.
DC INPUT
(1) Slide the POWER switch to the "OFF" position in the
direction of arrow as indicated by the diagram on the right.
The "CHARGE LED" will be in GREEN.
(2) Connect the DC plug of the AC/DC adapter to the "DC
INPUT" jack on the right side of the unit.
(3) Connect the AC plug of the AC/DC adapter to the AC outlet.
(4) The "CHARGE LED" will turn to red to indicate that the unit
is charging the attached battery pack.
(5) The "CHARGE LED" will turn green after the battery is full.
DC Plug
AC Plug
-16-
Unloading the Battery
Step 1:
Press the points on the battery pack
with your fingers, as indicated by the
diagram above.
Step 2:
Keep pressing and pull the battery pack
out in the direction indicated by the
drawing above.
-17-
Step 3:
Slide the battery pack out, as shown in the
diagram above.
DVD Basics
To get the optimum use out of your DVD player,
make sure you read this section completely.
Loading and Playing Discs
Before you load a disc, make sure that it is
compatible with the player. Note that the
following discs CANNOT be used with this
player:
Regional Coding
Both the DVD player and disc are coded
by regions. These regional codes must match
in order for the disc to play. If the codes don't
match , the disc won't play. This unit's code is
region 1. Other regional codes can't be
played in this unit.
Optical disc
•CD-1, CD-ROM,DVD-ROM
Mini disc
•CDG(audio only , not graphics).
Types of Discs your DVD will play
Loading and Playing a Disc
DVD-Video: DVD contains video.
CD-DA: CD contains musical or sound
content only.
CD-Video: CD contains movie only.
CD-R/RW: A disc that contains audio files
(for example, a CD-R with downloaded MP3
Files), MPEG, or JPEG files.
When you slide the POWER switch to the
"ON" position. Slide the OPEN switch to right
for lifting the front panel and put the disc
printed-side up into the disc area. The disc
will begin to play momentarily when the front
cover is locked into the door locker.
-18-
Settings and Adjustments
This chapter describes how to use the on-screen setup pages included in the SETUP MENU.
Using the Setup Menu
Using the setup display, you can do the initial setup, adjust the picture quality, and set the various outputs. You can
also set a language for the on-screen display and the setup display, as well as limit playback by children.
(1) Press the SETUP button to display the icons and pages on the display screen.
(2) Select the desired page you want by using the
buttons to move the cursor.
To Cancel Using the Setup Display
Press the SETUP button on the remote.
Language Setup
English
OSD
Menu
Audio
Setting the Language for On-Screen Display
Press the SETUP button, use the
button to
navigate to Language Settings icon, then use the
button to select OSD Lang.
Chinese
Subtitle
OSD(On Screen Display) Language Menu
The OSD Lang submenu allows the user to select
the language for the on-screen display. Press
and then use the
buttons to select the desired
language. The system supports the following OSD
languages: English, French , German, Italy, and
Spanish.
: Move
-19-
: Select Setup: Quit
Settings for Display
Press the SETUP button, use the
buttons
to navigate to the Graphic Settings icon, and
then use the button to select the Graphic
Type submenu. The setup allows you to
adjust the aspect ratio of the screen. Press
and then use the
buttons to select the
appropriate setting. The options include:
Screen Setup
TV Type
Screen Saver
TV System
Video Output
Brightness
Contrast
4:3/PS (Pan and Scan)
This uses a 4:3 aspect ration and displays an image
that takes up the entire screen. Portions of the left
and right side of the image are removed to accommodate this aspect ratio.
4:3 PS
4:3 LB
16:9
4:3/LB (Letter-Box)
This uses a 4:3 aspect ratio and displays a wide image with black bands on the upper and lower portions of the screen.
: Move
16:9 (Wide)
This uses a 16:9 aspect ratio and displays a widescreen image. Choose this option if you are using a
widescreen LCD panel.
Then press SELECT to confirm the aspect
ratio setting.
-20-
: Select Setup: Quit
Default Settings
Press the SETUP button, and use the
"left/right" buttons and the "down" button to
go to the Default Setting submenu under the
Favorite Setting icon. The default setup
allows you to reset all options to factory
defaults. Press and then press SELECT
to reset.
Custom Setup
Parental Ctrl
Password
Angle Mark
Default
Note : This function will not affect the Parental
settings.
: Move
-21-
Read
: Select Setup: Quit
Parental Settings (Parental Control)
Custom Setup
This section of the SETUP MENU allows users
to rate the contents of a movie during
playback, from G to ADULT. The parental
control function allows you to limit viewing
choices for children and other minors.
1. After navigating to the Classif ication
submenu under the Favorite Setting icon,
use the
buttons to select from:
Parental Ctrl
Password
Angle Mark
Default
: Move
KID SAF (Children)
G
PG
PG 13
PGR
R
NC-17
ADULT
4
5
6
7
8
: PG 13
:
:R
: NC 17
:
: Select Setup: Quit
Custom Setup
Parental Ctrl
Password
Angle Mark
DefaultX X X _
Note : The lower the value , the stricter the limitation.
2. Press the SELECT button to confirm the
selection.
3. Enter a four-digit password, using the
numeric buttons and then press the SELECT
button.
: Move
Note: The default password is 8888.
-22-
4
5
6
7
8
: PG 13
:
:R
: NC 17
:
: Select Setup: Quit
Settings for Password (Parental Control Password)
Press the SETUP button and navigate to the
Password submemu under the Favorite Setting
icon. The menu appears and allows you to
change the parental control password.
Press and then press SELECT.
OLD PASSWORD
Input the old password or the default
password (4 digits).
Parental Ctrl
Password
Angle Mark
Old:
New:
Default
NEW PASSWORD
Input a new password (4 digits) using the
numeric buttons.
Verify:
CONFIRM PWD
Confirm the new password by entering the
same new password again.
: Move
Then navigate to the OK button and press
SELECT to implement the new password.
-23-
: Select Setup: Quit
Playing Audio CDs
When playing an audio CD, the DISPLAY banner
appears automatically. It displays the current
track and the amount of the time for that track
playing , the total amount of time on the disc and
the current time running on the disc. Press the
DISPLAY button on the remote to display the
DISPLAY banner. The options below show you
what happens when you press the DISPLAY
button.
Using the REPEAT Feature
The default mode for the REPEAT feature is OFF.
Pressing REPEAT button consecutively changes
the REPEAT options as follows:
•Track - repeat the track that is playing.
•All - repeat the disc that is playing.
As you toggle through the options, the REPEAT
option changes that time. The track repeats once
that track has ended. The selected repeat option
loops repeatedly until you turn it off.
Press DISPLAY (1x)
" Single Elapsed " appears along with the current
track playing and the time of that track .
Press DISPLAY (2x)
" Single Remain " appears along with the current
track playing and the amount of time left.
Press DISPLAY (3x)
" Total Elapsed " appears along with the current
track playing and the total time playing on CD.
Press DISPLAY (4x)
" Total Remain " appears along with the current track
playing and the amount of time left on CD.
-24-
Playing MP3 CDs
3. Press the UP or DOWN arrow button to go
through the song list and highlight the song
you want. Press SELECT to begin playback
of the highlighted song.
MP3 is the format for storing digital audio. An
audio CD-quality song can be compressed into
the MP3 format with very little loss of quality,
while taking up much less space. CD-R/RW
discs that have been encoded in MP3 format can
be played on your DVD player.
Selecting Folders and Songs
When an MP3 disc is inserted in the player,
the navigation screen appears automatically.
You can change folders and songs through
navigating the file system. The DVD player
plays the songs in order they were burned to
the disc.
..
1. If a disc is playing, press STOP. Press the
UP or DOWN arrow button to go through the
folder list on the left side of the navigation
screen.
2. Once the folder you want is highlighted,
press SELECT.
-25-
Skipping Songs
Use NEXT button ( ) on the remote control
to move to the next song. Use the PREV
button (
) to move to the beginning of the
currently playing song. Press the
button 2
times to move to the previous song.
Using the REPEAT Feature
The default mode for the Repeat feature is
OFF. Change the repeat option by pressing
REPEAT consecutively:
•Track
•Folder
•Disc
•Off
- repeat the song that is playing.
- repeat the folder that is playing.
- repeat the disc that is playing.
- turn the repeat feature off.
-26-
Warnings
Troubleshooting
v Do not use any solvents or cleaning materials
when cleaning the video system.
1. IR Sensor Inoperative
(1) Verify that the batteries in the remote are
fresh.
(2) Verify that the remote sensor eye is not
obstructed.
(3) Verify that the infrared transmitter is
affixed over the sensor eye of the component
to be controlled.
v Do not use any abrasive cleaners, as these
may scratch the screen. Use only a lightly dampened lint-free cloth to wipe the screen if it is dirty.
v Before putting on headphones always adjust
the volume setting to the lowest position.
2. No Picture
(1) Verify that the correct video input mode is
used on the TV.
(2) Verify that the video cable is plugged into
the jack securely.
v Do not put pressure on the screen.
v Avoid touching or scratching the screen, as the
screen may become dirty or damaged.
3. No Sound
(1) Verify that the correct audio input mode is
used on the TV.
(2) Verify that the audio cable is plugged into
the jack securely.
-27-
Specifications
1. TFT-LCD
Screen Size
3.5 inch
Resolution
480 (W) x 234 (H)
Dot Pitch
0.149 (W) x 0.225 (H)
Contrast Ratio
150 : 1
Viewing Angle (degree) under CR >= 10
Top
10 (Min.)
Bottom
30 (Min.)
Left
40 (Min.)
45 (Typ.)
Right
40 (Min.)
45 (Typ.)
Uniformity
70
Brightness
250 nits
Lamp life
10,000 hours at 77 F (25 C)
o
2. Video Display System
3. Operating Temperature
41 ~ 113 F (5 ~ 45 C)
4. Storage Temperature
32 ~ 122 F (0 ~ 50 C)
5. Voltage
AC
110 ~ 240VAC at 0.5A, 50 ~ 60 Hz
DC
9VDC at 1.2A
6. Battery
Capacity
7.4V, 2600mAh
Material
Lithium-Ion Polymer
o
NTSC
-28-
o
o
o
o