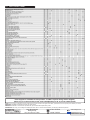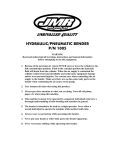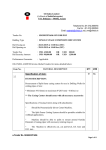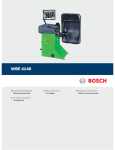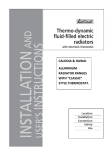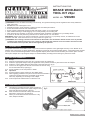
1
INSTRUCTIONS FOR: BRAKE WIND-BACK tool KIT 29pc MODEL NO: VS0286 1.safety instructions WARNING! Ensure all Health and Safety, local authority, and general workshop practice regulations are strictly adhered to when using tools. DO NOT use tools if damaged or worn. Maintain the tools in good and clean condition for best and safest performance. Ensure all threads are clean and well lubricated. Ensure vehicle is adequately supported with axle stands, ramps, etc. as appropriate. Wear suitable clothing to avoid snagging. Do not wear jewellery. Tie back long hair. Wear approved eye protection. A full range of personal safety equipment is available from your Sealey dealer. Account for all tools and parts being used and do not leave them in or on the vehicle. IMPORTANT: Always refer to the vehicle manufacturer’s service instructions, or proprietary manual, to establish the correct procedure and data. These instructions for use are provided as a guide only. WARNING! The warnings, cautions and instructions discussed in this instruction manual cannot cover all possible conditions and situations that may occur. It must be understood that common sense and caution are factors which cannot be built into this product, but must be applied by the operator. 2. Introduction Air operated wind back tool suitable for left or right hand wind back operations. Fast, lightweight and easy to use. Master set of adaptors suit a wide range of vehicle applications. Suitable for push-back and wind-back brake pistons. Left-handed thrust required for Ford, Citroen and Renault applications. Interchangeable adaptor plates with thrust bolt assembly and reaction plate. Includes 3/8”Sq drive adaptor and 2-pin magnetic adaptor for added flexibility. Kit helps prevent damage to pistons and seals. 3. Set up & operation 3.1 Set Up 3.1.1 Remove the wind back tool from the carry case and fit the 3/8" adaptor (5). 3.1.2 Select the appropriate adaptor using the application chart (overleaf, Section 5), attach this to the 3/8" adaptor. 3.1.3 Select the correct calliper plate and attach this to the wind back tool. (fig.2) 3.1.4 Connect an air supply to the air inlet on the bottom of the tool using the recommended set up right (fig.1). 3.1.5 Set the regulator on the compressor to 90PSI. 3.2Operation 3.2.1 Squeeze trigger to apply pressure on the calliper piston. 3.2.2 When applying pressure on the piston turn the wind back handle to rotate and compress the piston; the handle can be turned either way depending on the design of the calliper. 3.2.3 Push the pressure release button to retract the tool. fig.1 4. maintenance 4.1 4.2 4.3 Lubricate the tool daily with a few drops of sealey air tool oil dripped into the air inlet. Lightly oiling the wind back shaft will prolong the life of the tool. After use clean the tool with a damp cloth and mild detergent to remove any dirt and grime. When you are finished with the tool store it in a dry, safe, childproof location. fig.2 VS0286 - Issue: 2 - 23/09/10 5. APPLICATION CHART Parts support is available for this product. To obtain a parts listing and/or diagram, please log on to www.sealey.co.uk, email [email protected] or phone 01284 757500. NOTE: It is our policy to continually improve products and as such we reserve the right to alter data, specifications and component parts without prior notice. IMPORTANT: No liability is accepted for incorrect use of this product. WARRANTY: Guarantee is 12 months from purchase date, proof of which will be required for any claim. INFORMATION: For a copy of our catalogue and latest promotions call us on 01284 757525 and leave your full name, address and postcode. Sole UK Distributor Sealey Group, Bury St. Edmunds, Suffolk. 01284 757500 01284 703534 Web email www.sealey.co.uk [email protected] VS0286 - Issue: 2 - 23/09/10