1
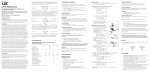
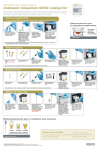
INSTRUCTIONS FOR USE
MICRO BLOOD COLLECTORS,
Product Numbers
SS2H, SS2U & SS2X
INTENDED USE
For collection and processing of capillary blood to prepare
plasma/serum.
SUMMARY
The StatSampler requires assembly before use by inserting the
Capillary tube, the end with the colored band first, through the
split stopper (See figure 1). Finger-stick blood is collected into a
Capillary tube and then turned to the vertical position allowing
the blood to drain into the MicroTube from which it can be rapidly
separated for the preparation of plasma/serum.
StatSampler blood collectors combine the advantages of:
1.) Immediate anticoagulation in the Capillary tube
2.) Ease of collection in a Capillary tube
3.) Reduction in technique dependency in collecting
capillary blood
4.) Isolation of cells by a barrier gel.
CONTENTS
1. 50 Capillary tubes
2. 50 MicroTubes
3.
4.
3 Pipette bulbs
10 non-split stoppers
ANTICOAGULANT
(not included in serum preparation kit)
Each Capillary tube contains enough lithium heparin (or EDTA)
to anticoagulate 200µl of blood. There is no anticoagulant contained in the MicroTube portion of the StatSampler. If a volume of
blood greater than 200µl is required, then a second Capillary
tube must be used to ensure the proper anticoagulant/ blood
ratio.
STORAGE
Store kit in a cool dry place.
"USE BEFORE" DATE
StatSampler capillary tubes containing anticoagulant should
not be used beyond the date stated on the vial label.
For in vitro diagnostic use.
PRODUCT DIFFERENCES
SS2H
Lithium heparin treated
SS2U
Untreated
SS2X
EDTA treated
PROCEDURE
1. Label the StatSampler MicroTube with a marking pen, if
desired, with patient i.d., date, time.
2. Assemble the StatSampler by carefully inserting a Capillary
tube, (the end with the colored band first) into the Micro
Tube through the split stopper. Hold the Capillary tube near
the end being inserted and carefully push it in until the colored band is even with the top of the stopper (See Figure 1).
CAUTION - ALWAYS ASSEMBLE THE STATSAMPLER BEFORE
BLOOD COLLECTION TO PREVENT UNNECESSARY EXPOSURE
TO BLOODBORNE PATHOGENS AND TO MINIMIZE BLOOD
SPILLAGE AND POSSIBLE TUBE BREAKAGE.
PROCEDURE (cont.)
3. Perform a “finger-stick” using good laboratory practice.
HELPFUL HINTS FOR COLLECTION OF CAPILLARY
BLOOD SPECIMENS*
*as outlined in the NCCLS publication; Procedures for the Collection
of Diagnostic Blood Specimens by Skin Puncture Second Edition;
Approved Standard. NCCLS publication H4-A2. Villanova, PA: July
1986.
CHOOSING A SITE
3a. The site of choice, in adults and older children, would be the
palmar (finger print) surface of the finger. Do not use the side or tip of
the finger. Tissue thickness found in these locations is about half that
found in the center of the finger.
3b. Infants under the age of one year should have skin puncture
procedures performed on either the lateral or medial plantar surface
of the heel or the plantar surface of a big toe. This is to avoid injury to
the infant from skin puncture of an insufficient tissue depth area. It is
imperative that the depth of puncture in the infant not exceed 2.4 mm
to avoid penetrating bone and the risk of osteomyelitis.(3) The optimum puncture depth of the heel in the newborn is between 0.35 and
1.6 mm beneath the skin surface as this is where the major blood
vessels are located.(3)
SITE PREPARATION
3c. Warm the site. Warming of the site drastically increases blood
flow to the area, resulting in a larger quantity of blood collected. When
following proper collection procedures, up to 0.5 ml of blood can be
obtained from a single puncture site. Warming is achieved by either
applying a warm compress to the site or placing the site under warm
running water. The site should be warmed at a temperature not to
exceed 42oC for a minimum of three minutes.
3d. Clean the puncture site. Use a commercially prepared alcohol
pad or a 75% aqueous solution of isopropanol. After cleaning, thoroughly dry the site with a sterile gauze pad. Residual alcohol can
cause hemolysis. Do not cleanse area with betadine as it may cause
an elevation of potassium, phosphorus, and uric acid.
8. Following collection, StatSampler MicroTubes for serum preparation should be allowed to clot for at least 30 minutes before
centrifugation. Treated samples can be spun immediately to
yield plasma. Centrifugation:
●
StatSpin centrifuges. With StatSpin models RP or MP (earlier
models 1 & 3) centrifuge with the RT12 rotor (or equivalent)
using the “Tube Rotor /30 seconds” cycle to prepare plasma or
serum.
●
Low-speed clinical centrifuges. Centrifuge at 1500 rcf for 20
minutes. The StatSampler MicroTube may be placed in a
larger plastic centrifuge tube for easier access.
●
High-speed microcentrifuges. Centrifuge for 2 minutes.
BARRIER GEL
MicroTubes for plasma/serum separation contain an inert barrier
material which has a density between that of cells and plasma.
During centrifugation the inert barrier gel rises to the plasma/cell
interface where it lodges and forms a physical barrier between the
liquid portion and cells. This inhibits re-mixing of the red cells with
the plasma. (See figure 3)
LIMITATIONS
StatSampler has been designed for capillary blood collection.
Chemistry values obtained from skin puncture specimens may
differ from those obtained by venipuncture.(1,2) Milking the skin
may cause hemolysis and thus affect the accuracy of some determinations.
Capillary tubes treated with lithium heparin or EDTA have been
wide-ly used in the collection of blood and the subsequent preparation of plasma. This product should perform in a similar manner.
However, the user should determine that plasma of adequate quality
for their testing purposes is produced by StatSampler Micro Blood
Collectors.
3e. Puncture the site. A commercial lancet device, either automated
(spring loaded) or manual, is available in a wide variety of styles for
uniform depth punctures. The Tenderfoot by I.T.C. should be used if
the specimen is obtained from an infant.(4) This specially designed
device delivers a cut that is only 1mm in depth, preventing injury to
the infant’s heel bone and surrounding tissue. Incisions between 0.35
and 1.6 mm in depth leave virtually no hematoma and allow for subsequent sampling from the same region.(4)
Figure 1
SPECIMEN COLLECTION
3f. After blood flow has begun, wipe off the first drop. Angle the
puncture site downward so as to facilitate blood flow. Be certain not
to “milk” the appendage; a steady firm pressure is preferable if required.
4.
Hold the StatSampler assembly by the Capillary tube. Collect
the sample in the StatSampler, taking care not to press the opening of the Capillary tube to the skin. After wiping off the first drop
of blood, aspirate blood into the Capillary tube as it appears at
the wound. Tilt the tube horizontally or slightly upward. Avoid
introducing any air bubbles into the Capillary tube.
5.
Fill the Capillary tube to the end; fill volume is approximately
200 µL.
6.
Turn the assembly to the vertical position; the blood will drain
into the MicroTube (See Figure 2). To discharge the last drop of
blood into the MicroTube, wipe the Capillary end with a lab tissue, then place a pipette bulb (included in your kit) over the top
of the Capillary tube. Squeeze a puff of air into the Capillary
tube to expel the last drop. Save the pipette bulb.
7.
Remove and discard the Capillary tube. Gently shake the
MicroTube to ensure mixing of the anticoagulant.
Plasma
Gel
Cells
Figure 2
Figure 3
REFERENCES:
1. Procedures for the Collections of Diagnostic Blood Specimens by Skin Puncture - Second
Edition; Approved Standard. NCCLS publication H4-A3. Villanova, PA: July 1986.
2. Blumenfeld, T. A., Hertelendy, W. G., and Ford, S.H. Simultaneously obtained skin puncture
serum, skin puncture plasma and venous serum compared and effects of warming the skin
before puncture. Clin. Chem. 23:1705, 1977
3. Meites, Samuel. Skin-Puncture and Blood-Collecting Technique for Infants; Update and Problems.
Clin. Chem. 34:1890-1894, 1988.
4. Burns, Edward R.. Development and Evaluation of a New Instrument for Safe Heel-stick
Sampling of Neonates; Lab. Med. 20: 481-483, July 1989.
Telephone
781-551-0100
Toll free
800-782-8774
Telefax
781-551-0036
StatSampler Patent Number 5,257,984.
85 Morse Street
Norwood, Massachusetts
02062 USA
StatSpin and StatSampler are registered trademarks of StatSpin , Inc.
ssxuh-M.p65
7/20/98
54-001696-001
REV. M
INSTRUCTIONS FOR USE
EDTA TREATED MICRO
BLOOD COLLECTORS,
Product Numbers SS1E & SS2E
INTENDED USE
For capillary collection of whole blood.
SUMMARY
The StatSampler requires assembly before use by inserting the
Capillary tube, the end with the colored band first, through the split
stopper (See figure 1). Finger-stick blood is collected into a Capillary tube and then turned to the vertical position allowing the blood
to drain into the MicroTube from which it can be used as a whole
blood sample.
StatSampler blood collectors combine the advantages of:
1.) Immediate anticoagulation in the Capillary tube
2.) Ease of collection in a Capillary tube
3.) Reduction in technique dependency in collecting
capillary blood
CONTENTS
1. 50 EDTA treated Capillary tubes
2. 50 MicroTubes with attached stoppers
3. 3 Pipette bulbs
ANTICOAGULANT
Each Capillary tube contains enough EDTA to anticoagulate the
designated fill volume of blood. There is no anticoagulant contained in the MicroTube portion of the StatSampler. If a volume of
blood greater than the designated fill volume is required, then a
second Capillary tube must be used to ensure the proper anticoagulant / blood ratio.
STORAGE
Keep vial of capillary tubes closed while not in use. Store kit
in a cool dry place.
"USE BEFORE" DATE
StatSampler capillary tubes containing anticoagulant should
not be used beyond the date stated on the vial label.
For in vitro diagnostic use.
PRODUCT DIFFERENCES
SS1E
Designated Fill Volume =
SS2E
Designated Fill Volume =
100 µL
200 µL
PROCEDURE
1. Label the StatSampler MicroTube with a marking pen, if desired,
with patient i.d., date, time.
2. Assemble the StatSampler by carefully inserting a Capillary tube,
(the end with the colored band first) into the MicroTube through
the split stopper. Hold the Capillary tube near the end being inserted and carefully push it in until the colored band is even with
the top of the stopper (See Figure 1).
CAUTION - ALWAYS ASSEMBLE THE STATSAMPLER BEFORE
BLOOD COLLECTION TO PREVENT UNNECESSARY EXPOSURE
TO BLOODBORNE PATHOGENS AND TO MINIMIZE BLOOD
SPILLAGE AND POSSIBLE TUBE BREAKAGE.
PROCEDURE (cont.)
6.
Turn the assembly to the vertical position; the blood will drain
into the MicroTube (See Figure 2). To discharge the last drop of
blood into the MicroTube, wipe the Capillary end with a lab tissue, then place a pipette bulb (included in your kit) over the top
of the Capillary tube. Squeeze a puff of air into the Capillary
tube to expel the last drop. Save the pipette bulb.
7.
Remove and discard the Capillary tube and split stopper. Secure purple cap to close MicroTube. Gently shake the MicroTube
to ensure mixing of the anticoagulant.
3. Perform a “finger-stick” using good laboratory practice.
HELPFUL HINTS FOR COLLECTION OF CAPILLARY
BLOOD SPECIMENS*
*as outlined in the NCCLS publication; Procedures for the Collection
of Diagnostic Blood Specimens by Skin Puncture Second Edition;
Approved Standard. NCCLS publication H4-A2. Villanova, PA: July
1986.
CHOOSING A SITE
3a. The site of choice, in adults and older children, would be the
palmar (finger print) surface of the finger. Do not use the side or
tip of the finger. Tissue thickness found in these locations is
about half that found in the center of the finger.
3b. Infants under the age of one year should have skin puncture
procedures performed on either the lateral or medial plantar surface of the heel or the plantar surface of a big toe. This is to
avoid injury to the infant from skin puncture of an insufficient
tissue depth area. It is imperative that the depth of puncture in
the infant not exceed 2.4 mm to avoid penetrating bone and the
risk of osteomyelitis.(3) The optimum puncture depth of the heel
in the newborn is between 0.35 and 1.6 mm beneath the skin
surface as this is where the major blood vessels are located.(3)
Note:
8.
Transfer the blood in the Capillary tube into the
microtube as soon as possible and mix thoroughly.
After mixing, the sample is stable for 2-4 hours. (1)
Following collection, EDTA treated blood should be thoroughly
remixed just before use.
SITE PREPARATION
Figure 1
3c. Warm the site. Warming of the site drastically increases blood
flow to the area, resulting in a larger quantity of blood collected.
When following proper collection procedures, up to 0.5 ml of
blood can be obtained from a single puncture site. Warming is
achieved by either applying a warm compress to the site or placing the site under warm running water. The site should be warmed
at a temperature not to exceed 42oC for a minimum of three
minutes.
3d. Clean the puncture site. Use a commercially prepared alcohol
pad or a 75% aqueous solution of isopropanol. After cleaning,
thoroughly dry the site with a sterile gauze pad. Residual alcohol
can cause hemolysis. Do not cleanse area with betadine as it
may cause an elevation of potassium, phosphorus, and uric acid.
3e. Puncture the site. A commercial lancet device, either automated
(spring loaded) or manual, is available in a wide variety of styles
for uniform depth punctures. The Tenderfoot by I.T.C. should be
used if the specimen is obtained from an infant.(4) This specially designed device delivers a cut that is only 1mm in depth,
preventing injury to the infant’s heel bone and surrounding tissue. Incisions between 0.35 and 1.6 mm in depth leave virtually
no hematoma and allow for subsequent sampling from the same
region.(4)
SPECIMEN COLLECTION
3f.
4.
5.
After blood flow has begun, wipe off the first drop. Angle the
puncture site downward so as to facilitate blood flow. Be certain
not to “milk” the appendage; a steady firm pressure is preferable, if required.
Hold the StatSampler assembly by the Capillary tube. Collect
the sample in the StatSampler, taking care not to press the opening of the Capillary tube to the skin. After wiping off the first drop
of blood, aspirate blood into the Capillary tube as it appears at
the wound. The blood must be free flowing and not intermittent
(starting and stopping), otherwise clots may form. Tilt the tube
horizontally or slightly upward. Avoid introducing any air bubbles
into the Capillary tube.
Fill the Capillary tube to the end; if larger volume is desired, use
a fresh Capillary tube to maintain proper blood / anticoagulant
ratio.
Remove
and discard
capillary tube
and split cap.
Figure 2
Figure 3
LIMITATIONS
StatSampler has been designed for capillary blood collection. Values obtained from skin puncture specimens may differ from those
obtained by venipuncture.(1,2) Milking the skin may cause hemolysis and thus affect the accuracy of some determinations. Some
clotting may occur with non-free flowing blood.
REFERENCES:
1. Procedures for the Collections of Diagnostic Blood Specimens by Skin Puncture - Second
Edition; Approved Standard. NCCLS publication H4-A3. Villanova, PA: July 1986.
2. Blumenfeld, T. A., Hertelendy, W. G., and Ford, S.H. Simultaneously obtained skin puncture
serum, skin puncture plasma and venous serum compared and effects of warming the skin
before puncture. Clin. Chem. 23:1705, 1977
3. Meites, Samuel. Skin-Puncture and Blood-Collecting Technique for Infants; Update and
Problems. Clin. Chem. 34:1890-1894, 1988.
4. Burns, Edward R.. Development and Evaluation of a New Instrument for Safe Heel-stick
Sampling of Neonates; Lab. Med. 20: 481-483, July 1989.
StatSpin, Inc.
85 Morse Street
Norwood, MA 02062
Tel:
Fax:
800-782-8774
781-551-0100
781-551-0036
StatSampler Patent Number 5,257,984.
StatSampler and StatSpin are registered trademarks of StatSpin, Inc., an IRIS Company.
SS2E-1EF.p65
9/08/00
54-002861-001
REV. F