1
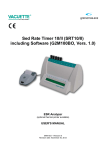
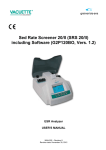
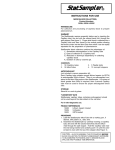
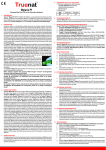
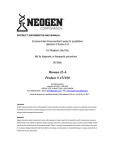
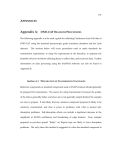
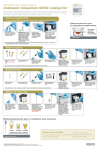
Operator’s
Manual
ESRA-10
Automated
Erythrocyte Sedimentation
Rate Analyzer
Model Number S400-00
2
3
TABLE OF CONTENTS
1. Precautions and Safety
1.1
1.2
1.3
1.4
1.5
PAGE
User Precautions..............................................................…......…….…..… 6
Electrical equipment…….………………………………………………………
Mechanical equipment……………………………………………………….…
Analysis samples……………………………………………………………..…
Precautions on ESRAtainer Tubes……………………………………………
6
6
6
6
2. INTRODUCTION
2.1 ESRA-10 Instrument..……………………………………………………..…….
2.2 Description and Intended Use……………………………………………..……
7
7
3. INSTALLATION
3.1
3.2
3.3
3.4
Description of Components..........................................................................
Examine Contents……………......................................................…............
Set up the Analyzer………………………………………………………………
Initialization……………………………………………………………………….
8
8
8
9
4. BASIC OPERATION
4.1
4.2
4.3
4.4
Quick Start Instructions...........….................................................................
ESRAtainer Tube Storage…………………….............................…...........…
ESRAtainer Labelling..............................…………………………….………..
Precautions...........................................…...................................................
10
10
11
11
5. OPERATING PROCEDURE
5.1 Procedure for ESR Measurement.……………………………………….……..
5.2 Sample Insertion…………………………………………….……………...…….
5.3 Sample Recognition……………………………………………………….……..
5.4 Sample Removal………………………………………………………………….
5.5 Display Messages………………………………………………………….……..
5.6 Limitations…………………………………………………………………….…...
5.7 Controls………………………………………………………………………..…..
5.8 Performance Criteria……………………………………………………………..
12
12
13
13
13
14
14
14
6. TECHNICAL SPECIFICATIONS
6.1 System Specifications...........................................................................…....
6.2 Default Dip Switch Settings..........................................................................
6.3 Optional Printer..........................................................……………….............
6.4 Temperature Correction...................................................................……......
6.5 RS-232 DATA Port…………………………………………………………….....
4
15
16
16
16
16
TABLE OF CONTENTS
7. THEORY OF OPERATION
PAGE
7.1 Measurement Principle.............................................................................
7.2 Calculation………….…………....................................................................
7.3 Results conversion in mm/hr......................................................................
7.4 Results correction to 18 C..........................................................................
7.5 Temperature Correction……….......................…….............................……
17
17
18
19
19
8. MAINTENANCE and TROUBLESHOOTING
8.1 Maintenance…………….............................................................................
8.2 Cleaning Instructions............................................................................…..
8.3 Self Test………………………………………………………………………….
8.4 Troubleshooting……………………………………………………….……..…
20
20
20
21
9. THEORETICAL INFORMATION
9.1 Westergren method...........................................................….....................
9.2 Variations of ESR................................................................…............…....
22
22
10. WARRANTY INFORMATION
10.1 Warranty………………………………………………………………………...
5
24
PRECAUTIONS AND SAFETY
1.1 User Precautions
Before beginning work with the analyzer the rules for handling bio hazardous materials and for
the Electro-mechanical systems must be understood to protect the user from any dangers.
1.2 Electrical equipment
To reduce risk of shock, do not disassemble instrument. Refer service to qualified service
personal. The analyzer has no user serviceable parts. Disassembly of unit can harm device
and void warranty.
1.3 Mechanical equipment
The ESRA-10 has internal moving parts. Use with only ESRAtainer tubes. Inserting foreign
parts into the channel ports can damage internal scanning mechanism. Disconnect power prior
to service. Refer all service to qualified service personal.
1.4 Analysis samples
All biological fluids should be considered biohazardous. Operator should use universal
precautions. Do not remove the tube cap, as this is not necessary and poses a risk to the
operator even if standards of precautions are followed to avoid the biological danger. This
applies for any technical operator qualified in the use of the instrument. Only ESRAtainer tubes
should be used in the ESRA-10 analyzer. The use of any other tube will potentially damage
the unit and void the warranty. Additionally other tubes may give erroneous results.
1.5 Precaution on ESRAtainer Tubes
Do not use tubes or needles if foreign matter is present. Handle all biological samples and
blood collection “sharps” (lancets, needles, Luer adapters, and blood collection sets)
according to the policies and procedures of your facility.
Obtain appropriate medical attention in the case of any exposure to biological samples (for
example, through a puncture injury), since transmission of infectious diseases may occur.
6
INTRODUCTION
2.1 ESRA-10 Instrument
The StatSpin ESRA-10 is a microprocessor-controlled erythrocyte sedimentation rate analyzer.
This unique device generates results in 30 minutes, and allows random access to enhance
workflow. Initial indications are displayed in as little as 12 minutes from sample insertion.
Capable of up to 20 samples an hour this maintenance free instrument produces results on 1.6
mL samples. No buttons to push, or sample pre-treatment required. Simply draw sample into
the ESRAtainer vacuum collection tube, invert tube to mix the citrate, and insert into analyzer.
ESRA-10 comes complete with a manual filling station and standards. The analyzer has an
optional printer, which connects, to the RS-232 port located on the back. Temperature
correction can be activated with a flip of a dipswitch. The analyzer was designed with safety
features including a low voltage power supply and total weight is less than 2 pounds.
2.2 Description & Intended Use
The ESRA-10 (Erythrocyte Sedimentation Rate Analyzer) is controlled by a microprocessor
and is used exclusively for analysis of the erythrocyte sedimentation rate.
It constantly and simultaneously scans up to 10 ESRAtainer vacuum tubes. Sample can be
drawn directly through venous puncture or with use of the manual filling station,
(ESRA_FS).
The ESRA-10 follows the sedimentation of each sample independently, tracks and records
sedimentation levels throughout the analysis period. Results are displayed in mm/hr
(Westergren method). Figure 1 below depicts a complete ESRA-10 System complete with
Analyzer, Filling Station, Power Supply, Standard, ESRAtainer Tubes and optional Printer.
Figure 1
7
INSTALLATION
3.1 Description of Components
ESRA-10 – Analyzer operates on 12VAC provided by external power supply (included).
Instrument allows up to 10 samples ESRAtainer tubes to be place into the ports located
on front panel. The analyzer is also equipped with an RS-232 port and power switch
located on the rear panel. Its 40-character display is backlit to provide easy reading
under any lighting conditions.
ESRA-FS – Manual filling station to allow transfer of sample from an EDTA tube to the
ESRAtainer tubes by simple filling the tube until the blood level meets the fill line (TOP
of BLOCK). Capacity of 10 tubes and fabricated from clear acrylic for easy cleaning.
ESRA-ST – Reference standard used for troubleshooting the analyzer if questions or
problems occur. Refer to Maintenance section for proper use.
ESRA-PR – (Optional) Printer has been configured to work with the ESRA-10 Analyzer
by printing a hard copy of the results for each sample. After each interval is complete
the ESRA-10 sends the data down the RS-232 port to the printer. StatSpin does not
support the use of other instruments connected to the DATA port.
ET01-50 & ET01-400 - ESRAtainer vacuum tubes specifically made for use with
ESRA-10. They contain sodium citrate at 3.8% and vacuum for drawing 1.6 mL of
blood. ESRAtainer tubes are a closed system with a black stopper. The color of the
tuber stopper is in accordance to ICSH (International Council for Standardization on
Hematology) on color-coding of blood collection tubes.
3.2 Examine Contents
The ESRA-10 and its accessories are delivered in a single carton. Unpack unit with its
accessories and inspect contents for any signs of damage. If the apparatus is damaged,
please inform your carrier immediately. Save the shipping carton with its packing materials
in the event the instrument needs to be repaired or returned for service.
3.3 Set up the Analyzer
•
•
•
•
•
The ESRA-10 should be placed on a flat and level bench top away from centrifuges,
oscillating agitators or other vibrating instruments that might cause movement of the bench
and result in an incorrect reading.
Direct light on the instrument and sudden changes of temperature should be avoided.
Install cable between Analyzer and printer (optional).
Plug power supply(s) into 120VAC (50/60 Hz) grounded outlet(s).
Locate power in jack on rear of instruments and connect to power supply.
Caution: Do Not connect the printer supply to the Analyzer. Refer to figure 2 for
identification, or call StatSpin Customer Service for assistance.
•
Locate power switch on rear of Analyzer, depress to turn unit on.
INSTALLATION
8
3.4 Initialization
Each time the ESRA-10 is turned on, it carries out an electronic initialization, clears the
memory and performs an instrument check test.
If a printer is connected, the display will also present the results’ header that will be given at
the end of each analysis.
If the printer is not connected, the display presents:
PRINTER NOT READY...
In a few seconds the display will change to indicate the sign “ ---“ in the numbered
positions.
The instrument is now ready for analysis.
ESRA-10: (rear view)
POWER SWITCH
RS-232 Printer Port
POWER INPUT
ESRA-Power Supply
Printer Interface Cable
Figure 2
9
BASIC OPERATION
4.1 QUICK START INSTRUCTIONS
1. Set up instrument and connect power supply and printer.
2. Switch on printer and ESRA-10. Analyzer will initialize. Display will indicate “---” for
each channel. Unit is ready for sample introduction.
3. Collect Sample:
a) ESRAtainer tubes contain sodium citrate 3.8% and vacuum for 1.6mL of blood.
Collect via venous puncture, follow standard laboratory practices for collection or
b) Place ESRAtainer tubes into ESRA-FS (filling station), transfer blood from
collection tube to the ESRAtainer. Stop transfer once the level of blood reaches
the “top of block”.
4. Gently mix tubes, invert 8 to 10 times, insert into channels.
5. After 12 minutes: Initial indications are displayed:
N
L
H
H+
H++
=
< 11 mm/h
= 11-38 mm/h
= 38-82 mm/h
= 82-120 mm/h
= > 120 mm/h
6. After 30 minutes: Actual result appears above the respective channel.
a) If printer is connected, data is transferred to printer and results captured.
b) If no printer is connected, record the values.
7. After recording the results, remove the tubes; “---” will appear for each channel
available for new sample. Do Not Remove the tube until results are recorded. The
analyzer will display the results until the tube is removed.
4.2 ESRAtainer Tube Storage
The test tubes for this instrument are specifically made for use with ESRA-10. They
contain sodium citrate at 3.8% and vacuum for drawing 1.6 mL of blood.
Store tubes at 5 - 25°C. The sodium citrate solution is clear and colorless.
Do not use if the solution is discolored or contains precipitates. Do not use tubes after their
expiration date. After sample collection, tubes can be stored for up to four hours for
sedimentation rates. Only ESRAtainer tubes should be used in the ESRA-10 analyzer. The
use of any other tube will potentially damage the unit and void the warranty. Additionally
other tubes may give erroneous results.
10
BASIC OPERATION
4.3 ESRAtainer Labelling
Identify the sample by writing on the original test tube label or by applying a coded label.
Follow the scheme of Figure 3 to carry out this action correctly. In the figure the test tube
marked A has the correct blood level and original label on which to write the patient code or
any other relevant data in the absence of a bar code. The part marked H shows the
transparent zone that absolutely must be left free to allow the infrared rays to recognize the
end of the blood column. The next test –tube (B) shows the correct position for the label.
Test tubes C and D illustrate how incorrect application of the label obstructs the reading of the
analysis.
LABEL
LABEL
H
YES
YES
NO
Figure 3
11
NO
OPERATING PROCEDURE
5.1 Procedures for ESR measurement
Once obtained, patient sample should be inverted 8-10 times prior to testing. If transferring
from EDTA tube, use filling station as guide for proper sample volume. Be sure the upper
level of blood is parallel to “Top of Block”. If not measured immediately, samples should be
analyzed within four hours.
5.2 Sample insertion
After mixing, the sample must be promptly transferred to the analyzer. It is also advisable to
follow numerical sequence when loading the channels. After loading the tenth, wait for the
results of the first samples and remove them from their channels before continuing to insert
new test tubes. Follow the monitor display to check proper location on the analysis plate.
After a few seconds, the display corresponding to the position number indicates the analysis
has begun by displaying: "run". If after three minutes the message "run" remains unchanged,
the sample has been accepted by the ESRA -10 and the analysis is underway. If not, the
message "ERL" appears, indicating that the blood level in the test tube is not within the limits
permitted by the instrument ( + 4, - 10 mm).
The sample positions on the analytic plate are numbered from 1 to 10 but numbering is
intended progressively in groups of 10, so when the results of channel number one are
completed this position automatically becomes number 11 and will continue by the same
reasoning with number 21 and so on.
For samples with blood levels between +4 and -10 mm the results will be automatically
adjusted by the ESRA-10 software.
Continue to insert additional tubes sequentially into the remaining available positions.
Twelve minutes after insertion, initial indications are displayed, “N” for normal and “H” for high.
At thirty minutes the result in mm/hour (Westergren) will appear on the display in the position
corresponding to the respective channel and remain until that tube is removed. After tube
removal, results will disappear from the display in 60 seconds, and new sample tubes can be
inserted.
If the printer is connected to the ESRA-10, it will print out the results at the end of each
analysis as follows:
seq. N pos. Id # mm
s001 p01................xxx
s002 p02................xxx
s020 p10................xxx
s021 p01................xxx
All memory, including the sequences, are cancelled when the instrument is switched off.
12
OPERATING PROCEDURE
5.3 Sample Recognition
The following could adversely effect results:
a) dilution ratio
f ) time after sample-taking ( > 4 hours )
b) bubbles
g) direct sunlight
c) strong haemolytic samples
h) foam
d) sudden agitation
i ) lipemic samples
e) temperatures < 15° C or > 30° C
5.4 Sample removal
While analyzing, the ESRA-10 displays the instrument status, the real-time progress for
analysis underway and the results for samples already completed. Before a result is displayed,
the operator is informed by two short beeps.
As soon as a sample result is displayed, it will be automatically transmitted to the printer.
Data will remain on the display until the operator, having noted the value, removes the
corresponding test tube from the reading plate. In about one minute the data on the display will
disappear, and the position is now available for a new sample.
NOTE: To avoid losing the result, be sure to record the value before removing the tube
from the reading plate.
5.5 Display Messages
Messages may appear on the display:
ERL: Indicates that the sample is not of a level that would permit the instrument to read
it. If the level is too low (> 10mm) the sample should be taken again because outside these
limits the results of the analysis may be altered.
ERS: Indicates that the test tube has been removed from the position in which it had
been placed. The test tubes are checked in their positions at constant 15 second intervals. Do
not touch the test tubes during the whole period of analysis because, for the reason described,
the result will be lost.
“ ERROR: Mechanical problems..”
This warning will be given if the instrument should find problems with the mechanical
movement of the reading plate. After this indication the instrument will definitely stop its
operation and the technical service needs to be called
13
OPERATING PROCEDURE
5.6 LIMITATIONS
A. Strongly lipemic or hemolytic samples may alter reading capability.
B. Sedimentation rate values > 140 mm/hr. will be indicated with a “ > 140 ”
C. Temperatures outside the given range will be accepted as 15° C min and 30° C max.
For sample identification ( if no printer is connected ) a form similar to the one enclosed to this
manual may be used on which the patient name or code number must be recorded before the
tube is inserted into the analyzer.
5.7 Controls
Control should be run according to your standard laboratory practices. StatSpin is listed on
the package insert and recommends the following control for use with the ESRA-10
analyzer:
Manufactuer:
Description:
Mfg. Part No.:
Hematronix, Inc.
Benicia, CA 94510
Equinox-SedRate
ESR101
ESR102
Normal
Abnormal
Other manufacturer’s control can be used with the ESRA-10 with values established in your
laboratory.
Note: Without the optional printer it is necessary to record the control values within 10 min of test completion.
14
TECHNICAL SPECIFICATIONS
6.1 System Specifications
Application
Erythrocyte sedimentation rate analysis
Reading chambers
10 channels
Analysis time
30 minutes
Display
back-light for easy read
Throughput
20 Samples per hour
Loading pattern
random
Tube Volume
1.6 mL
Tube Content
0.4mL sodium citrate 3.8%
Blood draw level
acceptance
+ 4 mm / - 10 mm from normal
Measuring method
infrared transmission scanning
Results
in Westergren mm/h (by interpolation)
Temperature correction
Optional automatic compensation referred to 18°
(Manley) Accepted range 15° - 30° C.
Optical resolution
+/- 0,2 mm
Results resolution
+/- 1 mm
Analytical Range
0 – 140 mm/hr.
Reproducibility
C.V. < 5 % (sample depending)
Interface
RS 232 C for printer
Dimensions
5.5H x 7W x 4D
Weight
2 lbs
Power Requirements
Operating Conditions
Warranty
12VAC 50/60Hz 0.5A
(supplied with 120VAC Power Supply)
temperature 15° - 30° C
humidity: 45% - 85%
2 years parts and labor
15
TECHNICAL SPECIFICATIONS
6.2 Default Dip Switch Settings
The ESRA-10 Analyzer has been equipped with a Dip Switch. Located on the rear panel
this switch has been provided to allow for possible upgrades and enhancements to the
ESRA-10. Do not alter original settings unless instructed by Authorized Service or a
StatSpin representative.
Default Dip Switch Settings
SW1
SW2
SW3
SW4
SW5
SW6
SW7
SW8
OFF
OFF
OFF
OFF
OFF
OFF
OFF
OFF
6.3 Optional Printer
SW2
Set SW2 to ON position to enable printer.
ON
6.4 Temperature Correction
Set SW1 to ON position to enable automatic temperature correction.
The ESRA -10 surveys the room temperature and converts the result to
the reference temperature of 18°C. (Manley). See section 7.5 for more
information on temperature correction.
SW1
ON
6.5 RS- 232 DATA PORT
Pin
2
3
4
5
8
Signal
RXD
TXD
DTR
GND
CTS
Information provided for technical reference only, data signals conform to
RS-232 standard.
16
THEORY OF OPERATION
7.1 Measurement Principle
The ESRA-10 reading principle is illustrated in Figure 4. Infrared transmitter-receiver pair
covers area C of the test tube. The end points of the movement are: L for the lower and H for
the upper.
During movement from L to H the infrared ray cannot strike the receiver because it is
obstructed by the high number of red corpuscles.
As soon as the ray comes out of the cells, the receiver captures the signal and tells the
computer to note the steps required by the motor to reach the level of the moment.
L1 represents the steps for the erythrocyte level at zero time and L2 the steps for the level after
30'.
K also represents the steps necessary to reach the lower part of the test tube from which the
red corpuscles column begins.
Even if the test tubes constantly draws 1.6 mL (ESRAtainer) the blood level in the test tube
may be subject to slight variations depending on the sample.
To compensate this variation within certain limits the instrument adopts the principle of the
percentage of sedimentation with regard to the initial level L1.
7.2 Calculation
From (1) we therefore see how the sedimentation percentage, for example, is calculated after
30 minutes.
(1)
% S 30' = 100 ( L1 - L2 ) / ( L1 + K)
Necessary data for the construction of regression curves between the percentage values
obtained from the instrument at 30 minutes and the values in millimetres of sedimentation after
an hour according to Westergren technique were gathered from three different laboratories
operating in clearly specified conditions.
The result is the curve in Fig.(5) for the test at 30 minutes.
From the second degree polynomial equation (2) applied to the curves in question the roots: a,
b, and c were obtained.
(2)
Y = aX^2 + bX + c
17
THEORY OF OPERATION
legend :
P) test tube support
P
BARCODE
H) infrared Tx-Rx
hight position
L) infrared Tx-Rx
low position
R) red blood cells
S) plasma
C) course of detectors
K) distance from bottom
test tube and infrared
low position
L1) course of initial level
(at time zero)
L2) course of level after
30 minutes
l3) course of level after
60 minutes
S
H
R
C
L1
L2
L3
L
K
Figure 4
7.3 Results conversion in mm/hr
We call a1, b1, c1, the roots for the correlation between the reading at 30' with 1 hour
Westergren.
From (3) results the formula to obtain the mm/h from the percentage of sedimentation that the
instrument indicates in 30'.
(3)
mm/ 1 hour = (-b1 + SQR( b1^2 - 4 a1 (c1-Y))) / (2 a1)
% 30' SEDIMENTATION
where Y = % S 30'
and assuming the discriminate (b^2 - 4a1(c1 - Y)) > 0
Figure 5
WESTERGREN
18
THEORY OF OPERATION
7.4 Results correction to 18°C
The results obtained from the formula (3) express by interpolation the values correlated to the
method of reference related to the room - temperature. See Manley Table 1
7.5 Temperature Correction
ESRA -10 surveys the room temperature and converts the result to the reference temperature
of 18°C. (Manley). This is necessary in order to avoid considerable variations of values due to
different room temperatures. Please contact StatSpin for detailed instruction on enabling this
feature.
Once enabled the ESRA-10, constantly measures the analysis temperature, and converts the
values obtained to the reference values of 18 degrees using the Manley Table 1 therefore
ensuring better reproducibility of results carried out at different temperatures.
Manley Table 1
Temperature
corrected
values
Analysis Temperatures
18 °C
15 °C
18 °C
20 °C
25 °C
30 °C
5
4
5
5
6
8
10
9
10
10
12
16
20
18
20
21
25
31
30
27
30
31
37
45
40
36
40
42
49
58
50
46
50
52
60
71
60
55
60
62
71
82
70
63
70
72
82
93
80
72
80
82
93
104
90
81
90
93
103
114
100
90
100
103
114
125
ESRA-10 converts the results for analysis temperatures between 15 °C and 30 °C. For values
below 15 °C, ESRA-10 will use the factor for 15 °C, and for values above 30 °C the correction
factor of 30 °C.
19
MAINTENANCE and TROUBLESHOOTING
8.1 Maintenance
The overall simplicity of the analyzer means the ESRA-10 does not require special
maintenance. The most sensitive part is the infrared sensors inside the instrument.
Care and attention are required above all regarding the cleanliness of the upper part (test tube
positioning plate) which can be covered when not in use. Do not clean the upper plate with
liquids or damp cloths. The entry of liquids or solid material into the channel openings can
cause considerable damage to the instrument.
8.2 Cleaning Instructions
Any dust can be removed using an ordinary vacuum cleaner.
Label fragments could fall into the channel openings and obstruct a correct reading function
during analysis. Care should be taken to avoid these incidences.
8.3 Self Test
The ESRA-10 has been supplied with a set of reference standards. These standards,
ESRA-ST, are used to check functionality of the instrument and are not intended to be run
on a routine basis. ESRA-ST standards should be stored in a safe location and kept for
troubleshooting. Please have the ESRA-ST nearby should you need to contact StatSpin for
service.
Procedure:
1. Assure temp correction has not been turned on.
2. Turn unit off
3. Insert the ESRA-ST rack into ESRA-10 into channels 5,6 and 7. (orientate rack
with label facing toward you )
4. Be sure all other channels are empty.
5. Turn unit on
6. Unit detects tubes and goes into self-test mode. If “Self Test” does not appear
in display, confirm rack is in proper channels.
7. Results will be displayed within 2 min. Record numbers in top row only*.
8. Turn unit off, remove ESRA-ST standard.
Self Test
Temp.
(a.t.
1
24
93)
(18C
##
##
##)
Values must be within the following ranges:
m.steps
###
1 +/- 0
24 +/- 4
93 +/- 6
Note: Other displayed data are for troubleshooting purposes only. Record only top row
results. Contact StatSpin Customer Service if Values are out of range.
20
MAINTENANCE TROUBLESHOOTING GUIDE
8.4 Troubleshooting
Before calling for a service technician, please check the handling of sample collection,
mixing procedures and operating instructions
ALARM OR TROUBLE CAUSE
REMEDY
ERL
a) sample level high or low
b) the label was not placed in its
proper position. Refer to page 18.
sample has been removed
motor or mechanical defect
a)Repeat sample collection
b)Replace label and repeat
analysis
Repeat analysis
Call service assistance
a) sample clot
b) sample has foam
c) sample measured after 4
hours from sample collection
d) were samples mixed properly?
e) Did you consider the automatic
temp. conversion of the ESRA-10
a) possible obstruction of infrared
barrier by external materials( label
parts, etc,)
b) disconnection or defect of
internal cable.
a)power switch on?
b)power supply working?
c)internal problem
a) Repeat sample collection
b) Re-mix gently
ERS
MECHANICAL ERROR
Data result is not
credible
One or more “RUN”
appear on the display
without tubes being
introduced.
No info on display
Info on display
scrambled
OPTION
T.ERR
“Temperature error”
sensor malfunction
a) Call service assistance
b) Call service assistance
a)Switch power on
b)Check power supply, replace if
necessary.
c)Call service assistance
Call service assistance
Data-analysis is not converted
to 18 C.
Call service assistance
a) Check power supply
Data result is not printed a) Printer power
b) Check cable
b) Printer cable
c) See manual for check
c) Printer configuration
printer configuration
d) Check printer test by
power on when key
f/f is pressed.
e) Replace printer
PRINTER
a) Printer is connected but in OFF a) Switch-on the printer and
NOT READY.....
position
re-switch the ESRA-10
(on the display)
b) Set SW2 in "OFF" position
21
THEORETICAL INFORMATION
9.1 Westergren Method
This is the standard method in accordance with the National Committee for Clinical Laboratory
Standards (NCCLS).
It consists of a support that keeps the Westergren tubes, containing incoagulable blood,
perfectly vertical and hermetically sealed.
Westergren tubes have a diameter of 2.5 mm and are graduated up to 200 mm.
As soon as the sample is taken the venous blood is mixed with a sodium citrate solution at
3.8% (0.13 M), in the ratio of respectively four to one (1.6 mL + 0.4 mL of sodium citrate).
The blood thus prepared and well mixed is drawn into a Westergren tube up to the zero mark.
The tube is inserted in the appropriate support and the erythrocyte level is read after 60 min.
9.2 Variation of ESR
A. Net increase of ESR (100 mm or more per hour)
1. Multiple myeloma and
Waldenstrom macroglobulinemia
2. Malignant lymphoma
3. Leukemia
4. Serious anemia
5. Carcinomas
6. Sarcomas
7. Serious bacterial infections
8. Collagenosis
9. Biliary or portal cirrhosis
10. Ulcerous colitis
11. Serious nephrosis
B. Moderate increase of ESR
12. Internal hemorrhage
13. Acute hepatitis
14. Ectopic pregnancy
unbroken after the third month
15. Broken ectopic pregnancy
16. Menstruation
17. Normal pregnancy after the
third month
18. Oral contraceptives taken
19. Tuberculosis
20. Postcommissurotomy syndrome
21. Dextran administered
intravenously
C. Normality of ESR (most cases)
1. Acute and chronic contagious diseases
2. Acute localized infections
3. Reactivation of a chronic infection
4. Rheumatic illness
5. Rheumatoid arthritis
6. Myocardial infarction
1. First stage acute appendicitis
(in the first 24 hours)
2. Precocious integral ectopic pregnancy
3. Malarial paroxysm
4. Cirrhosis of the liver
5. Arthrosis
6. Mononucleosis
7. Acute allergies
8. Viruses without complications
9. Peptic ulcer
10.Typhoid fever
11.Undulant fever
12. Rheumatic carditis with
cardiac decompensation
13. Whooping cough
7. Malignant tumor with necrosis
8. Hyperthyroidism
9. Hypothyroidism
10. Lead or arsenic poisoning
11. Nephrosis
22
THEORETICAL INFORMATION
_______________________________________________________________________
1) THYGESEN, J.E.(1942). The mechanism of blood sedimentation. Acta Medica Scandinavia, Suppl. 134.
2) WINTROBE,M.M. and Landsberg, J.W. (1935). A standardised technique for the blood sedimentation test.
American Journal of Medical Sciences, 189, 102
3) HARDWICKE, J. and SQUIRE, J.R. (1965). The basis of the erythrocyte sedimentation rate. Clinical
Science, 11, 333
4) International Committee for Standardisation in Haematology (1977). Recommendation for measurement
of erythrocyte sedimentation rate of human blood. American Journal of Clinical Pathology, 68,505
5) LASCARI, A.D. (1972). The erythrocyte sedimentation rate. Paediatric Clinics of North America, 19,1113
6) MANLEY, R.W. (1957). The effect of room temperature on erythrocyte sedimentation rate and its
corrections. Journal of Clinical Pathology, 10, 354
23
WARRANTY
10.1 Warranty
StatSpin Inc., a wholly owned subsidiary of International Remote Imaging Systems,
Chatsworth, CA, takes pride in its products and believes they are manufactured to the
highest possible standards. Consequently, StatSpin warrants to the original purchaser that
the instruments shall be free from defects in material and workmanship under normal and
proper use, (as defined in the Operator’s Manual). For instruments sold outside the United
States, contact the authorized StatSpin dealer in your area for warranty details. This
warranty shall extend for a period of 24 months from the date of installation at an end-user
site. Provided that the purchaser has filled out and forwarded to StatSpin the Warranty
Registration Card, StatSpin will, at its option, repair or replace any unit covered by this
warranty returned to StatSpin with shipping costs prepaid. Repaired or replaced
instruments supplied under this warranty carry only the unexpired portion of the original
warranty.
StatSpin shall not be responsible for damage to a StatSpin instrument resulting from
misuse, negligence, accident, or resulting from unauthorized repairs, alterations, or
improper installation. Additionally, StatSpin shall not be liable for any claims, losses or
damages of any third party or for lost profits or indirect or consequential damages of any
kind even if StatSpin has been advised of the possibility of such damages. The purchaser
shall be deemed liable for any and all claims, losses, or damages incurred by the use or
misuse of the StatSpin instrument by the purchaser, its employees or others, following
receipt of the instrument or other items.
THIS WARRANTY IS GIVEN EXPRESSLY AND IN LIEU OF ALL OTHER WARRANTIES,
EXPRESSED OR IMPLIED. THE PURCHASER AGREES THAT THERE IS NO
WARRANTY OF MERCHANTABILITY OR OF FITNESS FOR ANY INTENDED PURPOSE
AND THAT THERE ARE NO OTHER REMEDIES OR WARRANTIES, EXPRESSED OR
IMPLIED, WHICH EXTEND BEYOND THE DESCRIPTION ON THE FACE OF THIS
AGREEMENT. NO AGENT OR EMPLOYEE OF STATSPIN IS AUTHORIZED TO
EXTEND ANY OTHER WARRANTY OR TO ASSUME FOR STATSPIN ANY LIABILITY
EXCEPT AS SET FORTH ABOVE. THIS WARRANTY IS ONLY APPLICABLE TO THE
ORIGINAL PURCHASER, RESIDING IN NORTH AMERICA AND IS NOT
TRANSFERABLE.
Doc. No. 55-4208-001 Rev. B
24
E.S.R. DATA REPORT
Laboratory.........................................................
Operator name.................................................
data.....................
N.
1
2
3
4
5
6
7
8
9
10
11
12
13
14
15
16
17
18
19
20
21
22
23
24
25
26
27
28
29
30
31
32
33
34
35
pos
patient identification
1
2
3
4
5
6
7
8
9
10
1
2
3
4
5
6
7
8
9
10
1
2
3
4
5
6
7
8
9
10
1
2
3
4
5
25
mm/h