1
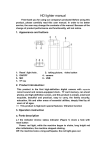
MINI BUTTON CAMERA S918 MANUAL
RECORDING FUNCTION BUTTONS
The contents of this manual may change. Because of product performance and functionality
changes that occur will not do further notice.
1. APPEARANCE KEY
( Photo for reference only, please prevail in kind. )
1: CAMERA
·
·
2: USB
3: TF CARD
·
4: K1 KEY
·
5: K2 KEY
·
6: MIC
·
LIGHT
TRANSMISSION HOLE
2. INTRODUCTION
This product is the first high-definition digital camera with a separate recording and camera
functions MINI DV, TF (SD) card memory, you can take photos and high-definition screen, this
product is simple, small and exquisite, practical, easy to use, in home security and essential
areas of life. It is equipped with even vibration function.
3. INSTRUCTIONS
① SHOWS THE VARIOUS COMPONENTS:
①-1. THE INDICATOR SHOWS:
Status indicator ( icon 6 ) share a hole with the MIC.
Power: red light, while the machine began to shake, initialize After a long red light, the machine
stopped shaking.
Shutdown: long vibrates machine twice, the red light goes out.
USB Status: Insert a USB cable : machine will vibrates. after your computer initiates : you will
be able to read, write, view & copy. ( the red light will be flashing. )
Video mode: Start Recording: short shock machine 2, red light flashes 2 times, lights off. Video
Pause: long-red light flashes 3 times, the machine short-shock 3.
Photo: take a picture of the red light flashes every time; machine vibration time, camera waiting
for: a long red light.
Recording: machine vibration six times, lights flash 6 times after lights off, into the recording.
Low power: red lights flash.
①-2. the button description: K1 key: for boot, shutdown, sound recording. ( K2 key: for
photo, video. )
Note: press the K1, K2 key to implement reset ( when the machine case of crash, please press
the two keys to reset. )
①-3. socket Description: MINI 5PIN USB socket ( Exhibit 2 ) for connecting a computer or
charger, a data transfer and charging. TF deck ( Exhibit 3 ), used to store files, storage camera,
photo paper generated.
①-4. camera: ( Exhibit 1 ), used to pick up video signals.
② SWITCH MACHINES:
Press and turn key ( K1 ) boot, start the camera system initialization ( red light, the machine
began to shake ), the initial complete, long red light, the machine stopped shaking. Enter the
default camera, camera, sound recording standby mode, after the boot of any state, long press
the power button ( K1 ) Save the file and shutdown ( red light flashes 2 times, while the machine
long shock 2 ).
③ MODE SWITCHING:
The machine has quick access to the model state functions: Boot After initialization, the model
can be K1, K2 two-button direct access, no need for mode switching.
④ CAMERA MODE:
When the machine is turned off, insert the TF ( SD ) card ( Exhibit 3 ), press the power button (
K1 ), red light, the machine began to shake, After system initialization, long red light, then the
camera at the default the camera mode, camera mode, recording mode state; long by K2 key,
the machine short shock 2, while the red light flashes 2 times, red light off, this time into the
video camera had been among them in the camera, press "K2 "key to see the current job status,
machine vibration 2, while the red light blinks two times out; short press" K1 "key, the machine a
short vibrates three times, while the red light flashes 3 times longer, then save the file and stop
the camera, back to camera mode, camera mode, recording mode standby. In order to secure
the preservation of documents, camera every 15 minutes to save a file, save the file will remain
under a video recording.
Note: In the video, the unit has a loop recording function.
⑤ CAMERA MODE:
Insert the TF ( SD ) card ( Exhibit 3 ), boot, system initialization is complete, the unit is in the
default camera mode, camera mode, recording mode state; short photographed by key K2, K2
per short by a key, the machine vibration time, red light flashes and a photograph stored, back to
the default camera mode, camera mode, test mode recording standby.
⑥ SOUND RECORDING:
This machine has separate video/audio recording:
Insert the TF ( SD ) card ( Exhibit 3 ), boot, system initialization is completed, press "K1" key,
the machine a short vibrates six times, while the red light flashes 6 times, off light, then the
machine will enter the recording the. Short press "K2" button to view current job status, machine
vibration 6, dual-lamp flashes six out; short press "K1" key, the machine a short vibrates three
times, while the red light flashes 3 times longer, at this time Save the file and stop recording and
return to camera mode, camera mode, recording mode standby.
⑦ MOVING THE DISK:
In the off state, insert the TF ( SD ) card ( Exhibit 2 ), the use of this machine is equipped with a
USB extension cable, connect the machine's USB port ( Exhibit 1 ), the other end and then
connect to your PC USB interface, this time Computer removable disk logo will pop up, you can
also "My Computer" to find the "Removable Disk" icon. When the unit is connected to the PC, the
unit's movement as a computer disk has started to work, you can be very easily see through the
computer, transmit, copy and view. Recorded video file of this machine are: TF ( SD ) Card
Driver \ _DCIM \ 101DSCIM. Need to uninstall the unit, please click on the bottom right corner of
the taskbar icon mobile devices, in which unloading of the removable storage device ( Eject ), to
be safely unplug the system recognized hardware, then disconnect the machine from the
computer.