1
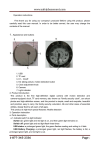
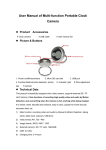
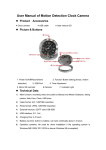
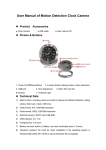
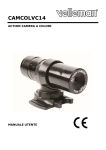
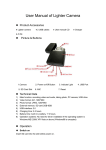
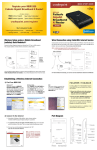
HD lighter manual
First thank you for using our company’s products! Before using this
product, please carefully read this user manual. In order to be better
service, the user may change the contents of the manual. Because of the
change of product performance and functionality, will not notice.
1. Appearance and buttons
1:Reset \ light hole、
3:ON/OFF
5:MIC
7:TF Slot
2:taking picture,video button
4:camera
6:USB
2. Product introduction:
This product is the first high-definition digital camera with separate
record sound and camera-equipped clock,TF card memory, can shoot
photos and high-definition screen, and this product is simple, small and
exquisite, beautiful and practical, easy to carry, the family security,
education, life and other areas of essential utilities, deeply liked by all
users of all ages.
!!!This product is high-tech special features: Vibration function
3. Operation instruction
a. Parts description
a.1 the indicator shows: status indicator (Figure 1) share a hole with
reset button
Power: red light, while the machine began to shake, long bright red
after initialization, the machine stopped shaking.
Off: the machine twice a long earthquake, the red light goes out
USB state: Insert a USB machine vibration one time, when reading,
writing U disk, the red light flash
Video mode: beginning of the video: machine short shock 2 times, red
light flashes 2 times, lights out. Video Pause: After the long red light
flashes 3 times, 3 times the machine short-shock
Photo: take a picture for every red light flashes once; machine
vibration time。camera waiting for: a long red light
Sound recording: machine shake 6 times, lights flash 6 times out the
lights, into the recording.
Low power: the red light flash
a.2 Button Description: open, off key (Figure 3): for boot, shutdown,
sound recording.
Camera, camera button (Figure 2): for photo, video.
Reset (Figure 1):when the machine is not responding, click this
button
a.3 Socket Description: USB plug (Figure 6) for connecting a
computer or charger is for data transfer and charging. TF deck (Exhibit 7),
used to store files, stored video, taking pictures of the resulting file.
a.4 Camera: (Figure 4), used to pick up video signals.
a.5 MIC: (Exhibit 5) to pick up sound.
b.ON/OFF:
Press power button (Figure 3) boot, the camera system initialization
started (the red light, the machine begins to shake), the initial complete,
long red light, stop the machine vibration. Enter the default camera,
camera, sound recording standby mode, after turning on any state, long
press the power button to save the file and shutdown (red light flashes 2
times, while the machine long shock 2).
c. Mode switching:
The machine has quick access to the state function of each mode:
boot initialization finished, the model can "on \ off" camera key and the
"pictures \ camera" directly into the two-button, no need for mode
switching.
d. Camera mode:
When the unit is turned off, insert the TF card (Figure 7), long press
"on \ off" button (Figure 3), red light, the machine began to shake, after
system initialization, long red light, At this point the camera at the default
camera mode, camera mode, recording mode state; long press "camera \
video" button, the machine 2 times the short shock, while the red light
flashes 2 times, red light off, this time into the video camera hasamong
them in the camera, press "camera \ video" button to view the current job
status, machine shake 2 times, while the red light flashes 2 times out;
short press "on \ off" button, the machine short-shock 3 times,
while long red light flashes 3 times, then save the file and stop recording
and return to camera mode, camera mode, recording mode standby. In
order to secure the preservation of documents, recording every 15
minutes or so to save a file, save the file will continue to the next section
of the video recording.
Note: In the video, the unit has a loop recording function.
e.Photo mode:
Insert TF card (Exhibit 7), boot, system initialization is complete, the
unit is in the default camera mode, camera mode, recording mode state;
short press "camera \ video" button to take pictures, each according to a
short, machine vibration time, take a picture of the red light blinks once
and stored, back to the default camera mode, camera mode, test mode
recording standby.
f. Recording:
This machine has a separate recording function:
Insert TF card (Exhibit 7), boot, system initialization is complete, press
"Open \ Shutdown" button, the machine short-shock 6, while the red light
flashes 6 times, put out the lights, when the machine entered
the recording function. In the recording mode, short press "camera \
video" button to view the current job status, machine vibration 6, double
light flashes six times out; in the recording mode, short press "on \ off"
button, the machine short-Zhen 3 times, while the red light flashes 3
times longer, then save the file and stop recording and return to camera
mode, camera mode, recording mode standby.
g. Removable Disk:
In the off state, insert the TF card (Figure 7), directly connected to
your PC USB interface, then the computer will eject removable disk logo,
you can also "My Computer" find the "Removable Disk"
disk character. When the unit is connected to the computer, the machine
as a removable disk computer has started to work, you can easily see
through the computer, transmit, copy, delete files. The machine recorded
video file is: * Disk \ _DCIM \ 101DSCIM. Need to uninstall the unit, please
click on the bottom right corner of the taskbar icon on removable devices,
in which the removable storage device unloaded until the system
recognizes the hardware can be safely pulled out, then disconnect the
machine from the computer
Note: According to the differences in computer configuration or system,
identifying the removable disk will be slightly different, please be patient,
this period is best not to carry out the operation of the camera, so the
impact on the computer to recognize the hardware, if the time is not
recognized to a removable disk, try to re-insert, if still does not recognize
the hardware, make sure your operating system, drivers, USB interface
cable is the things normal; (Note: This confidential USB connection in
the off state to enter "can be Removable Disk ")
h. PC camera function:
First you must install on your computer comes with CD-ROM drive in
the camera. The supplied CD-ROM drive into your computer, run the CD
in the STK02N 2.4.exe to install the camera driver, camera driver installed
after the camera can use a computer. Power or no TF card status,
connected to the computer, the machine into the PC Camera (webcam)
mode, in this mode, you can easily video chat with friends, shooting
emoticons, and so on. Open the webcam picture: Double-click My
Computer →
(Note: This confidential USB connection in the
boot state to enter the web camera function)
i. Special features of this product: shock prompts can be
directly connected to the computer video camera, video
camera files can be stored directly on the computer.
Special features: In the state of the network camera ,Click on the driver
disk file(debut),Set the location of stored video files,Select(webcam),
Click Back to start operation of camera。
j.Charge:
Directly to the PC USB port or charger, can charge the machine, note:
the camera built-in high-capacity polymer lithium battery, no memory
effect, can be used with the charge, but the initial use of the first five, set
the battery After charging to saturation and then to activate the battery
maximum capacity, access to standard working hours. In order to
maximize battery energy storage capacity of each charge, in the light
indicates fully charged continue to charge 30 to 60 minutes.
k. Time changes:
Camera provides a video file to display the function of recording time,
you can set the time according to actual needs, the time format for the
year. Months. Day: minutes: seconds. Set as follows to connect a
computer to find the mobile disk, the disk space to move the mouse right
click pop-up menu "New" → "Text Document" to the document named
"time" (the letters must be lowercase) Its extension is ". txt". You can
also desktop built in accordance with the method described above, such
a folder then copy it to disk folder. Time to open the folder, set the time
format such as: 2000.01.01 00:00:00, year, month, day and hour, minute,
seconds, separated by spaces. Then save it. After the files are kept safe
exit hardware, boot time is set. After time setting, video file time to time
you set one to the. Note: Time must be set after the power came into
effect.
l. Exception handling:
Power has been flash red: card is inserted, or card is damaged.
Camera battery is low margin, fast flashing red light about 3 seconds,
automatically save the current image file and shut down, if you want to
continue using the camera, please use the charge.
Improper operation of the camera due to accidental or other special
reason to stop responding when the rod with a diameter of 1mm press
the "reset" button (Figure 1), reboot and then use.
Can not start: the battery has power, please charge; "reset" button,
power off, reboot.
No video: The card is plugged or damaged.
Not associated computer: Make sure your operating system, drivers,
USB interface cable is the things are normal.
No disk space capacity, TF card is plugged or damaged.
3.
Parameters
Project-related parameters
video format AVI
M-JPEG video encoding
Video Resolution 640 * 480
Video frame rate 30fps
Playback software operating system or major audio and video playback
software
Picture format JPG 1280 * 960
Photo 5M pix
Ratio of 4:3 image
Support System Windows me/2000 xp 2003/vista: M
Battery capacity 200mAh
About 90 minutes working time
Charging voltage DC-5V
MINI 5pin USB Interface
Storage support 1G \ 2G \ 4G \ 8G \ 16G TF card
High-capacity lithium polymer battery type power