1
ThankYou!
\
We are grateful you have chosen FM VHF/UHF portable
transceiver. This 2-way radio represents novel design and stable
performance. lt is developed to meet the demands of portability,
easy-operating and rnultifunction. The small size and reasonable
price will satisfy you.
MODELS QOVERED BYTHIS MANUAL:
\uxvuHr
FM TBANScEIvER
il
1. Please DO NOT try to open the transceiver,
c it may do
damage to the transceiver,.
2. Please use the matched antenna in case it shortens
communication distance. Please DO ilOT ffi
is installed. Please also use battery pacr(
offered in case of any damage.
bfu trrEnna
ild dragr we've
b iect srfght for a
long time; DO NOT place the transcdrrer rs ilf UiE
dAf
3. Please DO NOT expose the transcduer
and dusty environments; DO NOT wash the bansceiver with
Thank you for
using
recommend you:
.
.
.
FM transceiver. Before using, we
Please check whether the package is broken.
Unpack the transceiver carefully: Identify the items listed in the
following table.
lf any damage or miss has occurred during shipment, contact
with dealer immediately.
SUPPLIED ACCESSORIES
detergent with harsh chemicals.
4. Please turn off the power immediately and remove the
rechargeable battery pack fiom the transceirer if any dnorrnal
odor or smoke is detected, and tfren contact the deder.
lii
Iransceiver
1
Rubber Antenna
1
7.4V Li-ion Battery
'l
String
1
Desk Charger
1
Belt Clip
1
User's Manual
1
...
ilr
I
l
Charge Battery Pack
lnstall/Remove Battery Pack
lnstall Belt Clip ......................
...........-..................- 3
Shortcut Operation
....................... I 2
............................... 4
Basic Operation
Switch Power On/Off.
I
Adjust
8
Select
I
Menu Operation
Delete Channel
8
8
I
I
I
I
FM Radio
o
Search Broadcast Channel ..........-..
Set SQL Level
liu
11
vl
o VHF Frequency
.
.
.
.
Range/1 36-1 73'995MHz
UHF Frequency Range/400-469'995MHz
199 Stored Channels
CTCSS/DCS
VOX Function
o Calling Function
.
PC Programmable
o Wired
CoPY Function
. Alarm Function
. Group Programmable
. FM Radio Function
. High/Low Power Selection
o
.
NarrowAVide Bandwidth Selection
Chinese/English Voice Annunciation(Optional)
Ir
MIC
Charge Battery Pack
The battery is not charged in the
factory and please charges it before
using. The first charging can't
reach full capability after buying or
storing for a long time (more than
two months). Please charge and
discharge it for two or three times to
really reach full capability.
Plug the uncharged battery or
transceiver with battery into charger, and make sure the battery
contact with charging terminal. Red light means charging on,
while green light means off.
Notice:
.
Please do not charge the battery again if it is charged fully,
otherwise, the life of the battery will be shorted or it will be
damaged.
.
Please turn ofi the transceiver before charging. lt may disturb
charging if you use the transceiver when charging.
. lt comes to the limit of the battery life if the use time of
transceiver shortens obviously even charging is correct. Please
change new battery pack.
lnstall/Remove Battery Pack
Match battery pack with button
at the back of transceiver, then
pack. Push battery latch on the top of
the transceiver to release the upside of
battery pack, and then pull it away froni the
transceiver.
lnstall Belt Glip
Fix belt clip with two matched screws to
make it convenient to take if necessary.
lnstall 0ptional Speaker/MlG Earphone
Used for earphone and wired copy between
two radios, and also operate with pC
software. (Please contact the dealer about
data wire and PC software.)
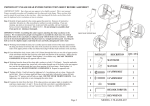
Keypad
lnput Frequency and operate function.
@m@@
@@@@
@@@@
@@@@
slide battery pack upon until
hearing a clatter.
Please turn off the transceiver
first before removing battery
ls
4l
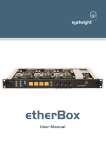
LCD Screen
B'-o
AO
t J t,F @ B
,HEEEEE#
SKIP LM DV
CI)
F
\ppear when CTCSS is on
@
{ppear when DCS is on
.$
Appear when VOX is on
SKIP
+
..\\ Yll
You can find kinds of indicators on the screen showing selected
content. Sometimes you may forget what these indicators
represent or how to set them. And then the following table can be
useful.
Add scanned channel
lncrease frequency
Decrease frequency
d
Appear when keypad is locked
q>
\ppear when group is on
AO
\ppear when FM radio is on
L
-ow power transmitting
pear when pressing F and
Display frequency in use or menu function
Appear when reverse frequency is on
ls
6l
I
FR Mode(Frequency Mode)
Under FR mode, you can re-press
channel number.
@
ro select full frequency or
pr"..@Eto
You can
change, or directly input your needed
full frequency or channel number.
I
CH Mode(ChannelMode)
Press@o swift the power
on,then switch to CH mode. Under
to change channel number, or
directly input your needed number. You have to store at least one
channel, or you can not enter this mode.
CH mode,You can press
NOTE:Press
@ [El
anO switch the power on,and you can change
@
between FR and CH mode.
I
Menu Mode
then press [@] to enter menu. tren press@{El
to select. You can enter menu to operate, and operation details
please refer to "Menu Operation."
press
@
I
lgl
I Switch Power On/Off
Turn the Power/Volume knob clockwise to switch on the
transceiver; turn the Power/ly'olume knob counterclockwise to
switch the transceiver off.
I
Adjust Volume
Turn the PowerAy'olume knob clockwise
it counterclockwise to decrease volume.
I
to increase volume; turn
Select Frequency
Press@to
i
nc
rease f req
uen
cy; pr"."[ vl=]to
d ec
rease
frequency.
lf you can't get your needed frequency, please change frequency
step, details refer to "Set Frequency Step."
Or you can input your needed frequency via keypad, details refer
to "Keypad"
I
PTT Transmit
1. Press and hold "PTT" and speak normally. (Red light flashes
while transmitting.)
2. Release "PTT" to turn to receiving state.
I
VOX Transmit
1. You can set VOX plus and VOX stop to delay transmit time in
menu function.(VOX plus:1 is the highest level,you need to speak
loud to powerfully transmit; 9 is the lowest level.)
2. Press@, then press {ffi] to turn VOX function on.
3. lnsert the MIC earphone.
4. Speak to MlC, and it can transmit when you speak loud
lt
8l
enough.
I
MONI
1. Press MONI to enter Moni mode. (SQL on)
2. ode(SQL on), then release 'MONI', the transceiver is still in
MONI mode; then press 'MONI' to exit Moni mode.
I
Turn On/Off FM Radio
Alarm Function
t . tlotO I rtr I tor 1O seconds to enter
Alarm function.
Turn the Volume knob to change alarming volume.
3. lf there is frequency in stored channel, the transceiver will auto
Under standby mode,press @ to enter FM Radio function,then
press "MONI" to switch FM Radio on/off. When radio is on, LCD
screen displays"AO".Under Full Frequency mode,you can input
4-5 digital numbers, or you can press @)[[il=l to change the
radio frequency; frequency step is SOK;Under CH mode,you
press@)@ or input 2 digital numbers(O1 -25)to change
transmit.
curent channel.
4. Under Alarm function, the transceiver rings and transmits for 20
seconds, and there are 1 0 seconds between the first and second
ringing. After recycling for 3 times, it exits, then back to normal
I
Under FM Radio mode, press
state.
mode(You can't switch when FM Radio is off.)
5. While alarming during 10 seconds, the transceiver exits when
receiving signal, then back to nonnal state.
6. While alarming, you can also press "PTT" to exit.
I
I
2.
I
Calling Function
1. Press [T.rl tfr"n release it shorfly,transceiver enters calling
state; A calling signal is transmitted, and it lasts for 4 seconds.
2. Under calling state, you can press PTT to stop calling, back to
standby state.
"an
Select FR/CH Mode
(@
to switch FM radio,s FR/CH
Search BroadcastChannel
Under FM Radio mode, you can use this functon to quicky get
your needed channel.
Under FM radio frequency mode,pres.
function,then pre"s
lffilto
@ to enter this
search broadcast channel.
LCD displays"Rs UP/dN". you can press G)lfill
to change
searching direction. Press any other key to exit searching.
3. When calling is received, the transceiver rings, and matched
icon flickers in the screen.
frequency and then exits.
I
While searching, press PT-[ and lt will auto exit.
Keylock On/Off
1. Under standby mode,hold
keylock onloff.
ls
@
tor one second to switch
When certain channel is searched, FM radio stops at the searched
I
Set MON! Mode
Setting Way:Under FM Radio mode,press
@
to enter function
lol
option,then press
F
to enter; press
@)]
to enter this function;Select DW,then press
@ [Fl
to select,finally press F to confirm.
t
For A86, pr"""
then pess 0-9,#/. to operate, and you can
edit the function easier.
@,
NOTE:When DW is ON,you can MONI signal under FM radio
mode; while receiving signal, it will exit FM radio mode to enter
receiving mode. After speaking, it will auto return to FM radio
I
mode.
t. PresstD,then press@lto
When DWis OFF, it will stay in FM radio mode.
2. Press
I SetSQLLevel
@,o
@
I
@
Store Channel Data
Under FM Radio mode,input radio frequcny, pr"""
pr"""
@
to store channel data; press
channel you want to store,then pr"ss
I
[D
@m
@
I
[D,th"n
Reverse Frequency Function On/Off
[D
to store data.
When this channel is without transmit frequency, you can't enter
Reverse Frequcny function.
Delete Channel Data
I
!I
,o delete. After deleting, LCD displays"xx DEL". You can go
to delete next channel.
@,o
Press
then press @)lto switch Reverse Frequency function
on/off. While this function is on, the icon will show on the screen.
to select the
Set FM Radio mode and CH mode,then switch the power off.
Hold @ and switch the power on to delete FM radio channel
data. Now LCD displays"xx DEL". eress G)[F] to select
channel,then press @,lCD displays"xx YES". Finally press
VOX Function On/Off
Press
then press
switch VOX function on/off. While
VOX Function is on, the icon will show on the screen.
0-9. Then press any key to exit.
I
@E
set SQL level. There are levels 0-9.
to select SQL level,confirm and store, then
press any other key to exit.
to function option,then press
set SQL level. Youc an press @@
to select level
Under FM Radio mode,press
Set SQL Leve!
I
Set FrequencyStep
1. Press(Dthen press
ao
5K/ 1 0K/ 1 2.5K/20W25W 30K/ 50K.
@
set frequency step. There are
2. Press
to select frequency step,confirm and store,
then press any other key to exit.
@E
I
Set Different Frequency
@
@,o
eress
then press
switch different frequency. With
plus frequency, LCD screen shows +; with reduce frequency, LCD
I rr
121
screen shows
I
Reveive signa.
-,
I
Scan
Set Transmit Signal
@ tn"n pr""s [@lto begin scanning.
2. Press @ while scanning, the radio will save currently
you press
@
2. Press @
directly exit.
3. Press
1. Press
scanned frequency/channel, then exit scanning. lf
any other key, the radio won't save any frequency/channel and
3. While scanning,,press
@lEl
5. CH Mode:while out of group mode, radio will scan the stored
channel(you can store 199 channels in total);under group mode,
radio will scan the stored channel in the group(you can store no
more than 20 channel each group).
6. lf there are less than 2 stored channels, and they aren't added,
radio can't scan.
Set TransmiVReceive Signal
1. Press
Z. Press
[D
@
tnen press
@,to
to switch signal type,see as below:
@
N
to adjust DCS,see as below:
DCS
a. Press
@)lmlto
5. Press
@,o
N--+DCS
I
select your needed group.
store and exit. Other keys are no use to exit'
NOTE:When under CH XXX Mode, you can't set Transmit/
l.J
@l
to set transmit signal.
ro switch the signal type,see as below:
OFF+CTCSS+DCSN+OFF
@
to adjust DCS,see as below:
DCS N
+DCS
I
@)El to select your needed group.
5. Press @ to store and exit. Other keys are no use to exit.
a. Press
NOTE:When under CH XXX mode, you can't set transmit signal.
I
Menu Option
@
@,o
Press
then press
refer to below operations.
I
set TransmiVReceive signa.
OFF--+CTCSS+DCS
s. Press
tnen press
to change scanning direction.
4. VFO Mode:radio will scan all frequency ranges.
I
1. Press
enter menu option. Details please
Select Working Group
[D then press @,o select working group.
2. Press @m
to select your needed group. There are 10
'l .
Press
groups A-J to select. Only the group with stored channel(s) can
be selected.
3. Press any other key to exit, back to standby mode.
NOTE:With the radio under CH mode,and Group Function is
on,your operation is available.
I
Store NewOhannel
1. Under full frequency mode,you can store new channel.
14ll
2. Prses
@
tn"n pre"" [@r to store new channel; the channel
number and F will flicker on the screen.
3. Press
to select the channel you want to channel, or
directly input number to select the channels to store.
@m
+. Press
I
[D
to confirm and exit.
Set High/Low Power
@
,o enter function option,then
1. Under standby mode,press
pres"
to switch high/low power.
@
2. When it's low power, LCD screen show"L".
(D then press @l radio enter menu function. Press
@[E] ,o select menu options;
Press (@
.- to enter, then press @@ to adjust,finally press
:
It-do confirm and back to last option.
You can also press lffilto exit,back to last option.
Press
Menu Details As Below:
1. Set Ringing
Ofi:turn off ringing
On:turn on ringing
NOTE:When radio is without"Voice Annunciation Function",you
have to close "Voice Numbering Function" in No.17 to allow
ringing and beeping.
2. Set Background Light
On:background light keep on
Off:background light keep off
Auot:background light on when you press any key; it's otf
without any operation within 10 seconds.
3. Set Timeout
You can select:OFF/30/60/90/
1
20/
1
50/
1
80/21 O/24O/27 0(s)
4. Set Different Frequency
You can directly input 5 digital numbers of different
frequency:(00.000M-99.995M)(lt can only be set under full
frequency mode).
5. Turn On/Off Group
I rs
16
I
On:turn on group
Manu:lock keypad by hand
Off:turn off group
AuTo:auto lock keypad
There are total 199 channel in this radio, divided in 10 groups.
There are respectively 20 channels in first g groups, while 1g
channels for lsat group.
The channels 1-20 are in group A, channels 21-40 are in group
B, followings are according, and channels 181-1gg are in group
J.(lt is available only under CH mode.)
6. Show Curuent Battery Voltage
Show current battery voltage when switching the power on,
back to standy mode after 1 0 seconds.
7. Set VOX Level
Set VOX from levesl
13. Set Boot-strap Display
OFF:not show any content
DC:show current voltage
MSG:show greeting words
14. Set Boot-strap lnformation
You can set information with 5 letters. press @El
,o
select letters; press (@ to switch to next letter; **
l@ a
cancel front letter, press @,o confirm and exit.
15. Set Channel Name
-9
On:show channel name under CH mode
8. Set VOX Timeout
Off:no show channel name under CH mode
You can select:0.3S/0.5S/1.0S/1 .5S/2.0S/3.0S
16. Set MONI Mode under CH mode
9. Save Time
On:turn on save power function
Off:turn off save power function
10. Set Scan Mode
When DW is ON,you can MONI signal under FM radio mode;
while receiving signal, it will exit FM radio mode to enter receiving
mode. After speaking, it will auto return to FM radio mode.
When DW is OFE it will stay in FM radio mode.
CO:carrier wave scan
17. Voice Annunciation Function
TO:time scan
When VOIC is ON, turn on voice annunciation function
SE:single time scan; it stops when any signal is scanned
When VOIC is OFE turn off voice annunciation function
11. Set Scan Add/Delete
ADD:add
DEL:delete
12. Set Keylock Mode
ltt
NOTE: voice annunciation function must be turned off if radio
is without this function, to allow beep and ringing work.
18. Wide/Narrow Bandwidth Selection
W: select wide band
N:select narrow band
18
1
Note:When you select wide band, please set same for radios in
same group, to guarantee voice quality.
I
Keypad lnput
1. Your radio must be under 'Channel + Frequency" mode.
1. Under CH mode,input 1-3 digital numbers to switch current
frequency. After inputing, radio will switch to your input channel if
it has stored frequency, unless it returns to original channel.
eg:CH 1:(input 001)
CH 98:(input 098 or 98)
CH 123:(input 123)
2. Under FR(full frequency) mode,input 6 digital numbers to switch
current frequency. After inputing, radio will switch to your input
frequency if it's available, unless it returns to original frequency.
Irs
2. Hol@to switch power on. Now LCD screen shows"DEl",and
channel number fl ickers.
to select your needed channel,or directly
@m
input your needed channel number,then pr"". @, now LCD
3. Press
screen shows"YES'.
4. Finally press @ to confirm. After deleting first channel, radio
switches to next channel stored with frequency. lf all channels are
without frequenry, radio will exit, back to full frequency mode.
201
oFF
I
SetStored Channel
go16 [r'ro0 ano
@ to switch power on. LCD screen
[D, f-CO screen shows*CH-1 ".
1. Select Channel Number
@)lml
to select your needed channel, you can select
ranges from 1 -199.
2. Set Receive Frequency
Press @ to set receive frequency. Press
@ *o select whether
setting receive frequency of current channel. lf you want to delete
curret channel, you can pre". @, LCD screen shows,,-----",then press @ ,o confirm,now this channel is deleted. Radio
go to delete next channel.
You can also input 6 digital numbers,then pre""
then radio enters to receive signa programming.
You calso can press
@m
change current frequency. Press
(D
to confirm,
to change frequency step to
@
switch current frequency
step(sMOK/1 2.5K/2OK/25K/3OK/5OK). Press {D to confirm
and tner to receive signal programming.
ao
3. Set Receive Signal
When you enter this option,LOD screen shows(3 OFF), press
@ ao select your needed signal type, then press @m
to select your needed group of receive signal, press (F, to
confirm.
lzt
67.0
d 023N
--->OFF
When you select DQT signal, you can press
DCS N
shows"SELF", then press
ersess
@@@
+
+
@
+DCS
@
to adjust.
I
4. Set Transmit Frequency
Please refer to "Set Receive Frequency".
5. Set Transmit Signal
Please refer to "Set Receive Signal".
6. Set Busy Channel Lock
eress
@)[
press(Dto
lto select
OFF,WAVE Lock or CALL tock, then
confirm.
7. Set Add/Delete Scan Function
@)[F]l
itDto confirm
eress
to select Add or Detete scan function,then press
8. Set High/Low Power
ryS. @[El
@
to select High or Low power function,then press
to confirm.
9, Set Channel Name
You can set channel name with five digital names, press
to select letter, then pr""" @ to next tetter,press
@m
fo
delete
front letter,then pr""" [D to confirm. Now
@
current channel is programmed, and radio enters to next
programming channel.
221
begin copying. While copying,the copied radio will show"Cl
I
Delete All Channels/Frequencies
Press
[trlontl
anO
(D to switch power on,LCD screen
(D, now LCD screen shows,,VFO,,.
shows"ClEAR",then press
eress @{ffi1 to select"VFo"or"FUll", finally press
delete, now radio auto returns to standby mode.
OU",copying radio show"CL lN". When successfully copied, the
copied radio shows"End", then auto back to the original state of
wired copy state;when copy failed, the copied radio shows"Err",
then auto back to the original state of wired copy. lt takes about
15 seconds to finish copying.
@,o
When select"VFO",radio deletes all frequency information, and
save all channel information.
When select"FULL",radio deletes all frequency and channel
)nformat)on.
I
PC Program Function:
1. Connect the radio's SP/MlC jack and computer
COM(communication port) with the program cable,then switch
power on.
2. Turn on the computer,and launch the program software. Read
the parameters of the radio, then select your needed frequency
and other function parameters. Afterwards, click related button to
write to radio, or directly press the relative signal on the toolbar to
start writing. After the progress is finished, LCD screen displays
"Succeed". Now all parameters are written in the radio.
I
Wired Copy Function
eress {froNtl and
[F]
to switch power on to enter wired copy
state, LCD screen displays"ClonE",then press MONI to
lzs
241
High
:1
Power:SW
Frequency Modulate
36-1 73.995MH2 UHF:400-469.995MH2
ximum Frequency
Plase lock frequency synthesize
Power<1300mA
Power<800mA
<0.20uV(12dB SINAD)
DC7.4V Li-ion battery
Simplex of co-frequency or alien frequency
102mm x62mm x35mm
2209(including battery pack)
lzs
Low Power:1W