1
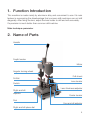
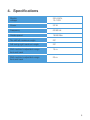
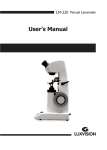
LENS
USER’S MANUAL DRILLING MACHINE
DM 2000
Notification
Dear Users,
Thank you for your purchase of DM 2000 Lens Drilling Machine . Please take time to
read our user’s manual carefully before use.
This guarantees you to make full use of this unit and prolongs the operation life of
this unit.
Precautions
If you have detected abnormal heat, smoke, noise or smell, immediately stop using
the product.
In the event of an abnormality, turn off the power and disconnect the power plug from
the power socket. Continuing to use the product may result in electric shock or fire.
Observe the instructions given below regarding the power cable:
•
•
•
•
•
•
Be sure to use the supplied or specified power cable.
Do not modify, forcibly bend, kink or pull the power cable.
When disconnecting the power cable from the AC outlet, be sure to hold the cable
by the plug.
Pulling the cable may cause wire breakage or shot circuit, resulting in fire or electric
shock.
Do not connect or disconnect the plug of the power cable to/from the AC outlet
using wet hands.
Doing so may result in electric shock.
Do not touch the product with wet hands while the power cable is connected
to the AC outlet.
Doing so may result in electric shock.
If the product will not be used for a long period, disconnect the power cable
from the power source. Leaving the cable connected to the power socket for
a prolonged period will consume electricity and may result in heating.
Content
1.
Function Introduction .....................................................................................4
2.
Name of Parts ................................................................................................4
3.
Function ........................................................................................................5
4.
Specifications .................................................................................................6
1. Function Introduction
This machine is made mainly by aluminum alloy and convenient to use. It’s main
feature is overcoming the disadvantage that common drill machines can not drill
diagonally. After fixing the lens, adjust the lens holder to drill and mill accurately.
It’s precision is much better than common drill machine.
Main technique parameter
2. Name of Parts
Handle
Depth locator
Motor
Angular turning wheel
Drill chuck
Drill bit
Lens locator
Switch
Lens thickness adjuster
Right and left
adjustor
Center locator
Dial
Fore and aft adjuster
Right and left place dial
4
3. Function
1.
It uses dual-purpose motor driving Drill Bit directly, which turning is controlled
by switch. The machine can drill straight hole, right and left diagonal hole. If drill
straight hole, replace the second hand of sawyer to the center 0.5. If drill diagonal
hole, make the second hand to an angle and fix the Lens Angles Site Screw.
2.
Attach the drill bit: loose drill hole with accessory drill bit lock, make machine
head to left, put Drill Bit wanted to the hole, turn Fore Screw and make drill bit
close to dial. Press handle, keep 0.5mm distance between drill bit with dial, and
tighten the hole. If depth of drill hole is not enough, use part 8-depth locator to
adjust and ensure that the surface of dial will not be injured when drilling.
3.
The two red nips on Lens Holder is used to fix lens. Up turn to loose and down
turn to fasten. Before drilling, put and fasten the lens wanted relatively according
to Right and Left scale and Fore and Aft Scale, then use the screw to adjust the
lens to correct position. If drill and mill the edger of lens, move the screw of lens
holder to point B. Lens Holder may be moved freely.
5
4. Specifications
Electric
voltage
220-240V,
10-120V
Power
30 W
Frequency
50/60 Hz
Rotate speed
18000 Min
The drill left maximum angle
20°
Drill swing right maximum angle
20°
Shift machine´s adjustable range
front and back
15 m
Shift machine´s adjustable range
front and back
20 m
6
LUXVISION is not responsible or liable for indirect, special or consequential damages arising out of or in
connection with the use or performance of the product or damages with respect to any economic loss,
loss of property, loss of revenues or profits, loss of enjoyment or use, costs of removal or installation or
other consequential damages of whatsoever nature. Some states do not allow the exclusion or limitation
of incidental or consequential damages. Accordingly, the above limitation may not apply to you.
Every effort has been made to ensure the accuracy of this manual. However, LUXVISION, makes no
warranties with respect to the documentation and disclaims any implied warranties of merchantability
and fitness for a particular purpose. LUXVISION, Inc. shall not be liable for any errors or for incidental or
consequential damages in connection with the furnishing, performance, or use of this manual or the examples
herein. The information in this document is subject to change without notice.
7