1
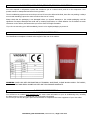
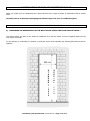
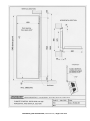
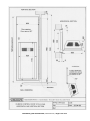
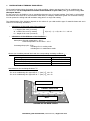
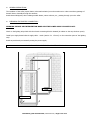
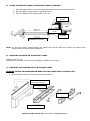
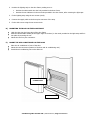
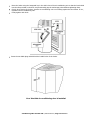
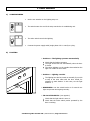
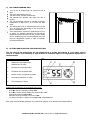
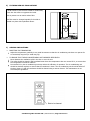
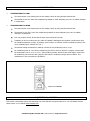
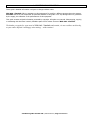
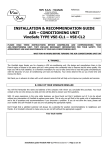
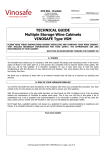
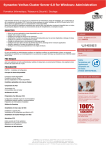
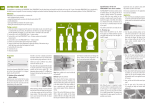
NVS S.A.S. 2 Rue des Artisans F-68280 SUNDHOFFEN Tel. + 33 (0)3 89 71 45 35 Fax. + 33 (0)3 89 71 49 73 Email: [email protected] Web : www.vinosafe.com Reference: 446vsesavev12 Last update : 01/04/09 INSTALLATION & RECOMMENDATION GUIDE AIR – CONDITIONING DOOR VinoSafe TYPE VSE 12 – VSE 40 PLEASE READ THESE INSTRUCTIONS BEFORE ASSEMBLING AND COMMISSIONING YOUR AIR-CONDITIONING DOOR. THEY INCLUDE NECESSARY INFORMATION FOR YOUR SAFETY, THE APPROPRIATE USE AND MAINTENANCE OF YOUR CABINET. WAIT FOR 48 HOURS BEFORE TURNING THE CABINET ON A. THANKS… The VinoSafe team thanks you for choosing a VSE air-conditioning door. We design and manufacture them in the French region of Alsace in the same spirit as a wine grower who constantly tries to improve her/his wines quality. We hope you will be fully satisfied. It is therefore mandatory for you to take some time to read this guide simultaneously with the discovery of your cabinet look and features. Your wines deserve this as you invest time and money into them. We thank you in advance to share with us all relevant remarks that will help us to improve our products and services. B. ROLE OF YOUR VINOSAFE RESELLER You will find hereunder the name and address of the company with whom you concluded this purchase. Your local contact is the one who knows you best and who will be able to answer your first questions. With 15 years experience in the wine cellar business, we have found out that 2 problems out of 3 can be solved without any intervention of VinoSafe to replace some parts. This is why you will find in this guide a lot of explanations and a list of questions and recommendations if you encounter a problem. If you do not solve the issue, please call you reseller and call VinoSafe in case you are not getting the appropriate replies. Don’t forget that a satisfied customer will always be a potential for positive recommendations to neighbours and friends. It is VinoSafe’s interest to make sure you are not left without the appropriate support! Your local reseller Installation guide VinoSafe VSE / 446vsesavev12 / Page 1 out of 17 C. DELIVERY, UNPACKING, STORAGE, REMOVAL CONDITIONS You have acquired a refrigeration system that contains a gas in a closed circuit, and oil in the compressor. Your product cannot be transported and stored in any position. The air-conditioning system must never be put to bed. It has to be delivered inclined, then after out packing, it always must remain standing (respect the same records at the time of a move) Please check that the packaging is not damaged before you unpack. Damages to the outside packaging could be significant of transport damages that could end up creating dysfunctions or outside defaults. Do not hesitate to make comments on the delivery documents that you receive from the freight forwarder. If you do not start using your VSE immediately, leave it in its original packaging to protect it. D. CABINET IDENTIFICATION The identification nameplate is located at the top/left of the rear of the cabinet. WARNING: WHEN YOU NEED INFORMATION OR TECHNICAL ASSISTANCE, PLEASE ALWAYS SUPPLY THE MODEL, TYPE AND SERIAL NUMBER LOCATED ON THIS VINOSAFE NAMEPLATE. E. PRODUCT PRESENTATION You will find on our website www.vinosafe.com the most recent information on your air-conditioning door, including the latest version of this user manual that you will be able to download. On our site you can also buy spare parts and accessories to complement the inner equipment of your wine cellar. Installation guide VinoSafe VSE / 446vsesavev12 / Page 2 out of 17 F. STORING WINE Your VinoSafe air-conditioning door has been designed to provide ideal conservation conditions for your wines. Wine is a complex product, which develops very slowly over a long time, requiring specific conditions in which to mature. All wines are stored at the same temperature but the temperatures for serving and tasting vary depending on the wine. As in wine producers' natural wine cellars, it is not the storage temperature itself, which is important, but rather the need for the temperature to remain constant. In other words, if your store is set to any temperature between 10°C and 14°C, your wine will enjoy ideal conservation conditions provided that this temperature is not subject to fast and important variations. IN ANY CASE, IF YOU NOTE ANY ANOMALY IN THE TEMPERATURE OR HUMIDITY INSIDE YOUR STORE, REMEMBER THAT YOUR WINES WILL ONLY BE AFFECTED IF THEY ARE EXPOSED TO THESE ABNORMAL CONDITIONS FOR A LONG TIME. G. SAFETY RECOMMENDATIONS Use this appliance only for the purpose for which it is intended: - Storing your wine at a temperature between 8° and 15°C. Any other purpose may be dangerous and is forbidden. The manufacturer may not responsible if the appliance is not used properly. An appliance that has been damaged (impact, flooding, fire, surges caused by lightning, etc…) may be dangerous for your safety. If the appliance has suffered damage, unplug the appliance immediately or disconnect the power supply and contact the manufacturer (see rating plate on the appliance). This appliance complies with current safety regulations. Maintenance work (such as electric connections) must only be carried out by qualified engineers. Faulty connections or repairs that have not been carried out correctly present a considerable danger for the user. Make sure that the voltage on your mains supply corresponds to the rating shown on the rating plate. This appliance may not be electrically safe if it is not connected to an effective earth lead. It is essential that this basic safety measure is taken and, if there is any doubt, the domestic wiring installation should be checked by a qualified electrician. The manufacturer shall not be held responsible for the consequences if the appliance is not earthed or if the earth is faulty or incorrectly connected. For safety reasons do not use an extension lead. Disconnect the appliance from the power supply while undertaking maintenance work or cleaning (unplug the appliance or open the circuit breaker). Do not allow young children to play with this appliance or to use it. Do not leave the keys within their reach. They could lock themselves inside. Do not lean on the door when it is open. If liquid accidentally runs into the air conditioning unit, (broken wine bottles, etc…), unplug the appliance immediately or disconnect the mains supply and contact the manufacturer (see rating plate on the appliance). Make sure that appliances are rendered unusable when they are no longer in use. Unplug the appliance and cut the cable. Then take the appliance to an approved refuse tip. Keep the manuals with your appliance for future reference. Installation guide VinoSafe VSE / 446vsesavev12 / Page 3 out of 17 H. INSTALLATION OF YOUR AIR CONDITIONING DOOR When you unpack your air-conditioning door, check that there are no signs of impact or deformation and no surface faults. Carefully remove all protective packaging and adhesive tape from your air-conditioning door. H1. PREPARATION OF THE “WINE CELLAR” A) MEASURING THE RESERVE AREA IN THE WALL BEFORE FIXING THE DOOR SUPPORT FRAME : The support frame, the base for the whole air-conditioner door and door frame, must be completely fitted into the wall of your wine cellar. For this purpose, it is advisable, if necessary, to build the reserve area respecting the following dimensions as shown opposite: S T A N D A R T 2 0 3 0 S P E C I A L 1 9 1 0 Installation guide VinoSafe VSE / 446vsesavev12 / Page 4 out of 17 Installation guide VinoSafe VSE / 446vsesavev12 / Page 5 out of 17 Installation guide VinoSafe VSE / 446vsesavev12 / Page 6 out of 17 B) INSULATING WORK IN THE WINE CELLAR : Your room must satisfy precise insulating criteria so that your VinoSafe air-conditioning door can effectively and durably regulate the ambient air while minimising your electric consumption. IMPORTANT: The insulating work must be carried out on all the surfaces of the wine cellar (walls, grounds and ceiling) according to the following procedure INSTALLATION OF A VAPOUR CARRIER : The water vapour tends to migrate through the surfaces from outside the cellar (warmer) to inside the cellar (cooler). This excessive addition of humidity causes the seeping of water, producing several harmful results : Poor storage of labels and corks with risk of mildew. Uninterrupted operation of the air-conditioner reducing the length of its life. In fact, all the airconditioner’s energy is used to dry the cellar and not to cool the air. Damaging of the thermal insulation. To avoid this, it is essential to equip all the interior surfaces of the cellar with a vapour barrier (walls, ceiling and ground). This vapour barrier must be waterproof and continuous. This can be archived : By covering the wall with a polythene type plastic film. By covering the surfaces with an aluminium / bitumen compound. By covering the surfaces with an aluminium / polythene compound. By applying bitumen to the surfaces. Installation guide VinoSafe VSE / 446vsesavev12 / Page 7 out of 17 INSTALLATION OF THERMAL INSULATION : The thermal insulation limits the heating of the cellar providing a better operating rate of the air-conditioning unit. We remind you that it is important to insulate all the surfaces of your cellar (walls, ground and ceiling) over the vapour barrier. For the ground, it is preferable to use an extruded polystyrene type of compact insulator (Roof mat) or polyurethane foam that can be covered for a more attractive finish with, for example, washed fine gravel over a cement covering. You can protect the ceiling and wall insulation using paint or a rough cast coating. The characteristics of the insulation depend on the volume of your cellar and the type of material chosen and are in relation to the following calculations: Calculation of the total area of the surface S : L = length of the room (in metres) W = width of the room (in metres) H = Height of the room (in metres) S (in m²) = (L + W) x H x 2 + L x W x 2 Calculation of the thickness of the insulation : Assumption: External temperature = 30° C Internal temperature of the cellar = 10° C Percentage duty cycle: 75 % including 15 % in cooling mode including 60 % in maintenance mode Choose your insulating material and retain the corresponding insulating coefficient Insulating material Expanded polystyrene Extruded Polystyrene (Roof mat) Polyurethane : (En kcal/m/° C) 0.038 0.026 0.022 Now determine the insulating thickness “T”: - For an air conditioning door type VSE 12 : T (mm) = - For an air conditioning door type VSE 40 : T (mm) = x S x 70 x S x 33 VAPOUR BARRIER THERMAL INSULATION WALL OUTSIDE OF THE WINE CELLAR Installation guide VinoSafe VSE / 446vsesavev12 / Page 8 out of 17 GENERAL PRECAUTIONS : The insulation of the cellar (vapour barrier a thermal insulation) must be continuous in order to avoid any passage of harmful heat or humidity through the surfaces. Avoid thermal bridges by also insulating metallic beams, water columns, etc.., passing through your wine cellar. PRÉPARING THE ELECTRIC CONNECTION : WARNING: BEFORE ANY INTERVENTION MAKE SURE THE POWER SUPPLY IS SWITCH OFF. Check on the lighting strip which side the electric connecting block is situated (in relation to the way the door opens). Install your single-phased electric supply cable + earth (section 3 x 1.5 mm²) to the connection point of the lighting strip. Avoid any accident by momentarily cutting the power supply. H2. INSTALLATION OF THE AIR CONDITIONING DOOR SUPPORT FRAME DOOR FRAME Installation guide VinoSafe VSE / 446vsesavev12 / Page 9 out of 17 A) FIXING THE SUPPORT FRAME TO THE RESERVE AREA OF THE WALL : Place the support frame in the reserve area and mark the place of the mounting screws. Drill holes ( 8 mm) and insert the 6 plugs ( 8 mm). Fix on the support frame with 6 screws T.F. 6 x 50. SUPPORT FRAME WALL SCREWS WITH PLUG OUTSIDE HORIZONTAL SECTION NOTE: You can place wooden wedges between the support frame and the walls not to deform the support frame columns while the screws are being tightened. B) MOUNTING THE FRAME ON THE SUPPORT FRAME Using 6 screws (5 x 25). Sometimes it is necessary to force the screws slightly to obtain the self-cutting. C) MOUNTING THE LIGHTING STRIP ON THE DOOR FRAME WARNING: BEFORE ANY INTERVENTION MAKE SURE THE POWER SUPPLY IS SWITCH OFF. 1. Screw off the two screws (4x10) and remove the side covers. YELLOW INDICATOR CAP GREEN INDICATOR CAP INDICATORS SIDE COVERS LIGHTING STRIP Installation guide VinoSafe VSE / 446vsesavev12 / Page 10 out of 17 2. Position the lighting strip on the door frame, making sure to: Position the white switch into the hole provided in the door frame. Position the two indicators in the two holes provided in the door frame, after removing the light caps. 3. Fix the lighting strip using the two screws (4x16). 4. Connect the supply cable to the three pins connector of the strip. 5. Fix the side covers using the two screws 4x10. D) MOUNTING THE DOOR ON THE DOOR FRAME Hook the door into the hinge pins of the door frame. Slide the black flexible sheath (at the upper angle of the door) in the notch provided on the light strip and fix it into place by screwing the nut. Mount the two four pins connectors. E) MOUNT THE AIR-CONDITIONER ON THE DOOR Place the air-conditioner in front of the door. Mount the two connectors (bottom of the door and air-conditioning unit). Install the air-conditioning unit on the slide rail. CONNECTORS SLIDE RAIL Installation guide VinoSafe VSE / 446vsesavev12 / Page 11 out of 17 Move the hooks using the hexagonal key in the side holes of the air-conditioning unit so that the hooks slide into the slits provided on the door and provisionally grip the anchorage points without tightening them. Check, when closing of the door, that the air-conditioning unit is no rubbing against the door frame. If it is, reposition the air-conditioning unit. Firmly tighten each hook. Insert the two black plugs which block the handle holes of the hooks. Your VinoSafe air-conditioning door is installed Installation guide VinoSafe VSE / 446vsesavev12 / Page 12 out of 17 I. USER MANUAL A) B) COMMISSIONING Set the two switches on the lighting strip to 0. The switch nearer the end of the strip controls the air conditioning unit. The other switch controls the lighting. Connect the power supply cable (single phase 220 V+ earth) to a plug. LIGHTING Position 0 : The lighting operates automatically Check that the lighting operates. The light should turn off automatically when the door is closed. The yellow indicator on the outside shows whether the light is on inside the wine cellar. Position 1 : Lighting override The lighting can also be turned on manually if you wish to stay in the wine cellar with the door closed, for example to stack bottles. In this case, set the light switch to 1. REMEMBER to set the switch back to 0 for normal use: light can prevent wine ageing correctly. IN CAS OF PROBLEM : (see opposite) Check that the light switch is set to 0. Check that the white switch pusher operated by the door is working. Installation guide VinoSafe VSE / 446vsesavev12 / Page 13 out of 17 C) AIR CONDITIONNING UNIT Turn on the air conditioning unit (switch at end of strip). The green light should come on. The internal fan operates continuously. The external fan operates only when the unit is cooling. The unit thermostat is preset to maintain a constant temperature of about 12 to 13 °C inside the wine cellar. This temperature can be adjusted between 8°C and 15° C by setting the thermostat on the front face of the air conditioning unit. If the temperature outside the cellar drops too low, (in winter, for example) and there is a risk that the temperature inside the cellar will fall, a heater within the air conditioning unit will automatically take over from the refrigeration system in order to maintain the ideal temperature. D) SETTING AND ADJUSTING THE TEMPERATURES The set values in the thermostats are not temperatures in grades, but indexes. A 1 unit index value is close to 1° Celsius. It is necessary to wait 48 hours to check the impact of a temperature adjustment on the thermostat. Electronic thermostat (Picture D1) : B1 : Displays the requested value Validates the set value B2 : Increases the requested value B3 : Decreases the requested value L1 : Flashes during a programming phase L2 : The heating resistance is active L3 : The compressor is active Pict.D1 Display and programming of the desired index value: - Press B1 until you read the message Set. Press B1 a second time to display the wished index value. Change this value using B2 & B3. Save this value by Pressing once more on B1. To confirm the value is saved, the message Set will be displayed. After some time the display gets back to normal mode (display of the actual internal temperature). Installation guide VinoSafe VSE / 446vsesavev12 / Page 14 out of 17 E) FILTRING NEW AIR FROM OUTSIDE A small amount of new air from outside is continuously drawn into the cellar to oxygenate the inside. This air passes over an active carbon filter. This filter must be changed regularly if the cellar is located in a place with unpleasant odours. F) GENERAL PRECAUTIONS RESETTING THE TEMPERATURE Adjust the temperature gradually in very small increments so that the air conditioning unit does not operate for an excessively long time (to avoid icing up). TO ENSURE THAT THE AIR CONDITIONING UNIT OPERATES EFFICIENTLY Never obstruct the ventilation grills in the door or over the unit. The cellar should be placed in well-ventilated area where the temperature does not exceed 35°C, to ensure that the refrigeration unit will be effective. Dust sucked in by the air conditioning unit may reduce the efficiency of operation. The air conditioning unit should be checked regularly to ensure that the condenser is clean. The air conditioning unit should be lifted off the door (page 11) and the condenser should be cleaned using a vacuum cleaner. This maintenance is not covered by the guarantee. Side to be cleaned Installation guide VinoSafe VSE / 446vsesavev12 / Page 15 out of 17 J. MAINTENANCE TEMPERATURE TOO LOW The thermometer is not showing the correct reading: Check by using another thermometer. Thermostat set too low: Raise the temperature gradually to avoid subjecting your wine to sudden changes in temperature. TEMPERATURE TOO HIGH The thermometer is not showing the correct reading: Check by using another thermometer. Thermostat set too high: Lower the temperature gradually to avoid subjecting your wine to sudden changes in temperature. Door not properly closed: Check that the door closes and locks correctly. Ventilation in the room where the wine cellar is installed is inadequate (this problem usually arises when the outside temperature is high): If possible, open the door or windows. Install a ventilation system in the room (ventilation grill, extractor fan, etc…) Thermostat setting decreased too suddenly: Causes the air conditioning unit to ice up. Air conditioning iced up: Turn the air conditioning unit off for 48 hours and turn on again, ensuring that the thermostat is set on 13 °C or 14 °C. If the problem persists, disconnect the main supply, remove the air conditioning unit from the door (page11) and clean the condenser using a vacuum cleaner. This maintenance is not covered by the guarantee. Side to be cleaned K. QUESTIONS / ANSWERS This section is developed step by step following new cases that are brought forward to us. You will always find the latest version on our website www.vinosafe.com. Installation guide VinoSafe VSE / 446vsesavev12 / Page 16 out of 17 L. ADVICES AND CONCLUSION These guide’s detailed information is subject to changes without notice. NVS SAS - VinoSafe offers no warranty on this equipment if is used for a different purpose than wine storage. VinoSafe cannot be held responsible for potential mistakes in this guide or for any damage linked or generated by the supply, the utilisation or the performances of this equipment. This guide contains original information protected by copyright. All rights are reserved. Photocopying, copying or translating this document is strictly forbidden apart from a written consent of NVS SAS - VinoSafe. We thanks you again for your trust in NVS SAS - VinoSafe and remain, via our resellers our directly, at your entire disposal. And happy wine tasting… with restraint ! Installation guide VinoSafe VSE / 446vsesavev12 / Page 17 out of 17