1
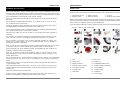
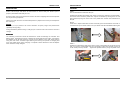
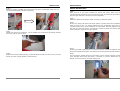
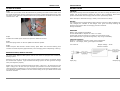
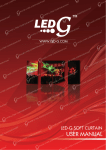
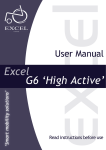
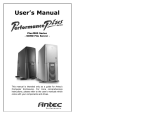
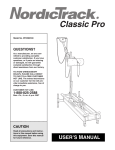
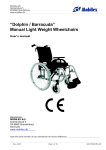
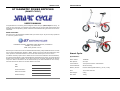
SMART CYCLE
USER’S MANUAL
GT MAGNETIC POWER BICYCLES
(SMART CYCLE)
USER’S MANUAL
Congratulations on selecting the GT Magnetic Power Bicycle (Smart Cycle in short). In
order to use and enjoy your Smart Cycle safely and to get the best performance and
durability from this product, please read this manual before riding and retain it for future
reference.
READ THIS FIRST
We want you to be completely satisfied with your Smart Cycle. If you have any questions
or concerns, please call us:
41 BENTLEY STREET, WETHERILL PARK NSW 2164, AUSTRALIA
PHONE: (02) 9729 0022
WEB: www.gtmotor.com.au
Each bicycle comes with a Vehicle Identification Number (VIN) embossed into the frame
and a Motor Identification Number (MIN). Please record the VIN and MIN along with
other pertinent information below in the event that the bicycle is lost or stolen.
To obtain warranty repair service based on the terms and conditions mentioned below,
this card must be filled in and authenticated by the dealer from whom you purchase this
Smart Cycle. Proof of Purchase, in the form of invoice, issued by the dealer will also be
required. “Date of Purchase” will be determined by the date indicated on the invoice,
which should be the same as the date filled in the card.
VIN:
MIN:
Invoice Number:
Date of Purchase:
Dealer’s Stamp:
1
Smart Cycle
Specification:
Motor Power:
120Watts
Max Speed:
20 km/h
Transmission:
Two speed electronic transmission
Frame Material:
Aluminum Alloy
Battery Source:
Lithium Rechargeable battery (14.4V, 11Ah)
Size:
1100×400×930mm
Net Weight:
9.5kg
Max load:
100kg
2
SMART CYCLE
WARNING AND CAUTIONS
USER’S MANUAL
SMART CYCLE
Even on the best days, riding or operating any sort of vehicle is hazardous. This manual
contains many cautions and warnings. There are also some common sense rules to keep
in mind as you are preparing to ride and as you are riding. It is important that you read
and understand the rules outlined in this manual. Thanks!
Ensure all quick release is tightened up. Fail to do this can cause physical damages
and hurts.
The following is a list of all the necessary parts and components of your new Smart Cycle.
Please make sure everything is enclosed in the box and in good working condition.
1 - Dismantled Bicycle
4 - Warranty Card
2 - Battery charger
5 - Owner’s Manual
3 - Took Kit
6 – Magnetic Control Button
Please check the bike along with the parts and components thoroughly for any damage
that may have been sustained during shipping. Be careful to avoid scratching the frame
when untying or unpacking the bicycle and components.
Never attempt to disassemble the battery, or controller. This can result in injury,
fire, or damage to the Smart Cycle.
If you find that something is missing, please call the Smart Cycle authorized dealer.
Recharge the battery before the battery is used up. Failure to do this can result in
decreased battery performance for the life of the Smart Cycle.
Figure 1 – Parts of your Smart Cycle
Do not charge the battery without attendance and in an ambient temperature below
45°C. Keep the charger out of the reach of children.
Disconnect the cable from the DC IN jack on your Smart Cycle after charging is
complete.
Do not place your Smart Cycle where it will be exposed to strong sunshine or high
heat over 60°C, and use in an ambient temperature of between -10°C to 35°C.
Do not immerse your Smart Cycle in water especially seawater or expose your
Smart Cycle to high humidity, or rain for extended periods. This can damage or
destroy the electrical components.
Only one rider at a time. Riding double or carrying large objects that obstruct your vision
or interfere with your control of the Smart Cycle can result in loss of control.
Kids and people lack of the balancing ability are prohibited to ride. Children are
forbidden to operate without the guidance.
Ride only in flat and smooth road conditions. Ride on uneven road can cause
physical reactions. Do not use the product to climb steep road over 15 degree, it will
greatly loose power.
Do not perform tricks or stunts. Maintain complete control, caution and a reasonable
speed at all times. This Smart Cycle is not suited for stunt jumping, competition or
racing.
1 – Bell
When riding at night or in inclement weather, always use lights that are bright and
in good working order.
2 – Brake Lever
9 – Double rim
3 – Battery Indicator
10 – Saddle/Adjustable Tube
Take special precautions when riding in the rain, ice or snow. Give yourself more
time and room to brake. Ride slower than normal in order to keep full control of your
Smart Cycle.
Ride with traffic and obey all traffic laws.
8 – Mud guard
4 – Magnetic Control Button
11 – Saddle tube Quick Release
5 – Front Quick Release
12 – Rear Reflector
6 – Charging port
13 – Chain & Pedal
7 – Disk Motor
14 – Kickstand
Remove the key (plastic button) from the Smart Cycle after use. Make sure the
product is placed safely. Unattended product may result in theft.
15 – Sensor Light
3
4
SMART CYCLE
USER’S MANUAL
PREPERATIONS
ASSEMBLY
Please read through and follow all instructions to ensure that your Smart Cycle is
properly assembled and ready for use.
STEP 1
Use the kickstand to stand the bicycle.
Remove Smart Cycle from the box and remove all of the wrappings and ties that protect
the bicycle during shipment.
Pedals and kickstand are folded when taken out from the package. Pull the pedals straight
and insert them inside the pedal tube. Adjust the Pedals by turning them to ensure the
spring button sprung out of the hole in the pedal tube. Stretch the kickstand to hold the
bicycle.
Fill the tyres with air to the recommended pressure (20psi for the front tyre and 35psi for
the rear tyre).
NOTICE
Deficiency of tyre pressure will cause decrease of speed, range and performance
capability during riding.
Step 2
Insert the T-shape handle bar into the front tube, press to the bottom until hear a click.
Lock the front quick release. Make sure you cannot twist the handlebars after tightening.
Charge the battery before riding. A charge cycle is 4-6 hours and 12 hours for the first 3
charges
CAUTION
The following instruction should be followed to avoid the damage of controller and
battery pack. The DC IN jack cover is located on the left side of main frame. Connect the
AC adaptor to DC IN jack and then connect the AC adaptor to the wall socket (220V)
using the main lead. Indicator light flashes green during the period of charging and
turns into stable green when charging is complete. Please disconnect the AC adaptor
when the bike is fully charged.
5
STEP 3
Pedals are sealed at the back of the foam. Screw in the pedals on the aluminum crank arm
with your fingers. Understand that the right pedal is right-hand thread, but the left pedal
is left-hand (reverse) thread.
Tighten the pedals securely using the pedal wrench.
6
SMART CYCLE
STEP 4
Adjust the height of saddle tube and lock the tube quick release tight. Make sure you
cannot twist the saddle tube after tightening.
USER’S MANUAL
RIDING INSTRUCTIONS
STEP 1
Make sure all of your quick releases are locked and secure. Make sure all parts,
components and accessories are in good working order. Check all fittings and be sure that
they are tight and secure. Inspect your bike completely.
STEP 2
Adjust the saddle to the proper height according to assembly Step6.
Step 3
Smart Cycle apply push start mechanical system to protect the motor and battery pack.
Push the bike to give it a starting speed and then immediately press the magnetic
controlling button (key) to the handle bar to ride forward. Hold the magnetic button, the
bike will go at the lower speed. To accelerate, release the button and repress within one
second, the bike moves at the higher speed.
Step 5
Install your seat on the seat post.
until they hold the seat in place.
Fit the saddle onto the grooves and tighten the bolt
Step 4
Smart Cycle adopt E-ABS system. To reduce the speed, release the magnetic controlling
button and the bike slows down. The brake lever can be squeezed to stop the bike quickly.
Step 6
Adjust the tilt of the saddle. Initially, you should adjust the seat to its level. Later, you may
decide you want a slight upward or downward tilt.
7
Step5
The front light is sensible and have two modes. Use the remote magnetic control key to
touch the light sensor area (see photo), it switches on. Touch a second time, the light
flashes. Touch a third time, the light switches off.
8
SMART CYCLE
USER’S MANUAL
FOLDING & STORAGE
BATTERY SYSTEM
Step1
Loosen the quick release under the handle bar by pressing the white “Press” button with
the thumb of left hand. Use the right hand to lift out the T shape handle bar from the tube
and pull it to the right side. Keep the brake level up and place the left brake level inside the
crank to lock T-bar.
CAUTION
Only use the charger that was supplied with your bike to charge the battery for safety
reason. Use of the improper charger can result in fire or explosion. Never leave the
product unattended when charging and should be operated by adults.
Never attempt to dismantle charger, battery and controller for safety.
NOTICE
The charging time for lithium battery pack is around 4-6 hours. After the battery pack is
fully charged, the indicator of the charger turns green and stops flashing. Please
disconnect the power after the charging process is finished.
Charger Indication
WARNING
Battery may explode if mistreated.
Do not disassemble or dispose of in fire or in water.
Contact with metal or placing in humidity can cause short circuit.
If the batteries leak or give off strange odor, stop using immediately.
Step2
Unfasten the saddle quick release and push the saddle to the end.
Charging Indication
Phase 1: charging in process 0-99%, green light flashes
Phase 2: full charge, 100%, green light turns stable
Step3
Press the spring button on the two pedals and fold the pedals.
Step4
Please keep the bike stored in shade and dry place. Make sure that the battery pack
remains around 50% power (approximately 2 hour charging) when transporting or storing.
100-240V AC
Output Voltage : 16.8V
Charger indicator
BRAKING SYSTEM, WHEELS AND RIMS
The front wheel applies E-ABS system and the rear wheel is equipped with mechanical
braking system.
Whenever you hear any irregular noise from the wheels or the brakes, the wheels should
be checked and repaired. Tight mechanical braking system can also generate strange
noise, and adjust it properly.
Input plug
Inflate your tyres up to a maximum pressure of 20psi(1.5kg/ cm³)for the front tyre and
35psi(2.5kg/ cm³)for the rear tyre. Improper tyre pressure will cause excessive wear,
causing premature replacement. Low tyre pressure will also make riding more difficult. The
tyre should be properly seated in the rim and the fitting of the tyre bead and rim bead
should be checked.
9
10
Output plug
SMART CYCLE
USER’S MANUAL
MAINTAINENCE
push and the motor
will charge the
Throughout the year, there are simple steps you can take to inspect and maintain your
Smart Cycle:
battery. Then use the
AC adaptor can
1. Every week or two, tighten all nuts and bolts. Check all hardware to see that no parts
are worn, damaged, or missing. Make certain that the frame and fork alignment are true
and that all components are seated in the right position.
2. Clean the frame and all parts regularly with a moist cloth or sponge. Do not
completely immerse the bicycle in water and avoid soaking the battery and motor area.
Be sure to completely dry bike with a soft towel to prevent rusting and corrosion. Your
Smart Cycle are water resistant, but not water-proof.
charge the battery.
Insufficient range
3. Replace the battery
3. Damaged or old
battery
Keep control cable lubricated.
We strongly recommend you to deliver the defective bicycle to our authorized dealers
and get repaired if any damage occurs. You may contact the nearest authorized dealer.
For further information, please contact your dealer.
TROUBLESHOOTING
Problem
1. Inflate tyre
2. Charge the battery
charged
3. Reflectors should be kept clean, securely fastened and positioned for easy visibility at
night from the front, rear and side. Immediately replace any damaged reflectors.
4. Replace worn or damaged cables.
1. Low tyre pressure
2. Battery not fully
Possible Cause
Correction
Press the magnetic
1. Low battery
1. Charging the battery
controlling button, motor
2. Still status
2. Push start
dose not work
3. E-ABS locked
3. Squeeze and loose the
brake level
consecutively to
unlock the brake.
Plug in
the Ad adaptor, the
battery can not be charged
1. not connected
1. check the connecting
2. the charger is broken
wire and make sure it
3. Circuit Protection
is well connected
4. Long time storage
2. replace the charger
Authorised Australia Distributor:
3. disconnect the AC
adaptor to the DC IN
jack and reconnect
when the green light
41 BENTLEY STREET, WETHERILL PARK NSW 2164, AUSTRALIA
PHONE: (02) 9729 0022
WEB: www.gtmotor.com.au
flashes
4. give the bike a quick
11
12