1
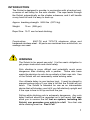
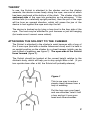
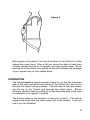
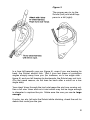
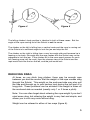
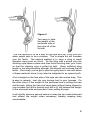
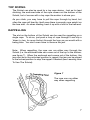
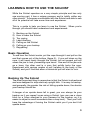
Soloist
Solo Belay System
Instruction Manual
Manufactured by:
Rock Exotica Equipment
P.O. Box 160470
Clearfield, UT 84016
Phone: 801-728-0630
Fax: 801-728-0667
www.rockexotica.com
Rock Exotica Equipment makes no express warranties concerning the
Soloist. This product is soley for use in recreational climbing and mountaineering, following the specific guidelines of the User’s Manual.
INTRODUCTION
The Soloist is designed to provide, in conjunction with a backup knot,
a means of self belay for the solo climber. The rope feeds through
the Soloist automatically as the climber advances, and it will handle
a very hard fall and it is easy to back up.
Approx. breaking strength: 5000 lbs (2270 kg)
Weight:
10 oz. (285 gm)
Rope Size: 10-11 mm for lead climbing.
Construction:
6061-T6 and 7075-T6 aluminum alloys and
hardened stainless steel. All parts are machined from solid stock; no
castings are used.
WARNING
The Soloist is for expert use only! It is the user’s obligation to
get proper instruction and climb safely.
Solo climbing is more difficult and potentially much more
dangerous than climbing with a partner. Those who have
made the decision to solo do so entirely at their own risk. Use
of the Soloist will not necessarily make soloing safer.
Your ultimate belay is your backup knot. It must be placed to
prevent serious injury if you take a fall that the Soloist will not
catch. The Soloist is intended for use as an intermediate
device that will shorten your fall if you fall relatively upright and
if the rope is free to lift up and lock the jaw.
Falling while climbing solo is extremely dangerous. Any solo
belay method should be regarded as a last resort that may
allow you to survive the fall, but no system, including the
Soloist, can guarantee your safety in a fall. Your first rule
while climbing must be: Don’t Fall.
1
THEORY
In use, the Soloist is attached to the climber and as the climber
ascends, the device moves freely along the rope, one end of which
has been anchored at the bottom of the climb. The climber clips the
anchored side of the rope into protection as he advances. If the
climber falls (in a relatively upright position), then the pull of the rope
will be from an upward direction, which will cause the jaw of the
device to lock against the rope and stop the fall.
The device is backed up by tying a loop knot in the free side of the
rope. The knot may be attached to your harness or just left hanging
(but make sure it cannot come untied).
ATTACHING THE SOLOIST TO THE CLIMBER
The Soloist is attached to the climber’s waist harness with a loop of
8 or 9 mm rope (tied with a double fisherman’s knot) and it is held in
an upright position on the climber by a chest harness (which can be
just a piece of webbing; see figure 1). The open side of the Soloist
faces forward (figure 2).
The Soloist should be located at the correct height relative to the
climber’s body, which will help you to stay upright after a fall. (If you
turn upside down after a fall, the Soloist will probably release).
Figure 1
This is one way to make a
simple chest harness from a
loop of webbing.
Put the loop over your head
and one shoulder, twist it half
a turn and put it over your
head and other shoulder.
2
Figure 2
Most people will position it so that the bottom of the Soloist is a little
higher than navel level. After a fall you should be able to hang from
it totally relaxed and be in no danger of turning upside down. Avoid
wearing it too low and/or very tightly, as this will increase the leverage
of your upper body to turn upside down.
OPERATION
The Soloist must be rigged correctly (figure 3), so that the anchored
side of the rope comes out the bottom of the Soloist (but don’t put it
through the rappel slot by mistake). The free side of the rope comes
out the top of the Soloist and through the chest ‘biner. Before
climbing, double check by pulling up on the anchored side of the rope
to make sure you rigged it correctly.
The Soloist relies on the direction of rope pull to lock it. The critical
angle is the angle that the rope comes out of the Soloist. It will not
lock if you fall headfirst.
3
Figure 3
The proper way to rig the
Soloist (left) and what happens in a fall (right).
In a free fall beneath your pro (figure 4), even if you are leaning far
back, the Soloist should lock. But if your last piece of protection
angles sharply away from you (for instance, on a low angle slab figure 5), and you fall leaning far backwards, the Soloist may not lock.
(For the same reason, do not lean far back after a catch on a low
angle slab).
Your chest ‘biner through the top hole keeps the pin from coming out.
Use a full size ‘biner and not a mini which may not be large enough
in diameter to capture the pin. Make sure the one you use is large
enough.
If rocks, ice, etc. fall onto the Soloist while climbing, check the unit for
debris that could jam the jaw.
4
Figure 4
Figure 5
The falling climber’s body position is identical in both of these cases. But the
angle of the rope coming out of the Soloist is not the same.
The climber on the left is falling from a vertical route and the rope is coming out
of the Soloist at a sufficient angle to lock the jaw and stop the fall.
The climber on the right is falling from a very low angle slab and because he is
leaning so far back, the angle that the rope makes with the Soloist may not be
adequate to lock the jaw. If the climber fell in the more usual manner for such
fall (leaning more into the rock), then the closeup view of the Soloist and the
rope would look like that on the left, and the jaw would lock.
REDUCING DRAG
At times, as you climb long pitches, there may be enough rope
between you and the anchor that the weight of the rope causes drag
through the Soloist. This weight on the anchored side may also pull
the free end through up to your backup knot during the last part of a
long pitch. These problems can be avoided if the weight is taken off
the anchored side as needed (usually only 1 or 2 times a pitch).
Note: You can often forget about relieving the rope weight if you don’t
mind some drag, but relieving the weight is very fast and simple, and
allows you to solo any route without drag.
Weight can be relieved in either of two ways (figure 6).
5
Figure 6
Two ways to take
the weight of the
anchored side of
the rope off of the
Soloist.
The first method is to tie a knot in the rope and clip it into your pro
when weight gets to be a problem. This is simple but will increase
your fall factor. The second method is to carry a sling of small
diameter rope (such as 3mm). Tie the sling with a prusik onto the
climbing rope below a piece and then hook the sling over your ‘biner
so that the climbing rope is pulled up tight. Given sufficient sling
length or low sling breaking strength, this should not increase the fall
factor. (Obviously, you’ve got to pick the right piece to use with either
of these methods since it may later be subjected to an upward pull).
A lot of weight on the free side of the rope can also cause drag. This
is easy to remedy. Just clip your backup knot to your harness. On
the other hand, if the weight of the anchored end is pulling the free
end through, letting the free end hang down without being clipped to
your harness (but with a backup knot still in it!) will balance the weight
of the anchored side and prevent it from pulling through.
It will quickly become second nature to keep the two sides balanced
and relieve the weight when necessary thereby keeping drag
unnoticeable.
6
TOP ROPING
The Soloist can also be used for a top rope device. Just as for lead
climbing, the anchored side of the rope comes out the bottom of the
Soloist, but of course with a top rope the anchor is above you.
As you climb, you may have to pull the rope through by hand, but
often the rope will feed by itself once there is enough rope weight on
the free side. As when leading, back it up with a knot in the free end.
RAPPELLING
The slot on the bottom of the Soloist can be used for rappelling on a
single rope. To do so, just push a loop of rope through it and clip a
‘biner (or two, for more friction) through the loop as you would with a
belay plate. You don’t even have to remove the jaw.
Note: When rappelling, the rope can run either way through the
Soloist (i.e. the anchored side can come out of the top or the bottom;
see figure 7). When the anchored end comes out of the bottom, the
jaw must be in the unlocked position to rappel; the jaw can be placed
in the locked position to stop the rappel if desired (see Learning How
To Use The Soloist).
Figure 7
The rope can run either
way when rappelling
7
Figure 7 continued
The rope can run either way when rappelling
WE WANT TO HEAR FROM YOU
If you have any questions about the Soloist, please contact us. We
would also like to receive comments, tips on using the Soloist and
reports of solo climbs. Information on solo climbing is very sparse
and your contribution (which we will pass on to others) can be
important. Thanks!
Rock Exotica Equipment
P.O. Box 16047
Clearfield, UT 84016
(801) 728-0630 Phone
(801) 728-0667 Fax
www.rockexotica..com
8
LEARNING HOW TO USE THE SOLOIST
While the Soloist operates on a very simple principle and has only
one moving part, it has a unique purpose and is totally unlike any
other device. To become comfortable with the Soloist and able to use
all of its potential will take some time and experience.
This is a guide to help you learn to use the Soloist. When you’re
through you should have understood and experienced:
1)
2)
3)
4)
5)
6)
7)
Backing up the Soloist
How to wear the Soloist
Top roping
Lead climbing
Falling on the Soloist
Falling on your backup
Rappelling
Basic Operation
To see how the Soloist works, put the rope through it and pull on the
end that comes out of the bottom (figure 3). If you pull down on the
rope, it will travel freely through the Soloist, but an upward pull will
cause the jaw to lock, preventing rope travel. One end of the jaw acts
as a lever; the other end is a cam that solidly locks the rope.
Experiment with various angles of pull (relative to the body of the
Soloist) and you’ll find that even a horizontal pull will start to lock.
Backing Up The Soloist
The most important thing to remember is that the Soloist is directional
and was designed to stop relatively upright falls. It is easy to backup,
and generally, the greater the risk of falling upside down, the shorter
your backup should be.
If danger of an upside down fall is great, you can always tie your
backup as if you weren’t even using a Soloist (you can use a clove
hitch on a ‘biner attached to your harness for the backup, as it is
easier to adjust in small increments than a loop knot). Then you’ll still
have the advantage of having the Soloist catch you if you don’t fall
upside down.
9
Backing up the Soloist is easy since you can simply tie a loop knot
and attach it to your harness or just let it hang down. A well tied loop
knot left hanging should not come untied, but if you are worried, clip
a ‘biner through the loop and around the rope. Attaching the backup
knot to your harness is not necessary since a knot will not go through
the body of the Soloist and the rope is kept inside the Soloist’s body
by both the chest ’biner and the jaw pin.
The choice of whether to attach the knot to you or let it hang down
depends on several things. At times you’ll want to let it hang down to
prevent the weight of the anchored side from pulling the free end
through. Conversely, you will sometimes hang it from your harness
to reduce drag through the Soloist. Most of the time, though, you can
do either one, and its often nice to just let it hang because that
reduces the number of parts of the rope that are hanging from you.
(By the way, if you’re doing an extremely tortuous route that snags
the free side of the rope as it gets pulled up, you can do as conventional climbers would be forced to do and climb it in short pitches. Or,
you can coil the free side of the rope or put it in a stuff sack, and take
the whole thing with you, uncoiling it as you go so it can feed through
the Soloist.)
When lead climbing, if you can judge where your backups should be,
you can tie them on the ground and untie them when necessary as
you’re climbing (but it is usually easier to put them in the right place
as you climb). (Remember that in lead climbing, a backup knot is
pulled up, moving toward you).
When top roping, you can also either attach the backup knot to you
or let it hang down. You may prefer to let it just hang down most of
the time (unless the knot could jam in a crack when it is later pulled
up) because the weight of the rope will often pull the rope through as
you climb, so you don’t have to pull it manually. When you do let it
just hang down, you can leave all your backup knots in the rope and
untie them subsequently when you pull the rope up or you can tie
one, pull up the rope and untie the previous knot, thereby only
keeping one knot in the rope. (In top roping the climber moves up
and away from the backup knot).
10
Wearing It
The open side of the Soloist is the front. The ‘biner hole is the top.
The rappel slot is near the bottom on the back of the Soloist. Tie the
Soloist to you waist harness and clip it to your chest harness in such
a way that the open side is pointing more or less to the front (figure
2).
To see how you’ll hang from it after a fall, throw your climbing rope
around a friendly tree limb and hang from it. The Soloist is pretty
forgiving in how it is worn, but you want it to be comfortable (not too
tight or too loose) while climbing and to not let you turn upside down
while hanging from it. You should also not wear it too high or it may
come up and hit your face in a big fall.
Top Roping
Now that you know how to put it on and back it up, it’s time to get out
there and do something with it!
Go to your favorite crag and put up a top rope on an easy route (wear
a disguise if you are afraid of being seen on anything less than 5.11).
This is a low intensity way to learn that, yes, it really will catch a fall.
Put the rope in the Soloist, remembering that whether leading or top
roping, the anchored side comes out the bottom and the free end
comes out the top (figure 3). Double check, as you always will
before climbing, by pulling up on the anchored side to make sure you
rigged it correctly and that the jaw is free to rotate.
Climb up a few feet (take up the slack by pulling on the side of the
rope that comes out the top of the Soloist) and tie a backup knot.
Now . . . JUMP! Assuming that the laws of physics are in effect, you
won’t go far. Climb up a few more feet, but this time leave some slack
in the rope and jump again.
After you’re comfortable taking these simulated falls, you should
explore the limits of the Soloist, so tie a short (1 foot) backup and
keep your hands on the rope to hold yourself. Hang from the rope
with the Soloist and, with both feet on the rock, start leaning back
(you may have to walk your feet up the rock). Eventually the Soloist
will release. Let yourself slide down to the backup knot. You’ve just
simulated what happens when you take a fall that the Soloist cannot
catch. Try a few more gentle falls at various extreme angles and
positions (ignore the stares of mystified passersby) so that your
backup catches you. Try some with the knot not attached to you and
some with it hooked to your harness.
11
Rappelling
While you are close to the ground, try rappelling a few feet with the
Soloist (see figure 7). Reverse the rope from how you had it for top
roping (in this new position the anchored side of the rope should
come out the top of the Soloist). It doesn’t matter if the jaw and pin
are in the Soloist or left out. Push a loop through the rappel slot, clip
a ‘biner through it and rappel, controlling the rappel with a hand
holding the free side of the rope, just as you would with any rappel
method. Try again with two ‘biners, which should give a little more
friction.
Reverse the way the rope runs through the Soloist (now it should be
back to how it was while top roping). Rappel with one and then two
‘biners. Now put the jaw in (if it wasn’t already), and you’ll try
something that is only possible when the rope is running the current
way through the Soloist. With your weight off the rope, lift up the tail
end of the jaw with your finger and hold it up as you apply your weight
(of course, your controlling hand is holding the rope, ready to control
the rappel). As you apply your weight, the rope will hold up the jaw
and lock it. this is a way to hold yourself on rappel if desired, but
never take your controlling hand off of the rope, in case of slippage,
unless you tie a backup knot. Speaking of slippage, see if you can
lean back and bounce around and make it slip.
The choice of which position to rappel in is up to you, but the following
is often convenient for free climbing on multiple pitches when you are
rappelling on the climbing rope: After leading the route, tie the free
end into a rappel anchor (establish it so that it will be a safe belay
anchor for the next pitch; i.e. protect against an upward as well as a
downward pull). Before rappelling, reverse the rope (from the way it
was while leading) so that the rope from the rappel anchor goes in the
bottom of the Soloist. Rappel and clean the route (in this position you
can lock off the rappel if necessary to make cleaning a stuck piece
easier). At the bottom, unclip the rappel ‘biner, untie the belay anchor
and you’re ready to second the pitch using the Soloist as a top rope
belay.
There is one other rather obscure advantage to rappelling with the
rope in the above position. The ‘biner clipped through the rappel loop
is, of course, what gives the system its friction. If the ‘biner should
somehow come unclipped while rappelling in this position, the jaw
would simply lock, preventing a fall. For this reason, this position may
be safer if a locking ‘biner is not available.
12
Now that you’ve tried a few mini rappels, climb the whole pitch,
pulling the slack through (it may slide through by itself, depending on
the route) and tying a few backup knots as necessary. Then try a
couple of full length rappels. If you’re nervous, you can back up your
rappel by tying a few loop knot downrope, untying them as you get to
them.
Leading
Try leading a few easy routes at first to get used to the feel of the
Soloist. Remember that if you are bothered by drag, you can easily
eliminate it (figure 6). Take a few small falls on bombproof protection
just for fun (falls can be fun?).
While leading, you’ll want to be aware of where the rope is below you,
so that in a fall, it won’t get tangled around your legs, which would
prevent the jaw from locking. Also, with any solo belay method there
will be two parts of the rope hanging from you, the anchored side and
the free side (plus the rope hanging from the backup knot if it’s
attached to you). Make sure you clip the anchored side into your
protection.
13