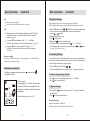
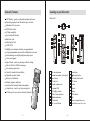
1
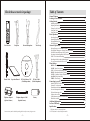
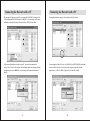
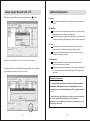
Digital Voice Recorder
Operation Manual
Printed in Hong Kong
50-PDR3-001011
Check the accessories in package
Table of Contents
General Features
Looking at Your Recorder
Getting Started
Installing the Batteries
Replacing the Batteries
Turning On / Off the Unit
Setting the Clock
Setting the Alarm
Basic Operations
Recording Messages
Remaining Recording Time
Playing Back Messages
Erasing Messages
Voice Recorder
Earphone
External Microphone
Wrist Strip
Advanced Operations
Moving Messages to a Different File Folder
Playing Back a Message at a Desired Time with an Alarm
Password Protected Messages-LOCK function
Preventing Accidental Operation-HOLD function
VOX - Voice Activated Recording
Recording with line-in and telephone adaptor*
To save into external audio device or a PC
Digital Voice Recorder
Software CD-ROM
Menu Settings
Operation Manual
PC-Link Program
Installation Guide
User Manual
Line-in Cable
Operation Manual
Telephone Adaptor*
(Optional feature)
PC-Link Software CD*
PC-Link Cable*
(Models dependent)
(Models dependent)
Telephone Adaptor Cable*
(Optional feature)
Battery
* Accessories may not be included in package which is subject to vary design version.
-1-
MODE - Recording Mode Setting
SOURC - Input Source Setting
VOX - Voice Activated Recording Setting
SENSE - Microphone Sensitivity Setting
CONTI - Continuous Message Playback Setting
ALARM - Daily Alarm Setting
TIMER - Timer Setting
Connecting to your PC**
Install the DVR PC-Link Software
Connect PC to the recorder
Download recorded messages to the PC
Save and decompress the message
Playback the message on PC
Compress the wave file
Upload the message from PC to the recorder
Initialize the recorder
Additional Information
In Case of Difficulty
Specifications
* Telephone adaptor is an optional feature
** PC-Link feature is subject to different models
-2-
3
4-5
6
6
6
6
7
7
8
8
9
10
11
12
12
12
12
13
13
14
14
15
15
15
15
15
15
15
15
16-21
16
17
18
19
20
20
21
21
22-23
24
25
Looking at your Recorder
Display Window
Getting Started
Installing the Batteries
A B
M
SP LP
D
F
AM
PM
A
- File Folder A
B
- File Folder B
1. Slide down and lift the battery compartment cover.
2. Insert two (2) LR03 (size AAA) alkaline batteries with correct
polarity.
3. Replace the cover.
Replacing the Batteries
OPEN
When the batteries are depleted,
flashes.
Replace the batteries as soon as possible.
Battery life* (See Page 25)
Note:
- PC Link
- Timer
Do not use manganese batteries.
- Alarm
Do not mix old and new batteries, different types of batteries, or rechargeable
batteries of different capacities.
- Playback speaker
Replace new batteries within 3 minutes. Otherwise, current date and time setting
may be lost. You need to set the date and time again. However, the recorded
messages will retain.
- Password protected
- New un-read message
If you do not plan to use the recorder for a long time, remove batteries.
Batteries can leak chemicals that destroy parts.
- Battery indicator
- Voice Activated Recording
- Standard Play
SP
LP
Turning On / Off the Unit
- Long Play
- Blank : Record / Playback mode
- Spinning : Recording and during message playback
- Solid on : Standby mode and memory indicator
= Empty
M
= Half full
- Month digit
D
PM
= Memory full
Note:
The system will turn off automatically if the unit remains idle for 60 seconds in
Standby mode to save battery power.
- Day digits
AM
F
1. To turn on the unit, press and hold the POWER button until unit beeps and
display window shows date and time.
2. To turn off the unit, press and hold the POWER button until unit beeps and
display window goes blank.
- Time digits
-5-
-6-
Getting Started
(continued)
Basic Operations
Setting the Clock
Recording Messages
1. When the recorder is in standby mode
, press SET and use
to scroll
down to Time date.
and Month 00 digits will start blinking.
2. Press
/
buttons to select Month setting.
3. Press
to shift to Day setting. Day 00 digits will blink.
4. Press
5. Repeat steps 3 & 4 in setting Hour & Minute.
6. If you choose 12-Hour mode, am / pm icon will be turned on and off
respectively while setting.
7. To select 24-Hour mode, press /
repeatedly until Hour digits shows 00 .
8. You can press
and
alternately to move to the setting that you want to
change.
9. Press SET or
to confirm clock setting until display window shows the
time you have chosen.
You can record up to 99 messages in each file (A & B). The newly recorded
message is automatically appended to the last recorded message, you can start
recording quickly without searching for the end of the last message.
Setting the Alarm
1.
2.
3.
4.
5.
6.
7.
8.
9.
Default voice source is microphone, for other voice input source selection. See P.15
1. Press FILE button for File Folders A or B .
2. Press REC to start recording message.
3. Press
to stop recording.
To pause a message during recording
1. Press
button to pause a message recording.
2. PAUSE blinks on the display window.
3. Press
button again to resume recording.
To protect a recorded message with password
In standby mode
, press SET button and use to scroll to ALARM menu.
Press
button to select the On/Off mode.
Press
button to change the flashing OFF to ON.
Press
button and the time for the alarm will appear and flashing.
Press
and
buttons to change the alarm time.
Press
to set the alarm and the
Icon will appear on the display.
System beeps for 30 seconds at set time. You can press
button to stop.
To turn off the Alarm, repeat steps 1-3. Then select OFF to turn off Alarm.
Icon disappears from display window.
1. Select the message number or immediately after your recorded message, press
SET button. LOCK Off will appear on the display window.
2. Press
button and the Off digits will blink.
3. Press
to toggle it to On.
4. Press
to confirm the change.
To playback the protected message, you need the password. See page 12.
To add a recording to a previously recorded message
You can add a recording to the message being played back.
1. During message playback, press REC button for 1 second.
2. Press to stop the recording.
Note:
The unit will enter standby mode after powered on or 60 seconds after recording /
message playback.
You can enter standby mode manually by pressing the
button after recording /
message playback.
-7-
The added recording will be placed after the current message and count as a part
of the message.
-8-
Basic Operations
(continued)
Basic Operations
Tips
(continued)
Playing Back Messages
Recording time (see page 25)
You can select the microphone sensitivity (see page 15)
When playing back a previously recorded message, start from Step 1.
When playing back a message you have just finished recording, start from Step 3.
Notes
When the memory is full, recording automatically stops and 'F' will flash
on the display window. To continue recording, first erase some of the
message (see page 11)
If you press REC when the memory is full. MEM FULL will display.
Erase some of the message before you start recording again. (see page 11)
If you press REC after you have recorded 99 messages, FOLDR FULL
will display. Select another file folder or erase some of the message
(see page 11)
1. Press the FILE button to select A or B folder that you want to listen the message.
2. You can scroll to the message number that you want to start listening by
pressing
or
repeatedly.
3. Press
to playback the message.
4. Press
to stop playback.
5. Message with
icon means new and un-read.
6. To playback messages with password protected
, PASSW *** will blink
buttons.
on the display window. Enter the correct password by using / and
(See page 12 for password setting)
Fast Scanning Messages
Notes on recording
Noise may be recorded if the object, such as your fingers, etc., accidentally rubs or
scratches the unit during recording.
Your recorder provides a Fast Scanning function to save you time without listening
to all messages contents but will let you hear the first 5 seconds of each message for
you to select which message that you want to listen.
Remaining Recording Time
1. Press the FILE button to select folder A or B .
2. Press and hold the
button for 2 seconds or until SCAN appears on the display.
To display the remaining recording time, press
The display will show:
A
SP
in standby mode
.
For this example:
The remaining time RT is 1 Hour, 28 minutes and
8 seconds in SP mode. For remaining time in LP
mode, please switch the recorder to LP mode and
display again.
For mode change please refer to P.15
To Pause a Message during Playback
1. Press
2. Press
to pause a message during playback and PAUSE will blinks.
again to resume playback.
To Repeat a Message
1. Press and hold the
button for 2 seconds or until RePeAT appears on the display
during playback.
2. Press
to stop the repeated playback.
For private listening
Connect an earphone to the EAR jack.
The built-in speaker will be automatically disconnected.
-9-
- 10 -
Basic Operations
(continued)
Advanced Operations
Erasing Messages
Moving Messages to a Different File
Erasing All Messages in a File
1. Press FILE to select A or B in which you want to move the message.
2. Press
/
to skip to the message you want to move.
3. Press SET and use
/
to scroll to MOVE TO A or B option.
4. Press
to perform the move message operation.
5. To cancel moving the message, press SET before step 4.
1. Press FILE button to select which file that you want to erase messages.
2. Press ERASE button in playback idle mode i.e.
disappears.
3. ERASE ALL will flash on the display.
4. Press ERASE button again will erase all the messages in that File.
5. To cancel erasing, press
button before step 4.
Erasing Messages one by one
1. Press FILE button to select A or B that you want to erase messages.
2. Press
to playback the message and use
/
to scroll to the message you
want to erase.
3. Press ERASE while the message is being played back.
4. ERASE THIS will flash on the display and the first 5 seconds of the message will
playback repeatedly for 10 times..
5. Press ERASE again to erase the message.
6. To cancel erasing, press
button before step 5.
Notes
Note
The move function does not duplicate a message in another file. When you move
a message to another file, it will be deleted from the previous file. The moved message
will be added behind the last recorded message of the target file.
Playing Back a Message at a Desired Time with an Alarm
1. Use FILE and
/
to select the file and message you want to playback.
2. Press SET and scroll down to ALARM option.
3. Press
then
/
and
again to turn On the ALARM function.
4. Use
/
and
buttons to set the Day and Time for the Voice Alarm.
5. At the set time, the alarm will sound and the VOICE ALRM will flash on the display.
Press
during the Alarm sound to start the playback of the message.
You can erase the recorded message one by one or all message in a file at a time.
Note that once a recording has been erased, you cannot retrieve it.
Password Protected Messages LOCK Function
When a message is erased, the remaining message will advance and renumbered.
Your recorder provides 3-digit programmable security code to protect your private
messages. The default factory setting is 000. It is strongly recommended that you
should change your password when you start storing your private messages.
Setting / Changing your own password
1. In standby mode, press SET button and use
/
to scroll to PASSWORD
option.
2. Press
, PASSW and flashing *** will appear on the display.
3. Use
/
and
buttons to set or change your password.
- 11 -
- 12 -
Advanced Operations
(continued)
Advanced Operations
(continued)
Preventing Accidental Operation HOLD function
Recording with line-in and telephone adaptor*
Slide the HOLD switch in the direction of the arrow. HOLD will appear on the display
whenever any button is being pressed.
Line-in source:
1. Connect the smaller end of the the audio line-in cable to the external mic/line-in jack
and the other end to the external device (Audio or PC) sound output such as
earphone jack.
2. Set the source to Line-in (LINE). See Page 15
3. Follow the same procedure as with the microphone. See page 8
To cancel the HOLD function, simply slide the HOLD switch in the opposite direction.
You cannot power on the unit when the unit is auto powered off in HOLD mode.
You have to cancel the HOLD mode to power on the unit.
VOX-Voice Activated Recording
To automatically pause recording when there is no sound or voice present (and prevent
unnecessary recording), use the VOX function. This function maximizes recording time
and save storage of the recorder.
1. In standby mode
, press SET button and use
to scroll to VOX menu.
2. Press
button to select the On/Off mode.
3. Press
and
buttons to toggle between OFF and ON.
4. Press
to confirm the change.
When VOX is turned on, the unit pauses recording when no voice is detected for
2 seconds and WAIT will flash on the display window. Recording will be resumed
when voice is detected again.
Telephone conversation with telephone adaptor:
1. Unplug the handset cable from the telephone set and connect the handset cable to the
HANDSET socket of telephone adaptor.
2. Connect one end of the supplied telephone cable to the TEL socket of telephone
adaptor and the other end to the telephone set.
3. Connect the smaller end of the audio line-in cable to the external mic/line-in jack of
the digital voice recorder and the other end to the DVR socket of the telephone
adaptor.
4. Set the source to Telephone (TEL). See page 15.
5. Follow the same procedure as with the build-in microphone. See page 8
* Telephone adaptor is an optional feature
To save into the external audio device (such as a tape recorder)
1. Connect the smaller end of the audio cable to the earphone jack of the digital voice
recorder and the other end to the Mic input jack or AUX jack of the external audio
device.
2. Press the record button on the external audio device and the play button on the
digital voice recorder to start recording.
You may need to purchase another cable or adaptor if the provided audio cable does not fit the input
jack of the external audio device.
To save into PC
Please follow the procedures in Connecting the recorder with a PC. See page 16
- 13 -
- 14 -
Menu Settings
Connecting the Recorder with a PC
Press SET button in standby mode to enter the menu. Use
/
to select the menu
option. Press
to select the option,
/
to change the setting and then
again to perform the change.
MODE
Recording mode setting, switch between (SP ) mode for better sound quality and (LP )
mode for longer recording time.
With the supplied PC Link software, you can download recorded messages to your
computer. The software provides management of recorded messages as well as
playback of those messages.
System Requirements
SOURCE
- Pentium or faster
- CD-ROM drive
- Sound Blaster Compatible
Input source selection, switch between built-in/external Microphone (MIC ),
Line In (LINE ) and Telephone adaptor (TEL).
Installing the PC-Link Software
VOX
Voice Activated Recording, switch between ON (enable) and OFF (disable).
(See page 13)
SENSE
Microphone sensitivity setting. Switch between HI and LO.
Hi : To record at meetings or in a quiet or spacious place.
Lo : To record for dictation or in a noisy place.
CONTI
- Windows 98/98SE/ME/2000/XP
- More than 5MB free hard disk space
- Serial port
1. Place the installation CD into your CD-ROM drive. The installation dialogue box
(PC LINK InstallShield Wizard) will be displayed on Monitor.
2. Follow the on-screen instruction to install the software.
If the setup menu does not automatically appear after inserting the CD-ROM into the
CD-ROM drive:
1. Click Start button on your Windows desktop and choose Run on Start menu.
2. Type "<CD-ROM drive letter>:\Setup" .
3. Click OK button or press Enter key on your keyboard. The setup menu appears.
4. Follow the on-screen instruction to install the software.
Continuous playback option, switch between On (enable) and Off (disable).
ALARM
Alarm setting. (See page 7)
TIME DATE
Date and time setting. (See page 7)
PASSWORD
Password setting. (See page 12)
TIMER
Timer setting in (HH:MM) The unit will beep when the set time was reached,
press
to stop the beep.
- 15-
- 16-
Connecting the Recorder with a PC
Connecting the Recorder to the PC
Connecting the Recorder with a PC
All the recorded messages will display on the PC-Link Window.
1. Connect the recorder with the provided serial cable to a serial port of your PC.
PCLINK will display.
2. The recorder will automatically power up if it is off and
3. Click [Start] [Programs] [DVR] [PC-Link] to run the PC-Link program.
4. The following Upload / Download Utility window will pop up.
Choose which File Folder and message you want to download to PC,
and then press the
Click
button to start the download.
button, the PC-Link connects to the recorder .....
Note : You need to unlock those password protected message before you can download it.
- 17 -
- 18 -
Connecting the Recorder with a PC
Connecting the Recorder with a PC
The message will then store to the PC as a compressed file. MX48 file format for LQ
(LP) recording and MX128 file format is for HQ (SP). You can change the file name
and location, the default location will save the files in DVR PC-Link folder.
You can playback the message by select it and press the Play button.
If you want to playback the message on your PC, you need to decompress the
message first. Select the file and press the Decompress button, the message will then
decompress and save as a .WAV file. You can change the file name and directory of
this file.
You can compress a Wave file (.wav) to a MX48 (LQ) or MX128(HQ) file and upload
it to the recorder. Select the wave file, press the compress button and select the
compression i.e. 4.8K is for MX48 (LQ) and 12.8K is for MX128 (HQ).
- 19 -
- 20 -
Connecting the Recorder with a PC
Select which compressed file you want to upload and press the
Additional Information
button.
On Safety
Do not operate the unit while driving, cycling or operating any motorized
vehicle.
On Handling
Do not leave the unit in a location near heat sources, or in a place subject to
direct sunlight, excessive dusty or mechanical shock.
Should any solid object or liquid drop into the unit, remove the batteries and
have the unit checked by qualified personnel before operating it any further.
On Noise
Noise may be heard when the unit is placed near an AC power source, a
fluorescent lamp or a mobile phone during recording or playback.
Noise may be recorded when an object, such as your finger, etc., rubs or
scratches the unit during recording.
Note : The file will appended to the end of the recording and renumbered.
The initialize button is use to delete ALL old messages in the recorder except those
un-read and password protected. Click Yes to proceed.
On Maintenance
To clean the exterior, use a soft cloth slightly moistened in the water.
Do not use alcohol, benzene or thinner.
Keep personal credit cards using magnetic coding or spring-wound watches,
etc., away from the unit to prevent possible damage by the magnet used in
the speaker.
Backup recommendations
To avoid potential risk of data loss caused by accidental operation or
malfunction of the digital recorder, we recommend that you save a
backup copy of your recorded messages on a PC or a tape recorder, etc.
See page 14
"Although this unit is perfectly designed for recording convenience and comfortably
to every user, unpredictable mishandling may occur during operation.
Manufacturer is not responsible for any consequences or condemnation in case of
data lost when using the unit"
- 21 -
- 22 -
Additional Information
In Case of Difficulty
If your recorder does not work properly, try the following suggestions before seeking
repair assistance.
Declaration
The product function maybe reset when it is subjected to electrostatic
discharge disturbance. Just follow the instruction described in this
manual to set the function again for normal operation.
This device complies with part 15 of the FCC Rules. Operation is
subject to the following two conditions: (1) This device may not cause
harmful interference, and (2) this device must accept any interference
received, including interference that may cause undesired operation.
Note: This equipment has been tested and found to comply with the limits for a Class
B digital device, pursuant to part 15 of the FCC Rules. These limits are designed to
provide reasonable protection against harmful interference in a residential installation.
This equipment generates, uses and can radiate radio frequency energy and, if not
installed and used in accordance with the instruction, may cause harmful interference
to radio communications. However, there is no guarantee that interference will not
occur in a particular installation. If this equipment does cause harmful interference to
radio or television reception, which can be determined by turning the equipment off
and on, the user is encouraged to try to correct the interference by one or more of the
following measures:
-- Reorient or relocate the receiving antenna.
-- Increase the separation between the equipment and receiver.
-- Connect the equipment into an outlet on a circuit different from that to which
the receiver is connected.
-- Consult the dealer or an experienced radio/TV technician for help.
Symptom
Solution
Display does not turn on
Check if batteries are inserted with correct
polarity.
The batteries are weak. Replace new batteries.
Check if the buttons are locked with the HOLD
switch.
The unit cannot record message
Check if memory is full, F and memory full
will displayed. Try erasing some messages or
download to PC to make room for new one.
99 messages have been recorded in the selected
file. Select another file or erase some of the
message.
No sound comes from the speaker
The earphone is plugged in.
The volume is turned down completely.
Recording level is low
Try a closer distance between microphone and
the sound source during recording.
Microphone sensitivity is set to 'Lo '. Set it to
'Hi'.
Noise or 'SCRATCHY' sound
during playback
An object, such as your finger, etc. accidentally
rubbed or scratched the unit during recording.
Noise was recorded.
The unit does not operate
correctly
Take out the batteries and reinsert it again.
Press the reset switch (inside the small hole in
battery compartment) by using a small ball-point
pen etc.
(The unit will reset to the factory default settings,
but the recorded messages will remain)
If you continue to have problems, contact your local dealer where you purchase the unit.
- 23 -
- 24 -
General Features
Looking at your Recorder
LCD Display - guides you through operation with icons
Recording capacity from 240 minutes up to 16 hours
Maximum 198 voice notes
SP/LP mode select
2-Folder capability
Key lock (hold) function
Real time clock
Daily Alarm Clock
VOR (VOX)
Multiple voice alarm to schedule your appointments
3-digit programmable password for confidential voice notes
Instant messages record/playback/pause/skip/repeat
Voice notes append
Speed Search - search any messages without waiting
Selectively delete/All delete messages
New messages protection
Voice files transfer between folders
Adjustable speaker volume
Battery Low indication
Memory capacity indication
Audio jack for external headset/microphone
Compact size - ready to use from your pocket
PC Linkage for voice mail via Internet (optional)
-3-
Main Unit
1
2
6
3
4
5
17
7
8
9
10
11
12
20
18
13
19
14
OPEN
15
21
16
22
1
2
3
4
5
6
7
8
9
10
11
Built-in microphone
External microphone / line-in jack
Power button
PC Link jack
External earphone jack
Recording LED
LCD display window
Play / Scroll up button
Backward button
Stop button
REC (record) button
-4-
12
13
14
15
16
17
18
19
20
21
22
Erase button
Forward button
File folder select button
SET button
Speaker
Volume +
Volume HOLD button
Clip
Battery compartment cover
Reset button (small hole inside)
Specifications
Recording media:
Recording time:
SP mode:
LP mode:
Memory size
Maximum number of
recordings:
Speaker:
Microphone:
Power requirement:
Battery life:
Max power output:
PC-Link Operating
Environment*:
Dimension:
Weight:
Accessories included:
Non-volatile FLASH memory
PDR3-240
PDR3-480
PDR3-960
85 min.
170 min.
340 min.
220 min.
440 min.
880 min.
8MBytes
16MBytes
32MBytes
198 messages in total with 99 messages per file
folder
Built-in 23mm diameter
Built-in omni-directional microphone
2 x AAA alkaline battery LR03
Approx. 9 Hrs of continuous recording or 8 Hrs
continuous playback (speaker volume in
mid level)
Earphone: 30mW, 32
Speaker: 200mW, 8
PC: IBM PC/AT compatible, Pentium or above,
OS: Win98 / 98SE / ME / 2000 / XP
RAM: 32MB or more
Hard Disk: 5MB of free hard disk space
(additional space required to store voice file)
Sound Card: Sound Blaster 16 or compatible
CD-ROM drive and Serial port
105mm x 30mm x 18mm
37g (without battery)
Earphone, External microphone cable, Audio
line-in cable, Wrist strap, User manual,
(CD-ROM and RS-232 cable)**
* Please note that PC-Link feature is subject to different models
** Included with PC-Link feature
- 25 -