1
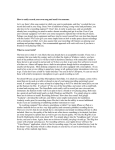
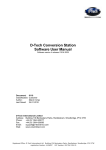
Tech-Neal-calities
Setting Up the Blade Accurately
Installing the blade
Note: To avoid injury, handle the cutter blades carefully.
The following is a step-by-step procedure for installing a new blade. There are three
types of blade holders currently in use: the original PHP30/31 series and the
subsequent PHP32 series. The diagram below will help you identify the parts.
Blade
Holder
Shafts
Blade
Plunger
Holder
Shaft
Caps
PHP31-CBxx
PHP32-CBxx
PHP32-CBxxN
If you are using the PHP31 series follow these steps:
1. Remove the plunger shaft from the plunger by turning it counterclockwise.
2. If you are replacing a worn blade, remove the old blade from the
plunger. See What to Do with Those Worn Blades.
3. While holding the spring, take the new blade and drop the new
blade into the holder.
Tap Here
4. Tap the side of the plunger so the blade will seat itself on the
bottom of the plunger. This will prevent the blade from hanging
up on the threads.
5. Place the plunger shaft back in the plunger and press down until there is a click.
6. Start turning the shaft clockwise. Stop and tap the plunger occasionally while
turning the shaft.
If you are using the PHP32 or the PHP32N series follow these
steps:
1. Remove the plunger cap from the plunger by turning it counterclockwise.
2. Remove the old blade from the cap if applicable.
3. Stand the cap upright and insert the new blade into the hole while
holding the spring.
4. Push the blade down a few times to ensure that it is seated
correctly
5. Re-attach the cap with the blade inside the plunger.
Setting the blade depth.
The blade tip depth should extend past the plunger tip the same distance that is equal
to the thickness of the vinyl.
Tip: Sometimes this is hard to see. Therefore, to verify the blade depth, hold the tool
in your hand, draw a circle on the vinyl. If the cut circle on the vinyl can be pulled
up, the blade is extended far enough.
Tip: When the knob of the plunger is turned the distance of one full turn, the blade
moves 0.5 mm or .02 inches.
Setting the Cutting Conditions
The cutter has four conditions that can be preset to cut different materials. For
example, COND1 can be set for pen plotting, COND2 can be set for highperformance vinyl. Press buttons 1-4 when the cutter is in READY mode to select a
corresponding condition. To change the parameters with the condition, be sure the
cutter is in the condition you would like to change. Below are the steps to set the
condition parameters properly.
Tip: After installing the blade and blade holder, collect the different materials you
will be cutting (i.e. intermediate, high performance, different brands.) As explained
above, set each condition accordingly to each material. COND1 might be set for
high performance, COND2 might be set to intermediate or reflective. Or, set each
condition to the type of cutting you will be doing (ie. set COND1 for normal cutting,
whereas set COND2 for small or intricate cutting).
Perform a test cut.
1. After installing the vinyl or media, select the condition and move the cutting tool
to an area to test cuts and press TEST.
2. The LCD will display three choices TEST1, TEST2, and CUTTING PRO.
3. Press button 1 for TEST1.
4. A triangle within a square will be cut.
Testing for FORCE
Remove the square while trying to leave the triangle.
1. Press the CONDITION button.
2. A black blinking cursor will appear next to the FORCE value.
3. If the square releases easily but pulls up the triangle then press the UP
ARROW button to increase the value by 1.
4. OR
5. Looking at the back of the media, if there are indentations or the blade has cut
completely through the backing then press the DOWN ARROW BUTTON to
decrease the value by 1
6. Press ENTER
7. Repeat the instructions above starting from step 1.
Testing the OFFSET.
For an explanation of OFFSET, review “What is the OFFSET value?”
1. Look at the corners of the square. If the corners are rounded, the value is too low,
increase the OFFSET value. If the corners are spiked, the value is too high,
decrease the OFFSET value.
Note: With our newer cutters, offset is a blade choice. For example, if you were
using the CB09U blade, you would select the 09U as your offset. To change this
value press the side arrow keys until your blade appears. This will automatically
set the offset to the appropriate value. If you feel the offset for the blade you are
using is not exact, you can increase the value next to the blade offset by pressing
the up and down arrow keys.
2. To change the OFFSET press the CONDITION button.
3. Press the 3 button for CUTTER OFFSET.
4. To increase the value, press the UP ARROW button
Too High
Too Low
Good
What is the OFFSET value?
The offset value is the distance the plotter sends the blade past each corner. Notice
the picture of the pen and the dashed line in the middle of the pen in figure below:
This dashed line is what is called the center point. When the plotter is told by the
computer to move to a certain coordinate, the plotter will move the center point to
the coordinate. This works well with a pen since the center point meets perfectly
with the pen point.
In contrast, the cutting blade is different. The enlarged drawing in the figure below
shows that the location of the cutting point is behind the center point.
Blade
Vinyl
Offset Distance
Cut Point
This means that the plotter must maneuver the center point beyond the corner to
achieve square corners.
Tip: To further test the offset value,with your software, draw a circle and send it to
the plotter. If the stop and start points of the circle do not meet, raise or lower your
offset by 1.
What is the QUALITY value for?
The quality has to do with the acceleration rate. Use this value to avoid torn corners.
The general rule is if you are cutting large graphics, set the QUALITY higher (4-6).
If you are cutting small intricate graphics, set the QUALITY lower (1-3).
Commonly, the setting is set to 4 to cover most cases.
Note: If this value is too high, the cutter will possibly create problems with sharp
corners or intricate detailed cutting.
What to Do with Those Used Blades
Try not to throw them away. Blades can be re-used on large jobs. Larger lettering
jobs (larger than 5”) do not require as sharp of a blade since the weeding is easier
due to the weight of the larger graphics.
Tip: Many of our users will obtain two blade holders: One for their normal cutting
with a sharper, newer blade, and the other for the worn blades that can be used to
cut larger graphics.
Troubleshooting
Problem
The cut line starts out
crooked
Corners are being
pulled up.
Reason for the Problem
The blade does not rotate
freely.
Solution
Grease the blade holder
Remove any foreign matter inside
the plunger.
Offset Pressure is too low
Raise the offset cut pressure.
(See Offset Pressure in your
User’s manual)
The blade spring may have
loosened.
Replace the blade with a new
spring of another blade or replace
the blade.
The cutting speed may be
too high for the type of
material you are cutting.
Lower the speed.
The blade is extended too
far.
The blade is broken or dull
See Setting the blade depth.
Replace the blade.
Quality is too high.
Lower the QUALITY setting.