1
LPRD Handbook
License Plate Recognition Data
End User License Agreement
Server Installation Guide
Client Installation Guide
Replicator Guide
Agency User and Administration Manual
SPAWAR Systems Center, Atlantic
2010
LPRD Handbook
Table of Contents
References ----------------------------------------------------------------------------------------------------------------------- 1
Acknowledgements ------------------------------------------------------------------------------------------------------------ 1
Points of Contact---------------------------------------------------------------------------------------------------------------- 1
End User License Agreement ------------------------------------------------------------------------------------------------ 2
LPRD Server Installation Guide --------------------------------------------------------------------------------------------- 3
I.
Downloading JDK and GlassFish ---------------------------------------------------------------------------------------------------------- 3
II.
Creating a Second GlassFish Domain -------------------------------------------------------------------------------------------------- 11
III.
Firewall Setup ---------------------------------------------------------------------------------------------------------------------------- 12
IV.
Installing MySQL------------------------------------------------------------------------------------------------------------------------- 15
V.
Setting Up the MySQL Databases ------------------------------------------------------------------------------------------------------ 20
VI.
Creating a Domain Windows Service and Enabling Automatic Restart Upon Reboot --------------------------------- 21
VII.
Editing the jleie.properties File ------------------------------------------------------------------------------------------------------ 23
VIII.
Deploy JLEIE ------------------------------------------------------------------------------------------------------------------------------ 25
IX.
Copy router.properties ---------------------------------------------------------------------------------------------------------------- 28
X.
Deploy JRA-Router ------------------------------------------------------------------------------------------------------------------------- 29
LPRD UI-JSF2 Client Installation Guide ---------------------------------------------------------------------------------- 31
I.
Upgrade Glassfish JSF (Mojarra) version --------------------------------------------------------------------------------------------- 31
II.
Deploy ui-jsf2.war on Domain1 --------------------------------------------------------------------------------------------------------- 36
III.
Check That The Server Is Running--------------------------------------------------------------------------------------------------- 37
IV.
Installation of LDAP --------------------------------------------------------------------------------------------------------------------- 38
V.
Create a New Root ------------------------------------------------------------------------------------------------------------------------- 41
VI.
Change LDAP Admin Password ------------------------------------------------------------------------------------------------------ 43
VII.
Add NIS Schema ------------------------------------------------------------------------------------------------------------------------- 47
VIII.
Populate LDAP --------------------------------------------------------------------------------------------------------------------------- 48
IX.
Set the LPR system Admin Password----------------------------------------------------------------------------------------------- 49
X.
Test Login------------------------------------------------------------------------------------------------------------------------------------- 50
LPRD Replicator Installation Guide -------------------------------------------------------------------------------------- 52
Prerequisites --------------------------------------------------------------------------------------------------------------------------------------- 52
Installing the Replicator ------------------------------------------------------------------------------------------------------------------------- 52
LPRD Agency User & Administration Manual -------------------------------------------------------------------------- 58
I.
General Information ----------------------------------------------------------------------------------------------------------------------- 59
Introduction------------------------------------------------------------------------------------------------------------------------------------- 59
Basic System Overview ----------------------------------------------------------------------------------------------------------------------- 59
II.
Getting Started------------------------------------------------------------------------------------------------------------------------------ 59
Obtaining a User Account ------------------------------------------------------------------------------------------------------------------- 59
Launching the LPRD System----------------------------------------------------------------------------------------------------------------- 60
Logging In ---------------------------------------------------------------------------------------------------------------------------------------- 61
III.
LPRD Searches --------------------------------------------------------------------------------------------------------------------------- 63
Last Fifty Hits ----------------------------------------------------------------------------------------------------------------------------------- 63
Plate Search ------------------------------------------------------------------------------------------------------------------------------------- 65
Using Wildcards -------------------------------------------------------------------------------------------------------------------------------- 67
IV.
Agency Administration Functions --------------------------------------------------------------------------------------------------- 68
Logging In ---------------------------------------------------------------------------------------------------------------------------------------- 68
List Users----------------------------------------------------------------------------------------------------------------------------------------- 70
Add User ----------------------------------------------------------------------------------------------------------------------------------------- 71
Edit User ----------------------------------------------------------------------------------------------------------------------------------------- 72
Delete User-------------------------------------------------------------------------------------------------------------------------------------- 73
User Audits -------------------------------------------------------------------------------------------------------------------------------------- 73
V.
System Administration Functions ------------------------------------------------------------------------------------------------------ 75
Logging In ---------------------------------------------------------------------------------------------------------------------------------------- 75
List Users----------------------------------------------------------------------------------------------------------------------------------------- 77
Add User ----------------------------------------------------------------------------------------------------------------------------------------- 79
Edit User ----------------------------------------------------------------------------------------------------------------------------------------- 80
Delete User-------------------------------------------------------------------------------------------------------------------------------------- 81
List Organizations ------------------------------------------------------------------------------------------------------------------------------ 82
Add Organizations ----------------------------------------------------------------------------------------------------------------------------- 83
Edit Organization ------------------------------------------------------------------------------------------------------------------------------ 84
Delete Organization --------------------------------------------------------------------------------------------------------------------------- 85
Appendix A - LPRD MOU Template --------------------------------------------------------------------------------------- 86
THIS PAGE INTENTIONALLY LEFT BLANK
LPRD Handbook
1
References
The Department of the Navy's Space and Naval Warfare Systems Center, Atlantic (SPAWAR) and License
Plate Recognition Data (LPRD) were funded under Interagency Agreement No. 2005-DDR-R-087, from
the U.S. Department of Justice, Office of Justice Programs, National Institute of Justice.
The views and opinions of authors expressed herein do not necessarily reflect those of the United States
Government.
Reference herein to any specific commercial products, processes, or services by trade name, trademark,
manufacturer, or otherwise does not necessarily constitute or imply its endorsement, recommendation,
or favoring by the United States Government.
The information and statements contained herein shall not be used for the purposes of advertising, nor
to imply the endorsement or recommendation of the United States Government.
With respect to documentation contained herein, neither the United States Government nor any of its
employees make any warranty, express or implied, including but not limited to the warranties of
merchantability and fitness for a particular purpose. Further, neither the United States Government nor
any of its employees assume any legal liability or responsibility for the accuracy, completeness, or
usefulness of any information, apparatus, product, or process disclosed; nor do they represent that its
use would not infringe privately owned rights.
Distribution of this document authorized to federal, state, local, and tribal government agencies and
their contractors only for administrative or operational use, December 2010. Other requests for this
document shall be referred to the Space and Naval Warfare Systems Center, Code 54150, P.O. Box
190022, North Charleston, SC 29419-9022.
Acknowledgements
These materials have been created in direct consultation and testing with the Escondido Police
Department (California), Myrtle Beach Police Department (South Carolina), Georgetown Police
Department (South Carolina), La Mesa Police Department (California), and Chula Vista Police
Department (California). A special thanks to The Automated Regional Justice Information System and
The South Carolina Law Enforcement Division for their integral involvement to the development of
LPRD.
SPAWAR would like to thank Scientific Research Corporation and the LPRD team for researching and
writing the Handbook.
Additionally, SPAWAR would like to thank the National Institute of Justice (NIJ) for its contribution to the
success of this project.
Points of Contact
Space and Naval Warfare Systems Center, Atlantic (SPAWAR)
Joint Information Sharing Branch
LPRD Handbook
2
P.O. Box 190022
North Charleston, SC 29419-9022
(b)(6)
(843) 218-4528
Scientific Research Corporation (SRC)
1101 Remount Road, Suite 500
North Charleston, SC 29406
(843) 747-8766 (phone)
(843) 747-7702 (fax)
SRC Program Managers and Team Members:
(b)(4), (b)(6)
(b)(4), (b)(6)
End User License Agreement
Documentation:
Distribution of LPRD documentation is authorized to federal, state, local, and tribal government agencies
only for administrative or operational use, December 2010. Other requests for this and other project
documentation shall be referred to the Space and Naval Warfare Systems Center, Code 51620, P.O. Box
190022, North Charleston, SC 29419-9022.
Software Program:
LAW ENFORCEMENT OPEN SOURCE LICENSE
Permission is hereby granted, free of charge, to any person obtaining a copy of this software and
associated documentation files (the "Software"), to deal in the Software without restriction, including
without limitation the rights to use, copy, modify and merge copies of the Software, and to permit
persons to whom the Software is furnished to do so, subject to the following conditions:
The above notice and this permission notice shall be included in all copies or modified portions of the
Software.
THE SOFTWARE IS PROVIDED "AS IS", WITHOUT WARRANTY OF ANY KIND, EXPRESS OR IMPLIED,
INCLUDING BUT NOT LIMITED TO THE WARRANTIES OF MERCHANTABILITY, FITNESS FOR A PARTICULAR
PURPOSE AND NONINFRINGEMENT. IN NO EVENT SHALL THE AUTHORS OR COPYRIGHT HOLDERS BE
LIABLE FOR ANY CLAIM, DAMAGES OR OTHER LIABILITY, WHETHER IN AN ACTION OF CONTRACT, TORT
OR OTHERWISE, ARISING FROM, OUT OF OR IN CONNECTION WITH THE SOFTWARE OR THE USE OR
OTHER DEALINGS IN THE SOFTWARE.
LPRD Handbook
3
LPRD Server Installation Guide
I.
Downloading JDK and GlassFish
A. Installing JDK
1. Go to:
http://java.sun.com/javase/downloads/index.jsp
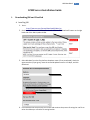
2. Scroll down to the Java SE downloads in detail. Click on the “Download” button on the right
hand side of the JDK 6 Update 20 JDK.
3. Select Windows from the first platform dropdown menu (if not preselected), check the
agreement box (if you agree), leave the second dropdown menu at 1.5 Mbps, and click
download.
4. Click underlined file name on the next screen and continue the process of saving the .exe file to
either the desktop or a familiar file saving location.
LPRD Handbook
4
5. When the ‘Download Complete’ window appears, click ‘Close’.
6. Double click on the JDK icon wherever the file was saved in order to complete the installation.
7. This action may prompt a box like the following to appear. Click ‘Continue’.
8. The License Agreement should appear next. Click ‘Accept’, if you do.
LPRD Handbook
5
9. A Custom Setup screen should appear next. Click ‘Next’, as you can ‘change your choice of
features after installation by using the Add/Remove Programs utility in the Control Panel’.
10. It will continue downloading, and should ask for an installation directory (or destination folder
to install to). For JDK installation, it can go into the prescribed folder (something to the effect
of C:\Program Files (x86)\Java\jre6\). Click ‘Next’.
11. It will continue installing and should conclude with a completion window saying that it
successfully installed. Click ‘Finish’.
LPRD Handbook
6
B. Installing GlassFish
1. Go to:
http://java.sun.com/javaee/
2. Scroll down to the JDK 6 Update 20 with Java EE box. Click the ‘Download’ button for ‘Java EE 5
SDK’.
3. Select the appropriate Platform and Language needed for your download and also the
‘Download’ button for the ‘GlassFish Java EE’ on the next screen.
4. Click on the .exe file and choose ‘Save’ when prompted by a download window. Save the .exe
file to either the desktop or a familiar file saving location.
LPRD Handbook
7
5. When the ‘Download Complete’ window appears, click ‘Close’.
6. Double click on the Java EE icon wherever the file was saved in order to complete the
installation. Choose ‘Run’ when prompted with the question “Are you sure you want to run
this software?”
7. This should bring up the Installation Window. Click ‘Next’.
a. Agree with the terms of the license, if you do, and click ‘Next’.
LPRD Handbook
8
b. The next window will allow a selection of the installation directory. Change the
installation directory from C:\Sun\SDK to C:\origins\Sun\SDK and click ‘Open’. Click ‘Next’.
c. When prompted with the following window, click ‘Create Directory’.
LPRD Handbook
9
d. The following screen should appear:
i. Choose an admin password (min 8 characters). This will be referred in this installation
guide as your ‘GlassFish Administrator Password for domain1’. MAKE SURE THESE
CREDENTIALS ARE REMEMBERED.
ii. Select ‘Don’t Prompt for Admin User Name and Password’.
iii. The Admin, HTTP, HTTPS ports should be left at the default (4848, 8080, 8181).
iv. Click ‘Next’.
e. The next screen should have the last 4 boxes checked (‘Enable Updatecenter Client’,
‘Create Desktop Shortcut to Autodeploy Directory’, ‘Add bin directory to PATH’, ‘Create
Windows Service’). Click ‘Next’.
LPRD Handbook
10
f. Click ‘Install Now’ on the next screen which will start the installation process.
g. Optionally select ‘Skip Registration’ once installation has been completed and click ‘Next’.
h. The next screen will show that the installation is complete. Click ‘Start Server’. This
should bring up a ‘Startup Complete’ window. Click ‘Ok’ to exit out of this small window.
Click ‘Finish’ on the ‘Installation Complete’ screen.
LPRD Handbook
II.
11
Creating a Second GlassFish Domain
1. Open Windows Command Prompt via Start->Run->’cmd’
2. Change directory down to the GlassFish directory by typing:
cd c:\origins\Sun\SDK\bin [enter]
3. To check that domain1 is running:
a. Type “asadmin list-domains [enter]”
b. If domain 1 is operating properly, it should say “domain1 running”.
4. To create a new domain:
a. Type:
asadmin [enter]
And, then type:
create-domain --adminport 4949 --instanceport
9090 domain2 [enter]
b. It will ask for admin username and password. For admin we suggest ‘admin’. Enter the
credentials of your personal choice followed by enter (we suggest the same credentials
as were created in domain1). These credentials will be referred to in this installation
guide as your ‘GlassFish Admin Password for domain2’. MAKE SURE YOU REMEMBER
THESE CREDENTIALS AS THEY WILL BE NEEDED LATER.
LPRD Handbook
12
c. If successful, the screen should have the text “Domain domain2 created”. If
unsuccessful, see Troubleshooting Tips.
III.
Firewall Setup
1. Go to Start->Administrative Tools->Windows Firewall with Advanced Security->Inbound Rules
(found on the left sidebar)-> New Rule (found on the right sidebar)
2. Select ‘Port’ and click ‘Next’.
LPRD Handbook
13
3. Select ‘TCP’ and ‘Specific local ports’. In the blank beside ‘Specific local ports’ type 8080,9090.
Optionally, if you would like to administer the machine remotely, also include 4848,4949.
**Warning: Be sure the server is not directly connected to the Internet. It must be on a private
network only accessible through VPN (or equivalent) ** Click ‘Next’.
4. Select ‘Allow the Connection’.
LPRD Handbook
14
5. Mark ‘Domain’ and ‘Private’. The server should not be connected to a public network. Click
‘Next’.
6. On the next screen, type the name as ‘jleie’. For the description, write something to the effect
of ‘Firewall rules for jleie’. Click ‘Finish’.
LPRD Handbook
IV.
15
Installing MySQL
1. Open your browser and go to:
http://www.mysql.com/downloads/mysql/
2. Click the ‘Download’ button on Windows x86, 64-bit), MSI Installer.
3. Click on the ‘No thanks, just take me to the downloads!’. This will take you to the ‘Mirrors in’
section. Select the HTTP that is closest to your location.
4. Save the .msi file either to your desktop or a familiar and easily accessed file downloads
location.
5. After having finished downloading the file, double click on the icon to start the installation and
choose ‘Run’ when prompted with an “Open File” window.
6. When the Setup Wizard starts, click ‘Next’.
LPRD Handbook
16
7. The next screen will have Setup Type options. Choose ‘Typical’ (first option).
8. Click ‘Install’ on the next screen. (After clicking, you may have to click ‘Continue’ if a User
Account Control box pops up).
9. On the MySQL Enterprise screen that will pop up next, click ‘Next’, and then ‘Next’ again on the
following screen.
10. Select only the ‘Configure the MySQL Server now’ option and click ‘Finish’.
LPRD Handbook
17
11. Click ‘Continue’ on the “User Account Control” window that may pop up.
12. Click ‘Next’ on the “MySQL Server Instance Configuration Wizard” window.
13. Select ‘Standard Configuration’ on the next screen with Configuration Type options. Click
‘Next’.
LPRD Handbook
18
14. Check both ‘Install as Windows Service’ (this will allow the database to launch and start
automatically) and ‘Include Bin Directory in Windows PATH’ (this will help with ease of
populating the database). Leave the Service Name as MySQL and ensure that the ‘Launch the
MySQL Server automatically’ box is checked. Click ‘Next’.
15. Select the ‘Modify Security Settings’ and enter a root password. Optionally, check the box
‘Enable root access from remote machines’. These credentials will be referred to as your
‘MySQL Admin Password’ in this installation guide. Click ‘Next’. MAKE SURE YOU REMEMBER
THESE CREDENTIALS AS THEY WILL BE NEEDED LATER.
LPRD Handbook
16. Click ‘Execute’ to start the configuration of the database.
17. Select ‘Finish’ to close the Wizard once the configuration is complete.
19
LPRD Handbook
V.
20
Setting Up the MySQL Databases
1. Open Windows Command Prompt via: Start->Run->typing ‘cmd’->Click ‘Ok’.
2. Next, create an origins database by:
a. Typing (with exact syntax only 3 spaces total: one space after mysql, u, and root):
mysql –u root –p(Your MySQL Admin Password) [enter]
**Sample password here was ‘asamplepassword’
b. Create a database called ‘origins’ by typing:
create database origins; [enter]
c. Create a database called ‘origins_rod’ (rod = Repository Of Data) by typing:
create database origins_rod; [enter]
d. Exit out of the mysql command by typing ‘exit [enter]’.
e. Next, insert the JLEIE Installation CD provided to you (there are two .sql files: origins.sql
and origins_rod.sql to be loaded into MySQL).
LPRD Handbook
21
f. Next, load these two .sql files into MySQL. To do this, type:
i. mysql –u root –p(Your MySQL Admin Password) < (the
location of the origins.sql file)
ii. mysql –u root –p(Your MySQL Admin Password) < (the
location of the origins_rod.sql file)
**sample password here was ‘sample’
**The location of the .sql, if directly accessing them off of the CD should be
d:\config\db\mysql\origins.sql and d:\ config\db\mysql\origins_rod.sql . If the files are
in another location, type the full directory of where they are located (You can right click
on the file in the place it is stored, go to properties and it will give you the location.
Follow this address by origins.sql or origins_rod.sql). If there is a space in the pathname,
you will need to surround the pathname with double-quotes.
VI.
Creating a Domain Windows Service and Enabling Automatic Restart Upon
Reboot
A. Creating a domain Windows Service
1. Open up Windows command prompt as an administrator by: Start->Accessories->right
click on Command Prompt->Run as Administrator.
2. Type (make sure EXACT syntax; note that when ‘=’ is used, there should only be one
space after the ‘=’):
c:\windows\system32\sc.exe create domain2 binPath=
”c:\origins\Sun\SDK\lib\appservService.exe
\”c:\origins\Sun\SDK\bin\asadmin.bat start-domain
domain2\” \”c:\origins\Sun\SDK\bin\asadmin.bat stopdomain domain2\”” start= auto DisplayName= “jleie Service”
**If you do not get the output of ‘SUCCESS’, then you must retype the above phrase again as it
did not create the service.
LPRD Handbook
22
**If you need to delete the Windows service you created and then create it again, see
Troubleshooting Tips
3. Check to see that the Windows Service is running under Start->Administrative Tools->
Services. “jleie Service” should appear in the list with an ‘Automatic’ startup type.
Note that the domain1 Windows service is named: “SunJavaSystemAppserver9PE”.
B. Enabling Automatic Restart Upon Reboot
1. Go under StartAdministrative ToolsServices. Find the ‘jleie Service’ Windows
service that was created in part A and click to highlight it. Click ‘start’ to start the
Windows Service.
2. Now check to make sure that the Windows Service is working correctly. To do this:
a. Reboot the server (Start->Shutdown->Reboot).
b. Log back in.
c. Open command prompt (via Start->run-> type ‘cmd’) and change directory
down to where the asadmin command is by typing cd
c:\origins\Sun\SDK [enter]; asadmin [enter]; list-domains
[enter]. If working properly, domain1 and domain2 should be shown as
running.
LPRD Handbook
VII.
23
Editing the jleie.properties File
1. Create a ‘config’ directory under the origins directory on the C drive. Download the
jleie.properties from the JLEIE Installation CD provided to you, to this newly created
‘config’ directory.
** If you are installing the system somewhere else, you can define a system property
“origins.config.file” by going to http://localhost:4949, logging in as admin, clicking
Configuration then System PropertiesAdd Propertyorigins.config.file (with the value being
the full pathname to jleie.properties) **
LPRD Handbook
24
2. The file needs to be edited with {password} being your MySQL Admin Password. This
can be done via:
a. Open the .properties file in notepad. Edit the two {password} blocks under both
origins_rod and origins.
b. Replace {password} text (including the brackets) with your MySQL Admin
Password.
**sample password here was ‘asamplepassword’
c. Save and close the file.
LPRD Handbook
VIII.
25
Deploy JLEIE
A. Deploy .war files on domain2 and Test the Database
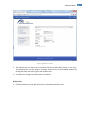
1. To deploy the .war files, open your web browser and go to http://localhost:4949/. Enter
your ‘GlassFish Admin Password for domain2’.
2. Go to Web Applications on the next screen, in the left hand menu.
LPRD Handbook
26
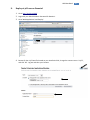
3. Next, click ‘Deploy’.
4. Next, ‘Browse’ for the jleie-services-1.7.2.war file that is on your JLEIE Installation CD,
change the Context Root to ‘jleie’ and click ‘Ok’. Do not forget to change the context
root to ‘jleie’ by removing the –services-x.x suffix, or replicators will be unable to
connect.
LPRD Handbook
27
5. Go to the c:\ drive and open the origins directory. Create a new directory called
‘upload’.
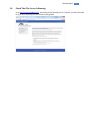
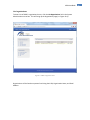
6. In your web browser, go to http://localhost:9090/jleie/LPRHandlerService?tester
a. Put any value into the two boxes and click the button that says
‘getLast50Reads’.
LPRD Handbook
28
b. If it worked correctly, the screen should look something like the following:
B. Monitoring
Monitor the c:\origins\logs\jleie.log file which keeps track of problems in a notepad file. Open to
see if it is giving error messages.
IX.
Copy router.properties
The router.properties file is on the Installation CD. Copy this into c:\origins\config. Normally it does
not require any changes.
LPRD Handbook
X.
29
Deploy JRA-Router
1. Deploy jra-router-1.7.2.war on domain1
Go to http://localhost:4848. Enter your username and ‘GlassFish password for domain1’.
2. Go to ‘Web Applications’ and click ‘Deploy’.
LPRD Handbook
30
3. Browse for the router-jra-1.7.2.war file, change the context root to router-jra, and click ‘Ok’.
4. After deploying the router-jra-1.7.2.war file, a router.xml.enc.keystore key file will be created in
c:\origins\keys. This file needs to distributed to all replicators using secure replication.
LPRD Handbook
LPRD UI-JSF2 Client Installation Guide
**LPRD Server Installation is a prerequisite for completing this installation.
I.
Upgrade Glassfish JSF (Mojarra) version
1. Go to: https://javaserverfaces.dev.java.net/
2. Download the Mojarra 2.0.0 binary bundle.
3. Save the file on your desktop or a familiar download location.
31
LPRD Handbook
32
4. Next, extract the zipped folder by right clicking on the downloaded directory and selecting ‘Extract
All’ from the dropdown menu. Continue the extracting process by selecting ‘Extract’ when the
Extraction Wizard appears (the default destination will put an unzipped file in the same place where
your zipped folder is).
LPRD Handbook
33
5. Rename the jsf-impl.jar found in [GlassFish installed Directory]\lib (i.e., c:\origins\Sun\SDK\lib) to jsfimpl.jar.bkp.
6. Copy and paste the new jsf-api and jsf-impl .jar files (found in the recently unzipped file’s lib
directory) to [installation directory of GlassFish]/lib (i.e., c:\origins\Sun\SDK\lib).
LPRD Handbook
34
LPRD Handbook
35
7. Find the domain.xml file found in:
[installation directory of GlassFish]/domains/[domain-name]/config/domain.xml
a. Open this file in WordPad or some other text editor program.
b. Add 'classpath-prefix="${com.sun.aas.installRoot}/lib/jsf-api.jar" to the java-config element
(do a Find search for ‘java-config’. The first ‘java-config’ that it comes to is the java-config
element spoken of).
8. Repeat step 7 for every domain in [installation directory of GlassFish]/domains . Domain2 also
needs the above procedure.
9. Restart your Glassfish domains (using Windows Services or by rebooting the server).
LPRD Handbook
II.
36
Deploy ui-jsf2.war on Domain1
1. Go to http://localhost:4848/
2. Login with your GlassFish Admin Password for Domain1.
3. Go to ‘Web Applications’ and ‘Deploy’.
4. Browse for the ui-jsf2.war file located on your Installation Disk, change the context root to ‘ui-jsf2’,
and click ‘Ok’. Log out and close your browser.
LPRD Handbook
III.
37
Check That The Server Is Running
Go to http://localhost:8080/ui-jsf2. You should see the following screen. However, you will not be able
to log in until completing the next sections installing LDAP:
LPRD Handbook
IV.
38
Installation of LDAP
A. Install Apache Directory Server
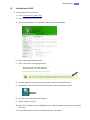
1. Go to: http://directory.apache.org/.
2. Click on the green Directory Server.
3. Click on the ApacheDS 1.5.7 in the Downloads menu on the left sidebar.
4. Select ‘Download Windows Installer’.
5. Click on the .exe file in the light green box.
6. Save the application on your desktop or an easily accessible download directory.
7. Double click on the icon where the file was stored to start the installation process.
8. Click ‘Next’ when the Setup Wizard appears.
9. Choose ‘I Agree’, if you do.
10. Select ‘Full’ installation from the dropdown menu and leave ‘Apache Directory Server’ checked.
Click ‘Next’.
11. Use the default directory for the installation location. Click ‘Next’.
LPRD Handbook
39
12. Use the default directory for the Server Instances Home Directory. Click ‘Next’.
13. Use the default directory for the JDK home Directory. Click ‘Install’.
14. After installation is complete, click ‘Next’.
15. Choose ‘Finish’ and ‘Yes’ to the ‘Do you want to start the default directory instance?’ question.
B. Install Apache Directory Studio
1. Go to: http://directory.apache.org/
2. Click on the blue Directory Studio.
3. Click on the ‘Download Apache Directory Studio 1.5.3’.
4. Choose ‘Download for Windows’.
LPRD Handbook
5. Click on the .exe file in the light green box.
6. Save the file on the desktop or an easily accessible download directory.
7. Once download is complete, close out of the download window.
8. Double click on the icon where the file was stored to start the installation process.
9. Click ‘Next’ when the Setup Wizard appears.
10. Choose ‘I Agree’, if you do.
11. Use the default destination folder preselected and click ‘Install’.
12. Once installation is complete, click ‘Next’.
13. Click ‘Finish’ to close out the Studio Setup Wizard.
40
LPRD Handbook
V.
41
Create a New Root
1. Next, find the LDAP installation directory. If you followed the steps above, it should be in
c:\Program Files(x86).
2. Next, find the .xml file that is under the file extension:
{ldap install directory}\instances\default\conf\server.xml
(i.e., c:\Program Files(x86)\instances\default\conf\server.xml).
3. Open the .xml file in Notepad.
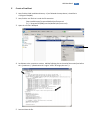
4. Scroll down to the <partitions> section. Add the following line to the end of the section (but before
the </partitions>): <jdbmPartition id="origins" suffix="dc=origins,dc=com" />
5. Save and close the file.
LPRD Handbook
42
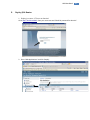
6. Next, restart the server. Go under Start->Administrative Tools->Services. Find the ‘Apache
Directory Server’ and right click on it. Choose ‘Restart’ under the dropdown menu.
LPRD Handbook
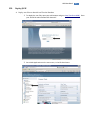
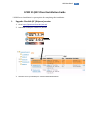
VI.
43
Change LDAP Admin Password
1. Open Apache Directory Studio by going under Start->All Programs->Apache Directory Studio->
Apache Directory Studio.
2. Click the ‘Go to the Workbench’ circle when the program loads.
3. Next, create a new connection to localhost:10389. Go under the top menu bar ‘LDAP’->’New
Connection…’
LPRD Handbook
44
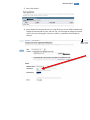
4. Set a ‘Connection Name’, ‘Hostname’, and ‘Port’. Choose ‘No encryption’ for the Encryption
Method. Click ‘Next’.
5. Set the Bind DN or user to ‘uid=admin,ou=system’. If required the default Bind password is ‘secret’.
Click ‘Finish’.
LPRD Handbook
45
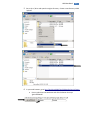
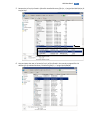
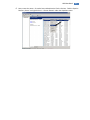
Expand the ‘ou=system’ tab and click on the uid=admin. Double-click on the ‘userPassword’ attribute in
the attributes list that is displayed.
6. Go to the ‘New Password’ tab in the box that appears. This will be referred to in this guide as your
‘LDAP Password’. Click ‘Ok’ to save the password and exit the window.
LPRD Handbook
46
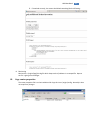
7. Right click on the server connection in the bottom left corner. Go to ‘Properties’ in the dropdown
menu. Go to the ‘Authentication’ tab in the box that appears. Type your LDAP Password in the bind
password box. Click ‘Ok’ to exit the window and save your changes.
LPRD Handbook
VII.
47
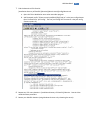
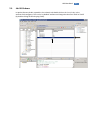
Add NIS Schema
In Apache Directory Studio, expand the ‘ou=schema’ tab->double-click on the ‘cn=nis’ tab. In the
attribute list that appears, click on the ‘m-disabled’ attribute and change the value from TRUE to ‘FALSE’
(by double-clicking TRUE and typing FALSE).
LPRD Handbook
VIII.
48
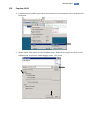
Populate LDAP
1. In Apache Directory Studio, right click on the connection in the ‘Connections’ tab in the bottom left
hand corner.
2. Choose Import->LDIF import from the dropdown menu. Browse for the origins.init.ldif file on your
Installation CD. Uncheck the ‘Enable Logging’ option. Click ‘Finish’.
LPRD Handbook
IX.
49
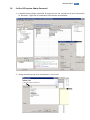
Set the LPR system Admin Password
1. In Apache Directory Studio, expand the ‘dc=origins,dc=com’ tab. Expand the ‘ou=users’ tab and click
on ‘uid=admin’. Right click on the Attributes list and select ‘New Attribute’.
2. Change the Attribute type to be ‘userPassword’. Click ‘Finish’.
LPRD Handbook
50
3. Enter a password in the Password Editor box that will pop up. Click ‘Ok’. This will be your password
for the ‘admin’ user when using the ui-jsf2 client.
X.
Test Login
1. Visit http://localhost:8080/ui-jsf2/ and click the Login link:
LPRD Handbook
51
2. Log in by leaving ORI blank, user “admin”, and the password which you set in section IX.3. Click the
Submit button:
3. You should now see the System Administrator’s menu on the left. For futher information on using
the client, refer to the LPRD Agency User & Administrator Manual, later in this handbook:
LPRD Handbook
52
LPRD Replicator Installation Guide
Prerequisites
•
You will need this information:
-
Your LPR Database name, username and password
-
Your agency’s unique ORI
•
Connectivity to the regional LPRD server. This will be provided to you by the regional LPRD server
administrator.
•
An account with Administrator access.
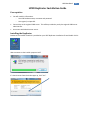
Installing the Replicator
Browse to the installer file which is provided on your JLEIE Replicator Installation CD and double-click it:
Wait a moment as the installer prepares itself:
If a User Account Control window pops up, click “Yes”:
LPRD Handbook
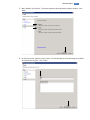
Click “Next” on the Welcome screen:
Click “Next” to accept the default installation folder:
Click “Next” to accept the default Start Menu folder:
53
LPRD Handbook
54
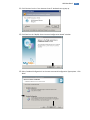
Wait a moment as the replicator is installed:
If you have an older installation and the replicator suggests migrating your existing configuration, click “Yes”:
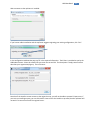
In the configuration window that pops up, fill in the required information. The IP:Port is provided to you by the
LPRD administrator. Please be careful that you enter the correct ORI. The description is simply some text that
describes your organization/agency. Then click Next:
Note that if the installer cannot connect to the regional server, you will not be able to proceed. Expert users, if
you insist on installing anyway, you can click Next 5 times to force the installer to proceed, but the replicator will
not work if it cannot connect to the regional server.
LPRD Handbook
55
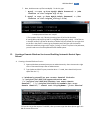
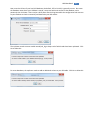
Now, enter the IP:Port of your local LPR database; the default, 127.0.0.1:1433, is generally correct. Also enter
the database name where your LPR data is stored, a username with write access to that database, and a
password, then click Next. There may be a brief pause after clicking Next while the configuration tool connects
to your database to check connectivity and determine your LPR vendor:
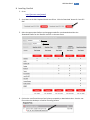
The replicator needs to create a table named lprd_log to keep track of which reads have been replicated. Click
Yes to allow this:
For some databases, the replicator needs to add an additional column to your LPR table. Click Yes to allow this:
LPRD Handbook
56
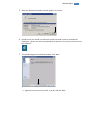
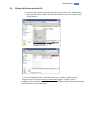
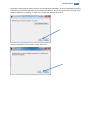
Select the maximum age of reads in order to be considered for replication. If you are upgrading a previous
installation, you also have the ability to Clear Replication History. Do not clear the history unless you have
reason to believe it is necessary. In most cases, simply click Next on this screen:
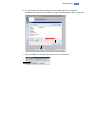
On the Configuration’s finish screen, simply click Finish:
LPRD Handbook
57
Click “Finish” to complete installation:
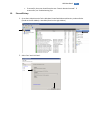
Congratulations, that’s it! The LPRD Configuration tool, Uninstaller, and Log are now available in your Start
Menu:
It is wise to click the Replicator Log option to ensure that everything looks good. Note that the log is
now stored in %ProgramData%/LPRD Replicator/logs; the link will open that log in your default editor.
LPRD Handbook
LPRD Agency User &
Administration Manual
58
LPRD Handbook
I.
General Information
Introduction
Welcome to the License Plate Recognition Data (LPRD) User Manual. This manual provides
users and administrators with a working knowledge of the License Plate Search and
administrative functions. This allows users to operate the LPRD system in a daily working
environment. This Manual is organized to give users and administrators a high-level
understanding of each application and the steps necessary to operate the application to its
fullest extent.
Basic System Overview
LPRD uses open-source software developed by SPAWAR to allow information to be shared
across jurisdictional boundaries regardless of the structure of the underlying data sources.
Using the various search functions, authorized agency users can search on set fields and view
returned matching results in a pre-set format. The central database allows users to search for
and view records of all of the contributing agencies. Users must have a valid user account and
password to use the LPRD system.
In addition to performing queries, agency administrators will have a variety of responsibilities in
LPRD operation. Agency administrators will generate agency user accounts and supply initial
passwords for the LPRD system. They will be responsible for all of their agency’s users and the
particular role each user has within LPRD. Agency administrators can add, edit, and delete
agency user accounts as needed to keep information current. Agency administrators will be the
first people to handle any agency user issues. If an issue cannot be resolved, the agency
administrator will be responsible for contacting the LPRD System Administrator for assistance.
II.
Getting Started
Obtaining a User Account
To log in and use the LPRD system, users must have a valid user account and password. User
accounts are obtained from the local agency Administrator. Contact the local agency
Administrator for a valid username and password.
59
LPRD Handbook
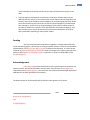
Launching the LPRD System
1. Open the web browser (e.g. Internet Explorer).
2. Type in the appropriate URL to open the Home screen (see Figure 1-1).
Figure 1-1. LPRD Home Screen
60
LPRD Handbook
Logging In
1. Click the Login link in upper right corner of the Home Screen to bring up the Login Screen
(see Figure 1-2), begin typing your ORI and select the correct one. Then, enter the username
and password previously assigned by the local Agency Administrator.
Note: Passwords are case sensitive. Usernames are not case sensitive.
Figure 1-2. LPRD Login Screen
2. Click SUBMIT to log into the LPRD system. The username and password will then be
validated against the authentication mechanism.
Contact the local Agency Administrator if you have any problems logging in.
3. After logging in, the LPRD welcome screen appears, and you will see a new menu on the left
(see Figure 1-3).
61
LPRD Handbook
Figure 1-3. LPRD Welcome screen
62
LPRD Handbook
III.
LPRD Searches
Last Fifty Hits
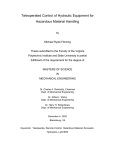
1. By clicking on the Last Fifty Hits link in the left menu, users can view the last 50 license
plates that were loaded into the system using the Platescan XML file with pictures and the
proper longitude and latitude coordinates (see Figure 2-1).
By default the page size is set to 10 license plates per page, and the user has the option of
changing the results per page to either 25 or 50.
Figure 2-1. LPRD Last Fifty Hits screen
63
LPRD Handbook
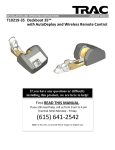
2. Users can click on any plate link in the results window to bring up that particular plate’s
activity data page (see Figure 2-2). The Latitude and Longitude coordinates populate a
marker on a map powered by OpenStreetMaps located to the right of or below the activity
data. If more than one Activity Date exists than each activity will have its own location
marker on the map. You can click on the marker on the list to the left to center the map on
that location.
Figure 2-2. LPRD License Plate Details screen
64
LPRD Handbook
Plate Search
Users may perform a Plate Search against the LPRD central database. The system queries these
data sources using the information entered on the Search screen and then returns matching
records on the Search Results screen (see Figure 3-1).
Figure 3-1. LPRD Plate Search screen
65
LPRD Handbook
Clicking inside the After this Date and Before this Date text boxes will bring up a calendar that
allows the user to select dates to search from, until, and during when activities might have taken
place for a particular license plate (see Figure 3-2).
Figure 3-2. LPRD Plate Search screen with calendar drop down
66
LPRD Handbook
Using Wildcards
Wildcards may be used in multiple ways to find valuable information stored in the LPRD system.
Agency users can use the standard wildcard symbol, the percent sign (%). The percent sign
represents zero or more characters that are unknown at the time of the query. For example,
the query for 307% (see Figure 3-3) will return results like 307AAA, 307ABC, 307CCC, etc.
Figure 3-3. LPRD Plate Search screen using % sign
When your search returns multiple results, the user has the option to view a License Pate Details
page by clicking a Tag link and following the same methods as discussed in the Last Fifty Hits
section above.
67
LPRD Handbook
IV.
Agency Administration Functions
In addition to performing queries, an agency administrator can list, add, edit, and/or delete user
accounts that are within their agency only. They can also perform user audits on users that are
within their agency only.
Logging In
1. Click the Login link in upper right corner of the Home Screen to bring up the Login Screen
(see Figure 5-1), begin typing your Agency ORI, along with your Agency Administrator
username and password.
Note: When logging in as an agency administrator, the agency ORI is entered.
Note: Passwords are case sensitive. Usernames are not case sensitive.
Figure 5-1. LPRD Login Screen
68
LPRD Handbook
2. Click SUBMIT to log into the LPRD system. The username and password will then be
validated against the authentication mechanism.
3. After logging in, the LPRD welcome Agency Administrator screen appears (see Figure 5-2).
Figure 5-2. LPRD Admin Welcome Screen
69
LPRD Handbook
List Users
To view a list of your agency users, click the List Users link on the left side of the screen under
Agency Administration menu box to access the List Users page (see Figure 5-3).
Figure 5-3. LPRD List Users Screen
70
LPRD Handbook
71
Add User
1. To add a user to your agency, click the Add User link on the left side of the page under
Agency Administration menu box to access the Add User page (see Figure 6-1).
Figure 6-1. Add User Page
2. Complete the below fields on the Add User page. Table 6-1 outlines these fields.
Table 6-1. Add User Page Fields
FIELD
DESCRIPTION/OPTIONS
ORI
ORI is auto-assigned.
Username
Enter the username for the new user. Usernames may not contain a space at the
beginning or end of the string, a special character (i.e. # % &), or any of the
following characters: , ; ‘ “ + \ < >
Password
Assign a password for the username. Passwords must contain at least eight
characters, including an upper and lower case alphabetical character, a number,
and a special character (i.e. @ # * ). Passwords are case sensitive.
LPRD Handbook
72
Table 6-1. Add User Page Fields
FIELD
DESCRIPTION/OPTIONS
Confirm
Password
Retype the password entered in the Password field. Remember, passwords are
case sensitive.
Full Name
Enter the user’s first, middle, and last name.
Short Name
Enter the user’s short name.
Email
Enter the user’s email address.
User Type
• Select the appropriate user type by clicking on the drop down box.
• Agency User – This user has query and limited administration privileges (change
password). This value is selected by default.
• Agency Administrator –
• System Administrator –
3. Click SUBMIT to save the new user account.
Note: Users accounts can only be created for the agency of the agency administrator. Agency
administrators cannot add user accounts for other agencies.
Edit User
1. Click the List Users link to bring up your agency users, and click Edit link to the right of the
user’s information to display the Edit User screen (see Figure 6-2).
Figure 6-2. LPRD Edit Users Screen
LPRD Handbook
2. The agency administrator can edit a user’s Password, Full Name, Short Name, Email, or User
Type. The administrator can also assign or unassign access to any of the available modules
by clicking the check box to the right of the module name.
3. Click Submit to save changes.
Delete User
1. Click the List Users link to bring up your agency users, and click the Delete link to the right of
the user’s information to delete a user.
User Audits
The Agency Administrator can perform an Audit Search of all Users in their agency to see what
each User has searched (see Figure 7-1).
Figure 7-1. LPRD Audit Search Screen
73
LPRD Handbook
1. Enter an Agency User’s User Name in the User Name text box.
2. Click SUBMIT, and this will return all searches performed by this User since they were
added to the system (see Figure 7-2).
Figure 7-2. LPRD Audit Search Results Screen
The Agency Administrator has the ability to narrow the search spectrum by date/s by using the
After and Before this date text boxes (see Plate Search section above).
They can also narrow the search by searching for a single or many specific search items by
entering them in the Search Terms text boxes.
For example, if the user searched for tag 123ABC, but not all of this information was known, the
administrator could enter ’12,C’ in the Search Terms text box and click SUBMIT. This would
return all searches performed by the user for tags containing 12 and C.
74
LPRD Handbook
V.
System Administration Functions
In addition to performing queries, a system administrator can create and manage agency user
and organization accounts. They can add, edit, and delete user and organization accounts. Plus
they can list users.
Logging In
1. Click the Login link in upper right corner of the Home Screen to bring up the Login Screen
(see Figure 8-1), begin typing your Administrator username and password.
Note: When logging in as a system administrator, the ORI field is left blank.
Note: Passwords are case sensitive. Usernames are not case sensitive.
Figure 8-1. LPRD Login Screen
2. Click SUBMIT to log into the LPRD system. The username and password will then be
validated against the authentication mechanism.
3. After logging in, the LPRD welcome Administrator screen appears (see Figure 8-2).
75
LPRD Handbook
Figure 8-2. LPRD Admin Welcome Screen
76
LPRD Handbook
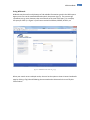
List Users
To view a list of an organization’s users, click the List Users link on the left side of the screen
under System Administration menu box to access the List Users page (see Figure 8-3).
Figure 8-3. LPRD List Users Screen
77
LPRD Handbook
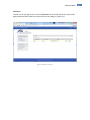
Type the ORI of the organization whose users you would like to view in the ORI text box, and the
users will display (see Figure 8-4).
Figure 8-4. LPRD List Users Screen
78
LPRD Handbook
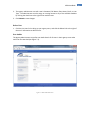
79
Add User
1. To add a user, click the Add User link on the left side of the page under System
Administration menu box to access the Add User page (see Figure 9-1).
Figure 9-1. Add User Page
2. Complete the below fields on the Add User page. Table 9-1 outlines these fields.
Table 9-1. Add User Page Fields
FIELD
DESCRIPTION/OPTIONS
ORI
Enter the ORI where the new user will be assigned.
Username
Enter the username for the new user. Usernames may not contain a space at the
beginning or end of the string, a special character (i.e. # % &), or any of the
following characters: , ; ‘ “ + \ < >
Password
Assign a password for the username. Passwords must contain at least eight
characters, including an upper and lower case alphabetical character, a number,
and a special character (i.e. @ # * ). Passwords are case sensitive.
LPRD Handbook
80
Table 9-1. Add User Page Fields
FIELD
DESCRIPTION/OPTIONS
Confirm
Password
Retype the password entered in the Password field. Remember, passwords are
case sensitive.
Full Name
Enter the user’s first, middle, and last name.
Short Name
Enter the user’s short name.
Email
Enter the user’s email address.
User Type
• Select the appropriate user type by clicking on the drop down box.
• Agency User – This user has query and limited administration privileges (change
password). This value is selected by default.
• Agency Administrator –
• System Administrator –
3. Click SUBMIT to save the new user account.
Edit User
1. Click List Users then click the Edit link to the right of the user’s information to display the
Edit User screen (see Figure 9-2).
LPRD Handbook
Figure 9-2. LPRD Edit Users Screen
2. The administrator can edit a user’s Password, Full Name, Short Name, Email, or User Type.
The administrator can also assign or unassign access to any of the available modules by
clicking the check box to the right of the module name.
3. Click Submit to change user information as indicated.
Delete User
1. Click the Delete link to the right of the user’s information to delete a user.
81
LPRD Handbook
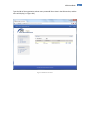
List Organizations
To view a list of LPRD’s organizational users, click the List Organizations link in the System
Administration menu box. This will bring up the Organization page (see Figure 10-1).
Figure 10-1. LPRD List Organizations Screen
Organizations will be listed on separate lines listing their ORI, Organization Name, and Email
Address.
82
LPRD Handbook
Add Organizations
1. To add an organization, click the Add Organization link on the left side of the page under the
System Administration menu box. This will bring up the Add Organization screen (see Figure
11-1).
Figure 11-1. LPRD Add Organization Screen
2. Complete the below fields on the Add Organization page. Table 11-1 outlines these fields.
Table 11-1. Add Organization Page Fields
FIELD
DESCRIPTION/OPTIONS
ORI
Enter the ORI for the new organization. ORI’s may not contain a space at the
beginning or end of the string, a special character (i.e. # % &), or any of the
following characters: , ; ‘ “ + \ < >.
Organization
Name
• Enter the Organization Name for the new organization. Organization Name’s
may not contain a space at the beginning or end of the string, a special
character (i.e. # % &), or any of the following characters: , ; ‘ “ + \ < >.
83
LPRD Handbook
Table 11-1. Add Organization Page Fields
FIELD
DESCRIPTION/OPTIONS
Organization
Email
Enter the Email Address for the new organization.
Available
Modules
Click in each radio box that the new organization will have access to.
3. Click SUBMIT to add the organization.
Edit Organization
1. To edit an organization account, click List Organizations then click on the EDIT link in the far
right column. The Edit link will direct users to the Edit Organization screen (see Figure 11-2).
2. The administrator can edit an Organization Name or Organization Email. The administrator
also can assign access to any of the available modules by clicking the check box to the right
of the module name.
84
LPRD Handbook
Figure 11-2. LPRD Edit Organization Screen
3. Click SUBMIT to save changes.
Delete Organization
1. Click the DELETE link to the right of the organization’s information to delete an organization
85
LPRD Handbook
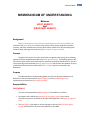
Appendix A - LPRD MOU Template
86
LPRD Handbook
MEMORANDUM OF UNDERSTANDING
Between
(HOST AGENCY)
And
[PROPOSED AGENCY]
Background
[Name of Host Agency Project] [License Plate Recognition Data sharing (LPRD)] is an
initiative of the [Host Agency] to create an information sharing system designed to replicate,
maintain, and share law enforcement license plate reader systems from all participating state
and local public safety agencies within the [State of Name or region of Name].
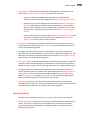
Concept
The goal of this project is to share license plate recognition data among all contributing
agencies that have established this MOU with [Host Agency System]. Participating agencies will
share license plate reader (LPR) information for replication to the data warehouse or as part of a
central querying system hosted by [Hosting Agency System] and will have the capability to query
all LPR based information from around the [State or Region] which is stored within the
warehouse.
Purpose
This Memorandum of Understanding (MOU) sets forth an agreement between and
defines the roles and responsibilities of [Host Agency] and the [Proposed Agency], in
implementing connectivity to [Host Agency System].
Responsibilities
[HOST AGENCY]
The roles and responsibilities of [Host Agency] in this MOU are as follows:
•
Host Agency will establish the [Name of the Host Agency System] as a shared
information system to the benefit of all public safety agencies in the [State or region of
xxxx].
•
The [Host Agency] will appoint a project manager to oversee [Name of Host Agency
project] and implement the terms and conditions of this MOU.
87
LPRD Handbook
•
[Hosting Agency] will direct the management of all obligations, responsibilities, and
assets of [Name of Host Agency System], including but not limited to:
o
Any and all contractual obligations for development, implementation,
expansion, maintenance, and management of [Name of Host Agency System],
o
Ownership of any and all equipment in the inventory of [Name of Host Agency
System], including but not limited to servers, workstations, communications
devices, routers, firewalls or other hardware, and all software in use or under
development in compliance with the requirements of [Name of Host Agency
System].
o
Security and control of any data resident in [Name of Host Agency System] data
warehouse, to exclusive Law Enforcement use as defined by [Name of Host
Agency System] Security Policies and Procedures.
•
[Host Agency] will design and implement a governance structure appropriate to the
proper operational maintenance of [Host Agency], and providing appropriate levels of
input to all participating agencies.
•
Host Agency will adopt Security Policies and Procedures as may be consistent with
appropriate security and maintenance of the system for all participating agencies. This
document shall become the governing MOU for participation in [Host Agency System]
upon ratification of the participating agencies.
•
[Host Agency] will ensure that appropriate personnel are made available as reasonably
necessary to assist with development, implementation, and testing of any hardware /
software solutions, as well as for any training required, for the purposes of this project.
•
Host Agency will assist in obtaining the cooperation of any third party contractor or
vendor approved by them to provide license plate reader systems in [Name of State or
Region] and / or internal or external technology providers (e.g. [State/Region] CIO /
Other [State/County/City] Agencies / [Host Agency] information technology staff) as
may be reasonably necessary for the purposes of this project.
•
[Host Agency] will assist in creation of the lessons learned and final reporting and
documentation of the project. The input provided by the host agency will be utilized for
future distributions and use of the system at other hosting agencies.
[PROPOSED AGENCY]
The roles and responsibilities of the [Proposed Agency] in this MOU are as follows:
•
The [Proposed Agency] maintains sole authority and responsibility for determining the
actions, if any, that are appropriate for the department’s information technology
environment, and for implementing any changes deemed to be appropriate to the
purposes of this project.
88
LPRD Handbook
•
The Chief Executive Officer of the [Proposed Agency], or an appropriate designee, will
be available, as reasonably required, to give guidance and approval to technical and
non-technical requirements of this assistance project.
•
The Chief Executive Officer of the [Proposed Agency] will adopt [Name of Host Agency
System] Security Policies and Procedures document, which is the governing MOU for
participation in [Name of Host Agency System], and agrees to remain in compliance with
the requirements, policies, and practices as outlined therein for the duration of the
[Proposed Agency]’s participation in [Name of Host Agency System].
•
The Chief Executive Officer of the [Proposed Agency] will appoint a representative as
the agency’s (Name of Host Agency System) Project Manager who will be responsible
for the overall coordination of the project on behalf of the department.
•
The [Proposed Agency] will make reasonable accommodations for access by [Host
Agency] staff to their facilities and license plate reader system as may be required in
furtherance of this project.
•
The [Proposed Agency] will ensure that appropriate personnel are made available as
reasonably necessary to assist with development, implementation, and testing of any
hardware / software solutions, as well as for any training required, for the purposes of
this project.
•
The [Proposed Agency] will assist in obtaining the assistance of any third party
contractor or vendor associated with their license plate reader system and / or internal
or external technology providers (e.g. county / municipal information technology staff)
as may be reasonably necessary for the purposes of this project.
•
[Proposed Agency] will assist in creation of the lessons learned and final report of the
project.
[ALL AGENCIES]
The roles and responsibilities of all agencies in this MOU are as follows:
•
All contributing agencies shall develop and maintain an LPR data usage policy that
addresses privacy concerns. Such usage policy may be derived from the International
Association of Chiefs of Police publications pertaining to license plate readers.
•
The ownership of the data that is contributed in this system shall remain with the
contributing agency. Therefore, all ownership rights are to the sole authority and
responsibility of the contributing agency. The data in this system is shared by the
contributing agency, for the communal use by other law enforcement and government
agencies that have this signed agreement with [Host Agency], but shall adhere to the
contributing agency’s usage policy when using the contributing agency’s data. All data
89
LPRD Handbook
use and handling shall comply with the current laws and statutes with respect to the
data.
•
The [Host Agency] shall develop and maintain an LPR data retention policy that can
addresses privacy concerns in accordance with current federal and state legislation and
statutes, and may be limited by system capability. All contributing agencies shall adhere
to the data retention policy until such time that The [Proposed Agency] has developed
their own policy. At that time, the [Proposed Agency] may submit a memorandum to
this MOU to address the retention of the data owned by The [Proposed Agency]. Such
data retention policy may be derived from the International Association of Chiefs of
Police publications pertaining to license plate readers.
Funding
Any costs associated with maintenance, upgrade, or changes required directly
to the contributing agency’s LPR system or existing computer network in order to accommodate
implementation of [Name of Host Agency System] interfaces and replication, or costs incurred
on behalf of [Name of Host Agency System] as a result of changes to the agency system(s) which
adversely affect [Name of Host Agency System] replication, may be the responsibility of the
[Proposed Agency].
Acknowledgement
[Host Agency] anticipates the duration of this implementation to be twelve (12)
calendar months, but may be extended at the discretion of the Director of [Host Agency] if
requested by the [Proposed Agency]. Such extension must be documented through appropriate
addendum to this MOU agreeable to both parties.
This Memorandum of Understanding will be effective upon signature of all parties.
Date:
Name (Print and Signature)
Title
[Proposed Agency]
90
LPRD Handbook
«City», State
______________________________________
Date: ________________
Name (Print and Signature)
Title
[Host Agency]
City, State
Date:
Date:
91