1
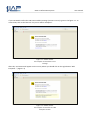
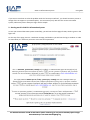
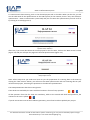
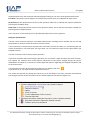
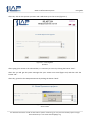
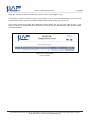
SLAP 2.0 Information System User manual SLAP 2.0 Information system ‐ User manual ‐ For detailed information on SLAP 2.0 Information system functioning, you may contact the SLAP project manager Darko Stalevski by e‐mail: [email protected] SLAP 2.0 Information System User manual 1. How to access the SLAP information system Considering the fact that the SLAP is a web application (a programme that works via the Internet), it can be accessed the same way as a web site – by typing the relevant address in the Internet browser. The address for SLAP 2.0 Information System access is: https://www.slap.skgo.org It is important to mention that it is necessary to type complete address, and not only www.slap.skgo.org. Unlike the most web sites, SLAP uses “secured” connection for data security and for this reason its web address does not have the standard prefix “http”, but “https”. This is the reason why the Internet browser (Internet Explorer, Firefox etc.) cannot automatically assign the correspondent prefix, therefore, if you do not type the complete address, you will get the message that SLAP is not available. You may have minor problems with the first accession to the SLAP system, depending on the Internet browser you use. In fact, the electronic certificate used for SLAP is “self signed”, which is interpreted as a potential risk by some browsers and you will be warned that accessing SLAP may be insecure. Naturally, the risk does not exist, though you will get similar message as when the web site is not available. This message differs depending on the browser which you use, therefore we cannot give its full contents here, but in one part of the message you will be offered to continue with the access to the web site (SLAP) “despite the risk”. In Internet Explorer, it is enough to click on this link and click “yes” on the question “do you want to ignore the potential risk”, while in Firefox there are few more steps, since the browser requires from you to create an exception rule for the given web address (SLAP system address). If you use Internet Explorer, the SLAP inaccessibility message (insecure access) is given in the figure 1.0. To access SLAP, click on “Continue to the website”. Figure 1.0 – Internet Explorer The computer screen with the error message For detailed information on SLAP 2.0 Information system functioning, you may contact the SLAP project manager Darko Stalevski by e‐mail: [email protected] SLAP 2.0 Information System User manual If you use Mozilla Firefox the SLAP inaccessibility message (insecure access) is given in the figure 1.1. To access SLAP, click on the blue link “Or you can add an exception”. Figure 1.1 – Mozilla Firefox The computer screen with the error message After this, two buttons will appear on the screen, where you should click on the right button “Add Exception…” (Figure 1.2) Figure 1.2 – Mozilla Firefox The computer screen with the “Add Exception” button SLAP 2.0 Information System User manual Then, a popup window “Add Security Exception” will appear on the screen. Click the “Get Certificate” button (Figure 1.3) Figure 1.3 – Mozilla Firefox The computer screen with the “Get Certificate” button After this, on the bottom of the popup window, the “Confirm Security Exception” button will appear. Click this button to se the font page of SLAP. Figure 1.4 – Mozilla Firefox The computer screen with the “Confirm Security Exception” popup window For detailed information on SLAP 2.0 Information system functioning, you may contact the SLAP project manager Darko Stalevski by e‐mail: [email protected] SLAP 2.0 Information System User guide If you use Opera, the SLAP inaccessibility message (insecure access) is given in the figure 1.5. To access SLAP, click on the “Approve” button. Figure 1.5 – Opera Browser The computer screen with the “Security Alert” popup window If you use Google Chrome, the SLAP inaccessibility message (insecure access) is given in the figure 1.6. To access SLAP, click on the “Proceed anyway” button. Figure 1.6 – Google Chrome The computer screen with the “Security Alert” popup window For detailed information on SLAP 2.0 Information system functioning, you may contact the SLAP project manager Darko Stalevski by e‐mail: [email protected] SLAP 2.0 Information System User guide If you are not sure how to solve the problem with the “Security Certificate”, you should contact a person in charge of the IT support in your Municipality. This is necessary only with the first access to the SLAP system, while every other attempt to log in will be simple. 2. Starting work in SLAP 2.0 Information System In case you accessed the SLAP system successfully, you will see the front page of SLAP, which is given in the figure 2.0. On the top of the page, there is a welcome message, and below it you will see the log in window. In order to access SLAP, it is necessary to have a user name and a password. For detailed information on SLAP 2.0 Information system functioning, you may contact the SLAP project manager Darko Stalevski by e‐mail: [email protected] SLAP 2.0 Information System User guide There are four user types of the SLAP system: General public – this type of user does not have a username and a password but , from the SLAP system front page, has an insight into the reports on project scoring, their current status, as well as some basic information about the project (sector and type the project belongs to, investment value, location, project documentation status, compatibility with the national, regional and local development strategy, etc.). This type of user can download the SLAP questionnaire in PDF format. Municipalities / Towns(local self‐government) – this type of user has access all the reports like the general public but, since it has a user name and a password, it can enter the SLAP and make data insertion into the database. Data insertion means defining new projects in the system and filling the electronic questionnaire. Ministries, banks and donor agencies – this type of user has the access to all the reports like the general public, but it has a username and a password for entering deeper into the SLAP system, which differs from the one that the municipalities/towns have. After entering the SLAP system, the user can see the data about all the projects in the SLAP database and it has an insight into their PPDs inserted by the local self governments. Besides that, this kind of user may create its own project scoring system and its own reports. System administrator – this type of user has all the privileges that other users have, and the ability to create new and extend the existing questionnaires and scoring systems, define new user groups, create user names and passwords etc. Depending on which user category you belong to, by enterring the SLAP system you will get the access to different parts of this information system. Further in this User guide, we will present every SLAP segment in detail, as well as with all the possibilities of the different user groups. 3. User group – Local self‐government (Municipalities /Towns) If you belong to this user group, a neccessary condition for access to the SLAP system and getting a user name and a password is to submit to the SLAP Manager documents on appointment of a SLAP coordinator, signed and endorsed by the Mayor. You may submit an original copy of the document or send it by fax to the Standing Conference of Towns and Municipalities on a fax number: 011 / 3221 215. After that, the SLAP Coordinator in your Municipality will get the user name and password by e‐mail. The user names have the following format: MunicipalityNameSlap (for example, the user name of the Municipality of Ada is Adaslap, the user name of the Municipality of Backa Palanka is Backapalankaslap etc). The passwords for access have the following format: slapXXXX! (word ’’Slap’’, four figures and an exclamation mark – for example, slap1234!,or slap3953! etc.). When you enter the user name and password, you should click on the “Registration” button in order to access the SLAP system. Note: unlike most web sites, pressing the ’’enter’’ button after entering the user name and password will not have a successful registration as a result. When you log in the SLAP system for the first time, the screen will look like in the figure 3.0. For detailed information on SLAP 2.0 Information system functioning, you may contact the SLAP project manager Darko Stalevski by e‐mail: [email protected] SLAP 2.0 Information System User guide Figure 3.0 – Inserting Data New project To start entering data about your infrastructure projects, you should click on the ’’New project’’ button. When you do this, the following will appear on the screen (Figure 3.1). Slika 3.1 – Novi projekat Prva strana elektronskog formulara SLAP 2.0 Information System User guide In upper left box, insert the project title in Serbian, maximum 50 characters. Similar to this, insert the project title in English in upper right box. The project title is inserted bilingually because it appears in all the reports generated from the SLAP system, so that both domestic and foreign donors can understand the contents of the table. This is the only data which should be inserted in two languages. After inserting the project title, select from the drop down list the project sector (economic infrastructure, social infrastructure or environment protection sector). Then the project type should be selected. You can select the project type by left clicking on the desired type and then on the right arrow. If you did all this correctly, you will see the selected project type in the white right box, below the “Selected project type”. Then, to choose the project location, select the desired municipality from the list or, if the project belongs to more than one municipality, choose the “Multi‐municipal project” option. In further electronic questionnaire filling, you can list all the municipalities which participate in the project. After filling in all the boxes on the first page of the electronic questionnaire, click on the “Save” button, in order to save the inserted data and continue with further insertion. When you do this, the table with all the project of the selected municipality, which are in the SLAP system, will appear on the screen. (Figure 3.2). If you just started inserting data into the system, only one project title will appear in the table. Figure 3.2 – Inserting Data Project list For detailed information on SLAP 2.0 Information system functioning, you may contact the SLAP project manager Darko Stalevski by e‐mail: [email protected] SLAP 2.0 Information System User guide To continue with data inserting, click on the desired project title in the table. When you do this, you will see the table with all the questionnaires in the SLAP system (at the moment, there is only one electronic questionnaire – SLAP 2.0 Information system PPD) and you can select the questionnaire you wish to fill in by clicking on its title (Figure 3.3). Figure 3.3 – Inserting Data Questionnaire selection After this, if you insert data about the certain project for the first time, click on the “New version” button (Figure 3.4) and you will open the page with the SLAP questionnaire (Figure 3.5). Figure 3.4 – Inserting Data New project version Note: All the steps that you made until now are just the preparation for inserting data in the SLAP. By clicking the “New version” button, you will access the SLAP questionnaire and start inserting data on your infrastructure project, answering the questions in the electronic questionnaire. The SLAP questionnaire has three scoring levels: These levels are marked by the icons with level number in front of every question: All the questions from the first level are mandatory, while at the second and third level questions, the number on the icon is yellow: If you do not answer some of the mandatory questions, you will not be able to publish your project. For detailed information on SLAP 2.0 Information system functioning, you may contact the SLAP project manager Darko Stalevski by e‐mail: [email protected] The SLAP questionnaire consists of 170 questions, divided in 17 groups: 1. Basic information about the institution which developed the project 2. Basic information about the project 3. Socio – economic indicators about the environment of the project development 4. Project documentation status 5. Project frame 6. Physical components of the project 7. Project users 8. Other expected positive effects 9. Project costs 10. Logical frame matrix 11. Indicators 12. Premises and risks 13. Institutional frame 14. Financial sources of the investment 15. Financial sustainability 16. Providing environment protection 17. Arrangements on implementation SLAP 2.0 Information System User guide All the questions from the seventeen mentioned groups belong to one of the three questionnaire levels: First level is eliminatory and its purpose is to filtrate the projects which are adequate for SLAP access. Second level of the questionnaire consists of the questions which aim to identify the projects suitable for financing the feasibility study. Third level of the questionnaire consists of the questions which aim to identify the projects suitable for financing project implementation. In the “Annex A” of this manual you can find detailed explanation of every question. Filling the questionnaire: You don`t have to answer questions in the SLAP questionnaire according to their number, but you can skip the questions if you don`t know the answer to some of them. It is not necessary to answer all the questions first time when you enter the data. If, in one working day you answer 10 questions, next time when you log in SLAP, you can continue to type from the point where you stopped last time. You don`t have time limit to answer all the questions. If you make a mistake while answering the question, you can answer it again and enter the correct answer. This regards the situation when some physical component of the project changes during the project development and when it is necessary to answer again the question regarding the changed component and to enter latest data. It is important to answer all the questions of the level 1 marked by the icon: If you do not do so, you wont be able to publish the project. You answer the question by putting the mouse cursor on the question you want, and after that question text changes the color in blue and shows the line which underlines the question (figure 3.6). For detailed information on SLAP 2.0 Information system functioning, you may contact the SLAP project manager Darko Stalevski by e‐mail: [email protected] SLAP 2.0 Information System User guide After this, click on the question you want and it will show up on the screen (figure 3.7) Figure 3.7 – Inserting Data Question After typing your answer in the selected box, it is necessary to save it by clicking the button “Save”. After this you will get the system message that your answer was saved (figure 3.8) and then click the button “OK”. After this, go back to the SLAP questionnaire by clicking the button “Back”. Figure 3.8 – Inserting Data Saved answer For detailed information on SLAP 2.0 Information system functioning, you may contact the SLAP project manager Darko Stalevski by e‐mail: [email protected] SLAP 2.0 Information System User guide You will see again the SLAP electronic questionnaire, where the question you have just answered will be ticked green (figure 3.9) Figure 3.9 – Inserting Data Answered question After this you can go to the next question, e.g. question 1.2 (figure 3.10). Figure 3.9 – Inserting Data Answered question Unlike the previous question (The name of project proposer ) where it was necessary to type the text in the correspondent box, with this question it is necessary to choose one of the options by clicking the correspondent circle (radio button). After this, as in the previous question, click the button “Save”, and then the button “Back”, in order to save your answer and go back to the SLAP questionnaire. SLAP 2.0 Information System User guide After this, you can go to the next question e.g. question 4.2.2 (figure 3.10). This question refers to the project documentation, more precisely it refers to the general design / master plan. Figure 3.10 – Inserting Data General design / Master plan Within the answer to this question, as well as when you answer all the questions regarding the existance of some document, type the document name (title), to see if the document is finalized and approved / adopted by the project proposer and authorised institution. Apart from these answers to the question about the existance of a certain document, as an evidence of its existance, it is necessary to attach that document. You can do this by clicking the “Add document” button, and thereafter opens the window for document adding (figure 3.11). Figure 3.10 – Inserting Data General design / Master plan Click the “Browse” button in order to find the document For detailed information on SLAP 2.0 Information system functioning, you may contact the SLAP project manager Darko Stalevski by e‐mail: [email protected] you want to attach. After you choose the document click the “Open” button. Figure 3.10 – Inserting Data General design / Master plan After this click the button “Submit” and wait for a moment in order to finish document upload (the period necessary for the document upload depends on its size). After the document upload you will get the message from the system that you document was successfully submitted. Click the “OK” button, and then the “SLAP questionnaire” button, in order to continue filling in the questionnaire. Figure 3.11 – SLAP Questionnaire Publishing data For detailed information on SLAP 2.0 Information system functioning, you may contact the SLAP project manager Darko Stalevski by e‐mail: [email protected] Now you have filled a part of the questionnaire and you answered several questions, but your project i.e. your answers are not visible or available to other system users. In order to officially public the data about your infrastructure project, it is necessary to tick the box “ Confirm the publishing of project data” on the top of the page with the SLAP questionnaire and after that click the button “Publish” (figure 3.11). After this, the data about your infrastructure project will be available for all the ministries, organisations and donor association, which use the SLAP information system. At the end of a working day, log off from the SLAP system, by clicking the “Sign out” link in the right top screen corner (figure 3.12). Figure 3.11 – SLAP Questionnaire Publishing data Next time when you log in the SLAP system, you will see on the screen the list of all the projects for which you had started filling in the SLAP questionnaire (figure 3.12). If you want to continue with data insertion for some of the projects which you have already started, click the name of the project, and if you want to start a completely new project click the button “New project”. Figure 3.12 – SLAP Questionnaire Repeated access to the Questionnaire If you decide to continue filling in the questionnaire for the project you have already started, the system will ask you to choose the questionnaire you want to fill and you should choose the same questionnaire as last time (figure 3.13). For detailed information on SLAP 2.0 Information system functioning, you may contact the SLAP project manager Darko Stalevski by e‐mail: [email protected] SLAP 2.0 Information System User guide After this, you will see all the versions ot the project on the screen (figure 3.14). In the table you will see all the versions of your project. If you want to continue filling in the version you have allready started , click on the ordinal number of the version in table (e.g. Version 1). The versions which have already been published cannot modify, but you can click “New version” in the table. In that way you will create the new version you can fill in, but it will allready contain all the answers you filled in before. Figure 3.14 – Inserting Data Version selection For detailed information on SLAP 2.0 Information system functioning, you may contact the SLAP project manager Darko Stalevski by e‐mail: [email protected]