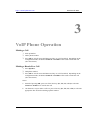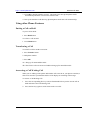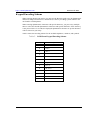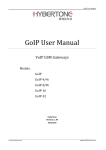
1
User Manual
SIP Phone
--Model EP-8201
Shenzhen HYBERTONE Technology Co., Ltd
Http://www.hybertone.com
Marketing@ hybertone.com
Support@ hybertone.com
http://www.hybertone.com
SIP Phone EP-8201
Copyright
Specifications are subject to change at any time without prior notification.
Copyright © 2007, HyberTone Technology Co., Ltd. All rights reserved.
No part of this publication, including text, examples, diagrams, or icons,
may be reproduced, transmitted, or translated in any form or by any means,
electronic, mechanical, manual, optical or otherwise, for any purpose,
without prior written permission of HyberTone Technology Co., Ltd.
Information in this publication is subject to change without notice.
HyberTone Technology Co., Ltd. may have patents or pending patent
applications, trademarks, copyrights, or other intellectual property rights
covering subject matter in this publication. The furnishing of this document
does not give you license to these patents, trademarks, copyrights, or other
intellectual property.
http://www.hybertone.com
SIP Phone EP-8201
Table of Contents
Table of Contents................................................................................................................ 1
Overview .............................................................................................................................. 2
VoIP Phone Features ........................................................................................................ 3
Shipping Contents............................................................................................................. 3
Installation and Basic Configuration .............................................................................. 1
Hardware Installation ....................................................................................................... 1
Accessing the Web Configuration Menu .................................................................... 1
Obtaining the VoIP Phone IP Address .................................................................... 1
Entering the VoIP Phone IP Address into a Browser............................................. 2
Configuring the VoIP Phone........................................................................................ 3
More Configurations.......................................................................................................... 1
Changing the Passwords............................................................................................... 1
Setting the LCD Default display.................................................................................. 2
Selecting Network Tones ............................................................................................. 2
Selecting Ring Tone ..................................................................................................... 2
Network Configuration..................................................................................................... 2
LAN Port Configuration............................................................................................... 3
PC Port Configuration .................................................................................................. 3
Setting the Time Server and Time Zone ..................................................................... 3
Performing an Online Upgrade.................................................................................... 3
Reset Configuration Settings ........................................................................................... 4
System Reboot .................................................................................................................. 4
VoIP Phone Operation....................................................................................................... 1
Making a Call................................................................................................................ 1
Making a Hands-Free Call ........................................................................................... 1
Answering an Incoming Call ....................................................................................... 2
Dialing from the Phonebook........................................................................................ 2
Viewing / Dialing from Call History........................................................................... 2
Redialing the last number............................................................................................. 2
Using other Phone Features ............................................................................................. 3
Putting a Call on Hold .................................................................................................. 3
Transferring a Call........................................................................................................ 3
Answering a Call Waiting Call.................................................................................... 3
Adjusting the Ring Volume ......................................................................................... 4
Adjusting the Handset Receiver Volume.................................................................... 4
Adjusting the Speaker Volume .................................................................................... 4
Adjusting the LCD Contrast ........................................................................................ 4
Resetting Phone Configuration.................................................................................... 4
Keypad Encoding Scheme ............................................................................................... 5
http://www.hybertone.com
SIP Phone EP-8201
Overview
The EP-8201 VoIP Phone is fully compatible with the open SIP industry standards.
This feature-rich VoIP Phone is designed as an enterprise grade VoIP device to work
seamlessly with most of the existing SIP systems.
Figure 1
EP-8201 VoIP Phone
http://www.hybertone.com
SIP Phone EP-8201
VoIP Phone Features
The EP-8201 VoIP Phone has the following features:
•
•
•
•
•
•
•
•
•
•
Supports SIP 2.0
Supports TCP/UDP/IP, RTP, HTTP, HTTPS, ARP, DNS, DHCP, NTP/SNTP, FTP,
TFTP, and SSL protocols
Interoperable with various 3rd party VoIP end user devices, Proxy/Registrar/Server,
and gateway products
Supports popular vocoders including G.711 a-law and u-law, GSM, G.723.1,
G.729a/b/ab
Supports standard voice features such as Caller ID Display or Block, Call Waiting,
Call Hold, Call Transfer, Call Forward, in-band and out-of-band DTMF
(RFC2833/SIP INFO), and Dial Plans
Supports conferencing, hands-free loudspeaker, phonebook, last number redial, call
log, volume control, and voicemail message indicator
Supports BASIC and DIGEST authentication (MD5, MD5-sess)
Provides easy configuration through automatic configuration, Web browser-based
Graphical User Interface (GUI), or, if desired, manual operation (phone keypad
interface)
Supports NTP and redundant DNS servers
NAT-friendly remote upgrade capability (via HTTP) even from behind
firewall/NAT router.
Shipping Contents
Table 1 below shows what comes packed with the EP-8201 VoIP Phone.
Table 1
Items Shipped with the EP-8201
Item
Description
Warranty Registration
Phone warranty card
Ethernet Cable
Straight cable
Power Supply (optional)
12VDC/500mA Output External Power Supply. This is
not required if your network switch supports POE.
http://www.hybertone.com
SIP Phone EP-8201
1
Installation and Basic
Configuration
Hardware Installation
1.
2.
3.
4.
Connect the handset and telephone cord to the base of the VoIP Phone.
Use the enclosed Ethernet cable to connect the LAN port to a hub or switch, or to a
DSL Router or Cable Modem.
Connect the power supply using the enclosed AC power supply.
For the first time installation, the phone will scan the network for available services
which are DHCP, PPPoE, and Fixed IP. Select the preferred service and enter the
required information if needed. No user input is required for DHCP service. User ID
and Password are required for PPPoE. IP address, Netmask, and Gateway IP Address
are required for Fixed IP mode.
Accessing the Web Configuration Menu
The steps for accessing the VoIP Phone Web Configuration Menu are:
Ø
Ø
Obtain the VoIP Phone IP address.
Enter the IP address into a browser.
Ø
Log in to the VoIP Phone.
Obtaining the VoIP Phone IP Address
To retrieve the IP address from the VoIP Phone:
Ø
Ø
Ø
When the phone is in the on-hook state, press Menu.
Press 3 (System Tools).
Press 1 (Phone Status).
http://www.hybertone.com
Ø
SIP Phone EP-8201
Press 1 (LAN Port).
The phone displays:
LAN PORT
1. STATUS: WORKING.
2. IP: xxx.xxx.xxx.xxx
where xxx is any valid IP address between 0 and 255.
Entering the VoIP Phone IP Address into a Browser
Connect a laptop or desktop computer to the same subnet as the SIP Phone when
accessing the Web Configuration Menu. The SIP Phone Web Configuration
Menu can be accessed from any Web browser using the following URL:
http://<phone-IP-address>
where <phone-IP-address> is the IP address of the phone.
The default User Name is “admin”; the default Password is “admin”.
Enter the User Name and Password into the Log In screen.
Click OK to log in to the VoIP Phone.
http://www.hybertone.com
SIP Phone EP-8201
Configuring the VoIP Phone
• Logging into the VoIP Phone
• Selecting Configurations and then Call Settings to display the page below.
Figure 2
•
Call Settings Screen – SIP (Single Server Mode)
Two registration modes are supported:
Ø
Single Server Mode – This mode allows SIP registrations to only one SIP Server /
Proxy; however, it can support up to 4 registrations with different SIP numbers and
names (Contact). A backup server option is available and it will be used once
registration to the primary server fails. Line 1 to Line 4 keys are predefined for the
“Contact1”, “Contact2”, “Contact3”, and “Contact4” in sequence. This allows the
user to specify which identity (Contact: SIP number and name) will be used for the
call. The default is to use the contact information for Line1 (Contact1).
Ø
Multiple Server Mode – This mode allows up to 4 SIP registrations to different SIP
servers / proxies as shown below. The Profile 1 is always used as the default SIP
server when a call is made without specifying the designated SIP server. Line 1 to
Line 4 keys are predefined for line selection. If a Profile is not programmed, the
corresponding line selection key is disabled.
http://www.hybertone.com
Figure 3
SIP Phone EP-8201
Call Settings Screen – SIP (Multiple Server Mode)
In general, the following basic parameters are required for a simple SIP registration.
•
o
o
SIP Phone number
o
o
o
o
o
o
SIP Proxy (IP Address or Fully Qualified Domain Name)
Display name (Optional: This name will be used for Call ID Name Delivery, so
that the other part can see your name before answering.)
SIP Registrar (IP Address or Fully Qualified Domain Name)
Authentication ID and password (if enabled)
Outbound Proxy
Home Domain
Register Expiry
Selecting the Audio Codec Preference to set the list of codecs to be used for this profile.
The default list has all codecs enabled and is arranged in the descending order of the data
bandwidth required.
http://www.hybertone.com
•
SIP Phone EP-8201
Selecting the Advanced tab for more VoIP settings. Depending on the requirements of
your service provider or network environment, some additional information listed below
may be required.
o
o
o
o
o
Signaling Port
Message Waiting
DTMF Signaling
NAT Traversal
Signaling QoS
Please consult your service provider or network administrator for more information or
instructions if necessary.
•
•
Selecting the Media Settings for packet length, jitter, Codec, and side tone settings.
Selecting Save Changes to store the current settings.
http://www.hybertone.com
SIP Phone EP-8201
2
More Configurations
Changing the Passwords
The EP-8201 supports two levels of configurations (user and administrator) via either the
Phone Menu or the Webpage. The user level is restricted from changing the call settings.
This administrator level allows full access to the phone configurations. Each level has its
own password and is required before entering the configuration interface.
The user name for the user level is “user” and for the administrator level is “admin”. The
User Password can be changed via the webpage in both user and administrator modes.
However, the Administrator Password can only be changed in the administrator mode. The
default password for user is “1234” and for admin is “admin”.
To change the Password(s):
1. Enter the VoIP phone webpage
2. Select Tools and then Change Password
3. Enter the New Password and Confirm Password under the User Level and/or
Administration Level.
4. Click Change.
http://www.hybertone.com
SIP Phone EP-8201
Setting the LCD Default display
You can set up the phone LCD to display two lines of text when the phone is idle.
To set the Vendor Name (title) and Title on LCD (Subtitle) in the phone:
1.
2.
3.
4.
Enter the VoIP phone webpage
Select Configurations and then Phone Settings
Fill in the Vendor Name (Title) field for the first text line.
Fill in the Title on LCD (Subtitle) field for the second line on LCD.
Selecting Network Tones
The Network Tone is the dial tone one hears when they pick up the handset to make a call,
and the ring back tone when they dial to a number. You can select Network Tones and Ring
Tone for the VoIP Phone, depending on the country where the phone is located.
To select Network Tones:
1. Select the Preference tab under the Configuration menu to access the Preference page.
2. Select a country on the list beside the label Network Tones. If your country is not on
the list, you can choose Customized and then enter the network tone definitions as
desired.
Selecting Ring Tone
Distinctive ringing is supported in both Single Server Mode and Multiple Server Mode.
Each Contact or Profile contains a Ring Type field which can be assigned to one of the
four predefined ring tones.
To select Ring Tone:
1. Select the Calling Settings under the Configuration menu
2. Choose a Contact for Single Server Mode or a Profile for Multiple Server Mode
3. Select a ring type (Type 1, Type 2, Type 3, Type 4) listed beside the Ring Type label.
Network Configuration
The Network Configurations screen allows you to set up the IP addresses of the LAN and
PC port, Bridge or Router mode (by selecting or deselecting Bridge Mode), default
Gateway Address, and Primary and Secondary DNS server IP addresses.
Note: the Primary DNS field will default to the IP address of your DHCP server.
http://www.hybertone.com
SIP Phone EP-8201
LAN Port Configuration
The VoIP Phone LAN port can be configured to obtain its IP address by DHCP or the IP
address can be set statically (used mainly when using the phone with a DSL line).
If you obtain a static IP address from your ISP, you can assign it to the VoIP Phone LAN
port by choosing “Static IP” selection and then entering the fields as provided.
1.
2.
3.
4.
Enter IP address of the phone beside IP Address.
Enter subnet mask beside Subnet Mask to specify the LAN Netmask.
Enter IP address of the default router beside Default Route.
Enter Primary and Secondary DNS addresses.
PC Port Configuration
Bridge Mode is the recommended setting for the VoIP Phone. This configuration is
important for an environment with an existing LAN and only one Ethernet outlet. It allows
a computer connected to the PC port to access the existing LAN. There is no need to
reconfigure the PC or the existing LAN.
In addition, the PC port also offers a Static IP mode which enables a new network segment
to be setup. A DHCP server can also be enabled to facilitate IP address assignment and
management.
Setting the Time Server and Time Zone
The Time Server is the Network Time Protocol server where the VoIP Phone retrieves date
and time information. The time is in GMT ± offset. For example, Pacific Standard Time is
GMT -8, and Pacific Daylight Time is GMT -7.
To set the Time Server and the time zone:
1. At the Time Server field, enter the IP address or the domain name (FQDN) of a valid
Time Server entry. It is set to timekeeper.isi.edu as factory default.
2. At the Time Zone field, enter GMT+x where x is the time difference between your
time zone and GMT.
Performing an Online Upgrade
WARNING! Performing an online upgrade is for experienced users or administrators only!
To prepare the VoIP Phone for an online upgrade:
1. Click Tools and then Online Upgrade.
2. Enter the IP address or domain name of the upgrade server and package name (ex.
http://wwwhybertone.com/update/cn2x4-3_08_14_15.pkg).
3. Click Start.
4. The message below appears when the firmware upgrade is completed. Click OK to
continue.
“Upgrade successful!”
http://www.hybertone.com
SIP Phone EP-8201
“Current version: xxxxxxxxx”
WARNING! Do not disconnect the power supply until the “Rebooting, Please
Wait…” message appears.
Reset Configuration Settings
If you would like to reset the IP phone to factory configuration, click on the Tools and then
Reset Config. Press “Yes” in the dialog box to confirm the reset. Please remember to use
the default passwords to access the phone again.
System Reboot
If you would like to reboot the VoIP phone, click on the Tools and then Reboot. Press
“Yes” in the dialog box to confirm the reboot. The phone will then reboot automatically.
http://www.hybertone.com
SIP Phone EP-8201
3
VoIP Phone Operation
Making a Call
1. Pick up handset.
2. Dial a phone number.
3. Press OK or wait for Auto Dial timeout (# key as well if enabled). Depending on the
configuration mode, the default Contact1 or Profile1 will be used to make the call.
(See notes below)
Making a Hands-Free Call
1. Press Speaker.
2. Dial phone number.
3. Press OK or wait for Auto Dial timeout (# key as well if enabled). Depending on the
configuration mode, the default Contact1 or Profile1 will be used to make the call.
(See notes below)
Notes:
a. Instead of pressing OK, press one of the line keys (L1, L2, L3, or L4) to select the
Contact or Profile to be used for the call.
b. An alternative way to make a call is to press a line key (L1, L2, L3, or L4) to select the
appropriate line first before dialing a phone number.
http://www.hybertone.com
SIP Phone EP-8201
Answering an Incoming Call
There are two ways to answer an incoming call:
1. Pick up the handset to answer the call normally.
2. Press the Speaker button to answer in speakerphone mode.
Dialing from the Phonebook
1. Press Menu
2. Choose PHONE BOOK
3. Choose the Profile desired (for Multiple Server Mode only)
3. Choose VIEW
4. Press UP or Down to view the Phone Book
5. Press OK to select the highlighted entry
6. Select DIAL to dial out the number
Viewing / Dialing from Call History
1A. Press UP to view the Missed Call List while on hook / idle
1B. Press DOWN to view the Answered Call List while on hook / idle
1C. Press OK to view the Dialed Call List while on hook / idle
2. Choose the Profile desired (for Multiple Server Mode only)
3. Press UP or Down to view the selected Call List
4. Press OK to dial out the highlighted entry
Redialing the last number
1. Pick up handset
2. Press L1, L2, L3, or L4 to select a line
3. Press REDIAL to dial out the last number dialed immediately
Or
1. Press REDIAL
2. Press UP or Down to select/high light the last number dialed from L1 to L4.
http://www.hybertone.com
SIP Phone EP-8201
3. Press OK to dial the number selected. The phone goes into Speakerphone mode
automatically and there is no need to select the line.
4. Pick up the handset to talk directly (Speakerphone mode turns off automatically).
Using other Phone Features
Putting a Call on Hold
To put a call on hold:
1. Press Hold button
To release a call on hold:
1. Press Hold button
Transferring a Call
To transfer a call to another extension:
1. Press Transfer button
2. Dial phone number
3. Press OK
4A. Hang up for unattended transfer.
4B. Wait for the call to be answered and then hang up for attended transfer.
Answering a Call Waiting Call
When you are talking on the phone and another call comes in on your phone extension, a
short tone sounds in your handset and the LCD displays an incoming call message.
To answer a Call Waiting Call:
1. Press the corresponding line key with an illuminated LED to put the current call on
hold and answer the Call Waiting Call.
2. Press the line key again to switch between the two calls.
http://www.hybertone.com
SIP Phone EP-8201
Adjusting the Ring Volume
1.
Press Menu.
2.
Select SYSTEM TOOLS.
3.
Select RING VOLUME.
4.
Press Up or Down to increase or decrease the ring volume as shown on the LCD.
Adjusting the Handset Receiver Volume
1.
Pick up the handset
2.
Press Up or Down to increase or decrease the handset receiver volume as shown on
the LCD.
Adjusting the Speaker Volume
1.
Press the Speaker button.
2.
Press Up or Down to increase or decrease the speaker volume as shown on the LCD.
Adjusting the LCD Contrast
1.
While the phone is idle, press Up or Down to increase or decrease the LCD Contrast
level as shown on the LCD.
Resetting Phone Configuration
T0 reset the SIP Phone to factory configuration:
1.
Press Menu
2.
Select SYSTEM TOOLS
3.
Select RESET CONFIG
4.
Press OK
5.
Enter the Username (default is admin) and Password (default is dbl#admin)
This will reset the entire phone configuration back to factory default settings.
http://www.hybertone.com
SIP Phone EP-8201
Keypad Encoding Scheme
When entering phone book entries, you must use the Phone keypad to key in alphanumeric
characters and special characters. The Phone uses the key encoding system similar to the
one found in cellular phones.
When entering alphanumeric characters and special characters, you press a key multiple
times to select the desired alphanumeric characters and special characters. If the same key
is not pressed after 1.5 seconds, the displayed alphanumeric character or special character
will be selected as your entry.
Table 2 shows the encoding scheme for the available alphabets, numbers, and symbols.
Table 2
VoIP Phone Keypad Encoding Scheme
Key
Description
1
1
2
2ABC
3
3DEF
4
4GHI
5
5JKL
6
6MNO
7
7PQRS
8
8TUV
9
9WXYZ
#
#@%&
0
0
*
*.,<!?