1
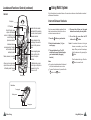
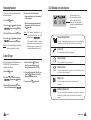
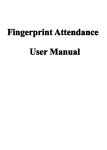
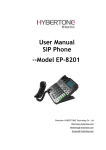
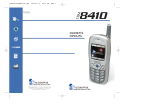
DIGITAL ENHANCED CORDLESS TELEPHONE
with Caller ID Function
CL-3350 INF
USER' S MANUAL
Congratulations
on purchasing our high quality product.
Please read the manual carefully to find out all features and how your telephone
works, so you can get the best out of your new phone.
Safety precautions
To reduce the risk of electrical shock and injury, please follow these basic safety
precautions before using the phone.
1. Carefully read and observe the instructions in this manual.
2. Follow all warnings marked on the unit.
3. When cleaning, unplug the phone first, then use a damp cloth to wipe. Do not
use liquid or aerosol cleaners.
4. Do not place objects on the line cord that may cause damage.
5. Do not use this phone in wet surroundings or environments where there is a
risk of explosion.
6. Avoid spilling of any liquid on the phone.
7. Unplug this phone from the wall outlet and refer servicing to qualified service
personnel only.
8. Pay attention to the polarity of the batteries, insert the rechargeable batteries
in accordance with polarity symbols ( this instruction is found in the installing
batteries section.)
9. Use only the batteries indicated in the User's Manual. Never use other
ordinary batteries or conventional alkaline batteries. Otherwise this may not
only cause personal injuries but also damage to the unit.
10. Do not mix exhausted batteries with full batteries. Exhausted batteries shall
not be disposed of with the usual household waste or in a fire.
11. If you are sure you will not be going to use the handset over a month, please
take out the batteries from the battery compartment.
12. Use only the power supply indicated in the User's Manual.
13. Keep the phone out of the reach of children.
14. Use the phone only in the described manner.
15. Stop using the phone if it becomes damaged.
16. The phone is designed to work with in a temperature range from 5
to 45
.
Appendix
Table of Contents
Troubleshooting
Symptom
Check & Remedy
No operation
Check that the power adapter is properly connected.
Check that the telephone line cord is properly connected.
Check that the handset is fully charged.
Check that the handset batteries are installed properly.
No dial tone
Check that the telephone line cord is properly connected.
Check that the power adapter is properly connected.
Warning beep occurs
when making a call
The Handset seems to
have very short
battery life.
Check that the handset batteries are not in low status.
Clean the charge contacts.
Consistently short battery life may indicate that
replacement of the batteries is necessary.
Before Using
Package Contents
Location and Function of Controls
LCD Window Icon Descriptions
Connecting Lines
Installing Batteries
Charging Handset
Using Handset Carrying Clip
Using Earmic (optional)
Turning Handset On/Off
Choosing Dial Mode
Setting Time
1
1
3
4
4
5
6
6
7
8
8
Basic Function
Making a Call
Receiving a Call
Switching the Microphone off (Mute)
Adjusting Voice Volume
Adjusting Ring Volume
Last Number Redial
Caller ID
Battery Level Indicator
Key Lock
Smart Dialing
Out of Range Indication
Registered Recall
Tone Dialing Switchover
Paging
30
Appendix
9
10
10
11
11
12
13
14
14
15
15
16
16
16
Feature List
Advanced Menu Functions
Menu Navigation
Menu Map
Phonebook
Call by Call
Key Beep
Selecting Ring Type
Setting VIP Ring
Changing PIN
Setting Access Code
Registering a New Handset
Resetting Handset
Selecting Base
Call Barring
Releasing Handset
Caller ID Type
17
17
18
19
20
21
21
22
22
23
24
24
25
26
26
Using Multi System
Intercom Between Handsets
Call Transfer Between Handsets
27
28
Feature List
29
Appendix
Troubleshooting
30
Caller ID type selection ( FSK or DTMF )
Stores up to 10 incoming calls number, up to 20 digits for each number
Stores up to 10 outgoing calls number, up to 24 digits for each number
Stores up to 10 numbers in phonebook memory, up to 24 digits for each
number
LCD displays calling and dialing number
Key lock setting
Call transfer of external calls (when using two or more handsets)
Internal calls
Ringer type selection
Setting VIP numbers with matching ringer
Ringer volume adjusting
Earpiece volume adjusting
New call indicator
Battery level indicator
In use indicator
Microphone mute function
Dialing mode selection
Real time clock (set time)
Redialing and preparation dialing functions
Smart dialing feature
Page on base unit to look for the handset easily
Call by call function
Key tone selection
Barring number setting
Access code setting
Tone dialing switchover
Out of range indication
Registered recall
Supports GAP function
Feature List
29
Call Transfer Between Handsets
1. During a telephone conversation, press
the
button. Your caller will be put on
hold.
INT
2. Enter the handset number (1~6) you
want to transfer to.
3. The paged handset will ring. To answer
the call from you, the paged handset
should press any button.
4. You can speak to the handset (Intercom).
Result: The paged handset is connected to
the outside party.
Or, to cancel the call transfer and talk
with the outside party again, press the
button.
Package Contents
Once you have unpacked your phone, check to make sure that all the parts shown below are
available. If any piece is missing or broken, please promptly call your dealer.
INT
Note: When you transfer a call, you may hang
up before the transferred station
answers your paging. The connection
between the caller and the station is
completed when you hang up. If the
transferred station does not answer the
call within a predetermined time, the
call is transferred back to your station.
C/R
You can transfer a call from one handset to
another.
Before Using
INT
M
1
4 GHI
7PQRS
ENU
OK
2ABC
3DEF
5 JKL
6MNO
8 TUV
9WXYZ
Three AAA batteries
(Rechargeable
Ni-MH batteries)
0
Base
5. To transfer the external call to the paged
handset, press the
button.
Handset
User's manual
User's manual
Adapters*
Line cord*
Carrying clip
*The shape of the plugs vary according to each country's specification.
Location and Function of Controls
Base
Rear and bottom View
Charge pins
Page button
Pages the handsets.
Also used to register
a new handset
In use indicator
lights steadily when
a call is in progress.
28
Using Multi System
Charge indicator
lights steadily
while the handset
is charging
Phone
Line Jack
Power Jack
Before Using
1
Location and Function of Controls(continued)
Using Multi System
Up to 6 handsets can be used with a base. You can make an intercom call and transfer an external
call between the handsets.
Handset
Intercom Between Handsets
Earpiece
LCD window
Redials the last number
you dialed. When entering
a number, inserts a pause
between numbers.
C/R
Scrolls through menu
options. Also adjusts
volume. In Standby mode,
scrolls through the
phonebook entries.
INT
Activates intercom
communications. During a
call, transfers a call to
another handset.
M
1
7PQRS
Allows you to access menu
options. Also used to return
to Standby mode from any
menu.
OK
2ABC
4 GHI
Makes, answers, or ends a
call.
ENU
3DE
F
5 JKL
6MNO
8 TUV
9WXY
0
Clears characters from
the display. Also used to
go back to the previous
menu.
When navigating menu
options, confirms the
menu or the option
selected.
If you have several handsets registered to the
base, two handsets can talk to each other on
an internal communication call.
1. Press the
INT
button on your handset.
2. Enter the handset number (1~6) you
want to page.
3. The paged handset rings. The LCD
window on the paged handset displays
your handset number (the paging
handset).
Z
In Standby mode, press
to lock keys on the phone.
Squeeze to turn the
phone on or off.
Notes:
If you enter a handset number that does not
exist, the handset sounds an error tone.
To cancel the intercom call, press either the
button or the
button.
4. To answer the call from you, the paged
handset's user should press any button.
5. To end the call, press either the INT
button or the
button.
Notes: If an external call comes in during an
intercom conversation, you will hear
beeps. When you hear the low beeps,
finish the intercom call by pressing the
button.
Then the external line rings. Press the
button to answer the call.
INT
Microphone
Rear View
Carrying clip
Battery cover
Charge pins
2
Before Using
Using Multi System
27
LCD Window Icon Descriptions
Releasing Handset
You can remove the registered handset from
the base if necessary.
M
1. Press the
EN
2. Press the
U
This area displays in-use
information such as the other
party's number, call duration,
menus, etc. In Standby mode, it
displays the handset number, and
the current time.
button.
or
button to choose
, then press the OK button.
3. Enter the PIN, then press the
4. Press the
5. If you want to select the handset to
release individually, enter the number(s)
of the handset(s).
OK
button.
or
button to choose
, then press the OK button.
Result: The LCD window displays all handsets
currently registered to the base.
When the selected handset number(s)
disappears in the LCD window, press
the OK button.
Result: The selected handset(s) will be
removed from the base. The LCD
window displays
.
If the removed handset is currently
registered to another base unit and is
within the range of the base unit, you
can use the handset with the base.
Signal strength icon
This icon is always displayed when your phone is on, and shows the
current signal strength. More bars indicate more signal strength.
Line icon
This icon indicates that the line is engaged.
Caller ID Type
There are two different Caller ID types which are
DTMF and FSK. This feature allows you to
change the Caller ID type.
1. Press the
M
2. Press the
EN
U
button.
or
button to choose
, then press the OK button.
3. Enter the PIN, then press the OK button.
Then the LCD window displays
.
Key lock icon
4. Press and hold the
button for
about 3 seconds, then the current
setting is displayed (FSK or DTMF).
5. If you want to change the Caller ID type,
press the
button once. Then the
phone exit to standby mode.
6. If not, press the
M
EN
U
button to exit.
This icon indicates the keys are locked.
New call icon
This icon indicates that there is a new call. To view the caller, access
the Call Log menu. See page 13.
Mute icon
This icon indicates that your phone's microphone is off
temporarily.
Battery status icon
This icon is displayed at all times when your phone is on, and shows
the level of your battery charge. The more bars, the greater the
capacity.
26
Menu
Before Using
3
Call Barring
Connecting Lines
1. Connect one end of the phone line cord to
the phone line jack on the rear of the base,
and the other end to a standard phone wall
jack.
2. Connect the modular end of the power
adapter to the power jack of the base, and
plug the other end into a standard AC wall
outlet.
It is possible to set the phone to restrict
numbers that can be dialed. Calls beginning
with numbers you specified can not be dialed
in this feature.
6. Press the
number.
You can set up to 4 different restricted
numbers containing up to 4 digits each.
1. Press the
If the feature is on, the message
displays when the restricted number is dialed.
To activate a call barring number:
To phone wall jack
To AC wall outlet
1. Press the
M
2. Press the
EN
U
3. Enter the PIN, then press the
The rechargeable Ni-MH batteries (AAA size )
come with your phone. Install the battery before
using your phone.
1. Slide the battery cover in the direction of
the arrow and pull it out.
4
Before Using
2. Insert new batteries as indicated,
matching correct polarity (+, - ).
Note: Reversing the orientation may
damage the handset.
4. Press the
OK
To deactivate a call barring number:
M
2. Press th
EN
button.
U
or
button to choose
, then press the OK
button.
3. Enter the PIN, then press the
button.
button.
or
button to choose
, then press the OK button.
Installing Batteries
button to save the
OK
OK
button.
button to access
.
4. Press the
OK
OK
button to access
.
5. Press the
or
button to choose
the cell number you want to deactivate,
and clear the number.
6. Press the
selection.
OK
button to save the
5. Enter the number you want to restrict, up
to 4 digits.
Menu
25
Resetting Handset
If you reset the handset, all the user-selectable
features including Phonebook, incoming and
outgoing call numbers and other settings
return to the initial setting at the time of
purchase.
To reset your handset:
1. Press the
M
EN
U
Installing Battery(continued)
2. Press the
or
button to choose
, then press the OK button.
3. Enter the PIN, then press the
4. Press
OK
OK
3. To replace the battery cover, slide the
cover up until it snaps shut.
button.
Notes:
The batteries need to be replaced if they
do not recover their full storage capacities
after recharging.
When replacing the batteries, always use
good quality Ni-MH re-chargeable
batteries. Never use other batteries or
conventional alkaline batteries.
button to confirm the reset.
button.
Your handset can be used with up to 4 base
units. This menu option allows you to select
the base you want to use.
Note: To use the handset with more than one
base unit, you must register the
handset to each base unit. See page
23.
To select a base unit:
1. Press the
M
2. Press the
3. Press the
or
button to scroll
through the available bases.
Charging Handset
Result: If you select
, the handset
will automatically find the first
available base unit when you lose
contact while moving around.
Important Note: Before initial operation, YOU
SHOULD FULLY CHARGE THE HANDSET for
about 14-16 hours.
4. Press the
selection.
To charge the handset, you should place it on
the base.
OK
button to save the
INT
M
1
4 GHI
7PQRS
EN
U
button.
or
button to choose
, then press the OK
C/R
Selecting Base
Result: When charging, the handset automatically
turns on and the charging lamp on the base
lights up.
ENU
OK
2ABC
3DEF
5 JKL
6MNO
8 TUV
9WXY
Z
0
button.
24
Menu
Before Using
5
Registering a New Handset
Using Handset Carrying Clip
The supplied handset carrying clip allows you
to conveniently carry the handset with you. It
clips easily to your belt, waist band, or shirt
pocket.
If you want to attach the carrying clip:
Attach the carrying clip to the back of the
handset. Make sure that the carrying clip
locks into place.
If you want to remove the carrying clip:
The handset which comes with the base unit
was already registered as handset 1. Each
additional handset you purchase must be
registered to the base unit.
Note: A handset can be registered to up to 4
different base units. And a base can be
used with up to 6 handsets.
Insert a screw driver along the edge of one
of its arms and release the clip. Then lift it
off.
Press
this button.
To register a handset:
1. Press the
2. Press the
M
EN
U
button.
or
button to choose
, then press the OK button.
3. Enter the PIN, then press the
button.
OK
Note: The PIN is preset to "0000" at the
factory. You can change the PIN. For
details, see page 22. If you want to
register other handsets from different
manufacturers to this base, you must
enter their PIN codes in this step.
Using Earmic (optional)
The earmic jack is located in the middle
right side of the handset and is 2.5mm
standard plug. Simply plug the earmic
into the jack and the earmic will be
Earmic jack
activated.
Note:
When the earmic is plugged into the
earmic jack, the microphone on the
handset will be deactivated.
5. Press and hold the
button on the
base for more than 5 seconds, then the
IN USE indicator starts to blinks. Then
release the button.
4. Press the
or
button to choose
the base number you want, then press
the OK button.
6. Press the
OK
button.
Result: The LCD window prompts you to
enter AC.
7. Enter your phone's AC (Authentication
Code), and press the OK button. The
AC is "0000".
Note: AC remains the same even if you want
to register other handsets from different
manufacturers to this base.
Result: When the registration is properly
completed, the LCD window displays
the handset number, and returns to
Standby mode.
Earphone
Microphone
Clip
Earmic plug
6
Before Using
Menu
23
Turning Handset On/Off
Changing PIN
The PIN is required for the following options:
Registering a new handset, Resetting a
handset and the items under
.
The PIN is preset to "0000" at the factory.
To change the PIN code:
1. Press the
M
EN
U
2. Press the
button.
or
button to choose
, then press the OK
button.
3. Enter the current PIN, then press the
button.
OK
Result: The LCD window does not display the
PIN you entered in order to maintain
secrecy. If you enter a wrong PIN, your
phone returns to Standby mode.
4. Enter a four-digit PIN you want to use,
then press the OK button.
5. Enter the new PIN again to confirm the
number, then press the OK button.
When you place the handset on the charger
to charge, the handset automatically turns on.
To turn the handset on or off in Standby mode,
follow these steps:
If the time on the display is not correct, you
can change the time. See " Setting Time " on
page 8.
1. To turn on the handset when the display
is off, press the
button.
2. To turn the handset off, press the
button until
appears. Then
the display is turned off.
Result: The first time you turn the phone on,
the LCD window displays the
handset number and the time. The
phone is in Standby mode and ready
for use.
Note: Nothing will appear in the LCD
window when battery power is very low.
YOU SHOULD FULLY CHARGE THE
HANDSET BEFORE USE.
Setting Access Code
Some telephone system requires an access
code (9, for example) and listen to a second
dial tone before dialing an outside number.
You can set your phone to insert one-digit
access code automatically when you use a
phone number from your Call ID list.
1. Press the
M
2. Press the
EN
U
button.
or
button to choose
, then press the OK
3. Enter the one-digit access code using the
number keypad.
Note: When you dial a phone number in the
Call Log list, the number will be dialed
following the access code and a preset
pause time.
4. Press the
selection.
OK
button to save the
button.
22
Menu
Before Using
7
Choosing Dial Mode
Selecting Ring Type
In order to provide compatibility with other
telephone systems, your phone can be set to
either pulse dialing (same as rotary), or tone
dialing (DTMF).
1. Press the
M
2. Press the
EN
U
button.
3.Enter the PIN, then press the
button.
4. Press the
button to choose
then press the OK button.
Result: The current setting is displayed.
or
button to choose
,then press the OK button.
Result: The LCD window prompts you to enter
the PIN. The PIN is preset to " 0000 "
5. Press the
or
6. Press the
selection.
or
.
OK
You can select your own ringing sound. 6 ring
types are available.
OK
button to choose
,
1. Press the
M
EN
U
button.
2. Press the
or
button to choose
, then press the OK button.
OK
3. Press the
4. Press the
or
button to choose
the ring type you want.
Result: Each time you press the
button or
button, the handset sounds the ring
you have chosen.
5. Press the
selection.
OK
button to save the
button to access
.
button to save the
Setting VIP Ring
Setting Time
1. Press the
M
EN
U
Result: The current setting is displayed.
button.
or
button to choose
,then press the OK button.
5. Enter the current time using the number
keypad.
Result: The LCD window prompts you to enter
the PIN. The PIN is preset to "0000" at
the factory.
Notes:
The time format is 24 hours. Select from 00
to 23.
If you want to correct a digit in the middle
while programming, use
or
button to
move the cursor to the incorrect number,
then enter a correct number.
,
6. Press the OK button to save the
selection.
2. Press the
3. Enter the PIN, then press the
4. Press the
8
OK
button.
or
button to choose
, then press the OK button.
Before Using
This option allows you to instantly identify
callers you've assigned to the phone's
memory by generating a distinctive ring. You
can use this feature only when the caller's
service network transmits the caller's
information.
3. Press the
You can specify 2 callers and select a VIP ring
tone for each caller among 6 different tones.
5. Enter the phone number you want to
designate, then press the OK button.
1. Press the
M
EN
U
button.
2. Press the
or
button to choose
, then press the OK button.
or
button to choose
, then press the OK button.
4. Press the
or
button to choose
the ring address you want, then press
the OK button.
6. Press the
or
button to scan
through the ring types available, then
K
press the O button to save the
selection.
Menu
21
Call By Call (Continue)
3. Press the
or
Phonebook entries.
button to recall
Basic Function
Updating Your Call by Call Numbers
You can delete or change the numbers.
4. Find the number you want using the
or
button.
5. When you find the desired entry, press
the OK button.
Result: The selected phone number displays
after the preselected Call by Call
number.
6. Press the
button to dial the number.
1. Press the
M
EN
U
button.
2. Press the
or
button to choose
call by call , then press the OK button.
M
2. Press the
EN
U
button.
or
button to choose
, then press the OK button.
Result: The display shows the current setting.
3. When the receiver answers, speak.
3. Press the
or
button to scroll
through the key tone options.
Result: You can choose from:
- Standard key tone.
- Two frequency tone.
- The key tone does not
sound.
4. Press the
selection.
20
Menu
2. Dial a telephone number.
Result: The stored number displays.
Key Beep
OK
1. Enter a telephone number. Check the
number in the LCD window.
Result: You hear a dial tone.
Note: You can store up to 10 telephone
numbers in memory for automatic
dialing. For details, see page 18
4. Using the
button, erase or change the
number, then press the OK button.
1. Press the
1. Pick up the handset and press the
button.
3. Press the
or
button repeatedly
to choose the memory cell you want to
delete or change.
C/R
You can set your handset not to sound the
key tone each time you press a key.
Making a Call
4. To end the call, either press the
button or replace the handset on the
base.
Note: To make a call to the last number you
dialed, use the Redial feature. For
details, see page 12.
You can enter the desired phone number in
Standby mode, which allows you to make
corrections before dialing. Follow these steps:
2615042
Notes:
If you make a mistake while entering a
number, press the C/R button to clear the
last digit and correct the number.
If you press the C/R button for more than one
second, all digits you have entered will be
cleared and the phone returns to the
Standby mode.
When you enter the first digit(s) of the
phone number, if the Smart Dialing feature
is enabled and there are the matching
numbers in the phone's memory, the
number appears on the display. For details,
see page 15.
2. When the number appears correctly,
press the
button.
button to save the
Basic Function
9
Call by Call
Receiving a Call
When a call is received, the phone rings
and the
icon on the display blinks.
Blinks
Caller's
number
2615042
If the caller can be identified, the caller's phone
number is displayed. If the caller cannot be
identified, only the
icon blinks.
1. To answer the call, press any button .
Or
If the handset is on the base, just simply
lift it up. You do not need to press any
button.
Result: The phone is connected and the
icon is steadily on. The LCD
window displays the talk time.
2. You can speak. To end the call, either
press the
button or replace the
handset on the base.
Note: After you lift the phone from the base to
receive the call, the
button does not
work for 3 seconds to prevent the phone
from being disengaged.
This feature lets you add a special service
number such as special network service
number. You can recall the number easily,
then attach the phone number you want to
call by entering the phone number manually
or accessing Phonebook.
You can temporarily switch your phone's
microphone off, so that the other party cannot
hear you.
2. Press the
or
button to choose
the desired Call by Call number, then
press the OK button.
You can store up to 3 Call by Call numbers.
3. Enter the phone number you want to call.
Storing Call by Call Numbers
Result: The phone number displays after the
selected Call by Call number.
1. Press the
M
EN
U
button.
4. Press the
2. Press the
or
button to choose
, then press the OK
3. Press the
or
button to choose
the desired memory cell.
Example: You wish to say something to
another person in the room but do
not want the other party to hear
you.
To switch the microphone off temporarily,
press the
button while you are on the
phone. The
icon appears in the LCD
window. Your correspondent can no longer
hear you.
INT
Result: The currently stored call by call
numbers are displayed.
The special Call by Call number will be
dialed, followed by the phone number.
button.
Switching the Microphone Off (Mute)
1. Press the OK button in Standby mode
to recall the call by call numbers.
4. Enter the desired number (up to 10
digits), then press the OK button.
Dialing Call by Call Number
button to dial the number.
When you dial from Phonebook:
1. Press the OK button in Standby mode
to recall the call by call numbers.
Result: The currently stored Call by Call
numbers are displayed.
2. Press the
or
button to choose
the desired number, then press the
button.
OK
When you dial phone number manually:
To switch the microphone back on, press the
button again.
INT
10
Basic Function
Menu
19
Adjusting Voice Volume
Phonebook
You can store frequently used phone numbers
up to 10 in your phone's internal Phonebook
so that you can easily make a call without
having to remember or enter the phone
number.
Storing a Phone Number in
Phonebook
1. Press the
M
2. Press the
EN
button.
U
button to access
OK
.
Viewing the Phonebook Entries
1. In Standby mode, press the
button.
button to find the
4. Enter the desired number (up to 24
digits), then press the OK button.
5. Repeat if necessary.
2. Press the
or
button until the
phone number you want is displayed.
Find out the number you want to dial.
Refer to " View the phonebook entries".
Then press the
button to dial.
Or
In Standby mode, press and hold the entry
number (0-9) until the stored number
appears.
Result: The number is automatically dialed.
Editing the Phonebook Entries
Using a Pause
3. Press the
or
button until the
phone number you want to edit displays.
A pause allows to have adequate time for the
phone number to register with the telephone
company's system and complete the call. A
pause provides a delay of 3 seconds.
2. Press the
M
EN
button.
4. Press the
or
button to choose
the volume level you want.
2. Press the
or
button to choose
, then press the OK button.
Result: You can adjust the volume from level
1 to 3. You can also turn the ringer
OFF. Each time you press
or
button, the handset sounds its
selected loudness.
U
M
EN
3. Press the
or
button to choose
, then press the OK
button.
Result: The current ring level is displayed.
5. Press the
selection.
OK
button to save the
Note: Setting to turn the ringer OFF.
When a call comes in, only the
icon in the window blinks.
button.
U
OK
button to access
.
4. If necessary, press the C/R button to
clear the digit(s) then enter the desired
number.
5. Press the
number.
Menu
Adjusting Ring Volume
1. Press the
1. Press the
volume 3
or
Note: If you make a mistake while entering a
number, use the C/R button to correct
the mistake. Each time you press the
button, the last digit is cleared. To clear
all digits, press and hold the C/R
button. Then enter the correct number.
18
During a conversation, the
or
button
adjusts the level of the ear piece volume. You
can adjust the volume from level 1 to 3. The
selected volume is displayed in the LCD
window.
Dialing a Number from Phonebook
Result: The first phonebook entry appears on
display.
3. Press the
or
entry you want.
If you want to insert a dialing pause
between numbers when you store a
number in memory, press the
button
until appears at the pause entry.
OK
button to save the
Basic Function
11
Last Number Redial
To dial the last number:
1. Press the
button to dial the number.
Your phone keeps the last 10 numbers you
have dialed and allows you to retrieve the
numbers.
To view and dial any of the last 10 numbers:
1. Press the
To delete a specific number in the Redial
memory:
Menu Navigation
1. Press the
To access a menu option :
button in Standby mode.
Result: The LCD window displays the last
number you dialed.
2. Press the
Advanced Menu Functions
button in Standby mode.
2. If you want to scroll through the memory,
press the
or
button until you
find out the number you want to call.
button.
1. To display menu items, press the
button.
3. When the number appears on the display,
press the OK button.
2. To scan through menu options, press
the
or
button repeatedly.
Result: The display prompts you to confirm
the deletion.
3. To select an option, press the OK
button when the option you want
appears in the LCD window.
4. Press the
OK
button.
Result: You hear a beep and the phone
returns to Standby mode after
clearing the memory number.
button to dial the number.
1. Press the
Notes:
When no numbers are found,
is
displayed.
When the redial memory storage is full, each
time you dial a new number, the oldest
number stored in the redial memory is
automatically erased, and the redial
memory is updated.
You can modify the displayed number
before pressing the
button by using C/R
button.
Basic Function
M
EN
U
2. Press the
button.
or
button to choose
, then press the OK button.
Result: The LCD window prompts you to
enter the PIN. The PIN is preset to
"0000" at the factory.
3. Enter the PIN, then press the
OK
button.
Result: The phone prompts you to confirm
the deletion.
4. Press the
12
EN
2. Scroll to the number you want to delete
by using the
or
button.
To delete all numbers in the Redial memory:
3. Press the
To return to Standby mode from any menu:
M
OK
button.
4. Repeat if necessary.
U
If you press the C/R button from any menu
(not in the number or text input mode) the
phone returns to the previous screen.
To return to Standby mode from any menu,
M
press the
button or the ENU button, or
press and hold the C/R button.
Also, the phone will automatically return to
Standby mode from any menu if no button is
pressed for about 30 seconds.
Menu Map
1. Store Phone (see page 18)
2. Call Log (see page 13)
3. Call by Call (see page 19)
4. Key Beep (see page 20)
5. Ring
Ring Type (see page 21)
Ring Level (see page 11)
VIP Ring (see page 21)
6. PIN Change* (see page 22)
7. Smart Dial (see page 15)
8. Access Code (see page 22)
9. Register* (see page 23)
10. HS Reset* (see page 24)
11. Clr Redial* (see page 12)*
12. Clr Call Log* (see page 13)*
13. Select Base (see page 24)
14. Base Menu*
Call Bar (see page 25)
Dial Mode (see page 8)
Time Set (see page 8)
Release (see page 26)
* PIN is required to access these menus.
Note: If there are several handsets registered
to the base unit and if there is anyone
who is using the Base Menu, you
cannot access the Base Menu until the
other handset has finished.
Menu
17
Registered Recall
The C/R button is used in conjunction with
special services such as Call waiting (Call ID
type II) which may be offered by your
telephone company. You can local transfer a
call to another extension under PABX, using
this feature.
Caller ID
To flash, simply press the
the line is engaged.
C/R
button while
Result: The display shows F .
Tone Dialing Switchover
To access certain services such as voice mail
or interactive telephone system, it is necessary
to use tone dialing. When your phone is set to
the pulse mode, DTMF dialing is available
temporarily.
Press the
button while the phone is in the
pulse dial mode. Your phone is converted to
the tone dial mode temporarily.
When you hang up the call, the mode returns
to pulse mode.
Press the
button on the base unit. All
handsets registered to the base will ring for
about 30 seconds.
The Call ID icon
appears when there are
new calls in the memory. Once you view all
the new calls using the Call Log menu, the
icon will disappear.
To review and dial any of the received
numbers:
1. Press the
2. Press the
Paging
You can page the handset from the base unit.
Using this feature, you can locate the lost
handset.
When you receive a call, the caller's phone
number is shown on the screen, if the caller's
information is transmitted from the network on
which the call was
made. The last 10 received calls are stored in
the Caller ID memory, and you can use the list
to make a call to any of the numbers.
To stop paging, press the
button on the
base or any button on the handset.
Note: If a call comes in while the handset is
being paged, the handset stops paging and
the bell will ring.
M
EN
U
button.
or
button to choose
,then press the OK button.
Result: The LCD window shows the last
caller's number (up to 20 digits). The
time when the call was received is
also displayed. If there is no caller ID
received,
is displayed.
3. Scroll the Caller ID numbers by using
the
or
button and choose the
desired number.
16
Basic Function
4. To dial the selected number, press the
button.
To delete a specific number from the Call Log:
1. Scroll to the number you want to delete
from the Caller ID memory, then press
the OK button.
2. Press the
deletion.
OK
button to confirm the
To delete all numbers in the Caller ID memory:
1. Press the
M
EN
U
2. Press the
button.
or
button to choose
,then press the OK
button.
Result: The LCD window prompts you to
enter the PIN. The PIN is preset to
"0000" at the factory.
3. Enter the PIN, then press the
OK
button.
Result: The phone prompts you to confirm the
deletion.
4. Press the
OK
button.
Basic Function
13
Battery Level Indicator
The
icon is continuously displayed at the
top right corner of the LCD window. The
icon shows the level of battery power. The
more bars you see, the more power you have
left.
When the battery is too weak for the phone to
operate, the handset will automatically turn off.
Place the handset
Smart Dialing
on the base to charge the handset battery.
Full
Flat
Key Lock
If you turn this feature on, all buttons except
for the
button will be locked and will not
function.
You can answer incoming calls or intercom
calls by using any buttons on the phone. But
when you hang up, the phone returns to the
lock mode. This feature is useful to avoid
pressing buttons by mistake.
1. To turn the feature on, press the
button briefly and the
in the LCD window.
icon appears
2. To turn the feature off, press the
button briefly and the
icon
disappears from the LCD window.
Notes:
If a power failure occurs, the Key Lock
feature is automatically cancelled.
Do not hold the
button for more than 3
seconds, or the handset will be turned o f f .
With the Smart Dial feature, your phone displays
the full phone number when you enter the first
digit(s) of the number provided that the number
is currently stored in your phone's memory (for
example, stored in the phonebook, received or
dialed recently).
3. Press the
button to dial the number
displayed. Or press the C/R button to
exit this smart dial mode.
To place a call using the smart dial feature:
1. Press the
1. In Standby mode, enter the first digit(s) of
the desired phone number.
2. Press the
Result: The phone searches for the matching
phone number from memory (in the
order of outgoing calls, Phonebook,
incoming calls), then displays the first
available number. Numbers blink
except for the part of the number you
entered.
button.
You can select to enable or disable the Smart
Dialing feature. To change the setting:
M
EN
U
button.
or
button to choose
, then press the OK
Result: The current setting is displayed.
3. Press the
or
or
button to choose
.
To enable this feature, select
2. If the number is not the one you want,
enter the remaining digits until you
see the desired number.
4. Press the
selection.
OK
.
button to save the
Out of Range Indication
If the handset is too far from the registered
base, the handset cannot properly engage the
telephone line. The
icon at the top left of
the LCD window blinks to warn you and the
signal strength indication bars next to the
icon disappear.
If you carry the handset too far from the base
unit during a call, the telephone line might be
disconnected and the handset returns to
Standby mode. Check if there is noise or
static. If so, move the handset closer to the
base station.
This icon blinks
when the handset
is out of range.
14
Basic Function
Basic Function
15