Transcript
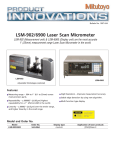
Rev 6-30-2011
Scout™
Certified ISO 9001
QUICK START GUIDE
This Quick Start guide explains how to set up your
Scout and use its key features. Once you’re set up
you can learn more about Decatur Radar at
www.DecaturElectronics.com.
Batteries
The Scout can be powered either from rechargeable NiMH
batteries or by means of the detachable power cord. When
powering the Scout from the batteries make sure the batteries
have been fully charged prior to use. Refer to your user’s
manual for information on charging and maintaining the
batteries. If you are powering the Scout from the power cord
go to step 1, otherwise go to step 2.
Connecting the Scout to Power
1. Connect the power cord to the Scout. Next, plug the
power cord into your vehicle’s cigarette lighter receptacle.
If you are using a separate battery pack as a power
source, plug the radar’s power cord into the battery pack’s
receptacle.
Powering on the Scout
The operation of the Scout is controlled by the 5 button
keypad and the trigger.
2. Press the PWR button on the keypad to turn the radar
on or off. The display should briefly display all of the
segments and icons as shown in Figure 1. Only the POWER
and HOLD icons should remain on.
Choosing Directionality
3. By default the Scout is set to pick up traffic both coming
towards and going away from the radar. If you want to
change the setting to read speeds only coming toward the
radar (t) or only going away from the radar (A) then press
the menu button until “dir” is displayed in the window.
Once “dir” is displayed press the “SEL” button to choose
toward (t), away(A), or both directions (tA). Once the setting
has been chosen that setting will be retained in memory.
Choosing Faster Mode
4. By default the Scout operates in Strongest signal mode.
You can active faster mode by pushing the FAST button.
Taking a Speed Reading
5. To measure the speed of target vehicles, pull and hold the
trigger. When you pull the trigger the HOLD icon will be
replaced with the XMIIT icon indicating that the radar is
now transmitting and the speed of the target vehicle will
show in the display.
Locking a Speed Reading
6. When you want to lock a speed, release the trigger then
quickly pull it in again (within 1/2 second). The radar will
take the speed from the left side of the display and move
it to the right side of the display and lock it in. At the
same time the Scout will continue to track speeds and
display speeds in the left side of the display as long as you
continue to hold the trigger in.
The locked speed will then flash alternately between the
locked speed and the directional indicator (t means it is
moving towards from you and A means it is moving away
from you.)
Releasing a Locked Speed
7. To release a locked speed pull and release the trigger
without any targets present.
Figure 1
GHD display & keypad.
Menu Selections
There are several menu selections available. Refer to the user’s
manual for detailed information on all the selections. Only
Directionality and Faster are covered in the quick start.
Powering Off the Scout
8. To power the Scout off, press the PWR button on the
keypad. The word OFF will be displayed and the radar will
power down
Testing the Scout
Pressing the TEST button while the unit is on initiates a
comprehensive system self-test. When the unit passes all
internal checks the message “PASS” is displayed. (Refer to the
user’s manual for more information on testing the Scout.)