1
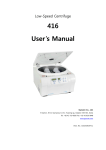
GLO GT416 Benchtop Centrifuge GLO GT416 User’s Manual Glotech Co., Ltd GLO GT416 Contents 1. GLO GT416G Performance 2. Precautions 3. Technical Specifications 4. Installation 4‐1. Delivery Checklist 4‐2. Unpacking the Instrument 4‐3. Installation Place 4‐4. Supply the Power 4‐5. On/off and the door open 4‐6. Rotor coupling and disassembling 5. Operation 5‐1. Control Panel 5‐2. Function Description 5‐3. Operation Sequence 5‐4. Miscellaneous Functions 6. Maintenance 7. Trouble Shooting 8. Ordering Information GLO GT416 1. Performance ■ Compact design with automatic door release ■ Max. 4,000 rpm/2,826 g, Time setting to 99 min 59 sec or continuous ■ Rapid acceleration and deceleration ■ “SOFT” start/stop function for gentle acceleration/deceleration ■ Digital display of speed and remaining time ■ Automatic RPM/RCF conversion ■ Automatic recognition and alarms for imbalance, over‐speed and over‐heat ■ Program memory for up to 10 ■ Unique air‐flow cooling internal design ■ Three layered safe door with auto‐lock function ■ Complete with autoclavable, fixed angle rotor (16 x 15 ㎖ tubes) or swing‐out rotor (4 wings or 6 wings) with buckets (50 ㎖, 15 ㎖, 2 x 15 ㎖, etc) ■ A range of adaptors being available for both rotors for tubes from 3 ㎖ to 15 ㎖ GLO GT416 1‐1. Delivery Checklist GLO GT416G Existing Type Comparison of centrifugation ‐. Centrifugal separation of blood in the direction of action ‐. Blood seokim After centrifugation Rotor Swing‐out Rotor Fixed angle Rotor Product GLO GT416 2. Precautions The instrument must be installed on a flat, stable, horizontal and solid surface. Before operating the instrument, check if the rotor and the rotor lid are securely fastened. Do not move the instrument when it is not completely stopped. Operate with a stable & appropriate power inlet. Do not place dangerous materials within 30cm distance around the instrument. Only use rotors from Glotech Co., Ltd. with appropriate tubes for centrifugation. Do not use hazardous, inflammable or radioactive materials as samples. When it is necessary to use toxic or radioactive materials or pathogenic micro‐organisms which belong to the Risk Group II of WHO: “Laboratory Bio‐ safety Manual,” follows national regulations. Use the emergency door open function only when the door key on the control panel is not working. The sample must be loaded weight‐balanced way not to cause imbalance. The density of sample material must not exceed 1.2g/ml at Max. RPM or RCF. Any improper handling or any usage of un‐qualified accessories is not able to be protected. 3. Technical Specifications Max. RPM Max. RCF Max. capacity Run time Noise level Acceleration time Deceleration time Program memory Imbalance Recognition Motor Safety Power & Frequency Dimension (WxDxH) mm Weight CE Certification GLO GT416 4,000 rpm 2,848 xg 10ml x 4 ≤ 99 min 59 sec or continuous ≤ 60 dB ≤ 20 sec ≤ 25 sec 10 Automatic High torque AC induction motor Lid‐lock AC 220‐230V, 50/60Hz 375 x 480 x 260 19.5 Kg Yes GLO GT416 4. Installation 4‐1. Delivery Checklist 4‐1‐1. Main body, 1ea 4‐1‐2. Power cable, 1ea 4‐1‐3. Emergency door open tool, 1ea 4‐1‐4. User’s manual, 1ea 4‐1‐5. Rotor 1 set 4‐1‐5. Rotor locking tool, 1ea 4‐2. Unpacking the instrument 4‐2‐1. Open the box and lift out the instrument carefully together with the safety padding. 4‐2‐2. Remove the safety padding and vinyl wrap. 4‐2‐3. Place the instrument on the flat space. 4‐3. Installation place 4‐3‐1. Install the machine at the solid and flat floor or table. If you place the centrifuge at the slope, the axis of rotation is possibly changed because of the rotor weight. 4‐3‐2. Install the machine about 30cm is departed from the wall because of the air circulation. 4‐3‐3. Install the machine at the place with appropriate temperature and humidity. It also has to be maintained with the proper temperature & humidity. 4‐3‐4. Install the machine at the place without any kinds of corrosive gases. 4‐4. Supply the power 4‐4‐1. 416G model uses 110V or 220V. Check proper voltage of your instrument and connect to adequate power outlet. 4‐4‐2. If the power input is more than +/‐ 10% of the recommended voltage or fluctuating frequently, it may affect some functions of the instrument. It is advised to use AVR (Automatic Voltage Regulator). 4‐4‐3. If you want to use the instrument at other voltage range, please contact us. * The instrument is delivered filling with protection padding inside the chamber. If you start operation without removing the protection padding, ‘Error 9’ is appeared because the rotor cannot rotate. In this case, open the door manually using the emergency door open function – refer to section 4‐4‐1 ‐ and remove the protection padding. Mount the rotor and turn on again. 4‐5. On/off and the door open 4‐5‐1. Turn on the instrument by pressing the switch on the right side of the machine. 4‐5‐2. Press the ‘Door’ button to open the door. 3‐5‐3. Remove the protection materials inside the chamber. 4‐6. Rotor coupling and disassembling 4‐6‐1. Mount the rotor fitting with the motor shaft. 4‐6‐2. Grasp the rotor with one hand, and rotate the rotor nut in the direction of clockwise, until it is tightly assembled. 4‐6‐3. To disassemble the rotor, rotate the rotor nut in a counterclockwise direction. GLO GT416 5. Operation 5‐1. Control Panel 5‐1‐1. Display FND: Shows the data of each function. 5‐1‐2. Up & down arrow: Uses to change input data. 5‐1‐3. Door: Uses to open the door. 5‐1‐4. RPM/RCF: Uses to switch the RPM/RCF display 5‐1‐5. TIME: Uses to set test time up to 99 min 59 sec (00: continuous) 5‐1‐6. START/STOP: Uses to start & stop operation. 5‐1‐7. PROG: Use to save a set of setting values or call the saved setting values. 5‐1‐8. SOFT START & STOP: Uses to accelerate or decelerate slowly. *If you press the arrow button longer than 3 seconds, the numbers change very rapidly and the set‐up is achieved faster. 5‐2. Function Description 5‐2‐1. RPM Speed display unit : 10 rpm Speed setting unit : 10 rpm Speed accuracy : <± 2% (at maximum speed) ①Press the ‘RPM/RCF’ button. ②Press the arrow button to change input value. 5‐2‐2. RCF (Relative Centrifugal Force) The conversion value from RPM to RCF is calculated automatically (based on the maximum radius and revolution) ①Press the ‘RPM/RCF’ button twice. ②Press the arrow button to change input value. GLO GT416 5‐2‐3. Time Time display: 99 min 59 sec, 2 digit display Time is down‐counted after starting centrifugation. ①Press the ‘TIME’ button. The display shows the previous time value and the minute LED and value blinks. ②Press the arrow button to change the minute value. ③Press the ‘TIME’ button again to set the second value, then the second LED and value blinks automatically. ④Press the arrow button to change the second value. * After finishing the setting, your input value is saved automatically in 2~3 seconds. 5‐2‐4. Soft Start & Stop For the sensitive samples not to disturb contents by fast acceleration and deceleration, use SOFT START/STOP. Centrifuge is accelerated or decelerated slowly. Press SOFT START / STOP button instead of ‘START’ button to use this function. 5‐2‐5. Program saving & recalling Use to save a set of setting values or call the saved setting values [Saving or Editing] ① Press the ‘PROG’ button longer than 2 seconds for saving your preferred set of the test values. ② Check the message of “PROGRAM SAVE: ##” at the display, and any number of “##” blinks. ③ Press the arrow button and select a number between 01 ~10. ④ Press the ‘Enter’ button to complete the saving or editing. [Recalling] ① To retrieve the saved program, just press the ‘PROG’ shortly. Check the message of “PROGRAM CALL: ##” at the display. Choose the number with the arrow button, and then press the ‘Enter’ button. 5‐2‐6. Door Press the ‘Door’ button to open the door. The door is not opened while the instrument is running. 5‐2‐7. START / STOP Pressing the ‘Start / Stop’ button, the operation is started to run with setting or stopped to run in any case.. 5‐3. Operation Sequence 5‐3‐1. Connect the AC cord to the appropriate voltage. 5‐3‐2. Turn on the power switch located at the right side of the unit. Then the latest operating values are recalled with beeping sound. 5‐3‐3. Open the door and check the rotor. 5‐3‐4. Input the function values according to your preferences. 5‐3‐5. Press the ‘START’ button to start the operation. 5‐3‐6. As soon as the set‐time is ended, the centrifugation will be ceased according to the set‐ deceleration level. If you want to interrupt before the set‐time, press the ‘STOP’ button. GLO GT416 5‐4. Miscellaneous Functions 5‐4‐1. In any cases needed for emergency open, you can use the emergency door open tool as long as the machine is idle. Insert the emergency tool into the emergency door open hole at the left‐upside of the unit. 5‐4‐2. Imbalance Alarm: When the rotor is imbalanced and the vibration is severe, the operation is urgently stopped with the error message on the display and the alarming sound. 6. Maintenance 6‐1. Outer part of instrument 6‐1‐1. Clean the outside of the machine with a dry soft cloth. If necessary, dip the cloth with neutral detergents and clean contaminated parts. Keep completely dry after cleaning. 6‐1‐2. Do not use any volatile chemicals such as alcohol, benzene, etc. 6‐1‐3. If any rust appears, clean with neutral detergents and dry it. 6‐2. Inner part of instrument 6‐2‐1. Keep dry inside the chamber after every use of the machine. 6‐2‐2. Clean the shaft always for avoiding an imbalance during the rotation. 6‐2‐3. If any part is contaminated, clean with neutral detergents. 6‐3. Rotor 6‐3‐1. Clean the rotor if any parts are contaminated with samples. 6‐3‐2. Keep dry after usage. 6‐4. Moving or shipping of instrument 6‐4‐1. If you need to move or ship the instrument, be cautious to protect the shaft from any physical impact. 6‐4‐2. Remove the rotor and fill inside the chamber with proper materials to keep the shaft on place. 6‐4‐3. It is recommended to move or ship rotors separately if no original safety padding is available. GLO GT416 7. Trouble Shooting Error Possible Causes E 1 Failure to reach to 200RPM within 2sec. E 2 When running, the door is opened. E 3 Over temperature of motor. E 4 Low voltage E 5 High voltage E 6 Over speed E 7 Failure of control system E 8 Imbalance E 9 RPM sensor recognition error Actions ‐ Check the RPM sensor. ‐ Check the connection of a RPM connector or a wire.* ‐ Check the door latch. ‐ Stop running, power off and on. ‐ Check the motor temperature. ‐ Check supply voltage. ‐ Use AVR to provide proper voltage. ‐ Check supply voltage. ‐ Use AVR to provide proper voltage. ‐ Stop running, power off and on. ‐ Tuning of the firmware(Download)* ‐ Stop running, power off and on. ‐ Tuning of the firmware(Download)* ‐ Check amount of samples. ‐ Check weight‐balances of samples. ‐ Check attached place of RPM sensor. ‐ Check connection of cable for RPM sensor. ‐ Change RPM sensor. * Any wire disconnection or tuning of the instrument must be performed only by a service engineer who is authorized by Glotech Co., Ltd. 8. Ordering Information Cat No. Product Description G1 7514 201 GLO GT416 Main Body, without Rotor Rotors & Accessories for GLO GT416 T1 111 010 Swing Rotor, GRS‐10‐4, includes 4 Buckets, GLB‐10 T1 111 090 Bucket, GLB‐10, 10 ㎖ Capacity 4 x 10 ㎖