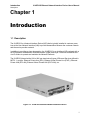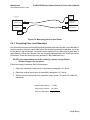
1
9145E10G
Network Interface Device
Hardware Users Manual
NOTICE
Canoga Perkins has prepared this manual for use by customers and Canoga Perkins
personnel as a guide for the proper installation, operation and/or maintenance of Canoga
Perkins equipment. The drawings, specifications and information contained in this document are the property of Canoga Perkins and any unauthorized use or disclosure of such
drawings, specifications and information is prohibited.
Canoga Perkins reserves the right to change or update the contents of this manual and
to change the specifications of its products at any time without prior notification. Every
effort has been made to keep the information in this document current and accurate as of
the date of publication or revision. However, no guarantee is given or implied that the
document is error free or that it is accurate with regard to any specification.
CANOGA PERKINS CORPORATION
20600 Prairie Street
Chatsworth, California 91311-6008
Business Phone: (818) 718-6300
(Monday through Friday 7 a.m. - 5 p.m. Pacific Time)
FAX: (818) 718-6312 (24 hrs.)
Web Site: www.canoga.com
E-mail: [email protected]
Copyright © 2004, 2005 Canoga Perkins Corporation
All Rights Reserved
EdgeAccess®
9145E10G Ethernet Network Interface Device
User Manual
Model Number 9145E10G
Part Number 6913700
Rev.A 12/2009
s1.0
TG
EdgeAccess and Canoga Perkins are registered trademarks of Canoga Perkins Corp.
To reference Technical Advisories and Product Release Notes, go to the Canoga Perkins
web site at http://www.canoga.com.
9145E10G Ethernet Network Interface Device User’s Manual
CAUTION!
This product may contain a laser diode emitter operating at a wavelength of 1300 nm - 1600 nm.
Use of optical instruments (for example: collimating optics) with this product may increase eye
hazard. Use of controls or adjustments or performing procedures other than those specified
herein may result in hazardous radiation exposure.
Under normal conditions, the radiation levels emitted by this product are under the Class 1 limits
in 21 CFR Chapter 1, Subchapter J.
ATTENTION!
Ce produit peut contenir un émetteur de diode de laser fonctionnant à une longueur d'onde 1300
de nm - nm 1600. Utilisation des instruments optiques (par exemple: la collimation du système
optique) avec ce produit peut augmenter le danger. L'utilisation des commandes ou des ajustements ou les procédures d'exécution autre que ceux indiquées ci-dessus peut avoir comme
conséquence l'exposition de la radiation dangereuse.
Dans des conditions normales, les niveaux de rayonnement émis par ce produit sont sous les
limites de la classe 1 en chapitre 1, Subchapter J de 21 CFR.
NOTICE!
This device contains static sensitive components. It should be handled only with proper Electrostatic Discharge (ESD) grounding procedures.
AVIS!
Ce dispositif contient les composants sensibles statiques. Il devrait être manipulé seulement
avec la Décharge Electrostatique (DES) appropriée procédures.
i
9145E10G Ethernet Network Interface Device User’s Manual
General Safety Considerations
Installation
The 9145E10G is suitable for installation in Network telecommunication facilities and locations
where the National Electric Code (NEC) applies.
Cabling
The 9145E10G has been designed and tested and has passed all the pertinent sections of GR1089 and GR-63 for Type 2 and Type 4 equipment. This equipment does not have direct electrical connection to outside plant equipment.
The Copper (RJ45) ports of the 9145E10G are not intended for direct connection to “Outside
Plant” metallic conductors and shall be isolated (by channel banks or office repeaters) from any
connections to network or terminal equipment that lie outside of the same building. The telecommunication interface connections are considered to be, and meet the requirements of, SELV circuits (not TNV).
Power
WARNING: The 9145E10G with redundant power supplies must have both power supply
cords disconnected before servicing.
Wiring methods used for the connection of the equipment to the AC or DC MAINS SUPPLY shall
be in accordance with the National Electrical Code, ANSI/NFPA 70, and the Canadian Electrical
Code, Part I, CSA C22.1.
The 9145E10G AC and DC units do not incorporate a disconnect device. The plug on the power
supply cord is intended to serve as the disconnect device. It is also recommended that the AC
socket-outlet shall be installed near the equipment and shall be easily accessible.
The 9145E10G DC has a nominal operating DC voltage of -48 VDC and passes the minimal
steady state DC operating voltage of -40 VDC in accordance with GR-1089 Issue 4 which
references American National Standards Institute (ANSI) T1.315, Table 1. Additionally, Canoga
Perkins design allows for a minimal steady state of -36VDC.
The 9145E10G DC model is configured for a DC-I, Isolated DC return.
Fuses
The 9145E10G is equipped with internal fuses. The AC model is fused at 2A, and the 24VDC
and the 48VDC models at 3A. Although not required, an external fuse may be used to isolate the
unit in a shared fuse distribution panel. In that case, the unit should be fused with a 3A slow blow
fuse or a 5A fast acting fuse for either 24VDC or 48VDC input voltages.
ii
9145E10G Ethernet Network Interface Device User’s Manual
Surge Protection
The AC powered 9145E10G does not contain an internal Surge Protective Device. An external
Surge Protective Device (SPD) should be used at the AC input of the network equipment according to facilities procedures and as defined by the National Electric Code (NEC).
Grounding
The 9145E10G AC & DC models are suitable for installation as part of the Common Bonding
Network (CBN).
All 9145E10G models are provided with a safety ground connection which is capable of conducting any fault current likely to be imposed, such as fault current from sources within the chassis.
For the DC model use an approved 18ga insulated wire connected to the terminal block’s middle
conductor. The plus and minus 24 VDC and 48VDC conductors should be a minimum of 20ga.
The AC will be grounded via the ground conductor of the power cord and must be connected to
an earthed mains socket-outlet.
An electrical conducting path should exist between the 9145E10G chassis and the metal surface
of the enclosure or rack in which it is mounted or to a grounding conductor. Electrical continuity
should be provided by using thread-forming type mounting screws that remove any paint or nonconductive coatings and establish a metal-to-metal contact. Any paint or other nonconductive
coatings should be removed on the surfaces between the mounting hardware and the enclosure
or rack. The surfaces should be cleaned and an antioxidant applied before installation.
Lightning Protection
The intra-building ports of the 9145E10G are suitable for connection to intrabuilding or unexposed wiring or cabling only. The intra-building port(s) of the equipment or subassembly MUST
NOT be metallically connected to interfaces that connect to the OSP or its wiring. These interfaces are designed for use as intra-building interfaces only (Type 2 or Type 4 ports as described in
GR-1089-CORE, Issue 4) and require isolation from the exposed OSP cabling. The addition of
Primary Protectors is not sufficient protection in order to connect these interfaces metallically to
OSP wiring.
To protect the port against intra-building lightning surges, the RJ45 ports of 9145E10G are suitable for connection to shielded intra-building cabling grounded at both ends.
ESD
The 9145E10G has been tested and passes the ESD requirements of Test level 4 for air and
contact discharges. However to protect the exposed components from electrostatic damage
when removing or replacing the SFP or XFP optical modules requires the proper use of static
mitigation procedures such as properly wearing a wrist strap.
iii
9145E10G Ethernet Network Interface Device User’s Manual
Operation Temperature
The 9145E10G is designed and Nationally Recognized Test Laboratory (NRTL) tested and verified to operate between 0°C to 50°C, and type tested for short term emergency ambient temperature of -5°C to 55°C.
Fans
The 9145E10G models equipped with fans are constructed with a Mid-front to mid-rear (EC class
F2-R2) airflow scheme i.e. draws air from the front and exhausts to the rear.
The 9145E10G models equipped with redundant fans are designed to function normally over the
entire long term operating temperature range; in the unlikely event of a single fan failure the
9145E10G will continue to perform normally over the long term operation temperature range until
a replacement can be installed.
Fan replacement cannot be performed in the field. Contact Canoga Perkins Technical Support
for an RMA number to arrange a repair.
Emissions and Immunity
This device complies with part 15 of the FCC rules. Operation is subject to the following two
conditions:
1. This device may not cause harmful interference
2. This device must accept any interference received, including interference that may cause
undesired operation.
The authority to operate this equipment is conditioned by the requirements that no modifications
will be made to the equipment unless the changes or modifications are expressly approved by
the Canoga Perkins Corporation.
To Users of Digital Apparatus in Canada: This Class A digital apparatus meets all requirements of the Canadian interference-causing equipment regulations.
Aux utilisateurs des appareillages de Digital au Canada: Cet appareil numérique de la
classe A respecte toutes les exigences du règlement sur le matérial brouilleur du Canada.
Special Accessories
The 9145E10G does not require any special accessories to achieve compliance for emission and
immunity criteria.
Double Pole/Neutral Fusing
On the 9145E10G a fuse may be in place in the neutral path on the AC power supply. After operation of the fuse, parts of the equipment that remain energized might represent a hazard during
servicing.
iv
9145E10G Ethernet Network Interface Device User’s Manual
Waste Electrical and Electronic Equipment (WEEE)
Product Disposal Information
Do not dispose of this product in unsorted municipal waste. This product is recyclable, and
should be recycled according to your local standards. For more information, contact Canoga
Perkins technical support.
v/(vi Blank)
9145E10G Ethernet Network Interface Device User’s Manual
Contents
1 Introduction .......................................................................................... 1
1.1 Description ........................................................................................................ 1
1.2 9145E10G Specifications .................................................................................. 2
1.2.1 Physical Characteristics .......................................................................................... 2
1.2.2 Environmental Characteristics ................................................................................. 2
1.2.3 Power Requirements ............................................................................................... 2
1.2.4 Regulatory Compliance ........................................................................................... 2
1.3
Hardened 9145E10G Specifications ................................................................ 3
1.3.1 Physical Characteristics .......................................................................................... 3
1.3.2 Environmental Characteristics ................................................................................. 3
1.3.3 Power Requirements ............................................................................................... 3
1.3.4 Regulatory Compliance ........................................................................................... 3
1.4 Mounting Options .............................................................................................. 3
1.4.1 Rack Mounting ........................................................................................................ 4
1.4.2 Wall Mounting .......................................................................................................... 4
2 Functional Description ........................................................................ 5
2.1 Base Unit ........................................................................................................... 5
2.2 Hardware Configuration .................................................................................... 7
2.2.1 Front Panel .............................................................................................................. 7
2.2.2 Rear Panel .............................................................................................................. 8
vii
9145E10G Ethernet Network Interface Device User’s Manual
2.3 Service Data Ports ............................................................................................ 8
2.4 Management Ports ............................................................................................ 9
2.4.1 EIA-232 Console Port .............................................................................................. 9
2.4.2 Ethernet Management Port ..................................................................................... 9
2.5 Port Default Settings ....................................................................................... 10
2.6 Power Connectors ........................................................................................... 10
2.6.1 Power Requirements............................................................................................. 10
2.6.2 Single AC Power Base Unit ................................................................................... 10
2.6.3 Redundant AC Power Base Unit ........................................................................... 11
2.6.4 Single DC Power Base Unit .................................................................................. 11
2.6.5 Redundant DC Power Base Unit ........................................................................... 11
2.6.6 AC/DC Power Base Unit ....................................................................................... 12
2.7 LED Indicators ................................................................................................. 12
2.7.1 Management Section LEDs ................................................................................... 13
2.7.2 Data Interface Section LEDs ................................................................................. 14
3 Installation .......................................................................................... 15
3.1 9145E10G Installation Procedures .................................................................. 15
3.2 Unpacking ....................................................................................................... 15
3.3 Mounting Options ............................................................................................ 16
3.3.1 Rack Mounting ...................................................................................................... 16
3.3.2 Wall Mounting ........................................................................................................ 20
3.3.3 Horizontal Flat Surface Mounting .......................................................................... 21
3.4 Installing the SFP Modules .............................................................................. 22
viii
9145E10G Ethernet Network Interface Device User’s Manual
3.5 Connecting the Electrical Power ..................................................................... 22
3.5.1 AC Power .............................................................................................................. 22
3.5.2 DC Power .............................................................................................................. 23
3.5.3 Grounding .............................................................................................................. 24
3.5.4 Connecting the Fiber Optic and UTP Ethernet Cables .......................................... 25
4 Operation ............................................................................................ 27
4.1 Power-Up and Front Panel Functions ............................................................. 27
4.1.1 Ethernet Management LEDS ................................................................................ 27
4.1.2 SFP/UTP Port Status LEDS .................................................................................. 29
4.2 Interface Management .................................................................................... 29
4.2.1 Setting Up the VT-100 Terminal ............................................................................ 30
5 Troubleshooting ................................................................................. 31
5.1 Optical Power Loss ......................................................................................... 31
5.2 Fault Conditions .............................................................................................. 31
5.2.1 Remote Fault (RMTF) ........................................................................................... 31
5.2.2 Link Loss Forwarding ............................................................................................ 33
5.3 Running Diagnostics ....................................................................................... 34
5.3.1 PING Testing ......................................................................................................... 34
5.3.2 Latency and Jitter Testing ..................................................................................... 34
5.4 Loopback Diagnostics ..................................................................................... 35
5.4.1 User Mode ............................................................................................................. 35
5.4.2 Network Mode ....................................................................................................... 36
ix
9145E10G Ethernet Network Interface Device User’s Manual
6 Maintenance ........................................................................................ 37
6.1 General Maintenance ...................................................................................... 37
6.2 Check Optical Power Levels ........................................................................... 37
6.2.1 Measuring Transmitter Output Power ................................................................... 37
6.2.2 Measuring Receiver Input Power .......................................................................... 38
6.2.3 Calculating Fiber Link Attenuation ......................................................................... 39
x
Introduction
9145E10G Ethernet Network Interface Device User’s Manual
Description
Chapter 1
Introduction
1.1 Description
The 9145E10G is a Network Interface Device (NID) that is typically installed in customer premises at the User Network Interface (UNI) to provide demarcation between the customer network
and the service provider network.
In addition to providing a clear demarcation, the 9145E10G is an intelligent NID equipped with a
set of Operation Administration and Maintenance (OAM) and Layer 2 functions that allows Service Providers to operate and maintain the Network Elements.
The 9145E10G placed at the UNI or NNI can terminate all types of Ethernet Services defined in
MEF 6.1, such as: Ethernet Private Line (EPL), Ethernet Virtual Private Line (EVPL), Ethernet
Private LAN (EP-LAN), Ethernet Virtual Private LAN (EVP-LAN), etc.
Figure 1-1. 9145E10G Ethernet Network Interface Device
1
9145E10G Ethernet Network Interface Device User’s Manual
Introduction
9145E10G Specifications
1.2 9145E10G Specifications
1.2.1 Physical Characteristics
•
Dimensions: 1.75" H x 8.25" W x 11.5" D (44.5 x 209.5 x 292 mm)
•
Weight: 5.50 lb to 5.95 lb (2.49 Kg to 2.70 Kg) (depending on model)
1.2.2 Environmental Characteristics
•
Operating Temperature: 0° to 50° C
•
Operating Humidity: 0 to 90% Relative Humidity (non-condensing)
1.2.3 Power Requirements
•
24VDC (18 to 36VDC), 2 Amps
•
48VDC (36 to 72VDC), 1 Amp
•
100 VAC to 240 VAC (auto-ranging), 50/60 Hz, 1 Amp
1.2.4 Regulatory Compliance
•
EN60825-1 (laser safety)
•
CE Mark
•
EMC Directive (EN55022 Class A, EN 55024, EN 61000-3-2/-3-3)
•
ETL, cETL & LVD (U.S. UL60950, CAN/CSA C22.2 No. 60950, EN/IEC 60950)
•
FCC Part 15B Class A (U.S.), ICES-003 (CAN), VCCI Class A (Japan), C-Tick
(AS/NZS 3548 - Australia)
•
NEBS Level 3
1.3 Mounting Options (Reference Chapter 3 for installation procedures)
.
2
•
19-Inch or 23-Inch rack mount (single unit or two units side by side in a 1U)
•
Wall Mount (face down or to either side)
•
Table Top
Introduction
9145E10G Ethernet Network Interface Device User’s Manual
Mounting Options (Reference Chapter 3 for installation procedures)
1.3.1 Rack Mounting
The customer is required to order the brackets required (see Figure 1-2) for their particular rack
installation.
Figure 1-2. 9145E10G Mounting Brackets
1.3.2 Wall Mounting
Canoga Perkins includes a mounting template in the shipping container (see Figure 1-3) to assist
the customer in mounting the 9145E10G on a wall.
1"
16 1/8"
3"
5"
9145E10G
8 1/8" X 11"
11"
1.563"
5"
1.563"
FRONT OF UNIT
1"
Figure 1-3. Wall Mounting Template
3/(4 Blank)
Functional Description
9145E10G Ethernet Network Interface Device User’s Manual
Base Unit
Chapter 2
Functional Description
2.1 Base Unit
The 9145E10G is designed with front-panel data and management ports and rear-panel power
and ground connectors. This design allows for a multitude of power and port options. Both types
of 9145E10G are able to accommodate feature enhancements through firmware upgrades.
Table 2-1. 9145E10G Model Numbers and Configuration
MODEL NUMBER
EXTENDED DESCRIPTION
9145E10G-525-0-0
9145E10G integral design with XFP User Port, Network Port, equipped with AC power
supply and fan
9145E10G-525-1-0
9145E10G integral design with XFP User Port, Network Port, equipped with 48DC power
supply and fan
9145E10G-525-A-0
9145E10G integral design with XFP User Port, Network Port, equipped with 24DC power
supply and fan
9145E10G-525-2-0
9145E10G integral design with XFP User Port, Network Port, equipped with redundant AC
power supply and fan
9145E10G-525-3-0
9145E10G integral design with XFP User Port, Network Port, equipped with redundant
48DC power supply and fan
9145E10G-525-B-0
9145E10G integral design with XFP User Port, Network Port, equipped with redundant
24DC power supply and fan
9145E10G-527-0-0
9145E10G integral design with XFP User Port, XFP Network Port, 1GigE UTP/SFP MPP,
and OOB port equipped with AC power supply and fan
9145E10G-527-1-0
9145E10G integral design with XFP User Port, XFP Network Port, 1GigE UTP/SFP MPP,
and OOB port equipped with 48DC power supply and fan
9145E10G-527-A-0
9145E10G integral design with XFP User Port, XFP Network Port, 1GigE UTP/SFP MPP,
and OOB port equipped with 24DC power supply and fan
9145E10G-527-2-0
9145E10G integral design with XFP User Port, XFP Network Port, 1GigE UTP/SFP MPP,
and OOB port equipped with redundant AC power supply and fan
9145E10G-527-3-0
9145E10G integral design with XFP User Port, XFP Network Port, 1GigE UTP/SFP MPP,
and OOB port equipped with redundant 48DC power supply and fan
9145E10G-527-B-0
9145E10G integral design with XFP User Port, XFP Network Port, 1GigE UTP/SFP MPP,
and OOB port equipped with redundant 24DC power supply and fan
5
9145E10G Ethernet Network Interface Device User’s Manual
Functional Description
Hardware Configuration
2.2 Hardware Configuration
The 9145E10G can be ordered with two different port and connector options (see Figure 2-1) and
six different power configurations (see Figure 2-2).
2.2.1 Front Panel
The 9145E10G is available in two models, the 9145E10G-525 or the 9145E10G-527. Customers
can choose the required model, depending on their application.
Figure 2-1. 9145E10G-525 and -527 Port and Connector Options
6
Functional Description
9145E10G Ethernet Network Interface Device User’s Manual
Service Data Ports
2.2.2 Rear Panel
Customers will also have a selection of power options to choose from (see Figure 2-2). Five
options are offered:
1. Single AC Power
2. Redundant AC Power
3. Single 24VDC or 48VDC Power
4. Redundant 24VDC or 48VDC Power
Figure 2-2. 9145E10G Rear Panel
2.3 Service Data Ports
The User and Network ports on both 9145E10G models (see Figure 2-1) provide XFP connectors. The Multi-Purpose Port (9145E10G Model 527 only) provides both fixed UTP and SFP connectors. The user can configure the 9145E10G Multi-Purpose port through the software to allow
for either the UTP or SFP connector to be active. Both connectors can not be active simultaneously.
•
The User port and Network port XFP connectors support 10G operation only.
•
The Multi-Purpose port UTP connector is IEEE 802.3 compliant for 10/100/1000BASE-T.
•
The Multi-Purpose port UTP connector supports MDI and MDIX connections.
•
The Multi-Purpose port SFP connector supports full-duplex operation at 1000 Mbps.
7
9145E10G Ethernet Network Interface Device User’s Manual
Functional Description
Management Ports
2.4 Management Ports
2.4.1 EIA-232 Console Port
The console port of both 9145E10G models are used for communication between the 9145E10G
and a VT100 terminal or emulator. The console port is a DE-9 female connector with a DCE pinout, which can be directly connected to a terminal with a straight through cable (see Figure 2-4).
5
4
9
3
8
2
7
1
1
6
6
2
3
4
5
6
7
8
9
3
7
4
8
5
9
TO PC SERIAL PORT
DTE
DE9 MALE
TO CRAFT PORT
DCE
DE9 FEMALE
1
2
DCD
RX DATA
TX DATA
DTR
SIG GND
DSR
RTS
CTS
RI
1
2
3
4
5
6
7
8
9
Figure 2-3. EIA-232 Console Port Pinouts
2.4.2 Ethernet Management Port
The Ethernet Management port is used for remote management of the 9145E10G-527. The ethernet management port has a management interface with an RJ45 UTP connector. The management port can sense and automatically cross-over the Tx and Rx pairs.
The UTP port is IEEE 802.3 compliant for 10BASE-T and 100BASE-TX and supports the following modes of operation:
8
•
10 Auto
•
100 Auto
Functional Description
9145E10G Ethernet Network Interface Device User’s Manual
Port Default Settings
2.5 Port Default Settings
Table 2-2 represents the default settings for each of the ports. The term active connector refers to
the connector, either UTP, SFP or XFP, that is currently enabled. For example, if a particular
9145E10G model has a User Port with both UTP and SFP connectors present, by default the
UTP is the Active Connector (it can currently transmit and receive data), while the SFP is the
Inactive Connector (i.e., it currently cannot transmit or receive data).
Table 2-2. Default Port Settings
UTP
SFP w/ Multispeed Optics
(100 to 1000)
XFP w/ 10GigE Optics
User Port
N/A
N/A
Auto
Network Port
N/A
N/A
Auto
Multipurpose Port
Auto
100 FD
N/A
Mgmt UTP port
Auto
100 FD
N/A
NOTE:Cells in yellow denote which of the connectors are active by default
2.6 Power Connectors
Both 9145E10G models will accommodate both single and redundant AC and DC powering
options, along with mixed AC and DC powe.
2.6.1 Power Requirements
18 VDC to 36 VDC, 2.0 Amps for 24VDC power supply
36 VDC to 72 VDC, 1.0 Amps for 48VDC power supply
100 VAC to 240 VAC (auto-ranging), 50/60 Hz, , 1.0 Amp
2.6.2 Single AC Power Base Unit
The Single AC powered 9145E10G (see Figure 2-5) has an IEC 320 power connector on the rear
panel. An appropriate AC power cord is supplied with the unit.
Figure 2-4. Single AC Power
9
9145E10G Ethernet Network Interface Device User’s Manual
Functional Description
Power Connectors
2.6.3 Redundant AC Power Base Unit
The Redundant AC powered 9145E10G (see Figure 2-6) has two power connectors on the rear
panel. Appropriate AC power cords are supplied with the unit.
Figure 2-5. Redundant AC Power
2.6.4 Single DC Power Base Unit
The Single DC powered 9145E10G (see Figure 2-7) has a three terminal receptacle on the rear
panel. A DC terminal block is supplied with the unit.
Figure 2-6. Single DC Power
2.6.5 Redundant DC Power Base Unit
The Redundant DC powered 9145E10G (see Figure 2-8) has two three terminal receptacles on
the rear-panel. Two DC terminal blocks are supplied with the unit.
Figure 2-7. Redundant DC Power
10
Functional Description
9145E10G Ethernet Network Interface Device User’s Manual
LED Indicators
2.7 LED Indicators
The following paragraphs describe the functions of the LED indicators (see Figure 2-9) on the
9145E10G base unit.
LINK/ACTIVITY LED
LINK/ACTIVITY LED (-527 ONLY)
LINK/ACTIVITY LED
SPEED LED
POWER LED
STATUS LED
SPEED LED (-527 ONLY)
SPEED LED
Figure 2-8. LED Indicators
2.7.1 Management Section LEDs
Table 2-3 provides the indications supplied by the L/A, SPD, POWER and STATUS LEDs,
located to the right of the Ethernet Management and Console ports.
Table 2-3. LED Indicators
LED Name
State
Condition
No link
Off
No transmit or receive activity
L/A
Green
Link on with full duplex
Blinking Green
Transmission or receiving activity with full duplex
System Booting
Amber
Link on with half duplex
Blinking Amber
Transmission or receiving activity with half duplex
Off
Port Disabled
Green
10GBASE full
Amber
System Test
Red
Remote Fault
Blinking Red
Invalid/Unsupported XFP installed
Slow Blinking Green*
Port Enabled but No Link
SPD
11
9145E10G Ethernet Network Interface Device User’s Manual
Functional Description
LED Indicators
LED Name
POWER
STATUS
State
Condition
Off
Power is off
Green
Power is on
Red
One of the board supply voltages has exceeded a
threshold value
Off
No Power
Green
Normal operation
Amber
System self-test in progress
Blinking Amber
System is booting
Red
One of the board supply voltages has exceeded a
threshold value
* Slow Blinking Green means LED toggles between OFF and GREEN approximately once per
second.
2.7.2 Data Interface Section LEDs
Table 2-4 represents the indications supplied by the SPD and L/A LEDs of the User, Network,
and Multipurpose ports. Indications apply to both UTP, SFP, and XSP LEDs.
Table 2-4. User and Network Port LED Indicators
LED Name
State
Condition
Off
Port Disabled
Green
10GBase Full
Amber
System Test
Red
Remote Fault
Blinking Red
Invalid/Unsupported XFP installed
Slow Blinking Green*
Port Enabled but No Link
SPD
No link
Off
No transmit or receive activity
Green
Link on with full duplex
Blinking Green
Transmission or receiving activity with full duplex
Amber
System test
L/A
Port Disabled
Red
LLF
Blinking Red
No Link, but transmitting OAM packets in unidirectional mode
* Slow Blinking Green means the LED toggles between OFF and GREEN approximately once per
second.
12
Functional Description
9145E10G Ethernet Network Interface Device User’s Manual
LED Indicators
Table 2-5. Multipurpose Port LED Indicators
LED Name
State
Condition
10Base T
Off
Auto
Port Disabled
Green
SPD
1000BaseT
100BaseT
Amber
System Test
Red
Remote Fault (SFP Only)
Blinking Red
Invalid/Unsupported SFP installed (SFP Only)
Slow Blinking Green*
Port Enabled but No Link
No link
Off
No transmit or receive activity
Green
Link on with full duplex
Blinking Green
Transmission or receiving activity with full duplex
System test
L/A
Amber
Link up with half duplex
Blinking Amber
Transmission or receiving activity with half duplex
Port Disabled
Red
LLF
Blinking Red
No Link, but transmitting OAM packets in unidirectional mode
* Slow Blinking Green means the LED toggles between OFF and GREEN approximately once per
second.
13/(14 Blank)
Installation
9145E10G Ethernet Network Interface Device User’s Manual
9145E10G Installation Procedures
Chapter 3
Installation
3.1 9145E10G Installation Procedures
This section describes how to unpack, install, and set up the 9145E10G. Before setting up the
9145E10G, make sure a 9 pin EIA-232 cable is available to connect the 9145E10G's console port
to a VT100 type terminal or PC for setup and configuration.
Keep the shipping container and all packing materials until the unit is installed and fully operational. In the event that the unit needs to be returned, contact Canoga Perkins Customer Service
for a Return Authorization Number (RMA) and instructions for return shipment.
CAUTION: Follow electrostatic discharge (ESD) safety precautions when
handling Canoga Perkins products, as with all electronic devices
with static sensitive components.
3.2 Unpacking
Open the shipping container, remove the accessories tray, and remove the accessories from the
tray (see Figure 3-1). Lift the 9145E10G out of the shipping container and remove the foam end
caps from the unit. Return all packing materials to the shipping container and put it in a safe place
in the event the unit needs to be returned.
15
9145E10G Ethernet Network Interface Device User’s Manual
Installation
Mounting Options
USE
R
MA
NU
AL S
GR1
Figure 3-1. Unpacking the 9145E10G
3.3 Mounting Options
The 9145E10G can be rack mounted, wall mounted, or placed on any horizontal flat surface such
as a shelf or table.
3.3.1 Rack Mounting
One 9145E10G can be mounted in either a 19" rack or a 23" rack, and two 9145E10Gs can be
mounted side by side in either a 19" rack or a 23" rack. Rack mounting kits (reference Table 3-1)
are available for each of the four rack mounting possibilities. Each rack mount kit contains the
brackets necessary for installing the 9145E10G (see Figure 3-2), as well as the mounting hardware required to attach the brackets to the unit(s). Rack mount screws are provided by the rack
manufacturer.
16
Installation
9145E10G Ethernet Network Interface Device User’s Manual
Mounting Options
Table 3-1. Rack Mount Kits
Rack Mount Kit
Part Number
Component
Part Number
Qty
Rack Mount Bracket
1802-2016
Kit, 19" Single Unit
Bracket, rack mount,single, 19”
6213614-119
2
Screw, flat head,8-32 x 0.25”
80680041
4
Rack Mount Bracket
1802-2017
Kit, 23" Single Unit
Bracket, rack mount,single, 23”
6213614-123
2
Screw, flat head,8-32 x 0.25"
80680041
4
Bracket, rack mount,dual, 19"
6213614-219
2
Screw, flat head,8-32 x 0.25"
80680041
4
Bracket, rack mount, center
6213615
2
Strap, rack mount, center
6213616
1
Bracket, rack mount, dual, rear
6213617
1
Rack Mount Bracket
1802-2019
Kit, 19" Dual Unit
Rack Mount Bracket
1802-2021
Kit, 23" Dual Unit
Screw, flat head, 8-32 x 0.25", SS, Phil80680041
lips
4
Screw, pan head, 8-32 x 0.25", SS,
Phillips
80880041
4
Bracket, rack mount,dual, 23"
6213614-223
2
Bracket, rack mount, center
6213615
2
Strap, rack mount, center
6213616
1
Bracket, rack mount, dual, rear
6213617
1
Screw, flat head, 8-32 x 0.25", SS, Phil80680041
lips
4
Screw, pan head, 8-32 x 0.25", SS,
Phillips
4
6213614-123
6213614-219
80880041
6213614-119
6213614-615
6213614-617
6213614-223
6213614-616
Figure 3-2. 9145E10G Rack Mounting Brackets
17
9145E10G Ethernet Network Interface Device User’s Manual
Installation
Mounting Options
Mounting One 9145E10G in a 19" or 23" Rack - To rack mount one 9145E10G, perform
the following steps:
1. Install the 19" Single Unit or 23" Single Unit Rack Mount Bracket Kit. The Rack Mount Kit
includes two mounting brackets, and the screws required to attach the brackets to the
9145E10G. The brackets attach to the two threaded holes on each side of the 9145E10G,
toward the front (see Figure 3-3) using the flat head screws provided. Torque the flat head
screws to 14.5 – 15.5 in-lb.
Figure 3-3. Install Rack Mount Kit
2. Place unit with brackets attached in place on the mounting rack.
3. Install two screws through each bracket into the threaded holes on the mounting rack
(see Figure 3-4). Torque the screws to the rack manufacturer’s specifications.
Figure 3-4. Mounting 9145E10G on Rack
18
Installation
9145E10G Ethernet Network Interface Device User’s Manual
Mounting Options
Mounting Two 9145E10Gs, Side by Side, in a 19" or 23" Rack - To rack mount two
9145E10Gs, perform the following steps:
1. Install the 19" Dual Unit or 23" Dual Unit Rack Mount Bracket Kit. The Rack Mount Kit
includes two rack mount brackets, two center brackets, a strap, a rear bracket, and the
screws required to attach the brackets to the 9145E10Gs. The mounting brackets attach
to the two threaded holes on the outside of each 9145E10G, toward the front (see Figure
3-3). The two center brackets attach to the two threaded holes on the inside of each
9145E10G, and the strap mounts over the front of each center bracket (see Figure 3-5).
The rear center bracket is attached to the threaded holes at the top inside corner of the
back of each 9145E10G (see Figure 3-6).
L/A
SPD
POWE
10GXFP
R
USER PO
S
STATU
RESET
RT
7
2
10G-5
9145E
Figure 3-5. Install Center Brackets and Strap
Figure 3-6. Install Rear Center Bracket
2. Place unit with brackets attached in place on the desired mounting rack.
3. Install two screws through each bracket into the threaded holes of the mounting rack (see
Figure 3-7). Torque the screws to the rack manufacturer’s specifications.
Figure 3-7. Mounting Two 9145E10Gs on Rack
19
9145E10G Ethernet Network Interface Device User’s Manual
Installation
Mounting Options
3.3.2 Wall Mounting
CAUTION: Fasteners used for wall mounting of the 9145E10G are required
to withstand a force of 18lbs, applied in any direction. Failure to
meet these requirements could result in damage to the equipment.
The bottom panel of the 9145E10G is designed with keyhole cutouts to accommodate wall
mounting. A template is provided with the Quick-Start Guide so that the installer can precisely
fasten mounting screws onto a wall. Two number 8 screws and wall anchors, which are not provided by Canoga Perkins, are used for wall mounting. The keyholes are designed so that the
9145E10G unit can be mounted in three positions: with front panel facing the floor, to the right or
to the left (see Figure 3-8).
Figure 3-8. Wall Mounting Cutout Locations
Assure that there is enough unobstructed space around the perimeter of the 9145E10G to allow
for adequate airflow and servicing. Install the 9145E10G on a wall as follows:
1. Tape the template (see Figure 3-9) to the wall, ensuring that the edge of the template corresponding to the direction you wish to mount the unit is parallel to the floor and ceiling.
2. Drill a hole through the center of each hole position marker on the template.
3. Remove the template from the wall
4. Install a screw anchor in each drilled hole, then install a #8 screw into each anchor. Leave
the screws protruding from the wall approximately 1/8”.
5. Place the keyholes of the 9145E10G over the screws, then slide the unit down to lock it
into position on the screws.
20
Installation
9145E10G Ethernet Network Interface Device User’s Manual
1.625"
INSTALL
MOUNTING
SCREWS
WALL
FAN
1
8
“
FRONT OF UNIT
5"
8¼"
8 ¼" X 11"
9145E10G
FAN
1.625"
11"
Mounting Options
Figure 3-9. 9145E10G Wall Mount Template
3.3.3 Horizontal Flat Surface Mounting
The 9145E10G requires at least one inch of unobstructed space around the perimeter for ventilation. Canoga Perkins recommends a space of 3 to 5 inches be left unobstructed to allow for SFP
module access, cable access and power connections. To install the 9145E10G on a flat surface,
place the 9145E10G on a secure flat surface such as a table, a shelf, or a desk within reach of
the power and fiber optic cables. Connect the power and fiber optic cables to the 9145E10G as
required.
21
9145E10G Ethernet Network Interface Device User’s Manual
Installation
Installing the SFP and XFP Modules
3.4 Installing the SFP and XFP Modules
1. Determine which SFP and XFP Module(s) is/are required for the User, Network, and Multipurpose ports by referencing the Product Data Sheet.
2. Insert a module into each available port and push firmly to seat module (see Figure 3-10).
3.
Raise latch to lock module in place.
Figure 3-10. Install SFP and XFP Modules
3.5 Connecting the Electrical Power
NOTE: When power is applied, all LED indicators will light amber.
3.5.1 AC Power
NOTE: Country specific power cords are available locally for installations
outside of North America
The 9145E10G uses a standard IEC320 AC Power Connector. Plug the AC power cord into the
socket at the rear of the 9145E10G and plug the other end of the AC power cord into a convenient AC outlet.
22
Installation
9145E10G Ethernet Network Interface Device User’s Manual
Connecting the Electrical Power
3.5.2 DC Power
CAUTION: The 24 VDC and 48VDC 9145E10Gs are only intended to be used
in a restricted access location in accordance with Articles 11016, -17, and -18 of the National Electric Code ANSI/NFPA 70.
NOTE: The DC Power Terminal Block is removable for ease of installation
and replacement. It is recommended the Terminal Block be removed
when connecting power to avoid accidentally crossed or shorted
power leads from damaging the 9145E10G or your DC Power Source.
The 9145E10G is shipped with a compatible DC Power terminal block. Connect DC power to the
9145E10G as follows (see Figure 3-11):
NOTE: The 9145E10G supports both Positive and Negative grounded DC
Power.
1. Loosen the terminal screws for +, -, and GND
2. Slide the wires one at a time (green = GND, red = +, black = -) into the square openings in
the bottom of the terminal block.
3. Tighten the terminal screws as wires are installed.
4. Use an ohmmeter to verify that power leads are not shorted to GND.
5. Connect the+ and - wires to the power source.
6. Insert the terminal block into the DC power receptacle at the rear of the 9145E10G.
TERMINAL
SCREWS
Figure 3-11. Connect D.C. Power
23
9145E10G Ethernet Network Interface Device User’s Manual
Installation
Connecting the Electrical Power
3.5.3 Grounding
A grounding lug kit is included in the 9145E10G accessory tray. Connect a 6AWG grounding
cable to the 9145E10G as follows (see Figure 3-12):
1. Strip approximately ¾-inch of insulation from the end of the grounding cable.
2. Twist the exposed wires together and trim the ends off evenly.
3. Insert exposed wire into the grounding lug until it bottoms out inside the barrel.
4. Position the crimping tool over the center of the grounding lug, with the lug in the crimping
tool’s proper crimp pocket.
5. Squeeze handles firmly until grounding wire is secured within the grounding lug.
6. Insulate the grounding connection as required.
7. Align the screw holes in the grounding lug with the mounting holes at the center of the
back of the 9145E10G.
8. Install the two screws included with the grounding lug kit. Torque screws to 14.5 – 15.5 inlb.
1RG
Figure 3-12. Install Grounding Lug
24
Installation
9145E10G Ethernet Network Interface Device User’s Manual
Connecting the Electrical Power
3.5.4 Connecting the Fiber Optic and UTP Ethernet Cables
3.5.4.1 Optical Fiber Cable Installation
NOTE: To avoid damaging the fiber end-surface or connector, use extreme
care when installing or removing cables.
Connect the Optical Fiber cables to the SFP and XFP modules as follows:
1. Plug in the optical cables with proper Tx to Rx or Rx to Tx orientation.
2. Ensure connector locks in place.
3. Label each cable with the signal direction (TX or RX).
3.5.4.2 UTP Cable Installation
Connect the UTP cables to the RJ45 connectors as follows:
1. Plug the UTP Cable into the RJ45 connector.
2. Be sure the locking tab is properly seated.
25/(26 Blank)
Operation
9145E10G Ethernet Network Interface Device User’s Manual
Power-Up and Front Panel Functions
Chapter 4
Operation
4.1 Power-Up and Front Panel Functions
The LEDs on the front panel indicate the system and port status of the 9145E10G (see Figure 41). During power-up, all LEDs on the 9145E10G will light amber. When power-up has been completed, the LEDs will display status as described in the following paragraphs. Additional information about fault conditions appears in the System Alarms and System Status & Configuration
screens (Reference 6913367, 9145E10G NID Software User’s Manual).
LINK/ACTIVITY LED
LINK/ACTIVITY LED (-527 ONLY)
LINK/ACTIVITY LED
SPEED LED
POWER LED
STATUS LED
SPEED LED (-527 ONLY)
SPEED LED
Figure 4-1. 9145E10G Status Indicators
4.1.1 Power and Status LEDs
The POWER and STATUS LEDs (see Figure 4-1), located to the right of the console and management ports, indicate condition and state of the 9145E10G. See Table 4-1 for significance of
LED conditions.
4.1.1 Ethernet Management LEDS
The Link/Activity ( L/A) front panel LED (see Figure 4-1), located to the right of the console and
management ports, indicates the presence of transmit or receive activity. The Speed (SPD) front
27
9145E10G Ethernet Network Interface Device User’s Manual
Operation
Power-Up and Front Panel Functions
panel LED, located directly below the L/A LED, indicates the speed of the transmissions. See
Table 4-1 to determine the 9145E10G status.
Table 4-1. Power, Status, and Ethernet Management LED Indications
LED Name
POWER
STATUS
State
Condition
Off
Power is off
Green
Power is on
Red
One of the board supply voltages has exceeded a
threshold value
Off
No Power
Green
Normal operation
Amber
System self-test in progress
Blinking Amber
System is booting
Red
One of the board supply voltages has exceeded a
threshold value
No link
Off
No transmit or receive activity
L/A
Green
Link on with full duplex
Blinking Green
Transmission or receiving activity with full duplex
System Booting
Amber
Link on with half duplex
Blinking Amber
Transmission or receiving activity with half duplex
Off
Port Disabled
Green
10GBASE full
Amber
System Test
Red
Remote Fault
Blinking Red
Invalid/Unsupported XFP installed
Slow Blinking Green*
Port Enabled but No Link
SPD
* Slow Blinking Green means LED toggles between OFF and GREEN approximately once per
second.
28
Operation
9145E10G Ethernet Network Interface Device User’s Manual
Power-Up and Front Panel Functions
4.1.2 XFP, SFP and UTP Port Status LEDS
The Speed (SPD) and Link/Activity (L/A) LEDs are located above the XFP, SFP and UTP Ports of
each port section (see Figure 4-1). See Table 4-2 to determine the current condition of these
ports.
Table 4-2. User and Network Port LED Indicators
LED Name
State
Condition
Off
Port Disabled
Green
10GBase Full
Amber
System Test
Red
Remote Fault
Blinking Red
Invalid/Unsupported XFP installed
Slow Blinking Green*
Port Enabled but No Link
SPD
No link
Off
No transmit or receive activity
Green
Link on with full duplex
Blinking Green
Transmission or receiving activity with full duplex
Amber
System test
L/A
Port Disabled
Red
LLF
Blinking Red
No Link, but transmitting OAM packets in unidirectional mode
* Slow Blinking Green means the LED toggles between OFF and GREEN approximately once per
second.
29
9145E10G Ethernet Network Interface Device User’s Manual
Operation
Interface Management
Table 4-3. Multipurpose Port LED Indicators
LED Name
State
Condition
10Base T (UTP only)
Off
Auto
Port Disabled
Green
SPD
1000Base-T or 1000Base-Fx for SFP port
100BaseT or 100Base-Fx for SFP port
Amber
System Test
Red
Remote Fault (SFP Only)
Blinking Red
Invalid/Unsupported SFP installed (SFP Only)
Slow Blinking Green*
Port Enabled but No Link
No link
Off
No transmit or receive activity
Green
Link on with full duplex
Blinking Green
Transmission or receiving activity with full duplex
System test
L/A
Amber
Link up with half duplex
Blinking Amber
Transmission or receiving activity with half duplex
Port Disabled
Red
LLF
Blinking Red
No Link, but transmitting OAM packets in unidirectional mode
* Slow Blinking Green means the LED toggles between OFF and GREEN approximately once per
second.
4.2 Interface Management
The 9145E10G is managed locally through the console port and remotely either through the
Management UTP port or inband via the User port. The console port is connected to a VT-100
terminal, using an emulation program, through the RS-232 serial port using a DE-9 cable. UTP is
an out-of-band 10/100 Mbps port supporting Telnet, SSH, and SNMP V1/V2C/V3 that is used for
network management.
4.2.1 Setting Up the VT-100 Terminal
When using the console port, you can use the HyperTerminal Emulation program that is included
with Microsoft Windows operating systems. The Telnet session is only available after the management TCP/IP configuration is completed.
NOTE: The Microsoft Windows Vista and Windows 7 operating systems do
not include HyperTerminal. If your terminal interface computer
uses Windows Vista or Windows 7, you will need to install a separate terminal emulation program.
30
Operation
9145E10G Ethernet Network Interface Device User’s Manual
Interface Management
The following steps describe how to set up HyperTerminal on your PC.
CAUTION: Connect serial cable after PC is booted up. Booting up with the
cable connected may cause the PC to load incorrect driver,
resulting in an erractic curser
1. Select Start>All Programs>Accessories>Communications>HyperTerminal. The New
Connection - HyperTerminal window will open.
2. Enter a name for the connection to the system in the Name box, select an icon to identify
this connection on your desktop, and click OK. The Connect To window will open.
3. Select COM from the Connect using drop down menu, and click OK. The Com1 Properties window will open.
4. At the COM 1 Properties window, on the Port Settings tab, select the following from the
appropriate dropdown menus, then Click Apply:
•
Bits per second: 9600 bps
•
Data bits: 8
•
Parity: None
•
Stop bits: 1
•
Flow control: None
5. Click OK. HyperTerminal connects to the system and VT100 terminal emulation starts.
6. In the Hyperterminal window, select the Properties button from the tool bar, select the
Settings tab, select VT100 from the Emulation drop down menu, and click OK.
7. Default username is admin
8. Default password is admin (case sensitive)
31
Troubleshooting
9145E10G Ethernet Network Interface Device User’s Manual
Optical Power Loss
Chapter 5
Troubleshooting
This chapter covers identifying fault conditions and determining corrective action. The front panel
LEDs provide both normal and fault information. To aid troubleshooting, Tables 5-1and 5-2 list all
LED functions and indications.
5.1 Optical Power Loss
Whenever there is a significant signal loss, the Rx indictor turns off. Check cable integrity, and
remove and inspect the cable connectors, being careful not to damage the fiber end-face surface
or the connector housing. Clean all optical connectors before reinstalling them.
5.2 Fault Conditions
The 9145E10G front panel and interface module LEDs show fault conditions. Additional information about fault conditions appears on the System Alarms Log. Use the System Alarms Screen to
view alarms and faults on the 9145E10G (reference 6913367, 9145E10G NID Software Version
1.0 Users Manual).
5.2.1 Remote Fault (RMTF)
If an optical port loses the RX optical signal, it sends a Remote Fault (RMTF) signal on its Transmit to the distant end on the optical link. The SPD LED is off, and an alarm flags the link loss on
the optical port. When an optical port receives a Remote Fault signal, the ACT/LNK LED lights
red and an alarm flags the remote side optical link failure. Both local and remote link partners
must be configured to the same RMTF enable/disable setting (See Figure 5-1).
USER
PORT
NETWORK
PORT
NETWORK
PORT
Tx
Rx
Rx
Tx
x
USER
PORT
Tx
Rx
Rx
Tx
RMTF
LOCAL DEVICE
Local device ACT/LNK detects link loss
Tx transmits RMTF to remote device
Local device ACT/LNK turns OFF
Remote device ACT/LNK turns red
REMOTE DEVICE
Figure 5-1. Remote Fault Signal
31
9145E10G Ethernet Network Interface Device User’s Manual
Troubleshooting
Fault Conditions
Table 5-1. Power, Status, and Ethernet Management LED Indications
LED Name
State
Off
Normal operation
Amber
System self-test in progress / Loopback mode
Red
Blinking Red
POWER
No Power
Green
Blinking Amber
STATUS
Condition
System is booting
Major alarms including Link Loss at the User,
Extension or MP Port (if MP port is supported)
Critical Alarms requiring immediate user intervention, such as the failure of one of the redundant
power supplies, temperature or voltage out of
range alarm or a fan failure.
Off
Power is off
Green
Power is on
Amber
System is booting or one power supply failed in a
redundant power supply configuration
Red
One of the board supply voltages has exceeded a
threshold value
10BaseT
Off
Auto and no link
Connector Not Selected
SPD
Amber
100BaseT
System booting
Slow Blinking Green* Port Enabled but No Link
Off
Green
L/A
Blinking Green
Amber
Blinking Amber
No link
No transmit or receive activity
Link on with full duplex
Transmission or receiving activity with full duplex
System Booting
Link on with half duplex
Transmission or receiving activity with half duplex
* Slow Blinking Green means LED toggles between OFF and GREEN approximately once per
second.
32
Troubleshooting
9145E10G Ethernet Network Interface Device User’s Manual
Fault Conditions
Table 5-2. User, Network, and Multipurpose Port LED Indications
LED Name
State
Condition
10BaseT (UTP only)
Off
Auto
Connector Not Selected
Green
SPD
Amber
Red
Blinking Red
1000BaseT or 1000Base-FX for SFP port
100BaseT or 100Base-FX for SFP port
System Test
Remote Fault (SFP Only)
Invalid/Unsupported SFP installed (SFP Only)
Slow Blinking Green* Connector Selected with No Link
Off
Green
Blinking Green
L/A
Amber
Blinking Amber
Red
Blinking Red
No link
No transmit or receive activity
Link on with full duplex
Transmission or receiving activity with full duplex
System test
Link up with half duplex
Transmission or receiving activity with half duplex
Port Disabled
LLF
No Link, but transmitting OAM packets in unidirectional mode
* Slow Blinking Green means the LED toggles between OFF and GREEN approximately once per
second.
5.2.2 Link Loss Forwarding
When Link Loss Forwarding (LLF) is enabled, a fault on one side of the 9145E10G propagates to
the other side to notify that device and stops signal transmission (see Figure 5-2). Set the LLF
propagation to User to Network, Network to User, or both directions. Set this in the User Interface
at the Functional Configuration screen (reference 6913367, 9145E10G NID Software Users Manual).
33
9145E10G Ethernet Network Interface Device User’s Manual
Troubleshooting
Running Diagnostics
x
FAULT
NO DATA
USER
PORT
NETWORK
PORT
NETWORK
PORT
Tx
Rx
Rx
Tx
USER
PORT
Tx
Rx
Rx
Tx
RMTF
x
Link loss detected on User Port
Fault propogated to Network Port
Network Port Tx stops transmitting data
Network Port Tx ACT/LNK LED turns red
REMOTE DEVICE
LOCAL DEVICE
USER PORT TO NETWORK PORT
USER
PORT
NETWORK
PORT
NETWORK
PORT
Tx
Rx
Rx
Tx
x
USER
PORT
Tx
Rx
Rx
Tx
RMTF
LOCAL DEVICE
Link loss detected on Network Port
Fault propogated to User Port
User Port stops transmitting data
User Port ACT/LNK LED turns red
REMOTE DEVICE
NETWORK PORT TO USER PORT
Figure 5-2. Link Loss Forwarding Propagation
5.3 Running Diagnostics
When you set up a new connection, you can verify the link connectivity using PING prior to sending data. A Latency and Jitter Test will verify the quality of the link.
5.3.1 PING Testing
You can verify network connectivity with another IP device within the subnet by sending a PING
to the IP address for that device. For PING testing instructions, reference 6913367, 9145E10G
NID Software Version 1.0 Users Manual.
5.3.2 Latency and Jitter Testing
Latency/Jitter Testing measures and reports performance and quality of the link between the
9145E10G and another Canoga Perkins capable device. Results reported include the Frame Loss
Ratio (FLR), and the minimums, average, and maximums for latency and jitter. For latency and jitter testing instructions, reference 6913367, 9145E10G NID Software User’s Manual.
34
Troubleshooting
9145E10G Ethernet Network Interface Device User’s Manual
Loopback Diagnostics
5.4 Loopback Diagnostics
Use Loopbacks to diagnose a fault on the optical link. The 9145E10G supports two loopback
modes that you can set at the local site for both the local and remote 9145E10Gs. These modes
loop the data through either the physical layer on the User side or the Network side.
When performing loopback diagnostics, the 9145E10G uses a unique MAC address, designated
as the Loop Test MAC Address, which is displayed on the Loopback Setup Screen (reference
6913367, 9145E10G NID Software Version 1.0 Users Manual). When in loopback mode, the
9145E10G filters and discards all service frames.
The 9145E10G is configurable to swap the origination and destination MAC Addresses and to
recalculate the looped frame's CRC. Test packets are returned to the source according to the
selected options. To display current loopback status, initiate loopbacks, configure address swapping and CRC recalculation options, and to run a loopback test, reference 6913367, 9145E10G
NID Software Version 1.0 Users Manual.
5.4.1 User Mode
User Mode loops data received on the local User Port Rx through the FPGA to the User Port Tx.
Data is not sent out the Network Port Tx and incoming data on the Network Port Rx is ignored
(see Figure 5-3). To set this mode, set the Loopback State for the Local Module to Local (reference 6913367, 9145E10G NID Software Version 1.0 Users Manual).
USER
PORT
NETWORK
PORT
NETWORK
PORT
USER
PORT
Tx
Rx
Tx
Rx
Rx
Tx
Rx
Tx
LOCAL DEVICE
NO DATA TRANSMISSION
DATA IGNORED
REMOTE DEVICE
Figure 5-3. User Mode
35
9145E10G Ethernet Network Interface Device User’s Manual
Troubleshooting
Loopback Diagnostics
5.4.2 Network Mode
Network Mode loops data received on the Network Port Rx through the Local User side to the
Network Port Tx. Data is not sent out the local User Port Tx and incoming data on the local User
Port Rx is ignored (see Figure 5-4). To set this mode, set the Loopback State for the Remote
module to Remote (reference 6913367, 9145E10G NID Software Users Manual).
USER
PORT
NETWORK
PORT
NETWORK
PORT
USER
PORT
Tx
Rx
Tx
Rx
Rx
Tx
Rx
Tx
LOCAL DEVICE
REMOTE DEVICE
Figure 5-4. Remote-Remote Loopback Mode
36
NO DATA TRANSMISSION
DATA IGNORED
Maintenance
9145E10G Ethernet Network Interface Device User’s Manual
General Maintenance
Chapter 6
Maintenance
6.1 General Maintenance
Well maintained components and clearly identified cables help assure optimum system operation. Damaged fiber optic cables and dirty connectors are a common source of signal loss or
attenuation. Fiber optics are especially susceptible to contamination. Inspect, clean, and test all
components to maintain optimum performance. Inspect the surface of the fiber optic ferrules and
clean as required.
CAUTION:
To avoid damage and signal loss, do not over-tighten or forcefit optical connectors.
6.2 Check Optical Power Levels
NOTE: For accurate results, warm up each unit for at least 30 minutes before
checking power levels. Ensure the Transmit laser is turned on when
the unit is powered up.
To ensure proper performance levels, measure Transmitter Output Power, Receiver Input Power,
and attenuation for all fiber links. Each 9145E10G is shipped with a document that lists the output
power for each optical transceiver.
6.2.1 Measuring Transmitter Output Power
To measure the output power, follow these steps (see Figure 6-1):
1. Inspect and clean connectors on a fiber optic test cable with a known loss, then connect it
to the Tx connector on the 9145E10G.
2. Set the optical power meter to the proper wavelength.
3. Connect the other end of the optic test cable to the optical power meter, wait two or three
minutes for the power reading to stabilize, and read the output power.
4. Add the test cable loss, then record the power level and compare it to the value on the
performance sheet that was included for that transceiver. Measurement tolerance is +/0.5 dBm.
37
9145E10G Ethernet Network Interface Device User’s Manual
Maintenance
Check Optical Power Levels
5. If the reading is low, repeat the measurement with a different test cable. If the power level
is still not within range, call Canoga Perkins Technical Support.
FIBER OPTIC
TRANSMITTER
FIBER OPTIC
RECEIVER
-7dBm
λ = 1300 nm
OPTICAL
POWER
METER
Figure 6-1. Measuring Transmitter Output Power
6.2.2 Measuring Receiver Input Power
To measure receiver input power, follow these steps (seeFigure 6-2):
1. Connect the transmit fiber to the transmit side of the equipment at the local site.
2. Connect a calibrated optical power meter to the end of the transmit fiber at the remote
site.
3. Measure and record the optical power on the transmit fiber at the remote site. This is the
receiver input power for the transmit fiber from the local site.
4. Connect the transmit fiber to the transmit side of the equipment at the remote site.
5. Connect a calibrated optical power meter to the end of the transmit fiber at the local site.
6. Measure and record the optical power on the transmit fiber at the local site. This is the
receiver input power for the transmit fiber from the remote site.
7. Compare the receiver input power with the sensitivity level listed on the optical specifications sheet, located in the Client Support Area of the Canoga Perkins web site. The
power level must be within the sensitivity range listed on the data sheet. If not, contact
Canoga Perkins Technical Support.
8. Compare the receiver input power to the receiver’s saturation (overdrive) level shown on
the optical specifications sheet, located in the Client Support Area of the Canoga Perkins
web site. The power level must be lower than the saturation level. If not, contact Canoga
Perkins Technical Support.
38
Maintenance
9145E10G Ethernet Network Interface Device User’s Manual
-24dBm
λ = 1300 nm
LOCAL SITE
OPTICAL
POWER
METER
Check Optical Power Levels
FIBER OPTIC
TRANSMITTER
FIBER OPTIC
RECEIVER
FIBER OPTIC
RECEIVER
FIBER OPTIC
TRANSMITTER
-24dBm
λ = 1300 nm
OPTICAL
POWER
METER
REMOTE SITE
Figure 6-2. Measuring Receiver Input Power
6.2.3 Calculating Fiber Link Attenuation
Link attenuation measurement identifies potential problems with links that are on the threshold of
receiver sensitivity. Measure optical fiber links at the shortest wavelength of operation, as it is the
limiting factor in the loss budget. Use a power meter calibrated for the laser source, then factor in
approximately 1 dB for the connector loss from the patch cables between the 9145E10G and the
local device. (Each fiber connection can generate 0.5 dB of additional loss.)
NOTE: If you cannot determine the Rx sensitivity, contact Canoga Perkins
Technical Support for assistance.
Follow these steps to calculate fiber link attenuation:
1. Determine transmitter output power as described in paragraph 6.2.1 above.
2. Determine receiver input power as described in paragraph 6.2.2 above.
3. Subtract receiver input power from transmitter output power. The result is the fiber link
attenuation.
Transmit Output Power
-7.0 dBm
Receiver Input Power
-28.2 dBm
Fiber Link Attenuation
21.2 dB
39/(40 Blank)
CANOGA PERKINS CORPORATION
20600 Prairie Street
Chatsworth, California 91311-6008 USA
Phone: (818) 718-6300 FAX: (818) 718-6312
Web Site: www.canoga.com
Email: [email protected]