1
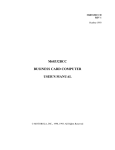
M68332EVKEM/AD1
April 1999
M68332EVKEM
EVALUATION KIT
EXERCISE MANUAL
© MOTOROLA, INC., 1991, 1999
Motorola reserves the right to make changes without further notice to any
products herein to improve reliability, function or design. Motorola does not
assume any liability arising out of the application or use of any product or circuit
described herein; neither does it convey any license under its patent rights nor the
rights of others. Motorola products are not designed, intended, or authorized for
use as components in systems intended for surgical implant into the body, or other
applications intended to support or sustain life, or for any other application in
which the failure of the Motorola product could create a situation where personal
injury or death may occur. Should Buyer purchase or use Motorola products for
any such unintended or unauthorized application, Buyer shall indemnify and hold
Motorola and its officers, employees, subsidiaries, affiliates, and distributors
harmless against all claims, costs, damages, and expenses, and reasonable attorney
fees arising out of, directly or indirectly, any claim of personal injury or death
associated with such unintended or unauthorized use, even if such claim alleges
that Motorola was negligent regarding the design or manufacture of the part.
The computer program stored in the Read Only Memory of the device contains
material copyrighted by Motorola Inc., first published 1991, and may be used only
under a license such as the License For Computer Programs (Article 14) contained
in Motorola’s Terms and Conditions of Sale, Rev. 1/79.
CONTENTS
CONTENTS
CHAPTER 1
1.1
1.2
INTRODUCTION............................................................................................................. 1-1
GENERAL DESCRIPTION ............................................................................................. 1-1
CHAPTER 2
2.1
2.2
2.3
2.4
SYSTEM CONFIGURATION
INTRODUCTION............................................................................................................. 2-1
TERMINAL/PERSONAL COMPUTER CONNECTION............................................... 2-2
POWER CONNECTION.................................................................................................. 2-4
POWER-UP ...................................................................................................................... 2-5
CHAPTER 3
3.1
3.2
GENERAL INFORMATION
EXAMPLE PROGRAMS
INTRODUCTION............................................................................................................. 3-1
APPLICATION PROGRAMS.......................................................................................... 3-6
3.2.1 Example 1: Generating 5 Phase-Locked Square Waves........................................... 3-6
3.2.2 Discrete I/O Mode ................................................................................................... 3-10
3.2.2.1 Example 2: Turn on and off a load ................................................................ 3-11
3.2.2.2 Example 3: Event Detection ........................................................................... 3-15
3.2.2.3 Example 4: Match Rate Sampling .................................................................. 3-18
3.2.3 Input Capture/Input Transition Counter (ITC) Mode.............................................. 3-22
3.2.3.1 Example 5: Square Wave Generation and Measurement .............................. 3-24
3.2.3.2 Example 6: Counting Events ......................................................................... 3-28
3.2.3.3 Linking............................................................................................................ 3-30
3.2.4 Example 7: Output Compare (OC) Mode................................................................ 3-31
APPENDIX A
EXERCISE MANUAL QUESTIONNAIRE
Questionnaire Questions........................................................................................................A-1
M68332EVKEM
iii
CONTENTS
FIGURES
1-1.
2-1.
2-2.
3-1.
3-2.
3-3.
3-4.
M68332EVK Evaluation Kit............................................................................................. 1-2
BCC Software Debug Configuration ................................................................................ 2-1
RS-232C Terminal/PC Cable Assembly........................................................................... 2-3
PWM Mode Parameters .................................................................................................... 3-7
Discrete I/O Mode Parameters ........................................................................................ 3-12
ITC Mode Parameters ..................................................................................................... 3-23
OC Mode Parameters ...................................................................................................... 3-33
TABLES
1-1.
3-1.
3-2.
3-3.
3-4.
iv
BCC Jumper Settings ........................................................................................................ 1-3
PWM Mode Channel Control Options.............................................................................. 3-8
Discrete I/O Mode Channel Control Options.................................................................. 3-13
ITC Mode Channel Control Options............................................................................... 3-24
OC Mode Channel Control Options................................................................................ 3-34
M68332EVKEM
GENERAL INFORMATION
CHAPTER 1
GENERAL INFORMATION
1.1
INTRODUCTION
This exercise manual introduces the MC68332 Microcontroller Unit (MCU) and
emphasizes the time processor unit (TPU). The MC68332 TPU is an MC68332
MCU internal module. This manual contains several application programs and
ends with a self-test.
To complete the self-test, you many need to consult the manuals describing the
MC68332 MCU device:
• MC68332 User’s Manual, MC68332UM/AD
• CPU32 Central Processor Unit Reference Manual, CPU32RM/AD
• M68300 Time Processor Unit Reference Manual, TPURM/AD
1.2
GENERAL DESCRIPTION
The MC68332 is a 32-bit integrated microcontroller that combines data
manipulation capabilities with peripheral subsystems. The MC68332 is a member
of the MC68300 family of modular embedded controllers to feature fully static,
high-speed, complementary metal-oxide semiconductor (HCMOS) technology. A
subset of the MC68020, the CPU32 instruction processing module provides
enhanced system performance and utilizes the extensive software base of the
Motorola M68000 Family.
To perform the exercises in this manual you need the M68332EVK Evaluation Kit
(EVK) or the M68332BCC Business Card Computer (BCC). When you mount the
BCC on the PFB it becomes an M68332EVK Evaluation Kit (EVK). All
references in this manual are to the EVK but you may use the BCC as a
standalone board.
The EVK is a table-top evaluation and emulation system (shown in Figure 1-1).
You may use the EVK to evaluate the MCU via user-developed programs; when
attached to your target system, the EVK emulates the MCU. This emulation
functionality includes breakpoints, trace functions, memory and register display
and modify commands, system call routines, and a diagnostic monitor.
M68332EVKEM/AD1
1-1
GENERAL INFORMATION
MC68332 MCU
EPROM
(1)
RS-232C
Connector
M68332BCC
Background
Mode
Connector
Optional
RAM or
EPROM
Optional
RAM
Connectors
for DI
Connectors
for BCC
RS-232C
(DI)
Connector
RS-232C
(BCC)
Connector
M68300PFB
Figure 1-1. M68332EVK Evaluation Kit
This manual lists the components and equipment required for EVK/BCC
operation. Information on power and PC hookups, a sample program for debugger
experimenting, and application programs also are in this manual.
1-2
M68332EVKEM/AD1
GENERAL INFORMATION
The EVK consists of two printed circuit boards (PCBs) and one software
program:
• M68332BCC Business Card Computer (BCC) PCB
• M68300PFB Platform Board (PFB) PCB
• M68CPU32BUG Debug Monitor (CPU32Bug) program
To use the EVK, you also need:
• +5 Vdc, 200 mA power supply
• RS-232C cable
• Terminal or personal computer (PC) — You may use an IBM-PC or
compatible PC instead of a terminal, but the PC must have a terminal
emulation package.
For exercises of this manual, use the default jumper settings from Table 1-1
(ignore the PCB settings if using the BCC as a standalone board):
Table 1-1. BCC Jumper Settings
BCC
M68332EVKEM/AD1
PFB
Jumpers
Pins
Jumpers
Pins
J1
1-2
J1
1-2
J2
2-3
J2
1-2
J3
2-3
J3
1-2
J4
1-2
J4
1 - 2, 4 - 5
J6
1-2
J5
No Jumper
J7
1-2
J6
No Jumper
J8
1-2
J7
1 - 2, 4 - 5
J8 - J13
2-3
J14
1-2
1-3
GENERAL INFORMATION
1-4
M68332EVKEM/AD1
SYSTEM CONFIGURATION
CHAPTER 2
SYSTEM CONFIGURATION
2.1
INTRODUCTION
If you are using the EVK make sure it is in the configuration shown in Figure 2-1.
This configuration lets you generate, debug, and execute the program examples of
this manual.
M68300PFB
M68332BCC
Figure 2-1. BCC Software Debug Configuration
M68332EVKEM/AD1
2-1
SYSTEM CONFIGURATION
2.2
TERMINAL/PERSONAL COMPUTER CONNECTION
Connect the EVK to a dumb terminal or to a personal computer (PC). A terminal
is cost effective, but has no memory or disk drive. Consequently, a terminal does
not let you save or download user-developed code. A PC does let you generate,
store, and download user-developed code, but costs more than a terminal.
Figure 2-2 shows the cable assembly required for this connection. Make up the
cable assembly if such a cable is not already available.
Insert the small connector of the cable assembly into PFB connector P9 (shown
below), one of the two 9-pin connectors of the PFB. Insert the other connector of
the cable assembly into a DB-25 serial I/O port of the terminal or PC.
The input serial format for the I/O port must be configured for 8 data bits, 1 stop
bit, no parity, and 9600 baud.
NC
RXD
TXD
DTR
GND
1
6
DSR
7
NC
8
CTR
9
NC
2
3
4
5
PFB P9
(BCC)
Terminal/PC I/O Port
2-2
M68332EVKEM/AD1
SYSTEM CONFIGURATION
1
1
14
RXD
2
15
TXD
3
6
2
7
3
8
16
4
4
17
5
18
PC
SERIAL
PORT
PFB P9
6
CTS
GND
DSR
(DB-9 MALE)
19
7
9
5
DTR
DCD
20
8
21
9
22
10
23
11
24
12
25
NOTE
Some serial communication cards need CTS,
DSR, DCD, and DTR to be shorted together
before they will function properly with the EVK.
Make this modification to the PC side of the cable.
13
(DB-25)
Figure 2-2. RS-232C Terminal/PC Cable Assembly
M68332EVKEM/AD1
2-3
SYSTEM CONFIGURATION
2.3
POWER CONNECTION
Use PFB connector P7 to connect power to the EVK. Contact 1 is GND; black
lever. Contact 2 is +5 volts; red lever. Use 20 or 22 AWG wire for power
connections. For each wire, trim back the insulation 1/4 in. (.635 cm), lift the
appropriate lever of P7 to release tension on the contacts, then insert the bare wire
into P7 and close the lever.
BLK
RED
GND
P7
+5V
CAUTION
Do not use wire larger than 20 AWG in connector P7. Such wire
could damage the connector.
Turn off PFB power when installing the BCC on the PFB or
removing the BCC from the PFB. Sudden power surges could
damage EVK integrated circuits.
2-4
M68332EVKEM/AD1
SYSTEM CONFIGURATION
2.4
POWER-UP
After jumper settings are correct, the EVK is in software debug configuration, and
the terminal (or PC) and power are connected, you may turn on power to the
EVK. This resets MCU and RS-232C port circuitry, and passes processing control
to the monitor program.
This message appears on the terminal or PC screen:
CPU32Bug Debugger/Diagnostics - Version 1.00
(C) Copyright 1991 by Motorola Inc.
CPU32Bug>
The prompt CPU32Bug>, at the end of this message, appears after any system
initialization, and any time the monitor program assumes processing control. By
itself, in shows that the system is waiting for a command line or other user input.
The message Invalid command CPU32Bug> indicates an incorrect user entry.
When the user enters a correct command, debug operation continues in one of two
basic modes. If the command causes execution of a user program, the monitor
may or may not be reentered, depending upon the desire of the user. For the
alternate case, the command is executed under the control of the monitor, and the
system resumes waiting. During command execution, additional user input may
be required, depending on the command. Chapter 3 of the M68CPU32BUG
Debug Monitor User’s Manual, M68CPU32BUG/D, explains CPU32Bug
commands.
The user can use any of the commands supported by the monitor. A standard input
routine controls the EVK operation while the user types a command line.
Command processing begins when the user presses the carriage return <CR> key,
at the end of the command line.
M68332EVKEM/AD1
2-5
SYSTEM CONFIGURATION
2-6
M68332EVKEM/AD1
EXAMPLE PROGRAMS
CHAPTER 3
EXAMPLE PROGRAMS
3.1
INTRODUCTION
To create, modify, and debug MC68332 MCU code, enter the memory modify
command. That is, type MM XXXX;DI(1) on the command line and press the
carriage return (<CR>). As with all assembler input, there must be exactly one
space between the mnemonic and the operand. There must be no space inside the
operand field. No comments are allowed after the instruction input and no line
labels are permitted.
The DI option activates the one-line assembler/disassembler. This is an
interactive, assembler/editor for the source program. As you enter each line of
source code, the assembler/disassembler converts the line to machine language
and stores it in memory. The assembler/disassembler disassembles the machine
code of each instruction, in order to display the instruction mnemonic and
operands. All valid opcodes are converted to assembly language mnemonic.
The contents of the specified memory location appear, along with the prompt (?)
for input. At this point you have three options:
• Enter a carriage return (<CR>) – Pressing the carriage return on an input
line, without other input, closes the present location and continues with
disassembly of the next instruction. The instruction is unchanged.
• Enter a new source instruction, then press <CR> – This activates the
assembler to assemble the new instruction and generate disassembly of the
object code generated. The new source line replaces the current line.
• Enter (.), then press <CR> – Terminate the assembler/disassembler by
entering only a period (.) on the command input line, then pressing the
carriage return.
After each new assembler input line, the new line is disassembled for the user
before stepping to the new instruction. The new line may assemble to a different
number of bytes than the previous one.
1. In this manual, all user input is in bold upper case. CPU32Bug accepts lower-case input as well.
M68332EVKEM/AD1
3-1
EXAMPLE PROGRAMS
The next few pages show how to operate the assembler/disassembler. First, you
will create a typical program loop. Then you will use CPU32BUG monitor
commands to debug the program. The routine examples illustrate how to display
memory, change memory, set a breakpoint, and start user program execution.
Power-up fills all user memory space with an alternating pattern of 0 and F
characters. To see this pattern, enter the memory display command:
CPU32Bug>MD 5000;DI<CR>
5000
0000FFFF
5004
0000FFFF
5008
0000FFFF
500C
0000FFFF
5010
0000FFFF
5014
0000FFFF
5018
0000FFFF
501C
0000FFFF
ORI.B
ORI.B
ORI.B
ORI.B
ORI.B
ORI.B
ORI.B
ORI.B
#$FF,D0
#$FF,D0
#$FF,D0
#$FF,D0
#$FF,D0
#$FF,D0
#$FF,D0
#$FF,D0
Now, program the EVK with the periodic interrupt timer (PIT) time-out program.
Starting at address $5000, enter this program as follows:
EXAMPLE
PROGRAM
CPU32Bug>MM 5000;DI<CR>
5000
5008
5012
5018
501C
5020
5024
502C
502E
5034
5036
503A
MOVE.L #$501C,$78<CR>
MOVE.L #$061E0120,$FFFA22<CR>
LPSTOP #$2500<CR>
BRA.W $5012<CR>
MOVEA.W #$5100,A0<CR>
MOVEA.W #$510E,A1<CR>
BTST.B #$0,$FFFC0C<CR>
BEQ.B $5024<CR>
MOVE.B (A0)+,$FFFC0F<CR>
CMPA.W A0,A1<CR>
BNE.W $5024<CR>
RTE<CR>
PROGRAM
DESCRIPTION
Enter memory modify command, with
disassembly option, for location $5000.
Set up level six vector table.
Initialize PIT.
Execute LPSTOP Instruction.
Loop.
Beginning of message.
End of message.
Check for SCI not busy.
Branch until free.
Send message byte.
Check for end of message.
Branch until done.
Return from print routine.
After entering this program, you must enter the ASCII code for the output
message, PIT TIME-OUT. When you run the program, this message appears
each time the program completes a loop. Enter this ASCII code at memory
location $5100:
CPU32Bug>MS 5100 ’PIT TIME-OUT’ODOA<CR>
3-2
Modify memory at location
$5100.
M68332EVKEM/AD1
EXAMPLE PROGRAMS
After entering the PIT timeout program, you may display the instructions at
location $5000:
EXAMPLE
PROGRAM
CPU32Bug>MD 5000;DI<CR>
5000
21FC0000 501C0078
5008
23FC061E 012000FF
FA22
5012
F80001C0 2500
5018
6000FFF8
501C
307C5100
5020
327C510E
5024
08390000 00FFFC0C
502C
67F6
CPU32Bug><CR>
502E
13D800FF FC0F
5034
B2C8
5036
6600FFEC
503A
4E73
503C
0000FFFF
5040
0000FFFF
5044
0000FFFF
5048
0000FFFF
PROGRAM
DESCRIPTION
MOVE.L
MOVE.L
LPSTOP.W
BRA.W
MOVEA.W
MOVEA.W
BTST.B
BEQ.B
MOVE.B
CMPA.W
BNE.W
RTE
ORI.B
ORI.B
ORI.B
ORI.B
Enter memory display mode.
#$501C,($78).W
#$061E0120, (FFFA22)
#$2500
$5012
#$5100,A0
#$510E,A1
#$0,($FFFC0C).L
$5024
Display next eight instructions.
(A0)+,(FFFC0F).L
A0,A1
$5024
#$FF,D0
#$FF,D0
#$FF,D0
#$FF,D0
To see the PIT output message, enter the memory display command for the $5100
storage location:
CPU32Bug>MD 5100<CR>
00005100 5049 5420 5449 4D45
M68332EVKEM/AD1
2D4F 5554 0D0A FFFF
PIT TIME-OUT....
3-3
EXAMPLE PROGRAMS
You may now experiment with the PIT program, via the following commands:
ROUTINE
DESCRIPTION
TERMINAL
CPU32Bug>MD 5000;DI<CR>
00005000 21FC0000 501C0078
00005008 23FC061E 012000FF FA22
00005012 F80001C0 2500
00005018 6000FFF8
0000501C 307C5100
00005020 327C510E
00005024 08390000 00FFFC0C
0000502C 67F6
CPU32Bug>MM 500C<CR>
0000500C 0120? 00FF.<CR>
CPU32Bug>g 5000<CR>
Effective address: 00005000
PIT TIME-OUT
PIT TIME-OUT
PIT TIME-OUT
:
:
Display memory at address $5000.
MOVE.L
#$501C,($78).W
MOVE.L
#$061E0120, (FFFA22)
LPSTOP.W
#$2500
BRA.W
$5012
MOVEA.W
#$5100,A0
MOVEA.W
#$510E,A1
BTST.B
#$0,($FFFC0C).L
BEQ.B
$5024
Modify memory at location $500C.
Change PIT timeout speed.
Go to address 5000 and begin execution.
Periodic interrupt timer time-out message.
Press the PFB ABORT switch to terminate the loop program:
Exception: ABORT
PC =00005018
SFC =5=SD
D0 =00000000
D4 =00000000
A0 =0000510E
A4 =00000000
00005018 6000FFF8
3-4
SR
DFC
D1
D5
A1
A5
=2500=TR:OFF_S_5_.....
=5=SD
USP =0000FC00
=00000000
D2 =00000000
=00000000
D6 =00000000
=0000510E
A2 =00000000
=00000000
A6 =00000000
BRA.W.W
$5012
VBR =00000000
SSP*=00010000
D3 =00000000
D7 =00000000
A3 =00000000
A7 =00010000
M68332EVKEM/AD1
EXAMPLE PROGRAMS
CPU32Bug>T 1<CR>
Trace one instruction.
PC =00005012
SR =2500=TR:OFF_S_5_.....
SFC =5=SD
DFC =5=SD
USP =0000FC00
D0 =00000000
D1 =00000000
D2 =00000000
D4 =00000000
D5 =00000000
D6 =00000000
A0 =0000510E
A1 =0000510E
A2 =00000000
A4 =00000000
A5 =00000000
A6 =00000000
00005012 F80001C0 2500
LPSTOP.W
#$2500
CPU32Bug>BR 5034<CR>
Set breakpoint at $5034.
BREAKPOINTS
00005034
VBR =00000000
SSP*=00010000
D3 =00000000
D7 =00000000
A3 =00000000
A7 =00010000
CPU32Bug>g 5000<CR>
Begin execution at location $5000.
Effective address: 00005018
PAt Breakpoint
Breakpoint terminates the program, so ’P’ appears.
PC =00005034
SR =2600=TR:OFF_S_6_.....
VBR =00000000
SFC =5=SD
DFC =5=SD
USP =0000FC00
SSP*=0000FFF8
D0 =00000000
D1 =00000000
D2 =00000000
D3 =00000000
D4 =00000000
D5 =00000000
D6 =00000000
D7 =00000000
A0 =00005101
A1 =0000510E
A2 =00000000
A3 =00000000
A4 =00000000
A5 =00000000
A6 =00000000
A7 =0000FFF8
00005034 B2C8
CMPA.W
A0,A1
M68332EVKEM/AD1
3-5
EXAMPLE PROGRAMS
3.2
APPLICATION PROGRAMS
This paragraph contains several examples, each with an appropriate application
program. These examples will acquaint you with the time processor unit (TPU)
section of the MC68332 Microcontroller Unit device, while familiarizing you
with the EVK. At the end of this manual is a self-test questionnaire, to verify your
understanding. Each item of the questionnaire includes a cross-reference back to
the corresponding part of the manual text. Should you answer a question
incorrectly, you easily would be able to review the correct information.
3.2.1
Example 1: Generating 5 Phase-Locked Square Waves
Many TPU functions involve such actions as counting positive edges, counting
negative edges, and measuring pulse widths. The most convenient place to obtain
a pulse train is from the TPU itself. Program 1 puts channel 0 in pulse width
modulation (PWM) mode, providing a signal that other channels can use.
(Example 2, discrete I/O mode, explains locations and uses of registers.)
Note that each TPU channel has a set of parameter registers; the purpose of these
registers depends on the operating mode of the channel. Figure 3-1 contains a
diagram of these registers for any single channel in PWM mode.
The first thing Program 1 does is set up the parameter registers for channel 0. The
parameter registers for channel 0 are from $FFFF00 through $FFFF0A. Figure 3-1
shows that, for channel 0, the channel control register is at $FFFF00, the pulse
width modulation high time (PWMHI) register is at $FFFF04, and the pulse width
modulation period (PWMPER) register is at location $FFFF06.
The channel control register (location $FFFF00) is the first parameter Program 1
configures. Figure 3-1 and Table 3-1 detail the first 9 bits of this 16-bit register.
The pin state control (PSC) field forces a pin high or low, or leaves the pin in its
current state, upon a write to the host service request register. For Example 1, the
PSC field value is 10: force pin low. The pin action control (PAC) field does not
pertain to this example. The time base select (TBS) field determines the timer
count register (TCR1 or TCR2). In Example 1, we use TCR1, so the TBS field
value must be 0100: capture TCR1, compare TCR1. Thus, Program 1 writes the
value $0092 to location $FFFF00.
Next, Program 1 loads the PWM high (PWMHI) and PWM period (PWMPER)
registers. The PWMHI value is the pulse period high time; the PWMPER value is
the overall pulse period. The initial, arbitrary values for this example are $2000
and $4000, respectively.
3-6
M68332EVKEM/AD1
EXAMPLE PROGRAMS
FIELD SIZE
3
1
1
1
2
FIELD NAME
1
ADDRESSES
OPTIONS
0
CHANNEL FUNCTION SELECT FIELD
$9 = PWM Mode
$FFFE0C-$FFFE12
CHANNEL PRIORITY FIELD
01 = LOW PRIORITY
10 = MIDDLE PRIORITY
11 = HIGH PRIORITY
$FFFE1C-$FFFE1E
HOST SEQUENCE FIELD
NOT USED
$FFFE14-$FFFE16
HOST SERVICE REQUEST FIELD
10 = INITIALIZATION
01 = IMMEDIATE UPDATE OF PWM
$FFFE18-$FFFE1A
INTERRUPT ENABLE FIELD
0 = NO INTERRUPT
1 = INTERRUPT
$FFFE0A
0
0
0
0
0
INTERRUPT STATUS FIELD
15
14
13
12
11
$FFFE20
10
9
8
7
6
$FFFFW0
5
4
3
2
1
0
CHANNEL_CONTROL
$FFFFW2
OLDRIS
$FFFFW4
PWMHI (1,3)
$FFFFW6
PWMPER (2,3)
$FFFFW8
PWMRIS
UPDATED BY CPU
W=
CHANNEL NUMBER
NOTES:
1. Best-case minimum for PWMHI is 32 system clocks.
2. Best-case minimum for PWMPER is 48 system clocks.
3. PWMHI and PWMPER must be accessed coherently.
Figure 3-1. PWM Mode Parameters
M68332EVKEM/AD1
3-7
EXAMPLE PROGRAMS
Table 3-1. PWM Mode Channel Control Options
TBS
PAC
PSC
8 7 6 5
4 3 2
1 0
0
0
1
1
Action
Input
0
1
0
1
—
—
—
—
1 x x
0
0
0
1
1
1
1
1
x
0
1
x
Output
x
0
1
x
Force pin as Specified by PAC Latches
Force pin High
Force pin Low
Do Not Force Any State
Do Not Change PAC
Do Not Change PAC
—
—
—
Do Not Change TBS
Output Channel
Capture TCR1, Compare TCR1
Capture TCR2, Compare TCR2
Do Not Change TBS
The next task for Program 1 is to load the channel function select field for
Channel 0. This field consists of bits 3 through 0 of channel function select
register 3 (CFS R3), at location $FFFE12. Per Figure 3-1, the code for PWM
mode is $9, so Program 1 writes the value $1001 to location $FFFE12. The
diagram below shows this value in CFS R3. (Other bits of CFS R3 do not pertain
to Example 1. For another example that also used channels 1, 2, and 3, the
corresponding program would have to load all bits of this register.)
15
CFS R3
$YFFE12
14
13
12
CHANNEL
3
0. 0
0
0
11
10
9
8
CHANNEL
2
0
0
0
0
7
6
5
4
CHANNEL
1
0
0
0
0
3
2
1
0
CHANNEL
0
1
0
0
1
The program also must assign a priority value to the two-bit channel priority field,
at register location $FFFE1E. Note that without a priority value, the channel will
not function. In Example 1, Channel 0 has high priority, so the channel priority
field receives the value 11 ($3). Thus, Program 1 writes the value $0003 to the
$FFFE1E register.
To start the PWM mode, the program must write the value for INITIALIZATION
to the host service request field of host service request register 1 (location
$FFFE1A). Thus, this register receives the value 10 ($2). This action starts a
PWM wave that has a 50-percent duty cycle and a period of $4000 clock cycles.
To see the wave form, connect an oscilloscope to the TP0 pins: pin 19 of PFB
connector P2, and pin 46 of BCC connector P1.
3-8
M68332EVKEM/AD1
EXAMPLE PROGRAMS
Enter Program 1, below, by typing in the bold characters:
Program 1. PWM Signal Generation
CPU32Bug>MM 6000;DI<CR>
6000
6008
6010
6018
6020
6028
6030
MOVE.W #$92,$FFFF00<CR>
MOVE.W #$2000,$FFFF04<CR>
MOVE.W #$4000,$FFFF06<CR>
MOVE.W #$9,$FFFE12<CR>
MOVE.W #$3,$FFFE1E<CR>
MOVE.W #$2,$FFFE1A<CR>
BRA.W $6030<CR>
CPU32Bug>GO 6000<CR>
Program 1 works in this way:
Line 6000
Loads the value $92 in the channel control register. This makes
the timer pin an output, forced low upon generation of a host
service request.
Line 6008
Loads the value $2000 as the pulse period high time in the
PWMHI register.
Line 6010
Loads the value $4000 as the overall pulse period in the
PWMPER register.
Line 6018
Loads the value $9 in the channel function select register, so
channel 0 operates in PWM mode.
Line 6020
Loads the value $3 in the channel priority field, to give channel 0
high priority.
Line 6028
Loads the value $2 in the host service request field, generating a
host service request for channel 0.
Line 6030
Jumps to itself, beginning an endless wait loop. In actual
practice, this jump instruction would direct the program to the
next task.
M68332EVKEM/AD1
3-9
EXAMPLE PROGRAMS
3.2.2
Discrete I/O Mode
The discrete I/O (DIO) mode is for sampling or driving logical values on timer
pins, according to the timer pin’s configuration as an input or an output. DIO
mode is one of eight main TPU timer modes. Common uses of this mode are:
• Driving an output timer pin high (or low), upon command. The
microengine reads the value of the timer pin, shifts bits 15 — 1 of the pinlevel register one place to the right, and copies the present value of the
timer pin to bit 15 of the pin-level register. Thus, reading bit 15 of the pinlevel register shows the current state of the timer pin; reading bits 14
through 0 shows the previous 15 states of the timer pin.
• Programming the timer system to generate an interrupt or other host service
request to the microengine upon a specified transition (low-to-high or highto-low) of an output timer pin. The microengine reads the value of the timer
pin, shifts bits 15 — 1 of the pin-level register one place to the right, and
copies the present value of the timer pin to bit 15 of the pin-level register.
Thus, reading the pin-level register shows the 16 most recent state
transitions of the timer pin.
• Configuring a timer pin as an input. This lets timer-pin values be sampled
(that is, read) at the rate specified in the match-rate register (in timer clock
cycles). Each time the microengine samples the pin value, the microengine
shifts bits 15 — 1 of the pin-level register one place to the right, and copies
the present value of the timer pin to bit 15 of the pin-level register. This use
approximates a receive channel of a universal asynchronous receiver
transmitter, sampling an incoming signal at a periodic rate, storing values in
the pin-level register.
Examples 2, 3, and 4, with their corresponding programs, illustrate these uses of
the DIO mode.
3-10
M68332EVKEM/AD1
EXAMPLE PROGRAMS
3.2.2.1
Example 2: Turn on and off a load
Turning on or off an electrical load, such as a light bulb or motor relay, is an
exercise in forcing a timer pin high or low on command. This is an appropriate job
for the DIO mode. Program 2 must perform these actions to invoke DIO mode:
1. Load the value $8 in the channel function select field of the appropriate
channel
function select register. (Figure 3-2 illustrates the channel function select
field and
other DIO mode parameters.)
2. Load a priority value in the channel priority field of the appropriate
channel priority
register. Note that there is no default priority; if the program does not load
a priority
value, the channel cannot generate a host service request.
3. Write the value $113 to the channel control register. As Table 3-2
indicates, this value determines that no output is forced and that no
changes are
made to the pin action control (PAC) and time base select (TBS) fields.
4. If interrupts are to be used, write the value 1 to the appropriate channel
interrupt
enable register. (Example 2 does not use interrupts, and the power-up
restart presumed to precede all programs of this manual clears the channel
interrupt register. Accordingly, Program 2 need not include any interrupt
instruction.)
Once the program carries out these actions, a %01 host service request configures
the timing pin as an output and forces it high. A %10 host service request also
configures the timing pin as an output, but forces it low. (The percent symbol
indicates a binary value.)
M68332EVKEM/AD1
3-11
EXAMPLE PROGRAMS
FIELD SIZE
3
1
1
1
2
FIELD NAME
1
OPTIONS
ADDRESSES
0
CHANNEL FUNCTION SELECT FIELD
$8 = DIO Mode
$FFFE0C-$FFFE12
CHANNEL PRIORITY FIELD
01 = LOW PRIORITY
10 = MIDDLE PRIORITY
11 = HIGH PRIORITY
$FFFE1C-$FFFE1E
HOST SEQUENCE FIELD
00 = UPDATE ON TRANSITION
01 = UPDATE ON MATCH RATE RATE
10 = UPDATE ON HSR 11
$FFFE14-$FFFE16
HOST SERVICE REQUEST FIELD
10 = INITIALIZATION
01 = SET PIN HIGH
11 = SET PIN LOW
$FFFE18-$FFFE1A
INTERRUPT ENABLE FIELD
0 = NO INTERRUPT
1 = INTERRUPT
$FFFE0A
0
0
0
0
0
INTERRUPT STATUS FIELD
15
14
13
12
11
$FFFE20
10
9
8
7
$FFFFW0
6
5
4
3
2
1
0
CHANNEL_CONTROL
$FFFFW2
PIN_LEVEL
$FFFFW4
MATCH_RATE
UPDATED BY CPU
W=
CHANNEL NUMBER
Figure 3-2. Discrete I/O Mode Parameters
3-12
M68332EVKEM/AD1
EXAMPLE PROGRAMS
Table 3-2. Discrete I/O Mode Channel Control Options
TBS
PAC
PSC
8 7 6 5
4 3 2
1 0
1 1
0
0
0
0
1
0
0
0
0
0
1
0
0
0
0
0
x
x
0
0
1
1
x
0
0
1
1
x
0
1
0
1
x
x
0
1
0
1
x
Action
Input
Output
———
Do Not Force
Do Not Detect Transition
Detect Rising Edge
Detect Falling Edge
Detect Either Edge
Do Not Change PAC
—
—
—
—
Do Not Change PAC
Input Channel
Capture TCR1, Match TCR1
Capture TCR1, Compare TCR2
Capture TCR2, Compare TCR1
Capture TCR2, Compare TCR2
Do Not Change TBS
—
—
—
—
—
Do Not Change TBS
Enter Program 2, below, by typing in the bold characters:
Program 2. Discrete I/O Mode Signal Generation
CPU32Bug>MM 6100;DI<CR>
6100
6108
6110
6118
6120
6124
6128
612C
6134
6138
613C
6140
MOVE.W #$8,$FFFE12<CR>
MOVE.W #$3,$FFFE1E<CR>
MOVE.W #$113,$FFFF00<CR>
MOVE.W #$1,$FFFE1A<CR>
MOVE.W #$FF,D0<CR>
SUB.W #1,D0<CR>
BNE.W $6124<CR>
MOVE.W #$2,$FFFE1A<CR>
MOVE.W #$FF,D0<CR>
SUB.W #1,D0<CR>
BNE.W $6138<CR>
BRA.W $6118<CR>
CPU32Bug>GO 6100<CR>
M68332EVKEM/AD1
3-13
EXAMPLE PROGRAMS
Program 2 works in this way:
Line 6100
Loads the value $8 in channel function select field of channel
control register. This puts channel 0 in DIO mode.
Line 6108
Loads the value $3 in the channel priority field, to give channel 0
high priority.
Line 6110
Loads the value $113 in the channel control register, making
channel 0 an output.
Line 6118
Host service request: forces channel 0 high.
Line 6120
Starts wait loop.
Line 612C
Host service request: forces channel 0 low.
Line 6140
Repeats program, so software generates a square wave.
If you run Program 2 once (no loop), the pin-level register bit 15 value should be
0; the bit 14 value should be 1. To verify the output of Program 2, connect an
oscilloscope to BCC connector P1, pin 46.
Once the DIO mode is set up, a programmer can set a selected timer pin high or
low. A possible application this permits is turning lights on and off, in response to
a photo-detector signal. Another possible application is activating a fuel injector
for a specified time period, upon detection of a timing mark. Example 2 shows an
important purpose of the DIO mode: making a timer pin be a simple input/output
under program control.
3-14
M68332EVKEM/AD1
EXAMPLE PROGRAMS
3.2.2.2
Example 3: Event Detection
Example 3 illustrates another important use of the DIO mode: detecting an event,
such as a box on a conveyer belt passing in front of a photo detector, then
generating an interrupt (if enabled) and interrupt flag. This requires detection of a
timer pin state transition. Program 3 (or the user) must perform these actions to
use the state-transition capability of the DIO mode:
1. Connect a jumper between the TP0 and TP1 pins of PFB connector P2.
(This is a physical connection the user must make; the program does not
make this connection.)
2. Load the value $8 in the channel function select field of channel function
select register 3.
3. Load a priority value in the channel priority field of channel priority
register 1. Note that there is no default priority; if the program does not
load a priority value, the channel cannot generate host service requests.
4. Write the value $000F to the channel control register. As table 3-2
indicates, this value determines that the channel is an input and that either
edge is detected.
5. Load the value $00 in the host sequence field of host sequence register 1.
This determines that updates occur on transition.
6. If interrupts are to be used, write the value 1 to the appropriate channel
interrupt enable register. (Example 3 does not use interrupts, and the
power-up restart presumed to precede all programs of this manual clears
the channel interrupt register. Accordingly, Program 3 need not include
any interrupt instruction.)
7. Load the value %11 in the host service request 1 register. This determines
that an interrupt will be generated when a rising edge is detected on the
timer pin.
Program 3 sets up channel 0 to generate a square wave pulse, and channel 1 to
sample the values of channel 0. Before running this program, make sure to install
a jumper between the TP0 and TP1 pins of PFB connector P2.
M68332EVKEM/AD1
3-15
EXAMPLE PROGRAMS
Enter Program 3, below, by typing in the bold characters:
Program 3. Discrete I/O Mode Signal Generation and Sampling
CPU32Bug>MM 6200;DI<CR>
6200
6208
6210
6218
6220
6228
6230
6238
6240
6248
624A
6252
6256
6258
625E
6262
6266
626A
6272
6274
627A
627C
6280
MOVE.W #$92,$FFFF00<CR>
MOVE.W #$100,$FFFF04<CR>
MOVE.W #$200,$FFFF06<CR>
MOVE.W #$89,$FFFE12<CR>
MOVE.W #$F,$FFFE1E<CR>
MOVE.W #$2,$FFFE1A<CR>
MOVE.W #$7,$FFFF10<CR>
MOVE.W #$0,$FFFE16<CR>
MOVE.W #$C,$FFFE1A<CR>
CLR.L D6<CR>
BCLR.B #$1,$FFFE21<CR>
BEQ.W $624A<CR>
ADDQ.L #1,D6<CR>
CMPI.L #$400,D6<CR>
BNE.W $624A<CR>
MOVEA.W #$7000,A0<CR>
MOVEA.L #$700C,A1<CR>
BTST.B #$0,$FFFC0C<CR>
BEQ.B $626A<CR>
MOVE.B (A0)+,$FFFC0F<CR>
CMPA.W A0,A1<CR>
BNE.W $626A<CR>
BRA.W $6248<CR>
After you enter Program 3, you must enter the ASCII code for the output message
(as in the PIT timeout example), then run the program:
CPU32Bug>MS 7000 ’1024 Edges’0D0A<CR>
CPU32Bug>GO 6200<CR>
3-16
M68332EVKEM/AD1
EXAMPLE PROGRAMS
Program 3 works in this way:
Line 6200
Loads the value $92 in the channel control register. This makes
the timer pin an output, forced low upon generation of a host
service request.
Line 6208
Loads the value $100 as the pulse period high time.
Line 6210
Loads the value $200 as the overall pulse period.
Line 6218
Loads the value $89 in the channel function select register. This
makes channel 0 operate in PWM mode and channel 1 operate in
DIO mode.
Line 6220
Loads the value $F in the channel priority fields, to give both
channel 0 and channel 1 high priority.
Line 6228
Loads the value $2 in the host service request field for channel 0.
This starts the square wave output.
Line 6230
Loads the value $7 in the channel control register. This directs
channel 1 to detect rising edges.
Line 6238
Loads the value $0 in the host sequence field for channel 1. This
directs the channel to update on transition.
Line 6240
Loads the value $C in the host service request field for channel 1.
This starts the timer looking for edges, but there is no change in
timer-pin output until the first edge is detected.
Line 6248
Clears data register D6 for use in counting the number of edges
detected.
Line 624A
Tests the channel 1 interrupt flag, sets the status register
accordingly, then clears the interrupt flag.
Line 6252
Loops back to the BCLR instruction until the test is TRUE (that
is, an interrupt was generated).
Line 6256
Upon interrupt detection, increments the edge count in D6.
Line 6258
Tests the edge count in D6 against the edge count limit value
$400 (that is 1024 edges).
Line 625E
If the edge count is not yet 1024, branches back to line 624A. If
the edge count is 1024, falls through to next instruction.
Line 6262
Loads a pointer to the start of the output string.
Line 6266
Loads a pointer to the end of the output string.
Line 626A
Start of display loop: checks whether the serial controller is busy.
Line 6272
Waits for the serial controller, if necessary.
Line 6274
Sends a character to the screen via the serial port.
M68332EVKEM/AD1
3-17
EXAMPLE PROGRAMS
3.2.2.3
Line 627A
Checks whether the character just sent was the last one of the
string.
Line 627C
If last character not yet displayed, branches back to line 626A. If
last character displayed, falls through to next instruction.
Line 6280
Branches back to line 6248, to clear the edge count register and
repeat the entire process.
Example 4: Match Rate Sampling
Another use of the DIO mode is sampling the value of an input timer pin at the
periodic rate determined by the match rate register. This is called match rate
sampling, or match mode.
The EVK clock input frequency is 16.777 Mhz. The divide-by-32 timer prescalar
yields a TPU clock period of 1.92 microseconds. This means that the fastest TPU
sample rate for a single channel is about 500K samples per second. Via the
divide-by-4 prescalar, a timer channel can be sampled at about 4M samples per
second.
As already mentioned, when the TPU samples a timer pin on a particular channel,
the TPU records the digital value in the pin level register for the channel. This
entails shifting the contents of the pin level register one place to the right, then
writing the new value to bit 15. Thus, the pin level register is a record of the 16
most recent samples.
Program 4 illustrates match rate sampling on the channel 0 output of Program 2.
(Program 2 used the DIO mode to generate an output by forcing a pin high and
low, under program control.) Program 4 generates the channel 0 output by forcing
the TP0 pin high for 50 microseconds, then low for 150 microseconds.
3-18
M68332EVKEM/AD1
EXAMPLE PROGRAMS
Enter Program 4, below, by typing in the bold characters:
Program 4: Discrete I/O Mode Match Rate Signal Generation
CPU32Bug>MM 6300;DI<CR>
6300
6308
6310
6318
6320
6328
6330
6338
6340
6344
6348
634C
6354
6358
635C
6360
6366
MOVE.W #$88,$FFFE12<CR>
MOVE.W #$4,$FFFE16<CR>
MOVE.W #$F,$FFFE1E<CR>
MOVE.W #$113,$FFFF00<CR>
MOVE.W #$3,$FFFF10<CR>
MOVE.W #$D,$FFFF14<CR>
MOVE.W #$0C,$FFFE1A<CR>
MOVE.W #$2,$FFFE1A<CR>
MOVE.W #$A9,D0<CR>
SUB.W #$1,D0<CR>
BNE.W $6344<CR>
MOVE.W #$1,$FFFE1A<CR>
MOVE.W #$33,D0<CR>
SUB.W #$1,D0<CR>
BNE $6358<CR>
MOVE.W $FFFF12,D1,<CR>
BRA $6338<CR>
CPU32Bug>GO 6300<CR>
M68332EVKEM/AD1
3-19
EXAMPLE PROGRAMS
Program 4 works in this way:
3-20
Line 6300
Loads the value $88 in the channel function select register. This
makes channels 0 and 1 operate in DIO mode.
Line 6308
Loads the value $4 in the host sequence register. This makes
channel 1 update at the specified match rate.
Line 6310
Loads the value $F in the channel priority fields, to give both
channel 0 and channel 1 high priority.
Line 6318
Loads the value $113 in the channel control register, making
channel 0 an output.
Line 6320
Loads the value $3 in the channel control register. This sets
channel 1 to capture (that is, sample) TP1 at the match rate.
Line 6328
Loads the value $D in the match rate register. This sets the match
rate to $D clock periods: 26.8 µsec.
Line 6330
Loads the value $0C in the host service request register, starting
channel 1 sampling.
Line 6338
Loads the value $2 in the host service request register, forcing
TP0 low.
Line 6340
Line 6344
Line 6348
These three lines form a 50-µsecond wait loop.
Line 634C
Loads the value $1 in the host service request register, forcing
TP1 high.
Line 6354
Line 6358
Line 635C
These three lines form a 150-µsecond wait loop.
Line 6360
Copies the contents of the pin level register into register D1, that
is, reads the pin level register.
Line 6366
Branches back to line 6338, to start the next cycle of the wave
form.
M68332EVKEM/AD1
EXAMPLE PROGRAMS
Program 4 generates this wave form:
0
50
100
150
200
MICROSECONDS
The sample rate is 13 TPU clock periods or each 25 microseconds. Sampling
twice every 50 microseconds guarantees that each 50-microsecond high pulse is
sampled at least once. Each 16-sample window should yield four high values and
12 low values: a pattern such as 0011000000110000 or 0110000001100000.
During testing, factory personnel ran Program 4, then terminated it at an arbitrary
time (by pressing the ABORT switch). A manual read of the pin level register
showed these results:
Sample 1
Sample 2
Sample 3
Sample 4
Sample 5
Sample 6
$0C0C
$3030
$4060
$6060
$0303
$0301
%0000110000001100
%0011000000110000
%0100000011000000
%0110000001100000
%0000001100000011
%0000001100000001
Most of the samples show a low time of 6 sample periods and a high time of 2
sample periods. Because the sample time in this case is only 2 times the frequency
of the waveform being sampled, there is some jitter as shown in sample 3 and
sample 6.
Note this final point about Program 4. Bits 3 and 2 of host service request register
1 received the value %11; this started Channel 1 sampling. Later, the same
register alternately received the values $0002 and $0001 to force the channel 0
output low and high, respectively. Although this means, technically, that bits 3
and 2 should receive the value %00 as part of those subsequent $0002 and $0001
values, the original host service request to channel 1 does not change. In other
words, once Program 4 starts the match mode, this mode does not stop. The host
service request bits are cleared automatically when the user terminates the
program.
M68332EVKEM/AD1
3-21
EXAMPLE PROGRAMS
3.2.3
Input Capture/Input Transition Counter (ITC) Mode
Input capture/input transition counter (ITC) mode is important for counting
events, measuring time intervals, and generating time intervals. Particular ITC
mode capabilities are:
• Capturing each specified event of a selected TCR, such as a rising edge, a
falling edge, or either edge.
• Counting a set number of negative, positive, or any transitions, then
generating an interrupt.
When a channel in input capture mode captures the set number of events, the TPU
can start the functioning of as many as eight other channels. This ability involves
linking: For two channels to be linked, the activating channel generates a link
signal to the activated channel. Channels in synchronized PWM mode, ITC mode,
or period/pulse width accumulator mode can generate link signals. Channels in
synchronized PWM mode or output compare mode can be destination channels,
that is, receive link signals.
Figure 3-3 shows ITC mode parameters. The contents of the channel control
register determine whether the first channel captures a selected edge or edges;
Table 3-3 explains the values of this parameter. The start link channel field
specifies the next channel to be activated when the first channel finishes its task.
That is, the start link channel field specifies the destination channel for a link
signal from the first channel. Any channel in synchronized PWM or output
compare modes can be this destination channel. The link channel count field
specifies the total number of additional destination channels. Destination channels
are in sequential order. For example, if we want to link four channels to the first,
the start link channel field specifies the first destination channel and the link
channel count field contains the value 4.
The eight-bit bank address field points to another memory location. This location
is incremented each time a function is performed the number of times specified in
the max count register. The transaction count register is incremented each time the
specified function is performed. For example, each time an input capture is made,
the memory location pointed to by bank address is incremented. The final
transaction time register contains the value of the TCR of the last transition. That
is, when the transaction count is greater than or equal to the max count register,
the captured TCR value is written to the final transaction time register. The last
transition time register contains the value of the TCR from the most recent
capture.
3-22
M68332EVKEM/AD1
EXAMPLE PROGRAMS
FIELD SIZE
3
1
1
1
2
FIELD NAME
1
OPTIONS
ADDRESSES
0
CHANNEL FUNCTION SELECT FIELD
$A = ITC Mode
$FFFE0C-$FFFE12
CHANNEL PRIORITY FIELD
01 = LOW PRIORITY
10 = MIDDLE PRIORITY
11 = HIGH PRIORITY
$FFFE1C-$FFFE1E
HOST SEQUENCE FIELD
00 = SINGLE SHOT, NO LINKS
01 = CONTINUAL, NO LINKS
10 = SINGLE SHOT, LINKS
11 = CONTINUAL, LINKS
$FFFE14-FFFE16
HOST SERVICE REQUEST FIELD
01 = INITIALIZATION
$FFFE18-$FFFE1A
INTERRUPT ENABLE FIELD
0 = NO INTERRUPT
1 = INTERRUPT
$FFFE0A
0
0
0
0
0
$FFFE20
INTERRUPT STATUS FIELD
15
14
13
12
11
10
9
$FFFFW0
$FFFFW2
8
7
6
5
4
3
2
1
0
CHANNEL_CONTROL
START_LINK
_CHANNEL
LINK_CHANNEL
_COUNT (2)
BANK_ADDRESS
$FFFFW4
MAX_COUNT (1,3)
$FFFFW6
TRANS_COUNT (1)
$FFFFW8
FINAL _TRANS_TIME
$FFFFWA
LAST_TRANS_TIME
0
UPDATED BY CPU
W=
CHANNEL NUMBER
NOTES:
1 . MAX_COUNT and TRANS_COUNT should be accessed coherently and reside on a
double-word boundary.
2 . The TPU does not perform checks on LINK_CHANNEL_COUNT value.
If LINK_CHANNEL_COUNT is greater than eight or equal to zero, results are
unpredictable.
3 . MAX_COUNT should be between zero and $FFFF. If MAX_COUNT equals zero, the
TPU counts one transition.
Figure 3-3. ITC Mode Parameters
M68332EVKEM/AD1
3-23
EXAMPLE PROGRAMS
Table 3-3. ITC Mode Channel Control Options
TBS
8
7 6 5
PAC
PSC
Action
4 3 2
1 0
Input
1 1
3.2.3.1
———
0 0 0
Do Not Detect Transition
0 0 1
Detect Rising Edge
0 1 0
Detect Falling Edge
0 1 1
Detect Either Edge
1 x x
Do Not Change PAC
0 0 x x
Input Channel
0 0 0 x
Capture TCR1
0 0 1 x
Capture TCR2
Example 5: Square Wave Generation and Measurement
This example illustrates one possible use of input capture mode. First, a program
sets channel 0 to output a square wave with an arbitrary period. Program 5a does
this, putting channel 0 in PWM mode. A second program, Program 5b, then puts
channel 1 in ITC mode, to measure the wave output of channel 0.
Enter Program 5a, below, by typing in the bold characters:
Program 5a: ITC Mode Square Wave Generation
CPU32Bug>MM 6400;DI<CR>
6400
6408
6410
6418
6420
6428
6430
MOVE.W #$82,$FFFF00<CR>
MOVE.W #$100,$FFFF04<CR>
MOVE.W #$200,$FFFF06<CR>
MOVE.W #$9,$FFFE12<CR>
MOVE.W #$3,$FFFE1E<CR>
MOVE.W #$22,$FFFE1A<CR>
BRA.W $6430<CR>
CPU32Bug>GO 6400<CR>
3-24
M68332EVKEM/AD1
EXAMPLE PROGRAMS
Program 5a works in this way:
Line 6400
Loads the value $82 in the channel control register. This makes
the channel 0 timer pin an output, forced low upon generation of
a host service request is generated.
Line 6408
Loads the value $100 as the pulse period high time.
Line 6410
Loads the value $200 as the overall pulse period.
Line 6418
Loads the value $9 in the channel function select register, making
channel 0 operate in PWM mode.
Line 6420
Loads the value $3 in the channel priority field, to give channel 0
high priority.
Line 6428
Loads the value $22 in the host service request field for channel
0. This starts the square wave output.
Now that the TPU is generating a periodic wave form on Channel 0, we use
channel 1 to measure the wave. Program 5b does this, putting channel 1 in input
capture mode. Program 5b (or the user) must perform therse actions:
1. Connect a jumper between the TP0 and TP1 pins of PFB connector P2.
(This is a physical connection the user must make; the program does not
make this connection.)
2. Load into the channel control register the value that specifies the capture
of TCR1 and detection of rising edges.
3. As this exercise does not involve linking, direct the bank address to
unimplemented RAM.
4. Set the maximum count to 1 (we will perform this function just once).
5. Load into channel function select register 3 the value that determines that
channel 1 operates in input capture mode and that channel 0 operates in
PWM mode.
6. Load into the channel priority register the value that gives both channel 1
and channel 0 high priority.
7. Load into the host sequence register the value that determines the singleshot sub-mode for channel 1.
8. Load into the host service request register the value that starts the input
capture function.
M68332EVKEM/AD1
3-25
EXAMPLE PROGRAMS
9. As soon as an input is captured, read the time from the last transaction
time register, load into the channel control register the value that
determines detection of falling edges, and load into the host service
request register the value that starts the input capture function.
10. As soon as a falling-edge input is captured, read the time from the last
transaction time register. The difference between the two time values
yields the high time, in timer clock cycles.
Enter program 5b, below, by typing in the bold characters:
Program 5b: ITC Mode Square Wave Capture
CPU32Bug>MM 6500;DI<CR>
6500
MOVE.W #$7,$FFFF10<CR>
6508
MOVE.W #$E,$FFFF12<CR>
6510
MOVE.W #$1,$FFFF14<CR>
6518
MOVE.W #$A9,$FFFE12<CR>
6520
MOVE.W #$F,$FFFE1E<CR>
6528
MOVE.W #$0,$FFFE16<CR>
6530
MOVE.W #$4,$FFFE1A<CR>
6538
MOVE.W $FFFE20,D1<CR>
653E
ANDI.W #$2,D1<CR>
6542
BEQ.W $6538<CR>
6546
MOVE.W #$1,$FFFE20<CR>
654E
MOVE.W $FFFF18,D2<CR>
6554
MOVE.W #$B,$FFFF10<CR>
655C
MOVE.W #$4,$FFFE1A<CR>
6564
MOVE.W $FFFE20,D1<CR>
656A
ANDI.W #$2,D1<CR>
656E
BEQ.W $6564<CR>
6572
MOVE.W $FFFF18,D3 <CR>
6578
MOVE.W #$1,$FFFE20<CR>
6580
BRA.W $6580<CR>
CPU32Bug>GO 6500<CR>
3-26
M68332EVKEM/AD1
EXAMPLE PROGRAMS
Program 5b works in this way:
Line 6500
Loads the value $7 in the channel control register. Per Table 3-3,
this makes channel 1 an input that captures TCR1, detecting
rising edges.
Line 6508
Loads the value $E in the blank address field. This directs the
bank address to unimplemented RAM.
Line 6510
Loads the value $1 in the max count register, so the function runs
one time and stops.
Line 6518
Loads the value $A9 in the channel select register. This makes
channel 1 operate in input capture mode and channel 0 operate in
PWM mode.
Line 6520
Loads the value $F in the channel priority register, giving both
channel 1 and channel 0 high priority.
Line 6528
Loads the value $0 in the host sequence field for channel 1. This
determines single-shot operation, wihout linking.
Line 6530
Loads the value $4 in the host service request field. This starts
channel 1 looking for a rising edge.
Line 6538
Line 653E
Line 6542
These three lines form a loop that continues until channel 1
detects a rising edge and interrupts.
Line 6546
Loads the value $1 in the channel interrupt status field, to clear
the channel 1 interrupt flag.
Line 654E
Saves to register D2 the value in the final trans time register.
(This is the timer value when the previous rising edge
occurred.)
Line 6554
Loads the value $B in the channel control register. Per Table 3-3,
this makes channel 1 an input that captures TCR1, detecting
falling edges.
Line 655C
Loads the value $4 in the host service request field. This starts
channel 1 looking for a falling edge.
Line 6564
Line 656A
Line 656E
These three lines form a loop that continues until channel 1
detects a falling edge and interrupts.
Line 6572
Saves to register D3 the value in the final trans time register.
(This is the timer value when the previous falling edge occurred.)
Line 6578
Loads the value $1 in the channel interrupt status field, to clear
the channel 1 interrupt flag.
M68332EVKEM/AD1
3-27
EXAMPLE PROGRAMS
3.2.3.2
Example 6: Counting Events
This example illustrates another use for the ITC mode, counting events. For
example, boxes travelling down a conveyor, may pass in front of an electric eye.
The ITC mode could issue an interrupt each time 25 boxes pass the electric eye,
and make available the number of boxes that passed the electric eye since the last
interrupt signal.
Program 6 is such a counting program: it uses channel 1 to count the number of
signal pulses that occur on channel 0 during a specified time. The max count
register is loaded with the number of events to be detected; the program issues an
interrupt each time it reaches this number. The trans count register keeps track of
the number of events that have occurred; the software can access this register at
any time.
The hardware setup for this example is the same as for Example 5. Use Program
5a to generate signal pulses, that is to put channel 0 in the PWM mode and
generate a 50% duty cycle square wave.
Next, enter program 6, below, by typing in the bold characters:
Program 6: Channel 1 - 50% Duty Cycle Square Wave
CPU32Bug>MM 6600;DI<CR>
6600
6608
6610
6618
6620
6628
6630
MOVE.W
MOVE.W
MOVE.W
MOVE.W
MOVE.W
MOVE.W
MOVE.W
#$7,$FFFF10<CR>
#$E,$FFFF12<CR>
#$FFF,$FFFF14<CR>
#$A9,$FFFE12<CR>
#$F,$FFFE1E<CR>
#$0,$FFFE16<CR>
#$4,$FFFE1A<CR>
6638
663C
6644
664A
664E
6652
6656
665C
MOVE.W $FFFF16,D4<CR>
SUB.W #$1,D6<CR>
BNE.W $663C<CR>
MOVE.W #$8000,D6<CR>
SUB.W #$1,D6<CR>
BNE.W $6642
MOVE.W $FFFF16,D5<CR>
BRA.W $664A<CR>
CPU32Bug>GO 6600<CR>
3-28
M68332EVKEM/AD1
EXAMPLE PROGRAMS
Program 6 works in this way:
Line 6600
Loads the value $7 in the channel control register. Per Table 3-3,
this makes channel 1 an input that captures TCR1, detecting
rising edges.
Line 6608
Loads the value $E in the blank address field. This directs the
bank address to unimplemented RAM.
Line 6610
Loads the value $FFF in the max count register.
Line 6618
Loads the value $A9 in the channel select register. This makes
channel 1 operate in input capture mode and channel 0 operate in
PWM mode.
Line 6620
Loads the value $F in the channel priority register, giving both
channel 1 and channel 0 high priority.
Line 6628
Loads the value $0 in the host sequence field for channel 1. This
determines single-shot operation, without linking.
Line 6630
Loads the value $4 in the host service request field. This starts
channel 1 looking for a rising edge.
Line 6638
Saves to register D4 the value in the trans count register.
Line 663C
Line 6644
These two lines establish a time delay that lets the service request
initialize the trans count regisiter.
Line 664A
Line 664E
Line 6652
These three lines form a counter and wait loop.
Line 6656
Saves to register D5 the final value in the trans count register.
Subtracting the initial reading from this reading yields the
number of pulses during the wait loop.
Note that Program 6 sets up channel 1 to count pulses forever, so the counter
would overflow if the counting time were too long. Wait loop creation entails
loading the value $8000 into data register 6, then decrementing the value to
$0000.
Run the above program, then abort. Subtract the value in register D4 from the
value in register D5, accounting for any values that roll over through $0000. The
remainder is the number of pulses that occurred during the wait loop.
M68332EVKEM/AD1
3-29
EXAMPLE PROGRAMS
3.2.3.3
Linking
The concept of linking already has been mentioned. In order for two channels to
be linked, the first channel must be capable of generating a link signal and the
second channel must be capable of receiving a link signal. The operating modes of
the channels determine these capabilities.
As mentioned earlier, a channel in synchronized PWM mode, ITC mode, or
period/pulse width accumulator mode can generate a link signal. This happens
automatically when the trans count register value of such a channel equals or
exceeds the max count register value.
In Example 6, for example, channel 1 was in ITC mode. The number of pulses
channel 1 counted could be entered in the max count register. So when the trans
count value reached the max count value, the start link channel field would
receive a link signal and the link channel count field would receive the number of
sequential channels. If the start link channel field received the value 5 and the link
channel count field received the value 3, link signals would go to destination
channels 5, 6 and 7.
Paragraph 3.2.4 includes linking information with regard to destination channels.
3-30
M68332EVKEM/AD1
EXAMPLE PROGRAMS
3.2.4
Example 7: Output Compare (OC) Mode
Output compare (OC) mode has two general roles:
1. Generating a rising edge, generating a falling edge, or toggling at some
programmable delay time.
2. Upon receiving a link signal, generating a square wave of a programmable
period.
Figure 3-4 shows OC mode parameters. Table 3-4 explains the values of the
channel control parameter for this mode.
A channel in OC mode can receive link signals, that is, be a linking destination
channel. The 50% duty cycle square wave generation mode is covered in this
example along with receiving link signals.
In Program 7, channel 0 is in PWM mode, channel 1 is in ITC mode, and channel
2 is in OC mode. Channel 1 links to channel 2. Differences between Program 7
and previous programs involve these parameters for channel 2:
• The channel control register receives the value $008F. This means that the
TBS field value is %0100, which selects TCR1. The PAC field value is
%011, which selects Toggle on Match. The PSC field value is %11, which
is arbitrary in this example.
• The offset register receives a value calculated by the TPU microengine in
continuous mode. Therefore, Program 7 does not need to put a value in this
register.
• The ratio register receives the numerator value of the actual ratio the TPU
microengine uses to calculate the offset. (The denominator value always is
$FF.) For example, if the ratio register receives the value $20, the
calculation ratio is $20/$FF. The ratio register value $FF yields a
calculation ratio of 1. (The offset value calculation is: RATIO * (Ref
Addr2) ).
• Reference address 2 (the value of the ref addr2 field) points to the
parameter RAM map. Reference address 2 is an 8-bit pointer of which the
upper 7 bits are specified. Bit 0 is forced to 0. This forces 16-bit word
alignment, tracking with the alignment of the parameter RAM. When
reference address 2 is a pointer, the upper 16 bits of the 24-bit address are
assumed to be $YFFF, where Y can be %0111 or the default is %1111. For
example, if the ref addr2 field receives the value $3A, reference address 2
M68332EVKEM/AD1
3-31
EXAMPLE PROGRAMS
points to the fifth parameter location for channel 3. Obviously, reference
address 2 must not point to a parameter location used for something else. It
may, however, point to a parameter location that can be shared, such as a
common period for two different channels.
As mentioned above, the ref addr2 value is part of the offset value calculation. In
Example 7, channel 15 is not used, so any of its parameter RAM cells can be
used. Program 7 uses the eighth parameter, at address $FFFFFE. This means that
ref addr2 receives the value $FE.
Before running Program 7, be sure to connect together the channel 0 and channel
1 timer pins (TP0 and TP1). This program sets up channel 0 to operate in PWM
mode, producing a periodic pulse train. Channel 1 operates in ITC mode, counting
the pulses of channel 0. When channel 1 counts 200 pulses, it sends a link signal
to channel 2. Channel 2 operates in OC mode, so it can receive the link signal.
Channel 2 outputs a square wave, but does not start until it receives both a host
service request from the CPU and the link signal from channel 1.
3-32
M68332EVKEM/AD1
EXAMPLE PROGRAMS
FIELD SIZE
3
2
FIELD NAME
1
$E = OC Mode
CHANNEL FUNCTION SELECT FIELD
1
1
1
ADDRESSES
OPTIONS
0
$FFFE0C-$FFFE12
0
CHANNEL PRIORITY FIELD
01 = LOW PRIORITY
10 = MIDDLE PRIORITY
11 = HIGH PRIORITY
$FFFE1C-$FFFE1E
HOST SEQUENCE FIELD
0x = MATCHES AND PULSES SCHEDULED
1x = ONLY READ TCR1, TCR2
$FFFE14-$FFFE16
HOST SERVICE REQUEST FIELD
01 = HOST-INITIATED PULSE
11 = INIT – CONTINUOUS PULSES
$FFFE18-$FFFE1A
0
0
0
0 = NO INTERRUPT
1 = INTERRUPT
INTERRUPT ENABLE FIELD
$FFFE0A
0
INTERRUPT STATUS FIELD
15
14
13
12
11
10
$FFFE20
9
8
7
6
$FFFFW0
5
4
3
2
1
0
CHANNEL_CONTROL
$FFFFW2
OFFSET
$FFFFW4
RATIO
$FFFFW6
REF_ ADDR2
REF_ ADDR1
0
$FFFFW8
REF_TIME
$FFFFWA
ACTUAL MATCH TIME
$FFFFEC
TCR1
$FFFFEE
TCR2
REF_ ADDR3
0
0
UPDATED BY HOST CPU
W=
CHANNEL NUMBER
Figure 3-4. OC Mode Parameters
M68332EVKEM/AD1
3-33
EXAMPLE PROGRAMS
Table 3-4. OC Mode Channel Control Options
TBS
PAC
PSC
8 7 6 5
4 3 2
1 0
Input
Output
0
0
1
1
———
———
———
———
Force Pin as Specified by PAC Latches
Force Pin High
Force Pin Low
Do Not Force Any State
0
0
0
0
1
0
0
0
0
0
1
3-34
1
1
1
1
1
x
x
0
0
1
1
x
x
0
1
0
1
x
0
0
1
1
x
0
1
0
1
x
0
1
0
1
Action
Do Not Detect Transition
Detect Rising Edge
Detect Falling Edge
Detect Either Edge
Do Not Change PAC
Do Not Change Pin State on Match
High on Match
Low on Match
Toggle on Match
Do Not Change PAC
———
———
———
———
Do Not Change TBS
Output Channel
Capture TCR1, Match TCR1
Capture TCR1, Match TCR2
Capture TCR2, Match TCR1
Capture TCR2, Match TCR2
Do Not Change TBS
M68332EVKEM/AD1
EXAMPLE PROGRAMS
Enter Program 7, below, by typing in the bold characters:
Program 7. Output Compare Mode
CPU32Bug>MM 6700;DI<CR>
6700
6708
6710
MOVE.W #$82,FFFF00<CR>
MOVE.W #$100,FFFF04<CR>
MOVE.W #$800,FFFF06<CR>
6718
6720
6728
MOVE.W #$07,FFFF10<CR>
MOVE.W #$210E,FFFF12<CR>
MOVE.W #$0200,FFFF14<CR>
6730
6738
6740
6748
MOVE.W
MOVE.W
MOVE.W
MOVE.W
6750
6758
6760
6768
6770
MOVE.W #$0EA9,FFFE12<CR>
MOVE.W #$38,FFFE16<CR>
MOVE.W #$3F,FFFE1E<CR>
MOVE.W #$36,FFFE1A<CR>
BRA.W $6770<CR>
#$8F,FFFF20<CR>
#$8000,FFFF24<CR>
#$FE00,FFFF26<CR>
#$30,FFFFFE<CR>
CPU32Bug>GO 6700<CR>
Program 7 works in this way:
Line 6700
Loads the value $82 in the channel 0 control register, so channel
0 operates in PWM mode.
Line 6708
Loads the value $100 as the pulse period high time in the
PWMHI register.
Line 6710
Loads the value $800 as the overall pulse period in the
PWMPER register.
Line 6718
Loads the value $07 in the channel 1 control register, so channel
1 operates in ITC mode, detecting rising edges.
Line 6720
Loads the value $210E in register FFFF12. This means that the
start link channel field receives the value %0010, specifying a
link to channel 2; channel 2 starts when channel 1 finishes. The
link channel count field receives the value %0001, specifying
that channel 2 is the only destination channel. The bank address
field receives the value $E, which points to an unused location.
M68332EVKEM/AD1
3-35
EXAMPLE PROGRAMS
Line 6728
Loads the value $0200 in the channel 1 max count register. This
means that a link signal goes to channel 2 when channel 1 counts
200 rising edges.
Line 6730
Loads the value $8F in the channel 2 control register. This makes
channel 2 an output that toggles on match.
Line 6738
Loads the value $80 in the ratio field. This sets the calculation
ratio to $80 / $FF, or 50%.
Line 6740
Loads the value $FE in the ref addr2 field. This value points to
parameter RAM location $FFFFFE.
Line 6748
Loads the value $30 in parameter RAM location $FFFFFE.
Line 6750
Loads the value $0EA9 in the channel function select register.
This means that channel 0 operates in PWM mode, channel 1
operates in ITC mode, and channel 2 operates in OC mode.
Line 6758
Loads the value $38 in the host sequence register. The channel 1
host sequence field receives the value %10, which specifies
single-shot operation, with linking. The channel 2 host sequence
field recieves the value %11, which specifies reading the TCR1
signal.
Line 6760
Loads the value $3F in the channel priority register, giving all
three channels high priority.
Line 6768
Loads the value $36 in the host service request register. This
initializes all three channels, channel 2 with continuous pulses.
Line 6770
Branches to line 6700 to establish the program loop.
This completes this exercise manual. The questionnaire of Appendix A is a
convenient review of issues throughout the manual.
3-36
M68332EVKEM/AD1
EXERCISE MANUAL QUESTIONNAIRE
APPENDIX A
EXERCISE MANUAL QUESTIONNAIRE
1. Suppose that a channel is set up in PWM mode. The PWMHI register
contains the value 1000 and the PWMPER register contains the value
4000. Assuming a 2 µsec period for the TPU clock, what is the duty cycle
(in percent) and the period of the pulse?
a. 10%, 5000 µsec
b. 20%, 10,000 µsec
c. 25%, 8000 µsec
d. 40%, 8000 µsec
2. Suppose Program 2 (page 3-12) repeats eight times (16 host service
requests). What pattern would be in the pin level register?
a. 1111 1111 1111 1111
b. 0000 0000 0000 0000
c. 1111 0000 1111 0000
d. 0101 0101 0101 0101
3. Suppose that the pin level register contains the value 0011111000000000,
and the match rate register contains the value $2. What is the high time of
the incoming signal, in clock periods?
a. 5
b. 10
c. 25
d. 32
4. Suppose that the max count register contains the value $0F. How many
pulses must be counted before an interrupt flag is set?
a. 4
b. 10
c. 15
d. 25
5. Suppose that a channel is set up to generate a square wave using the OC
mode as shown in Program 7. The ratio value is set to $80. The period of
the square wave is approximately 100 µsec. What will the period be if the
ratio value is changed to $40?
M68332EVKEM/AD1
a. 40 µsec.
b. 50 µsec.
c. 75 µsec.
d. 200 µsec.
A-1
EXERCISE MANUAL QUESTIONNAIRE
Questionnaire Answers
The answers to the questions are below. If you answered a question incorrectly,
you should review the material at the indicated pages.
A-2
1.
c
(pages 3-6 through 3-9)
2.
d
(pages 3-10 through 3-14)
3.
b
(pages 3-18 through 3-21)
4.
c
(pages 3-22 through 3-30)
5.
b
(pages 3-31 through 3-36)
M68332EVKEM/AD1